
Chapter 3
Loops and Logic
WHAT YOU WILL LEARN IN THIS CHAPTER:
- How you compare data values
- How you can define logical expressions
- How you can use logical expressions to alter the sequence in which program statements are executed
- How you can select different expressions depending on the value of a logical expression
- How to choose between options in a fixed set of alternatives
- How long your variables last
- How you can repeat a block of code a given number of times
- How you can repeat a block of code as long as a given logical expression is true
- How you can break out of loops and statement blocks
- What assertions are and how you use them
In this chapter you look at how you make decisions and choices in your Java programs. You also learn how to make your programs repeat a set of actions until a specific condition is met.
All your programs of any consequence will use at least some, and often most, of the language capabilities and programming techniques I cover in this chapter, so make sure you have a good grasp of them.
But first, how do you make decisions in code and so affect the way the program runs?
Making choices will be a fundamental element in all your programs. You need to be able to make decisions such as, “If the user wants to enter more data, then read another value from the keyboard,” or, “If the bank balance is large, buy the car with the go-faster stripes, else renew the monthly bus ticket.” Whatever decision you want to make, in programming terms it requires the ability to make comparisons between variables, constants, and the values of expressions and then execute one group of statements or another, depending on the result of a given comparison. Thus, the first step to understanding how you make decisions in a program is to look at how you make comparisons.
Making Comparisons
Java provides you with six relational operators (see Table 3-1) for comparing two data values. The data values you are comparing can be variables, constants, or expressions with values drawn from Java’s primitive data types — byte, short, int, long, char, float, or double.
TABLE 3-1: Java Relational Operators
| RELATIONAL OPERATORS | DESCRIPTION |
| > | Produces the value true if the left operand is greater than the right operand, and false otherwise. |
| >= | Produces the value true if the left operand is greater than or equal to the right operand, and false otherwise. |
| == | Produces the value true if the left operand is equal to the right operand, and false otherwise. |
| != | Produces the value true if the left operand is not equal to the right operand, and false otherwise. |
| <= | Produces the value true if the left operand is less than or equal to the right operand, and false otherwise. |
| < | Produces the value true if the left operand is less than the right operand, and false otherwise. |
As you see, each operator produces either the value true or the value false, and so is eminently suited to the business of making decisions. This also implies that you can use a boolean variable to store the result of a comparison. You saw how to declare variables of type boolean in the previous chapter. For example, you could define a boolean variable state and set its value to be the result of an expression using a comparison as follows:
boolean state = false;      // Define and initialize the variable
state = x - y < a + b;      // Store the result of comparing x-y with a+b
The value of the variable state is set to true in the assignment statement if x - y is less than a + b, and to false otherwise.
To understand how the preceding expression is evaluated, refer to the precedence table for operators that I introduced in the last chapter. You can see that the comparison operators are all of lower precedence than the arithmetic operators, so arithmetic operations are always completed before any comparisons are made, unless of course there are parentheses dictating otherwise. The expression:
x - y == a + b
produces the result true if x - y is equal to a + b because these arithmetic sub-expressions are evaluated first, and the values that result are the operands for the == operator. Of course, it is helpful to put the parentheses in, even though they are not strictly necessary. It leaves no doubt as to what is happening if you write:
(x - y) == (a + b)
Note that if the left and right operands of a relational operator are of differing types, values are promoted in the same way as you saw in the previous chapter for mixed arithmetic expressions. So if aDouble is of type double and number is of type int in the following expression
aDouble < number + 1
the result of the expression number + 1 is calculated as type int, and this value is promoted to type double before comparing it with the value of aDouble.
The if Statement
The first statement you look at that can make use of the result of a comparison is the if statement. The if statement, in its simplest configuration, is of the form
if(expression)
  statement;
where expression can be any expression that produces a value true or false. You can see a graphical representation of this logic in Figure 3-1.

If the value of expression is true, the statement that follows the if is executed; otherwise, it isn’t. A practical example of this is as follows:
if(number%2 != 0)            // Test if number is odd
  ++number;                  // If so make it even
The if condition between the parentheses tests whether the value of number is odd by comparing the remainder that results from dividing it by 2 with 0. If the remainder isn’t equal to 0, the value of number is odd, so you add 1 to make it even. If the value of number is even, the statement incrementing number is not executed.
NOTE Notice how the statement on the second line is indented. This is to show that it is subject to the if condition. You should always indent statements in your Java programs as cues to the program structure. You will learn more guidelines on the use of statement indenting as you work with more complicated examples.
You may sometimes see a simple if written on a single line. The previous example could have been written:
if(number%2 != 0) ++number; // If number is odd, make it even
This is perfectly legal. The compiler ignores excess spaces and newline characters. The semicolon acts as the delimiter for a statement. Writing an if in this way saves a little space, and occasionally it can be an aid to clarity, when you have a succession of such comparisons, for example, but generally it is better to write the action statement on a separate line from the condition being tested.
Statement Blocks
In general, wherever you can have one executable statement in Java, you can also have a block of statements enclosed between braces, {}. This applies to the statements within a statement block, so you can always nest a statement block between braces inside another statement block, and you can do this to any depth. The ability to use a block wherever you can have a statement means that you can use a statement block within the basic if statement that you just saw. Therefore, the if statement can equally well be of the following form:
if(expression) {
  statement 1;
  statement 2;
  ...
  statement n;
}
Now if the value of expression is true, all the statements enclosed in the following block are executed; if expression is false, the statements in the block are not executed. Of course, without the braces to enclose the block, the code no longer has a statement block:
if(expression)
  statement 1;
  statement 2;
  ...
  statement n;
Here, only the first statement, statement 1, is omitted when the if expression is false; the remaining statements are always executed regardless of the value of expression. You can see from this that indenting is just a visual cue to the logic. It has no effect on how the program code executes. This looks as though the sequence of statements belongs to the if, but only the first statement does because there are no braces. The indenting is incorrect and misleading here and the code should be written as:
if(expression)
  statement 1;
statement 2;
  ...
statement n;
NOTE In this book, I have adopted the convention of having the opening brace on the same line as the if condition. The closing brace is then aligned with the first character, i, in the keyword if. I indent all the statements within the block from the braces so that they are easily identified as belonging to the block. This is consistent with the pattern I have been using with a block defining a class and a block belonging to a method. There are other conventions that you can use if you prefer. In another common convention, the braces bounding a block appear on their own line and are aligned. The most important consideration is that you are consistent in whatever convention you adopt.
As a practical example of an if statement that includes a statement block, you could write the following:
if(number%2 != 0) {                              // Test if number is odd
  // If so make it even and output a message
  ++number;
  System.out.println("Number was forced to be even and is now " + number);
}
Now both statements between the braces are executed if the if expression is true, and neither of them is executed if the if expression is false.
NOTE It is good practice to always put opening and closing braces around the code dependent on an if condition, even when there is only a single action statement. This helps to make the code easier to follow and minimizes the possibility of the program logic being confused.
Statement blocks are more than just a convenient way of grouping statements together — they affect the life and accessibility of variables. You will learn more about statement blocks when I discuss variable scope later in this chapter. In the meantime, let’s look a little deeper into what you can do with the if statement.
The else Clause
You can extend the basic if statement by adding an else clause. This provides an alternative choice of statement, or statement block, that is executed when the expression in the if statement is false. You can see the syntax of this statement, and how the program’s control flow works, in Figure 3-2.

This provides an explicit choice between two courses of action — one for when the if expression is true and another for when it is false.
You can apply this in a console program and try out the random() method from the Math class at the same time.
TRY IT OUT: if-else
When you have entered the program text, save it in a file called NumberCheck.java. Compile it and then run it a few times to see what results you get.
public class NumberCheck {
  public static void main(String[] args) {
    int number = 0;
    number = 1+(int)(100*Math.random());// Get a random integer between 1 & 100
    if(number%2 == 0) {                 // Test if it is even
      System.out.println("You have got an even number, " + number);// It's even

    } else {
      System.out.println("You have got an odd number, " + number); // It's odd
    }
  }
}
NumberCheck.java
How It Works
You saw the random() method that is defined in the standard Math class in the previous chapter. It returns a random value of type double between 0.0 and 1.0, but the result is always less than 1.0, so the largest number you can get is 0.9999. . . (with the number of recurring digits being limited to the maximum number that the type double allows, of course). Consequently, when you multiply the value returned by 100.0 and convert this value to type int with the explicit cast, you discard any fractional part of the number and produce a random integer between 0 and 99. Adding 1 to this results in a random integer between 1 and 100, which you store in the variable number. You then generate the program output in the if statement. If the value of number is even, the first println() call is executed; otherwise, the second println() call in the else clause is executed.
Note the use of indentation here. It is evident that main() is within the class definition because indentation relative to the first line of the class definition provides you with a cue to that. The code for main() is clearly distinguished because it is indented relative to the first line of the method. You can also see immediately which statement is executed when the if expression is true and which applies when it is false.
Nested if Statements
The statement that is executed when an if expression is true can be another if, as can the statement in an else clause. This enables you to express such convoluted logic as “if my bank balance is healthy, then I will buy the car if I have my check book with me, else I will buy the car if I can get a loan from the bank.” An if statement that is nested inside another can also itself contain a nested if. You can continue nesting ifs one inside the other like this for as long as you still know what you are doing — or even beyond if you enjoy confusion.
To illustrate the nested if statement, I can modify the if from the previous example:
if(number%2 == 0) {                 // Test if it is even
  if(number < 50) {                 // Output a message if number is < 50
    System.out.println("You have got an even number < 50, " + number);
  }

} else {
  System.out.println("You have got an odd number, " + number); // It is odd
}
Now the message for an even value is displayed only if the value of number is also less than 50. There are three possible outcomes from this code fragment: If number is even and less than 50, you see a message to that effect; if number is even and is not less than 50, there is no output; and finally; if number is odd, a message is displayed.
The braces around the nested if are necessary here because of the else clause. The braces constrain the nested if in the sense that if it had an else clause, it would have to appear between the braces enclosing the nested if. If the braces were not there, the program would still compile and run but the logic would be different. Let’s see how.
With nested ifs, the question of which if statement a particular else clause belongs to often arises. If you remove the braces from the preceding code, you have:
if(number%2 == 0)                   // Test if it is even
  if(number < 50 )                  // Output a message if number is < 50
    System.out.println("You have got an even number < 50, " + number);
else
  System.out.println("You have got an odd number, " + number); // It is odd
This has substantially changed the logic from the previous version, in spite of the fact that the indentation implies otherwise. The else clause now belongs to the nested if that tests whether number is less than 50, so the second println() call is executed only for even numbers that are greater than or equal to 50. This is clearly not what was intended because it makes nonsense of the output in this case, but it does illustrate the rule for connecting elses to ifs, which is:
An else always belongs to the nearest preceding if in the same block that is not already spoken for by another else.
You need to take care that the indenting of statements with nested ifs is correct. It is easy to convince yourself that the logic is as indicated by the indentation, even when this is completely wrong.
Let’s try the if-else combination in another program.
TRY IT OUT: Deciphering Characters the Hard Way
Create the class LetterCheck, and code its main() method as follows:
public class LetterCheck {
  public static void main(String[] args) {
    char symbol = 'A';
    symbol = (char)(128.0*Math.random());        // Generate a random character

    if(symbol >= 'A') {                          // Is it A or greater?
      if(symbol <= 'Z') {                        // yes, and is it Z or less?
        // Then it is a capital letter
        System.out.println("You have the capital letter " + symbol);

    } else {                                     // It is not Z or less
        if(symbol >= 'a') {                      // So is it a or greater?
          if(symbol <= 'z') {                    // Yes, so is it z or less?
            // Then it is a small letter
            System.out.println("You have the small letter " + symbol);

          } else {                               // It is not less than z
            System.out.println(
            "The code is greater than a but it's not a letter");
          }

      } else {
          System.out.println(
                      "The code is less than a and it's not a letter");
        }
      }

    } else {
      System.out.println("The code is less than A so it's not a letter");
    }
  }
}
LetterCheck.java
How It Works
This program figures out whether the character stored in the variable symbol is an uppercase letter, a lowercase letter, or some other character. The program first generates a random character with a numeric code between 0 and 127, which corresponds to the characters in the basic 7-bit ASCII (ISO 646) character set. The Unicode coding for the ASCII characters is numerically the same as the ASCII code values. Within this character set, the letters A to Z are represented by a contiguous group of ASCII codes with decimal values from 65 to 90. The lowercase letters are represented by another contiguous group with ASCII code values that have decimal values from 97 to 122. So to convert any capital letter to a lowercase letter, you just need to add 32 to the character code.
The if statements are a bit convoluted, so let’s look at the diagram of the logic in Figure 3-3.

You have four if statements altogether. The first if tests whether symbol is ’A’ or greater. If it is, it could be a capital letter, a small letter, or possibly something else. But if it isn’t, it is not a letter at all, so the else for this if statement (toward the end of the program) produces a message to that effect.
The nested if statement, which is executed if symbol is ’A’ or greater, tests whether it is ’Z’ or less. If it is, then symbol definitely contains a capital letter, and the appropriate message is displayed. If it isn’t then it may be a small letter, so another if statement is nested within the else clause of the first nested if to test for this possibility.
The if statement in the else clause tests for symbol being greater than ’a’. If it isn’t, you know that symbol is not a letter, and a message is displayed. If it is, another if checks whether symbol is ’z’ or less. If it is you have a small letter, and if not you don’t have a letter at all.
You have to run the example a few times to get all the possible messages to come up. They all will — eventually.
After having carefully crafted our convoluted and cumbersome condition checking, I can now reveal that there is a much easier way to achieve the same result. You’ll see that in the section “Logical Operators” that follows immediately after a brief word on working with enumeration values.
Comparing Enumeration Values
You can’t compare variables of an enumeration type using the comparison operators but you can compare them using a method that every enumeration object provides. Suppose you define an enumeration type as:
enum Season { spring, summer, fall, winter }
You can now define and initialize a variable of type Season with the following statement:
Season season = Season.summer;
If you later want to check what the season variable currently holds, you could write:
if(season.equals(Season.spring)) {
  System.out.println("Spring has sprung, the grass is riz.");
} else {
  System.out.println("It isn't Spring!");
}
This calls the equals() method for the enumeration referred to by season. This method compares the value in season with the value between the parentheses and results in true if they are equal or false if they are unequal. You could use the equals() method to compare season with another variable of type Season, for example:
Season best = Season.winter;           // A new variable initialized to winter
if(season.equals(best)) {
  System.out.println("season is the same as best, and is equal to "+ best);
} else {
  System.out.println(" season has the value "+season +
                                " and best has the value " + best);
}
After defining the variable, best, you test whether the value of season is the same value as best. If it is, the first output statement is executed. If best and season are not equal, the output statement in the else block is executed.
The tests you have put in the if expressions have been relatively simple so far. Real life is typically more complicated. You often want to combine a number of conditions so that you execute a particular course — for example, if they are all true simultaneously. You can ride the roller coaster if you are older than 12 years old, taller than 4 feet tall, and shorter than 6 feet. Failure on any count and it’s no-go. Sometimes, though, you may need to test for any one of a number of conditions being true — for example, you get a lower price entry ticket if you are under 16, or over 65.
You can deal with both of these cases, and more, using logical operators to combine several expressions that have a value true or false. Because they operate on boolean values, they are also referred to as boolean operators. There are six logical operators that operate on boolean values as shown in Table 3-2.
TABLE 3-2: Logical Operators
| SYMBOL | LONG NAME |
| & | logical AND |
| && | conditional AND |
| | | logical OR |
| || | conditional OR |
| ^ | exclusive OR (XOR) |
| ! | logical negation (NOT) |
The AND and OR operators are very simple; the only point of potential confusion is the fact that you have the choice of two operators for each of AND and OR. The extra operators are the bitwise & and | from the previous chapter that you can also apply to boolean values where they have an effect that is subtly different from && and ||. Let’s first consider what each of these is used for in general terms and then look at how you can use some of them in an example.
Logical AND Operations
You can use either of the AND operators, && or &, where you have two logical expressions that must both be true for the result to be true — that is, you only want to be rich and healthy. Either AND operator produces the same result from the logical expression. I come back to how they differ in a moment. First, let’s explore how they are used. All of the following discussion applies equally well to & as well as to &&.
Let’s see how logical operators can simplify the last example. You could use the && operator if you test a variable of type char to determine whether it contains an uppercase letter or not. The value being tested must be both greater than or equal to ’A’ AND less than or equal to ’Z’. Both conditions must be true for the value to be a capital letter. Taking the example from our previous program, with a value stored in a char variable symbol, you could implement the test for an uppercase letter in a single if by using the && operator:
if(symbol >= 'A' && symbol <= 'Z')
   System.out.println("You have the capital letter " + symbol);
If you look at the precedence table in Chapter 2, you see that the relational operators are executed before the && operator, so no parentheses are necessary. Here, the output statement is executed only if both of the conditions combined by the operator && are true. However, as I have said before, it is a good idea to add parentheses if they make the code easier to read. It also helps to avoid mistakes.
In fact, the result of an && operation is very simple. It is true only if both operands are true; otherwise, the result is false.
You can now rewrite the set of ifs from the last example.
TRY IT OUT: Deciphering Characters the Easy Way
You can replace the outer if-else loop and its contents in LetterCheck.java as shown in the following code:
public class LetterCheck2 {
  public static void main(String[] args) {
    char symbol = 'A';
    symbol = (char)(128.0*Math.random());        // Generate a random character
    if(symbol >= 'A' && symbol <= 'Z') {       // Is it a capital letter
      System.out.println("You have the capital letter " + symbol);
    } else {
      if(symbol >= 'a' && symbol <= 'z') {    // or is it a small letter?
        System.out.println("You have the small letter " + symbol);
      } else {                                  // It is not less than z
        System.out.println("The code is not a letter");
      }
    }
  }
}
LetterCheck2.java
The output should be the same as the previous version of the code.
How It Works
Using the && operator has condensed the example down quite a bit. You now can do the job with two ifs, and it’s certainly easier to follow what’s happening.
You might want to note that when the statement in an else clause is another if, the if is sometimes written on the same line as the else, as in the following:
if(symbol >= 'A' && symbol <= 'Z') {          // Is it a capital letter
  System.out.println("You have the capital letter " + symbol);
} else if(symbol >= 'a' && symbol <= 'z') {   // or is it a small letter?
  System.out.println("You have the small letter " + symbol);

} else {                                      // It is not less than z
  System.out.println("The code is not a letter");
}
I think the original is clearer in this particular case, but writing else if can sometimes make the code easier to follow.
&& versus &
So what distinguishes && from &? The difference is that the conditional && does not bother to evaluate the right-hand operand if the left-hand operand is false because the result is already determined in this case to be false. This can make the code a bit faster when the left-hand operand is false.
For example, consider the following statements:
int number = 50;
if(number<40 && (3*number - 27)>100) {
  System.out.println("number = " + number);
}
Here the expression (3*number - 27)>100 is never executed because the expression number<40 is always false. On the other hand, if you write the statements as
int number = 50;
if(number<40 & (3*number - 27)>100) {
  System.out.println("number = " + number);
}
the effect is different. The whole logical expression is always evaluated, so even though the left-hand operand of the & operator is false and the result is a foregone conclusion after that is known, the right-hand operand (3*number - 27)>100) is still evaluated.
So, you can just use && all the time to make your programs a bit faster and forget about &, right? Wrong — it all depends on what you are doing. Most of the time you can use &&, but there are occasions when you want to be sure that the right-hand operand is evaluated. Equally, in some instances, you want to be certain the right-hand operand won’t be evaluated if the left operand is false.
For example, the first situation can arise when the right-hand expression involves modifying a variable — and you want the variable to be modified in any event. An example of a statement like this is:
if(++value%2 == 0 & ++count < limit) {
  // Do something
}
Here, the variable count is incremented in any event. If you use && instead of &, count is incremented only if the left operand of the AND operator is true. You get a different result depending on which operator is used.
I can illustrate the second situation with the following statement:
if(count > 0 && total/count > 5) {
  // Do something...
}
In this case, the right operand for the && operation is executed only if the left operand is true — that is, when count is positive. Clearly, if you were to use & here, and count happened to be zero, you would be attempting to divide the value of total by 0, which in the absence of code to prevent it would terminate the program.
Logical OR Operations
The OR operators, | and ||, apply when you want a true result if either or both of the operands are true. The logical OR, ||, works in a similar way to the && operator in that it omits the evaluation of the right-hand operand when the left-hand operand is true. Obviously if the left operand for the || operator is true, the result is true regardless of whether the right operand is true or false.
Let’s take an example. A reduced entry ticket price is issued to under 16-year-olds and to those aged 65 or older; this could be tested using the following if:
if(age < 16 || age >= 65) {
  ticketPrice *= 0.9;         // Reduce ticket price by 10%
}
The effect here is to reduce ticketPrice by 10 percent if either condition is true. Clearly in this case, both conditions cannot be true.
With an | or an || operation, you get a false result only if both operands are false. If either or both operands are true, the result is true.
Exclusive OR Operations
The exclusive OR results in true when its operands are different, so when one operand has the value true and the other has the value false, the result is true. When both operands have the same value, either both true or both false, the result is false. Thus the exclusive OR operator is useful on those rare occasions when you want to establish whether or not two boolean values are different.
Boolean NOT Operations
The third type of logical operator, !, applies to one boolean operand, and the result is the inverse of the operand value. So if the value of a boolean variable, state, is true then the expression !state has the value false, and if it is false, then !state evaluates to true. To see how the operator is used with an expression, you could rewrite the code fragment you used to provide discounted ticket price as the following:
if(!(age >= 16 && age < 65)) {
  ticketPrice *= 0.9;         // Reduce ticket price by 10%
}
The expression (age >= 16 && age < 65) is true if age is from 16 to 64. People of this age do not qualify for the discount, so the discount should be applied only when this expression is false. Applying the ! operator to the result of the expression does what you want.
You could also apply the ! operator in an expression that was a favorite of Charles Dickens:
!(Income > Expenditure)
If this expression is true, the result is misery, at least as soon as the bank starts bouncing your checks.
Of course, you can use any of the logical operators in combination when necessary. If the theme park decides to give a discount on the price of entry to anyone who is younger than 12 years old and shorter than 48 inches tall, or to someone who is older than 65 and taller than 72 inches tall, you could apply the discount with this test:
if((age < 12 && height < 48) || (age > 65 && height > 72)) {
   ticketPrice *= 0.8;             // 20% discount on the ticket price
}
The parentheses are not strictly necessary here, as && has a higher precedence than ||, but adding the parentheses makes it clearer how the comparisons combine and makes the code a little more readable.
WARNING Don’t confuse the bitwise operators & , | , ^ , and ! with the logical operators that look the same. Which type of operator you are using in any particular instance is determined by the type of operand with which you use it. The bitwise operators apply to integer types and produce an integer result. The logical operators apply to operands that have boolean values and produce a result of type boolean — true or false. You can use both bitwise and logical operators in an expression when it is convenient to do so.
Character Testing Using Standard Library Methods
Although testing characters using logical operators is a useful way of demonstrating how these operators work, in practice there is an easier way. The standard Java packages provide a range of standard methods to do the sort of testing for particular sets of characters such as letters or digits that you have been doing with if statements. They are all available within the Character class, which is automatically available in your programs. For example, you could have written the if statement in the LetterCheck2 program as shown in the following example.
TRY IT OUT: Deciphering Characters Trivially
In the following example, the if expressions in main() that were in the LetterCheck2 class have been replaced by expressions that call methods in the Character class to do the testing:
import static java.lang.Character.isLowerCase;
import static java.lang.Character.isUpperCase;

public class LetterCheck3 {
  public static void main(String[] args) {
    char symbol = 'A';
    symbol = (char)(128.0*Math.random());        // Generate a random character

    if(isUpperCase(symbol)) {
      System.out.println("You have the capital letter " + symbol);
    } else {
      if(isLowerCase(symbol)) {
        System.out.println("You have the small letter " + symbol);
      } else {
        System.out.println("The code is not a letter");
      }
    }
  }
}
LetterCheck3.java
How It Works
Because you have the import statements for the isUpperCase and isLowerCase method names at the beginning of the source file, you can call these methods without using the Character class name as qualifier. The isUpperCase() method returns true if the char value that you pass to it is uppercase, and false if it is not. Similarly, the isLowerCase() method returns true if the char value you pass to it is lowercase.
Table 3-3 shows some of the other methods included in the Character class that you may find useful for testing characters. In each case, you put the argument of type char that is to be tested between the parentheses following the method name.
TABLE 3-3: Methods Useful for Testing Characters
| METHOD | DESCRIPTION |
| isDigit() | Returns the value true if the argument is a digit (0 to 9), and false otherwise. |
| isLetter() | Returns the value true if the argument is a letter, and false otherwise. |
| isLetterOrDigit() | Returns the value true if the argument is a letter or a digit, and false otherwise. |
| isWhitespace() | Returns the value true if the argument is whitespace, which is any one of the following characters: space (' ') tab (' ') newline (' ') carriage return (' ') form feed ('f')The method returns false otherwise. |
You can find information on other methods in the Character class in the JDK documentation for the class.
The conditional operator is sometimes called a ternary operator because it involves three operands. It is best understood by looking at an example. Suppose you have two variables of type int with the names yourAge and myAge, and you want to assign the greater of the values stored in yourAge and myAge to a third variable, older, which is also of type int. You can do this with the following statement:
older = yourAge > myAge ? yourAge : myAge;
The conditional operator has a logical expression as the first of its three operands — in this case, it is the expression yourAge>myAge. If this expression is true, the operand that follows the ? symbol — in this case, yourAge — is evaluated to produce the value resulting from the operation. If the expression yourAge>myAge is false, the third operand that comes after the colon — in this case, myAge — is evaluated to produce the value from the operation. Thus, the result of this conditional expression is yourAge, if yourAge is greater than myAge, and myAge otherwise. This value is then stored in the variable older. The use of the conditional operator in this assignment statement is equivalent to the if statement:
if(yourAge > myAge) {
  older = yourAge;

} else {
  older = myAge;
}
Remember, though, the conditional operator is an operator and not a statement, so you can use it in a more complex expression involving other operators.
The conditional operator can be written generally as:
logical_expression ? expression1 : expression2
If the logical_expression evaluates as true, the result of the operation is the value of expression1, and if logical_expression evaluates to false, the result is the value of expression2. Note that if expression1 is evaluated because logical_expression is true, then expression2 is not, and vice versa.
You can use the conditional operator in lots of circumstances, and one common application of it is to control output, depending on the result of an expression or the value of a variable. You can vary a message by selecting one text string or another depending on the condition specified.
TRY IT OUT: Conditional Plurals
Type in the following code, which adds the correct ending to 'hat' depending on how many hats you have:
public class ConditionalOp {
  public static void main(String[] args) {
    int nHats = 1;                     // Number of hats
    System.out.println("I have " + nHats + " hat" + (nHats == 1 ? "." : "s."));

    nHats++;                           // Increment number of hats
    System.out.println("I have " + nHats + " hat" + (nHats == 1 ? "." : "s."));
  }
}
ConditionalOp.java
The output from this program is the following:
I have 1 hat.
I have 2 hats.
How It Works
The result of executing the conditional operator in the program is a string containing just a period when the value of nHats is 1, and a string containing an s followed by a period in all other cases. The effect of this is to cause the output statement to automatically adjust the output between singular and plural. You can use the same technique in other situations, such as where you need to choose “he” or “she” for example, as long as you are able to specify a logical expression to differentiate the situation in which you should use one rather than the other. A more challenging application you could try is to append “st,” “nd,” “rd,” or “th” to a date value, such as in “3rd November” or “4th July.”
You use the switch statement to select from multiple choices that are identified by a set of fixed values for a given expression. The expression that selects a choice must produce a result of an integer type other than long, or a value of an enumeration type, or a string. Thus, the expression that controls a switch statement can result in a value of type char, byte, short, or int, an enumeration constant, or a String object.
In normal use the switch statement operates rather like a rotary switch in that you can select one of a fixed number of choices. For example, on some makes of washing machine you choose between the various machine settings in this way, with positions for cotton, wool, synthetic fiber, and so on, which you select by turning the knob to point to the option that you want.
Here’s a switch statement reflecting this logic for a washing machine:
switch(wash) {
  case 1:                         // wash is 1 for Cotton
    System.out.println("Cotton selected");
    // Set conditions for cotton...
    break;
  case 2:                         // wash is 2 for Linen
    System.out.println("Linen selected");
    // Set conditions for linen...
    break;
  case 3:                         // wash is 3 for Wool
    System.out.println("Wool selected");
    // Set conditions for wool...
    break;
  default:                        // Not a valid value for wash
    System.out.println("Selection error");
    break;
}
The selection in the switch statement is determined by the value of the expression that you place between the parentheses after the keyword switch. In this case it’s simply the integer variable wash that would need to be previously declared as of type char, byte, short, or int. You define the possible switch options by one or more case values, also called case labels, which you define using the keyword case. In general, a case label consists of the case keyword followed by a constant value that is the value that selects the case, followed by a colon. The statements to be executed when the case is selected follow the case label. You place all the case labels and their associated statements between the braces for the switch statement. You have three case values in the example, plus a special case with the label default, which is another keyword. A particular case value is selected if the value of the switch expression is the same as that of the particular case value. The default case is selected when the value of the switch expression does not correspond to any of the values for the other cases. Although I’ve written the cases in the preceding switch sequenced by their case values, they can be in any order.
When a particular case is selected, the statements that follow that case label are executed. So if wash has the value 2, the statements that follow
case 2: // wash is 2 for Linen
are executed. In this case, these are:
System.out.println("Linen selected");
// Set conditions for linen...
break;
When a break statement is executed here, it causes execution to continue with the statement following the closing brace for the switch. The break is not mandatory as the last statement for each case, but if you don’t put a break statement at the end of the statements for a case, the statements for the next case in sequence are executed as well, through to whenever another break is found or the end of the switch block is reached. This is not usually what you want. The break after the default statements in the example is not strictly necessary, but it does protect against the situation when you might add another case label at the end of the switch statement block and overlook the need for the break at the end of the last case.
You need a case label for each choice to be handled in the switch, and the case values must all be different. The default case you have in the preceding example is, in general, optional. As I said, it is selected when the value of the expression for the switch does not correspond with any of the case values that you have defined. If you don’t specify a default case and the value of the switch expression does not match any of the case labels, none of the statements in the switch are executed, and execution continues at the statement following the closing brace of the switch statement.
You could rewrite the previous switch statement to use a variable of an enumeration type as the expression controlling the switch. Suppose you have defined the WashChoice enumeration type like this:
enum WashChoice { cotton, linen, wool } // Define enumeration type
You can now code the switch statement like this:
WashChoice wash = WashChoice.linen;              // Initial definition of variable
// Some more code that might change the value of wash...

switch(wash) {
  case cotton:
    System.out.println("Cotton selected");
    // Set conditions for cotton...
    break;
  case linen:
    // Set conditions for linen...
    System.out.println("Linen selected");
    break;
  case wool:
    System.out.println("Wool selected");
    // Set conditions for wool...
    break;
}
The switch is controlled by the value of the wash variable. Note how you use the enumeration constants as case values. You must write them without the enumeration type name as a qualifier in this context; otherwise, the code does not compile. Using enumeration constants as the case values makes the switch much more self-explanatory. It is perfectly clear what each case applies to. Because you cannot assign a value to a variable of an enumeration type that is not a defined enumeration constant, it is not necessary to include a default case here.
Here’s how you could write the switch statement to use an expression that results in a string:
switch(wash.toLowerCase()) {
  case "cotton":
    System.out.println("Cotton selected");
    // Set conditions for cotton...
    break;
  case "linen":
    System.out.println("Linen selected");
    // Set conditions for linen...
    break;
  case "wool":
    System.out.println("Wool selected");
    // Set conditions for wool...
    break;
  default:                        // Not a valid value for wash
    System.out.println("Selection error");
    break;
}
The wash variable here must be of type String — you will learn about the String class in Chapter 4. The toLowerCase() method from the String class converts the string stored in wash to lowercase so the switch works regardless of whether upper- or lowercase letters are used to specify the choice of wash.
The General Case of the switch Statement
The flowchart shown in Figure 3-4 shows the logic of the general switch statement.

NOTE While Figure 3-4 show the logic of the switch statement, the compiler may implement the process differently, often using a lookup table for case values.
Each case value is notionally compared with the value of an expression. If one matches then the code for that case is executed, and the break branches to the first statement after the switch. As I said earlier, if you don’t include the break statements, the logic is quite different, as shown in Figure 3-5.

Now when a case label value is equal to the switch expression, the code for that case is executed and followed by the statements for all the other cases that succeed the case that was selected, including that for the default case if that follows. This is not usually what you want, so make sure you don’t forget the break statements.
You can arrange to execute the same statements for several different case labels, as in the following switch statement:
char yesNo = 'N';
// more program logic...

switch(yesNo) {
  case 'n': case 'N':
       System.out.println("No selected");
       break;
  case 'y': case 'Y':
       System.out.println("Yes selected");
       break;
}
Here the variable yesNo receives a character from the keyboard somehow. You want a different action depending on whether the user enters "Y" or "N", but you want to be able to accept either uppercase or lowercase entries. This switch does just this by putting the case labels together. Note that there is no default case here. If yesNo contains a character other than those identified in the case statements, the switch statement has no effect. In practice, you might add a default case in this kind of situation to output a message indicating when the value in yesNo is not valid.
Of course, you could also implement this logic using if statements:
if(yesNo=='n' || yesNo=='N') {
  System.out.println("No selected");
  } else {
  if(yesNo=='y' || yesNo=='Y') {
    System.out.println("Yes selected");
  }
}
I prefer the switch statement as I think it’s easier to follow, but you decide for yourself. Let’s try an example.
TRY IT OUT: Making the switch
This example uses a switch controlled by an integer type and a switch controlled by a variable of an enumeration type:
public class TrySwitch {
  enum WashChoice {cotton, linen, wool, synthetic}     // Define enumeration type

  public static void main(String[] args) {
    // Variable to define the choice of wash
    WashChoice wash = WashChoice.cotton;

    // The clothes variable specifies the clothes to be washed by an integer
    // 1:shirts   2:sweaters  3:socks  4:sheets  5:pants
    int clothes = 3;

    switch(clothes) {
      case 1:
        System.out.println("Washing shirts.");
        wash = WashChoice.cotton;
        break;
      case 2:
        System.out.println("Washing sweaters.");
        wash = WashChoice.wool;
        break;
      case 3:
        System.out.println("Washing socks.");
        wash = WashChoice.wool;
        break;
      case 4:
        System.out.println("Washing sheets.");
        wash = WashChoice.linen;
        break;
      case 5:
        System.out.println("Washing pants.");
        wash = WashChoice.synthetic;
        break;
      default:
        System.out.println("Unknown washing - default synthetic.");
        wash = WashChoice.synthetic;
        break;
    }
    System.out.println("Wash is "+ wash);

    // Now select the wash temperature
    switch(wash) {
      case wool:
        System.out.println("Temperature is 120.");
        break;
      case cotton:
        System.out.println("Temperature is 170.");
        break;
      case synthetic:
        System.out.println("Temperature is 130.");
        break;
      case linen:
        System.out.println("Temperature is 180.");
        break;
    }
  }
}
TrySwitch.java
You should get the following output from this example:
Washing socks.
Wash is wool
Temperature is 120.
How It Works
This looks like a lot of code, but it’s because of the number of cases in the two switch statements. Obviously you don’t really need to use two switch statements here, but I used two to show integers and enumeration constants as case values.
You first define an enumeration type, WashChoice. You then define a variable of this type in the main() method with the following statement:
WashChoice wash = WashChoice.cotton; // Variable to define the choice of wash
The initial value for wash here is arbitrary. You could have chosen any of the possible enumeration constants for the WashChoice type.
Next, you define and initialize a variable identifying the type of clothes to be washed:
int clothes = 3;
The initial value for clothes corresponds to socks and in a more practical example would be arrived at by means other than just assigning the value. You use the clothes variable to control the next switch statement. For each case in the switch, you output what is to be washed and set the value for the wash variable to the appropriate enumeration constant. You would usually put a default case in this sort of switch statement because its control expression is numeric, and if the value was derived by some computation or other, there is always the possibility of an invalid value being produced. If there is no default case and the switch expression results in a value that does not correspond to any of the cases, execution just continues with the statement following the switch block.
After the first switch, you output the wash type:
System.out.println("Wash is "+ wash);
You saw in the previous chapter that the string representation of a value that is an enumeration constant is the name of the value as it appears in the type definition.
Lastly, you use the wash variable as the expression selecting a case in the next switch. Because a variable of an enumeration type must have an enumeration constant as a value, and all possible values are represented by cases in the switch, you don’t need a default case here.
Note that you could have defined the values for the various types of clothes as constant values:
final int SHIRTS = 1;
final int SWEATERS = 2;
final int SOCKS = 3;
final int SHEETS = 4;
final int PANTS = 5;
The value set for the clothes variable would then have been much more obvious:
int clothes = SOCKS;
Of course, you could also have used an enumeration for the clothes type, too, but I’ll leave you to work out what that would look like.
The scope of a variable is the part of the program over which the variable name can be referenced — in other words, where you can use the variable in the program. Every variable that I have declared so far in program examples has been defined within the context of a method, the method main(). Variables that are declared within a method are called local variables, as they are only accessible within the confines of the method in which they are declared. However, they are not necessarily accessible everywhere in the code for the method in which they are declared. Look at the next code fragment, which shows variables defined within nested blocks:
{
  int n = 1;                                     // Declare and define n

  // Reference to n is OK here
  // Reference to m here is an error because m does not exist yet

  {
    // Reference to n here is OK too
    // Reference to m here is still an error

    int m = 2;                                   // Declare and define m

    // Reference to m and n are OK here - they both exist
  }      // m dies at this point

  // Reference to m here is now an error
  // Reference to n is still OK though
}        // n dies at this point so you can't refer to it in following statements
A variable does not exist before its declaration; you can refer to it only after it has been declared. It continues to exist until the end of the block in which it is defined, and that includes any blocks nested within the block containing its declaration. The variable n is created as the first statement in the outer block. It continues to exist within the inner block too. The variable m exists only within the inner block because that’s where its declaration appears. After the brace at the end of the inner block, m no longer exists so you can’t refer to it. The variable n is still around, though, and it survives until the closing brace of the outer block.
So, the rule that determines the accessibility of local variables is simple. Local variables are accessible only from the point in the program where they are declared to the end of the block that contains the declaration. At the end of the block in which they are declared, they cease to exist. I can demonstrate this with an example.
TRY IT OUT: Scoping
Here’s a version of the main() method that demonstrates how variable scope works:
public class Scope {
  public static void main(String[] args) {
    int outer = 1;                              // Exists throughout the method

    {
      // You cannot refer to a variable before its declaration
      // Uncomment the following statement for an error
      // System.out.println("inner = " + inner);

      int inner = 2;
      System.out.println("inner = " + inner);     // Now it is OK
      System.out.println("outer = " + outer);     // and outer is still here

      // All variables defined in the enclosing outer block still exist,
      // so you cannot redefine them here
      // Uncomment the following statement for an error
      // int outer = 5;
    }

    // Any variables declared in the previous inner block no longer exist
    // so you cannot refer to them
    // Uncomment the following statement for an error
    // System.out.println("inner = " + inner);

    // The previous variable, inner, does not exist so you can define a new one
    int inner = 3;
    System.out.println("inner = " + inner);       // ... and output its value
    System.out.println("outer = " + outer);       // outer is still around
  }
}
Scope.java
As it stands, this program produces the following output:
inner = 2
outer = 1
inner = 3
outer = 1
If you uncomment the three statements as suggested, it won’t compile and each statement results in an error message from the compiler.
How It Works
The main() method in this program has one block nested inside the block that contains the code for the method. The variable outer is defined right at the start, so you can refer to this anywhere within the method main(), including inside the nested block. You are not allowed to re-declare a variable, so the commented statement that re-declares outer within the inner block causes a compiler error if you remove the double slash at the beginning of the line.
The variable inner is defined inside the nested block with the initial value 2, and you can refer to it anywhere from its declaration to the end of the inner block. After the closing brace of the inner block, the variable inner no longer exists, so the commented output statement that refers to inner is illegal. However, because the variable inner has expired, you can declare another one with the same name and with the initial value 3.
Note that all this is just to demonstrate the lifetime of local variables. It is not good practice to redefine variables that have expired, because of the obvious potential for confusion. Also, although I have only used variables of type int in the preceding example, scoping rules apply to variables of any type.
NOTE There are other variables called class variables that have much longer lifetimes when they are declared in a particular way. The variables PI and E in the standard library class Math are examples of these. They hang around as long as your program is executing. There are also variables that form part of a class object called instance variables. You will learn more about these in Chapter 5.
A loop enables you to execute a statement or block of statements repeatedly. The need to repeat a block of code arises in almost every program. If you did the first exercise at the end of the last chapter, based on what you had learned up to that point, you would have come up with a program along the lines of the following:
public class TryExample1_1 {
  public static void main(String[] args) {
    byte value = 1;
    value *= 2;
    System.out.println("Value is now "+value);
    value *= 2;
    System.out.println("Value is now "+value);
    value *= 2;
    System.out.println("Value is now "+value);
    value *= 2;
    System.out.println("Value is now "+value);
    value *= 2;
    System.out.println("Value is now "+value);
    value *= 2;
    System.out.println("Value is now "+value);
    value *= 2;
    System.out.println("Value is now "+value);
    value *= 2;
    System.out.println("Value is now "+value);
  }
}
The same pair of statements has been entered eight times. This is a rather tedious way of doing things. If the program for the company payroll had to include separate statements to do the calculation for each employee, it would never get written. A loop removes this sort of difficulty. You can write the method main() to do the same as the preceding code like so:
public static void main(String[] args) {
  byte value = 1;
  for(int i = 0 ; i < 8 ; ++i) {
    value *= 2;
    System.out.println("Value is now " + value);
  }
}
This uses one particular kind of loop — called a for loop. The for loop statement on the third line causes the statements in the following block to be repeated eight times. The number of times it is to be repeated is determined by the stuff between parentheses following the keyword for — you will see how in a moment. The point is that you could, in theory, repeat the same block of statements as many times as you want — a thousand or a million or a billion — it is just as easy and it doesn’t require any more lines of code. The primary purpose of the for loop is to execute a block of statements a given number of times.
In general, a loop has two parts to it: it has a loop body, which is the code that is to be repeated and can be a single statement or a block of statements, and it has a loop control mechanism that determines how many times the loop body should execute.
Varieties of Loop
There are four kinds of loop statements you can use. I introduce these in outline first to give an overview of all the possibilities.
1. The Numerical for Loop
for (initialization_expression ; loop_condition ; increment_expression) {
  // statements
}
I have described this loop as the numerical for loop as a rough indication of how it is used and to distinguish it from another variety of for loop that I describe in a moment. The numerical for loop is usually just referred to as a for loop. The loop body for this loop is the block of statements between the braces. The braces are optional when the loop body is just a single statement. The code to control the for loop appears in parentheses following the keyword for.
As you can see, the loop control mechanism has three parts separated by semicolons. The first part, the initialization_expression, executes once before the loop starts. You typically use this expression to initialize a counter for the number of loop iterations — for example, i = 0. With a loop controlled by a counter, which can be an integer or a floating-point variable, you typically count up or down by whatever increment or decrement you choose until the variable reaches some defined limit.
Execution of this loop continues as long as the condition you specify in the second part of the control mechanism, the loop_condition, is true. This expression is checked at the beginning of each loop iteration, and as long as it is true, the loop body executes. When loop_condition is false, the loop ends and execution continues with the statement following the loop block. For example, if you use i<10 as the loop_condition expression, the loop continues as long as the variable i has a value less than 10. The third part of the control information between the parentheses, the increment_expression, is usually used to increment the loop counter. This is executed at the end of each loop iteration. This could be ++i, which would increment the loop counter, i, by one. Of course, you might want to increment the loop counter in steps other than 1. For example, you might write i += 2 as the increment_expression to go in steps of 2, or even something more complicated such as i = 2*i+1.
2. The Collection-Based For Loop
for (type identifier : iterable_expression) {
  // statements
}
You can’t fully appreciate the capabilities of this loop until you have learned about arrays in Chapter 4 and Collection classes in Chapter 14, so I just give you a brief indication here of what you can do with it so you know about all the loop statements you have available. This for loop has two control elements separated by a colon that appear between the parentheses following the for keyword. The first element is an identifier of the type that you specify, and the second is an expression specifying a collection of objects or values of the specified type. The loop executes once for each item of the specified type that appears in the collection, and you can refer to the current item in the loop body using the identifier that you specified as the first control element.
3. The While Loop
while (expression) {
  // statements
}
This loop executes as long as the logical expression between the parentheses is true. When expression is false, the loop ends and execution continues with the statement following the loop block. The expression is tested at the beginning of the loop, so if it is initially false, the loop body is not executed at all. An example of a while loop condition might be yesNo==’y’ || yesNo==’y’. This expression is true if the variable yesNo contains ’y’ or ’y,’ so yesNo might hold a character entered from the keyboard in this instance.
4. The Do-While Loop
do {
  // statements
} while (expression);
This loop is similar to the while loop, except that the expression controlling the loop is tested at the end of the loop block. This means that the loop body always executes at least once, even if the expression is always false.
The basic logic of each of the four kinds of loop is shown in Figure 3-6.
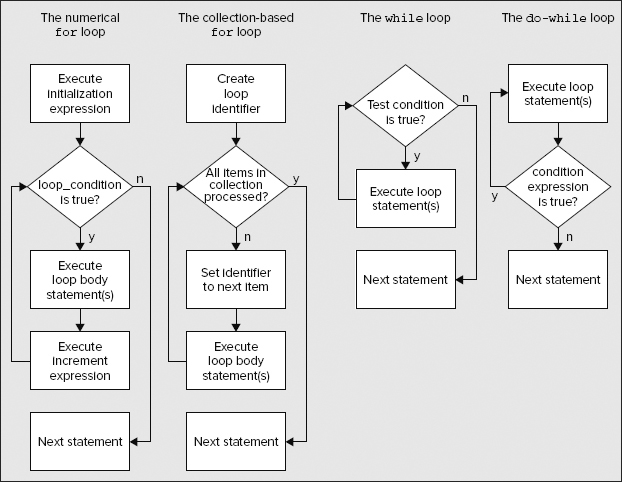
The two versions of the for loop have quite different mechanisms controlling the number of iterations. You can also see quite clearly that the primary difference between the while loop and the do-while loop is where the test is carried out.
Let’s explore each of these loops in turn and see how they work in a practical context.
TRY IT OUT: The Numerical for Loop
Let’s start with a very simple example. Suppose you want to calculate the sum of the integers from 1 to a given value. You can do this using the for loop as shown in the following example:
public class ForLoop {
  public static void main(String[] args) {
    int limit = 20;                     // Sum from 1 to this value
    int sum = 0;                        // Accumulate sum in this variable

    // Loop from 1 to the value of limit, adding 1 each cycle
    for(int i = 1; i <= limit; ++i) {
      sum += i;                         // Add the current value of i to sum
    }
    System.out.println("sum = " + sum);
  }
}
ForLoop.java
This program produces the output
sum = 210
but you can try it out with different values for limit.
NOTE The more mathematically minded will realize that the sum of the integers from 1 to n is given by the formula ![]() . However, using that would not demonstrate how a loop works.
. However, using that would not demonstrate how a loop works.
How It Works
All the work is done in the for loop. The loop counter is i, and this is declared and initialized within the for loop statement. The three elements that control the operation of the for loop appear between the parentheses that follow the keyword for. In sequence, their purpose is to:
- Set the initial conditions for the loop, particularly the loop counter
- Specify the condition for the loop to continue
- Increment the loop counter
The control elements in a for loop are always separated by semicolons, but as you see later, any or all of the control elements can be omitted; the two semicolons must always be present.
The first control element is executed when the loop is first entered. Here you declare and initialize the loop counter i. Because it is declared within the loop, it does not exist outside it. If you try to output the value of i after the loop with a statement such as
System.out.println("Final value of i = " + i); // Will not work outside the loop
you find that the program no longer compiles.
Where the loop body consists of just a single statement, you can omit the braces and write the loop like this:
for (int i = 1; i <= limit; ++i)
  sum += i;                            // Add the current value of i to sum
In general, it’s better practice to keep the braces in as it makes it clearer where the loop body ends.
If you need to initialize and/or declare other variables for the loop, you can do it here by separating the declarations by commas. For example, you could write the following:
for (int i = 1, j = 0; i <= limit; ++i) {
  sum += i * j++;                      // Add the current value of i*j to sum
}
In this fragment, I initialize an additional variable j, and, to make the loop vaguely sensible, I have modified the value to add the sum to i*j++, which is the equivalent of i*(i-1) in this case. Note that j is incremented after the product i*j has been calculated. You could declare other variables here, but note that it would not make sense to declare sum at this point. If you can’t figure out why, delete or comment out the original declaration of sum in the example and put it in the for loop instead to see what happens. The program won’t compile — right? After the loop ends, the variable sum no longer exists, so you can’t reference it. This is because all variables that you declare within the loop control expressions are logically within the block that is the body of the loop; they cease to exist after the end of the block.
The second control element in a for loop is a logical expression that is checked at the beginning of each iteration through the loop. If the expression is true, the loop continues, the loop body executes, and as soon as it is false, the loop is finished. In our program, the loop ends when i is greater than the value of limit.
The third control element in a for loop typically increments the loop variable, as you have seen in the example. You can put multiple expressions here, too, so you could rewrite the previous code fragment that added j to the loop as:
for (int i = 1, j = 0; i <= limit; ++i, ++j) {
  sum += i*j;                      // Add the current value of i*j to sum
}
Again, there can be several expressions here, and they do not need to relate directly to the control of the loop. You could even rewrite the original loop for summing integers so that the summation occurs in the loop control element:
for (int i = 1; i <= limit; sum += i, ++i) {
  ;
}
Now the loop statement is empty — you just have the semicolon to terminate it. The semicolon is optional, but putting in shows that you meant the block to be empty. This version of the code doesn’t really improve things, though, as it’s certainly not so easy to see what is happening and there are hazards in writing the loop this way. If you were to reverse the sequence of adding to sum and incrementing i as follows
for (int i = 1; i <= limit; ++i, sum += i) {  // Wrong!!!
  ;
}
you would generate the wrong answer. This is because the expression ++i would be executed before sum += i, so the wrong value of i is used.
You can omit any or all of the elements that control the for loop, but you must include the semicolons. It is up to you to make sure that the loop does what you want. I could rewrite the loop in the program as:
for (int i = 1; i <= limit; ) {
  sum += i++;                            // Add the current value of i to sum
}
I have simply transferred the operation of incrementing i from the for loop control expression to the loop body. The for loop works just as before. However, this is not a good way to write the loop, as it makes it much less obvious how the loop counter is incremented.
TRY IT OUT: The Collection-Based for Loop
You can’t do a whole lot with the collection-based for loop yet. This will come into its own later in the book, especially after Chapter 14, and you will learn more about what you can do with it in the next chapter. One thing that it does apply to and that you have learned something about is an enumeration. Here’s how you could apply the collection-based for loop to iterate through all the possible values in an enumeration:
public class CollectionForLoop {
  enum Season { spring, summer, fall, winter }   // Enumeration type definition

  public static void main(String[] args) {
    for(Season season : Season.values()) {       // Vary over all values
      System.out.println(" The season is now " + season);
    }
  }
}
CollectionForLoop.java
This generates the following output:
 The season is now spring
 The season is now summer
 The season is now fall
 The season is now winter
How It Works
The season variable of type Season that appears in the first control expression between the parentheses for the for loop is assigned a different enumeration constant value in each iteration of the loop. The second control expression, following the colon, identifies the collection that is the source of values for the variable declared in the first control expression. In this case it is an enumeration, but, in general, there are other collections you can use, as you see in Chapter 14. In the next chapter you will learn about arrays where both forms of the for loop can be used.
In this example, the enumeration defines four values, spring, summer, fall, and winter, so the variable season is assigned each of these values in turn, as the output shows.
TRY IT OUT: The while Loop
You can write the program for summing integers again using the while loop, which shows you how the loop mechanism differs from the for loop:
public class WhileLoop {
  public static void main(String[] args) {
    int limit = 20;                    // Sum from 1 to this value
    int sum = 0;                       // Accumulate sum in this variable
    int i = 1;                         // Loop counter

    // Loop from 1 to the value of limit, adding 1 each cycle
    while(i <= limit) {
      sum += i++;                      // Add the current value of i to sum
    }
    System.out.println("sum = " + sum);
  }
}
WhileLoop.java
You should get the following result:
sum = 210
How It Works
The while loop is controlled wholly by the logical expression that appears between the parentheses that follow the keyword while. The loop continues as long as this expression has the value true, and how it ever manages to arrive at the value false to end the loop is up to you. You need to be sure that the statements within the loop eventually result in this expression being false. Otherwise, you have a loop that continues indefinitely.
How the loop ends in the example is clear. You have a simple count as before, and you increment i in the loop statement that accumulates the sum of the integers. Sooner or later i will exceed the value of limit, and the while loop will end.
You don’t always need to use the testing of a count limit as the loop condition. You can use any logical condition you want.
TRY IT OUT: The do-while Loop
And last, but not least, you have the do-while loop.
As I said at the beginning of this topic, the do-while loop is much the same as the while loop, except for the fact that the continuation condition is checked at the end of the loop. You can write an integer-summing program with this kind of loop too:
public class DoWhileLoop {
  public static void main(String[] args) {
    int limit = 20;                    // Sum from 1 to this value
    int sum = 0;                       // Accumulate sum in this variable
    int i = 1;                         // Loop counter

    // Loop from 1 to the value of limit, adding 1 each cycle
    do {
      sum += i;                        // Add the current value of i to sum
      i++;
    } while(i <= limit);

    System.out.println("sum = " + sum);
  }
}
DoWhileLoop.java
The output is the same as the previous example.
How It Works
The statements within the do-while loop are always executed at least once because the condition that determines whether the loop should continue is tested at the end of each iteration. Within the loop you add the value of i to sum, and then increment it. When i exceeds the value of limit, the loop ends, at which point sum contains the sum of all the integers from 1 to limit.
The loop statement here has braces around the block of code that is within the loop. You could rewrite the loop so that only one statement was within the loop body, in which case the braces are not required. For example:
    do
      sum += i;                          // Add the current value of i to sum
    while(++i <= limit);
Of course, you can and should still put the braces in. I advise that you always use braces around the body of a loop, even when it is only a single statement.
There are often several ways of writing the code to produce a given result, and this is true here — you could also move the incrementing of the variable i back inside the loop and write it as follows:
    do {
      sum += i++;                        // Add the current value of i to sum
    } while (i <= limit);
The value of i is now incremented using the postfix increment operator. If you were to use the prefix form, you would get the wrong result. Note that the semicolon after the while condition is present in each version of the loop. This is part of the loop statement so you must not forget to put it in. The primary reason for using this loop over the while loop is if you want to be sure that the loop code always executes at least once.
Counting Using Floating-Point Values
You can use a floating-point variable as the loop counter in a for loop if you need to. This may be needed when you are calculating the value of a function for a range of fractional values. Suppose you want to calculate the area of a circle with values for the radius from 1 to 2 in steps of 0.2. You could write this as
for(double radius = 1.0 ; radius <= 2.0 ; radius += 0.2) {
  System.out.println("radius = " + radius + " area = " + Math.PI*radius*radius);
}
which produces the following output:
radius = 1.0 area = 3.141592653589793
radius = 1.2 area = 4.523893421169302
radius = 1.4 area = 6.157521601035994
radius = 1.5999999999999999 area = 8.04247719318987
radius = 1.7999999999999998 area = 10.178760197630927
radius = 1.9999999999999998 area = 12.566370614359169
The area has been calculated using the formula πr2 with the standard value PI defined in the Math class, which is 3.14159265358979323846. Although you may have intended the values of radius to increment from 1.0 to 2.0 in steps of 0.2, they don’t quite make it. The value of radius is never exactly 2.0 or any of the other intermediate values because 0.2 cannot be represented exactly as a binary floating-point value. If you doubt this, and you are prepared to deal with an infinite loop, change the loop to the following:
// BE WARNED - THIS LOOP DOES NOT END
for(double radius = 1.0; radius != 2.0; radius += 0.2) {
  System.out.println("radius = " + radius + " area = " + Math.PI*radius*radius);
}
If the value of radius reaches 2.0, the condition radius != 2.0 is false and the loop ends, but unfortunately, it doesn’t. Its last value before 2 is approximately 1.999 . . . and the next value is something like 2.1999 . . . and so it is never 2.0. From this you can deduce a golden rule:
WARNING When it comes to controlling a loop, never use tests that depend on an exact value for a floating-point variable.
Nested Loops
You can nest loops of any kind one inside another to any depth. Let’s look at an example where you can use nested loops.
A factorial of an integer, n, is the product of all the integers from 1 to n. It is written as n!. It may seem a little strange if you haven’t come across it before, but the factorial of an integer is very useful for calculating combinations and permutations of things. For example, n! is the number of ways you can arrange n different things in sequence, so a deck of cards can be arranged in 52! different sequences. Let’s try calculating some factorial values.
TRY IT OUT: Calculating Factorials
This example calculates the factorial of every integer from 1 up to a given limit. Enter the following code:
public class Factorial {
  public static void main(String[] args) {
    long limit = 20L;        // Calculate factorials of integers up to this value
    long factorial = 1L;     // A factorial will be stored in this variable

    // Loop from 1 to the value of limit
    for (long i = 1L; i <= limit; ++i) {
      factorial = 1L;        // Initialize factorial

      for (long factor = 2; factor <= i; ++factor) {
        factorial *= factor;
      }
      System.out.println(i + "! is " + factorial);
    }
  }
}
Factorial.java
This program produces the following output:
1! is 1
2! is 2
3! is 6
4! is 24
5! is 120
6! is 720
7! is 5040
8! is 40320
9! is 362880
10! is 3628800
11! is 39916800
12! is 479001600
13! is 6227020800
14! is 87178291200
15! is 1307674368000
16! is 20922789888000
17! is 355687428096000
18! is 6402373705728000
19! is 121645100408832000
20! is 2432902008176640000
How It Works
All the variables used in this example are of type long. Factorial values grow very rapidly so by using type long you allow much larger factorials to be calculated than if you used type int. You still could have declared factor and i as type int without limiting the size of the factorial value that the program can produce, but the compiler would then need to insert casts to make the int values type long whenever they were involved in an operation with a value of type long.
The outer loop, controlled by i, walks through all the integers from 1 to the value of limit. In each iteration of the outer loop, the variable factorial is initialized to 1, and the nested loop calculates the factorial of the current value of i using factor as the control counter that runs from 2 to the current value of i. The resulting value of factorial is then displayed before going to the next iteration of the outer loop.
Although you have nested a for loop inside another for loop here, as I said at the outset, you can nest any kind of loop inside any other. You could have written the nested loop as the following:
  for (long i = 1L; i <= limit; ++i) {
    factorial = 1L;          // Initialize factorial
    long factor = 2L;
    while (factor <= i) {
      factorial *= factor++;
    }
    System.out.println(i + "! is " + factorial);
  }
Now you have a while loop nested in a for loop. It works just as well, but it is rather more naturally coded as two nested for loops because they are both controlled by a counter.
NOTE If you have been concentrating, you may well have noticed that you don’t really need nested loops to display the factorial of successive integers. You can do it with a single loop that multiplies the current factorial value by the loop counter. However, this would be a very poor demonstration of a nested loop.
The continue Statement
There are situations where you may want to skip all or part of a loop iteration. Suppose you want to sum the values of the integers from 1 to some limit, except that you don’t want to include integers that are multiples of three. You can do this using an if and a continue statement:
for(int i = 1; i <= limit; ++i) {
  if(i % 3 == 0) {
    continue;                        // Skip the rest of this iteration
  }
  sum += i;                          // Add the current value of i to sum
}
The continue statement is executed in this example when i is an exact multiple of 3, causing the rest of the current loop iteration to be skipped. Program execution continues with the next iteration if there is one, and if not, with the statement following the end of the loop block. The continue statement can appear anywhere within a block of loop statements. You may even have more than one continue in a loop.
The Labeled continue Statement
Where you have nested loops, there is a special form of the continue statement that enables you to stop executing the inner loop — not just the current iteration of the inner loop — and continue at the beginning of the next iteration of the outer loop that immediately encloses the current loop. This is called the labeled continue statement.
To use the labeled continue statement, you need to identify the loop statement for the enclosing outer loop with a statement label. A statement label is simply an identifier that is used to reference a particular statement. When you need to reference a particular statement, you write the statement label at the beginning of the statement in question, separated from the statement by a colon. Let’s look at an example.
TRY IT OUT: Labeled continue
You could add a labeled continue statement to omit the calculation of factorials of odd numbers greater than 10. This is not the best way to do this, but it does demonstrate how the labeled continue statement works:
public class Factorial2 {
  public static void main(String[] args) {
    long limit = 20L;    // to calculate factorial of integers up to this value
    long factorial = 1L; // factorial will be calculated in this variable

    // Loop from 1 to the value of limit
    OuterLoop:
    for(long i = 1L; i <= limit; ++i) {
      factorial = 1;                   // Initialize factorial
      for(long j = 2L; j <= i; ++j) {
        if(i > 10L && i % 2L == 1L) {
          continue OuterLoop;          // Transfer to the outer loop
        }
        factorial *= j;
      }
      System.out.println(i + "! is " + factorial);
    }
  }
}
Factorial2.java
If you run this it produces the following output:
1! is 1
2! is 2
3! is 6
4! is 24
5! is 120
6! is 720
7! is 5040
8! is 40320
9! is 362880
10! is 3628800
12! is 479001600
14! is 87178291200
16! is 20922789888000
18! is 6402373705728000
20! is 2432902008176640000
How It Works
The outer loop has the label OuterLoop. In the inner loop, when the condition in the if statement is true, the labeled continue is executed causing an immediate transfer to the beginning of the next iteration of the outer loop. The condition in the if statements causes the calculation of the factorial to be skipped for odd values greater than 10.
In general, you can use the labeled continue to exit from an inner loop to any enclosing outer loop, not just the one immediately enclosing the loop containing the labeled continue statement.
Using the break Statement in a Loop
You have seen how to use the break statement in a switch block. Its effect is to exit the switch block and continue execution with the first statement after the switch. You can also use the break statement to break out from a loop. When break is executed within a loop, the loop ends immediately, and execution continues with the first statement following the loop. To demonstrate this, you write a program to find prime numbers. In case you have forgotten, a prime number is an integer that is only exactly divisible by itself and 1.
TRY IT OUT: Calculating Primes I
There’s a little more code to this than the previous example. This program finds all the primes from 2 to 50:
public class Primes {
  public static void main(String[] args) {
    int nValues = 50;                  // The maximum value to be checked
    boolean isPrime = true;            // Is true if we find a prime

    // Check all values from 2 to nValues
    for(int i = 2; i <= nValues; ++i) {
      isPrime=true;                    // Assume the current i is prime

      // Try dividing by all integers from 2 to i-1
      for(int j = 2; j < i; ++j) {
        if(i % j == 0) {            // This is true if j divides exactly
          isPrime = false;          // If we got here, it was an exact division
          break;                    // so exit the loop
        }
      }
      // We can get here through the break, or through completing the loop
      if(isPrime)                      // So is it prime?
        System.out.println(i);         // Yes, so output the value
    }
  }
}
Primes.java
You should get the following output:
2
3
5
7
11
13
17
19
23
29
31
37
41
43
47
How It Works
There are much more efficient ways to calculate primes, but this program demonstrates the break statement in action. The first step in main() is to declare two variables:
    int nValues = 50;                        // The maximum value to be checked
    boolean isPrime = true;                  // Is true if we find a prime
The first variable is the upper limit for integers to be checked to see if they are prime. The isPrime variable is used to record whether a particular value is prime or not.
The basic idea of the program is to go through the integers from 2 to the value of nValues and check each one to see if it has an integer divisor less than itself. The nested loops do this:
    for(int i = 2; i <= nValues; ++i) {
      isPrime=true;             // Assume the current i is prime

      // Try dividing by all integers from 2 to i-1
      for(int j = 2; j < i; ++j) {
        if(i % j == 0) {        // This is true if j divides exactly
          isPrime = false;      // If we got here, it was an exact division
          break;                // so exit the loop
        }
      }
      // We can get here through the break, or through completing the loop
      if(isPrime)               // So is it prime?
        System.out.println(i);  // Yes, so output the value
    }
The outer loop is indexed by i and steps through the possible values that need to be checked for primeness. The inner loop is indexed by j, the value of j being a trial divisor. This determines whether any integer less than the value being tested for primality is an exact divisor.
The checking is done in the if statement in the inner loop. If j divides i exactly, i%j is 0, so isPrime is set to false. In this case the break executes to exit the inner loop — there is no point in continuing as you now know that the value being tested is not prime. The next statement to be executed is the if statement after the closing brace of the inner loop block. You can also reach this point by a normal exit from the loop that occurs when the value is prime so you need a way to determine whether the current value of i was found to be prime or not. The isPrime variable solves this problem. You just check the value of isPrime and if it has the value true, you have a prime to display so you execute the println() call.
You could simplify this example if you used the labeled continue statement instead of the break statement as in the next Try It Out.
TRY IT OUT: Calculating Primes II
Try the following changes to the code in the Primes class:
public class Primes2 {
  public static void main(String[] args) {
    int nValues = 50;                  // The maximum value to be checked

    // Check all values from 2 to nValues
    OuterLoop:
    for(int i = 2; i <= nValues; ++i) {
      // Try dividing by all integers from 2 to i-1
      for(int j = 2; j < i; ++j) {
        if(i%j == 0) {                 // This is true if j divides exactly
          continue OuterLoop;          // so exit the loop
        }
      }
      // We only get here if we have a prime
      System.out.println(i);           // so output the value
    }
  }
}
Primes2.java
If you’ve keyed it in correctly, you get the same output as the previous example.
How It Works
You no longer need the isPrime variable to indicate whether you have a prime or not, as the output statement can be reached only through a normal exit from the inner loop. When this occurs it means you have found a prime. If you get an exact divisor in the inner loop, it implies that the current value of i is not prime, so the labeled continue statement transfers immediately to the next iteration of the outer loop.
Breaking Indefinite Loops
You will find that sometimes you need to use a loop where you don’t know in advance how many iterations will be required. This can arise when you are processing external data items that you might be reading in from the keyboard, for example, and you cannot know in advance how many there will be. You can often use a while loop in these circumstances, with the loop condition determining when the loop should end, but sometimes it can be convenient to use an indefinite loop instead and use a break statement in the loop body to end the loop. An indefinite loop is a loop where the control condition is such that the loop apparently continues to execute indefinitely. In this case, the mechanism to end the loop must be in the body of the loop.
TRY IT OUT: Calculating Primes III
Suppose you want the Primes program to generate a given number of primes, rather than check up to a given integer value. In this case, you don’t know how many numbers you need to check to generate the required number of primes. This is a case where an indefinite loop is useful. You can code this as follows:
public class Primes3 {
  public static void main(String[] args) {
    int nPrimes = 50;                  // The maximum number of primes required

    OuterLoop:
    for(int i = 2 ; ; ++i) {           // This loop runs forever
      // Try dividing by all integers from 2 to i-1
      for(int j = 2; j < i; ++j) {
        if(i % j == 0) {               // This is true if j divides exactly
          continue OuterLoop;          // so exit the loop
        }
      }
      // We only get here if we have a prime
      System.out.println(i);           // so output the value
      if(--nPrimes == 0) {             // Decrement the prime count
        break;                         // It is zero so we have them all
      }
    }
  }
}
Primes3.java
This program outputs the first 50 primes.
How It Works
This program is very similar to the previous version. The principal differences are that nPrimes contains the number of primes required, so the program produces the first 50 primes, instead of finding the primes between 2 and 50, and the for outer loop, controlled by i, has the loop condition omitted, so the loop has no direct mechanism for ending it. The loop must be terminated by the code within the loop; otherwise, it continues to execute indefinitely.
Here the termination of the outer loop is controlled by the if statement following the output statement. As you find each prime, the value is displayed, after which the value of nPrimes is decremented in the if statement:
if(--nPrimes == 0) {      // Decrement the prime count
  break;                  // It is zero so we have them all
}
The break statement is executed when nPrimes has been decremented to zero, and this exits the outer loop.
The Labeled break Statement
Java also has a labeled break statement. This enables you to jump immediately to the statement following the end of any enclosing statement block or loop that is identified by the label in the labeled break statement. The label precedes the opening brace of the block that it identifies. Figure 3-7 illustrates how the labeled break statement works.

The labeled break enables you to break out to the statement following an enclosing block or loop that has an identifying label, regardless of how many levels of nested blocks there are. You might have several loops nested one within the other, for example, where you could use the labeled break to exit from the innermost loop (or indeed any of them) to the statement following the outermost loop. You just need to add a label to the beginning of the relevant block or loop that you want to break out of, and use that label in the break statement.
Just to see it working you can alter the previous example to use a labeled break statement:
public class Primes4 {
  public static void main(String[] args) {
    int nPrimes = 50;                  // The maximum number of primes required

    // Check all values from 2 to nValues
    OuterLoop:
    for(int i = 2 ; ; ++i) {              // This loop runs forever
      // Try dividing by all integers from 2 to i-1
      for(int j = 2; j < i; ++j) {
        if(i % j == 0) {                  // This is true if j divides exactly
          continue OuterLoop;             // so exit the loop
        }
      }
      // We only get here if we have a prime
      System.out.println(i);              // so output the value
      if(--nPrimes == 0) {                // Decrement the prime count
        break OuterLoop;                  // It is zero so we have them all
      }
    }
    // break OuterLoop goes to here
  }
}
The program works in exactly the same way as before. The labeled break ends the loop operation beginning with the label OuterLoop, and so effectively branches to the point indicated by the comment.
Of course, in this instance its effect is no different from that of an unlabeled break. However, in general this would work wherever the labeled break statement was within OuterLoop. For example, it could be nested inside another inner loop, and its effect would be just the same — control would be transferred to the statement following the end of OuterLoop. The following code fragment illustrates this sort of situation. The label this time is Outside:
Outside:
for(int i = 0 ; i<count1 ; ++i) {
  ...
  for(int j = 0 ; j<count2 ; ++j) {
    ...
    for(int k = 0 ; k<count3 ; ++k) {
      ...
      break Outside;
      ...
    }
  }
}
// The labeled break transfers to here...
The labeled break is not needed very often, but when you need to break out of a deeply nested set of loops, it can be invaluable because it makes it a simple operation.
Every so often you will find that the logic in your code leads to some logical condition that should always be true. If you test an integer and establish that it is odd, it is certainly true that it cannot be even, for example. You may also find yourself writing a statement or statements that, although they could be executed in theory, in practice they never really should be. I don’t mean by this the usual sorts of errors that occur, such as some incorrect data being entered somehow, which should be handled ordinarily by the normal code. I mean circumstances where if the statements were to be executed, it would imply that something was very seriously wrong with the program or its environment. These are precisely the circumstances to which assertions apply.
NOTE For assertions to have an effect when you run your program, you must specify the -enableassertions option. For example:
java -enableassertions MyProg
You can also use its abbreviated form -ea:
java -ea MyProg
If you don’t specify this option when you run the program, assertions are ignored.
A simple assertion is a statement of the form:
assert logical_expression;
Here, assert is a keyword, and logical_expression is any expression that results in a value of true or false. When this statement executes, if logical_expression evaluates to true, then the program continues normally. If logical_expression evaluates to false, the program is terminated with an error message starting with:
java.lang.AssertionError
This is followed by more information about where the error occurred in the code. When this occurs, the program is said to assert.
Let’s consider an example. Suppose you have a variable of type int that stores the number of days in the current month. You might use it like this:
if(daysInMonth == 30) {
  System.out.println("Month is April, June, September, or November");

} else if(daysInMonth == 31) {
  System.out.println(
             "Month is January, March, May, July, August, October, or December.");
} else {
  assert daysInMonth == 28 || daysInMonth == 29;
  System.out.println("Month is February.");
}
You are presuming that daysInMonth is valid — that is, it has one of the values 28, 29, 30, or 31. Maybe it came from a file that is supposed to be accurate so you should not need to check it, but if it turns out not to be valid, the assertion detects it and ends the program.
You could have written this slightly differently:
if(daysInMonth == 30) {
  System.out.println("Month is April, June, September, or November");

} else if(daysInMonth == 31) {
  System.out.println(
             "Month is January, March, May, July, August, October, or December.");

} else if(daysInMonth == 28 || daysInMonth == 29) {
  System.out.println("Month is February.");

} else {
  assert false;
}
Here, if daysInMonth is valid, the program should never execute the last else clause. An assertion with the logical expression as false always asserts and terminates the program.
More Complex Assertions
There is a slightly more complex form of assertions that have this form:
assert logical_expression : string_expression;
Here, logical_expression must evaluate to a boolean value, either true or false. If logical_expression is false then the program terminates with an error message including the string that results from string_expression.
For example, you could have written the assertion in the last code fragment as:
assert false : "daysInMonth has the value " + daysInMonth;
Now if the program asserts, the output includes information about the value of daysInMonth.
Let’s see how it works in practice.
TRY IT OUT: A Working Assertion
Here’s some code that is guaranteed to assert — if you compile and execute it correctly:
public class TryAssertions {
  public static void main(String args[]) {
    int daysInMonth = 32;
    if(daysInMonth == 30) {
      System.out.println("Month is April, June, September, or November");

    } else if(daysInMonth == 31) {
      System.out.println(
          "Month is January, March, May, July, August, October, or December.");

    } else if(daysInMonth == 28 || daysInMonth == 29) {
      System.out.println("Month is February.");

    } else {
      assert false;
    }
  }
}
TryAssertions.java
Don’t forget that, after you have compiled the program, you must execute it with assertions enabled, like this:
java -enableassertions TryAssertions
You should then get the following output:
Exception in thread "main" java.lang.AssertionError
        at TryAssertions.main(TryAssertions.java:15)
How It Works
Because you have set daysInMonth to an invalid value, the assertion statement is executed, and that results in the error message. You could try out the other form of the assertion in the example:
assert false : "daysInMonth has the value " + daysInMonth;
Now you should see that the output includes the string resulting from the second expression in the assertion statement:
Exception in thread "main" java.lang.AssertionError: daysInMonth has the value 32
        at TryAssertions.main(TryAssertions.java:16)
I will use assertions from time to time in the examples in subsequent chapters.
In this chapter you have learned about all of the essential mechanisms for making decisions in Java. You have also learned all of the looping facilities that you have available when programming in Java. You will use all of these capabilities in examples throughout the rest of the book.
EXERCISES
You can download the source code for the examples in the book and the solutions to the following exercises from www.wrox.com.
1. Write a program to display a random choice from a set of six choices for breakfast (you could use any set — for example, scrambled eggs, waffles, fruit, cereal, toast, or yogurt).
2. When testing whether an integer is a prime, it is sufficient to try to divide by integers up to and including the square root of the number being tested. Rewrite the program example from this chapter to use this approach.
3. A lottery requires that you select six different numbers from the integers 1 to 49. Write a program to do this for you and generate five sets of entries.
4. Write a program to generate a random sequence of capital letters that does not include vowels.

• WHAT YOU LEARNED IN THIS CHAPTER
| TOPIC | CONCEPT |
| Relational Operators | You can use relational operators to compare values, and such comparisons result in values of either true or false. The relational operators are: > >= == != <= < |
| Logical Operators | You can combine basic comparisons and logical variables in more complex logical expressions by using logical operators. The logical operators are: & && | || ^ ! |
| The if Statement | The if statement is a basic decision-making tool in Java. It enables you to choose to execute a block of statements if a given logical expression has the value true. You can optionally execute another block of statements if the logical expression is false by using the else keyword. |
| The Conditional Operator | You can use the conditional operator to choose between two expressions depending on the value of a logical expression. |
| The switch Statement | You can use the switch statement to choose from a fixed number of alternatives. |
| Variable Scope | The variables in a method come into existence at the point at which you declare them and cease to exist after the end of the block that immediately encloses their declaration. The program extent where the variable is accessible is the scope of the variable. |
| Loops | You have four ways of repeating a block of statements: a numerical for loop, a collection-based for loop, a while loop, or a do-while loop. |
| continue Statements | The continue statement enables you to skip to the next iteration in the loop containing the continue statement. The labeled continue statement enables you to skip to the next iteration in an outer loop enclosing the labeled continue that is identified by the label. The labeled loop need not be the loop immediately enclosing the labeled continue. |
| break Statements | The break statement enables you to break out of a loop or switch statement. The labeled break statement enables you to break out of a loop or a switch and continue execution at the point in the code identified by the label. This is not necessarily the block that encloses it directly. |
| Assertions | You use an assertion statement to verify logical conditions that should always be true, or as code in parts of a program that should not be reached, but theoretically can be. |
