
Chapter 4
Arrays and Strings
WHAT YOU WILL LEARN IN THIS CHAPTER
- What arrays are and how you declare and initialize them
- How you access individual elements of an array
- How you can use individual elements of an array
- How to declare arrays of arrays
- How you can create arrays of arrays with different lengths
- How to create String objects
- How to create and use arrays of String objects
- What operations are available for String objects
- What StringBuffer objects are and how they relate to operations on String objects
- What operations are available for StringBuffer objects
In this chapter you start to use Java objects. You are first introduced to arrays, which enable you to deal with a number of variables of the same type through a single variable name, and then you look at how to handle character strings. Some of what I discuss in this chapter relates to objects, and as I have not yet covered in detail how you define a class (which is an object type definition), I have to skate over some aspects of how objects work, but all is revealed in Chapter 5.
With the basic built-in Java data types that you’ve seen in the previous chapters, each identifier corresponds to a single variable. But when you want to handle sets of values of the same type — the first 1,000 primes, for example — you really don’t want to have to name them individually. What you need is an array.
You should first have a rough idea of what an array is and how it works. An array is an object that is a named set of variables of the same type. Each variable in the array is called an array element. To reference a particular element in an array, you use the array name combined with an integer value of type int, called an index. You put the index between square brackets following the array name; for example, data[99] refers to the element in the data array corresponding to the index value 99. The index for an array element is the offset of that particular element from the beginning of the array. The first element has an index of 0, the second has an index of 1, the third an index of 2, and so on. Thus, data[99] refers to the hundredth element in the data array. The index value does not need to be an integer literal. It can be any expression that results in a value of type int that is equal to or greater than zero. Obviously a for loop is going to be very useful for processing array elements — which is one reason why you had to wait until now to hear about arrays.
Array Variables
An array variable and the array it refers to are separate entities. The memory that is allocated for an array variable stores a reference to an array object, not the array itself. The array object itself is a distinct entity that is elsewhere in memory. All variables that refer to objects store references that record the memory locations of the objects they refer to.
You are not obliged to create an array when you declare an array variable. You can first create the array variable and later use it to store a reference to a particular array.
You could declare the integer array variable primes with the following statement:
int[] primes; // Declare an integer array variable
The variable primes is now a placeholder for an integer array that you have yet to define. No memory has been allocated to hold an array itself at this point. The primes variable is simply a location in memory that can store a reference to an array. You see in a moment that to create the array itself you must specify its type and how many elements it is to contain. The square brackets following the type in the previous statement indicates that the variable is for referencing an array of int values, and not for storing a single value of type int. The type of the array variable is int[].
You may come across an alternative notation for declaring an array variable:
int primes[]; // Declare an integer array variable
Here the square brackets appear after the variable name, rather than after the type name. This is exactly equivalent to the previous statement so you can use either notation. Many programmers prefer the original notation, as int[] tends to indicate more clearly that the type is an array of values of type int.
Defining an Array
After you have declared an array variable, you can define an array that it references:
primes = new int[10]; // Define an array of 10 integers
This statement creates an array that stores 10 values of type int and stores a reference to the array in the variable primes. The reference is simply where the array is in memory. You could also declare the array variable and define the array of type int to hold 10 prime numbers with a single statement, as shown in Figure 4-1.
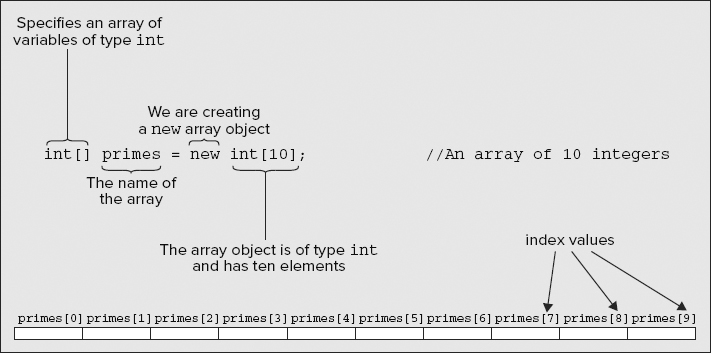
The first part of the definition specifies the type of the array. The element type name, int in this case, is followed by an empty pair of square brackets to indicate you are declaring an array rather than a single variable of type int. The part of the statement that follows the equal sign defines the array. The keyword new indicates that you are allocating new memory for the array, and int[10] specifies you want capacity for 10 variables of type int in the array. Because each element in the primes array is a variable of type int that requires 4 bytes, the whole array occupies 40 bytes, plus 4 bytes for the primes variable to store the reference to the array. When an array is created like this, all the array elements are initialized to a default value automatically. The initial value is zero in the case of an array of numerical values, is false for boolean arrays, is 'u0000' for arrays storing type char, and is null for an array of objects of a class type.
Consider the following statement:
double[] myArray = new double[100];
This statement is a declaration of the array variable myArray. The statement also defines the array because the array size is specified. The variable myArray refers to an array of 100 values of type double, and each element has the value 0.0 assigned by default. Because there are 100 elements in this array, the legal index values range from 0 to 99.
The Length of an Array
You can refer to the length of the array — the number of elements it contains — using length, a data member of the array object. For example, for the array myArray that you defined in the previous section, you can refer to its length as myArray.length, which has the value 100. You can use the length member of an array to control a numerical for loop that iterates over the elements of an array.
Accessing Array Elements
As I said earlier, you refer to an element of an array by using the array name followed by the element’s index value enclosed between square brackets. You can specify an index value by any expression that produces a zero or positive result of type int. If you use a value of type long as an index, you get an error message from the compiler; if your calculation of an index uses long variables and the result is of type long, you need to cast it to type int. You no doubt recall from Chapter 2 that arithmetic expressions involving values of type short and type byte produce a result of type int, so you can use those in an index expression.
You refer to the first element of the primes array as primes[0], and you reference the fifth element in the array as primes[4]. The maximum index value for an array is one less than the number of elements in the array. Java checks that the index values you use are valid. If you use an index value that is less than 0, or greater than the index value for the last element in the array, an exception is thrown — throwing an exception is just the way errors at execution time are signaled, and there are different types of exceptions for signaling various kinds of errors. The exception type in this case is an ArrayIndexOutOfBoundsException. When such an exception is thrown, your program is terminated unless there is some provision in your code for dealing with it. You look at exceptions in detail in Chapter 7, including how you can deal with exceptions and prevent termination of your program.
The primes array is an example of what is sometimes referred to as a one-dimensional array, because each of its elements is referenced using one index — running from 0 to 9 in this case. You see later that arrays can also have two or more dimensions, the number of dimensions being the same as the number of indexes required to access an element of the array.
Reusing Array Variables
As I explained at the beginning of this chapter, an array variable is separate from the array that it references. Rather like the way an ordinary variable can store different values at different times, you can use an array variable to store a reference to different arrays at different points in your program. Suppose you have declared and defined the variable primes as before, like this:
int[] primes = new int[10]; // Allocate an array of 10 integer elements
This produces an array of 10 elements of type int. Perhaps a bit later in your program you want to use the array variable primes to refer to a larger array, with 50 elements, say. You could simply write the following:
primes = new int[50]; // Allocate an array of 50 integer elements
Now the primes variable refers to a new array of values of type int that is entirely separate from the original. When this statement is executed, the previous array of 10 elements is discarded, along with all the data values you may have stored in it. The variable primes can now be used to reference only elements of the new array. This is illustrated in Figure 4-2.

After executing the statement shown in Figure 4-2, the array variable primes now points to a new integer array of 50 elements with index values running from 0 to 49. Although you can change the array that an array variable references, you can’t alter the type of value that an element stores. All the arrays referenced by a given variable must correspond to the original type that you specified when you declared the array variable. The variable primes, for example, can only reference arrays of type int[]. You have used an array of elements of type int in the illustration, but the same thing applies equally well when you are working with arrays of elements of type long or double or of any other type. Of course, you are not restricted to working with arrays of elements of primitive types. You can create arrays of elements to store references to any type of object, including objects of the classes that you define yourself in Chapter 5.
Initializing Arrays
You can initialize the elements in an array with your own values when you declare it, and at the same time determine how many elements it has. To do this, you simply add an equal sign followed by the list of element values enclosed between braces following the specification of the array variable. For example, you can define and initialize an array with the following statement:
int[] primes = {2, 3, 5, 7, 11, 13, 17}; // An array of 7 elements
This creates the primes array with sufficient elements to store all of the initializing values that appear between the braces — seven in this case. The array size is determined by the number of initial values so no other information is necessary to define the array. The values are assigned to the array elements in sequence, so in this example primes[0] has the initial value 2, primes[1] has the initial value 3, primes[2] has the initial value 5, and so on through the rest of the elements in the array.
If you want to set only some of the array elements to specific values explicitly, you can create the array with the number of elements you want and then use an assignment statement for each element for which you supply a value. For example:
int[] primes = new int[100];
primes[0] = 2;
primes[1] = 3;
The first statement declares and defines an integer array of 100 elements, all of which are initialized to zero by default. The two assignment statements then set values for the first two array elements.
You can also initialize the elements in an array using a for loop to iterate over all the elements and set the value for each:
double[] data = new double[50];          // An array of 50 values of type double
for(int i = 0 ; i < data.length ; ++i) { // i from 0 to data.length-1
  data[i] = 1.0;
}
For an array with length elements, the index values for the elements run from 0 to length-1. The for loop control statement is written so that the loop variable i starts at 0 and is incremented by 1 on each iteration up to data.length-1. When i is incremented to data.length, the loop ends. Thus, this loop sets each element of the array to 1. Using a for loop in this way is one standard idiom for iterating over the elements in an array. You see later that you can use the collection-based for loop for iterating over and accessing the values of the array elements. Here you are setting the values so the collection-based for loop cannot be applied.
Using a Utility Method to Initialize an Array
You can also use a method that is defined in the Arrays class in the java.util package to initialize an array. For example, to initialize the data array defined as in the previous fragment, you could use the following statement:
Arrays.fill(data, 1.0); // Fill all elements of data with 1.0
The first argument to the fill() method is the name of the array to be filled. The second argument is the value to be used to set the elements. This method works for arrays of any primitive type. Of course, for this statement to compile correctly you need an import statement at the beginning of the source file:
import java.util.Arrays;
This statement imports the Arrays class name into the source file so you can use it as you have in the preceding code line. Without the import statement, you can still access the Arrays class using the fully qualified name. In this case the statement to initialize the array is:
java.util.Arrays.fill(data, 1.0); // Fill all elements of data with 1.0
This is just as good as the previous version of the statement.
Of course, because fill() is a static method in the Arrays class, you could import the method name into your source file:
import static java.util.Arrays.fill;
Now you can call the method with the name unadorned with the class name:
fill(data, 1.0); // Fill all elements of data with 1.0
You can also set part of an array to a particular value with another version of the fill() method:
double[] data = new double[100];
fill(data, 5, 11, 1.5);
This specifies that a range of elements in the array are to be set to a given value. You supply four arguments to this version of the fill() method. The first argument is the name of the array, data. The second argument is the index of the first element to be set. The third argument is 1 beyond the index of the last element to be set. The fourth argument is the value for the elements. This sets all the elements from data[5] to data[10] inclusive to 1.5.
There are versions of the fill() method for each of the primitive element types so you can use it to set values for any array of elements of a primitive type.
Initializing an Array Variable
You can initialize an array variable with a reference to an existing array of the same type. For example, you could declare the following array variables:
long[] even = {2L, 4L, 6L, 8L, 10L};
long[] value = even;
Here the array reference stored in even is used to initialize the array value in its declaration. This has the effect shown in Figure 4-3.
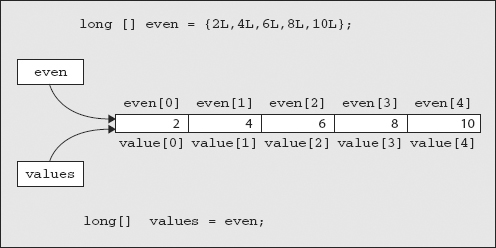
You have created two array variables, but you have only one array. Both arrays refer to the same set of elements, and you can access the elements of the array through either variable name — for example, even[2] refers to the same variable as value[2]. One use for this is when you want to switch the arrays referenced by two variables. If you were sorting an array by repeatedly transferring elements from one array to another, by flipping the array you were copying from with the array you were copying to, you could use the same code. For example, if you declared array variables as
double[] inputArray = new double[100];        // Array to be sorted
double[] outputArray = new double[100];       // Reordered array
double[] temp;                                // Temporary array reference
when you want to switch the array referenced by outputArray to be the new input array, you could write the following:
temp = inputArray;           // Save reference to inputArray in temp
inputArray = outputArray;    // Set inputArray to refer to outputArray
outputArray = temp;          // Set outputArray to refer to what was inputArray
None of the array elements are moved here. Just the addresses of where the arrays are located in memory are swapped, so this is a very fast process. Of course, if you want to replicate an array, you have to create a new array of the same size and type, and then copy the value of each element of the old array to your new array.
NOTE I’m sure that you realize that you can copy the contents of an array to a new array using a loop. In Chapter 15 you learn about methods in the Arrays class that can do this more efficiently.
Using Arrays
You can use array elements in expressions in exactly the same way as you might use a single variable of the same data type. For example, if you declare an array samples, you can fill it with random values between 0.0 and 100.0 with the following code:
double[] samples = new double[50];     // An array of 50 double values
for(int i = 0; i < samples.length; ++i) {
  samples[i] = 100.0*Math.random();    // Generate random values
}
This shows how the numerical for loop is ideal when you want to iterate through the elements in an array to set their values. Of course, this is not an accident. A major reason for the existence of the for loop is precisely for iterating over the elements in an array.
To show that array elements can be used in exactly the same way as ordinary variables, I could write the following statement:
double result = (samples[10]*samples[0] - Math.sqrt(samples[49]))/samples[29];
This is a totally arbitrary calculation, of course. More sensibly, to compute the average of the values stored in the samples array, you could write
double average = 0.0;                  // Variable to hold the average

for(int i = 0; i < samples.length; ++i) {
  average += samples[i];               // Sum all the elements
}
average /= samples.length;             // Divide by the total number of elements
Within the loop, you accumulate the sum of all the elements of the array samples in the variable average. You then divide this sum by the number of elements.
Notice how you use the length of the array, samples.length, all over the place. It appears in the for loop and in floating-point form as a divisor to calculate the average. When you use arrays, you often find that references to the length of the array are strewn all through your code. As long as you use the length member of the array, the code is independent of the number of array elements. If you change the number of elements in the array, the code automatically deals with that. You should always use the length member when you need to refer to the length of an array — never use explicit values.
Using the Collection-Based for Loop with an Array
You can use a collection-based for loop as an alternative to the numerical for loop when you want to process the values of all the elements in an array. For example, you could rewrite the code fragment from the previous section that calculated the average of the values in the samples array like this:
double average = 0.0;                  // Variable to hold the average
for(double value : samples) {
  average += value;                    // Sum all the elements
}
average /= samples.length;             // Divide by the total number of elements
The for loop iterates through the values of all elements of type double in the samples array in sequence. The value variable is assigned the value of each element of the samples array in turn. Thus, the loop achieves the same result as the numerical for loop that you used earlier — the sum of all the elements is accumulated in average. When you are processing all the elements in an array, you should use the collection-based for loop because it is easier to read and less error-prone than the numerical for loop. Of course, when you want to process only data from part of the array, you still must use the numerical for loop with the loop counter ranging over the indexes for the elements you want to access.
It’s important to remember that the collection-based for loop iterates over the values stored in an array. It does not provide access to the elements for the purpose of setting their values. Therefore, you use it only when you are accessing all the values stored in an array to use them in some way. If you want to recalculate the values in the array, use the numerical for loop.
Let’s try out an array in an improved program to calculate prime numbers:
TRY IT OUT: Even More Primes
Try out the following code, derived, in part, from the code you used in Chapter 3:
import static java.lang.Math.ceil;
import static java.lang.Math.sqrt;

public class MorePrimes {
  public static void main(String[] args) {
    long[] primes = new long[20];      // Array to store primes
    primes[0] = 2L;                    // Seed the first prime
    primes[1] = 3L;                    // and the second
    int count = 2;                     // Count of primes found-up to now,
                                       // which is also the array index
    long number = 5L;                  // Next integer to be tested

    outer:
    for( ; count < primes.length; number += 2L) {
      // The maximum divisor we need to try is square root of number
      long limit = (long)ceil(sqrt((double)number));

      // Divide by all the primes we have up to limit
      for(int i = 1; i < count && primes[i] <= limit; ++i) {
        if(number%primes[i] == 0L) {   // Is it an exact divisor?
          continue outer;              // Yes, so try the next number
        }
      }
      primes[count++] = number;        // We got one!
    }

    for(long n : primes) {
      System.out.println(n);           // Output all the primes
    }
  }
MorePrimes.java
This program computes as many prime numbers as the capacity of the primes array allows.
How It Works
Any number that is not a prime must be a product of prime factors, so you only need to divide a prime number candidate by prime numbers that are less than or equal to the square root of the candidate to test for whether it is prime. This is fairly obvious if you think about it. For every factor a number has that is greater than the square root of the number, the result of division by this factor is another factor that is less than the square root. You perhaps can see this more easily with a specific example. The number 24 has a square root that is a bit less than 5. You can factorize it as 2 * 12, 3 * 8, 4 * 6; then you come to cases where the first factor is greater than the square root so the second is less, 6 * 4, 8 * 3, and so on, and so you are repeating the pairs of factors you already have.
You first declare the array primes to be of type long and define it as having 20 elements. You set the first two elements of the primes array to 2 and 3, respectively, to start the process off, as you use the primes you have in the array as divisors when testing a new candidate.
The variable count is the total number of primes you have found, so this starts out as 2 because you have already stored 2 and 3 in the first two elements of the primes array. Note that because you use count as the for loop control variable, you omit the first expression between parentheses in the loop statement, as the initial value of count has already been set.
You store the candidate to be tested in number, with the first value set as 5. The for loop statement labeled outer is slightly unusual. First of all, the variable count that determines when the loop ends is not incremented in the for loop statement, but in the body of the loop. You use the third control expression between the for loop parentheses to increment number in steps of two because you don’t want to check even numbers. The for loop ends when count is equal to the length of the array. You test the value in number in the inner for loop by dividing number by all of the prime numbers you have in the primes array that are less than, or equal to, the square root of the candidate. If you get an exact division, the value in number is not prime, so you go immediately to the next iteration of the outer loop via the continue statement.
You calculate the limit for divisors you need to try with the following statement:
long limit = (long)ceil(sqrt((double)number));
The sqrt() method from the Math class produces the square root of number as a double value, so if number has the value 7, for example, a value of about 2.64575 is returned. This is passed to the ceil() method, which is also a member of the Math class. The ceil() method returns a value of type double that is the minimum whole number that is not less than the value passed to it. With number as 7, this returns 3.0, the smallest integral value not less than the square root of 7. You want to use this number as the limit for your integer divisors, so you cast it to type long and store the result in limit. You are able to call the sqrt() and ceil() methods without qualifying their names with the class to which they belong because you have imported their names into the source file.
The cast of number to type double is not strictly necessary. You could write the statement as:
long limit = (long)ceil(sqrt(number));
The compiler will insert the cast for you. However, by putting the explicit cast in, you indicate that it was your intention.
If you don’t get an exact division, you exit normally from the inner loop and execute the statement:
primes[count++] = number; // We got one!
Because count is the number of values you have stored, it also corresponds to the index for the next free element in the primes array. Thus, you use count as the index to the array element in which you want to store the value of number and then increment count.
When you have filled the primes array, the outer loop ends and you output all the values in the array in the loop:
for(long n : primes) {
  System.out.println(n);               // Output all the primes
}
This loop iterates through all the elements of type long in the primes array in sequence. On each iteration n contains the value of the current element, so that is written out by the println() method.
You can express the logical process of this program as the following sequence of steps:
1. Take the number in question and determine its square root.
2. Set the limit for divisors to be the smallest integer that is greater than this square root value.
3. Test to see if the number can be divided exactly (without remainder) by any of the primes already in the primes array that are less than the limit for divisors.
4. If any of the existing primes divide into the current number, discard the current number and start a new iteration of the loop with the next candidate number.
5. If none of the divisors divide into number without a remainder, it is a prime, so enter the existing number in the first available empty slot in the array and then move to the next iteration for a new candidate number.
6. When the array of primes is full, stop looking for new primes and output all the prime number values from the array.
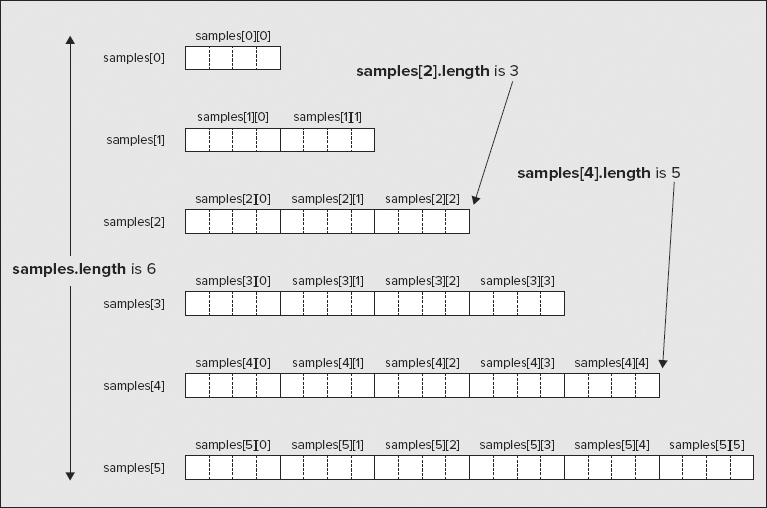
Arrays of Arrays
You have worked only with one-dimensional arrays up to now, that is, arrays that use a single index. Why would you ever need the complications of using more indexes to access the elements of an array?
Consider a specific example. Suppose that you have a fanatical interest in the weather, and you are intent on recording the temperature each day at 10 separate geographical locations throughout the year. After you have sorted out the logistics of actually collecting this information, you can use an array of 10 elements corresponding to the number of locations, where each of these elements is an array of 365 elements to store the temperature values. You declare this array with the statement:
float[][] temperature = new float[10][365];
This is called a two-dimensional array because it has two dimensions — one with index values running from 0 to 9, and the other with index values from 0 to 364. The first index relates to a geographical location, and the second index corresponds to the day of the year. That’s much handier than a one-dimensional array with 3650 elements, isn’t it?
Figure 4-4 shows the organization of the two-dimensional array.

There are 10 one-dimensional arrays that make up the two-dimensional array, and they each have 365 elements. In referring to an element, the first pair of square brackets encloses the index for a particular array and the second pair of square brackets encloses the index value for an element within that array. So to refer to the temperature for day 100 for the sixth location, you use temperature[5][99]. Because each float variable occupies 4 bytes, the total space required to store the elements in this two-dimensional array is 10 × 365 × 4 bytes, which is a total of 14,600 bytes.
For a fixed value for the second index in a two-dimensional array, varying the first index value is often referred to as accessing a column of the array. Similarly, fixing the first index value and varying the second, you access a row of the array. The reason for this terminology should be apparent from Figure 4-4.
You could equally well have used two statements to create the last array, one to declare the array variable and the other to define the array:
float [][] temperature;                // Declare the array variable
temperature = new float[10][365];      // Create the array
The first statement declares the array variable temperature for two-dimensional arrays of type float. The second statement creates the array with ten elements, each of which is an array of 365 elements of type float.
Let’s exercise this two-dimensional array in a program to calculate the average annual temperature for each location.
TRY IT OUT: The Weather Fanatic
To save you having to wander around 10 different locations armed with a thermometer, you’ll generate the temperatures as random values between −10 degrees and 35 degrees. This assumes you are recording temperatures in degrees Celsius. If you prefer Fahrenheit, you could generate values from 14 degrees to 95 degrees to cover the same range.
public class WeatherFan {
   public static void main(String[] args) {
      float[][] temperature = new float[10][365];      // Temperature array

      // Generate random temperatures
      for(int i = 0; i < temperature.length; ++i) {
         for(int j = 0; j < temperature[i].length; ++j) {
            temperature[i][j] = (float)(45.0*Math.random() Đ 10.0);
        }
      }

      // Calculate the average per location
      for(int i = 0; i < temperature.length; ++i) {
         float average = 0.0f;     // Place to store the average

         for(int j = 0; j < temperature[i].length; ++j) {
            average += temperature[i][j];
         }

         // Output the average temperature for the current location
         System.out.println("Average temperature at location "
                + (i+1) + " = " + average/(float)temperature[i].length);
      }
   }
WeatherFan.java
When I ran the program, I got the following output:
Average temperature at location 1 = 12.2733345
Average temperature at location 2 = 12.012519
Average temperature at location 3 = 11.54522
Average temperature at location 4 = 12.490543
Average temperature at location 5 = 12.574791
Average temperature at location 6 = 11.950315
Average temperature at location 7 = 11.492908
Average temperature at location 8 = 13.176439
Average temperature at location 9 = 12.565457
Average temperature at location 10 = 12.981103
You should get different results.
How It Works
After declaring the array temperature you fill it with random values using nested for loops. Note how temperature.length used in the outer loop refers to the length of the first dimension, 10 in this case. In the inner loop you use temperature[i].length to refer to the length of the second dimension, 365. You could use any index value here; temperature[0].length would have been just as good for all the elements because the lengths of the rows of the array are all the same in this case. In the next section you will learn how you create arrays with rows of varying length.
The Math.random() method generates a value of type double from 0.0 up to, but excluding, 1.0. This value is multiplied by 45.0 in the expression for the temperature, which results in values between 0.0 and 45.0. Subtracting 10.0 from this value gives you the range you require, − 10.0 to 35.0.
You then use another pair of nested for loops, controlled in the same way as the first, to calculate the averages of the stored temperatures. The outer loop iterates over the locations and the inner loop sums all the temperature values for a given location. Before the execution of the inner loop, the variable average is declared and initialized, and this is used to accumulate the sum of the temperatures for a location in the inner loop. After the inner loop has been executed, you output the average temperature for each location, identifying the locations by numbers 1 to 10, one more than the index value for each location. Note that the parentheses around (i+1) here are essential. To get the average, you divide the variable average by the number of samples, which is temperature[i].length, the length of the array holding temperatures for the current location. Again, you could use any index value here because, as you have seen, they all return the same value, 365.
You can write the nested loop to calculate the average temperatures as nested collection-based for loops, like this:
      int location = 0;                          // Location number
      for(float[] temperatures : temperature) {
         float average = 0.0f;     // Place to store the average

         for(float t : temperatures) {
            average += t;
         }

         // Output the average temperature for the current location
         System.out.println("Average temperature at location "
                + (++location) + " = " + average/(float)temperatures.length);
      }
The outer loop iterates over the elements in the array of arrays, so the loop variable temperatures reference each of the one-dimensional arrays in temperature in turn. The type of the temperatures variable is float[] because it stores a reference to a one-dimensional array from the array of one-dimensional arrays, temperature. As in the earlier example, the explicit cast for temperatures.length to type float is not strictly necessary.
The inner for loop iterates over the elements in the array that is currently referenced by temperatures, and the loop variable t is assigned the value of each element from the temperatures in turn. You have to define an extra variable, location, to record the location number as this was previously provided by the loop variable i, which is not present in this version. You increment the value of location in the output statement using the prefix form of the increment operator so the location values are 1, 2, 3, and so on.
Arrays of Arrays of Varying Length
When you create an array of arrays, the arrays in the array do not need to be all the same length. You could declare an array variable, samples, with the statement:
float[][] samples; // Declare an array of arrays
This declares the array object samples to be of type float[][]. You can then define the number of elements in the first dimension with the statement:
samples = new float[6][]; // Define 6 elements, each is an array
The samples variable now references an array with six elements, each of which can hold a reference to a one-dimensional array. You can define these arrays individually if you want:
samples[2] = new float[6];             // The 3rd array has 6 elements
samples[5] = new float[101];           // The 6th array has 101 elements
This defines two of the six possible one-dimensional arrays that can be referenced through elements of the samples array. The third element in the samples array now references an array of 6 elements of type float, and the sixth element of the samples array references an array of 101 elements of type float. Obviously, you cannot use an array until it has been defined, but you could conceivably use these two and define the others later — not a likely approach, though!
If you want the array samples to have a triangular shape, with one element in the first row, two elements in the second row, three in the third row, and so on, you can define the arrays in a loop:
for(int i = 0; i < samples.length; ++i) {
   samples[i] = new float[i+1];        // Allocate each array
}
The effect of this is to produce the array layout that is shown in Figure 4-5.
The 21 elements in the array occupy 84 bytes. When you need a two-dimensional array with rows of varying length, allocating them to fit the requirement can save a considerable amount of memory compared to just using rectangular arrays where the row lengths are all the same.
To check out that the array is as shown in Figure 4-5, you can define it in a program using the code fragments you have just seen and include statements to display the length member for each of the one-dimensional arrays.
You could use a numerical for loop to initialize the elements in the samples array, even though the rows may differ in length:
for(int i = 0; i < samples.length; ++i) {
  for(int j = 0 ; j < samples[i].length ; ++j) {
   samples[i][j] = 99.0f;              // Initialize each element to 99
  }
}
Of course, for the loops to execute properly the arrays must already have been created. The upper limit for the control variable in the inner loop is samples[i].length. The expression samples[i] references the current row in the two-dimensional array so samples[i].length is the number of elements in the current row. The outer loop iterates over the rows in the samples array, and the inner loop iterates over all the elements in a row.
You can also achieve the same result with slightly less code using the fill() method from the Arrays class that you saw earlier:
for(int i = 0; i < samples.length; ++i) {
   java.util.Arrays.fill(samples[i], 99.0f); // Initialize elements in a row to 99
}
Because the fill() method fills all the elements in a row, you need only one loop that iterates over the rows of the array.
Multidimensional Arrays
You are not limited to two-dimensional arrays either. If you are an international java bean grower with multiple farms across several countries, you could arrange to store the results of your bean counting in the array declared and defined in the following statement:
long[][][] beans = new long[5][10][30];
The array, beans, has three dimensions. It provides for holding bean counts for each of up to 30 fields per farm, with 10 farms per country in each of 5 countries.
You can envisage this as just a three-dimensional array, but remember that beans is really an array of five elements, each of which holds a reference to a two-dimensional array, and each of these two-dimensional arrays can be different. For example, if you really want to go to town, you can declare the array beans with the statement:
long[][][] beans = new long[3][][]; // Three two-dimensional arrays
Each of the three elements in the first dimension of beans can hold a different two-dimensional array, so you could specify the first dimension of each explicitly with the following statements:
beans[0] = new long[4][];
beans[1] = new long[2][];
beans[2] = new long[5][];
These three arrays have elements that each hold a one-dimensional array, and you can also specify the sizes of these independently. Note how the empty square brackets indicate there is still a dimension undefined. You could give the arrays in each of these elements random dimensions between 1 and 7 with the following code:
for(int i = 0; i < beans.length; ++i)              // Vary over 1st dimension
   for(int j = 0; j < beans[i].length; ++j)        // Vary over 2nd dimension
      beans[i][j] = new long[(int)(1.0 + 6.0*Math.random())];
If you can find a sensible reason for doing so, or if you are just a glutton for punishment, you can extend this to four or more dimensions.
Arrays of Characters
All the arrays you have defined have contained elements storing numerical values so far. You can also have arrays of characters. For example, you can declare an array variable of type char[] to hold 50 characters with the following statement:
char[] message = new char[50];
Keep in mind that characters are stored as Unicode UTF-16 in Java so each element occupies 2 bytes.
If you want to initialize every element of this array to a space character, you can either use a for loop to iterate over the elements of the array, or just use the fill() method in the Arrays class, like this:
java.util.Arrays.fill(message, ' '), // Store a space in every element
Of course, you can use the fill() method to initialize the elements with any character you want. If you put ' ' as the second argument to the fill() method, the array elements all contain a newline character.
You can also define the size of an array of type char[] by the characters it holds initially:
char[] vowels = { 'a', 'e', 'i', 'o', 'u'};
This defines an array of five elements, initialized with the characters appearing between the braces. This is fine for things such as vowels, but what about proper messages?
Using an array of type char[], you can write statements such as:
char[] sign = {'F', 'l', 'u', 'e', 'n', 't', ' ',
               'G', 'i', 'b', 'b', 'e', 'r', 'i', 's', 'h', ' ',
               's', 'p', 'o', 'k', 'e', 'n', ' ',
               'h', 'e', 'r', 'e'};
Well, you get the message — just — but it’s not a very friendly way to deal with it. It looks like a collection of characters, which is what it is. What you really need is something a bit more integrated — something that looks like a message but still gives you the ability to get at the individual characters if you want. What you need is a String.
You will need to use character strings in most of your programs — headings, names, addresses, product descriptions, messages — the list is endless. In Java, ordinary strings are objects of the class String. The String class is a standard class that comes with Java, and it is specifically designed for creating and processing strings. The definition of the String class is in the java.lang package so it is accessible in all your programs by default. Character in strings are stored as Unicode UTF-16.
String Literals
You have already made extensive use of string literals for output. Just about every time the println() method was used in an example, you used a string literal as the argument. A string literal is a sequence of characters between double quotes:
"This is a string literal!"
This is actually a String literal with a capital S — in other words, a constant object of the class String that the compiler creates for use in your program.
As I mentioned in Chapter 2, some characters can’t be entered explicitly from the keyboard so you can’t include them directly in a string literal. You can’t include a newline character by pressing the Enter key because doing so moves the cursor to a new line. You also can’t include a double quote character as it is in a string literal because this is used to indicate where a string literal begins and ends. You can specify all of these characters in a string in the same way as you did for char constants in Chapter 2 — you use an escape sequence. All the escape sequences you saw when you looked at char constants apply to strings. The statement
System.out.println("This is
a string constant!");
produces the output
This is
a string constant!
because is interpreted as a newline character. Like values of type char, strings are stored internally as Unicode characters. You can also include Unicode character codes in a string as escape sequences of the form unnnn where nnnn are the four hexadecimal digits of the Unicode coding for a particular character. The Greek letter π, for example, is u03C0.
WARNING When you want to display Unicode characters, the environment in which they are to appear must support displaying Unicode. If you try to write Unicode characters such as that for π to the command line under MS Windows, for example, they will not display correctly.
You recall from my preliminary discussion of classes and objects in Chapter 1 that a class usually contains data members and methods, and naturally, this is true of the String class. The sequence of characters in the string is stored in a data member of the String object and the methods for the String object enable you to process the data in a variety of ways. I will go into the detail of how a class is defined in Chapter 5, so in this chapter I concentrate on how you can create and use objects of the class String without explaining the mechanics of why things work the way that they do. You already know how to define a String literal. The next step is to learn how you declare a String variable and how you create String objects.
Creating String Objects
Just to make sure there is no confusion in your mind, a String variable is simply a variable that stores a reference to an object of the class String. You declare a String variable in much the same way as you define a variable of one of the basic types. You can also initialize it in the declaration, which is generally a good idea:
String myString = "My inaugural string";
This declares the variable myString as type String and initializes it with a reference to a String object encapsulating the string "My inaugural string". You can store a reference to another string in a String variable, after you have declared it, by using an assignment. For example, you can change the value of the String variable myString to the following statement:
myString = "Strings can be knotty";
The effect of this is illustrated in Figure 4-6.

The String object itself is distinct from the variable you use to refer to it. In the same way as you saw with array objects, the variable myString stores a reference to a String object, not the object itself, so in other words, a String variable records where the String object is in memory. When you declare and initialize myString, it references the object corresponding to the initializing string literal. When you execute the assignment statement, the original reference is overwritten by the reference to the new string and the old string is discarded. The variable myString then contains a reference to the new string.
String objects are said to be immutable — which just means that they cannot be changed. This means that you cannot extend or otherwise modify the string that an object of type String represents. When you execute a statement that combines existing String objects, you are always creating a new String object as a result. When you change the string referenced by a String variable, you throw away the reference to the old string and replace it with a reference to a new one. The distinction between a String variable and the string it references is not apparent most of the time, but you see situations later in this chapter where it is important to understand this, so keep it in mind.
You should also keep in mind that characters in a string are Unicode characters, so each one typically occupies 2 bytes, with the possibility that they can be 4 bytes if you are using characters represented as surrogates. This is also not something you need worry about most of the time, but there are occasions where you need to be conscious of that, too.
Of course, you can declare a variable of type String without initializing it:
String anyString; // Uninitialized String variable
The anyString variable that you have declared here does not refer to anything. However, if you try to compile a program that attempts to use anyString before it has been initialized by some means, you get an error. If you don’t want a String variable to refer to anything at the outset — for example, if you may or may not assign a String object to it before you use the variable — then you must initialize it to a special null value:
String anyString = null; // String variable that doesn't reference a string
The literal null is an object reference value that does not refer to anything. Because an array is essentially an object, you can also use null as the value for an array variable that does not reference anything.
You can test whether a String variable refers to anything or not by a statement such as:
if(anyString == null) {
  System.out.println("anyString does not refer to anything!");
}
The variable anyString continues to be null until you use an assignment to make it reference a particular string. Attempting to use a variable that has not been initialized is an error. When you declare a String variable, or any other type of variable in a block of code without initializing it, the compiler can detect any attempts to use the variable before it has a value assigned and flags it as an error. As a rule, you should always initialize variables as you declare them.
You can use the literal null when you want to discard a String object that is currently referenced by a variable. Suppose you define a String variable like this:
String message = "Only the mediocre are always at their best";
A little later in the program, you want to discard the string that message references. You can just write this statement:
message = null;
The value null replaces the original reference stored so message now does not refer to anything.
Arrays of Strings
You can create arrays of strings. You declare an array of String objects with the same mechanism that you used to declare arrays of elements for the basic types. You just use the type String in the declaration. For example, to declare an array of five String objects, you could use the statement:
String[] names = new String[5];
It should now be apparent that the argument to the method main() is an array of String objects because the definition of the method always looks like this:
public static void main(String[] args) {
  // Code for method...
}
You can also declare an array of String objects where the initial values determine the size of the array:
String[] colors = {"red", "orange", "yellow", "green",
                                                 "blue", "indigo", "violet"};
This array has seven elements because there are seven initializing string literals between the braces.
Of course, as with arrays storing elements of primitive types, you can create arrays of strings with any number of dimensions.
You can try out arrays of strings with a small example.
TRY IT OUT: Twinkle, Twinkle, Lucky Star
Let’s create a console program to generate your lucky star for the day:
public class LuckyStars {
  public static void main(String[] args) {
    String[] stars = {
                        "Robert Redford"  , "Marilyn Monroe",
                        "Boris Karloff"   , "Lassie",
                        "Hopalong Cassidy", "Trigger"
                     };
    System.out.println("Your lucky star for today is "
                          + stars[(int)(stars.length*Math.random())]);
  }
LuckyStars.java
When you compile and run this program, it outputs your lucky star. For example, I was fortunate enough to get the following result:
Your lucky star for today is Marilyn Monroe
How It Works
This program creates the array stars of type String[]. The array length is set to however many initializing values appear between the braces in the declaration statement, which is 6 in this case.
You select a random element from the array by creating a random index value within the output statement with the expression (int)(stars.length*Math.random()). Multiplying the random number produced by the method Math.random() by the length of the array, you get a value between 0.0 and 6.0 because the value returned by random() is between 0.0 and 1.0. The result won’t ever be exactly 6.0 because the value returned by the random() method is strictly less than 1.0, which is just as well because this would be an illegal index value. The result is then cast to type int and results in a value from 0 to 5, making it a valid index value for the stars array.
Thus the program selects a random string from the array and displays it, so you should see different output if you execute the program repeatedly.
There are many kinds of operations that can be performed on strings, but let’s start with one you have used already, joining two or more strings to form a new, combined string. This is often called string concatenation.
Joining Strings
To join two String objects to form a new, single string you use the + operator, just as you have been doing with the argument to the println() method in the program examples thus far. The simplest use of this is to join two strings together:
myString = "The quick brown fox" + " jumps over the lazy dog";
This joins the two strings on the right of the assignment and stores the result in the String variable myString. The + operation generates a completely new String object that is separate from the two original String objects that are the operands, and a reference to this new object is stored in myString. Of course, you also use the + operator for arithmetic addition, but if either of the operands for the + operator is a String object or literal, then the compiler interprets the operation as string concatenation and converts the operand that is not a String object to a string.
Here’s an example of concatenating strings referenced by String variables:
String date = "31st ";
String month = "December";
String lastDay = date + month;         // Result is "31st December"
If a String variable that you use as one of the operands to + contains null, then this is automatically converted to the string "null". So if the month variable were to contain null instead of a reference to the string “December”, the result of the concatenation with date would be the string "31st null".
Note that you can also use the += operator to concatenate strings. For example:
String phrase = "Too many";
phrase += " cooks spoil the broth";
After executing these statements, the variable phrase refers to the string "Too many cooks spoil the broth". Of course, this does not modify the string "Too many". The string that is referenced by phrase after this statement has been executed is a completely new String object. This is illustrated in Figure 4-7.

Let’s see how some variations on the use of the + operator with String objects work in an example.
TRY IT OUT: String Concatenation
Enter the following code for the class JoinStrings:
public class JoinStrings {
   public static void main(String[] args) {

      String firstString = "Many ";
      String secondString = "hands ";
      String thirdString = "make light work";

      String myString;                 // Variable to store results

      // Join three strings and store the result
      myString = firstString + secondString + thirdString;
      System.out.println(myString);

      // Convert an integer to String and join with two other strings
      int numHands = 99;
      myString = numHands + " " + secondString + thirdString;
      System.out.println(myString);

      // Combining a string and integers
      myString = "fifty-five is " + 5 + 5;
      System.out.println(myString);

      // Combining integers and a string
      myString = 5 + 5 + " is ten";
      System.out.println(myString);
   }
JoinStrings.java
If you run this example, it produces some interesting results:
Many hands make light work
99 hands make light work
fifty-five is 55
10 is ten
How It Works
The first statement after defining the variables is:
myString = firstString + secondString + thirdString;
This joins the three string values stored in the String variables — firstString, secondString, and thirdString — into a single string and stores this in the variable myString. This is then used in the next statement to present the first line of output.
The next statement that produces a new string uses the + operator you have used regularly with the println() method to combine strings, but clearly something a little more complicated is happening here:
myString = numHands + " " + secondString + thirdString;
This operation is illustrated in Figure 4-8.

Behind the scenes, the value of the variable numHands is being converted to a string that represents this value as a decimal digit character. This is prompted by the fact that it is combined with the string literal, " ", using the + operator. Dissimilar types in a binary operation cannot be operated on, so one operand must be converted to the type of the other if the operation is to be possible. Here the compiler arranges that the numerical value stored in numHands is converted to type String to match the type of the right operand of the + operator. If you look back at the table of operator precedence, you’ll see that the associativity of the + operator is from left to right, so the strings are combined in pairs starting from the left, as shown in Figure 4-8.
The left-to-right associativity of the + operator is important in understanding how the next two lines of output are generated. The two statements involved in creating these strings look very similar. Why does 5 + 5 result in 55 in one statement and 10 in the other? The reason is illustrated in Figure 4-9.
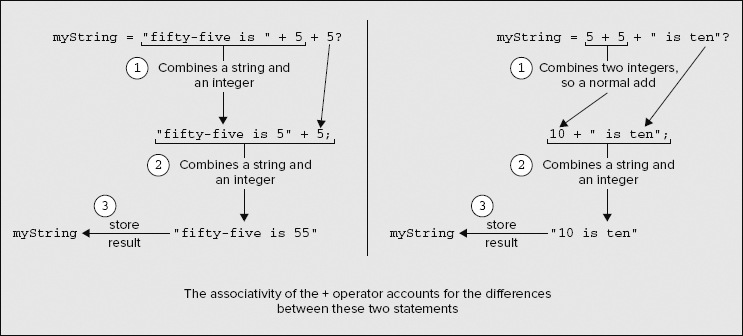
The essential difference between the two is that the first statement always has at least one operand of type String, so the operation is one of string concatenation, whereas in the second statement the first operation is an arithmetic addition because both operands are integers. In the first statement, each of the integers is converted to type String individually. In the second, the numerical values are added, and the result, 10, is converted to a string representation to allow the literal "is ten" to be concatenated.
You don’t need to know about this at this point, but in case you were wondering, the conversion of values of the basic types to type String is actually accomplished by using a static method, toString(), of a standard class that corresponds to the basic type. Each of the primitive types has an equivalent class defined, so for the primitive types I have already discussed there are the wrapper classes shown in Table 4-1.
TABLE 4-1: Wrapper Classes
| BASIC TYPE | WRAPPER CLASS |
| byte | Byte |
| short | Short |
| int | Integer |
| long | Long |
| float | Float |
| double | Double |
| boolean | Boolean |
| char | Character |
The classes in the table are called wrapper classes because objects of each of these class types wrap a value of the corresponding primitive type. Whenever a value of one of the basic types appears as an operand to + and the other operand is a String object, the compiler arranges to pass the value of the basic type as the argument to the toString() method that is defined in the corresponding wrapper class. The toString() method returns the String equivalent of the value. All of this happens automatically when you are concatenating strings using the + operator. As you see later, these are not the only classes that have a toString() method — all classes do. I won’t go into the significance of these classes now, as I cover these in more detail in Chapter 5.
The String class also defines a method, valueOf(), that creates a String object from a value of any type. You just pass the value you want converted to a string as the argument to the method. For example
String doubleString = String.valueOf(3.14159);
You call the valueOf() method using the name of the class String, as shown in the preceding line. This is because the method is a static member of the String class. You learn what static means in this context in Chapter 5.
Comparing Strings
Here’s where the difference between the String variable and the string it references becomes apparent. To compare values stored in variables of the primitive types for equality, you use the == operator. This does not apply to String objects (or any other objects). The expression
string1 == string2
checks whether the two String variables refer to the same string. If they reference separate strings, this expression has the value false, regardless of whether or not the strings happen to be identical. In other words, the preceding expression does not compare the strings themselves; it compares the references to the strings, so the result is true only if string1 and string2 both refer to one and the same string. You can demonstrate this with a little example.
TRY IT OUT: Two Strings, Identical but Not the Same
In the following code, you test to see whether string1 and string3 refer to the same string:
public class MatchStrings {
  public static void main(String[] args) {

    String string1 = "Too many ";
    String string2 = "cooks";
    String string3 = "Too many cooks";

    // Make string1 and string3 refer to separate strings that are identical
    string1 += string2;

    // Display the contents of the strings
    System.out.println("Test 1");
    System.out.println("string3 is now: " + string3);
    System.out.println("string1 is now: " + string1);

    if(string1 == string3) {           // Now test for identity
      System.out.println("string1 == string3 is true." +
                         " string1 and string3 point to the same string");
    } else {
      System.out.println("string1 == string3 is false." +
                  " string1 and string3 do not point to the same string");
    }

    // Now make string1 and string3 refer to the same string
    string3 = string1;
    // Display the contents of the strings
    System.out.println("

Test 2");
    System.out.println("string3 is now: " + string3);
    System.out.println("string1 is now: " + string1);

    if(string1 == string3) {           // Now test for identity
      System.out.println("string1 == string3 is true." +
                         " string1 and string3 point to the same string");
    } else {
      System.out.println("string1 == string3 is false." +
                  " string1 and string3 do not point to the same string");
    }
  }
MatchStrings.java
You have created two scenarios in this example. In the first, the variables string1 and string3 refer to separate String objects that happen to encapsulate identical strings. In the second, they both reference the same String object. The program produces the following output:
Test 1
string3 is now: Too many cooks
string1 is now: Too many cooks
string1 == string3 is false. string1 and string3 do not point to the same string

Test 2
string3 is now: Too many cooks
string1 is now: Too many cooks
string1 == string3 is true. string1 and string3 point to the same string
How It Works
The three variables string1, string2, and string3 are initialized with the string literals you see. After executing the assignment statement, the string referenced by string1 is identical to that referenced by string3, but as you see from the output, the comparison for equality in the if statement returns false because the variables refer to two separate strings. Note that if you were to just initialize string1 and string3 with the same string literal, "Too many cooks", only one String object would be created, which both variables would reference. This would result in both comparisons being true.
Next you change the value of string3 so that it refers to the same string as string1. The output demonstrates that the if expression has the value true, and that the string1 and string3 objects do indeed refer to the same string. This clearly shows that the comparison is not between the strings themselves, but between the references to the strings. So how do you compare the strings?
Comparing Strings for Equality
To compare two String variables, that is, to decide whether the strings they reference are equal or not, you must use the equals() method, which is defined for objects of type String . For example, to compare the String objects referenced by the variables string1 and string3 you could write the following statement:
if(string1.equals(string3)) {
      System.out.println("string1.equals(string3) is true." +
                                 " so strings are equal.");
}
This calls the equals() method for the String object referenced by string1 and passes string3 as the argument. The equals() method does a case-sensitive comparison of corresponding characters in the strings and returns true if the strings are equal and false otherwise. Two strings are equal if they are the same length, that is, have the same number of characters, and each character in one string is identical to the corresponding character in the other.
Of course, you could also use the equals() method for the string referenced by string3 to do the comparison:
if(string3.equals(string1)) {
      System.out.println("string3.equals(string1) is true." +
                                 " so strings are equal.");
}
This is just as effective as the previous version.
To check for equality between two strings ignoring the case of the string characters, you use the method equalsIgnoreCase(). Let’s put these methods in the context of an example to see them working.
TRY IT OUT: String Identity
Make the following changes to the MatchStrings.java file of the previous example:
public class MatchStrings2 {
  public static void main(String[] args) {

    String string1 = "Too many ";
    String string2 = "cooks";
    String string3 = "Too many cooks";

    // Make string1 and string3 refer to separate strings that are identical
    string1 += string2;

    // Display the contents of the strings
    System.out.println("Test 1");
    System.out.println("string3 is now: " + string3);
    System.out.println("string1 is now: " + string1);

    if(string1.equals(string3)) {                // Now test for equality
      System.out.println("string1.equals(string3) is true." +
                                 " so strings are equal.");
    } else {
      System.out.println("string1.equals(string3) is false." +
                          " so strings are not equal.");
    }

    // Now make string1 and string3 refer to strings differing in case
    string3 = "TOO many cooks";
    // Display the contents of the strings
    System.out.println("
Test 2");
    System.out.println("string3 is now: " + string3);
    System.out.println("string1 is now: " + string1);

    if(string1.equals(string3)) {                // Compare for equality
      System.out.println("string1.equals(string3) is true " +
                                 " so strings are equal.");
    } else {
      System.out.println("string1.equals(string3) is false" +
                                 " so strings are not equal.");
    }

    if(string1.equalsIgnoreCase(string3)) {      // Compare, ignoring case
      System.out.println("string1.equalsIgnoreCase(string3) is true" +
                                 " so strings are equal ignoring case.");
    } else {
      System.out.println("string1.equalsIgnoreCase(string3) is false" +
                                 " so strings are different.");
    }
  }
}
MatchStrings2.java
Of course, if you don’t want to create another source file, leave the class name as it was before, as MatchStrings. If you run this example, you should get the following output:
Test 1
string3 is now: Too many cooks
string1 is now: Too many cooks
string1.equals(string3) is true. so strings are equal.

Test 2
string3 is now: TOO many cooks
string1 is now: Too many cooks
string1.equals(string3) is false so strings are not equal.
string1.equalsIgnoreCase(string3) is true so strings are equal ignoring case.
How It Works
In the if expression, you’ve called the equals() method for the object string1 to test for equality with string3. This is the syntax you’ve been using to call the method println() in the object out. In general, to call a method belonging to an object, you write the object name, then a period, and then the name of the method. The parentheses following the method name enclose the information to be passed to the method, which is string3 in this case. The general form for calling a method for an object is shown in Figure 4-10.
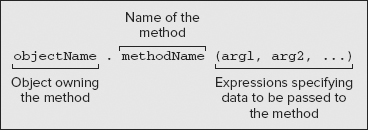
NOTE You learn more about this in Chapter 5, when you look at how to define your own classes. For the moment, just note that you don’t necessarily need to pass any arguments to a method because some methods don’t require any arguments. On the other hand, several arguments can be required. It all depends on how the method was defined in the class.
The equals() method requires one argument that you put between the parentheses. This must be the String object that is to be compared with the original object. As you saw earlier, the method returns true if the string passed to it (string3 in the example) is identical to the string pointed to by the String object that owns the method; in this case, string1. As you also saw in the previous section, you could just as well call the equals() method for the object string3, and pass string1 as the argument to compare the two strings. In this case, the expression to call the method would be
string3.equals(string1)
and you would get exactly the same result.
The statements in the program code after outputting the values of string3 and string1 are:
    if(string1.equals(string3)) {                // Now test for equality
      System.out.println("string1.equals(string3) is true." +
                                 " so strings are equal.");
    } else {
      System.out.println("string1.equals(string3) is false." +
                          " so strings are not equal.");
    }
The output from this shows that calling the equals() method for string1 with string3 as the argument returns true. After the if statement you make string3 reference a new string. You then compare the values of string1 and string3 once more, and, of course, the result of the comparison is now false.
Finally, you compare string1 with string3 using the equalsIgnoreCase() method. Here the result is true because the strings differ only in the case of the first three characters.
String Interning
Having convinced you of the necessity for using the equals method for comparing strings, I can now reveal that there is a way to make comparing strings with the == operator effective. The mechanism to make this possible is called string interning. String interning ensures that no two String objects encapsulate the same string, so all String objects encapsulate unique strings. This means that if two String variables reference strings that are identical, the references must be identical, too. To put it another way, if two String variables contain references that are not equal, they must refer to strings that are different. So how do you arrange that all String objects encapsulate unique strings? You just call the intern() method for every new String object that you create. To show how this works, I can amend a bit of an earlier example:
    String string1 = "Too many ";
    String string2 = "cooks";
    String string3 = "Too many cooks";

   // Make string1 and string3 refer to separate strings that are identical
   string1 += string2;
   string1 = string1.intern();           // Intern string1
The intern() method checks the string referenced by string1 against all the String objects currently in existence. If it already exists, the current object is discarded, and string1 contains a reference to the existing object encapsulating the same string. As a result, the expression string1 == string3 evaluates to true, whereas without the call to intern() it evaluated to false.
All string constants and constant String expressions are automatically interned. That’s why string1 and string3 would reference the same object if you were to use the same initializing string literal. Suppose you add another variable to the previous code fragment:
String string4 = "Too " + "many ";
The reference stored in string4 is automatically the same as the reference stored in string1. Only String expressions involving variables need to be interned explicitly by calling intern(). You could have written the statement that created the combined string to be stored in string1 with this statement:
string1 = (string1 + string2).intern();
This now interns the result of the expression (string1 + string2), ensuring that the reference stored in string1 is unique.
String interning has two benefits. First, it reduces the amount of memory required for storing String objects in your program. If your program generates a lot of duplicate strings then this is significant. Second, it allows the use of == instead of the equals() method when you want to compare strings for equality. Because the == operator just compares two references, it is much faster than the equals() method, which involves a sequence of character-by-character comparisons. This implies that you may make your program run much faster, but only in certain cases. Keep in mind that the intern() method has to use the equals() method to determine whether a string already exists. More than that, it compares the current string against a succession of, and possibly all, existing strings in order to determine whether the current string is unique. Realistically, you should stick to using the equals() method in the majority of situations and use interning only when you are sure that the benefits outweigh the cost.
WARNING If you use string interning, you must remember to ALWAYS intern your strings. Otherwise the == operator will not work properly.
Checking the Start and End of a String
It can be useful to be able to check just part of a string. You can test whether a string starts with a particular character sequence by using the startsWith() method for the String object. The argument to the method is the string that you want to look for at the beginning of the string. The argument string can be of any length, but if it’s longer than the original string you are testing, it will always return false. If string1 has been defined as "Too many cooks", the expression string1.startsWith("Too") has the value true. So would the expression string1.startsWith("Too man"). Here’s an example of using this method:
String string1 = "Too many cooks";
if(string1.startsWith("Too")) {
  System.out.println("The string does start with "Too" too!");
}
The comparison is case-sensitive so the expression string1.startsWith("tOO") results in the value false.
A complementary method endsWith() checks for what appears at the end of a string, so the expression string1.endsWith("cooks") has the value true. The test is case-sensitive here, too.
Sequencing Strings
You’ll often want to place strings in order — for example, when you have a collection of names. Testing for equality doesn’t help because to sort strings you need to be able to determine whether one string is greater than or less than another. What you need is the compareTo() method in the String class. This method compares the String object for which it is called with the String argument you pass to it and returns an integer that is negative if the String object is less than the argument that you passed, zero if the String object is equal to the argument, and positive if the String object is greater than the argument. Of course, sorting strings requires a clear definition of what the terms less than, equal to, and greater than mean when applied to strings, so I explain that first.
The compareTo() method compares two strings by comparing successive corresponding characters, starting with the first character in each string. The process continues until either corresponding characters are found to be different, or the last character in one or both strings is reached. Characters are compared by comparing their Unicode representations — so two characters are equal if the numeric values of their Unicode representations are equal. One character is greater than another if the numerical value of its Unicode representation is greater than that of the other. A character is less than another if its Unicode code is less than that of the other.
One string is greater than another if the first character that differs from the corresponding character in the other string is greater than the corresponding character in the other string. So if string1 has the value "mad dog", and string2 has the value "mad cat", then the expression
string1.compareTo(string2)
returns a positive value as a result of comparing the fifth characters in the strings: the 'd' in string1 with the 'c' in string2.
What if the corresponding characters in both strings are equal up to the end of the shorter string, but the other string has more characters? In this case the longer string is greater than the shorter string, so "catamaran" is greater than "cat".
One string is less than another string if it has a character less than the corresponding character in the other string, and all the preceding characters are equal. Thus, the following expression returns a negative value:
string2.compareTo(string1)
Two strings are equal if they contain the same number of characters and corresponding characters are identical. In this case the compareTo() method returns 0.
You can exercise the compareTo() method in a simple example.
TRY IT OUT: Ordering Strings
In this example you create three strings that you can compare using the compareTo() method. Enter the following code:
public class SequenceStrings {
  public static void main(String[] args) {

    // Strings to be compared
    String string1 = "A";
    String string2 = "To";
    String string3 = "Z";

    // Strings for use in output
    String string1Out = """ + string1 + """;     // string1 with quotes
    String string2Out = """ + string2 + """;     // string2 with quotes
    String string3Out = """ + string3 + """;     // string3 with quotes

    // Compare string1 with string3
    int result = string1.compareTo(string3);
    if(result < 0) {
      System.out.println(string1Out + " is less than " + string3Out);
    } else if(result > 0) {
        System.out.println(string1Out + " is greater than " + string3Out);
    } else {
        System.out.println(string1Out + " is equal to " + string3Out);
    }

    // Compare string2 with string1
    result = string2.compareTo(string1);
    if(result < 0) {
      System.out.println(string2Out + " is less than " + string1Out);

    } else if(result > 0) {
        System.out.println(string2Out + " is greater than " + string1Out);
    } else {
      System.out.println(string2Out + " is equal to " + string1Out);
    }
  }
}
SequenceStrings.java
The example produces the following output:
"A" is less than "Z"
"To" is greater than "A"
How It Works
You should have no trouble with this example. It declares and initializes three String variables: string1, string2, and string3. You then create three further String variables that correspond to the first three strings with double quote characters at the beginning and the end. This is just to simplify the output statements.
You have an assignment statement that stores the result of comparing string1 with string3:
int result = string1.compareTo(string3);
You can now use the value of result to determine how the strings are ordered:
    if(result < 0) {
      System.out.println(string1Out + " is less than " + string3Out);
    } else if(result > 0) {
        System.out.println(string1Out + " is greater than " + string3Out);
    } else {
        System.out.println(string1Out + " is equal to " + string3Out);
    }
The first if statement determines whether string1 is less than string3. If it is, then a message is displayed. If string1 is not less than string3, then either they are equal or string1 is greater than string3. The else if statement determines which is the case and outputs a message accordingly.
You compare string2 with string1 in the same way.
As with the equals() method, the argument to the compareTo() method can be any expression that results in a String object.
Accessing String Characters
When you are processing strings, sooner or later you need to access individual characters in a String object. To refer to a character at a particular position in a string you use an index of type int that is the offset of the character position from the beginning of the string.
This is exactly the same principle you used for referencing an array element. The first character in a string is at position 0, the second is at position 1, the third is at position 2, and so on. However, although the principle is the same, the practice is not. You can’t use square brackets to access characters in a string — you must use a method.
Extracting String Characters
You extract a character from a String object by using the charAt() method. This accepts an integer argument that is the offset of the character position from the beginning of the string — in other words, an index. If you attempt to use an index that is less than 0 or greater than the index for the last position in the string, you cause an exception to be thrown, which causes your program to be terminated. I discuss exactly what exceptions are, and how you should deal with them, in Chapter 7. For the moment, just note that the specific type of exception thrown in this case is called IndexOutOfBoundsException. Its name is rather a mouthful, but quite explanatory.
To avoid unnecessary errors of this kind, you obviously need to be able to determine the length of a String object. To obtain the length of a string, you just need to call its length() method. Note the difference between this and the way you got the length of an array. Here you are calling a method, length(), for a String object, whereas with an array you were accessing a data member, length. You can explore the use of the charAt() and length() methods in the String class with another example.
TRY IT OUT: Getting at Characters in a String
In the following code, the soliloquy is analyzed character-by-character to determine the vowels, spaces, and letters that appear in it:
public class StringCharacters {
  public static void main(String[] args) {
    // Text string to be analyzed
    String text = "To be or not to be, that is the question;"
                 +"Whether 'tis nobler in the mind to suffer"
                 +" the slings and arrows of outrageous fortune,"
                 +" or to take arms against a sea of troubles,"
                 +" and by opposing end them?";
    int spaces  = 0,                                 // Count of spaces
        vowels  = 0,                                 // Count of vowels
        letters = 0;                                 // Count of letters

    // Analyze all the characters in the string
    int textLength = text.length();                  // Get string length

    for(int i = 0; i < textLength; ++i) {
      // Check for vowels
      char ch = Character.toLowerCase(text.charAt(i));
      if(ch == 'a' || ch == 'e' || ch == 'i' || ch == 'o' || ch == 'u') {
        vowels++;
      }

      //Check for letters
      if(Character.isLetter(ch)) {
        letters++;
      }

      // Check for spaces
      if(Character.isWhitespace(ch)) {
        spaces++;
      }
    }

    System.out.println("The text contained vowels:     " + vowels + "
" +
                       "                   consonants: " + (letters-vowels) + "
"+
                       "                   spaces:     " + spaces);
  }
StringCharacters.java
Running the example, you see the following output:
The text contained vowels:     60
                   consonants: 93
                   spaces:     37
How It Works
The String variable text is initialized with the quotation you see. All the counting of letter characters is done in the for loop, which is controlled by the index i. The loop continues as long as i is less than the length of the string, which is returned by the method text.length() and which you saved in the variable textLength.
Starting with the first character, which has the index value 0, you retrieve each character from the string by calling its charAt() method. You use the loop index i as the index to the character position string. The method returns the character at index position i as a value of type char, and you convert this to lowercase, where necessary, by calling the static method toLowerCase() in the class Character. The character to be converted is passed as an argument, and the method returns either the original character or, if it is uppercase, the lowercase equivalent. This enables you to deal with all the characters in the string as if they were lowercase.
There is an alternative to using the toLowerCase() method in the Character class. The String class also contains a toLowerCase() method that converts a whole string to lowercase and returns a reference to the converted string. You could convert the string text to lowercase with the following statement:
text = text.toLowerCase(); // Convert string to lower case
This statement replaces the original string with the lowercase equivalent. If you want to retain the original, you can store the reference to the lowercase string in another variable of type String. The String class also defines the toUpperCase() method for converting a string to uppercase, which you use in the same way as the toLowerCase() method.
The if expression checks for any of the vowels by ORing the comparisons with the five vowels together. If the expression is true, you increment the vowels count. To check for a letter of any kind you use the isLetter() method in the Character class, and accumulate the total letter count in the variable letters. This enables you to calculate the number of consonants by subtracting the number of vowels from the total number of letters.
Finally, the loop code checks for a space by using the isWhitespace() method in the class Character. This method returns true if the character passed as an argument is a Unicode whitespace character. As well as spaces, whitespace in Unicode also includes horizontal and vertical tab, newline, carriage return, and form-feed characters. If you just wanted to count the spaces in the text, you could explicitly compare for a space character. After the for loop ends, you just output the results.
Searching Strings for Characters
There are two methods available to you in the String class that search a string: indexOf() and lastIndexOf(). Each of these comes in four different flavors to provide a range of search possibilities. The basic choice is whether you want to search for a single character or for a substring, so let’s look first at the options for searching a string for a given character.
To search a string text for a single character, 'a' for example, you could write:
int index = 0;                         // Position of character in the string
index = text.indexOf('a'),             // Find first index position containing 'a'
The method indexOf()searches the contents of the string text forward from the beginning and return the index position of the first occurrence of 'a'. If 'a' is not found, the method returns the value −1.
NOTE This is characteristic of both search methods in the class String. They always return either the index position of what is sought or −1 if the search objective is not found. It is important that you check the index value returned for −1 before you use it to index a string; otherwise, you get an error when you don’t find what you are looking for.
If you wanted to find the last occurrence of 'a' in the String variable text, you just use the method lastIndexOf():
index = text.lastIndexOf('a'), // Find last index position containing 'a'
The method searches the string backward, starting with the last character in the string. The variable index therefore contains the index position of the last occurrence of 'a', or −1 if it is not found.
You can now find the first and last occurrences of a character in a string, but what about the ones in the middle? Well, there’s a variation of each of the preceding methods that has a second argument to specify a “from position” from which to start the search. To search forward from a given position, startIndex, you would write:
index = text.indexOf('a', startIndex);
This version of the method indexOf() searches the string for the character specified by the first argument starting with the position specified by the second argument. You could use this to find the first 'b' that comes after the first 'a' in a string with the following statements:
int aIndex = -1;                                 // Position of 1st 'a'
int bIndex = -1;                                 // Position of 1st 'b' after 'a'
aIndex = text.indexOf('a'),                      // Find first 'a'
if(aIndex >= 0) {                                // Make sure you found 'a'
   bIndex = text.indexOf('b', aIndex+1);         // Find 1st 'b' after 1st 'a'
}
After you have the index value from the initial search for 'a', you need to check that 'a' was really found by verifying that aIndex is not negative. You can then search for 'b' from the position following 'a'. As you can see, the second argument of this version of the method indexOf() is separated from the first argument by a comma. Because the second argument is the index position from which the search is to start, and aIndex is the position at which 'a' was found, you should increment aIndex to the position following 'a' before using it in the search for 'b' to avoid checking for 'b' in the position you already know contains 'a'.
If 'a' happened to be the last character in the string, it wouldn’t matter because the indexOf() method just returns −1 if the index value is beyond the last character in the string. If you somehow supplied a negative index value to the method, it simply searches the whole string from the beginning.
Of course, you could use the indexOf() method to count how many times a particular character occurred in a string:
int aIndex = -1;                                 // Search start position
int count = 0;                                   // Count of 'a' occurrences
while((aIndex = text.indexOf('a', ++aIndex)) > -1) {
  ++count;
}
The while loop condition expression calls the indexOf() method for the String object referenced by text and stores the result in the variable aIndex. If the value stored is greater than -1, it means that 'a' was found, so the loop body executes and count is incremented. Because aIndex has -1 as its initial value, the search starts from index position 0 in the string, which is precisely what you want. When a search reaches the end of the string without finding 'a', -1 is returned by the indexOf() method and the loop ends.
Searching for Substrings
The indexOf() and lastIndexOf() methods also come in versions that accept a string as the first argument, which searches for this string rather than a single character. In all other respects they work in the same way as the character searching methods you have just seen. I summarize the complete set of indexOf() methods in Table 4-2.
TABLE 4-2: IndexOf () Methods
| METHOD | DESCRIPTION |
| indexOf(int ch) | Returns the index position of the first occurrence of the character ch in the String for which the method is called. If the character ch does not occur, −1 is returned. |
| indexOf(int ch, int index) |
Same as the preceding method, but with the search starting at position index in the string. If the value of index is less than or equal to 0, the entire string is searched. If index is greater than or equal to the length of the string, −1 is returned. |
| indexOf(String str) | Returns the index position of the first occurrence of the substring str in the String object for which the method is called. If the substring str does not occur, −1 is returned. |
| indexOf(String str, int index) |
Same as the preceding method, but with the search starting at position index in the string. If the value of index is less than or equal to 0, the entire string is searched. If index is greater than or equal to the length of the string, −1 is returned. |
The four flavors of the lastIndexOf() method have the same parameters as the four versions of the indexOf() method. The last occurrence of the character or substring that is sought is returned by the lastIndexOf() method. Also because the search is from the end of the string, if index is less than 0, −1 is returned, and if index is greater than or equal to the length of the string, the entire string is searched.
The startsWith() method that I mentioned earlier in the chapter also comes in a version that accepts an additional argument that is an offset from the beginning of the string being checked. The check for the matching character sequence then begins at that offset position. If you have defined a string as
String string1 = "The Ides of March";
then the expression string1.startsWith("Ides", 4) has the value true.
I can show the indexOf() and lastIndexOf() methods at work with substrings in an example.
TRY IT OUT: Exciting Concordance Entries
You’ll use the indexOf() method to search the quotation you used in the last “Try It Out” example for "and" and the lastIndexOf() method to search for "the".
public class FindCharacters {
  public static void main(String[] args) {
    // Text string to be analyzed
    String text = "To be or not to be, that is the question;"
                + " Whether 'tis nobler in the mind to suffer"
                + " the slings and arrows of outrageous fortune,"
                + " or to take arms against a sea of troubles,"
                + " and by opposing end them?";

    int andCount = 0;                  // Number of and's
    int theCount = 0;                  // Number of the's

    int index = -1;                    // Current index position

    String andStr = "and";             // Search substring
    String theStr = "the";             // Search substring

    // Search forwards for "and"
    index = text.indexOf(andStr);      // Find first 'and'
    while(index >= 0) {
      ++andCount;
      index += andStr.length();        // Step to position after last 'and'
      index = text.indexOf(andStr, index);
    }

    // Search backwards for "the"
    index = text.lastIndexOf(theStr);  // Find last 'the'
    while(index >= 0) {
      ++theCount;
      index -= theStr.length();        // Step to position before last 'the'
      index = text.lastIndexOf(theStr, index);
    }
    System.out.println("The text contains " + andCount + " ands
"
                     + "The text contains " + theCount + " thes");
  }
FindCharacters.java
The program produces the following output:
The text contains 2 ands
The text contains 5 thes
NOTE If you were expecting the "the" count to be 3, note that there is one instance in "whether" and another in "them". If you want to find three, you need to refine your program to eliminate such pseudo-occurrences by checking the characters on either side of the "the" substring.
How It Works
You define the String variable, text, as before, and set up two counters, andCount and theCount, for the two words. The variable index keeps track of the current position in the string. You then have String variables andStr and theStr holding the substrings you will be searching for.
To find the instances of "and", you first find the index position of the first occurrence of "and" in the string text. If this index is negative, text does not contain "and", and the while loop does not execute, as the condition is false on the first iteration. Assuming there is at least one "and", the while loop block executes and andCount is incremented for the instance of "and" you have just found. The indexOf() method returns the index position of the first character of the substring, so you have to move the index forward to the character following the last character of the substring you have just found. This is done by adding the length of the substring, as shown in Figure 4-11.
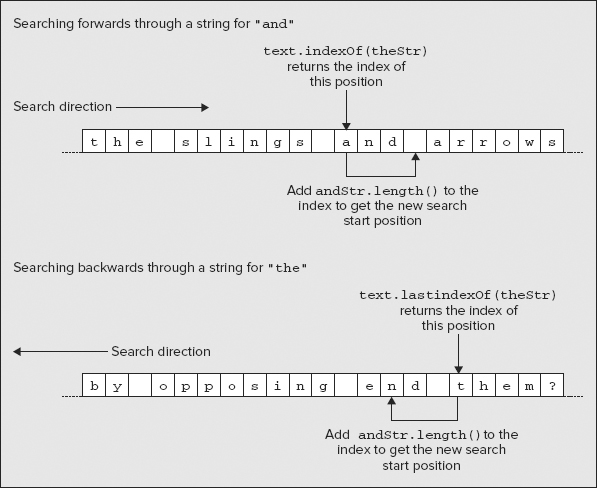
You are then able to search for the next occurrence of the substring by passing the new value of index to the indexOf() method. The loop continues as long as the index value returned is not −1.
To count the occurrences of the substring "the" the program searches the string text backward by using the method lastIndexOf() instead of indexOf(). This works in much the same way, the only significant difference being that you decrement the value of index, instead of incrementing it. This is because the next occurrence of the substring has to be at least that many characters back from the first character of the substring you have just found. If the string "the" happens to occur at the beginning of the string you are searching, the lastIndexOf() method is called with a negative value for index. This does not cause any problem — it just results in −1 being returned in any event.
Extracting Substrings
The String class includes the substring() method, which extracts a substring from a string. There are two versions of this method. The first version extracts a substring consisting of all the characters from a given index position up to the end of the string. This works as illustrated in the following code fragment:
String place = "Palm Springs";
String lastWord = place.substring(5);
After executing these statements, lastWord contains the string "Springs", which corresponds to the substring starting at index position 5 in place through to the end of the string. The method copies the substring from the original to form a new String object. This version of the method is useful when a string has basically two constituent substrings, but a more common requirement is to be able to extract several substrings from a string in which each substring is separated from the next by a particular delimiter character such as a comma, a slash, or even just a space. The second version of substring() helps with this.
The second version of the substring() method enables you to extract a substring from a string by specifying the index positions of the first character in the substring and one beyond the last character of the substring as arguments to the method. With the variable place being defined as before, the following statement results in the variable segment being set to the string "ring":
String segment = place.substring(7, 11);
NOTE With either version of the substring() method, an exception is thrown if you specify an index that is outside the bounds of the string. As with the charAt() method, the substring() method throws IndexOutOfBoundsException if the index value is not valid.
You can see how substring() works with a more substantial example.
TRY IT OUT: Word for Word
You can use the indexOf() method in combination with the substring() method to extract a sequence of substrings that are separated by spaces in a single string:
public class ExtractSubstrings {
  public static void main(String[] args) {
    String text = "To be or not to be";          // String to be segmented
    int count = 0;                               // Number of substrings
    char separator = ' ';                        // Substring separator

    // Determine the number of substrings
    int index = 0;
    do {
      ++count;                                   // Increment substrings count
      ++index;                                   // Move past last position
      index = text.indexOf(separator, index);
    } while (index != -1);

    // Extract the substring into an array
    String[] subStr = new String[count];         // Allocate for substrings
    index = 0;                                   // Substring start index
    int endIndex = 0;                            // Substring end index
    for(int i = 0; i < count; ++i) {
      endIndex = text.indexOf(separator,index);  // Find next separator

      if(endIndex == -1) {                       // If it is not found
        subStr[i] = text.substring(index);       // extract to the end
      } else {                                         // otherwise
        subStr[i] = text.substring(index, endIndex);   // to end index
      }

      index = endIndex + 1;                      // Set start for next cycle
    }

    // Display the substrings
    for(String s : subStr) {                     // For each string in subStr
      System.out.println(s);                     // display it
    }
  }
ExtractSubstrings.java
When you run this example, you should get the following output:
To
be
or
not
to
be
How It Works
After setting up the string text to be segmented into substrings, a count variable to hold the number of substrings, and the separator character, separator, the program has three distinct phases:
1. The first phase counts the number of substrings by using the indexOf() method to find separators. The number of separators is always one less than the number of substrings. By using the do-while loop, you ensure that the value of count is one more than the number of separators because there is always one loop iteration for when the separator is not found.
2. The second phase extracts the substrings in sequence from the beginning of the string and stores them in an array of String variables that has count elements. A separator follows each substring from the first to the penultimate so you use the version of the substring() method that accepts two index arguments for these. The last substring is signaled by a failure to find the separator character when endIndex is −1. In this case you use the substring() method with a single argument to extract the substring through to the end of the string text.
3. The third phase simply outputs the contents of the array by displaying each element in turn, using a collection-based for loop. The String variable, s, defined in the loop references each string in the array in turn. You display each string by passing s as the argument to the println() method.
What you have been doing here is breaking a string up into tokens — substrings in other words — that are separated by delimiters — characters that separate one token from the next. This is such a sufficiently frequent requirement that Java provides you with an easier way to do this — using the split() method in the String class.
Tokenizing a String
The split() method in the String class is specifically for splitting a string into tokens. It does this in a single step, returning all the tokens from a string as an array of String objects. To do this it makes use of a facility called regular expressions, which I discuss in detail in Chapter 15. However, you can still make use of the split() method without knowing about how regular expressions work, so I ignore this aspect here. Just keep the split() method in mind when you get to Chapter 15.
The split() method expects two arguments. The first is a String object that specifies a pattern for a delimiter. Any delimiter that matches the pattern is assumed to be a separator for a token. Here I talk only about patterns that are simply a set of possible delimiter characters in the string. You see in Chapter 15 that the pattern can be much more sophisticated than this. The second argument to the split() method is an integer value that is a count of the maximum number of times the pattern can be applied to find tokens and, therefore, affects the maximum number of tokens that can be found. If you specify the second argument as zero, the pattern is applied as many times as possible and any trailing empty tokens discarded. This can arise if several delimiters at the end of the string are being analyzed. If you specify the limit as a negative integer, the pattern is also applied as many times as possible, but trailing empty tokens are retained and returned. As I said earlier, the tokens found by the method are returned in an array of type String[].
The key to tokenizing a string is providing the appropriate pattern defining the set of possible delimiters. At its simplest, a pattern can be a string containing a sequence of characters, each of which is a delimiter. You must specify the set of delimiters in the string between square brackets. This is necessary to distinguish a simple set of delimiter characters from more complex patterns. Examples are the string "[abc]" defining 'a', 'b', and 'c' as delimiters, or "[, .:;]" specifying a comma, a period, a space, a colon, or a semicolon as delimiters. There are many more powerful ways of defining a pattern, but I defer discussing that until Chapter 15.
To see how the split() method works, consider the following code fragment:
String text = "to be or not to be, that is the question.";
String[] words = text.split("[, .]", 0);  // Delimiters are comma, space, or period
The first statement defines the string to be analyzed and split into tokens. The second statement calls the split() method for the text object to tokenize the string. The first argument to the method specifies a comma, a space, or a period as possible delimiters. The second argument specifies the limit on the number of applications of the delimiter pattern as zero, so it is applied as many times as necessary to tokenize the entire string. The split() method returns a reference to an array of strings that are stored in the words variable. In case you hadn’t noticed, these two lines of code do the same thing as most of the code in main() in the previous working example!
Another version of the split() method requires a single argument of type String specifying the pattern. This is equivalent to using the version with two arguments, where the second argument is zero, so you could write the second statement in the previous code fragment as:
String[] words = text.split("[, .]"); // Delimiters are comma, space, or period
This produces exactly the same result as when you specify the second argument as 0. Now, it’s time to explore the behavior of the split() method in an example.
TRY IT OUT: Using a Tokenizer
Here you split a string completely into tokens with alternative explicit values for the second argument to the split() method to show the effect:
public class StringTokenizing {
  public static void main(String[] args) {
    String text = "To be or not to be, that is the question."; // String to segment
    String delimiters = "[, .]";     // Delimiters are comma, space, and period
    int[] limits = {0, -1};          // Limit values to try

    // Analyze the string
    for(int limit : limits) {
      System.out.println("
Analysis with limit = " + limit);
      String[] tokens = text.split(delimiters, limit);
      System.out.println("Number of tokens: " + tokens.length);
      for(String token : tokens) {
        System.out.println(token);
      }
    }
  }
StringTokenizing.java
The program generates two blocks of output. The first block of output corresponding to a limit value of 0 is:
Analysis with limit = 0
Number of tokens: 11
To
be
or
not
to
be

that
is
the
question
The second block of output corresponding to a limit value of −1 is:
Analysis with limit = -1
Number of tokens: 12
To
be
or
not
to
be

that
is
the
question
In this second case, you have an extra empty line at the end.
How It Works
The string identifying the possible delimiters for tokens in the text is defined by the statement:
String delimiters = "[, .]"; // Delimiters are comma, space, and period
The characters between the square brackets are the delimiters, so here you have specified that comma, space, and period are delimiters. If you want to include other characters as delimiters, just add them between the square brackets. For example, the string "[, .:;!?]" adds a colon, a semicolon, an exclamation point, and a question mark to the original set.
You also have an array of values for the second argument to the split() method call:
int[] limits = {0, -1}; // Limit values to try
I included only two initial values for array elements to keep the amount of output in the book at a minimum, but you should try a few extra values.
The outer collection-based for loop iterates over the limit values in the limits array. The limit variable is assigned the value of each element in the limits array in turn. The same string is split into tokens on each iteration, with the current limit value as the second argument to the split() method. You display the number of tokens produced by the split() method by outputting the length of the array that it returns. You then output the contents of the array that the split() method returns in the nested collection-based for loop. The loop variable, token, references each string in the tokens array in turn.
If you look at the first block of output, you see that an array of 11 tokens was returned by the split() method. The text being analyzed contains 10 words, and the extra token arises because there are two successive delimiters, a comma followed by a space, in the middle of the string, which causes an empty token to be produced. It is possible to make the split() method recognize a comma followed (or preceded) by one or more spaces as a single delimiter, but you will have to wait until Chapter 15 to find out how it’s done.
The second block of output has 12 tokens. This is because there is an extra empty token at the end of the list of tokens that is eliminated when the second argument to the split() method is 0. The extra token is there because the end of the string is always a delimiter, so the period followed by the end of the string identifies an empty token.
Modified Versions of String Objects
You can use a couple of methods to create a new String object that is a modified version of an existing String object. These methods don’t change the original string, of course — as I said, String objects are immutable.
To replace one specific character with another throughout a string, you can use the replace() method. For example, to replace each space in the string text with a slash, you can write:
String newText = text.replace(' ', '/'), // Modify the string text
The first argument of the replace() method specifies the character to be replaced, and the second argument specifies the character that is to be substituted in its place. I have stored the result in a new variable newText here, but you can save it back in the original String variable, text, if you want to effectively replace the original string with the new modified version.
To remove whitespace from the beginning and end of a string (but not the interior) you can use the trim() method. You can apply this to a string as follows:
String sample = "   This is a string   ";
String result = sample.trim();
After these statements execute, the String variable result contains the string "This is a string". This can be useful when you are segmenting a string into substrings and the substrings may contain leading or trailing blanks. For example, this might arise if you were analyzing an input string that contained values separated by one or more spaces.
Creating Character Arrays from String Objects
You can create an array of variables of type char from a String object by using the toCharArray() method that is defined in the String class. Because this method creates an array of type char[] and returns a reference to it, you only need to declare the array variable of type char[] to hold the array reference — you don’t need to allocate the array. For example:
String text = "To be or not to be";
char[] textArray = text.toCharArray();      // Create the array from the string
The toCharArray() method returns an array containing the characters of the String variable text, one per element, so textArray[0] contain 'T', textArray[1] contains 'o', textArray[2] contain ' ', and so on.
You can also extract a substring as an array of characters using the method getChars(), but in this case you do need to create an array that is large enough to hold the characters and pass it as an argument to the method. Of course, you can reuse a single array to store characters when you want to extract and process a succession of substrings one at a time and thus avoid having to repeatedly create new arrays. Of necessity, the array you are using must be large enough to accommodate the longest substring. The method getChars() expects four arguments. In sequence, these are:
- The index position of the first character to be extracted from the string (type int)
- The index position following the last character to be extracted from the string (type int)
- The name of the array to hold the characters extracted (type char[])
- The index of the array element to hold the first character (type int)
You could copy a substring from text into an array with the following statements:
String text = "To be or not to be";
char[] textArray = new char[3];
text.getChars(9, 12, textArray, 0);
This copies characters from text at index positions 9 to 11 inclusive, so textArray[0] is 'n', textArray[1] is 'o', and textArray[2] is 't'.
Using the Collection-Based for Loop with a String
You can’t use a String object directly as the source of values for a collection-based for loop, but you have seen already that you can use an array. The toCharArray() method therefore provides you with a way to iterate over the characters in a string using a collection-based for loop. Here’s an example:
String phrase = "The quick brown fox jumped over the lazy dog.";
int vowels = 0;
for(char ch : phrase.toCharArray()) {
  ch = Character.toLowerCase(ch);
  if(ch == 'a' || ch == 'e' || ch == 'i' || ch == 'o' || ch == 'u') {
    ++vowels;
  }
}
System.out.println("The phrase contains " + vowels + " vowels.");
This fragment calculates the number of vowels in the String phrase by iterating over the array of type char[] that the toCharArray() method for the string returns. The result of passing the value of the loop variable ch to the static toLowerCase() method in the Character class is stored back in ch. Of course, you could also use a numerical for loop to iterate over the element’s characters in the string directly using the charAt() method.
Obtaining the Characters in a String as an Array of Bytes
You can extract characters from a string into a byte[] array using the getBytes() method in the class String. This converts the original string characters into the character encoding used by the underlying operating system — which is usually ASCII. For example:
String text = "To be or not to be";         // Define a string
byte[] textArray = text.getBytes();         // Get equivalent byte array
The byte array textArray contains the same characters as in the String object, but stored as 8-bit characters. The conversion of characters from Unicode to 8-bit bytes is in accordance with the default encoding for your system. This typically means that the upper byte of the Unicode character is discarded, resulting in the ASCII equivalent. Of course, it is quite possible that a string may contain Unicode characters that cannot be represented in the character encoding in effect on the local machine. In this case, the effect of the getBytes() method is unspecified.
Creating String Objects from Character Arrays
The String class also has a static method, copyValueOf(), to create a String object from an array of type char[].Recall that you can use a static method of a class even if no objects of the class exist.
Suppose you have an array defined as follows:
char[] textArray = {'T', 'o', ' ', 'b', 'e', ' ', 'o', 'r', ' ',
                    'n', 'o', 't', ' ', 't', 'o', ' ', 'b', 'e' };
You can create a String object encapsulating these characters as a string with the following statement:
String text = String.copyValueOf(textArray);
This results in the object text referencing the string "To be or not to be".
You can achieve the same result like this:
String text = new String(textArray);
This calls a constructor for the String class, which creates a new object of type String that encapsulates a string containing the characters from the array. The String class defines several constructors for defining String objects from various types of arrays. You learn more about constructors in Chapter 5.
Another version of the copyValueOf() method can create a string from a subset of the array elements. It requires two additional arguments to specify the index of the first character in the array to be extracted and the count of the number of characters to be extracted. With the array defined as previously, the statement
String text = String.copyValueOf(textArray, 9, 3);
extracts three characters starting with textArray[9], so text contains the string "not" after this operation.
There’s a class constructor that does the same thing:
String text = new String(textArray, 9, 3);
The arguments are the same here as for the copyValueOf() method, and the result is the same.
String objects cannot be changed, but you have been creating strings that are combinations and modifications of existing String objects, so how is this done? Java has two other standard classes that encapsulate strings, the StringBuffer class and the StringBuilder class, and both StringBuffer and StringBuilder objects can be altered directly. Strings that can be changed are referred to as mutable strings, in contrast to String objects that are immutable strings. Java uses objects of the StringBuffer class type internally to perform many of the operations that involve combining String objects. After the required string has been formed as a StringBuffer object, it is then converted to an object of type String.
You have the choice of using either a StringBuffer object or a StringBuilder object whenever you need a string that you can change directly, so what’s the difference? In terms of the operations these two classes provide, there is no difference, but StringBuffer objects are safe for use by multiple threads, whereas StringBuilder objects are not. You learn about threads in Chapter 16, but in case you’re not familiar with the term, threads are just independent execution processes within a program that can execute concurrently. For example, an application that involves acquiring data from several remote sites could implement the data transfer from each remote site as a separate thread. This would allow these relatively slow operations to execute in parallel, sharing processor time in a manner determined by the operating system. This usually means that the elapsed time for acquiring all the data from the remote sites is much less than if the operations were executed sequentially in a single thread of execution.
Of course, if concurrent threads of execution access the same object, there is potential for problems. Complications can arise when one thread might be accessing an object while another is in the process of modifying it. When this sort of thing is possible in your application, you must use the StringBuffer class to define mutable strings if you want to avoid trouble. The StringBuffer class operations have been coded to prevent errors arising from concurrent access by two or more threads. If you are sure that your mutable strings will be accessed only by a single thread of execution, then you should use StringBuilder objects because operations on these will be faster than with StringBuffer objects.
So when should you use mutable String objects rather than immutable String objects? StringBuffer and StringBuilder objects come into their own when you are transforming strings frequently — adding, deleting, or replacing substrings in a string. Operations are faster and easier using mutable objects. If you have mainly static strings that you occasionally need to concatenate in your application, then String objects are the best choice. Of course, if you want to, you can mix the use of both mutable and immutable in the same program.
As I said, the StringBuilder class provides the same set of operations as the StringBuffer class. I describe mutable string operations in terms of the StringBuffer class for the rest of this chapter because this is always a safe choice, but don’t forget that all the operations that I discuss in the context of StringBuffer are available with the StringBuilder class, which is faster but not thread-safe.
Creating StringBuffer Objects
You can create a StringBuffer object that contains a given string with the following statement:
StringBuffer aString = new StringBuffer("A stitch in time");
This declares a StringBuffer object, aString, and initializes it with the string "A stitch in time". When you are initializing a StringBuffer object, you must use this syntax, with the keyword new, the StringBuffer class name, and the initializing value between parentheses. You cannot just use the string as the initializing value as you did with String objects. This is because there is rather more to a StringBuffer object than just the string that it contains initially, and of course, a string literal is a String object by definition.
You can also create a StringBuffer object using a reference stored in a variable of type String:
String phrase = "Experience is what you get when you're expecting something else.";
StringBuffer buffer = new StringBuffer(phrase);
The StringBuffer object, buffer, contains a string that is the same as that encapsulated by the String object, phrase.
You can just create the StringBuffer variable, in much the same way as you created a String variable:
StringBuffer myString = null;
This variable does not refer to anything until you initialize it with a defined StringBuffer object. For example, you could write:
myString = new StringBuffer("Many a mickle makes a muckle");
This statement creates a new StringBuffer object encapsulating the string "Many a mickle makes a muckle" and stores the reference to this object in myString. You can also initialize a StringBuffer variable with an existing StringBuffer object:
StringBuffer aString = myString;
Both myString and aString now refer to a single StringBuffer object.
The Capacity of a StringBuffer Object
The String objects that you have been using each contain a fixed string, and when you create a String object, memory is allocated to accommodate however many Unicode characters are in the string it encapsulates. Everything is fixed so memory usage is not a problem. A StringBuffer object is a little different. It contains a block of memory called a buffer, which may or may not contain a string, and if it does, the string need not occupy the entire buffer. Thus, the length of a string in a StringBuffer object can be different from the length of the buffer that the object contains. The length of the buffer is referred to as the capacity of the StringBuffer object.
After you have created a StringBuffer object, you can find the length of the string it contains, by using the length() method for the object:
StringBuffer aString = new StringBuffer("A stitch in time");
int theLength = aString.length();
If the object aString were defined as in the preceding declaration, the variable theLength would have the value 16. However, the capacity of the object is larger, as illustrated in Figure 4-12.


When you create a StringBuffer object from an existing string, the capacity is the length of the string plus 16. Both the capacity and the length are in units of Unicode characters, so twice as many bytes are occupied in memory.
The capacity of a StringBuffer object is not fixed, though. It grows automatically as you add to the string to accommodate a string of any length. You can also specify the initial capacity when you create a StringBuffer object. For example, the following statement creates a StringBuffer object with a specific value for the capacity:
StringBuffer newString = new StringBuffer(50);
This creates an object, newString, with the capacity to store 50 characters. If you omit the capacity value in this declaration, the object has a default capacity of 16 characters. Thus, the StringBuffer object that you create here has a buffer with a capacity of 50 characters that is initially empty — no string is stored in it.
A String object is always a fixed string, so capacity is irrelevant — it is always just enough to hold the characters in the string. A StringBuffer object, on the other hand, is a container in which you can store a string of any length, and it has a capacity at any given instant for storing a string up to a given size. Although you can set the capacity, it is unimportant in the sense that it is just a measure of how much memory is available to store Unicode characters at this particular point in time. You can get by without worrying about the capacity of a StringBuffer object at all because the capacity required to cope with what your program is doing is always provided automatically. It just gets increased as necessary.
So why have I mentioned the capacity of a StringBuffer object at all? While it’s true you can use StringBuffer objects ignoring their capacity, the capacity of a StringBuffer object is important in the sense that it affects the amount of overhead involved in storing and modifying a string. If the initial capacity is small, and you store a string that is long, or you add to an existing string significantly, you need to allocate extra memory. Allocating additional memory takes time, and if it occurs frequently, it can add a substantial overhead to the processor time your program needs to complete the task. It is more efficient to make the capacity of a StringBuffer sufficient for the needs of your program.
To find out what the capacity of a StringBuffer object is at any given time, you use the capacity() method for the object:
int theCapacity = aString.capacity();
This method returns the number of Unicode characters the object can currently hold. For aString defined as shown, this is 32. When you create a StringBuffer object containing a string, its capacity is 16 characters greater than the minimum necessary to hold the string.
The ensureCapacity() method enables you to change the default capacity of a StringBuffer object. You specify the minimum capacity you need as the argument to the method. For example:
aString.ensureCapacity(40);
If the current capacity of the aString object is less than 40, this increases the capacity of aString by allocating a new larger buffer, but not necessarily with a capacity of 40. The capacity is the larger of either the value that you specify, 40 in this case, or twice the current capacity plus 2, which is 66, given that aString is defined as before. You might want to do this sort of thing when you are reusing an existing StringBuffer object in a new context where the strings are longer.
Changing the String Length for a StringBuffer Object
You can change the length of the string contained in a StringBuffer object with the method setLength(). Note that the length is a property of the string the object holds, as opposed to the capacity, which is a property of the string buffer. When you increase the length for a StringBuffer object, you are adding characters to the existing string and the extra characters contain 'u0000'. A more common use of this method is to decrease the length, in which case the string is truncated. If aString contains "A stitch in time", the statement
aString.setLength(8);
results in aString containing the string "A stitch", and the value returned by the length() method is 8. The characters that were cut from the end of the string by this operation are lost.
To increase the length to what it was before, you could write:
aString.setLength(16);
Now aString contains the string:
"A stitchu0000u0000u0000u0000u0000u0000u0000u0000"
The setLength() method does not affect the capacity of the object unless you set the length to be greater than the capacity. In this case the capacity is increased to accommodate the new string length to a value that is twice the original capacity plus two if the length you set is less than this value. If you specify a length that is greater than twice the original capacity plus two, the new capacity is the same as the length you set. If the capacity of aString is 66, executing the statement
aString.setLength(100);
sets the capacity of the object, aString, to 134. If you supplied a value for the length of 150, then the new capacity would be 150. You must not specify a negative length here. If you do, IndexOutOfBoundsException is thrown.
Adding to a StringBuffer Object
The append() method enables you to add a string to the end of the existing string stored in a StringBuffer object. This method comes in quite a few flavors, but perhaps the simplest adds the string contained within a String or a StringBuffer object to a StringBuffer object. This works with string literals too.
Suppose you define a StringBuffer object with the following statement:
StringBuffer aString = new StringBuffer("A stitch in time");
You can add to it with the statement:
aString.append(" saves nine");
After this aString contains "A stitch in time saves nine". The length of the string contained in the StringBuffer object is increased by the length of the string that you add. You don’t need to worry about running out of space though. The capacity is always increased automatically whenever necessary to accommodate the longer string.
The append() method returns a reference to the extended StringBuffer object, so you could also assign it to another StringBuffer object. Instead of the previous statement, you could have written:
StringBuffer bString = aString.append(" saves nine");
Now both aString and bString point to the same StringBuffer object.
If you take a look at the operator precedence table in Chapter 2, you see that the '.' operator (sometimes called the member selection operator) that you use to execute a particular method for an object has left-to-right associativity. You can therefore write multiple append operations in a single statement:
StringBuffer proverb = new StringBuffer();                 // Capacity is 16
proverb.append("Many").append(" hands").append(" make").
                      append(" light").append(" work.");
The second statement is executed from left to right, so that the string contained in the object proverb is progressively extended until it contains the complete string. The reference that each call to append() returns is used to call append() again for the same object, proverb.
Appending a Substring
Another version of the append() method adds part of a String or a StringBuffer object to a StringBuffer object. This version of append() requires three arguments: a reference to the String or StringBuffer object from which the substring to be appended is obtained, the index position of the first character in the object for the substring that is to be appended, and the index position of one past the last character to be appended. If you supply null as the first argument, the substring from will be extracted from the string "null".
To illustrate the workings of this, suppose you create a StringBuffer object and a String object with the following statements:
StringBuffer buf = new StringBuffer("Hard ");
String aString = "Waxworks";
You can then append part of the aString object to the buf object with this statement:
buf.append(aString, 3, 7);
This operation is shown in Figure 4-13.
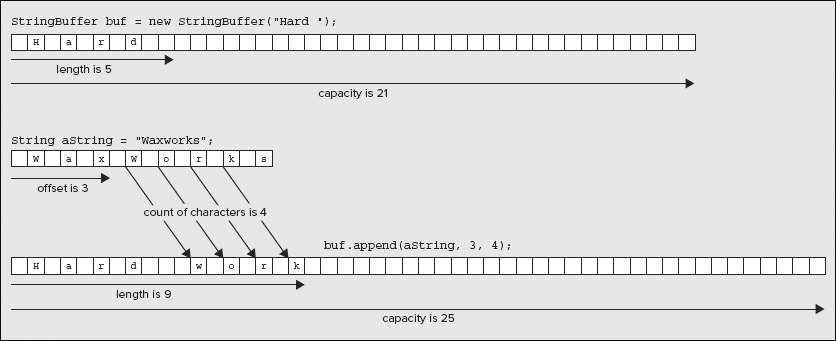
This operation appends the substring of aString that starts at index position 3 and ends at index position 6, inclusive, to the StringBuffer object buf. The object buf then contains the string "Hard work". The capacity of buf would be automatically increased if the resultant’s length exceeds the capacity.
Appending Basic Types
You have a set of versions of the append() method that enable you to append() the string equivalent of values of any of the primitive types to a StringBuffer object. These versions of append()accept arguments of any of the following types: boolean, char, byte, short, int, long, float, or double. In each case, the value is converted to a string equivalent of the value, which is appended to the object, so a boolean variable is appended as either “true” or “false,” and for numeric types the string is a decimal representation of the value. For example
StringBuffer buf = new StringBuffer("The number is ");
long number = 99L;
buf.append(number);
results in buf containing the string "The number is 99".
There is nothing to prevent you from appending constants to a StringBuffer object. For example, if you now execute the statement
buf.append(12.34);
the object buf contains "The number is 9912.34".
There is also a version of the append() method that accepts an array of type char[] as an argument. The contents of the array are appended to the StringBuffer object as a string. A further variation on this enables you to append a subset of the elements from an array of type char[] by using two additional arguments: one to specify the index of the first element to be appended, and another to specify the total number of elements to be appended. An example of how you might use this is as follows:
char[] text = { 'i', 's', ' ', 'e', 'x', 'a', 'c', 't', 'l', 'y'};
buf.append(text, 2, 8);
This appends the string " exactly" to buf, so after executing this statement buf contains "The number is 9912.34 exactly".
You may be somewhat bemused by the plethora of append() method options, so let’s collect all the possibilities together. You can append any of the following types to a StringBuffer object:

In each case the String equivalent of the argument is appended to the string in the StringBuffer object.
I haven’t discussed type Object yet — I included it in the table here for the sake of completeness. You learn about this type of object in Chapter 6.
Finding the Position of a Substring
You can search the buffer of a StringBuffer object for a given substring by calling the indexOf() method or the lastIndexOf() method. The simpler of the two versions of this method requires just one argument, which is the string you are looking for, and the method returns the index position of the last occurrence of the string you are searching for as a value of type int. The method returns −1 if the substring is not found. For example:
StringBuffer phrase = new StringBuffer("one two three four");
int position = phrase.lastIndexOf("three");
The value returned is the index position of the first character of the last occurrence of "three" in phrase, which is 8. Remember, the first character is at index position 0. Of course, if the argument to the lastIndexOf() method was "t", the result would be the same because the method finds the last occurrence of the substring in the buffer.
The second version of the lastIndexOf() method requires an additional argument that specifies the index position in the buffer where the search is to start. For example:
position = phrase.lastIndexOf("three", 8);
This statement searches backward through the string for the first character of the substring starting at index position 8 in phrase, so the last nine characters (index values 9 to 17) in the buffer are not examined. Even through "three" extends beyond index position 8, it will be found by this statement and 8 will be returned. The index constraint is on the search for the first character, not the whole string.
Replacing a Substring in the Buffer
You use the replace() method for a StringBuffer object to replace a contiguous sequence of characters with a given string. The string that you specify as the replacement can contain more characters than the substring being replaced, in which case the string is extended as necessary. The replace() method requires three arguments. The first two are of type int and specify the start index in the buffer and one beyond the end index of the substring to be replaced. The third argument is of type String and is the string to be inserted. Here’s an example of how you might use the replace() method:
StringBuffer phrase = new StringBuffer("one two three four");
String substring = "two";
String replacement = "twenty";

// Find start of last occurrence of "two"
int position = phrase.lastIndexOf(substring);
phrase.replace(position, position+substring.length(), replacement);
The first three statements define the original StringBuffer object, the substring to be replaced, and the string to replace the substring. The next statement uses the lastIndexOf() method to find the position of the first character of the last occurrence of substring in phrase. The last statement uses the replace() method to substitute replacement in place of substring. To get the index value for one beyond the last character of substring, you just add the length of substring to its position index. Because replacement is a string containing more characters than substring, the length of the string in phrase is increased, and the new contents are "one twenty three four".
I have not bothered to insert code to check for the possibility of −1 being returned in the preceding code fragment, but naturally in a real-world context it is essential to do this to avoid the program being terminated when the substring is not present.
Inserting Strings
To insert a string into a StringBuffer object, you use the insert() method of the object. The first argument specifies the index of the position in the object where the first character is to be inserted. For example, if buf contains the string "Many hands make light work", the statement
buf.insert(4, " old");
inserts the string " old" starting at index position 4, so buf contains the string "Many old hands make light work" after executing this statement.
Many versions of the insert() method accept a second argument of any of the same range of types that apply to the append() method, so you can use any of the following with the insert() method:

In each case the string equivalent of the second argument is inserted starting at the index position specified by the first argument.
If you need to insert a subset of an array of type char[] into a StringBuffer object, you can call the version of insert() that accepts four arguments, shown below:
insert(int index, char[] str, int offset, int length)
This method inserts a substring into the StringBuffer object starting at position index. The substring is the String representation of length characters from the str[] array, starting at position offset.
If the value of index is outside the range of the string in the StringBuffer object, or the offset or length values result in illegal indexes for the array str, then an exception of type StringIndexOutOfBounds Exception is thrown.
There’s another version of insert() that you can use to insert a substring of a String or StringBuffer object into a StringBuffer object. The first argument is the offset index for the insertion; the second is the reference to the source of the substring; the third argument is the index for the first character of the substring; and the last argument is the index of one beyond the last character in the substring.
NOTE If you look in the JDK documentation for StringBuffer, you see parameters for insert() and other methods of type CharSequence. This type allows a String or StringBuffer reference to be supplied (as well as some other types). I avoid discussing CharSequence further at this point because it is different from a class type and it needs an in-depth explanation. I explain this in Chapter 6.
Extracting Characters from a Mutable String
The StringBuffer class includes the charAt() and getChars() methods, both of which work in the same way as the methods of the same name in the String class which you’ve already seen. The charAt() method extracts the character at a given index position, and the getChars() method extracts a range of characters and stores them in an array of type char[] starting at a specified index position.
You should note that there is no equivalent to the getBytes() method for StringBuffer objects. However you can obtain a String object from a CharBuffer object by calling its toString() method, then you can call getBytes() for the String object to obtain the byte[] array corresponding to the StringBuffer object.
Other Mutable String Operations
You can change a single character in a StringBuffer object by using the setCharAt() method. The first argument indicates the index position of the character to be changed, and the second argument specifies the replacement character. For example, the statement
buf.setCharAt(3, 'Z'),
sets the fourth character in the string to 'Z'.
You use the deleteCharAt() method to remove a single character from a StringBuffer object at the index position specified by the argument. For example:
StringBuffer phrase = new StringBuffer("When the boats come in");
phrase.deleteCharAt(10);
After these statements have executed, phrase contains the string "When the bats come in".
If you want to remove several characters from a StringBuffer object you use the delete() method. This method requires two arguments: The first is the index of the first character to be deleted, and the second is the index position following the last character to be deleted. For example:
phrase.delete(5, 9);
This statement deletes the substring "the " from phrase, so it then contains the string "When bats come in".
You can completely reverse the sequence of characters in a StringBuffer object with the reverse() method. For example, if you define the object with the declaration
StringBuffer palindrome = new StringBuffer("so many dynamos");
you can then transform it with the statement:
palindrome.reverse();
which results in palindrome containing the useful phrase “somanyd ynam os”.
Creating a String Object from a StringBuffer Object
You can produce a String object from a StringBuffer object by using the toString() method of the StringBuffer class. This method creates a new String object and initializes it with the string contained in the StringBuffer object. For example, to produce a String object containing the proverb that you created in the previous section, you could write:
String saying = proverb.toString();
The object saying contains "Many hands make light work".
The toString() method is used extensively by the compiler together with the append() method to implement the concatenation of String objects.
Suppose you have the following strings defined:
String str1 = "Many", str2=" hands", str3=" make", str4=" light", str5=" work.";
When you write a statement such as
String saying = str1 + str2 + str3 + str4 + str5;
the compiler implements this as:
String saying = new StringBuffer().append(str1).append(str2).
                                   append(str3).append(str4).
                                   append(str5).toString();
The expression to the right of the = sign is executed from left to right, so the segments of the string encapsulated by the objects are appended to the StringBuffer object that is created until finally the toString() method is invoked to convert it to a String object. String objects can’t be modified, so any alteration or extension of a String object involves the use of a StringBuffer object, which can be changed.
It’s time to see a StringBuffer object in action.
TRY IT OUT: Using a StringBuffer Object to Assemble a String
This example just exercises some of the StringBuffer operations you have seen by assembling a string from an array of words and then inserting some additional characters into the string:
public class UseStringBuffer {
  public static void main(String[] args) {
    StringBuffer sentence = new StringBuffer(20);
    System.out.println("
StringBuffer object capacity is " +
                                        sentence.capacity() +
                                   " and string length is "+sentence.length());

    // Append all the words to the StringBuffer object
    String[] words = {"Too"  , "many", "cooks", "spoil", "the" , "broth"};
    sentence.append(words[0]);
    for(int i = 1 ; i < words.length ; ++i) {
      sentence.append(' ').append(words[i]);
    }

    // Show the result
    System.out.println("
String in StringBuffer object is:
" +
                                                          sentence.toString());
    System.out.println("StringBuffer object capacity is now " +
                                           sentence.capacity()+
                                   " and string length is "+sentence.length());

    // Now modify the string by inserting characters
    sentence.insert(sentence.lastIndexOf("cooks")+4,"ie");
    sentence.insert(sentence.lastIndexOf("broth")+5, "er");
    System.out.println("
String in StringBuffer object is:
" + sentence);
    System.out.println("StringBuffer object capacity is now " +
                                          sentence.capacity() +
                                   " and string length is "+sentence.length());

  }
}
UseStringBuffer.java
The output from this example is:
StringBuffer object capacity is 20 and string length is 0

String in StringBuffer object is:
Too many cooks spoil the broth
StringBuffer object capacity is now 42 and string length is 30

String in StringBuffer object is:
Too many cookies spoil the brother
StringBuffer object capacity is now 42 and string length is 34
How It Works
You first create a StringBuffer object with a buffer capacity of 20 characters with the following statement:
StringBuffer sentence = new StringBuffer(20);
The output statement that follows just displays the buffer capacity and the initial string length. You obtain these by calling the capacity() and length() methods, respectively, for the sentence object. The string length is zero because you have not specified any buffer contents.
The next four statements create an array of words and append those words to sentence:
    String[] words = {"Too"  , "many", "cooks", "spoil", "the" , "broth"};
    sentence.append(words[0]);
    for(int i = 1 ; i < words.length ; ++i) {
      sentence.append(' ').append(words[i]);
To start the process of building the string, you append the first word from the words array to sentence. You then append all the subsequent words in the for loop, preceding each word with a space character.
The next output statement displays the buffer contents as a string by calling the toString() method for sentence to create a String object. You then output the buffer capacity and string length for sentence once more. The output shows that the capacity has been automatically increased to 42 and the length of the string is 30.
In the last phase of the program you insert the string "ie" after the substring "cook" with the statement:
sentence.insert(sentence.lastIndexOf("cooks")+4,"ie");
The lastIndexOf() method returns the index position of the last occurrence of "cooks" in sentence, so you add 4 to this to specify the insertion position after the last letter of "cook". You use the same mechanism to insert the string "er" following "broth" in the buffer.
Finally, you output the string and the capacity and string length with the last two statements in main():
    System.out.println("
String in StringBuffer object is:
" + sentence);
    System.out.println("StringBuffer object capacity is now "+ sentence.capacity() +
                       " and string length is "+sentence.length());
Note that the first output statement does not call the toString() method explicitly. The compiler inserts the call for you to convert the StringBuffer object to a String object. This is necessary to make it compatible with the + operator for String objects.
You should now be thoroughly familiar with how to create and use arrays. Most people have little trouble dealing with one-dimensional arrays, but arrays of arrays are a bit trickier so try to practice using these.
You have also acquired a good knowledge of what you can do with String objects, as well as StringBuffer and StringBuilder objects. Most operations with these objects are very straightforward and easy to understand. Being able to decide which methods you should apply to the solution of specific problems is a skill that comes with a bit of practice.
EXERCISES
You can download the source code for the examples in the book and the solutions to the following exercises from www.wrox.com.
1. Create an array of String variables and initialize the array with the names of the months from January to December. Create an array containing 12 random decimal values between 0.0 and 100.0. Display the names of each month along with the corresponding decimal value. Calculate and display the average of the 12 decimal values.
2. Write a program to create a rectangular array containing a multiplication table from 1 * 1 up to 12 * 12. Output the table as 13 columns with the numeric values right-aligned in the columns. (The first line of output is the column headings, the first column with no heading, then the numbers 1 to 12 for the remaining columns. The first item in each of the succeeding lines is the row heading, which ranges from 1 to 12.)
3. Write a program that sets up a String variable containing a paragraph of text of your choice. Extract the words from the text and sort them into alphabetical order. Display the sorted list of words. You could use a simple sorting method called the bubble sort. To sort an array into ascending order the process is as follows:
a. Starting with the first element in the array, compare successive elements (0 and 1, 1 and 2, 2 and 3, and so on).
b. If the first element of any pair is greater than the second, interchange the two elements.
c. Repeat the process for the whole array until no interchanges are necessary. The array elements are now in ascending order.
4. Define an array of ten String elements each containing an arbitrary string of the form "month/day/year"; for example,"10/29/99" or "12/5/01". Analyze each element in the array and output the date represented in the form 29th October 1999.
5. Write a program that reverses the sequence of letters in each word of your chosen paragraph from Exercise 3. For instance, "To be or not to be." becomes "oT eb ro ton ot eb."
• WHAT YOU LEARNED IN THIS CHAPTER
| TOPIC | CONCEPT |
| Using an Array | You use an array to hold multiple values of the same type, identified through a single variable name. |
| Accessing Array Elements | You reference an individual element of an array by using an index value of type int. The index value for an array element is the offset of that element from the first element in the array, so the index of the first element is 0. |
| Using Array Elements | An array element can be used in the same way as a single variable of the same type. |
| The Number of Array Elements | You can obtain the number of elements in an array by using the length member of the array object. |
| Arrays of Arrays | An array element can also contain an array, so you can define arrays of arrays, or arrays of arrays of arrays, and so on. |
| String Objects | A String object stores a fixed character string that cannot be changed. However, you can assign a given String variable to a different String object. |
| String Length | You can obtain the number of characters stored in a String object by using the length() method for the object. |
| String Class Methods | The String class provides methods for joining, searching, and modifying strings — the modifications being achieved by creating a new String object. |
| Mutable Strings | StringBuffer and StringBuilder objects can store a string of characters that you can modify. |
| StringBuffer and StringBuilder Objects | StringBuffer and StringBuilder objects support the same set of operations. StringBuffer objects are safe when accessed by multiple threads of execution whereas StringBuilder object are not. |
| Length and Capacity of a StringBuffer object | You can get the number of characters stored in a StringBuffer object by calling its length() method, and you can find out the current maximum number of characters it can store by using its capacity() method. You can change both the length and the capacity for a StringBuffer object. |
| Creating a String Object from a StringBuffer object | You can create a String object from a StringBuffer object by using the toString() method of the StringBuffer object. |
