
Chapter 16
Threads
WHAT YOU WILL LEARN IN THIS CHAPTER
- What a thread is and how to create threads in your programs
- How to control interactions between threads
- What synchronization means and how to apply it in your code
- What deadlocks are and how to avoid them
- What an executor is and how to use an executor to start and manage threads
- How to create threads that return a value
- How to set thread priorities
In this chapter you investigate the Java facilities that enable you to overlap the execution of segments of a single program. As well as ensuring your programs run more efficiently, this capability is particularly useful when your program must, of necessity, do a number of things at the same time: for example, a server program on a network that needs to communicate with multiple clients. As you see in Chapter 18, threads are also fundamental to any Java application that uses a graphical user interface (GUI), so it’s essential that you understand how threads work.
Most programs of a reasonably large size contain some code segments that are more or less independent of one another and that might execute more efficiently if the code segments could be overlapped in time. Threads provide a way to do this. A thread of execution is a serial sequence of instructions that is reasonably independent of other code segments in a program so its execution can be controlled independently. If you have a machine with two or more processors then as many computations as you have processors can be executing concurrently. This allows the possibility for more than one program to be executing at any given instant. It also allows multiple threads of execution in a single program to be executing at the same time. All the program examples you have seen so far in the book consist of a single thread of execution. Graphical applications have two or more threads. Other kinds of applications can benefit from having more than one thread.
Of course, if your computer has only one processor, you can’t execute more than one computation at any instant, but you can still overlap input/output operations with processing. You can also have multiple threads in progress at one time. In this case the operating system manages the transfer of execution control between them and determines when each thread gets access to the processor and for how long.
Using threads you can allow processes in a program that need to run continuously, such as a continuously running animation, to be overlapped with other activities in the same program. Java applets in a web page are executed under the control of a single program — your browser — and threads make it possible for multiple applets to be executing concurrently. In this case the threads serve to segment the activities running under the control of the browser so that they appear to run concurrently. If you have only one processor, this is an illusion created by your operating system because only one thread can actually be executing instructions at any given instant, but it’s a very effective illusion. To produce animation, you typically put some code that draws a succession of still pictures in a loop that runs indefinitely. The code to draw the picture generally runs under the control of a timer so that it executes at a fixed rate — for example, 20 times per second. Of course, nothing else can happen in the same thread while the loop is running. If you want to have another animation running, it must be in a separate thread. Then the multitasking capability of your operating system can allow both threads to share the available processor time, thus allowing both animations to run.
Let’s get an idea of the principles behind how threads operate. Consider a simple program that consists of three activities:
- Reading a number of blocks of data from a file
- Performing some calculation on each block of data
- Writing the results of the calculation to another file
You could organize the program as a single sequence of activities. In this case the activities — read file, process, write file — run in sequence, and the sequence is repeated for each block to be read and processed. You could also organize the program so that reading a block from the file is one activity, performing the calculation is a second activity, and writing the results is a third activity. Both of these situations are illustrated in Figure 16-1.
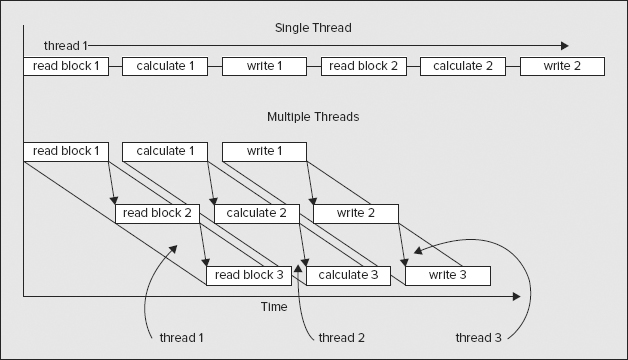
After a block of data has been read, the computation process can start, and as soon as the computation has been completed, the results can be written out. With the program executing each step in sequence (that is, as a single thread), as shown in the top half of Figure 16-1, the total time for execution is the sum of the times for each of the individual activities. However, suppose you were able to execute each of the activities independently, as illustrated in the lower half of Figure 16-1. In this case, reading the second block of data can start as soon as the first block has been read, and in theory you can have all three activities executing concurrently. This is possible even though you have only one processor because the input and output operations are likely to require relatively little processor time while they are executing, so the processor can be doing other things while they are in progress. This can reduce the total execution time for the program.
These three processes that run more or less independently of one another — one to read the file, another to process the data, and a third to write the results — are separate threads. Of course, the first example at the top of Figure 16-1 has just one thread that does everything in sequence. Every Java program has at least one thread. However, the three threads in the lower example in Figure 16-1 aren’t completely independent of one another. After all, if they were, you might as well make them independent programs. You have practical limitations, too — the potential for overlapping these threads is dependent on the capabilities of your hardware and your operating system. However, if you can get some overlap in the execution of the threads, the program is likely to run faster. You’ll find no magic in using threads, though. Your computer has only a finite capacity for executing instructions, and if you have many threads running, you may in fact increase the overall execution time because of the overhead implicit in managing the switching of control between threads.
An important consideration when you have a single program running as multiple threads is that the threads are unlikely to have identical execution times, and when one thread is dependent on another, you can’t afford to have one overtaking the other — otherwise, you have chaos. Before you can start calculating in the example in Figure 16-1, you need to be sure that the block of data that the calculation uses has been read, and before you can write the output, you need to know that the calculation is complete. This necessitates having some means for the threads to communicate with one another.
The way I have shown the threads executing in Figure 16-1 isn’t the only way of organizing the program. You could have three threads, each of which reads the file, calculates the results, and writes the output, as shown in Figure 16-2.

Now there’s a different sort of contention between the threads. They are all competing to read the file and write the results, so there needs to be some way of preventing one thread from getting at the input file while another thread is already reading from it. The same goes for the output file. There’s another aspect of this arrangement that is different from the previous version. For example, if one thread, thread 1, reads a block, block 4, that needs a lot of time to compute the results, another thread, thread 2, could conceivably read a following block, block 5, and calculate and write the results for block 5 before thread 1 has written the results for block 4. If you don’t want the results appearing in a different sequence from the input, you should do something about this. However, before I delve into the intricacies of making sure that the threads don’t get tangled or knotted, let’s first look at how you create a thread.
Creating Threads
Your program always has at least one thread: the one created when the program begins execution. In a normal Java application program, this thread starts at the beginning of main(). With an applet, the browser is the main thread. That means that when your program creates a thread, it is in addition to the main thread of execution that created it. As you might have guessed, creating an additional thread involves using an object of a class, and the class is java.lang.Thread. Each additional thread that your program creates is represented by an object of the class Thread, or of a subclass of Thread. If your program is to have three additional threads, you need to create three such objects.
To start the execution of a thread, you call the start() method for the Thread object. The code that executes in a new thread is always a method called run(), which is public, accepts no arguments, and doesn’t return a value. Threads other than the main thread in a program always start in the run() method for the object that represents the thread. A program that creates three threads is illustrated diagrammatically in Figure 16-3.
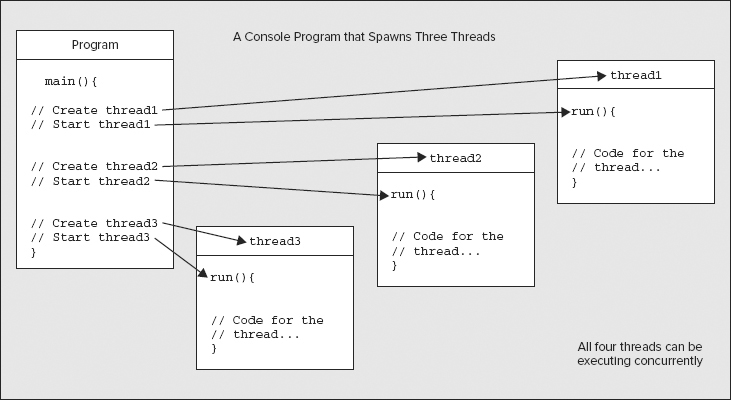
If a class that you define to represent a thread in your program is to do anything, you must implement the run() method for the class because the version inherited from the Thread class does nothing. Your implementation of run() can call any other methods you want. Figure 16-3 shows the main() method creating all three threads, but that doesn’t have to be the case. Any thread can create more threads.
Now here comes the bite: You don’t call the run() method to start a thread, you call the start() method for the object representing the thread, and that causes the run() method to be called. When you want to stop the execution of a thread that is running, you must signal to the Thread object that it should stop itself by setting a field that the thread checks at regular intervals, for example.
The reason you must start a thread in the way I have described is somewhat complex, but basically it boils down to this: Threads are always owned and managed by the operating system, and only the operating system can create and start a new thread. If you were to call the run() method yourself, it would simply operate like any other method, running in the same thread as the program that calls it.
When you call the start() method for a Thread object, you are calling a native code method that causes the operating system to initiate another thread from which the run() method for the Thread object executes.
In any case, it is not important to understand exactly how this works. Just remember: Always start your thread by calling the start() method. If you call the run() method directly, you have not created a new thread and your program does not work as you intended.
You can define a class that is to represent a thread in two ways:
- You can define a subclass of Thread that provides a definition of the run() method that overrides the inherited method.
- You can define your class as implementing the Runnable interface, which declares the run() method, and then creates a Thread object in your class when you need it.
You explore the advantages of both approaches in a little more detail. You can see how deriving a subclass of Thread works by using an example.
TRY IT OUT: Deriving a Subclass of Thread
You define a single class, TryThread, which you derive from Thread. As always, execution of the application starts in the main() method. Here’s the code:
import java.io.IOException;

public class TryThread extends Thread {
  public TryThread(String firstName, String secondName, long delay) {
    this.firstName = firstName;                            // Store the first name
    this.secondName = secondName;                        // Store the second name
    aWhile = delay;                                      // Store the delay
    setDaemon(true);                                     // Thread is daemon
  }

  public static void main(String[] args) {
    // Create three threads
    Thread first = new TryThread("Hopalong ", "Cassidy ", 200L);
    Thread second = new TryThread("Marilyn ", "Monroe ", 300L);
    Thread third = new TryThread("Slim ", "Pickens ", 500L);

    System.out.println("Press Enter when you have had enough...
");
    first.start();                                        // Start the first thread
    second.start();                                      // Start the second thread
    third.start();                                       // Start the third thread

    try {
      System.in.read();                                  // Wait until Enter key pressed
      System.out.println("Enter pressed...
");

    } catch (IOException e) {                            // Handle IO exception
      System.out.println(e);                             // Output the exception
    }
    System.out.println("Ending main()");
    return;
  }

  // Method where thread execution will start
  @Override
  public void run() {
    try {
      while(true) {                                      // Loop indefinitely...
        System.out.print(firstName);                      // Output first name
        sleep(aWhile);                                   // Wait aWhile msec.
        System.out.print(secondName + "
");             // Output second name
      }
    } catch(InterruptedException e) {                    // Handle thread interruption
      System.out.println(firstName + secondName + e);     // Output the exception
    }
  }

  private String firstName;                               // Store for first name
  private String secondName;                             // Store for second name
  private long aWhile;                                   // Delay in milliseconds
}
TryThread.java
If you compile and run the code, you see something like this:
Press Enter when you have had enough...

Hopalong Marilyn Slim Cassidy
Hopalong Monroe
Marilyn Cassidy
Hopalong Pickens
Slim Monroe
Marilyn Cassidy
Hopalong Cassidy
Hopalong Monroe
Marilyn Pickens
Slim Cassidy
Hopalong Monroe
Marilyn Cassidy
Hopalong Cassidy
Hopalong Monroe
Marilyn Pickens
Slim Cassidy
Hopalong Cassidy
Hopalong Monroe
Marilyn
Enter pressed...

Ending main()
How It Works
You have three instance variables in the TryThread class, and these are initialized in the constructor. The two String variables hold first and second names, and the variable aWhile stores a time period in milliseconds. The constructor for the class, TryThread(),automatically calls the default constructor, Thread(), for the base class.
The class containing the main() method is derived from Thread and implements run(), so objects of this class represent threads. The fact that each object of your class has access to the method main() is irrelevant — the objects are perfectly good threads. The method main() creates three such objects: first, second, and third.
Daemon and User Threads
The call to setDaemon(), with the argument true in the TryThread constructor, makes the thread that is created a daemon thread. A daemon thread is simply a background thread that is subordinate to the thread that creates it, so when the thread that created it ends, the daemon thread dies with it. In this case, the main() method creates the daemon threads so that when main() returns and ends the main thread, all the threads it has created also end. If you run the example a few times pressing Enter at random, you should see that the daemon threads die after the main() method returns, because, from time to time, you get some output from one or another thread after the last output from main().
A thread that isn’t a daemon thread is called a user thread. The diagram in Figure 16-4 shows two daemon threads and a user thread that are created by the main thread of a program.
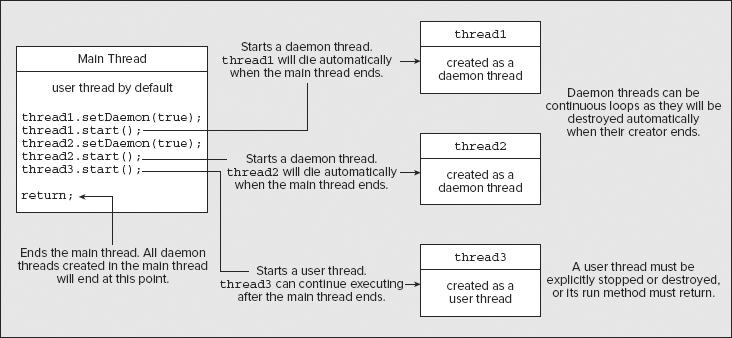
A user thread has a life of its own that is not dependent on the thread that creates it. It can continue execution after the thread that created it has ended. The default thread that contains main() is a user thread, as shown in the diagram, but thread3 shown in the diagram could continue to execute after main() has returned. Threads that run for a finite time are typically user threads, but there’s no reason why a daemon thread can’t be finite. Threads that run indefinitely should usually be defined as daemon threads simply because you need a means of stopping them. A hypothetical example might help you to understand this, so let’s consider how a network server handling transactions of some kind might work in principle.
A network server might be managed overall by a user thread that starts one or more daemon threads to listen for requests. When the server starts up, the operator starts the management thread, and this thread creates daemon threads to listen for requests. Each request that is recognized by one of these daemon threads might be handled by another thread that is created by the listening thread, so that each request is handled independently. Where processing a transaction takes a finite time, and where it is important that the requests are completed before the system shuts down, the thread to handle the request might be created as a user thread to ensure that it runs to completion, even if the listening thread that created it stops. Generally you would not want a program to be able to create an unlimited number of threads because the more threads there are running, the greater the operating system overhead there is in managing the threads. For this reason, a program often makes use of a thread pool of a specified fixed number of threads. When a new thread is required for a particular task, such as servicing a request, one of the threads in the thread pool is allocated to the task. If all the threads in the pool have been allocated, then a new thread cannot be started until one of the threads that is currently running terminates. The class libraries provide help in the creation and management of thread pools through the java.util.concurrent.ThreadPoolExecutor class. When the time comes to shut the system down, the operator doesn’t have to worry about how many listening threads are running. When the main thread is shut down all the listening threads also shut down because they are daemon threads. Any outstanding threads dealing with specific transactions then run to completion.
Note that you can call setDaemon() for a thread only before it starts; if you try to do so afterward, the method throws an IllegalThreadStateException exception. Also, a thread that is itself created by a daemon thread is a daemon by default.
Creating Thread Objects
In the main() method you create three Thread variables that store three different objects of type TryThread. As you can see, each object has an individual name pair as the first two arguments to its constructor, and a different delay value passed as the third argument. All objects of the class TryThread are daemon threads because you call setDaemon() with the argument true in the constructor. Because the output can continue indefinitely, you display a message to explain how to stop it.
After you’ve created a thread, it doesn’t start executing by itself. You need to set it going. As I said earlier, you don’t call the run() method for the Thread object to do this, you call its start() method. Thus, you start the execution of each of the threads represented by the objects first, second, and third by calling the start() method that is inherited from Thread for each object. The start() method starts the object’s run() method executing and then returns to the calling thread. Eventually, all three threads are executing in parallel with the original application thread, main().
Implementing the run() Method
The run() method contains the code for thread execution. The code in this case is a single, infinite while loop that you have put in a try block because the sleep() method that is called in the loop can throw the InterruptedException exception that is caught by the catch block. The code in the loop outputs the first name, calls the sleep() method that is inherited from Thread, and then outputs the second name. The sleep() method suspends execution of the thread for the number of milliseconds that you specify in the argument. This gives any other threads that have previously been started a chance to execute. This allows the output from the three threads to become a little jumbled.
With a multicore processor as many PCs have these days, multiple threads will be executing concurrently. Each time a thread calls the sleep() method, one of the waiting threads jumps in and starts executing. You can see the sequence in which the threads execute from the output. From the names in the output you can deduce that they execute in the sequence first, second, third, first, first, second, second, first, first, third, and so on. The actual sequence depends on your operating system scheduler and the number of processors that you have, so this is likely to vary from machine to machine. The execution of the read() method that is called in main() is blocked until you press Enter, but all the while the other threads continue executing. The output stops when you press Enter because this allows the main thread to continue and execute the return. Executing return ends the thread for main(), and because the other threads are daemon threads, they also die when the thread that created them dies, although as you may have seen, they can run on a little after the last output from main().
Stopping a Thread
If you did not create the threads in the last example as daemon threads, they would continue executing independently of main(). If you are prepared to terminate the program yourself (use Ctrl+C in a Windows command-line session running Java), you can demonstrate this by commenting out the call to setDaemon() in the constructor. Pressing Enter ends main(), but the other threads continue indefinitely.
A thread can signal another thread that it should stop executing by calling the interrupt() method for that Thread object. This in itself doesn’t stop the thread; it just sets a flag in the thread that indicates an interruption has been requested. This flag must be checked in the run() method to have any effect and the thread should then terminate itself. The isInterrupted() method that the Thread class defines returns true if the interrupted flag has been set. The method does not reset the flag, but calling the interrupted() method tests the flag and resets it if it was set.
As it happens, the sleep() method checks whether the thread has been interrupted and throws an InterruptedException if it has been. You can see that in action by altering the previous example a little.
TRY IT OUT: Interrupting a Thread
Make sure the call to the setDaemon() method is still commented out in the constructor and modify the main() method as follows:
  public static void main(String[] args) {
    // Create three threads
    Thread first = new TryThread("Hopalong ", "Cassidy ", 200L);
    Thread second = new TryThread("Marilyn ", "Monroe ", 300L);
    Thread third = new TryThread("Slim ", "Pickens ", 500L);

    System.out.println("Press Enter when you have had enough...
");
    first.start();                      // Start the first thread
    second.start();                     // Start the second thread
    third.start();                      // Start the third thread
    try {
      System.in.read();                 // Wait until Enter key pressed
      System.out.println("Enter pressed...
");

      // Interrupt the threads
      first.interrupt();
      second.interrupt();
      third.interrupt();
    } catch (IOException e) {           // Handle IO exception
      System.out.println(e);            // Output the exception
    }
    System.out.println("Ending main()");
    return;
  }
TryThreadInterrupted.java
I created this as a new example in the download called TryThreadInterrupted. Of course, some of the code in main() has to be changed accordingly. Now the program produces output that is something like the following:
Press Enter when you have had enough...

Slim Hopalong Marilyn Cassidy
Hopalong Monroe
Marilyn Cassidy
Hopalong Pickens
Slim Cassidy
Hopalong Monroe
Marilyn
Enter pressed...

Ending main()
Marilyn Monroe java.lang.InterruptedException: sleep interrupted
Slim Pickens java.lang.InterruptedException: sleep interrupted
Hopalong Cassidy java.lang.InterruptedException: sleep interrupted
How It Works
Because the main() method calls the interrupt() method for each of the threads after you press the Enter key, the sleep() method that is called in each thread registers the fact that the thread has been interrupted and throws an InterruptedException. This is caught by the catch block in the run() method and produces the new output that you see. Because the catch block is outside the while loop, the run() method for each thread returns and each thread terminates.
You can check whether a thread has been interrupted by calling the isInterrupted() method for the thread. This returns true if interrupt() has been called for the thread in question. Because this is an instance method, you can use this in one thread to determine whether another thread has been interrupted. For example, in main() you could write:
if(first.isInterrupted()) {
  System.out.println("First thread has been interrupted.");
}
Note that this determines only whether the interrupted flag has been set by a call to interrupt() for the thread — it does not determine whether the thread is still running. A thread could have its interrupt flag set and continue executing — it is not obliged to terminate because interrupt() is called. To test whether a thread is still operating, you can call its isAlive() method. This returns true if the thread has not terminated.
The instance method isInterrupted() in the Thread class has no effect on the interrupt flag in the thread — if it was set, it remains set. However, the static interrupted() method in the Thread class is different. It tests whether the currently executing thread has been interrupted, and if it has, it clears the interrupted flag in the current Thread object and returns true.
When an InterruptedException is thrown, the flag that registers the interrupt in the thread is cleared, so a subsequent call to isInterrupted() or interrupted() returns false.
Connecting Threads
If in one thread you need to wait until another thread dies, you can call the join() method for the thread that you expect isn’t long for this world. Calling the join() method with no arguments halts the current thread for as long as it takes the specified thread to die:
thread1.join(); // Suspend the current thread until thread1 dies
You can also pass a long value to the join() method to specify the number of milliseconds you’re prepared to wait for the death of a thread:
thread1.join(1000); // Wait up to 1 second for thread1 to die
If this is not precise enough, you have a version of join() with two parameters. The first is a time in milliseconds and the second is a time in nanoseconds. The current thread waits for the duration specified by the sum of the arguments. Of course, whether or not you get nanosecond resolution depends on the capability of your hardware.
The join() method can throw an InterruptedException if the current thread is interrupted by another thread, so you should put a call to join() in a try block and catch the exception.
Thread Scheduling
The scheduling of threads depends to some extent on your operating system, but each thread certainly gets a chance to execute while the others are “asleep," that is, when they’ve called their sleep() methods. If your operating system uses preemptive multitasking (Microsoft Windows and Linux both support preemptive multitasking), or your hardware has multiple processors that are supported by the operating system, the program works without the call to sleep() in the run() method (you should also remove the try and catch blocks if you remove the sleep() call). However, if your operating system doesn’t schedule in this way, without the sleep() call in run(), the first thread hogs a single processor and continues indefinitely.
Figure 16-5 illustrates how four threads might share a single processor over time by calling the sleep() method to relinquish control.
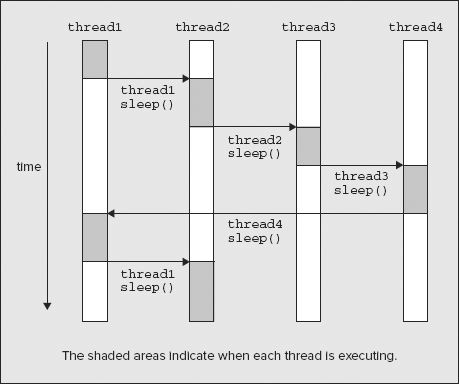
Note that there’s another method, yield(), defined in the Thread class, that gives other threads a chance to execute. You use this when you just want to allow other threads a look-in if they are waiting, but you don’t want to suspend execution of the current thread for a specific period of time. When you call the sleep() method for a thread, the thread does not continue for at least the time you have specified as an argument, even if no other threads are waiting. Calling yield(), on the other hand, causes the current thread to resume immediately if no threads are waiting.
Implementing the Runnable Interface
As an alternative to defining a new subclass of Thread, you can implement the Runnable interface in a class. You’ll find that this is generally much more convenient than deriving a class from Thread because you can derive your class from a class other than Thread and it can still represent a thread. Because Java allows only a single base class, if you derive your class from Thread, it can’t inherit functionality from any other class. The Runnable interface declares only one method, run(), and this is the method that is executed when the thread is started.
TRY IT OUT: Using the Runnable Interface
To see how this works in practice, you can write another version of the previous example. I’ve called this version of the program JumbleNames:
import java.io.IOException;

public class JumbleNames implements Runnable {
  // Constructor
  public JumbleNames(String firstName, String secondName, long delay) {
    this.firstName = firstName;                         // Store the first name
    this.secondName = secondName;                     // Store the second name
    aWhile = delay;                                   // Store the delay
  }

  // Method where thread execution will start
  public void run() {
    try {
      while(true) {                                   // Loop indefinitely...
        System.out.print(firstName);                   // Output first name
        Thread.sleep(aWhile);                         // Wait aWhile msec.
        System.out.print(secondName+"
");            // Output second name
      }
    } catch(InterruptedException e) {                 // Handle thread interruption
      System.out.println(firstName + secondName + e);  // Output the exception
    }
  }

  public static void main(String[] args) {
    // Create three threads
    Thread first = new Thread(new JumbleNames("Hopalong ", "Cassidy ", 200L));
    Thread second = new Thread(new JumbleNames("Marilyn ", "Monroe ", 300L));
    Thread third = new Thread(new JumbleNames("Slim ", "Pickens ", 500L));

    // Set threads as daemon
    first.setDaemon(true);
    second.setDaemon(true);
    third.setDaemon(true);
    System.out.println("Press Enter when you have had enough...
");
    first.start();                                     // Start the first thread
    second.start();                                   // Start the second thread
    third.start();                                    // Start the third thread
    try {
      System.in.read();                               // Wait until Enter key pressed
      System.out.println("Enter pressed...
");

    } catch (IOException e) {                         // Handle IO exception
      System.err.println(e);                          // Output the exception
    }
    System.out.println("Ending main()");
    return;
  }

  private String firstName;                            // Store for first name
  private String secondName;                          // Store for second name
  private long aWhile;                                // Delay in milliseconds
}
JumbleNames.java
How It Works
You have the same data members in this class as you had in the previous example. The constructor is almost the same as previously, too. You can’t call setDaemon() in this class constructor because the class isn’t derived from Thread. Instead, you need to do that in main() after you’ve created the objects that represent the threads and before you call the run() method. The run() method implementation is also very similar. The class doesn’t have sleep() as a member, but because it’s a public static member of the Thread class, you can call it in the run() method by using the class name as the qualifier.
In the main() method you still create a Thread object for each thread of execution, but this time you use a constructor that accepts an object of type Runnable as an argument. You pass an object of our class JumbleNames to it. This is possible because the JumbleNames class implements Runnable.
Thread Names
Threads have a name, which in the case of the Thread constructor you’re using in the example is a default name composed of the string "Thread*" with a sequence number appended. If you want to choose your own name for a thread, you can use a Thread constructor that accepts a String object specifying the name you want to assign to the thread. For example, you could have created the Thread object first with the following statement:
Thread first = new Thread(new JumbleNames("Hopalong ", "Cassidy ", 200L), "firstThread");
This assigns the name "firstThread" to the thread. Note that this name is used only when displaying information about the thread. It has no relation to the identifier for the Thread object, and there’s nothing, apart from common sense, to prevent several threads being given the same name.
You can obtain the name assigned to a thread by calling the getName() method for the Thread object. The name of the thread is returned as a String object. You can also change the name of a thread by calling the setName() method defined in the class Thread and passing a String object to it.
After you’ve created the three Thread objects in the example, you call the setDaemon() method for each of them. The rest of main() is the same as in the original version of the previous example, and you should get similar output when you run this version of the program.
An object of a class that implements Runnable might need access to the Thread object that encapsulates the thread in which it is executing. The static currentThread() method in the Thread class returns a reference to the current thread so that provides access when you need it.
In all the examples you’ve seen so far in this chapter, the threads are launched and then left to compete for computer resources. Because all three threads compete in an uncontrolled way for a processor, the output from the threads gets muddled. This isn’t normally a desirable feature in a program. In most instances where you use threads, you need to manage the way in which they execute so that their activities are coordinated and they don’t interfere with each other.
Of course, in our examples, the programs are deliberately constructed to release control of the processor part way through outputting a name. While this is very artificial, similar situations can arise in practice, particularly where threads are involved in a repetitive operation. It is important to appreciate that a thread can be interrupted while a source statement is executing. For example, imagine that a bank teller is crediting a check to an account and at the same time the customer with that account is withdrawing some cash through an ATM. This might happen in the following way:
- The bank teller checks the balance of the customer’s account, which is $500.
- The ATM asks for the account balance.
- The teller adds the value of the check, $100, to the account balance to give a figure of $600.
- The ATM takes $50 off the balance of $500, which gives a figure of $450, and spits out five $10 bills.
- The teller assigns the value of $600 to the account balance.
- The ATM assigns the value $450 to the account balance.
Here you can see the problem very well. The account balance should be $550, so the customer has lost $100. Asking the account for its balance and assigning a new balance to the account are two different operations that are totally unconnected. As long as this is the case, you can never guarantee that this type of problem will not occur. Of course, I’m talking about programming here, not banks. Everyone knows that banks never make mistakes.
Where two or more threads share a common resource, such as a file or a block of memory, you’ll need to take steps to ensure that one thread doesn’t modify a resource while that resource is still being used by another thread. Having one thread update a record in a file while another thread is partway through retrieving the same record is a recipe for disaster. One way of managing this sort of situation is to use synchronization for the threads involved. I will discuss the basic synchronization capabilities provided by the Java language in this chapter, but note that the concurrency library provided as the java.util.concurrent, java.util.concurrent.atomic, and java.util.concurrent.locks packages contains classes that implement specialized thread management facilities.
Synchronization
The objective of synchronization is to ensure that when several threads want access to a single resource, only one thread can access it at any given time. You can use synchronization to manage your threads of execution in two ways:
- You can manage code at the method level. This involves synchronizing methods.
- You can manage code at the block level. This uses synchronizing blocks.
Let’s look at how you can use synchronized methods first.
Synchronized Methods
You can make a subset (or indeed all) of the methods for any class object mutually exclusive, so that only one of the methods can execute at any given time. You make methods mutually exclusive by declaring them in the class using the keyword synchronized. For example:
class MyClass {
  synchronized public void method1() {
    // Code for the method...
  }

  synchronized public void method2() {
    // Code for the method...
  }

  public void method3() {
    // Code for the method...
  }
}
Now, only one of the synchronized methods in a class object can execute at any one time. Only when the currently executing synchronized method for an object has ended can another synchronized method start for the same object. The idea here is that each synchronized method has guaranteed exclusive access to the object while it is executing, at least so far as the other synchronized methods for the class object are concerned.
The synchronization process makes use of an internal lock that every object has associated with it. The lock is a kind of flag that is set by a process, referred to as locking or a lock action, when a synchronized method starts execution. Each synchronized method for an object checks to see whether the lock has been set by another method. If it has, it does not start execution until the lock has been reset by an unlock action. Thus, only one synchronized method can be executing at one time, because that method has set the lock that prevents any other synchronized method from starting.
NOTE There is no constraint here on simultaneously executing synchronized methods for two different objects of the same class. It’s only concurrent access to any one object that is controlled by synchronization.
Of the three methods in myClass, two are declared as synchronized, so for any object of the class, only one of these methods can execute at one time. The method that isn’t declared as synchronized, method3(), can always be executed by a thread, regardless of whether a synchronized method is executing in some other thread.
It’s important to keep clear in your mind the distinction between an object that has instance methods that you declared as synchronized in the class definition and the threads of execution that might use them. A hypothetical relationship between three threads and two objects of the class myClass is illustrated in Figure 16-6.

The numbers on the arrows in the figure indicate the sequence of events. No! indicates that the thread waits until the method is unlocked so it can execute it. While method1() in obj2 is executing, method2() for the same object can’t be executed. The synchronization of these two instance methods in an object provides a degree of protection for the object, in that only one synchronized method can mess with the data in the object at any given time.
However, each object is independent of any other object when it comes to synchronized instance methods. When a thread executes a synchronized method for an object, it is assured exclusive access to the object insofar as the synchronized methods in that object are concerned. Another thread, though, can still call the same method for a different object. While method1() is being executed for obj1, this doesn’t prevent method1() for obj2 being executed by some other thread. Also, if there’s a method in an object that has not been declared as synchronized — method3() in obj1, for example — any thread can call that at any time, regardless of the state of any synchronized methods in the object.
If you apply synchronization to static methods in a class, only one of those static methods in the class can be executing at any point in time; this is per-class synchronization, and the class lock is independent of any locks for objects of the class.
An important principle that you need to understand is that only the run() method is necessarily part of a thread of execution in a class object that represents a thread. Other methods for the same class object are only part of the thread of execution if they are called directly or indirectly by the run() method. All the methods that are called directly or indirectly from the run() method for an object are all part of the same thread, but they clearly don’t have to be methods for the same Thread object. Indeed, they can be methods that belong to any other objects, including other Thread objects that have their own run() methods.
Using Synchronized Methods
To see how synchronization can be applied in practice, you construct a program that provides a simple model of a bank. This particular bank is a very young business with only one customer account initially, but you have two clerks, each working flat out to process transactions for the account, one handling debits and the other handling credits. The objects in the program are illustrated in Figure 16-7.
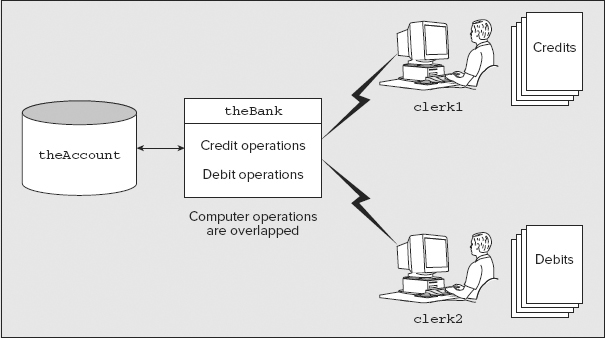
The bank in the model is actually a computer that performs operations on the account, and the account is stored separately. Each clerk can communicate directly with the bank. You define four classes that you use in the program to model banking operations:
- A Bank class to represent the bank’s computer
- An Account class to represent the account at the bank
- A Transaction class to represent a transaction on the account — a debit or a credit, for example
- A Clerk class to represent a bank clerk
You also define a class containing the method main() that starts the process off and determines how it all works.
WARNING As you develop the code, you won’t necessarily get it right the first time, but you will improve as you find out more about how to program using threads. This will expose some of the sorts of errors and complications that can arise when you’re programming using threads. I’ve included the incremental changes to the example as separate programs in the code download numbered sequentially.
TRY IT OUT: Defining a Bank Class
The bank computer is the agent that performs the operations on an account so you start with that. You can define the Bank class that represents the bank computer as follows:
// Define the bank

public class Bank {
  // Perform a transaction
  public void doTransaction(Transaction transaction) {
    int balance = transaction.getAccount().getBalance(); // Get current balance

    switch(transaction.getTransactionType()) {
      case CREDIT:
        // Credits require a lot of checks...
        try {
          Thread.sleep(100);

        } catch(InterruptedException e) {
          System.out.println(e);
        }
        balance += transaction.getAmount();              // Increment the balance
        break;

      case DEBIT:
        // Debits require even more checks...
        try {
          Thread.sleep(150);

        } catch(InterruptedException e) {
          System.out.println(e);
        }
        balance -= transaction.getAmount();              // Decrement the balance
        break;

      default:                                           // We should never get here
        System.out.println("Invalid transaction");
        System.exit(1);
    }
    transaction.getAccount().setBalance(balance);        // Restore the A/C balance
  }
}
Directory "BankOperation 1"
How It Works
The Bank class is very simple. It keeps no records of anything locally as the accounts are identified separately, and it has only one method that carries out a transaction. The Transaction object provides all the information about what the transaction is and the account to which it applies. You can define the possible types of transactions with the following enumeration:
// Bank account transaction types
public enum TransactionType {DEBIT, CREDIT }
You have provided only for debit and credit operations on an account, but the enum type and the switch statement could easily be extended to accommodate other types of transactions. Both of the transactions supported involve some delay while the standard nameless checks and verifications that all banks have are carried out. The delay is simulated by calling the sleep() method belonging to the Thread class.
Of course, during this time, other things in other threads may be going on. There are no instance variables to initialize in a Bank object, so you don’t need a constructor. Because the Bank object works using a Transaction object, let’s define the class for that next.
TRY IT OUT: Defining a Transaction on an Account
The Transaction class can represent any transaction on an account. You can define the class as follows:
public class Transaction {
  // Constructor
  public Transaction(Account account, TransactionType type, int amount) {
    this.account = account;
    this.type = type;
    this.amount = amount;
  }

  public Account getAccount() {
    return account;
  }

  public TransactionType getTransactionType() {
    return type;
  }

  public int getAmount() {
    return amount;
  }

  @Override
  public String toString() {
    return type + " A//C: " + account + ": $" + amount;
  }

  private Account account;
  private int amount;
  private TransactionType type;
}
Directory "BankOperation 1"
How It Works
The type of transaction is specified by the TransactionType enumeration. A transaction records the amount for the transaction and a reference to the account to which it applies, so a Transaction object specifies a complete transaction. The methods are very straightforward, just accessor methods for the data members that are used by the Bank object, plus the toString() method overload in case you need it.
TRY IT OUT: Defining a Bank Account
You can define an account by the following class type:
// Defines a customer account
public class Account {
  // Constructor
  public Account(int accountNumber, int balance) {
    this.accountNumber = accountNumber;          // Set the account number
    this.balance = balance;                      // Set the initial balance
  }

  // Return the current balance
  public int getBalance() {
    return balance;
  }

  // Set the current balance
  public void setBalance(int balance) {
    this.balance = balance;
  }

  public int getAccountNumber() {
    return accountNumber;
  }

  @Override
  public String toString() {
    return "A/C No. " + accountNumber + " : $" + balance;
  }

  private int balance;                           // The current account balance
  private int accountNumber;                     // Identifies this account
}
Directory "BankOperation 1"
How It Works
The Account class is also very simple. It just maintains a record of the amount in the account as a balance and provides methods for retrieving and setting the current balance. Operations on the account are performed externally by the Bank object. You have a bit more than you need in the Account class at the moment, but the methods you don’t use in the current example might be useful later.
TRY IT OUT: Defining a Bank Clerk
A clerk is a slightly more complicated animal. He or she retains information about the bank and details of the current transaction, and is responsible for initiating debits and credits on an account by communication with the central bank. Each clerk works independently of the others so they are each a separate thread:
public class Clerk implements Runnable {
  // Constructor
  public Clerk(Bank theBank) {
    this.theBank = theBank;           // Who the clerk works for
    inTray = null;                    // No transaction initially
  }

  // Receive a transaction
  public void doTransaction(Transaction transaction) {
    inTray = transaction;
  }

  // The working clerk...
  public void run() {
    while(true) {                     // Non-stop work...
      while(inTray == null) {         // No transaction waiting?
        try {
          Thread.sleep(150);          // Then take a break...

        } catch(InterruptedException e) {
          System.out.println(e);
        }
      }

      theBank.doTransaction(inTray);
      inTray = null;                  // In-tray is empty
    }
  }

  // Busy check
  public boolean isBusy() {
    return inTray != null;            // A full in-tray means busy!
  }

  private Bank theBank;               // The employer - an electronic marvel
  private Transaction inTray;         // The in-tray holding a transaction
}
Directory "BankOperation 1"
How It Works
A Clerk object is a thread because it implements the Runnable interface. Each clerk has an in-tray, capable of holding one transaction, and although the in-tray is not null, the clerk is clearly busy. A clerk needs to be aware of the Bank object that is employing him or her, so a reference is stored in theBank when a Clerk object is created. A transaction is placed in the in-tray for a clerk by calling his or her doTransaction() method. You can check whether a clerk is busy by calling the isBusy() member, which returns true if a transaction is still in progress.
The real work is actually done in the run() method. If the in-tray is empty, indicated by a null value in inTray, then there’s nothing for the clerk to do, so after sleeping a while, the loop goes around again to give the clerk another look at the in-tray. When a transaction has been recorded in the in-tray, the method in theBank object is called to carry it out, and the inTray is reset to null.
All you need now is the class to drive our model world, which you can call BankOperation. This class requires only the method main(), but there are quite a lot of things to do in this method so you put it together piece by piece.
TRY IT OUT: Defining the Operation of the Bank
Apart from setting everything up, the main() method has to originate transactions on the accounts and pass them on to the clerks to be expedited. You start with just one account and a couple of clerks. Here’s the basic structure:
import java.util.Random;

public class BankOperation {
  public static void main(String[] args) {
    int initialBalance = 500;     // The initial account balance
    int totalCredits = 0;         // Total credits on the account
    int totalDebits =0;           // Total debits on the account
    int transactionCount = 20;    // Number of debits and credits

    // Create the account, the bank, and the clerks...

    // Create the threads for the clerks as daemon, and start them off

    // Generate the transactions of each type and pass to the clerks

    // Wait until both clerks are done

    // Now output the results
  }
}
Directory "BankOperation 1"
The import for the Random class is there because you need it for code you add a little later. To create the Bank object, the clerks, and the account, you need to add the following code:
    // Create the account, the bank, and the clerks...
    Bank theBank = new Bank();                       // Create a bank
    Clerk clerk1 = new Clerk(theBank);               // Create the first clerk
    Clerk clerk2 = new Clerk(theBank);               // Create the second clerk
    Account account = new Account(1, initialBalance);// Create an account
The next step is to add the code to create the threads for the clerks and start them going:
    // Create the threads for the clerks as daemon, and start them off
    Thread clerk1Thread = new Thread(clerk1);
    Thread clerk2Thread = new Thread(clerk2);
    clerk1Thread.setDaemon(true);                      // Set first as daemon
    clerk2Thread.setDaemon(true);                      // Set second as daemon
    clerk1Thread.start();                              // Start the first
    clerk2Thread.start();                              // Start the second
The code to generate the transactions looks like a lot but is quite repetitive:
    // Generate transactions of each type and pass to the clerks
    Random rand = new Random();                        // Random number generator
    Transaction transaction;                           // Stores a transaction
    int amount = 0;                                    // stores an amount of money
    for(int i = 1 ; i <= transactionCount ; ++i) {
      amount = 50 + rand.nextInt(26);                  // Generate amount of $50 to $75
      transaction = new Transaction(account,           // Account
                              TransactionType.CREDIT,  // Credit transaction
                                    amount);           //  of amount
      totalCredits += amount;                          // Keep total credit tally

      // Wait until the first clerk is free
      while(clerk1.isBusy()) {
        try {
          Thread.sleep(25);                            // Busy so try later

        } catch(InterruptedException e) {
          System.out.println(e);
        }
      }
      clerk1.doTransaction(transaction);               // Now do the credit

      amount = 30 + rand.nextInt(31);                  // Generate amount of $30 to $60
      transaction = new Transaction(account,           // Account
                               TransactionType.DEBIT,  // Debit transaction
                                    amount);           //  of amount
      totalDebits += amount;                           // Keep total debit tally
      // Wait until the second clerk is free
      while(clerk2.isBusy()) {
        try {
          Thread.sleep(25);                            // Busy so try later

        } catch(InterruptedException e) {
          System.out.println(e);
        }
      }
      clerk2.doTransaction(transaction);               // Now do the debit
    }
After all the transactions have been processed, you can output the results. However, the clerks could still be busy after you exit from the loop, so you need to wait for both of them to be free before outputting the results. You can do this with a while loop:
    // Wait until both clerks are done
    while(clerk1.isBusy() || clerk2.isBusy()) {
      try {
        Thread.sleep(25);

      } catch(InterruptedException e) {
        System.out.println(e);
      }
    }
Lastly, you output the results:
// Now output the results
System.out.println(
          "Original balance : $" + initialBalance+"
" +
          "Total credits    : $" + totalCredits+"
" +
          "Total debits     : $" + totalDebits+"
" +
          "Final balance    : $" + account.getBalance() + "
" +
          "Should be        : $" + (initialBalance + totalCredits - totalDebits));
How It Works
The variables in the main() method track the total debits and credits, and record the initial account balance. They are there to help you figure out what has happened after the transactions have been processed. The number of times you debit and then credit the account is stored in transactionCount, so the total number of transactions is twice this value. You have added five further blocks of code to perform the functions indicated by the comments, so let’s now go through each of them in turn.
The Account object is created with the account number as 1 and with the initial balance stored in initialBalance. You pass the bank object, theBank, to the constructor for each of the Clerk objects, so that they can record it.
The Thread constructor requires an object of type Runnable, so you can just pass the Clerk objects in the argument. There’s no problem in doing this because the Clerk class implements the Runnable interface. You can always implicitly cast an object to a type that is any superclass of the object or any interface type that the object class implements.
All the transactions are generated in the for loop. The handling of debits is essentially the same as the handling of credits, so I go through the code only for the latter in detail. A random amount between $50 and $75 is generated for a credit transaction by using the nextInt() method for the rand object of type Random that you create. You recall that nextInt() returns an int value in the range 0 to one less than the value of the argument, so by passing 26 to the method, you get a value between 0 and 25 returned. You add 50 to this and, presto, you have a value between 50 and 75. You then use this amount to create a Transaction object that represents a credit for the account. To keep a check on the work done by the clerks, you add this credit to the total of all the credits generated, which is stored in the variable totalCredits. This enables you to verify whether or not the account has been updated properly.
Before you pass the transaction to clerk1, you must make sure that he or she isn’t busy. Otherwise, you would overwrite the clerk’s in-tray. The while loop does this. As long as the isBusy() method returns true, you continue to call the sleep() method for a 25-millisecond delay, before you go round and check again. When isBusy() returns false, you call the doTransaction() method for the clerk, with the reference to the transaction object as the argument. The for loop runs for 20 iterations, so you generate 20 random transactions of each type.
The third while loop works in the same way as the previous check for a busy clerk — the loop continues if either of the clerks is busy.
Lastly, you output the original account balance, the totals of credits and debits, and the final balance, plus what it should be for comparison. That’s all you need in the method main(), so you’re ready to give it a whirl. Remember that all four classes need to be in the same directory.
Running the Example
Now, if you run the example, the final balance is wrong. You should get results something like the following:
Original balance : $500
Total credits    : $1295
Total debits     : $880
Final balance    : $212
Should be        : $915
Of course, your results won’t be the same as this, but they should be just as wrong. The customer will not be happy. His account balance is seriously off — in the bank’s favor, of course, as always. So how has this come about?
The problem is that both clerks are operating on the same account at the same time. Both clerks call the doTransaction() method for the Bank object, so this method is executed by both clerk threads. Separate calls on the same method are overlapping.
TRY IT OUT: Synchronizing Methods
One way you can fix this is by simply declaring the method that operates on an account as synchronized. This prevents one clerk getting at the method for an account while it is still in progress with the other clerk. To implement this you should amend the Bank class definition as follows:
// Define the bank
public class Bank {
  // Perform a transaction
  synchronized public void doTransaction(Transaction transaction) {
    // Code exactly as before...
  }
}
Directory "BankOperation 2 - Synchronized Methods"
How It Works
Declaring this method as synchronized prevents a call to it from being executed while another is still in operation. If you run the example again with this change, the result is something like:
Original balance : $500
Total credits    : $1279
Total debits     : $932
Final balance    : $847
Should be        : $847
The amounts might be different because the transaction amounts are random, but your final balance should be the same as adding the credits to the original balance and subtracting the debits.
As you saw earlier, when you declare methods in a class as synchronized, it prevents concurrent execution of those methods within a single object, including concurrent execution of the same method. It is important not to let the fact that there is only one copy of a particular method confuse you. A given method can be potentially executing in any number of threads — as many threads as there are in the program, in fact. If it were not synchronized, the doTransaction() method could be executed concurrently by any number of clerks.
Although this fixes the problem in that the account balance is now correct, the bank is still amazingly inefficient. Each clerk is kicking his or her heels while another clerk is carrying out a transaction. At any given time a maximum of one clerk is working. On this basis the bank could fire them all bar one and get the same throughput. You can do better, as you see later.
Synchronizing Code Blocks
In addition to being able to synchronize methods on a class object, you can also specify a statement or a block of code in your program as synchronized, which is more powerful because you specify which particular object is to benefit from the synchronization of the statement or code block, not just the object that contains the code as in the case of a synchronized method. Here you can set a lock on any object for a given statement block. When the block that is synchronized on the given object is executing, no other code block or method that is synchronized on the same object can execute. To synchronize a statement, you just write:
synchronized(theObject)
  statement;            // Synchronized with respect to theObject
No other statements or statement blocks in the program that are synchronized on the object theObject can execute while this statement is executing. This applies even when the statement is a call to a method, which may in turn call other methods. The statement here could equally well be a block of code between braces. This is powerful stuff. Now you can lock a particular object while the code block that is working is running.
To see precisely how you can use this in practice, let’s create a modification of the last example. Let’s up the sophistication of our banking operation to support multiple accounts. To extend our example to handle more than one account, you just need to make some changes to main(). You add one extra account to keep the output modest, but you modify the code to handle any number of accounts.
TRY IT OUT: Handling Multiple Accounts
You can modify the code in main() that creates the account and sets the initial balance to create multiple accounts as follows:
public class BankOperation3 {
  public static void main(String[] args) {
    int[] initialBalance = {500, 800};                   // The initial account balances
    int[] totalCredits = new int[initialBalance.length]; // Two cr totals
    int[] totalDebits = new int[initialBalance.length];  // Two db totals
    int transactionCount = 20;                               // Number of debits and credits

    // Create the bank and the clerks...
    Bank theBank = new Bank();                               // Create a bank
    Clerk clerk1 = new Clerk(theBank );                      // Create the first clerk
    Clerk clerk2 = new Clerk(theBank );                      // Create the second clerk

    // Create the accounts, and initialize total credits and debits
    Account[] accounts = new Account[initialBalance.length];
    for(int i = 0 ; i < initialBalance.length ; ++i) {
      accounts[i] = new Account(i+1, initialBalance[i]); // Create accounts
      totalCredits[i] = totalDebits[i] = 0;
    }

    // Create the threads for the clerks as daemon, and start them off

    // Create transactions randomly distributed between the accounts...

    // Wait until both clerks are done

    // Now output the results...
  }
}
Directory "BankOperation 3 - Multiple Accounts"
The shaded lines are where the changes occur. You now create an array of accounts in a loop, the number of accounts being determined by the number of initial balances in the initialBalance array. Account numbers are assigned successively starting from 1. The code for creating the bank and the clerks and for creating the threads and starting them is exactly the same as before. The shaded comments that follow the code indicate the other segments of code in main() that you need to modify.
The next piece you need to change is the creation and processing of the transactions:
// Create transactions randomly distributed between the accounts
Random rand = new Random();
Transaction transaction;                               // Stores a transaction
int amount = 0;                                        // Stores an amount of money
int select = 0;                                    // Selects an account
for(int i = 1 ; i <= transactionCount ; ++i) {
  // Choose an account at random for credit operation
  select = rand.nextInt(accounts.length);
  amount = 50 + rand.nextInt(26);                      // Generate amount of $50 to $75
  transaction = new Transaction(accounts[select],  // Account
                          TransactionType.CREDIT,      // Credit transaction
                                amount);               //  of amount
  totalCredits[select] += amount;                  // Keep total credit tally

  // Wait until the first clerk is free
  while(clerk1.isBusy()) {
    try {
      Thread.sleep(25);                                // Busy so try later
    } catch(InterruptedException e) {
      System.out.println(e);
    }
  }
  clerk1.doTransaction(transaction);                   // Now do the credit

  // choose an account at random for debit operation
  select = rand.nextInt(accounts.length);
  amount = 30 + rand.nextInt(31);                      // Generate amount of $30 to $60
  transaction = new Transaction(accounts[select],  // Account
                          TransactionType.DEBIT,   // Debit transaction
                                amount);           //  of amount
  totalDebits[select] += amount;                   // Keep total debit tally

  // Wait until the second clerk is free
  while(clerk2.isBusy()) {
    try {
      Thread.sleep(25);                                // Busy so try later
    } catch(InterruptedException e) {
      System.out.println(e);
    }
  }
  clerk2.doTransaction(transaction);                   // Now do the debit
}
Directory "BankOperation 3 - Multiple Accounts"
The last modification you must make to the method main() is for outputting the results. You now do this in a loop, as you have to process more than one account:
// Now output the results
for(int i = 0 ; i < accounts.length ; ++i) {
  System.out.println("Account Number:"+accounts[i].getAccountNumber() + "
" +
     "Original balance    : $" + initialBalance[i] + "
" +
     "Total credits       : $" + totalCredits[i] + "
" +
     "Total debits        : $" + totalDebits[i] + "
" +
     "Final balance       : $" + accounts[i].getBalance() + "
" +
     "Should be           : $" + (initialBalance[i]
                               + totalCredits[i]
                               - totalDebits[i]) + "
");
}
Directory "BankOperation 3 - Multiple Accounts"
This is much the same as before except that you now extract values from the arrays you have created. If you run this version it works perfectly, of course. A typical set of results is:
Account Number:1
Original balance    : $500
Total credits       : $659
Total debits        : $614
Final balance       : $545
Should be           : $545

Account Number:2
Original balance    : $800
Total credits       : $607
Total debits        : $306
Final balance       : $1101
Should be           : $1101
How It Works
You now allocate arrays for the initial account balances, the totals of credits and debits for each account, and for the accounts themselves. The number of initializing values in the initialBalance[] array determines the number of elements in each of the arrays. In the for loop, you create each of the accounts with the appropriate initial balance and initialize the totalCredits[] and totalDebits[] arrays to zero.
In the modified transactions loop, you select the account from the array for both the debit and the credit transactions by generating a random index value that you store in the variable select. The index select is also used to keep a tally of the total of the transactions of each type.
This is all well and good, but by declaring the methods in the class Bank as synchronized, you’re limiting the program quite significantly. No operation of any kind can be carried out while any other operation is in progress. This is unnecessarily restrictive because there’s no reason to prevent a transaction on one account while a transaction for a different account is in progress. What you really want to do is constrain the program to prevent overlapping of operations on the same account, and this is where declaring blocks of code to be synchronized on a particular object can help.
Let’s consider the methods in the class Bank once more. What you really want is the code in the doTransaction() method to be synchronized so that simultaneous processing of the same account is prevented, not so that processing of different accounts is inhibited. What you need to do is synchronize the processing code for a transaction on the Account object that is involved.
TRY IT OUT: Applying Synchronized Code Blocks
You can do this with the following changes:
public class Bank {
  // Perform a transaction
  public void doTransaction(Transaction transaction) {
    switch(transaction.getTransactionType()) {
      case CREDIT:
        synchronized(transaction.getAccount()) {
          // Get current balance
          int balance = transaction.getAccount().getBalance();
          // Credits require a lot of checks...
          try {
            Thread.sleep(100);

          } catch(InterruptedException e) {
            System.out.println(e);
          }
          balance += transaction.getAmount();               // Increment the balance
          transaction.getAccount().setBalance(balance); // Restore A/C balance
          break;
        }

      case DEBIT:
        synchronized(transaction.getAccount()) {
          // Get current balance
          int balance = transaction.getAccount().getBalance();

          // Debits require even more checks...
          try {
            Thread.sleep(150);

          } catch(InterruptedException e) {
            System.out.println(e);
          }
          balance -= transaction.getAmount();              // Decrement the balance...
          transaction.getAccount().setBalance(balance);// Restore A/C balance
          break;
        }

      default:                                             // We should never get here
        System.out.println("Invalid transaction");
        System.exit(1);
    }
  }
}
Directory "BankOperation 4 - Synchronized Code Blocks"
How It Works
The expression in parentheses following the keyword synchronized specifies the object for which the synchronization applies. Once one synchronized code block is entered with a given account object, no other code block or method can be entered that has been synchronized on the same object. For example, if the block performing credits is executing with a reference to the object accounts[1] returned by the getAccount() method for the transaction, the execution of the block carrying out debits cannot be executed for the same object, but it could be executed for a different account.
The object in a synchronized code block acts rather like a baton in a relay race that serves to synchronize the runners in the team. Only the runner with the baton is allowed to run. The next runner in the team can run only after he gets hold of the baton. Of course, in any race you have several different batons so you can have several sets of runners. In the same way, you can specify several different sets of synchronized code blocks in a class, each controlled by a different object. It is important to realize that code blocks that are synchronized with respect to a particular object don’t have to be in the same class. They can be anywhere in your program where the appropriate object can be specified.
Note how you had to move the code to access and restore the account balance inside both synchronized blocks. If you hadn’t done this, accessing or restoring the account balance could occur while a synchronized block was executing. This could obviously cause confusion because a balance could be restored by a debit transaction after the balance had been retrieved for a credit transaction. This would cause the effect of the debit to be wiped out.
If you want to verify that we really are overlapping these operations in this example, you can add output statements to the beginning and end of each method in the class Bank. Outputting the type of operation, the amount, and whether it is the start or end of the transaction is sufficient to identify them. For example, you could modify the doTransaction() method in the Bank class to:
// Perform a transaction
public void doTransaction(Transaction transaction) {
  switch(transaction.getTransactionType()) {
    case CREDIT:
      synchronized(transaction.getAccount()) {
        System.out.println("Start credit of " +
                transaction.getAccount() + " amount: " +
                transaction.getAmount());

        // code to process credit...

        System.out.println("  End credit of " +
                transaction.getAccount() + " amount: " +
                transaction.getAmount());
        break;
      }

    case DEBIT:
      synchronized(transaction.getAccount()) {
        System.out.println("Start debit of " +
                transaction.getAccount() + " amount: " +
                transaction.getAmount());
        // code to process debit...
        System.out.println("  End debit of " +
                transaction.getAccount() + " amount: " +
                transaction.getAmount());
        break;
      }

    default:                                       // We should never get here
      System.out.println("Invalid transaction");
      System.exit(1);
  }
}
This produces quite a lot of output, but you can always comment it out when you don’t need it. You should be able to see how a transaction for an account that is currently being worked on is always delayed until the previous operation on the account is completed. You can also see from the output that operations on different accounts do overlap. Here’s a sample of what I got:
Start debit of A/C No. 2 : $800 amount: 34
Start credit of A/C No. 1 : $500 amount: 72
  End credit of A/C No. 1 : $572 amount: 72
  End debit of A/C No. 2 : $766 amount: 34
Start credit of A/C No. 2 : $766 amount: 69
  End credit of A/C No. 2 : $835 amount: 69
Start debit of A/C No. 2 : $835 amount: 43
  End debit of A/C No. 2 : $792 amount: 43
Start credit of A/C No. 2 : $792 amount: 59
  End credit of A/C No. 2 : $851 amount: 59
Start debit of A/C No. 1 : $572 amount: 45
  End debit of A/C No. 1 : $527 amount: 45
Start credit of A/C No. 1 : $527 amount: 52
  End credit of A/C No. 1 : $579 amount: 52
Start debit of A/C No. 1 : $579 amount: 45
Start credit of A/C No. 2 : $851 amount: 64
...
You can see from the first two lines here that a credit for account 1 starts before the preceding debit for account 2 is complete, so the operations are overlapped. The overlapping of operations is affected by the number of processors in your PC. If you want to force overlapping debits and credits on the same account, you can comment out the calculation of the value for select for the debit operation in the for loop in main(). This modification is shown in bold:
// Generate a random account index for debit operation
// select = rand.nextInt(accounts.length);
totalDebits[select] += amount;              // Keep total debit tally
This makes the debit transaction apply to the same account as the previous credit, so the transactions are always contending for the same account.
Of course, this is not the only way of getting the operations to overlap. Another approach would be to equip accounts with methods to handle their own credit and debit transactions and declare these as synchronized methods.
Although testing that you have synchronization right is relatively easy in our example, in general it is extremely difficult to be sure you have adequately tested a program that uses threads. Getting the design right first is essential, and you really have no substitute for careful design in programs that have multiple threads (or indeed any real-time program that has interrupt handlers). You can never be sure that a real-world program is 100 percent correct — only that it works correctly most of the time!
Deadlocks
Because you can synchronize code blocks for a particular object virtually anywhere in your program, there’s potential for a particularly nasty kind of bug called a deadlock. This involves a mutual interdependence between two threads. One way this arises is when one thread executes some code synchronized on a given object, theObject, say, and then needs to execute another method that contains code synchronized on another object, theOtherObject, say. Before this occurs, though, a second thread executes some code synchronized to theOtherObject and needs to execute a method containing code synchronized to the first object, theObject. This situation is illustrated in Figure 16-8.

The sequence of events is as follows:
- thread1 starts first and synchronizes on theObject. This prevents any methods for theObject being called by any other thread.
- thread1 then calls sleep() so thread2 can start.
- thread2 starts and synchronizes on theOtherObject. This prevents any methods for theOtherObject being called by any other thread.
- thread2 then calls sleep(), allowing thread1 another go.
- thread1 wakes up and tries to call method2() for theOtherObject, but it can’t until the code block in thread2 that is synchronized on theOtherObject completes execution.
- thread2 gets another go because thread1 can’t proceed and tries to call method1() for theObject. This can’t proceed until the code block in thread1 that is synchronized on theObject completes execution.
Neither thread has any possibility of continuing — they are deadlocked. Finding and fixing this sort of problem can be very difficult, particularly if your program is complicated and has other threads that continue to execute.
You can create a trivial deadlock in the last example by making the for loop in main() synchronized on one of the accounts. For example:
synchronized(accounts[1]) {
  for(int i = 1 ; i <= transactionCount ; ++i) {
    // code for generating transactions etc...
  }
}
A deadlock occurs as soon as a transaction for accounts[1] arises because the doTransaction() method in the theBank object that is called by a Clerk object to handle the transaction is synchronized to the same object and can’t execute until the loop ends. Of course, the loop can’t continue until the method in the theBank object terminates, so the program hangs.
In general, ensuring that your program has no potential deadlocks is extremely difficult. If you intend to do a significant amount of programming using threads, you need to study the subject in much more depth than I can deal with here.
An executor is an object that you can use to start and manage threads. This can make thread programming much easier and more efficient. An executor can execute a Runnable task, which is the kind of task that is already familiar to you. It can also execute a Callable<V> task, which is a task that can execute in a separate thread, just like a Runnable task, but which also returns a value on completion. The type parameter, V, for the interface is the type of the value to be returned by the class, so a Callable<> class type must implement the interface with the appropriate type specified.
The Callable<> interface specifies just one method, call(), that a Callable<> object must implement. The call() method is the equivalent of the run() method in the Runnable interface, but in addition returns a value when the method terminates. Thus you can define a task that you want to execute as a separate thread either by a class that implements the Runnable interface, or by a class that implements the Callable<> interface when you want the task to return a value.
The java.util.concurrent.Executors class provides static factory methods for creating executor objects. I introduce you to java.util.concurrent.ExecutorService objects as an example of how you can use an executor. You can create an ExecutorService object like this:
ExecutorService threadPool = Executors.newCachedThreadPool();
This creates an object that creates new threads as required. Each time you use the threadPool object to start another task, either an existing thread in the pool that is currently no longer running is used, or a new thread is created and added to the thread pool. If you want to limit the number of threads that might be created, you can create a thread pool with a fixed number of threads, like this:
int nThreads = 5;
ExecutorService threadPool = Executors.newFixedThreadPool(nThreads);
This fragment creates a thread pool that contains up to nThreads threads. Starting a new task using the threadPool object results in the task being executed in a new thread as long as there are fewer than nThreads threads already in operation. If all threads in the pool have been allocated, the new task is placed in a queue to wait until one of the existing threads becomes free. All the threads in the pool continue to exist until threadPool is shut down. The method throws an exception of type IllegalArgumentException if you specify the maximum number of threads to be less than 1.
ExecutorService is an interface type that is implemented by several classes in the java.util.concurrent package. Both of the methods from the Executors class that I have introduced return a reference to an object of type ThreadPoolExecutor, and the functionality is described by the ExecutorService interface. Let’s look at how you use a ThreadPoolExecutor object.
Working with an Executor
The methods specified by the ExecutorService interface enable you to submit new tasks to be executed in a new thread or an existing unused thread within a thread pool. The interface declares three versions of the submit() method: two for starting tasks that are Runnable objects and one for starting Callable<> tasks. You start a Runnable task like this:
ExecutorService threadPool = Executors.newCachedThreadPool();
Future<?> future = threadPool.submit(clerk1);
This fragment starts the Runnable task, clerk1, that is a Clerk object from the previous example. In general, the submit() method returns a reference of type java.util.concurrent.Future<V> that reflects the state of the task at any time, and eventually encapsulates the result of executing a task, the result being of type V. A Runnable task does not return a result so the value returned by submit will be of type Future<?>.
The second submit() method for a Runnable task accepts a second argument of type V that specifies the result that is to be returned when the task completes. This enables you to ensure that the result you specify is encapsulated by the Future<V> object when the task finishes.
I’ll discuss the other version of the submit() method and then return to the question of what you can do with a Future<V> object.
Executing Callable<V> Tasks
A task that executes in a thread and returns a result must implement the Callable<> interface that declares the call() method. The result that the call() method returns is the result of executing the task. You can execute a Callable<> task in a thread pool like this:
Future<String> future = threadPool.submit(callableTask);
This statement executes the task, callableTask, and the future object encapsulates the result of executing the task that, in this instance, is an object of type String.
All versions of the submit() method throw an exception of type NullPointerException if the task argument is null and throw an exception of type java.util.concurrent.RejectedExecutionException if the task cannot be executed for some reason.
Future<V> Object Methods
The Future<> reference that the submit() method returns is returned immediately, before the task completes execution. The Future<> object therefore provides a way to access the executing task and determine its state. You can use the Future<> object to cancel execution of the task to which it relates:
if(future.cancel(true)) {
  System.out.println("Task has been cancelled.");
} else {
  System.out.println("Task could not be cancelled.");
}
The argument to the cancel() method should be specified as true if the task should be interrupted. If you specify the argument as false and the task is still executing, it is allowed to continue. The method returns false if the task could not be cancelled and true otherwise.
You can call the isCancelled() method for a Future<> object to determine whether or not the task was canceled before it completed normally. The method returns true if the task was canceled and false otherwise. If the task has ended, calling the isDone() method returns true; it returns false if the task is still running.
You obtain the result of executing a task by calling the get() method for the Future<> object that relates to it. There are two versions of get(). The first has no parameters and you call it like this:
String result = null;
try {
  result = future.get();
} catch(CancellationException e) {
  System.out.println("Task was cancelled before a result was obtained.");
} catch(InterruptedException e) {
  System.out.println(
             "Current thread was interrupted while awaiting a result.");
} catch(ExecutionException e) {
  System.out.println("Task threw an exception: ");
  Throwable cause = e.getCause();
  if(cause == null) {
    System.out.println("Cause could not be determined.");
  } else {
    System.out.println(cause);
  }
}
The future reference here relates to a Callable<String> task that returns a String object. The get() method will block if the task is still running and returns the result when the task has completed. The method throws java.util.concurrent.CancellationException if the task was canceled so the result cannot be returned. This exception has RuntimeException as a base class and need not be caught. The method can also throw an exception of type ExecutionException if the task threw an exception, and, in this case, calling getCause() for the exception object returns a Throwable reference identifying the cause of the exception or null if the cause could not be determined. The method throws an exception of type InterruptedException if the current thread was interrupted while waiting for the task to complete.
The second version of get() enables you to avoid the possibility of the method blocking indefinitely. It requires two arguments, a value of type long specifying the maximum number of time units the method should wait for the task to complete before returning, and a constant from the java.util.concurrent.TimeUnit enumeration that specifies the time unit for the first argument. The enumeration defines the following constants:
Obviously, you are most likely to be using MILLISECONDS or possibly SECONDS as the value for the second argument to the get() method.
Shutting down a Thread Pool
Calling shutdown() for an ExecutorService object starts the process of shutting down a thread pool by closing it to new tasks. Existing tasks continue to run. You typically want to wait for tasks in a thread pool to complete before closing it and the awaitTermination() method does that. Here’s how you might use it:
threadPool.shutdown();
try {
  if(threadPool.awaitTermination(100L, TimeUnit.MILLISECONDS)) {
    System.out.println("All tasks completed.");
  } else {
    System.out.println("Tasks failed to complete.");
  }
} catch(InterruptedException e) {
  System.out.println("Current thread interrupted awaiting termination.");
}
The awaitTermination() waits for tasks in the thread pool to complete for the time you specify by the two arguments. The method returns false if all the tasks did not complete in that timeframe.
You can shut down the tasks in a thread pool by calling its shutdownNow() method:
List<Runnable> tasks = threadPool.shutdownNow();
This attempts to shut down all the tasks in the thread pool although the result is not guaranteed. The method cancels tasks that are running by calling interrupt() for each thread so tasks that do not respond to being interrupted do not shut down. The method returns a reference to a list containing references to those tasks in the thread pool that were waiting to start execution when shut down occurred.
You can test whether all tasks in a thread pool have been shut down by calling the isTerminated() method for the ExecutorService object. This method returns true if either shutdown() or shutdownNow() has been called and all tasks have ended. The isShutdown() method returns true if the executor has been shut down.
Let’s try an executor in an example.
TRY IT OUT: Using an Executor
This example implements a version of the bank using an executor to execute the treads. The Account and Transaction classes and the TransactionType enum are the same as for the previous example. I call the class that defines the main() method UsingExecutors.
In this version of the bank, you create debit and credit transactions as tasks executing in separate threads that submit transactions to the clerks. The tasks that create transactions are Callable<> tasks because they need to return the total value of the debit or credit transactions that have been created for each account.
Generating Transactions
Here’s a definition of the class identifying a source of transactions:
// Generates transactions for clerks
import java.util.Random;
import java.util.Vector;
import java.util.concurrent.Callable;

public class TransactionSource implements Callable<int[]> {

  // Constructor
  public TransactionSource(TransactionType type, int maxTrans,
                                Vector<Account> accounts, Vector<Clerk> clerks) {
    this.type = type;
    this.maxTrans = maxTrans;
    this.accounts = accounts;
    this.clerks = clerks;
    totals = new int[accounts.size()];
  }

  // The source of transactions
  public int[] call() {
    // Create transactions randomly distributed between the accounts
    Random rand = new Random();
    Transaction transaction = null;                       // Stores a transaction
    int amount = 0;                                       // Stores an amount of money
    int select = 0;                                       // Selects an account
    boolean done = false;
    for(int i = 1 ; i <= maxTrans ; ++i) {
      // Generate a random account index for  operation
      select = rand.nextInt(accounts.size());
      amount = 50 + rand.nextInt(26);           // Generate amount $50 to $75
      transaction = new Transaction(accounts.get(select), // Account
                                    type,                 // Transaction type
                                    amount);              //  of amount
      totals[select] += amount;                           // Keep total tally for account
      done = false;
      while(true) {
        // Find a clerk to do the transaction
        for(Clerk clerk : clerks) {
          if(done = clerk.doTransaction(transaction))
            break;
        }
        if(done) {
          break;
        }

        // No clerk was free so wait a while
        try {
          Thread.sleep(10);
        } catch(InterruptedException e) {
          System.out.println(" TransactionSource
" + e);
          return totals;
        }
      }
      if(Thread.interrupted()) {
        System.out.println("Interrupt flag for "+ type +
                                     " transaction source set. Terminating.");
        return totals;
      }
    }
    return totals;
  }

  private TransactionType type;
  private int maxTrans;
  private Vector<Account> accounts;
  private Vector<Clerk> clerks;
  private int[] totals;
}
Directory "UsingExecutors"
The class implements Callable<int[]> because a task returns an array of values of type int. The constructor expects four arguments: the type of transactions to be generated, DEBIT or CREDIT, the maximum number of transactions to be created, a reference to a Vector<Account> containing the accounts, and a reference to a Vector<Clerk> containing the clerks. The constructor just stores these in the object and creates an array of the appropriate size to store the total value of the transactions created for each account.
The call() method returns a reference of type int[], which is a reference to the array of totals. The for loop generates the transactions in much the same way as the previous example. Having created a transaction, the method tries to assign the transaction to a clerk in an indefinite while loop. It searches through the clerks vector to find a clerk that can accept a transaction; you implement the doTransaction() method for a Clerk object to return true if the transaction can be accepted and false otherwise. If a clerk accepts the transaction, the indefinite while loop is terminated and the outer for loop continues.
If no clerk is free, the method calls sleep() to wait a while before trying again to see if a clerk has become free. This continues until a clerk does become free or until the thread is interrupted.
On each iteration of the outer for loop that generates transactions, you call the static interrupted() method for the Thread class to allow the possibility for the thread to be canceled externally. If you don’t do this, the only possibility for canceling the thread is while it is sleeping. When the call() method ends, it returns a reference to the totals array.
Defining a Clerk
Each clerk also runs as a separate thread, but because a clerk does not need to return a value, you can define it as a Runnable class:
import java.util.List;
import java.util.Collections;
import java.util.LinkedList;

public class Clerk implements Runnable {
  // Constructor
  public Clerk(int ID, Bank theBank) {
    this.ID = ID;
    this.theBank = theBank;            // Who the clerk works for
  }

  // Receive a transaction
  synchronized public boolean doTransaction(Transaction transaction) {
    if(inTray.size() >= maxTransactions)
      return false;
    inTray.add(transaction);           // Add transaction to the list
    return true;
  }

  // The working clerk...
   public void run() {
    while(true) {
      while(inTray.size() == 0) {       // No transaction waiting?
        try {
          Thread.sleep(200);            // then take a break
          if(inTray.size() != 0)
            break;
          else
            return;
        } catch(InterruptedException e) {
          System.out.println("Clerk " + ID + "
" + e);
          return;
        }
      }
      theBank.doTransaction(inTray.remove(0));
      if(Thread.interrupted()) {
        System.out.println(
                     "Interrupt flag for Clerk " + ID + " set. Terminating.");
        return;
      }
    }
  }

  int ID;
  private Bank theBank;
  private List<Transaction> inTray =    // The in-tray holding transactions
                   Collections.synchronizedList(new LinkedList<Transaction>());
  private int maxTransactions = 8;      // Maximum transactions in the in-tray
}
Directory "UsingExecutors"
The Clerk constructor requires two arguments: an integer value that identifies a particular clerk and a reference to the bank. Transactions are stored in a List<Transaction> collection that is the in-tray for a clerk. The List<Transaction> object is created as a synchronized list from a LinkedList<Transaction> object using a static utility method that is defined in the Collections class. Using a synchronized list ensures that there is no concurrent access to the list by a transaction source thread, which involves the doTransaction() method for a Clerk object, and a Clerk thread, which is the run() method for a Clerk object.
A clerk has an in-tray of a limited size specified by the maxTransactions member and does not accept transactions if the in-tray is full. The doTransaction() method returns true if the transaction can be added to the in-tray returns false otherwise. The doTransaction() method is also synchronized to ensure that only one transaction source can communicate with a given clerk at one time.
In the run() method, a clerk sleeps if there are no transaction in inTray. Each time a clerk completes a transaction, the interrupted() method is called to allow for cancellation of the Clerk thread.
Defining the Bank
The bank is defined by the Bank class, much as you have seen earlier:
public class Bank {
  // Perform a transaction
  public void doTransaction(Transaction transaction) {
    synchronized(transaction.getAccount()) {
      int balance = 0;
      switch(transaction.getTransactionType()) {
        case CREDIT:
          System.out.println("Start credit of " +
                  transaction.getAccount() + " amount: " +
                  transaction.getAmount());

            // Get current balance
            balance = transaction.getAccount().getBalance();

            // Credits require a lot of checks...
            try {
              Thread.sleep(100);

            } catch(InterruptedException e) {
              System.out.println(e);
            }
            balance += transaction.getAmount();          // Increment the balance
            transaction.getAccount().setBalance(balance);// Restore A/C balance
            System.out.println("  End credit of " +
                    transaction.getAccount() + " amount: " +
                    transaction.getAmount());
            break;
        case DEBIT:
            System.out.println("Start debit of " +
                    transaction.getAccount() + " amount: " +
                    transaction.getAmount());

            // Get current balance
            balance = transaction.getAccount().getBalance();

            // Debits require even more checks...
            try {
              Thread.sleep(150);

            } catch(InterruptedException e) {
              System.out.println(e);
            }
            balance -= transaction.getAmount();          // Decrement the balance...
            transaction.getAccount().setBalance(balance);// Restore A/C balance

            System.out.println("  End debit of " +
                    transaction.getAccount() + " amount: " +
                    transaction.getAmount());
            break;

        default:                                         // We should never get here
          System.out.println("Invalid transaction");
          System.exit(1);
      }
    }
  }
}
Directory "UsingExecutors"
The doTransaction() method for the Bank object is executed in a Clerk thread. The code in the doTransaction() method for the bank is synchronized on the account to which the transaction applies. This ensures that only one clerk can access any given account at a time. As before, debits take longer than credits to process. The doTransaction() method includes output for each transaction that is processed so you can see all the details of what goes on in the bank before that final accounts are displayed.
Running Banking Operations
The main() method creates and initiates all the threads that operate the bank. Here’s the class definition:
import java.util.Vector;
import java.util.concurrent.Executors;
import java.util.concurrent.ExecutorService;
import java.util.concurrent.Future;
import java.util.concurrent.ExecutionException;
import java.util.concurrent.TimeUnit;

public class UsingExecutors {

    public static void main(String[] args) {
      int[] initialBalance = {500, 800};        // The initial account balances
      int[] totalCredits = new int[initialBalance.length]; // Two cr totals
      int[] totalDebits = new int[initialBalance.length];  // Two db totals
      int transactionCount = 20;             // Number of debits and of credits
      int clerkCount = 2;

      // Create the account, the bank, and the clerks...
      Bank theBank = new Bank();                           // Create a bank
      Vector<Clerk> clerks = new Vector<Clerk>();          // Stores the clerk
      Vector<Account> accounts = new Vector<Account>();    // Stores the accounts

      for(int i = 0 ; i < clerkCount ; ++i) {
        clerks.add(new Clerk(i+1, theBank));               // Create the clerks
      }

      for(int i = 0 ; i < initialBalance.length ; ++i) {
        accounts.add(new Account(i+1, initialBalance[i])); // Create accounts
        totalCredits[i] = totalDebits[i] = 0;
      }

      ExecutorService threadPool = Executors.newCachedThreadPool();

      // Create and start the transaction source threads
      Future<int[]> credits = threadPool.submit(new TransactionSource(
                  TransactionType.CREDIT, transactionCount, accounts, clerks));
      Future<int[]> debits = threadPool.submit(new TransactionSource(
                  TransactionType.DEBIT, transactionCount, accounts, clerks));

      // Create and start the clerk threads
      for(Clerk clerk : clerks) {
        threadPool.submit(clerk);
      }
      try {
        totalCredits = credits.get();
        totalDebits = debits.get();
      } catch(ExecutionException e) {
        System.out.println(e.getCause());
      } catch(InterruptedException e) {
        System.out.println(e);
      }

      // Orderly shutdown when all threads have ended
      threadPool.shutdown();
      try {
        threadPool.awaitTermination(10L, TimeUnit.SECONDS);
      } catch(InterruptedException e) {
        System.out.println(e);
      }

      if(threadPool.isTerminated()) {
        System.out.println("
All clerks have completed their tasks.
");
      } else {
        System.out.println("
Clerks still running - shutting down anyway.
");
        threadPool.shutdownNow();
      }


    // Now output the results
    for(int i = 0 ; i < accounts.size() ; ++i) {
      System.out.println("Account Number:"+accounts.get(i).getAccountNumber()+"
"+
         "Original balance    : $" + initialBalance[i] + "
" +
         "Total credits       : $" + totalCredits[i] + "
" +
         "Total debits        : $" + totalDebits[i] + "
" +
         "Final balance       : $" + accounts.get(i).getBalance() + "
" +
         "Should be           : $" + (initialBalance[i]
                                   + totalCredits[i]
                                    totalDebits[i]) + "
");
    }
  }
}
Directory "UsingExecutors"
When I ran the example, I got the following output:
Start credit of A/C No. 2 : $800 amount: 62
  End credit of A/C No. 2 : $862 amount: 62
Start debit of A/C No. 1 : $500 amount: 66
Start credit of A/C No. 2 : $862 amount: 54
  End credit of A/C No. 2 : $916 amount: 54
Start debit of A/C No. 2 : $916 amount: 53
  End debit of A/C No. 1 : $434 amount: 66
Start credit of A/C No. 1 : $434 amount: 56
  End credit of A/C No. 1 : $490 amount: 56
  End debit of A/C No. 2 : $863 amount: 53
Start debit of A/C No. 1 : $490 amount: 58
  End debit of A/C No. 1 : $432 amount: 58
Start credit of A/C No. 1 : $432 amount: 61
Start credit of A/C No. 2 : $863 amount: 61
  End credit of A/C No. 1 : $493 amount: 61
  End credit of A/C No. 2 : $924 amount: 61
Start debit of A/C No. 1 : $493 amount: 51
  End debit of A/C No. 1 : $442 amount: 51
Start credit of A/C No. 2 : $924 amount: 72
Start debit of A/C No. 1 : $442 amount: 53
  End credit of A/C No. 2 : $996 amount: 72
Start debit of A/C No. 2 : $996 amount: 50
  End debit of A/C No. 1 : $389 amount: 53
  End debit of A/C No. 2 : $946 amount: 50
Start credit of A/C No. 1 : $389 amount: 67
Start credit of A/C No. 2 : $946 amount: 62
  End credit of A/C No. 1 : $456 amount: 67
  End credit of A/C No. 2 : $1008 amount: 62
Start debit of A/C No. 2 : $1008 amount: 65
Start debit of A/C No. 1 : $456 amount: 50
  End debit of A/C No. 1 : $406 amount: 50
  End debit of A/C No. 2 : $943 amount: 65
Start credit of A/C No. 2 : $943 amount: 51
  End credit of A/C No. 2 : $994 amount: 51
Start debit of A/C No. 2 : $994 amount: 66
  End debit of A/C No. 2 : $928 amount: 66
Start credit of A/C No. 1 : $406 amount: 71
Start credit of A/C No. 2 : $928 amount: 64
  End credit of A/C No. 2 : $992 amount: 64
Start credit of A/C No. 2 : $992 amount: 53
  End credit of A/C No. 1 : $477 amount: 71
Start credit of A/C No. 1 : $477 amount: 72
  End credit of A/C No. 2 : $1045 amount: 53
  End credit of A/C No. 1 : $549 amount: 72
Start debit of A/C No. 1 : $549 amount: 58
  End debit of A/C No. 1 : $491 amount: 58
Start debit of A/C No. 1 : $491 amount: 54
  End debit of A/C No. 1 : $437 amount: 54
Start credit of A/C No. 2 : $1045 amount: 73
Start credit of A/C No. 1 : $437 amount: 55
  End credit of A/C No. 2 : $1118 amount: 73
  End credit of A/C No. 1 : $492 amount: 55
Start credit of A/C No. 1 : $492 amount: 50
  End credit of A/C No. 1 : $542 amount: 50
Start debit of A/C No. 2 : $1118 amount: 65
Start credit of A/C No. 1 : $542 amount: 69
  End credit of A/C No. 1 : $611 amount: 69
Start credit of A/C No. 1 : $611 amount: 69
  End debit of A/C No. 2 : $1053 amount: 65
  End credit of A/C No. 1 : $680 amount: 69
Start credit of A/C No. 2 : $1053 amount: 60
Start debit of A/C No. 1 : $680 amount: 67
  End credit of A/C No. 2 : $1113 amount: 60
  End debit of A/C No. 1 : $613 amount: 67
Start debit of A/C No. 1 : $613 amount: 55
  End debit of A/C No. 1 : $558 amount: 55
Start credit of A/C No. 2 : $1113 amount: 71
Start debit of A/C No. 1 : $558 amount: 75
  End credit of A/C No. 2 : $1184 amount: 71
Start debit of A/C No. 2 : $1184 amount: 59
  End debit of A/C No. 1 : $483 amount: 75
  End debit of A/C No. 2 : $1125 amount: 59
Start debit of A/C No. 1 : $483 amount: 54
Start debit of A/C No. 2 : $1125 amount: 72
  End debit of A/C No. 1 : $429 amount: 54
  End debit of A/C No. 2 : $1053 amount: 72
Start debit of A/C No. 2 : $1053 amount: 66
  End debit of A/C No. 2 : $987 amount: 66
Start debit of A/C No. 1 : $429 amount: 63
  End debit of A/C No. 1 : $366 amount: 63

All clerks have completed their tasks.

Account Number:1
Original balance    : $500
Total credits       : $570
Total debits        : $704
Final balance       : $366
Should be           : $366

Account Number:2
Original balance    : $800
Total credits       : $683
Total debits        : $496
Final balance       : $987
Should be           : $987
When you run the example, you will almost certainly see different output.
How It Works
The initialization in main() that occurs before the ExecutorService object is created is much the same as the previous example. The principle difference is that the clerks and accounts are now stored in Vector<> collection objects. You have the possibility of specifying an arbitrary number of accounts by increasing the number of values in the initialBalance array and increasing the number of clerks by changing the value specified for clerkCount. If you want more transactions, just change the value of transactionCount. I kept the number low for everything to keep the volume of output at modest levels.
After the accounts and clerks have been created, you obtain an ExecutorService reference to an executor object by calling the newCachedThreadPool() factory method from the Executors class:
ExecutorService threadPool = Executors.newCachedThreadPool();
This provides as many threads as you require.
You create the TransactionSource objects in the arguments to the submit() method for the ExecutorService object:
      Future<int[]> credits = threadPool.submit(new TransactionSource(
                 TransactionType.CREDIT, transactionCount, accounts, clerks));
      Future<int[]> debits = threadPool.submit(new TransactionSource(
                 TransactionType.DEBIT, transactionCount, accounts, clerks));
You only need references to the Future<> objects that are returned by the submit() method because these give you access to the value returned by the Callable<> threads as well as the means of controlling their execution. The type parameter for the Future<> type specification corresponds to the type of value that each thread returns. After executing these statement, you have two new threads running.
You create and start the Clerk threads in a loop:
      for(Clerk clerk : clerks) (
        threadPool.submit(clerk);
      }
This creates and starts a thread for each Clerk object in the clerks vector. After executing this loop you have a total of five threads running, including the main thread.
You retrieve the values returned by the TransactionSource threads by calling the get() method for the Future<> object that is returned when you call submit() for the ExecutorService object. This occurs in a try block to deal with the exceptions that can be thrown.
Before producing the final output summarizing the status of each account, you shut down the threads and the thread pool in an orderly fashion. The first step is to call shutdown() for the threadPool object to ensure no further threads can start. You then call awaitTermination() to wait for the threads to terminate. The method waits for up to 10 seconds for all the threads to end and continues execution if they do not. If all the clerks have not completed their tasks after 10 seconds, you shut down the thread pool anyway and output the results.
All threads have a priority that determines which thread is executed when several threads are waiting for their turn. This makes it possible to give one thread more access to processor resources than another. Let’s consider an elementary example of how this could be used. Suppose you have one thread in a program that requires all the processor resources — some solid long-running calculation — and some other threads that require relatively few resources. By making the thread that requires all the resources a low-priority thread, you ensure that the other threads are executed promptly while the processor bound thread can make use of the processor cycles that are left over after the others have had their turn.
The possible values for thread priority are defined in static data members of the class Thread. These members are of type int and are declared as final. The maximum thread priority is defined by the member MAX_PRIORITY, which has the value 10. The minimum priority is MIN_PRIORITY, defined as 1. The value of the default priority that is assigned to the main thread in a program is NORM_PRIORITY, which is set to 5. When you create a thread, its priority is the same as that of the thread that created it.
You can modify the priority of a thread by calling the setPriority() method for the Thread object representing the thread. This method accepts an argument of type int that defines the new priority for the thread. An IllegalArgumentException is thrown if you specify a priority that is less than MIN_PRIORITY or greater than MAX_PRIORITY.
If you’re going to be messing about with the priorities of the threads in your program, you need to be able to find out the current priority for a thread. You can do this by calling the getPriority() method for the Thread object. This returns the current priority for the thread as a value of type int.
You need to keep in mind that the actual execution priority of a thread that you set by calling setPriority() depends on the mapping between Java thread priorities and the native operating system priorities. The thread scheduling algorithm that your operating system uses also affects how your Java threads execute and what proportion of the processor time they are allocated.
Using Thread Priorities
In the last example, you could set priorities for the threads by modifying the Clerk and TransactionSource class constructors to accept an extra argument of type int. This would provide you with a program to play with the effect of setting different thread priorities and you could experiment with different delays for doing transactions in the bank. For example, you could change the Clerk class constructor to:
  public Clerk(int ID, Bank theBank, int priority) {
    this.ID = ID;
    this.theBank = theBank;           // Who the clerk works for
    this.priority = priority;
  }
You also need to add a new data member to the class to store the priority for the thread:
private int priority;
Of course, you can’t set the thread priority in the constructor. This is an easy mistake to make if you don’t think about what is going on. The constructor is executed in the main thread, not in the working clerk thread. The place to set the priority for the clerk thread is at the beginning of the run() method. You need to add the following as the first statement in the run() method:
Thread.currentThread().setPriority(priority); // Set priority for thread
This obtains a reference to the current thread by calling the static currentThread() method and then uses that to call setPriority() for the thread.
The TransactionSource class constructor could be changed in a similar way:
  public TransactionSource(TransactionType type, int maxTrans,
                Vector<Account> accounts, Vector<Clerk> clerks, int priority) {
    this.type = type;
    this.maxTrans = maxTrans;
    this.accounts = accounts;
    this.clerks = clerks;
    this.priority = priority;
    totals = new int[accounts.size()];
  }
You also need to add the priority member to the class. Setting the priority for the thread should be the first statement in the call() method — it’s the same statement as in the run() method in the Clerk class.
The main() method needs to be changed so the constructor calls pass a value for the priority of each thread. Here’s how you might set priorities for the clerk threads:
      int priority = 0;
      for(int i = 0 ; i < clerkCount ; ++i) {
        priority = i%2 == 0 ? Thread.MIN_PRIORITY + (i + 1) : Thread.MAX_PRIORITY - (i + 1);
        if(priority < Thread.MIN_PRIORITY || priority > Thread.MAX_PRIORITY)
          priority = Thread.NORM_PRIORITY;
        clerks.add(new Clerk(i+1, theBank, priority));    // Create the clerks
      }
This assigns priorities alternating between high and low priorities to get a large divergence between the threads. If the number of clerks was set greater than MAX_PRIORITY− 1, you could end up with invalid priority values so the if statement verifies that everything is legal and sets NORM_PRIORITY in place of invalid values.
You could amend the calls to the TransactionSource constructor to the following:
      Future<int[]> credits = threadPool.submit(
                new TransactionSource(
                           TransactionType.CREDIT, transactionCount,
                           accounts, clerks, Thread.MAX_PRIORITY-1));
      Future<int[]> debits = threadPool.submit(
                           new TransactionSource(
                           TransactionType.DEBIT, transactionCount,
                           accounts, clerks, Thread.MIN_PRIORITY+1));
I won’t go through this in detail as the example really is just for experimenting with threads. The complete example is in the download in the SettingThreadPriorities directory. This includes some changes to track which clerk is doing each transaction. Whether or not thread priorities have any effect depends on your operating system. If it doesn’t support thread priorities, then setting thread priorities in your Java code has no effect. Try out the program to see what happens.
In this chapter you learned about threads and the basics of how you can create and manage them. You use threads from time to time in examples later in this book, so be sure you don’t move on from here without being comfortable with the basic ideas of how you create and start a thread.
In general, thread programming is not for the faint-hearted. Thread programming is difficult, even for experienced programmers. It is hard for most people to visualize clearly what is happening when multiple threads are executing and it is easy to get things wrong, sometimes in very subtle ways. It is therefore something to venture into only when there are clear performance benefits to be gained.
EXERCISES
You can download the source code for the examples in the book and the solutions to the following exercises from www.wrox.com.
1. Modify the UsingExecutors example in the chapter so that each transaction is a debit or a credit at random.
2. Modify the result of the previous exercise to allow an arbitrary number of transaction source objects to be in effect.
3. Extend the result of the previous exercise to incorporate two supervisors for two teams of clerks, where the supervisors each run in their own thread. The supervisor threads should receive transactions from transaction sources and pass them to the clerks they supervise. The supervisors’ work should result in a variable time delay in transferring transaction to the clerks of between 100 and 500 milliseconds.

• WHAT YOU LEARNED IN THIS CHAPTER
| TOPIC | CONCEPT |
| Threads | Threads are subtasks in a program that can be executing concurrently. |
| Thread Objects | A thread is represented by an object of the class Thread. Execution of a thread begins with the execution of the run() method defined in the class Thread. |
| Thread Code | You define the code to be executed in a thread by implementing the run() method in a class derived from Thread, or in a class that implements the interface Runnable. |
| Daemon Threads | A thread specified as daemon ceases execution when the thread that created it ends. |
| User Threads | A thread that isn’t a daemon thread is called a user thread. A user thread is not terminated automatically when the thread that created it ends. |
| Starting a Thread | You can start execution of a thread by calling the start() method for its Thread object. If you need to halt a thread before normal completion, you can stop execution of a thread by calling the interrupt() method for its Thread object. |
| Synchronized Methods | Methods can be declared as synchronized. Only one synchronized instance method for an object can execute at any given time. Only one synchronized static method for a class can execute at one time. |
| Synchronized Code Blocks | A code block can be declared as synchronized on an object. Only one synchronized code block for an object can execute at any given time. |
| Deadlocks | A deadlock is a situation in which two threads are both waiting for the other to complete some action. Deadlocks can occur in subtle ways in multi-threaded applications, which makes such applications difficult to debug. |
| Executors | An executor is an object that can create, manage, and start threads. |
| Creating an Executor | You create an executor object by calling one of the static methods defined in the Executors class. |
| Thread Pools | You can create executors that provide a thread pool with a fixed number of threads that may be reused or with an unlimited number of threads. |
| Threads Returning a Value | A thread that returns a value is defined by a class that implements the Callable<V> interface. This interface defines the call() method that returns a value of type V. |
| Future<V> Objects | A Future<V> object is returned by the submit() method for an ExecutorService object that starts a thread. You can use the object returned to manage the thread and to obtain the result of a Callable<> thread. |
| Thread Priorities | You can modify the relative priority of a thread by calling its setPriority() method. This has an effect on execution only in environments that support priority scheduling. |
