Chapter 6
Extending Classes and Inheritance
WHAT YOU WILL LEARN IN THIS CHAPTER
- How to reuse classes by defining a new class based on an existing class
- What polymorphism is and how to define your classes to take advantage of it
- What an abstract method is
- What an abstract class is
- What an interface is and how you can define your own interfaces
- How to use interfaces in your classes
- How interfaces can help you implement polymorphic classes
A very important part of object-oriented programming enables you to create a new class based on a class that has already been defined. The class that you use as the base for your new class can be one that you have defined, a standard class in Java, or a class defined by someone else — perhaps from a package supporting a specialized application area.
This chapter focuses on how you can reuse existing classes by creating new classes based on the ones you have and explores the ramifications of using this facility, and the additional capabilities it provides. You also delve into an important related topic — interfaces — and how you can use them.
Let’s start by understanding the jargon. Defining a new class based on an existing class is called derivation. The new class, or derived class, is referred to as a direct subclass of the class from which it is derived. The original class is called a base class because it forms the base for the definition of the derived class. The original class is also referred to as a superclass of the derived class. You can also derive a new class from a derived class, which in turn was derived from some other derived class, and so on. This is illustrated in Figure 6-1.

This shows just three classes in a hierarchy, but there can be as many as you like.
Let’s consider a more concrete example. You could define a class Dog that could represent a dog of any kind:
class Dog {
  // Members of the Dog class...
}
This might contain a data member identifying the name of a particular dog, such as Lassie or Poochy, and another data member to identify the breed, such as Border Collie or Pyrenean Mountain Dog. From the Dog class, you could derive a Spaniel class that represented dogs that were spaniels:
class Spaniel extends Dog {
  // Members of the Spaniel class...
}
The extends keyword that you use here identifies that Dog is a base class for Spaniel, so an object of type Spaniel has members that are inherited from the Dog class, in addition to the members of the Spaniel class that appear in its definition. The breed is Spaniel for all instances of the class Spaniel, although in general the name for each spaniel may be different. The Spaniel class might have some additional data members that characterize the specifics of what it means to be a spaniel. You see in a moment how you can arrange for the base class data members to be set appropriately.
A Spaniel object is a specialized instance of a Dog object. This reflects real life. A spaniel is obviously a dog and has all the properties of a basic dog, but it has some unique characteristics of its own that distinguish it from all the dogs that are not spaniels. The inheritance mechanism that adds all the properties of the base class — Dog in this instance — to those in the derived class is a good model for the real world. The members of the derived class define the properties that differentiate it from the base type, so when you derive one class from another, you can think of your derived class as a specification for objects that are specializations of the base class object. Another way of thinking about this is that the base class defines a set of objects and a derived class defines a specific subset of those that have particular defining characteristics.
In summary, when you derive a new class from a base class, the process is additive in terms of what makes up a class definition. The additional members that you define in the new class establish what makes a derived class object different from a base class object. Any members that you define in the new class are in addition to those that are already members of the base class. For your Spaniel class that you derived from Dog, the data members to hold the name and the breed that are defined for the class Dog are automatically in the class Spaniel. A Spaniel object always has a complete Dog object inside it — with all its data members and methods. This does not mean that all the members defined in the Dog class are available to methods that are specific to the Spaniel class. Some are and some aren’t. The inclusion of members of a base class in a derived class so that they are accessible in that derived class is called class inheritance. An inherited member of a base class is one that is accessible within the derived class. If a base class member is not accessible in a derived class, then it is not an inherited member of the derived class, but base class members that are not inherited still form part of a derived class object.
An inherited member of a derived class is a full member of that class and is freely accessible to any method in the class. Objects of the derived class type contain all the inherited members of the base class — both fields and methods, as well as the members that are specific to the derived class. Remember that a derived class object always contains a complete base class object within it, including all the fields and methods that are not inherited. The next step is to take a closer look at how inheritance works and how the access attribute of a base class member affects its visibility in a derived class.
You need to consider several aspects of defining and using a derived class. First of all, you need to know which members of the base class are inherited in the derived class. I explain what this implies for data members and methods separately — there are some subtleties here you need to be quite clear on. I also look at what happens when you create an object of the derived class. There are some wrinkles in this context that require closer consideration. Let’s start by looking at the data members that are inherited from a base class.
Inheriting Data Members
Figure 6-2 shows which access attributes permit a class member to be inherited in a subclass. It shows what happens when the subclass is defined in either the same package or a different package from that containing the base class. Remember that inheritance implies accessibility of the member in a derived class, not just presence.
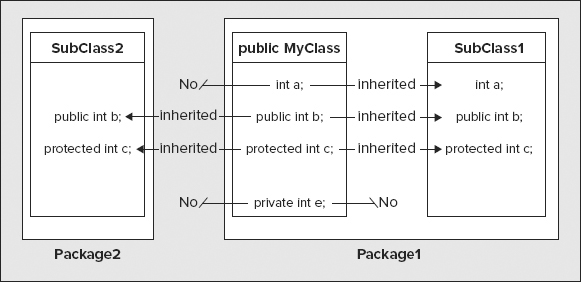
NOTE Remember that a class itself can be specified as public. This makes the class accessible from any package anywhere. A class that is not declared as public can be accessed only from classes within the same package. This means, for example, that you cannot define objects of a non-public class type within classes in other packages. It also means that to derive a new class from a class in a different package, the base class must be declared as public. If the base class is not declared as public, it cannot be reached directly from outside the package.
As you can see from Figure 6-2, a subclass that you define in the same package as its base class inherits everything except for private data members of the base. If you define a subclass outside the package containing the base class, the private data members are not inherited, and neither are any data members in the base class that you have declared without access attributes. Members defined as private in the base class are never inherited under any circumstances. The base class, MyClass, must be declared as public in Package1, otherwise it would not be accessible from Package2 as the base class for SubClass2.
You should also be able to see where the explicit access specifiers now sit in relation to one another. The public specifier is the least restrictive on class members because a public member is available everywhere, protected comes next, and prevents access from classes outside of a package, but does not limit inheritance — provided the class itself is public. Putting no access specifier on a class member limits access to classes within the same package and prevents inheritance in subclasses that are defined in a different package. Because of this, class members without an access specifier are often referred to as package-private. The most restrictive is private because access is constrained to the same class.
The inheritance rules apply to members of a class that you have declared as static — as well as non-static members. Recall that only one occurrence of each static variable in a class exists and is shared by all objects of the class, whereas each object has its own set of instance variables. So, for example, a variable that you declare as private and static in the base class is not inherited in a derived class, whereas a variable that you declare as protected and static are inherited and are shared between all objects of a derived class type, as well as objects of the base class type.
Hidden Data Members
You can define a data member in a derived class with the same name as a data member in the base class. This is not a recommended approach to class design generally, but it’s possible that it can arise unintentionally. When it occurs, the base class data member may still be inherited, but are hidden by the derived class member with the same name. The hiding mechanism applies regardless of whether the respective types or access attributes are the same or not — the base class member is hidden in the derived class if the names are the same.
Any use of the derived class member name always refers to the member defined as part of the derived class. To refer to the inherited base class member, you must qualify it with the keyword super to indicate it is the member of the superclass that you want. Suppose you have a data member value as a member of the base class, and a data member with the same name in the derived class. In the derived class, the name value references the derived class member, and the name super.value refers to the member inherited from the base class. Note that you cannot use super.super.something to refer to a member name hidden in the base class of a base class.
In most situations you won’t need to refer to inherited data members in this way, as you would not deliberately set out to use duplicate names. The situation can commonly arise if you are using a class as a base that is subsequently modified by adding data members — it could be a Java library class, for example, or some other class in a package designed and maintained by someone else. Because your code does not presume the existence of the base class member with the same name as your derived class data member, hiding the inherited member is precisely what you want. It enables the base class to be altered without breaking your code.
Inherited Methods
Ordinary methods in a base class, by which I mean methods that are not constructors, are inherited in a derived class in the same way as the data members of the base class. Those methods declared as private in a base class are not inherited, and those that you declare without an access attribute are inherited only if you define the derived class in the same package as the base class. The rest are all inherited.
Constructors are different from ordinary methods. Constructors in the base class are never inherited, regardless of their attributes. You can look into the intricacies of constructors in a class hierarchy by considering how derived class objects are created.
Objects of a Derived Class
I said at the beginning of this chapter that a derived class extends a base class. This is not just jargon — it really does do this. As I have said several times, inheritance is about what members of the base class are accessible in a derived class, not what members of the base class exist in a derived class object. An object of a subclass contains all the members of the original base class, plus any new members that you have defined in the derived class. This is illustrated in Figure 6-3.
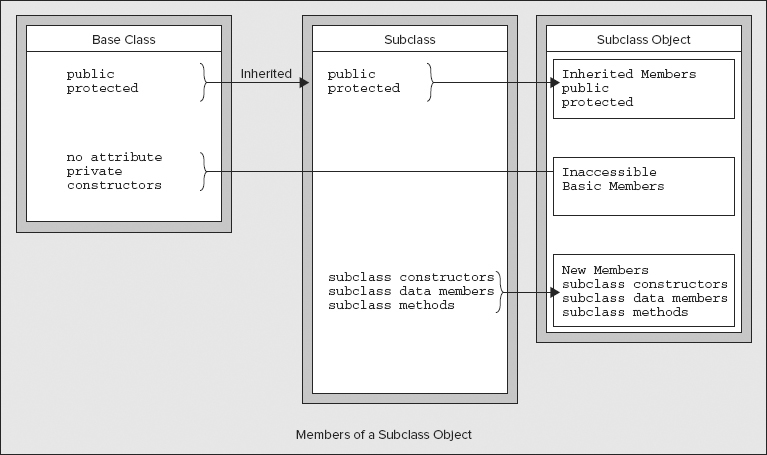
The base members are all there in a derived class object — you just can’t access some of them in the methods that you have defined for the derived class. The fact that you can’t access some of the base class members does not mean that they are just excess baggage — they are essential members of your derived class objects. A Spaniel object needs all the Dog attributes that make it a Dog object, even though some of these may not be accessible to the Spaniel methods. Of course, the base class methods that are inherited in a derived class can access all the base class members, including those that are not inherited.
Though the base class constructors are not inherited in your derived class, you can still call them to initialize the base class members. More than that, if you don’t call a base class constructor from your derived class constructor, the compiler tries to arrange to do it for you. The reasoning behind this is that because a derived class object has a base class object inside it, a good way to initialize the base part of a derived class object is using a base class constructor.
To understand this better, let’s take a look at how it works in practice.
Deriving a Class
Let’s take a simple example. Suppose you have defined a class to represent an animal as follows:
public class Animal {
  public Animal(String aType) {
    type = new String(aType);
  }

  public String toString() {
    return "This is a " + type;
  }

  private String type;
}
Directory "TestDerived"
This has a member, type, to identify the type of animal, and its value is set by the constructor. It is private and is therefore not inherited in a class derived from Animal. You also have a toString() method for the class to generate a string representation of an object of the class.
You can now define another class, based on the class Animal, to define dogs. You can do this immediately, without affecting the definition of the class Animal. You could write the basic definition of the class Dog as:
public class Dog extends Animal {
  // constructors for a Dog object

  protected String name;                     // Name of a Dog
  protected String breed;                    // Dog breed
}
You use the keyword extends in the definition of a subclass to identify the name of the direct superclass. The class Dog inherits only the method toString() from the class Animal, because the private data member and the constructor cannot be inherited. Of course, a Dog object has a type data member that needs to be set to "Dog"; it just can’t be accessed by methods that you define in the Dog class. You have added two new instance variables in the derived class. The name member holds the name of the particular dog, and the breed member records the kind of dog it is. These are both protected and therefore are accessible in any class derived from Dog. All you need to add is the means of creating Dog class objects.
Derived Class Constructors
You can define two constructors for the subclass Dog, one that just accepts an argument for the name of a dog and another that accepts both a name and the breed of the Dog object. For any derived class object, you need to make sure that the private base class member, type, is properly initialized. You do this by calling a base class constructor from the derived class constructor:
public class Dog extends Animal {
  public Dog(String aName) {
    super("Dog");                                // Call the base constructor
    name = aName;                                // Supplied name
    breed = "Unknown";                           // Default breed value
  }

  public Dog(String aName, String aBreed) {
    super("Dog");                                // Call the base constructor
    name = aName;                                // Supplied name
    breed = aBreed;                              // Supplied breed
  }

  protected String name;                         // Name of a Dog
  protected String breed;                        // Dog breed
}
Directory "TestDerived"
The statement in the derived class constructors that calls the base class constructor is
super("Dog"); // Call the base constructor
The use of the super keyword here as the method name calls the constructor in the superclass — the direct base class of the class Dog, which is the class Animal. This initializes the private member type to "Dog" because this is the argument passed to the base constructor. The superclass constructor is always called in this way in the subclass, using the name super rather than the base class constructor name Animal. The super keyword has other uses in a derived class. You have already seen that you can access a hidden member of the base class by qualifying the member name with super.
Calling the Base Class Constructor
You should always call an appropriate base class constructor from the constructors in your derived class. The base class constructor call must be the first statement in the body of the derived class constructor. If the first statement in a derived class constructor is not a call to a base class constructor, the compiler inserts a call to the default no-arg base class constructor for you:
super(); // Call the default base constructor
Unfortunately, this can result in a compiler error, even though the offending statement was inserted automatically. How does this come about?
When you define your own constructor in a class, as is the case for the Animal class, no default constructor is created by the compiler. It assumes you are taking care of all the details of object construction, including any requirement for a default constructor. If you have not defined your own default constructor in a base class — that is, a constructor that has no parameters — when the compiler inserts a call to the default constructor from your derived class constructor, you get a message saying that the constructor is not there.
TRY IT OUT: Testing a Derived Class
You can try out the Dog class with the following code:
public class TestDerived {
  public static void main(String[] args) {
    Dog aDog = new Dog("Fido", "Chihuahua");     // Create a dog
    Dog starDog = new Dog("Lassie");             // Create a Hollywood dog
    System.out.println(aDog);                    // Let's hear about it
    System.out.println(starDog);                 // and the star
  }
}
Directory "TestDerived"
Of course, the files containing the Dog and Animal class definitions must be in the same directory as TestDerived.java. I put them all in a folder with the name TestDerived. The example produces the following rather uninformative output:
This is a Dog
This is a Dog
How It Works
Here you create two Dog objects and then output information about them using the println() method. This implicitly calls the toString() method for each. You could try commenting out the call to super() in the constructors of the derived class to see the effect of the compiler’s efforts to call the default base class constructor.
You have called the inherited method toString() successfully, but this knows only about the base class data members. At least you know that the private member, type, is being set up properly. What you really need though is a version of toString() for the derived class.
Overriding a Base Class Method
You can define a method in a derived class that has the same signature as a method in the base class. Having the same signature means that the method names must be the same and the parameter lists must contain the same number of parameters with identical types. The access attribute for the method in the derived class can be the same as that in the base class or it can be less restrictive, but it cannot be more restrictive. This means that if you declare a method as public in the base class, for example, any derived class definition of the method must also be declared as public. You cannot omit the access attribute in the derived class in this case, or specify it as private or protected.
When you define a new version of a base class method in this way, the derived class method is called for a derived class object, not the method inherited from the base class. The method in the derived class overrides the method in the base class. The base class method is still there though, and it is still possible to call it in a derived class. Let’s see an overriding method in a derived class in action.
TRY IT OUT: Overriding a Base Class Method
You can add the definition of a new version of toString() to the definition of the derived class, Dog:
  // Present a dog's details as a string
  public String toString() {
    return "It's " + name + " the " + breed;
  }
With this change to the example, the output is now:
It's Fido the Chihuahua
It's Lassie the Unknown
How It Works
The toString() method in the Dog class overrides the base class method because it has the same signature. Recall from Chapter 5 that the signature of a method is determined by its name and the parameter list. So, now whenever you use the toString() method for a Dog object either explicitly or implicitly, this method is called — not the base class method.
NOTE You are obliged to declare the toString() method as public. When you override a base class method, you cannot change the access attributes of the new version of the method to be more stringent than that of the base class method that it overrides. Because public is the least stringent access attribute, you have no other choice.
Of course, ideally you would like to output the member, type, of the base class, but you can’t reference this in the derived class because it is not inherited. However, you can still call the base class version of toString(). It’s another job for the super keyword.
TRY IT OUT: Calling a Base Class Method from a Derived Class
You can rewrite the derived class version of toString() to call the base method:
// Present a dog's details as a string
public String toString() {
  return super.toString() + "
It's " + name + " the " + breed;
}
Directory "TestDerived"
Running the example again produces the following output:
This is a Dog
It's Fido the Chihuahua
This is a Dog
It's Lassie the Unknown
How It Works
You use the super keyword to identify the base class version of toString() that is hidden by the derived class version. You used the same notation to refer to superclass data members that were hidden by derived class data members with the same name. Calling the base class version of toString() returns the String object for the base part of the object. You then append extra information to this about the derived part of the object to produce a String object specific to the derived class.
When you define a method in a derived class that is intended to override a superclass method, it is easy to make a mistake in the signature for the derived class method. If the name and parameter list of your derived class method are not identical to that of the superclass method, you are defining an overload for the base class method, not an override.
The @Override annotation is intended to protect you from this kind of error. Here’s how you could use the @Override annotation in the Dog class:
public class Dog extends Animal {
  public Dog(String aName) {
    super("Dog");                                // Call the base constructor
    name = aName;                                // Supplied name
    breed = "Unknown";                           // Default breed value
  }

  public Dog(String aName, String aBreed) {
    super("Dog");                                // Call the base constructor
    name = aName;                                // Supplied name
    breed = aBreed;                              // Supplied breed
  }

  // Present a dog's details as a string
  @Override
  public String toString() {
    return super.toString() + "
It's " + name + " the " + breed;
  }

  protected String name;                         // Name of a Dog
  protected String breed;                        // Dog breed
}
Obviously you are unlikely to make an error in the parameter list for the toString() method that is inherited from the Object class. However, you might spell the name as ToString(), in which case you do not have an override for toString(); you have just added a new method.
Any method you mark with the @Override annotation causes the compiler to verify that the signature of the method is the same as a method with the same name in a superclass. If it is not, you get an error message. It is therefore a good idea to use the @Override annotation for all your methods that override an inherited method.
CHOOSING BASE CLASS ACCESS ATTRIBUTES
You now know the options available to you in defining the access attributes for classes you expect to use to define subclasses. You know what effect the attributes have on class inheritance, but how do you decide which you should use?
There are no hard and fast rules — what you choose depends on what you want to do with your classes in the future, but there are some guidelines you should consider. They follow from basic object-oriented principles:
- You should declare the methods that make up the external interface to a class as public. As long as there are no overriding methods defined in a derived class, public base class methods are inherited and fully available as part of the external interface to the derived class. You should not normally make data members public unless they are constants intended for general use.
- If you expect other people will use your classes as base classes, your classes will be more secure if you keep data members private, and provide public methods for accessing and manipulating them when necessary. In this way you control how a derived class object can affect the base class data members.
- Making base class members protected allows them to be accessed from other classes in the same package, but prevents direct access from a class in another package. Base class members that are protected are inherited in a subclass and can, therefore, be used in the implementation of a derived class. You can use the protected option when you have a package of classes in which you want uninhibited access to the data members of any class within the same package — because they operate in a closely coupled way, for instance — but you want free access to be limited to subclasses in other packages.
- Omitting the access attribute for a class member makes it directly available to other classes in the same package while preventing it from being inherited in a subclass that is not in the same package — it is effectively private when viewed from another package.
Class inheritance is not just about reusing classes that you have already defined as a basis for defining a new class. It also adds enormous flexibility to the way in which you can program your applications, with a mechanism called polymorphism. So what is polymorphism?
The word polymorphism generally means the ability to assume several different forms or shapes. In programming terms it means the ability of a single variable of a given type to be used to reference objects of different types and to automatically call the method that is specific to the type of object the variable references. This enables a single method call to behave differently, depending on the type of the object to which the call applies. This is illustrated in Figure 6-4.


A few requirements must be fulfilled to get polymorphic behavior, so let’s step through them.
First of all, polymorphism works with derived class objects. It also depends on a new capability that is possible within a class hierarchy that you haven’t met before. Up to now you have always been using a variable of a given type to reference objects of the same type. Derived classes introduce some new flexibility in this. Of course, you can store a reference to a derived class object in a variable of the derived class type, but you can also store it in a variable of any direct or indirect base class type. More than that, a reference to a derived class object must be stored in a variable of a direct or indirect class type for polymorphism to work. For example, Figure 6-4 illustrates how a variable of type Dog can be used to store a reference to an object of any type derived from Dog. If the Dog class were derived from the Animal class here, a variable of type Animal could also be used to reference Spaniel, Chihuahua, or Collie objects.
Polymorphism means that the actual type of the object involved in a method call determines which method is called, rather than the type of the variable being used to store the reference to the object. In Figure 6-4, if aDog contains a reference to a Spaniel object, the bark() method for that object is called. If it contains a reference to a Collie object, the bark() method in the Collie class is called. To get polymorphic operation when calling a method, the method must be declared as a member of the base class — the class type of the variable you are using — as well as being declared as a member of the class type of the object involved. So in the example, the Dog class must contain a bark() method, as must each of the derived classes. You cannot call a method for a derived class object using a variable of a base class type if the method is not a member of the base class. Any definition of the method in a derived class must have the same signature as in the base class and must have an access specifier that is no more restrictive.
Methods that have the same signature have the same name, and have parameter lists with the same number of parameters and corresponding parameters are of the same type. You have a bit more flexibility with the return type when you are defining a polymorphic method. For polymorphic behavior, the return type of the method in the derived class must either be the same as that of the base class method or must be of a type that is a subclass of the return type in the base class. Where the return types are different but the return type of the method in the derived class is a subclass of the return type in the base class, the return types are said to be covariant. Thus the type of object returned by the derived class method is just a specialization of the type returned by the base class method. For example, suppose that you have a method defined in a base class Animal that has a return type of type Animal:
public class Animal {
  Animal createCreature() {
    // Code to create an Animal object and return a reference to it...
  }

  // Rest of the class definition ...
}
You can redefine the createCreature() method in a derived class Dog like this:
public class Dog extends Animal {
  @Override
  Dog createCreature() {
    // Code to create a Dog object and return a reference to it...
  }

  // Rest of the class definition...
}
As long as the return type for the method in the derived class is a subclass of the return type in the base class, as you have here, even though the return types are different you can still get polymorphic behavior. I can summarize the conditions that need to be met if you want to use polymorphism as follows:
- The method call for a derived class object must be through a variable of a base class type.
- The method called must be defined in the derived class.
- The method called must also be declared as a member of the base class.
- The method signatures for the method in the base and derived classes must be the same.
- Either the method return type must be the same in the base and derived classes or the return types must be covariant.
- The method access specifier must be no more restrictive in the derived class than in the base.
When you call a method using a variable of a base class type, polymorphism results in the method that is called being selected based on the type of the object stored, not the type of the variable. Because a variable of a base type can store a reference to an object of any derived type, the kind of object stored is not known until the program executes. Thus the choice of which method to execute has to be made dynamically when the program is running — it cannot be determined when the program is compiled. The bark() method that is called through the variable of type Dog in the earlier illustration may do different things depending on what kind of object the variable references. As you later see, this introduces a whole new level of capability in programming using objects. It implies that your programs can adapt at run time to accommodate and process different kinds of data quite automatically.
Note that polymorphism applies only to methods. It does not apply to data members. When you access a data member of a class object, the variable type always determines the class to which the data member belongs. This implies that a variable of type Dog can only be used to access data members of the Dog class. Even when it references an object of a derived type, Spaniel, for example, you can only use it to access data members of the Dog part of a Spaniel object.
Using Polymorphism
As you have seen, polymorphism relies on the fact that you can assign an object of a subclass type to a variable that you have declared as being of a superclass type. Suppose you declare the variable:
Animal theAnimal = null; // Declare a variable of type Animal
You can quite happily make theAnimal refer to an object of any of the subclasses of the class Animal. For example, you could use it to reference an object of type Dog:
theAnimal = new Dog("Rover");
As you might expect, you could also initialize the variable theAnimal to reference an object when you declare it:
Animal theAnimal = new Dog("Rover");
This principle applies quite generally. You can use a variable of a base class type to store a reference to an object of any class type that you have derived, directly or indirectly, from the base. You can see what magic can be wrought with this in practice by extending the previous example. You can add a new method to the class Dog that displays the sound a Dog makes. You can add a couple of new subclasses that represent some other kinds of animals.
TRY IT OUT: Listening to the Animals
This example provides animals with a voice via a sound() method. I put the source files in a folder with the name AnimalVoices. You need to make one change to the class Animal. To select the method sound() dynamically for derived class objects, it needs to be a member of the base class. Add a content-free version of a method sound() to the Animal class:
class Animal {
   // Rest of the class as before...

   // Dummy method to be implemented in the derived classes
   public void sound(){}
}
Directory "AnimalVoices"
Only a particular Animal object makes a specific sound, so the sound() method in this class does nothing.
First of all, you enhance the class Dog by adding a method to display the sound that a dog makes:
public class Dog extends Animal {
  // A barking method
  @Override
  public void sound() {
    System.out.println("Woof    Woof");
  }

  // Rest of the class as before...
}
Directory "AnimalVoices"
You can also derive a class Cat from the class Animal:
public class Cat extends Animal {
  public Cat(String aName) {
    super("Cat");                      // Call the base constructor
    name = aName;                      // Supplied name
    breed = "Unknown";                 // Default breed value
  }

  public Cat(String aName, String aBreed) {
    super("Cat");                      // Call the base constructor
    name = aName;                      // Supplied name
    breed = aBreed;                    // Supplied breed
  }

  // Return a String full of a cat's details
  @Override public String toString() {
    return super.toString() + "
It's " + name + " the " + breed;
  }

  // A miaowing method
  @Override
  public void sound() {
    System.out.println("Miiaooww");
  }

  protected String name;               // Name of a cat
  protected String breed;              // Cat breed
}
Directory "AnimalVoices"
Just to make it a crowd, you can derive another class — of ducks:
public class Duck extends Animal {
  public Duck(String aName) {
    super("Duck");                     // Call the base constructor
    name = aName;                      // Supplied name
    breed = "Unknown";                 // Default breed value
  }

  public Duck(String aName, String aBreed) {
    super("Duck");                     // Call the base constructor
    name = aName;                      // Supplied name
    breed = aBreed;                    // Supplied breed
  }

  // Return a String full of a duck's details
  @Override
  public String toString() {
    return super.toString() + "
It's " + name + " the " + breed;
  }

  // A quacking method
  @Override
  public void sound() {
    System.out.println("Quack quackquack");
  }

  protected String name;               // Duck name
  protected String breed;              // Duck breed
}
Directory "AnimalVoices"
The data members of both classes are protected, so they are accessible in any derived class, but not from any class that is not in the same package.
You can fill the whole farmyard, if you need the practice, but three kinds of animal are sufficient to show you how polymorphism works.
You need a program that uses these classes. To give the classes a workout, you can create an array of type Animal and populate its elements with different subclass objects. You can then select an object randomly from the array, so that there is no possibility that the type of the object selected is known ahead of time. Here’s the code to do that:
import java.util.Random;

public class TryPolymorphism {
  public static void main(String[] args) {
    // Create an array of three different animals
    Animal[] theAnimals = {
                            new Dog("Rover", "Poodle"),
                            new Cat("Max", "Abyssinian"),
                            new Duck("Daffy","Aylesbury")
                          };

    Animal petChoice;                  // Choice of pet

    Random select = new Random();      // Random number generator
    // Make five random choices of pet
    for(int i = 0; i < 5; ++i) {
      // Choose a random animal as a pet
      petChoice = theAnimals[select.nextInt(theAnimals.length)];

      System.out.println("
Your choice:
" + petChoice);
      petChoice.sound();               // Get the pet's reaction
    }
  }
}
Directory "AnimalVoices"
When I ran this I got the following output:
Your choice:
This is a Duck
It's Daffy the Aylesbury
Quack quackquack
Your choice:
This is a Cat
It's Max the Abyssinian
Miiaooww

Your choice:
This is a Duck
It's Daffy the Aylesbury
Quack quackquack
Your choice:
This is a Duck
It's Daffy the Aylesbury
Quack quackquack

Your choice:
This is a Cat
It's Max the Abyssinian
Miiaooww
The chances are good that you will get a different set than this, and a different set again when you rerun the example. The output from the example clearly shows that the methods are being selected at run time, depending on which object happens to get stored in the variable petChoice.
How It Works
The definition of the sound() method in the Animal class has no statements in the body, so it does nothing if it is executed. You see a little later in this chapter how you can avoid including the empty definition for the method but still get polymorphic behavior in the derived classes.
You need the import statement because you use a Random class object in the example to produce pseudo-random index values in the way you have seen before. The array theAnimals of type Animal contains a Dog object, a Cat object, and a Duck object. You select objects randomly from this array in the for loop using the Random object select, and store the selection in petChoice. You then call the toString() and sound() methods using the object reference stored. The effect is that the appropriate method is selected automatically to suit the object stored, so the program operates differently depending on what type of object is referenced by petChoice.
Of course, you call the toString() method implicitly in the argument to println(). The compiler inserts a call to this method to produce a String representation of the object referenced by petChoice. The particular toString() method is automatically selected to correspond with the type of object referenced by petChoice. This would still work even if you had not included the toString() method in the base class. You see a little later in this chapter that there is a toString() method in every class that you define, regardless of whether you define one or not.
Polymorphism is a fundamental part of object-oriented programming. You make extensive use of polymorphism in many of the examples you develop later in the book, and you will find that you use it often in your own applications and applets. But this is not all there is to polymorphism in Java, and I will come back to it again later in this chapter.
MULTIPLE LEVELS OF INHERITANCE
As I indicated at the beginning of the chapter, there is nothing to prevent a derived class from being used as a base class. For example, you could derive a class Spaniel from the class Dog without any problem:
TRY IT OUT: A Spaniel Class
Start the Spaniel class off with this minimal code:
class Spaniel extends Dog {
  public Spaniel(String aName) {
    super(aName, "Spaniel");
  }
}
Directory "AnimalVoices"
To try this out you can add a Spaniel object to the array theAnimals in the previous example, by changing the statement to the following:
Animal[] theAnimals = {
                        new Dog("Rover", "Poodle"),
                        new Cat("Max", "Abyssinian"),
                        new Duck("Daffy","Aylesbury"),
                      new Spaniel("Fido")
                      };
Directory "AnimalVoices"
Don’t forget to add in the comma after the Duck object. Try running the example again a few times.
How It Works
The class Spaniel inherits members from the class Dog, including the members of Dog that are inherited from the class Animal. The class Dog is a direct superclass, and the class Animal is an indirect superclass of the class Spaniel. The only additional member of Spaniel is the constructor. This calls the Dog class constructor using the keyword super and passes the value of aName and the String object "Spaniel" to it.
If you run the TryPolymorphism class a few times, you should get a choice of the Spaniel object from time to time. Thus, the class Spaniel is also participating in the polymorphic selection of the methods toString() and sound(), which in this case are inherited from the parent class, Dog. The inherited toString() method works perfectly well with the Spaniel object, but if you wanted to provide a unique version, you could add it to the Spaniel class definition. This would then be automatically selected for a Spaniel object rather than the method inherited from the Dog class.
In the Animal class, you introduced a version of the sound() method that did nothing because you wanted to call the sound() method in the subclass objects dynamically. The method sound() has no meaning in the context of the generic class Animal, so implementing it does not make much sense. This situation often arises in object-oriented programming. You will often find yourself creating a superclass from which you will derive a number of subclasses, just to take advantage of polymorphism.
To cater to this, Java has abstract classes. An abstract class is a class in which one or more methods are declared, but not defined. The bodies of these methods are omitted, because, as in the case of the method sound() in the Animal class, implementing the methods does not make sense. Because they have no definition and cannot be executed, they are called abstract methods. The declaration for an abstract method ends with a semicolon and you specify the method with the keyword abstract to identify it as such. To declare that a class is abstract you just use the keyword abstract in front of the class keyword in the first line of the class definition.
You could have defined the class Animal as an abstract class by amending it as follows:
public abstract class Animal {
  public abstract void sound();   // Abstract method

  public Animal(String aType) {
    type = new String(aType);
  }

  public String toString() {
    return "This is a " + type;
  }

  private String type;
}
The previous program works just as well with these changes. It doesn’t matter whether you prefix the class name with public abstract or abstract public; they are equivalent, but you should be consistent in your usage. The sequence public abstract is typically preferred. The same goes for the declaration of an abstract method, but both public and abstract must precede the return type specification, which is void in this case.
An abstract method cannot be private because a private method cannot be inherited and therefore cannot be redefined in a subclass.
You cannot instantiate an object of an abstract class, but you can declare a variable of an abstract class type. With the new abstract version of the class Animal, you can still write:
Animal thePet = null; // Declare a variable of type Animal
just as you did in the TryPolymorphism class. You can then use this variable to store objects of the subclasses, Dog, Spaniel, Duck, and Cat.
When you derive a class from an abstract base class, you don’t have to define all the abstract methods in the subclass. In this case the subclass is also abstract and you aren’t able to instantiate any objects of the subclass either. If a class is abstract, you must use the abstract keyword when you define it, even if it only inherits an abstract method from its superclass. Sooner or later you must have a subclass that contains no abstract methods. You can then create objects of this class type.
I must now reveal something I have been keeping from you. All the classes that you define are subclasses by default — whether you like it or not. All your classes have a standard class, Object, as a base, so Object is a superclass of every class. You never need to specify the class Object as a base in the definition of your classes — it happens automatically.
There are some interesting consequences of having Object as a universal superclass. For one thing, a variable of type Object can store a reference to an object of any class type. This is useful when you want to write a method that needs to handle objects of unknown type. You can define a parameter to the method of type Object, in which case a reference to any type of object can be passed to the method. When necessary you can include code in the method to figure out what kind of object it actually is (you see some of the tools that enable you to do this a little later in this chapter).
Of course, your classes inherit members from the class Object. These all happen to be methods, of which seven are public, and two are protected. The seven public methods are shown in Table 6-1.
TABLE 6-1: Object Class Methods
| METHOD | PURPOSE |
| toString() | This method returns a String object that describes the current object. In the inherited version of the method, this is the name of the class, followed by '@' and the hexadecimal representation for the object. This method is called automatically when you concatenate objects with String variables using +. You can override this method in your classes to create your own string for an object of your class. |
| equals() | This compares the reference to the object passed as an argument with the reference to the current object and returns true if they are equal. Thus true is returned if the current object and the argument are the same object (not just equal — they must be one and the same object). It returns false if they are different objects, even if the objects have identical values for their data members. |
| getClass() | This method returns an object of type Class that identifies the class of the current object. You learn a little more about this later in this chapter. |
| hashCode() | This method calculates a hashcode value for an object and returns it as type int. Hashcode values are used in classes defined in the package java.util for storing objects in hash tables. You see more about this in Chapter 14. |
| notify() | This is used to wake up a thread associated with the current object. I discuss how threads work in Chapter 16. |
| notifyAll() | This is used to wake up all threads associated with the current object. I also discuss this in Chapter 16. |
| wait() | This method causes a thread to wait for a change in the current object. I discuss this method in Chapter 16, too. |
Note that getClass(), notify(), notifyAll(), and wait() cannot be overridden in your own class definitions — they are fixed with the keyword final in the class definition for Object (see the section on the final modifier later in this chapter).
It should be clear now why you could get polymorphic behavior with toString() in your derived classes when your base class did not define the method. There is always a toString() method in all your classes that is inherited from Object. This means that, ideally, we should have used the @Override annotation with this method in the Animal class, or indeed any class that implements toString().
The two protected methods that your classes inherit from Object are shown in Table 6-2.
TABLE 6-2: Protected Object Class Methods
| METHOD | PURPOSE |
| clone() | This method creates an object that is a copy of the current object regardless of type. It can be of any type, as an Object variable can refer to an object of any class. Note that clone() does not work with all class objects and does not always do precisely what you want, as you see later in this section. |
| finalize() | This method may be called to clean up when an object is destroyed. There is rarely any reason to override this method. |
Because all your classes inherit the methods defined in the Object class I explain the most important ones in a little more detail.
The toString() Method
You have already made extensive use of the toString() method, and you know that it is used by the compiler to obtain a String representation of an object when necessary. It is obvious now why you must always declare the toString() method as public in a class. It is declared as such in the Object class and you can’t declare it as anything else.
You can see what the toString() method that is inherited from the Object class outputs for an object of one of your classes by commenting out the toString() method in Animal class in the previous example. A typical sample of the output for an object is:
Your choice:
Spaniel@b75778b2
It's Fido the Spaniel
Woof    Woof
The second line here is generated by the toString() method implemented in the Object class. This is inherited in the Animal class, and it is called because you no longer override it. The hexadecimal digits following the @ in the output are the hashcode of the object, which is produced by the hashcode() method that is inherited from Object.
Obviously, knowing that toString() is inherited from Object in the Animal class, it would have been appropriate to use the @Override annotation for the method in the Animal class.
Determining the Type of an Object
The getClass() method that all your classes inherit from Object returns an object of type Class that identifies the class of an object. Suppose you have a variable pet of type Animal that might contain a reference to an object of type Dog, Cat, Duck, or even Spaniel. To figure out what sort of thing it really refers to, you could write the following statements:
Class objectType = pet.getClass();               // Get the class type
System.out.println(objectType.getName());        // Output the class name
The method getName() is a member of the Class class, and it returns the fully qualified name of the actual class of the object for which it is called as a String object. Thus, the second statement outputs the name of the class for the pet object. If pet referred to a Duck object, this would output:
Duck
This is the fully qualified name in this case, as the class is in the default package, which has no name. For a class defined in a named package, the class name would be prefixed with the package name. If you just wanted to output the class identity, you need not explicitly store the Class object. You can combine both statements into one:
System.out.println(pet.getClass().getName()); // Output the class name
This will produce the same output as before.
Remember that the Class object returns the actual class of an object. Suppose you define a String object like this:
String saying = "A stitch in time saves nine.";
You could store a reference to this String object as type Object:
Object str = saying;
The following statement displays the type of str:
System.out.println(str.getClass().getName());
This statement outputs the type name as java.lang.String. The fact that the reference is stored in a variable of type Object does not affect the underlying type of the object itself.
When your program is executing, there are instances of the Class class in existence that represent each of the classes and interfaces in your program (I explain what an interface type is a little later in this chapter). There is also a Class object for each array type in your program as well as every primitive type. The Java Virtual Machine (JVM) generates these when your program is loaded. Because Class is primarily intended for use by the JVM, it has no public constructors, so you can’t create objects of type Class yourself.
Although you can use the getClass() method to get the Class object corresponding to a particular class or interface type, there is a more direct way. If you append .class to the name of any class, interface, or primitive type, you have a reference to the Class object for that class.
For example, java.lang.String.class references the Class object for the String class and Duck.class references the Class object for the Duck class. Similarly, int.class is the class object for the primitive type, int, and double.class is the one corresponding to type double. This may not seem particularly relevant at this point, but keep it in mind. Since there is only one Class object for each class or interface type, you can test for the class of an object programmatically. Given a variable pet of type Animal, you could check whether the object referenced was of type Duck with the following statement:
if(pet.getClass() == Duck.class) {
  System.out.println("By George - it is a duck!");
}
This tests whether the object referenced by pet is of type Duck. Because each Class object is unique, this is a precise test. If pet contained a reference to an object that was a subclass of Duck, the result of the comparison in the if would be false. You see a little later in this chapter that you have an operator in Java, instanceof, that does almost the same thing — but not quite.
Note that the Class class is not an ordinary class. It is an example of a generic type. I discuss generic types in detail in Chapter 13, but for now, be aware that Class really defines a set of classes. Each class, interface, array type, and primitive type that you use in your program is represented by an object of a unique class from the set defined by the Class generic type.
Duplicating Objects
As you saw in the summary at the beginning of this section, the protected method clone() that is inherited from the Object class creates a new object that is a copy of the current object. It does this only if the class of the object to be cloned indicates that cloning is acceptable. This is the case if the class implements the Cloneable interface. Don’t worry about what an interface is at this point — you learn about this a little later in this chapter.
The clone() method that is inherited from Object clones an object by creating a new object of the same type as the current object and setting each of the fields in the new object to the same value as the corresponding fields in the current object. When the data members of the original object refer to class objects, the objects referred to are not duplicated when the clone is created — only the references are copied from the fields in the old object to the fields in the cloned object. This isn’t typically what you want to happen — both the old and the new class objects can now be modifying a single shared mutable object that is referenced through their corresponding data members, not recognizing that this is occurring.
Using the clone() method to duplicate objects can be complicated and cumbersome. If you need to clone objects of your class types, the simplest approach is to ignore the clone() method and implement a copy constructor in your class. A copy constructor is just a constructor that duplicates an object that is passed as an argument to it. Let’s look at an example to see how duplicating objects using a copy constructor works.
TRY IT OUT: Duplicating Objects
Let’s suppose you define a class Flea like this:
public class Flea extends Animal {
  // Constructor
  public Flea(String aName, String aSpecies) {
    super("Flea");                     // Pass the type to the base
    name = aName;                      // Supplied name
    species = aSpecies;                // Supplied species
  }

  // Copy Constructor
  public Flea(Flea flea) {
    super(flea);              // Call the base class copy constructor
    name = flea.name;
    species = flea.species;
  }

  // Change the flea's name
  public void setName(String aName) {
    name = aName;                      // Change to the new name
  }

  // Return the flea's name
  public String getName() {
    return name;
  }

  // Return the species
  public String getSpecies() {
    return species;
  }

  @Override
  public void sound() {
    System.out.println("Psst");
  }

  // Present a flea's details as a String
  @Override
  public String toString() {
    return super.toString() + "
It's " + name + " the " + species;
  }

  protected String name;               // Name of flea!
  protected String species;            // Flea species
}
Directory "DuplicateObjects"
The class has a copy constructor that creates a duplicate of the Flea object that is passed to it. It calls the base class copy constructor to set the type. You have defined accessor methods for the name and the species of flea. This is a common technique for providing access to private or protected data members of a class when this is necessary. You also have a public method setName() that enables you to change the name from outside of the class.
The base class needs a copy constructor too, so add the following definition to the Animal class:
  public Animal(Animal animal) {
    type = animal.type;
  }
Directory "DuplicateObjects"
This sets the type member to the type for the object that is passed as the argument.
The Dog class needs a copy constructor too, and it is useful to provide methods to access the data members:
public class Dog extends Animal {
  public Dog(String aName) {
    super("Dog");                                // Call the base constructor
    name = aName;                                // Supplied name
    breed = "Unknown";                           // Default breed value
  }

  public Dog(String aName, String aBreed) {
    super("Dog");                                // Call the base constructor
    name = aName;                                // Supplied name
    breed = aBreed;                              // Supplied breed
  }

  // Copy constructor
  public Dog(Dog dog) {
    super(dog);                                  // Call base copy constructor
    name = dog.name;
    breed = dog.breed;
  }

  // Rename the dog
  public void setName(String name) {
    this.name = name;
  }

  // Return the dog's name
  public String getName() {
    return name;
  }

  // Return the breed
  public String getBreed() {
    return breed;
  }

  // Present a dog's details as a string
  @Override
  public String toString() {
    return super.toString() + "
It's " + name + " the " + breed;
  }

  // A barking method
  @Override
  public void sound() {
    System.out.println("Woof    Woof");
  }

  protected String name;                         // Name of a Dog
  protected String breed;                        // Dog breed
}
Directory "DuplicateObjects"
You can now derive a class PetDog from Dog that contains a Flea object as a member:
public class PetDog extends Dog {
  // Constructor
  public PetDog(String name, String breed, String fleaName, String fleaSpecies) {
    super(name, breed);
    petFlea = new Flea("Max","circus flea");     // Initialize petFlea
  }

  // Copy constructor
  public PetDog(PetDog pet) {
    super(pet);                                  // Call base copy constructor
    petFlea = new Flea(pet.petFlea);             // Duplicate the flea
  }

  // Return the flea
  public Flea getFlea() {
    return petFlea;
  }

  @Override
  public void sound() {
    System.out.println("Woof");
  }

  // Return a String for the pet dog
  @Override
  public String toString() {
    return super.toString() + " - a pet dog.
It has a flea:
" + petFlea;
  }

  protected Flea petFlea;                        // The pet flea
}
Directory "DuplicateObjects"
This class defines a specialized type of Dog object that has a flea. To make it possible to clone a PetDog object, you implemented a copy constructor. Note how the copy constructor passes the PetDog object to the Dog class copy constructor. This is legal because the Dog class copy constructor has a parameter of type Dog and a PetDog object is a specialized type of Dog. In general you can pass an object of any type that is a subclass of the parameter type to a method.
You can try out creating and duplicating a PetDog object with the following code:
public class DuplicateObjects {
  public static void main(String[] args) {
    PetDog myPet = new PetDog("Fang", "Chihuahua", "Max", "Circus flea");
    System.out.println("
My pet details:
"+ myPet);
    PetDog yourPet = new PetDog(myPet);
    System.out.println("
Your pet details:
"+yourPet);
    yourPet.setName("Gnasher");                // Change your dog's name
    yourPet.getFlea().setName("Atlas");        // Change your dog's flea's name
    System.out.println("
Your pet details:
"+yourPet);
    System.out.println("
My pet details:
"+ myPet);
  }
}
Directory "DuplicateObjects"
I put the files in a DuplicateObjects folder. You need to add the files containing the new versions of the Dog and Animal classes.
This produces the following output:
My pet details:
This is a Dog
It's Fang the Chihuahua - a pet dog.
It has a flea:
This is a Flea
It's Max the circus flea

Your pet details:
This is a Dog
It's Fang the Chihuahua - a pet dog.
It has a flea:
This is a Flea
It's Max the circus flea

Your pet details:
This is a Dog
It's Gnasher the Chihuahua - a pet dog.
It has a flea:
This is a Flea
It's Atlas the circus flea

My pet details:
This is a Dog
It's Fang the Chihuahua - a pet dog.
It has a flea:
This is a Flea
It's Max the circus flea
How It Works
The first block of output shows the details of the original pet. The next block shows that the duplicate pet has exactly the same characteristics as the original. The third block shows the details of the duplicate after the dog’s name and its flea’s name have been changed. The last block of output shows that the original pet is unaffected by the change to the duplicate, thus demonstrating that the objects are completely independent of one another.
It is important to ensure that all mutable data members are duplicated in a copy constructor operation. If you simply copy the references for such data members, changes to one object affect the copy because they share the same objects as members. The copy constructor in the PetDog class creates a new Flea object for the new PetDog object by calling the copy constructor for the Flea class. The members inherited from Dog are both String objects. These are immutable, so you don’t need to worry about creating duplicates of them.
METHODS ACCEPTING A VARIABLE NUMBER OF ARGUMENTS
You can write a method so that it accepts an arbitrary number of arguments when it is called, and the arguments that are passed do not need to be of the same type. Such methods are called Varargs methods. The reason I have waited until now to mention this is that understanding how this works depends on having an understanding of the role of the Object class. You indicate that a method accepts a variable number of arguments by specifying the last parameter as follows:
Object ... args
The method can have zero or more parameters preceding this, but this must be last for obvious reasons. The ellipsis (three periods) between the type name Object and the parameter name args enables the compiler to determine that the argument list is variable. The parameter name args represents an array of type Object[], and the argument values are available in the elements of the array as type Object. Within the body of the method, the length of the args array tells you how many arguments were supplied.
Let’s consider a very simple example to demonstrate the mechanism. Suppose you want to implement a static method that accepts any number of arguments and outputs the arguments to the command line — whatever they are. You could code it like this:
public static void printAll(Object ... args) {
  for(Object arg : args) {
    System.out.print("  " + arg);
  }
  System.out.println();
}
The arguments can be anything. Values of primitive types are autoboxed because the method expects reference arguments. The loop outputs the string representation of each of the arguments on a single line, the string being produced by invoking the toString() method for whatever the argument is. Let’s see it working.
TRY IT OUT: Displaying Arguments of any Type
Here’s a program that exercises the printAll() method:
public class TryVariableArgumentList {
  public static void main(String[] args) {
    printAll( 2, "two", 4, "four", 4.5, "four point five");   // Six arguments
    printAll();                                              // No arguments
    printAll(25, "Anything goes", true, 4E4, false);         // Five arguments
  }

  public static void printAll(Object ... args) {
    for(Object arg : args) {
      System.out.print("  " + arg);
    }
    System.out.println();
  }
}
TryVariableArgumentList.java
This program produces the following output:
  2  two  4  four  4.5  four point five

  25  Anything goes  true  40000.0  false
How It Works
You can see from the output that the printAll() method works as advertised and accepts an arbitrary number of arguments. The first call of the printAll() method mixes arguments of type int, type String, and type double. Each numerical value is converted to an object of the corresponding wrapper class type by a boxing conversion that the compiler inserts. The output strings are then produced by calls to the toString() method for the objects, also expedited by the compiler. The second call to the method results in an empty line. The last line of output shows that autoboxing works with boolean values as well as values of the other primitive types.
The standard class libraries use the variable argument list capability to define the printf() method in the java.io.PrintStream class. This method produces formatted output for an arbitrary sequence of values of various types, where the formatting is specified by the first argument. System.out happens to be of type PrintStream so you can use printf() to produce formatted output to the command line. I discuss how you use the printf() method to produce output with more precise control over the format in which it is displayed in Chapter 8 in the context of streams.
Limiting the Types in a Variable Argument List
You don’t have to specify the type of the variable argument list as type Object; you can specify it as any class or interface type. The arguments must be of the type that you specify, or any subtype of that type. Specifying the type of the variable argument list as Object maximizes flexibility because any types of argument can be supplied, but there may be occasions where you want to restrict the types of the arguments that can be supplied. For example, if you want to define a method that computes the average of an arbitrary number of values that are to be supplied as individual arguments then you really want to be sure that the arguments can only be numerical values. Here’s how you could do this:
public static double average(Double ... args) {
  if(args.length == 0) {
    return 0.0;
  }
  double ave = 0.0;
  for(double value : args) {
    ave += value;
    }
  return ave/args.length;
}
In this case the arguments must be of type Double or of a type derived from Double, or — because of autoboxing conversion supplied by the compiler — of type double.
You can cast an object to another class type, but only if the current object type and the new class type are in the same hierarchy of derived classes, and one is a superclass of the other. For example, earlier in this chapter you defined the classes Animal, Dog, Spaniel, PetDog, Cat, and Duck, and these are related in the hierarchy shown in Figure 6-5.

You can cast a reference to an object of a given class type upwards through its direct and indirect superclasses. For example, you could cast a reference to an object of type Spaniel directly to type Dog, type Animal, or type Object. You could write:
Spaniel aPet = new Spaniel("Fang");
Animal theAnimal = (Animal)aPet;       // Cast the Spaniel to Animal
When you are assigning an object reference to a variable of a superclass type, you do not have to include the cast. You could write the assignment as:
Animal theAnimal = aPet; // Cast the Spaniel to Animal
This would work just as well. The compiler is always prepared to insert a cast to a superclass type when necessary.
When you cast an object reference to a superclass type, Java retains full knowledge of the actual class to which the object belongs. If this were not the case, polymorphism would not be possible. Because information about the original type of an object is retained, you can cast down a hierarchy as well. However, you must always write the cast explicitly because the compiler is not prepared to insert it. For the cast to work, the object must be a legitimate instance of the class you are casting to — that is, the class you are casting to must be the original class of the object, or must be a superclass of the object. For example, you could cast a reference stored in the variable theAnimal shown in the preceding example to type Dog or type Spaniel because the object was originally a Spaniel, but you could not cast it to Cat or Duck because an object of type Spaniel does not have Cat or Duck as a superclass. To cast theAnimal to type Dog, you would write the following:
Dog aDog = (Dog)theAnimal; // Cast from Animal to Dog
Now the variable aDog refers to an object of type Spaniel that also happens to be a Dog. Remember, you can only use the variable aDog to call the polymorphic methods from the class Spaniel that override methods that exist in Dog. You can’t call methods that are not defined in the Dog class. If you want to call a method that is in the class Spaniel and not in the class Dog, you must first cast aDog to type Spaniel.
Although you cannot cast between unrelated objects, from Spaniel to Duck for example, you can achieve a conversion by writing a suitable constructor, but obviously only where it makes sense to do so. You just write a constructor in the class to which you want to convert and make it accept an object of the class you are converting from as an argument. If you really thought Spaniel to Duck was a reasonable conversion, you could add the constructor to the Duck class:
public Duck(Spaniel aSpaniel) {
   // Back legs off, and staple on a beak of your choice...
   super("Duck");           // Call the base constructor
   name = aSpaniel.getName();
   breed = "Barking Coot";  // Set the duck breed for a converted Spaniel
}
This uses the getName() method in the Dog class that is inherited in the class Spaniel, and which returns the value of name for an object. This constructor accepts a Spaniel and turns out a Duck. This is quite different from a cast though. This creates a completely new object that is separate from the original, whereas a cast presents the same object as a different type.
When to Cast Objects
You will have cause to cast objects in both directions through a class hierarchy. For example, whenever you execute methods polymorphically, you are storing objects in a variable of a base class type and calling methods in a derived class. This generally involves casting the derived class objects to the base class. Another reason you might want to cast up through a hierarchy is to pass an object of several possible subclasses to a method. By specifying a parameter as a base class type, you have the flexibility to pass an object of any derived class to it. You could pass a Dog, Duck, or Cat object to a method as an argument for a parameter of type Animal, for example.
The reason you might want to cast down through a class hierarchy is to execute a method unique to a particular class. If the Duck class has a method layEgg(), for example, you can’t call this using a variable of type Animal, even though it references a Duck object. As I said, casting downward through a class hierarchy always requires an explicit cast.
TRY IT OUT: Casting Down to Lay an Egg
Let’s amend the Duck class and use it along with the Animal class in an example. Add layEgg() to the Duck class as:
public class Duck extends Animal {
  public void layEgg() {
    System.out.println("Egg laid");
  }
   // Rest of the class as before...
}
Directory "Lay Eggs"
If you now try to use this with the code:
public class LayEggs {
  public static void main(String[] args) {
    Duck aDuck = new Duck("Donald", "Eider");
    Animal aPet = aDuck;                    // Cast the Duck to Animal
    aPet.layEgg();                          // This won't compile!
   }
}
Directory "Lay Eggs"
you get a compiler message to the effect that layEgg() is not found in the class Animal.
Because you know this object is really a Duck, you can make it work by writing the call to layEgg() in the preceding code as:
((Duck)aPet).layEgg(); // This works fine
The object pointed to by aPet is first cast to type Duck. The result of the cast is then used to call the method layEgg(). If the object were not of type Duck, the cast would cause an exception to be thrown.
WARNING In general, you should avoid explicitly casting objects as much as possible because it increases the potential for an invalid cast and can therefore make your programs unreliable. Most of the time, you should find that if you design your classes carefully, you won’t need explicit casts very often.
Identifying Objects
There are circumstances when you may not know exactly what sort of object you are dealing with. This can arise if a derived class object is passed to a method as an argument for a parameter of a base class type for example, in the way that I discussed in the previous section. A parameter of type Animal could have a Duck, a Dog, or a Flea object passed as the argument. In some situations you may need to cast the object to its actual class type, perhaps to call a class-specific method. If you try to make the cast and it turns out to be illegal, an exception is thrown, and your program ends unless you have made provision for catching the exception. One way to obviate this situation is to verify that the object is of the type you expect before you make the cast.
You saw earlier in this chapter how you could use the getClass() method to obtain the Class object corresponding to the class type, and how you could compare it to a Class instance for the class you are looking for. You can also do this using the instanceof operator. For example, suppose you have a variable pet of type Animal, and you want to cast it to type Duck. You could code this as:
if(pet instanceof Duck) {
  Duck aDuck = (Duck)pet;             // It is a duck so the cast is OK
  aDuck.layEgg();                     // and You can have an egg for tea
}
If pet does not refer to a Duck object, an attempt to cast the object referenced by pet to Duck causes an exception to be thrown. This code fragment executes the cast and lay an egg only if pet does point to a Duck object. The preceding code fragment could have been written much more concisely as:
if(pet instanceof Duck) {
  ((Duck)pet).layEgg();          // It is a duck so You can have an egg for tea
}
So what is the difference between this and using getClass()? Well, it’s quite subtle. The instanceof operator checks whether a cast of the object referenced by the left operand to the type specified by the right operand is legal. The result is true if the object is the same type as the right operand, or of any subclass type. You can illustrate the difference by choosing a slightly different example.
Suppose pet stores a reference to an object of type Spaniel. You want to call a method defined in the Dog class, so you need to check that pet does really reference a Dog object. You can check whether you have a Dog object or not with the following statements:
if(pet instanceof Dog) {
  System.out.println("You have a dog!");
} else {
  System.out.println("It's definitely not a dog!");
}
You get confirmation that you have a Dog object here, even though it is actually a Spaniel object. This is fine, though, for casting purposes. As long as the Dog class is in the class hierarchy for the object, the cast works okay, so the operator is telling you what you need to know. However, suppose you write:
if(pet.getClass() == Dog.class) {
  System.out.println("You have a dog!");
}
else {
  System.out.println("It's definitely not a dog!");
}
Here the if expression is false because the class type of the object is Spaniel, so its Class object is different from that of Dog.class — you would have to write Spaniel.class instead of Dog.class to get the value true from the if expression.
You can conclude from this that for casting purposes you should always use the instanceof operator to check the type of a reference. You only need to resort to checking the Class object corresponding to a reference when you need to confirm the exact type of the reference.
When I introduced enumerations in Chapter 2, I said that there was more to enumerations than simply a type with a limited range of integer values. In fact, an enumeration type is a special form of class. When you define an enumeration type in your code, the enumeration constants that you specify are created as instances of a class that has the Enum class, which is defined in the java.lang package, as a superclass. The object that corresponds to each enumeration constant stores the name of the constant in a field, and the enumeration class type inherits the toString() method from the Enum class. The toString() method in the Enum class returns the original name of the enumeration constant, so that’s why you get the name you gave to an enumeration constant displayed when you output it using the println() method.
You have seen that you can put the definition of an enumeration type in the definition of a class. You can also put the definition in a separate source file. In this case you specify the name of the file containing the enumeration type definition in the same way as for any other class type. An enumeration that you define in its own source file can be accessed by any other source file in exactly the same way as any other class definition.
An object representing an enumeration constant also stores an integer field. By default, each constant in an enumeration is assigned an integer value that is different from all the others. The values are assigned to the enumeration constants in the sequence in which you specify them, starting with zero for the first constant, one for the second, and so on. You can retrieve the value for a constant by calling its ordinal() method, but you should not need to do this in general.
You have already seen in Chapter 3 that you can compare values of an enumeration type for equality using the equals() method. For example, assuming that you have defined an enumeration type, Season, with enumeration constants spring, summer, fall, and winter, you could write the following:
Season now = Season.winter;
if(now.equals(Season.winter))
  System.out.println("It is definitely winter!");
The equals() method is inherited from the Enum class in your enumeration class type. Your enumeration class type also inherits the compareTo() method that compares instances of the enumeration based on their ordinal values. It returns a negative integer if the value for the instance for which the method is called is less than the instance that you pass as the argument, 0 if they are equal, and a positive integer if the value of the current instance is greater than the value for the argument. Thus, the sequence in which you specify the enumeration constants when you define them determines the order that the compareTo() method implements. You might use it like this:
if(now.compareTo(Season.summer) > 0)
  System.out.println("It is definitely getting colder!");
The values() method for an enumeration that I introduced in Chapter 3 is a static member of your enumeration class type. This method returns a collection object containing all the enumeration constants that you can use in a collection-based for loop. You learn about collection classes in Chapter 14.
Adding Members to an Enumeration Class
Because an enumeration is a class, you have the possibility to add your own methods and fields when you define the enumeration type. You can also add your own constructors to initialize any additional fields you introduce. Let’s take an example. Suppose you want to define an enumeration for clothing sizes — jackets, say. Your initial definition might be like this:
public enum JacketSize { small, medium, large, extra_large, extra_extra_large }
You then realize that you would really like to record the average chest size applicable to each jacket size. You could amend the definition of the enumeration like this:
public enum JacketSize {
  small(36), medium(40), large(42), extra_large(46), extra_extra_large(48);

  // Constructor
  JacketSize(int chestSize) {
    this.chestSize = chestSize;
  }
  // Method to return the chest size for the current jacket size
  public int chestSize() {
    return chestSize;
  }

  private int chestSize;               // Field to record chest size
}
Directory "TryJackets"
Note how the list of enumeration constants now ends with a semicolon. Each constant in the list has the corresponding chest size between parentheses, and this value is passed to the constructor that you have added to the class. In the previous definition of JacketSize, the appearance of each enumeration constant results in a call to the default constructor for the class. In fact, you could put an empty pair of parentheses after the name of each constant, and it would still compile. However, this would not improve the clarity of the code. Because you have defined a constructor, no default constructor is defined for the enumeration class, so you cannot write enumeration constants just as names. You must put the parentheses enclosing a value for the chest size following each enumeration constant. Of course, if you want to have the option of omitting the chest size for some of the constants in the enumeration, you can define your own default constructor and assign a default value for the chestSize field.
Even though you have added your own constructor, the fields inherited from the base class, Enum, that store the name of the constant and its ordinal value are still set appropriately. The ordering of the constants that compareTo() implements are still determined by the sequence in which the constants appear in the definition. Note that you must not declare a constructor in an enumeration class as public. If you do, the enum class definition does not compile. The only modifier that you are allowed to apply to a constructor in a class defining an enumeration is private, which results in the constructor being callable only from inside the class.
The chest size is recorded in a private data member so there is also a chestSize() method to allow the value of chestSize to be retrieved.
Let’s see it working.
TRY IT OUT: Embroidering an Enumeration
First, create a new directory, TryJackets, for the example and save the JacketSize.java file containing the definition of the enumeration from the previous section in it. Now create another file containing the following definition:
public enum JacketColor { red, orange, yellow, blue, green }
Directory "TryJackets"
This should be in a file with the name JacketColor.java.
Now you can define a class that represents a jacket:
public class Jacket {
  public Jacket(JacketSize size, JacketColor color) {
    this.size = size;
    this.color = color;
  }

  @Override
  public String toString() {
    StringBuffer str = new StringBuffer("Jacket ");
    return str.append(size).append(" in ").append(color).toString();
  }

  private JacketSize size;
  private JacketColor color;
}
Directory "TryJackets"
Finally, you need a file containing code to try out some jackets:
public class TryJackets {
  public static void main(String[] args) {

    // Define some jackets
    Jacket[] jackets = {new Jacket(JacketSize.medium, JacketColor.red),
                     new Jacket(JacketSize.extra_large, JacketColor.yellow),
                     new Jacket(JacketSize.small, JacketColor.green),
                     new Jacket(JacketSize.extra_extra_large, JacketColor.blue)
                       };

    // Output colors available
    System.out.println("Jackets colors available are:
");
    for(JacketColor color: JacketColor.values()) {
      System.out.print("  " + color);
    }

    // Output sizes available
    System.out.println("

Jackets sizes available are:
");
    for(JacketSize size: JacketSize.values()) {
      System.out.print("  " + size);
    }

    System.out.println("

Jackets in stock are:");
    for(Jacket jacket: jackets) {
      System.out.println(jacket);
    }
  }
}
Directory "TryJackets"
When you compile and execute this program you get the following output:
Jackets colors available are:

  red  orange  yellow  blue  green

Jackets sizes available are:

  small  medium  large  extra_large  extra_extra_large

Jackets in stock are:
Jacket medium in red
Jacket extra_large in yellow
Jacket small in green
Jacket extra_extra_large in blue
How It Works
The main() method in the TryJackets class defines an array of Jacket objects. It then lists the sizes and colors available for a jacket simply by using the collection-based for loop to list the constants in each enumeration. Because the enumeration constants are objects, the compiler inserts a call to the toString() method for the objects to produce the output. You use the same kind of for loop to list the contents of the array of Jacket objects. This also involves an implicit call to the toString() method for each Jacket object.
Because you have defined the JacketSize and JacketColor enumerations in separate classes, they are accessible from any source file in the same directory. To make them even more widely available, you could put them in a package.
The Jacket class uses the enumeration types to define private fields recording the size and color of a jacket. Note how the toString() method in the Jacket class is able to use the size and color members as though they were strings. The compiler inserts a call to the toString() method for the enumeration type that applies. You can override the toString() method for an enumeration type. For example, you might decide you prefer to define the toString() method in the JacketSize enumeration like this:
  @Override
  public String toString() {
    switch(this) {
      case small:
        return "S";
      case medium:
        return "M";
      case large:
        return "L";
      case extra_large:
        return "XL";
      default:
        return "XXL";
    }
  }
Note how you can use this as the control expression for the switch statement. This is because this references the current instance, which is an enumeration constant. Because the expression is an enumeration constant, the case labels are the constant names. They do not need to be qualified by the name of the enumeration. With this implementation of toString() in the JacketSize enumeration, the output is:
Jackets colors available are:

  red  orange  yellow  blue  green

Jackets sizes available are:

  S  M  L  XL  XXL

Jackets in stock are:
Jacket M in red
Jacket XL in yellow
Jacket S in green
Jacket XXL in blue
Thus, you can see from this example that you can treat an enumeration type just like any other class type.
A basic problem in object-oriented programming is deciding how the classes in your program should relate to one another. One possibility is to create a hierarchy of classes by deriving classes from a base class that you have defined and adding methods and data members to specialize the subclasses. The Animal class and the subclasses derived from it are an example of this. Another possibility is to define a set of classes that are not hierarchical, but that have data members that are themselves class objects. A Zoo class might well have objects of types derived from Animal as members, for example. You can have class hierarchies that contain data members that are class objects — you already have this with the classes derived from Animal because they have members of type String. The examples so far have been relatively clear-cut as to which approach to choose, but it is not always so evident. Quite often you have a choice between defining your classes as a hierarchy and defining classes that have members that are class objects. Which is the best approach to take?
Like almost all questions of this kind, there are no clear-cut answers. If object-oriented programming were a process that you could specify by a fixed set of rules that you could just follow blindly, you could get the computer to do it. There are some guidelines though, and some contexts in which the answer may be more obvious.
Aside from the desirability of reflecting real-world relationships between types of objects, the need to use polymorphism is a primary reason for using subclasses (or interfaces, as you see shortly). This is the essence of object-oriented programming. Having a range of related objects that can be treated equivalently can greatly simplify your programs. You have seen how having various kinds of animals specified by classes derived from a common base class, Animal, enables us to act on different types of animals as though they are the same, producing different results depending on what kind of animal is being dealt with, and all this automatically.
A Classy Example
Many situations involve making judgments about the design of your classes. The way to go may well boil down to a question of personal preference. Let’s try to see how the options look in practice by considering a simple example. Suppose you want to define a class PolyLine to represent geometric entities that consist of a number of connected line segments, as illustrated in Figure 6-6.

Figure 6-6 shows two polylines, one defined by four points, the other defined by six points.
It seems reasonable to represent points as objects of a class Point. Points are well-defined objects that occur in the context of all kinds of geometric entities. You have seen a class for points earlier, which you put in the Geometry package. Rather than repeat the whole class, let’s just define the bare bones of what you need in this context:
public class Point {
  // Create a point from its coordinates
  public Point(double xVal, double yVal) {
     x = xVal;
     y = yVal;
  }

  // Create a point from another point
  public Point(Point point) {
     x = point.x;
     y = point.y;
  }

  // Convert a point to a string
  @Override
  public String toString() {
     return x+","+y;
  }

  // Coordinates of the point
  protected double x;
  protected double y;
}
Directory "TryPolyLine"
Save the source file containing this code in a new directory, TryPolyLine. You add all the files for the example to this directory. Both data members of Point are inherited in any subclass because they are specified as protected. They are also insulated from interference from outside the package containing the class. The toString() method enables Point objects to be concatenated to a String object for automatic conversion — in an argument passed to the println() method, for example.
The next question you might ask is, “Should I derive the class PolyLine from the class Point?” This has a fairly obvious answer. A polyline is clearly not a kind of point, so it is not logical to derive the class PolyLine from the Point class. This is an elementary demonstration of what is often referred to as the is a test. If you can say that one kind of object is a specialized form of another kind of object, you may have a good case for a derived class (but not always — there may be other reasons not to!). If not, you don’t.
The complement to the is a test is the has a test. If one object has a component that is an object of another class, you have a case for a class member. A House object has a door, so a variable of type Door is likely to be a member of the class House. The PolyLine class contains several points, which looks promising, but you should look a little more closely at how you might store them, as there are some options.
Designing the PolyLine Class
With the knowledge you have of Java, an array of Point objects looks like a good candidate to be a member of the class. There are disadvantages, though. A common requirement with polylines is to be able to add segments to an existing object. With an array storing the points you need to create a new array each time you add a segment, then copy all the points from the old array to the new one. This could be time-consuming if you have a PolyLine object with a lot of segments.
You have another option. You could create a linked list of points. In its simplest form, a linked list of objects is an arrangement where each object in the list has a reference to the next object as a data member. As long as you have a variable containing a reference to the first Point object, you can access all the points in the list, as shown in Figure 6-7.

Figure 6-7 illustrates the basic structure you might have for a linked list of points stored as a PolyLine. The points are stored as members of ListPoint objects. In addition to constructors, the PolyLine class needs a method to add points, but before you look into that, let’s consider the ListPoint class in more detail.
You could take one of at least three approaches to define the ListPoint class, and you could make arguments in favor of all three.
- You could define the ListPoint class with the x and y coordinates stored explicitly. The main argument against this would be that you have already encapsulated the properties of a point in the Point class, so why not use it?
- You could regard a ListPoint object as something that contains a reference to a Point object, plus members that refer to following ListPoint objects in the list. This is not an unreasonable approach. It is easy to implement and not inconsistent with an intuitive idea of a ListPoint.
- You could view a ListPoint object as a specialized kind of Point, so you would derive the ListPoint class from Point. Whether or not this is reasonable depends on whether you see this as valid. To my mind, this is stretching the usual notion of a point somewhat — I would not use this.
The best option looks to me to be the second approach. You could implement the ListPoint class with a data member of type Point, which defines a basic point with its coordinates. A ListPoint object would have an extra data member, next, of type ListPoint that is intended to contain a reference to the next object in the list. With this arrangement, you can find all the points in a Polyline object by starting with its start member, which stores a reference to its first ListPoint object. This contains a reference to the next ListPoint object in its next member, which in turn contains a reference to the next, and so on through to the last ListPoint object. You know it is the last one because its next member, which usually points to the next ListPoint object, is null. Let’s try it.
TRY IT OUT: The ListPoint Class
You can define the ListPoint class using the Point class with the following code:
public class ListPoint {
  // Constructor
  public ListPoint(Point point) {
    this.point = point;                // Store point reference
    next = null;                       // Set next ListPoint as null
  }

  // Set the pointer to the next ListPoint
  public void setNext(ListPoint next) {
    this.next = next;                  // Store the next ListPoint
  }

  // Get the next point in the list
  public ListPoint getNext() {
    return next;                       // Return the next ListPoint
  }

  // Return String representation
  @Override
  public String toString() {
    return "(" + point + ")";
  }

   private ListPoint next;             // Refers to next ListPoint in the list
   private Point point;                // The point for this list point
}
Directory "TryPolyLine"
Save this file in the same directory as the Point class, TryPolyLine.
How It Works
A ListPoint object is a means of creating a list of Point objects that originate elsewhere so you don’t need to worry about duplicating Point objects stored in the list. You can just store the reference to the Point object passed to the constructor in the data member, point. The data member, next, should contain a reference to the next ListPoint in the list, and because that is not defined here, you set next to null.
The setNext() method enables the next data member to be set for the existing last point in the list when a new point is added to the list. A reference to the new ListPoint object is passed as an argument to the method. The getNext() method enables the next point in the list to be determined, so this method is the means by which you can iterate through the entire list.
By implementing the toString() method for the class, you enable the automatic creation of a String representation for a ListPoint object when required. Here you differentiate the String representation of the ListPoint object by enclosing the String representation of point between parentheses.
You could now have a first stab at implementing the PolyLine class.
TRY IT OUT: The PolyLine Class
You can define the PolyLine class to use the ListPoint class as follows:
public class PolyLine {
  // Construct a polyline from an array of points
  public PolyLine(Point[] points) {
    if(points != null) {               // Make sure there is an array
      for(Point p : points) {
        addPoint(p);
      }
    }
  }

  // Add a Point object to the list
  public void addPoint(Point point) {
    ListPoint newEnd = new ListPoint(point);     // Create a new ListPoint
    if(start == null) {
      start = newEnd;                            // Start is same as end
    } else {
      end.setNext(newEnd);          // Set next variable for old end as new end
    }
    end = newEnd;                                // Store new point as end
  }

  // String representation of a polyline
  @Override
  public String toString() {
    StringBuffer str = new StringBuffer("Polyline:");
    ListPoint nextPoint = start;                 // Set the 1st point as start
    while(nextPoint != null) {
      str.append(" "+ nextPoint);                // Output the current point
      nextPoint = nextPoint.getNext();           // Make the next point current
    }
    return str.toString();
  }

  private ListPoint start;                       // First ListPoint in the list
  private ListPoint end;                         // Last ListPoint in the list
}
Directory "TryPolyLine"
This source file also goes in the TryPolyLine directory.
You might want to be able to add a point to the list by specifying a coordinate pair. You could overload the addPoint() method to do this:
  // Add a point defined by a coordinate pair to the list
  public void addPoint(double x, double y) {
    addPoint(new Point(x, y));
  }
Directory "TryPolyLine"
You just created a new Point object in the expression that is the argument to the other version of addPoint().
You might also want to create a PolyLine object from an array of coordinates. The constructor to do this would be:
  // Construct a polyline from an array of coordinates
   public PolyLine(double[][] coords) {
     if(coords != null) {
       for(int i = 0; i < coords.length ; ++i) {
         addPoint(coords[i][0], coords[i][1]);
      }
    }
  }
Directory "TryPolyLine"
How It Works
The PolyLine class has the data members start and end that you saw in Figure 6-7. These reference the first and last points of the list, or null if the list is empty. Storing the end point in the list is not essential because you can always find it by going through the list starting with start. However, having a reference to the last point saves a lot of time when you want to add a point to the list. The constructor accepts an array of Point objects and uses the addPoint() method to add all the points in the array to the list.
Adding a point to the list is deceptively simple. All the addPoint() method does is create a ListPoint object from the Point object passed as an argument, sets the next member of the old end point in the list to refer to the new point, and finally stores a reference to the new end point in the member end.
The toString() method returns a string representing the PolyLine object as a list of point coordinates. Note how the next member of the ListPoint objects controls the loop that runs through the list. When the last ListPoint object is reached, the next member will be returned as null and the while loop ends. You can now give the PolyLine class a whirl.
TRY IT OUT: Using PolyLine Objects
You can create a simple example to illustrate the use of the PolyLine class:
public class TryPolyLine {
  public static void main(String[] args) {
    // Create an array of coordinate pairs
    double[][] coords = { {1, 1}, {1, 2}, { 2, 3},
                          {-3, 5}, {-5, 1}, {0, 0} };

    // Create a polyline from the coordinates and display it
    PolyLine polygon = new PolyLine(coords);
    System.out.println(polygon);
    // Add a point and display the polyline again
    polygon.addPoint(10, 10);
    System.out.println(polygon);

    // Create Point objects from the coordinate array
    Point[] points = new Point[coords.length];
    for(int i = 0; i < points.length; ++i)
    points[i] = new Point(coords[i][0],coords[i][1]);

    // Use the points to create a new polyline and display it
    PolyLine newPoly = new PolyLine(points);
    System.out.println(newPoly);
  }
}
Directory "TryPolyLine"
Remember that all three classes, Point, ListPoint, and PolyLine, need to be together in the same folder as this class, which is the TryPolyLine directory if you followed my initial suggestion. If you have keyed everything in correctly, the program outputs three PolyLine objects:
Polyline: (1.0,1.0) (1.0,2.0) (2.0,3.0) (-3.0,5.0) (-5.0,1.0) (0.0,0.0)
Polyline: (1.0,1.0) (1.0,2.0) (2.0,3.0) (-3.0,5.0) (-5.0,1.0) (0.0,0.0) (10.0,10.0)
Polyline: (1.0,1.0) (1.0,2.0) (2.0,3.0) (-3.0,5.0) (-5.0,1.0) (0.0,0.0)
The first and the third lines of output are the same, with the coordinates from the coords array. The second has the extra point (10, 10) at the end.
The PolyLine class works well enough but it doesn’t seem very satisfactory. Adding all the code to create and manage a list for what is essentially a geometric entity is not very object-oriented is it? Come to think of it, why are you making a list of points? Apart from the type of the data members of the ListPoint class, there’s very little to do with Point objects in its definition; it’s all to do with the linking mechanism. You might also have lots of other requirements for lists. If you were implementing an address book for instance, you would want a list of names. A cookery program would need a list of recipes. You might need lists for all kinds of things — maybe even a list of lists! Let’s see if there’s a better approach.
A General-Purpose Linked List
Let’s put together a more general-purpose linked list and then use it to store polylines as before. You should save the source files for this in a new directory, as you implement them as a whole new example. I put the source files in a directory with the name TryLinkedList in the code download for the book.
The key to implementing a simple, general-purpose linked list is the Object class discussed earlier in this chapter. Because the Object class is a superclass of every class, you can use a variable of type Object to store any kind of object. You could re-implement the ListPoint class in the form of a ListItem class. This represents an element in a linked list that can reference any type of object:
class ListItem {
  // Constructor
  public ListItem(Object item) {
    this.item = item;                  // Store the item
    next = null;                       // Set next as end point
  }

  // Return class name & object
  @Override
  public String toString() {
    return "ListItem " + item ;
  }

  ListItem next;                       // Refers to next item in the list
  Object item;                         // The item for this ListItem
}
Directory "TryPolyLine2"
It’s basically similar to the ListPoint class except that you have omitted the methods to set and retrieve the next member reference. You see why these are not necessary in a moment. The toString() method assumes that the object referenced by item implements a toString() method. You won’t use the toString() method here when you come to exercise the general linked list class you’re implementing, but it is a good idea to implement the toString() method for your classes anyway. If you do, meaningful representations of class objects can always be output using the println() method, which is very handy for debugging.
You can now use objects of this class in a definition of a class that represents a linked list.
Defining a Linked List Class
The mechanics of creating and handling the linked list is similar to what you had in the PolyLine class, but externally you need to deal in the objects that are stored in the list, not in terms of ListItem objects. In fact, you don’t need to have the ListItem class separate from the LinkedList class. You can make it an inner class:
public class LinkedList {
  // Default constructor - creates an empty list
  public LinkedList() {}

  // Constructor to create a list containing one object
  public LinkedList(Object item) {
    if(item != null) {
      current = end = start = new ListItem(item); // item is the start and end
    }
  }

  // Construct a linked list from an array of objects
  public LinkedList(Object[] items) {
    if(items != null) {
      // Add the items to the list
      for(Object item : items) {
        addItem(item);
      }
      current = start;
    }
  }

  // Add an item object to the list
  public void addItem(Object item) {
    ListItem newEnd = new ListItem(item);   // Create a new ListItem
    if(start == null) {                     // Is the list empty?
      start = end = newEnd;             // Yes, so new element is start and end
    } else {                                // No, so append new element
      end.next = newEnd;                    // Set next variable for old end
      end = newEnd;                         // Store new item as end
    }
  }

  // Get the first object in the list
  public Object getFirst() {
    current = start;
    return start == null ? null : start.item;
  }

  // Get the next object in the list
  public Object getNext() {
    if(current != null) {
      current = current.next;           // Get the reference to the next item
    }
    return current == null ? null : current.item;
  }

  private ListItem start = null;            // First ListItem in the list
  private ListItem end = null;              // Last ListItem in the list
  private ListItem current = null;          // The current item for iterating

  // ListItem as a nested class
  private class ListItem {
    // ListItem class definition as before...
  }
}
Directory "TryPolyLine2"
Save this source file in the new directory for the example. You can use this class to create a linked list containing any types of objects. The class has data members to track the first and last items in the list, plus the member current, which is used to iterate through the list. You have three class constructors. The default constructor creates an empty list. You have a constructor to create a list with a single object, and another to create a list from an array of objects. Any list can also be extended by means of the addItem() method. Each of the constructors, apart from the default, sets the current member to the first item in the list, so if the list is not empty, this refers to a valid first item.
You can see that because the ListItem class is a member of the LinkedList class, you can refer to its data members directly within methods in the LinkedList class. This obviates the need for any methods in the ListItem class to get or set its fields. Because it is private it is not accessible outside the LinkedList class so there is no risk associated with this — as long as you code the LinkedList class correctly, of course.
The addItem() method works in much the same way as the addPoint() method did in the PolyLine class. It creates a new ListItem object and updates the next member of the previous last item to refer to the new one. The complication is the possibility that the list might be empty. The check in the if takes care of this. You take special steps if start holds a null reference.
The getFirst() and getNext() methods are intended to be used together to access all the objects stored in the list. The getFirst() method returns the object stored in the first ListItem object in the list and sets the current data member to refer to the first ListItem object. After calling the getFirst() method, successive calls to the getNext() method return subsequent objects stored in the list. The method updates current to refer to the next ListItem object, each time it is called. When the end of the list is reached, getNext() returns null.
TRY IT OUT: Using the General Linked List
You can now define the PolyLine class so that it uses a LinkedList object. All you need to do is put a LinkedList variable as a class member that you initialize in the class constructors, and implement all the other methods you had in the previous version of the class to use the LinkedList object:
public class PolyLine {
  // Construct a polyline from an array of coordinate pairs
  public PolyLine(double[][] coords) {
    Point[] points = new Point[coords.length];   // Array to hold points

    // Create points from the coordinates
    for(int i = 0; i < coords.length ; ++i) {
      points[i] = new Point(coords[i][0], coords[i][1]);
    }

    // Create the polyline from the array of points
    polyline = new LinkedList(points);
  }

  // Construct a polyline from an array of points
  public PolyLine(Point[] points) {
    polyline = new LinkedList(points);           // Create the polyline
  }

  // Add a Point object to the list
  public void addPoint(Point point) {
    polyline.addItem(point);                     // Add the point to the list
  }

  // Add a point from a coordinate pair to the list
  public void addPoint(double x, double y) {
     polyline.addItem(new Point(x, y));          // Add the point to the list
  }

  // String representation of a polyline
  @Override
  public String toString() {
    StringBuffer str = new StringBuffer("Polyline:");
    Point point = (Point) polyline.getFirst();
                                                 // Set the 1st point as start
    while(point != null) {
      str.append(" ("+ point+ ")");              // Append the current point
      point = (Point)polyline.getNext();         // Make the next point current
    }
    return str.toString();
  }

  private LinkedList polyline;                   // The linked list of points
}
Directory "TryPolyLine2"
You can exercise this using the same code as last time — in the TryPolyLine.java file. Copy this file to the directory for this example. Don’t forget to copy Point.java, too. I changed the name of the file from TryPolyLine.java to TryPolyLine2.java and the class name of course.
How It Works
The PolyLine class implements all the methods that you had in the class before, so the main() method in the TryPolyLine class works just the same. Under the covers, the methods in the PolyLine class work a little differently. The work of creating the linked list is now in the constructor for the LinkedList class. The PolyLine class constructors just assemble a point array if necessary and call the LinkedList constructor. Similarly, the addPoint() method creates a Point object from the coordinate pair it receives and passes it to the addItem() method for the LinkedList object, polyline.
Note that the cast from Point to Object when the addItem() method is called is automatic. A cast from any class type to type Object is always automatic because the class is up the class hierarchy — remember that all classes have Object as a base. In the toString() method, you must insert an explicit cast to store the object returned by the getFirst() or the getNext() method. This cast is down the hierarchy so you must specify the cast explicitly.
You could use a variable of type Object to store the objects returned from getFirst() and getNext(), but this would not be a good idea. You would not need to insert the explicit cast, but you would lose a valuable check on the integrity of the program. You put objects of type Point into the list, so you would expect objects of type Point to be returned. An error in the program somewhere could result in an object of another type being inserted. If the object is not of type Point — due to the said program error, for example — the cast to type Point fails and you get an exception. A variable of type Object can store anything. If you use this, and something other than a Point object is returned, it does not register at all.
Now that you have gone to the trouble of writing your own general linked list class, you may be wondering why someone hasn’t done it already. Well, they have! The java.util package defines a LinkedList class that is much better than this one. Still, putting your own together was a good experience, and I hope you found it educational, if not interesting. The way you have implemented the LinkedList class here is not the best approach. In Chapter 13 you learn about generic types, which enable you to define a linked list class that is type-safe. You look at the standard class in the java.util package that implements a linked list using the generic types capability in Chapter 14.
You have already used the final keyword to fix the value of a static data member of a class. You can also apply this keyword to the definition of a method, and to the definition of a class.
It may be that you want to prevent a subclass from overriding a method in your class. When this is the case, simply declare that method as final. Any attempt to override a final method in a subclass results in the compiler flagging the new method as an error. For example, you could declare the method addPoint() as final within the class PolyLine by writing its definition in the class as:
   public final void addPoint(Point point) {
    polyline.addItem(point);                     // Add the point to the list
  }
Any class derived from PolyLine is not able to redefine this method. Obviously, an abstract method cannot be declared as final — because it must be defined in a subclass somewhere.
If you declare a class as final, you prevent any subclasses from being derived from it. To declare the class PolyLine as final, you define it as:
public final class PolyLine {
   // Definition as before...
}
If you now attempt to define a class based on PolyLine, you get an error message from the compiler. An abstract class cannot be declared as final because this prevents the abstract methods in the class from ever being defined. Declaring a class as final is a drastic step that prevents the functionality of the class being extended by derivation, so you should be very sure that you want to do this.
In the classes that you derived from the class Animal, you had a common method, sound(), that was implemented individually in each of the subclasses. The method signature was the same in each class, and the method could be called polymorphically. The main point to defining the class Animal first and then subsequently defining the classes Dog, Cat, and so on, from it was to be able to get polymorphic behavior. When all you want is a set of one or more methods to be implemented in a number of different classes so that you can call them polymorphically, you can dispense with the base class altogether.
You can achieve the same result much easier by using a Java facility called an interface. The name indicates its primary use — specifying a set of methods that represent a particular class interface, which can then be implemented appropriately in a number of different classes. All of the classes then share this common interface, and the methods in it can be called polymorphically through a variable of the interface type. This is just one aspect of what you can do using an interface. I start by examining what an interface is from the ground up and then look at what you can do with it.
An interface is essentially a collection of related constants and/or abstract methods, and in most cases it contains just methods. An interface doesn’t define what a method does. It just defines its form — its name, its parameters, and its return type, so by definition the methods in an interface are abstract.
To make use of an interface, you implement the interface in a class — that is, you declare that the class implements the interface using the implements keyword and you write the code for each of the methods that the interface declares as part of the class definition. When a class implements an interface, any constants that were defined in the interface definition are available directly in the class, just as though they were inherited from a base class. An interface can contain either constants, or abstract methods, or both.
The methods in an interface are always public and abstract, so you do not need to specify them as such; it is considered bad programming practice to specify any attributes for them, and you definitely cannot add any attributes other than the defaults, public and abstract. This implies that methods declared in an interface can never be static, so an interface always declares instance methods. The constants in an interface are always public, static, and final, so you do not need to specify the attributes for these either.
An interface is defined just like a class, but using the keyword interface rather than the keyword class. You store an interface definition in a .java file with the same name as the interface. The name that you give to an interface must be different from that of any other interface or class in the same package. Just as for classes, the members of the interface — the constants and/or method declarations — appear between a pair of braces that delimit the body of the interface definition.
Encapsulating Constants in a Program
You will often find that a program makes use of a set of constant values that you really want to define only once. You might have values representing standard colors that your program uses or perhaps constants that are used in calculations such as conversion factors from one set of units to another. In Java versions prior to 5.0, a common approach was to define a set of related constants in an interface and then implement the interface in any class that used any of the constants. This approach has largely been made obsolete by the static import capability.
The capability to import static members of a class that was introduced in Java 5 provides an excellent way of dealing with constants in a program. However, the use of an interface for such purposes was very widespread prior to Java 5, so I first explain briefly how that works to equip you for when you run into it. I then explain how you use static import to access constants that you have defined in a class, which is a much cleaner and better way of making a set of constants available wherever they are needed.
Constants in an Interface
Suppose you are writing a program that converts measurements between metric and imperial units. Here’s how the constants that such a program might use could be defined in an interface:
public interface ConversionFactors {
  double INCH_TO_MM = 25.4;
  double OUNCE_TO_GRAM = 28.349523125;
  double POUND_TO_GRAM = 453.5924;
  double HP_TO_WATT = 745.7;
  double WATT_TO_HP = 1.0/HP_TO_WATT;
}
The ConversionFactors interface defines five constants for conversions of various kinds. Constants defined in an interface are automatically public, static, and final. You have no choice about this — constants defined in an interface always have these attributes. Because the constants are static and final, you must always supply initializing values for constants defined in an interface. The names given to these in the ConversionFactors interface use capital letters to indicate that they are final and cannot be altered — this is a common convention in Java. You can define the value of one constant in terms of a preceding constant, as in the definition of WATT_TO_HP. If you try to use a constant that is defined later in the interface — if, for example, the definition for WATT_TO_HP appeared first — your code does not compile.
Because you have declared the interface as public, the constants are also available outside the package containing the ConversionFactors interface. You can access constants defined in an interface in the same way as for public and static fields in a class — by just qualifying the name with the name of the interface. For example, you could write:
public class MyClass {
  // This class can access any of the constants defined in ConversionFactors
  // by qualifying their names...
  public static double poundsToGrams(double pounds) {
    return pounds*ConversionFactors.POUND_TO_GRAM;
  }

  // Plus the rest of the class definition...
}
Because the ConversionFactors interface includes only constants, a class can gain access to them using their unqualified names by declaring that it implements the interface. This has been the technique employed in the past. For example, here’s a class that implements the ConversionFactors interface:
public class MyOtherClass implements ConversionFactors {
  // This class can access any of the constants defined in ConversionFactors
  // using their unqualified names, and so can any subclasses of this class...
  public static double poundsToGrams(double pounds) {
    return pounds*POUND_TO_GRAM;
  }

  // Plus the rest of the class definition...
}
The constants defined in the ConversionFactors interface are now members of MyOtherClass and therefore are inherited in any derived classes.
Although this technique of using an interface as a container for constants works and has been widely used in the past, using a class to contain the constants as static fields and then importing the names of the fields as required provides a simpler more effective approach. This is now the recommended technique for handling sets of constants in a program. Let’s see how it works.
Constants Defined in a Class
You could define a class to hold the same set of constants that you saw defined in an interface in the previous section, like this:
package conversions;                             // Package for conversions

public class ConversionFactors {
  public static final double INCH_TO_MM = 25.4;
  public static final double OUNCE_TO_GRAM = 28.349523125;
  public static final double POUND_TO_GRAM = 453.5924;
  public static final double HP_TO_WATT = 745.7;
  public static final double WATT_TO_HP = 1.0/HP_TO_WATT;
}
Directory "TryConversions/conversions"
Of course, you can access the members of the ConversionsFactors class from outside by using the qualified names of the data members — ConversionFactors.HP_TO_WATT, for example. An alternative and possibly more convenient approach is to import the static members of the class into any class that needs to use any of the constants. This allows the constants to be referred to by their unqualified names. In this case, the class must be in a named package, because the import statement cannot be applied to the unnamed package.
Here’s how you might use it:
import static conversions.ConversionFactors.*;   // Import static members

public class MyOtherClass {
  // This class can access any of the constants defined in ConversionFactors

  public static double poundsToGrams(double pounds) {
    return pounds*POUND_TO_GRAM;
  }

  // Plus the rest of the class definition...
}
Now you can access any of the static members of the ConversionFactors class using their unqualified names from any source file. All that is necessary is the import statement for the static members of the class. Alternatively, you could just import the static members you want to use. For example, you could use the following import statement if you just want to use the constant with the name POUND_TO_GRAM:
import static conversions.ConversionFactors.POUND_TO_GRAM;
Let’s see it working in an example.
TRY IT OUT: Importing Constants into a Program
Save the ConversionFactors class definition ConversionFactors.java in a directory with the name conversions. Here’s a simple class that uses the constants defined in the utility class ConversionFactors:
import static conversions.ConversionFactors.*;   // Import static members

public class TryConversions {
  public static double poundsToGrams(double pounds) {
    return pounds*POUND_TO_GRAM;
  }

  public static double inchesToMillimeters(double inches) {
    return inches*INCH_TO_MM;
  }

  public static void main(String args[]) {
    int myWeightInPounds = 180;
    int myHeightInInches = 75;
    System.out.println("My weight in pounds: " +myWeightInPounds +
                       " 	-in grams: "+ (int)poundsToGrams(myWeightInPounds));
    System.out.println("My height in inches: " +myHeightInInches +
           " 	-in millimeters: "+ (int)inchesToMillimeters(myHeightInInches));
  }
}
Directory "TryConversions"
Save the TryConversions.java file in the TryConversions directory. Don’t forget that you must include the path to your conversions package when you compile this program. If the conversions directory is a subdirectory of C:MyPackages, the command to compile the program with TryConversions as the current directory is:
javac -classpath "C:MyPackages" TryConversions.java
When you compile and execute this example, you should see the following output:
My weight in pounds: 180       -in grams: 81646
My height in inches: 75        -in millimeters: 1905
How It Works
The fact that you have used only static methods to access the constants from the utility class is unimportant — it’s just to keep the example simple. They are equally accessible from instance methods in a class.
The two conversion methods use the conversion factors defined in the ConversionFactors class. Because you have imported the static fields from the ConversionFactors class in the conversions package into the TryConversions.java source file, you can use the unqualified names to refer to the constants.
Interfaces Declaring Methods
The primary use for an interface is to define the external form of a set of methods that represent a particular functionality. Let’s consider an example. Suppose that you want to specify a set of methods to be used for conversions between metric and imperial measurements. You could define such an interface like this:
public interface Conversions {
  double inchesToMillimeters (double inches);
  double ouncesToGrams(double ounces);
  double poundsToGrams(double pounds);
  double hpToWatts(double hp);
  double wattsToHP(double watts);
}
Directory "TryConversions2"
This interface declares five methods to perform conversions. Every method that is declared in the interface must have a definition within a class that implements the interface if you are going to create objects of the class type. A class that implements this interface would look like this:
public class MyClass implements Conversions {
  // Implementations for the methods in the Conversions interface
  // Definitions for the other class members...
}
Because the methods in an interface are, by definition, public, you must use the public keyword when you define them in your class — otherwise, your code does not compile. The implementation of an interface method in a class must not have an access specifier that is more restrictive than that implicit in the abstract method declaration, and you can’t get less restrictive than public.
A class can implement more than one interface. In this case, you write the names of all the interfaces that the class implements separated by commas following the implements keyword. Here’s an example:
public class MyClass implements Conversions, Definitions, Detections {
  // Definition of the class including implementation of interface methods
}
This class implements three interfaces with the names Conversions, Definitions, and Detections. The class body contains definitions for the methods declared in all three interfaces.
TRY IT OUT: Implementing an Interface
You can use the Conversions interface in a modified version of the previous example. Redefine the TryConversions class in the TryConversions.java source file as follows:
import static conversions.ConversionFactors.*;   // Import static members

public class TryConversions implements Conversions {
  public double wattsToHP (double watts) {
    return watts*WATT_TO_HP;
  }
  public double hpToWatts (double hp) {
    return hp*HP_TO_WATT;
  }

  public double ouncesToGrams(double ounces) {
    return ounces*OUNCE_TO_GRAM;
  }

  public double poundsToGrams(double pounds) {
    return pounds*POUND_TO_GRAM;
  }

  public double inchesToMillimeters(double inches) {
    return inches*INCH_TO_MM;
  }

  public static void main(String args[]) {
    int myWeightInPounds = 180;
    int myHeightInInches = 75;

    TryConversions converter = new TryConversions();
    System.out.println("My weight in pounds: " +myWeightInPounds +
     " 	-in grams: "+ (int)converter.poundsToGrams(myWeightInPounds));
    System.out.println("My height in inches: " + myHeightInInches
                       + " 	-in millimeters: "
                       + (int)converter.inchesToMillimeters(myHeightInInches));
  }
}
Directory "TryConversions2"
Save the file in a new directory, TryConversions2, and add a source file containing the definition for the Conversions interface to the same directory. You name a file containing an interface definition in a similar way to that of a class — the file name should be the same as the interface name, with the extension .java. Thus, the source file containing the Conversions interface definition is Conversions.java.
How It Works
The methods you were using in the original definition of the class are now not declared as static. Because interface methods are by definition instance methods, you cannot declare them as static in the class that implements the interface. As the methods are now instance methods, you have to create a TryConversions object, converter, to call them.
Of course, in this instance, statically importing the constants that are used by the interface method implementations is a clumsy way of doing things. Because the constants are clearly related to the methods, it would probably be better to define all the constants in the Conversions interface in addition to the method declarations.
Of course, you don’t have to implement every method in the interface, but there are some consequences if you don’t.
A Partial Interface Implementation
You can omit the implementation of one or more of the methods from an interface in a class that implements the interface, but in this case the class inherits some abstract methods from the interface so you would need to declare the class itself as abstract:
import static conversions.ConversionFactors.INCH_TO_MM;
import static conversions.ConversionFactors.OUNCE_TO_GRAM;

public abstract class MyClass implements Conversions {
  // Implementation of two of the methods in the interface
  @Override public double inchesToMillimeters(double inches) {
    return inches*INCH_TO_MM;
  }

  @Override public double ouncesToGrams(double ounces) {
    return ounces*OUNCE_TO_GRAM;
  }

  // Definition of the rest of the class...
}
You cannot create objects of type MyClass. To arrive at a useful class, you must define a subclass of MyClass that implements the remaining methods in the interface. The declaration of the class as abstract is mandatory when you don’t implement all of the methods that are declared in an interface. The compiler complains if you forget to do this.
Note the use of the @Override annotation. For a class that implements an interface and is not abstract, there is no need to use the @Override annotation because the compiler always generates an error message if you fail to implement any interface method with the correct signature. However, if you want to use the annotation in this case, you are free to do so. When you declare a class as abstract, no error message is produced for an incorrect signature for an interface method because the compiler has no way to know what you intended. The @Override annotation on interface method implementations ensure such errors are flagged in an abstract class.
Extending Interfaces
You can define one interface based on another by using the keyword extends to identify the base interface name. This is essentially the same form as you use to derive one class from another. The interface doing the extending acquires all the methods and constants from the interface it extends. For example, the interface Conversions would perhaps be more useful if it contained the constants that the original interface ConversionFactors contained. This would obviate the need for a separate class containing the constants, so there would be no need for the static import statement.
You could do this by defining the interface Conversions as follows:
public interface Conversions extends ConversionFactors {
  double inchesToMillimeters(double inches);
  double ouncesToGrams(double ounces);
  double poundsToGrams(double pounds);
  double hpToWatts(double hp);
  double wattsToHP(double watts);
}
Now the interface Conversions also contains the members of the interface ConversionFactors. Any class implementing the Conversions interface has the constants from ConversionFactors available to implement the methods. Analogous to the idea of a superclass, the interface ConversionFactors is referred to as a super-interface of the interface Conversions.
Of course, because the constants and the methods involved in conversion operations are closely related, it would have been much better to put them all in a single interface definition. But then it wouldn’t demonstrate one interface extending another.
Interfaces and Multiple Inheritance
Unlike a class, which can extend only one other class, an interface can extend any number of other interfaces. To define an interface that inherits the members of several other interfaces, you specify the names of the interfaces separated by commas following the keyword extends. For example:
public interface MyInterface extends HisInterface, HerInterface {
  // Interface members - constants and abstract methods...
}
Now MyInterface inherits all the methods and constants that are members of HisInterface and HerInterface. This is described as multiple inheritance. In Java, classes do not support multiple inheritance, only interfaces do.
Some care is necessary when you use this capability. If two or more super-interfaces declare a method with the same signature — that is, with identical names and parameters — the method must have the same return type in all the interfaces that declare it. If they don’t, the compiler reports an error. This is because it would be impossible for a class to implement both methods, as they have the same signature. If the method is declared identically in all the interfaces that declare it, then a single definition in the class satisfies all the interfaces. As I said in the previous chapter, every method in a class must have a unique signature, and the return type is not part of it.
Using Interfaces
What you have seen up to now has primarily illustrated the mechanics of creating an interface and incorporating it into a class. The really interesting question is — what should you use interfaces for?
An interface that declares methods defines a standard set of operations. Different classes can add such a standard interface by implementing it. Thus, objects of a number of different class types can share a common set of operations. Of course, a given operation in one class may be implemented quite differently from how it is implemented in another class. But the way in which you invoke the operation is the same for objects of all class types that implement the interface. For this reason it is often said that an interface defines a contract for a set of operations.
I hinted at the third and perhaps most important use of interfaces at the beginning of this discussion. An interface defines a type, so you can expedite polymorphism across a set of classes that implement the same interface. This is an extremely useful and powerful facility. Let’s have a look at how this works.
Interfaces and Polymorphism
You can’t create objects of an interface type, but you can create a variable of an interface type. For example:
Conversions converter = null; // Variable of the Conversions interface type
If you can’t create objects of type Conversions, what good is it? Well, you use it to store a reference to an object of any class type that implements Conversions. This means that you can use this variable to call the methods declared in the Conversions interface polymorphically. The Conversions interface is not a good example to show how this works. Let’s consider a real-world parallel that I can use to better demonstrate this idea, that of home audio/visual equipment and a remote control. I’m grateful to John Ganter who suggested this idea to me after reading a previous edition of this book.
You have a TV, possibly an audio receiver, and almost certainly a DVD player around your home, and each of them has its own remote control. All the remote controls probably have some common subset of buttons — power on/off, volume up, volume down, mute, and so on. After you have more than four or so remotes cluttering the place up, you might consider one of those fancy universal remote control devices to replace them — sort of a single definition of a remote control, to suit all equipment.
A universal remote has a lot of similarities to an interface. By itself a universal remote does nothing. It defines a set of buttons for standard operations, but the operation of each button must be programmed specifically to suit each kind of device that you want to control. You can represent the TV, VCR, DVD, and so on by classes, each of which makes use of the same remote control interface — the set of buttons, if you like — but each in a different way. Even though it uses the same button on the remote, Power On for the TV, for example, is quite different from Power On for the VCR. Let’s see how that might look in a concrete example.
TRY IT OUT: Defining Interfaces
Here’s how you might define an interface to model a simple universal remote:
public interface RemoteControl {
  boolean powerOnOff();                // Returns new state, on = true
  int volumeUp(int increment);         // Returns new volume level
  int volumeDown(int decrement);       // Returns new volume level
  void mute();                         // Mutes sound output
  int setChannel(int channel);         // Set the channel number and return it
  int channelUp();                     // Returns new channel number
  int channelDown();                   // Returns new channel number
}
Directory "TryRemoteControl"
The methods declared here in the RemoteControl interface should be self-explanatory. I have included just a few of the many possible remote operations here to conserve space in the book. You could add more if you want. You could have separate power on and power off methods, for example, tone controls, and so on. There is no definition for any of these methods here. Methods declared in an interface are always abstract — by definition. Nor is there an access attribute for any of them. Methods declared in an interface are always public by default.
Now any class that requires the use of the functionality provided by a RemoteControl just has to declare that it implements the interface and include the definitions for each of the methods in the interface. For example, here’s the TV:
import static java.lang.Math.max;
import static java.lang.Math.min;

public class TV implements RemoteControl {
  public TV(String make, int screensize) {
    this.make = make;
    this.screensize = screensize;
    // In practice you would probably have more
    // arguments to set the max and min channel
    // and volume here plus other characteristics for a particular TV.
  }

  public boolean powerOnOff() {
    power = !power;
    System.out.println(make + " "+ screensize + " inch TV power "
                    + (power ? "on.":"off."));
    return power;
  }

  public int volumeUp(int increment) {
    if(!power) {                       // If the power is off
      return 0;                        // Nothing works
    }

    // Set volume - must not be greater than the maximum
    volume += increment;
    volume = min(volume, MAX_VOLUME);
    System.out.println(make + " "+ screensize + " inch TV volume level: "
                     + volume);
    return volume;
  }

  public int volumeDown(int decrement) {
    if(!power) {                       // If the power is off
      return 0;                        // Nothing works
    }

    // Set volume - must not be less than the minimum
    volume -= decrement;
    volume = max(volume, MIN_VOLUME);
    System.out.println(make + " "+ screensize + " inch TV volume level: "
                     + volume);
    return volume;
  }

  public void mute() {
    if(!power) {                       // If the power is off
      return;                          // Nothing works
    }

    volume = MIN_VOLUME;
    System.out.println(make + " "+ screensize + " inch TV volume level: "
                     + volume);
  }

  public int setChannel(int newChannel) {
    if(!power) {                       // If the power is off
      return 0;                        // Nothing works
    }

    // Channel must be from MIN_CHANNEL to MAX_CHANNEL
    if(newChannel>=MIN_CHANNEL && newChannel<=MAX_CHANNEL)
      channel = newChannel;
    System.out.println(make + " "+ screensize + " inch TV tuned to channel: "
                     + channel);
    return channel;
  }

  public int channelUp() {
    if(!power) {                       // If the power is off
      return 0;                        // Nothing works
    }

    // Wrap channel up to MIN_CHANNEL when MAX_CHANNEL is reached
    channel = channel<MAX_CHANNEL ? ++channel : MIN_CHANNEL;
    System.out.println(make + " "+ screensize + " inch TV tuned to channel: "
                     + channel);
    return channel;
  }

  public int channelDown() {
    if(!power)  {                      // If the power is off
      return 0;                        // Nothing works
    }

    // Wrap channel down to MAX_CHANNEL when MIN_CHANNEL is reached
    channel = channel>MIN_CHANNEL ? --channel : MAX_CHANNEL;
    System.out.println(make + " "+ screensize + " inch TV tuned to channel: "
                     + channel);
    return channel;
  }

  private String make = null;
  private int screensize = 0;
  private boolean power = false;

  private final int MIN_VOLUME = 0;
  private final int MAX_VOLUME = 100;
  private int volume = MIN_VOLUME;

  private final int MIN_CHANNEL = 0;
  private final int MAX_CHANNEL = 999;
  private int channel = MIN_CHANNEL;
}
Directory "TryRemoteControl"
This class implements all the methods declared in the RemoteControl interface, and each method outputs a message to the command line so you know when it is called. Of course, if you omitted any of the interface method definitions in the class, the class would be abstract and you would have to declare it as such.
A DVDPlayer class defining a DVD player/recorder might also implement RemoteControl:
import static java.lang.Math.max;
import static java.lang.Math.min;

public class DVDPlayer implements RemoteControl {
  public DVDPlayer(String make) {
    this.make = make;
  }

  public boolean powerOnOff() {
    power = !power;
    System.out.println(make + " DVD Player power "+ (power ? "on.":"off."));
    return power;
  }

  public int volumeUp(int increment) {
     if(!power) {                      // If the power is off
       return 0;                       // Nothing works
  }

    // Set volume - must not be greater than the maximum
    volume += increment;
    volume = min(volume, MAX_VOLUME);
    System.out.println(make + " DVD Player volume level: " + volume);
    return volume;
  }

  public int volumeDown(int decrement) {
    if(!power) {                       // If the power is off
      return 0;                        // Nothing works
    }

    // Set volume - must not be less than the minimum
    volume -= decrement;
    volume = max(volume, MIN_VOLUME);
    System.out.println(make + " DVD Player volume level: " + volume);
    return volume;
  }

  public void mute() {
    if(!power) {                       // If the power is off
       return;                         // Nothing works
    }

    volume = MIN_VOLUME;
    System.out.println(make + " DVD Player volume level: " + volume);
  }

  public int setChannel(int newChannel) {
    if(!power) {                       // If the power is off
      return 0;                        // Nothing works
    }

    // Channel must be from MIN_CHANNEL to MAX_CHANNEL
    if(newChannel>=MIN_CHANNEL && newChannel<=MAX_CHANNEL) {
      channel = newChannel;
    }
    System.out.println(make + " DVD Player tuned to channel: " + channel);
    return channel;
  }

  public int channelUp() {
    if(!power) {                       // If the power is off
      return 0;                        // Nothing works
    }

    // Wrap channel round to MIN_CHANNEL when MAX_CHANNEL is reached
    channel = channel<MAX_CHANNEL ? ++channel : MIN_CHANNEL;
    System.out.println(make + " DVD Player tuned to channel: " + channel);
    return channel;
  }

  public int channelDown() {
    if(!power) {                       // If the power is off
      return 0;                        // Nothing works
    }

    // Wrap channel round to MAX_CHANNEL when MIN_CHANNEL is reached
    channel = channel>MIN_CHANNEL ? --channel : MAX_CHANNEL;
    System.out.println(make + " DVD Player tuned to channel: " + channel);
    return channel;
  }

  private String make = null;
  private boolean power = false;

  private final int MIN_VOLUME = 0;
  private final int MAX_VOLUME = 100;
  private int volume = MIN_VOLUME;

  private final int MIN_CHANNEL = 0;
  private final int MAX_CHANNEL = 99;
  private int channel = MIN_CHANNEL;
}
Directory "TryRemoteControl"
Of course, you could continue to define classes for other kinds of devices that use the remote, but these two are sufficient to demonstrate the principle.
Let’s see how you can use the RemoteControl interface and these two classes in a working example.
TRY IT OUT: Polymorphism Using an Interface Type
You want to demonstrate polymorphic behavior with these classes. By introducing a bit of “randomness” into the example, you can avoid having any prior knowledge of the objects involved. Here’s the class to operate both TV and DVD player objects via a variable of type RemoteControl:
import static java.lang.Math.random;

public class TryRemoteControl {
  public static void main(String args[]) {
    RemoteControl remote = null;

    // You will create five objects to operate using our remote
    for(int i = 0 ; i<5 ; ++i) {
      // Now create either a TV or a DVD Player/Recorder at random
      if(random()<0.5)
        // Random choice of TV make and screen size
        remote = new TV(random()<0.5 ? "Sony" : "Hitachi",
                        random()<0.5 ? 46 : 40);
      else // Random choice of DVD Player/Recorder
        remote = new DVDPlayer(random()<0.5 ? "Panasonic": "JVC");

      // Now operate it, whatever it is
      remote.powerOnOff();                       // Switch it on
      remote.channelUp();                        // Set the next channel up
      remote.volumeUp(10);                       // Turn up the sound
    }
  }
}
Directory "TryRemoteControl"
This should be in the same directory as the source files for the two classes and the interface defined earlier. When you compile and run this, you should see output recording a random selection of five TV and DVD player objects operated by the RemoteControl variable. I got the following:
JVC DVD Player power on.
JVC DVD Player tuned to channel: 1
JVC DVD Player volume level: 10
Panasonic DVD Player power on.
Panasonic DVD Player tuned to channel: 1
Panasonic DVD Player volume level: 10
Sony 46 inch TV power on.
Sony 46 inch TV tuned to channel: 1
Sony 46 inch TV volume level: 10
Sony 40 inch TV power on.
Sony 40 inch TV tuned to channel: 1
Sony 40 inch TV volume level: 10
Panasonic DVD Player power on.
Panasonic DVD Player tuned to channel: 1
Panasonic DVD Player volume level: 10
How It Works
The variable remote is of type RemoteControl so you can use it to store a reference to any class object that implements the RemoteControl interface. Within the for loop, you create either a TV or a DVDPlayer object at random. The TV or DVDPlayer object is of a randomly chosen make, and any TV object is either 46 inches or 40 inches — again chosen at random. The object that is created is then operated through remote by calling its powerOnOff(), channelUp(), and volumeUp() methods. Because the type of the object is determined at run time, and at random, the output demonstrates you are clearly seeing polymorphism in action here through a variable of an interface type.
Using Multiple Interfaces
Of course, a RemoteControl object in the previous example can be used to call only the methods that are declared in the interface. If a class implements some other interface besides RemoteControl, then to call the methods declared in the second interface you need either to use a variable of that interface type to store the object reference or to cast the object reference to its actual class type. Suppose you have a class defined as the following:
public MyClass implements RemoteControl, AbsoluteControl {
   // Class definition including methods from both interfaces...
}
Because this class implements RemoteControl and AbsoluteControl, you can store an object of type MyClass in a variable of either interface type. For example:
AbsoluteControl ac = new MyClass();
Now you can use the variable ac to call methods declared in the AbsoluteControl interface. However, you cannot call the methods declared in the RemoteControl interface using ac, even though the object reference that it holds has these methods. One possibility is to cast the reference to the original class type, like this:
((MyClass)ac).powerOnOff();
Because you cast the reference to type MyClass, you can call any of the methods defined in that class. You can’t get polymorphic behavior like this though. The compiler determines the method that is called when the code is compiled. To call the methods in the RemoteControl interface polymorphically, you have to have the reference stored as that type. Provided you know that the object is of a class type that implements the RemoteControl interface, you can get a reference of type RemoteControl from the reference stored in the variable ac. Like this, for example:
if(ac instanceof RemoteControl)
  ((RemoteControl)ac).mute();
Even though the interfaces RemoteControl and AbsoluteControl are unrelated, you can cast the reference in ac to type RemoteControl. This is possible because the object that is referenced by ac is actually of type MyClass, which happens to implement both interfaces and therefore incorporates both interface types.
If you got a bit lost in this last section don’t worry about it. You won’t need this level of knowledge about interfaces very often.
Interface Types as Method Parameters
Of course, you can specify that a parameter to a method is of an interface type. This has a special significance in that a reference to an object of any type can be passed as an argument as long as the object type implements the interface. By specifying a parameter as an interface type you are implying that the method is interested only in the interface methods. As long as an object is of a type that implements those methods, it is acceptable as an argument.
Methods within the standard class libraries often have parameters of interface types. The String, StringBuilder, and StringBuffer classes (plus the CharBuffer class that you see later in the book) implement the CharSequence interface. You’ll see lots of class methods that have a parameter of type CharSequence, in which case such methods will accept references to any of the class types I’ve mentioned as arguments. For example, the StringBuilder and StringBuffer classes both have constructors with a parameter of type CharSequence. You can therefore create new objects of these two class types from an object of any class that implement the interface.
Nesting Classes in an Interface Definition
You can put the definition of a class inside the definition of an interface. The class is an inner class to the interface. An inner class to an interface is static and public by default. The code structure would be like this:
interface Port {
  // Methods & Constants declared in the interface...

  class Info {
    // Definition of the class...
  }
}
This declares the interface Port with an inner class Info. Objects of the inner class are of type Port.Info. You might create one with a statement like this:
Port.Info info = new Port.Info();
The standard class library includes a number of interfaces with inner classes, including one with the name Port (in the javax.sound.sampled package) that has an inner class with the name Info, although the Info class does not have the default constructor that I have used in the illustration here. The circumstances where you might define a class as an inner class to an interface would be when objects of the inner class type have a strong logical association with the interface.
A class that implements the interface would have no direct connection with the inner class to the interface — it would just need to implement the methods declared by the interface, but it is highly likely it would make use of objects of the inner class type.
Interfaces and the Real World
An interface type is sometimes used to reference an object that encapsulates something that exists outside of Java, such as a particular physical device. This is done when the external device does not require methods implemented in Java code because all the function is provided externally. The interface method declarations just identify the mechanism for operating on the external object.
The example of the Port interface in the library is exactly that. A reference of type Port refers to an object that is a physical port on a sound card, such as that for the speaker or the microphone. The inner class, Port.Info, defines objects that encapsulate data to define a particular port. You can’t create a Port object directly because there is no class of type Port. Indeed, it doesn’t necessarily make sense to do so because your system may not have any ports. Assuming your PC has sound ports, you obtain a reference of type Port to an object that encapsulates a real port, such as the microphone, by calling a static method defined in another class. The argument to the method is a reference to an object of type Port.Info specifying the kind of port that you want. All the methods defined in the Port interface correspond to methods written in native machine code that operate on the port. To call them you just use the Port reference that you have obtained.
There are occasions where you need to define a class for which you will only ever want to define one object in your program, and the only use for the object is to pass it directly as an argument to a method. In this case, as long as your class extends an existing class, or implements an interface, you have the option of defining the class as an anonymous class. The definition for an anonymous class appears in the new expression, in the statement where you create and use the object of the class, so that there is no necessity to provide a name for the class.
I illustrate how this is done using an example. Suppose you want to define an object of a class that implements the interface ActionListener for one-time use. You could do this as follows:
pickButton.addActionListener(new ActionListener() {
                               // Code to define the class
                               // that implements the ActionListener interface
                              }
                             );
The class definition appears in the new expression that creates the argument to the addActionListener() method. This method requires a reference of type ActionListener — in other words, a reference to a class that implements the ActionListener interface. The parentheses following the name of the interface indicate you are creating an object reference of this type, and the details of the class definition appear between the braces. The anonymous class can include data members as well as methods, but obviously not constructors because the class has no name. Here, all the methods declared in the ActionListener interface would need to be defined. You use this approach in practice when you are implementing window-based applications later in the book.
If the anonymous class extends an existing class, the syntax is much the same. In this case, you are calling a constructor for the base class, and if this is not a default constructor, you can pass arguments to it by specifying them between the parentheses following the base class name. The definition of the anonymous class must appear between braces, just as in the previous example.
An anonymous class can be convenient when the class definition is short and simple. You shouldn’t use the approach to define classes of any complexity as it makes the code very difficult to understand.
You should now understand polymorphism and how to apply it. You will find that this technique can be utilized to considerable advantage in the majority of your Java programs. It certainly appears in many of the examples in the remaining chapters.
EXERCISES
You can download the source code for the examples in the book and the solutions to the following exercises from www.wrox.com.
1. Define an abstract base class Shape that includes protected data members for the (x, y) position of a shape, a public method to move a shape, and a public abstract method show() to output a shape. Derive subclasses for lines, circles, and rectangles. Also, define the class PolyLine that you saw in this chapter with Shape as its base class. You can represent a line as two points, a circle as a center and a radius, and a rectangle as two points on diagonally opposite corners. Implement the toString() method for each class. Test the classes by selecting ten random objects of the derived classes, and then invoking the show() method for each. Use the toString() methods in the implementation of show() in the derived classes.
2. Define a class, ShapeList, that can store an arbitrary collection of any objects of subclasses of the Shape class.
3. Implement the classes for shapes using an interface for the common methods, rather than inheritance from the superclass, while still keeping Shape as a base class.
4. Extend the LinkedList class that you defined in this chapter so that it supports traversing the list backward as well as forward.
5. Add methods to the class LinkedList to insert and delete elements at the current position.
6. Implement a method in the LinkedList class to insert an object following an object passed as an argument. Assume the objects stored in the list implement an equals() method that compares the this object with an object passed as an argument and returns true if they are equal.
• WHAT YOU LEARNED IN THIS CHAPTER
| TOPIC | CONCEPT |
| Abstract Methods | An abstract method is a method that has no body defined for it and is declared using the keyword abstract. |
| Abstract Classes | An abstract class is a class that contains one or more abstract methods. It must be defined with the attribute abstract. |
| Derived Classes | You can define one class based on another. This is called class derivation or inheritance. The base class is called a superclass, and the derived class is called a subclass. A superclass can also be a subclass of another superclass. |
| The Universal Superclass | Every class has the Object class as a base so every class inherits members from the Object class. The toString() method is inherited from the Object class. |
| Abstract Derived Classes | A subclass of an abstract class must also be declared as abstract if it does not provide definitions for all of the abstract methods inherited from its superclass. |
| Class Inheritance | A subclass inherits certain members of its superclass. An inherited member of a class can be referenced and used as though it were declared as a normal member of the class. |
| Constructors under Inheritance | A subclass does not inherit the superclass constructors. |
| Private and Package-Private Class Members | The private members of a superclass are not inherited in a subclass. If the subclass is not in the same package as the superclass, then members of the superclass that do not have an access attribute are not inherited. |
| Implementing Derived Class Constructors | The first statement in the body of a constructor for a subclass should call a constructor for the superclass. If it does not, the compiler inserts a call for the default constructor for the superclass. |
| Polymorphism | A subclass can override a method inherited from its superclass by re-implementing it in the subclass. If two or more subclasses, with a common base class, override a common set of methods, these methods can be selected for execution dynamically at run time. This behavior is termed polymorphism. |
| Polymorphic Behavior | The subclass method selected by a polymorphic call is determined by the type of the object that is used to call the method. |
| Using Variables of a Superclass Type | A variable of a superclass type can point to an object of any of its subclasses. Such a variable can then be used to execute the subclass methods inherited from the superclass polymorphically. |
| @Override | You should use the @Override annotation for derived class methods that can be called polymorphically to guard against errors arising from an incorrect method signature in the derived class. |
| Static Import | You can import the static members of a class that is defined in a named package into a class to allow the imported static members to be referenced by their unqualified names. |
| Enumeration Class Types | An enumeration type is a specialized form of class, and the enumeration constants that you define are instances of the enumeration class type. |
| Nested Classes | A class defined inside another class is called a nested class or inner class. An inner class may itself contain inner classes. |
| Interfaces | An interface can contain constants, abstract methods, and inner classes. |
| Implementing Interfaces in a Class | A class can implement one or more interfaces by declaring them in the class definition and including the code to implement each of the interface methods. |
| Partial Interface Implementation | A class that does not define all the methods for an interface it implements must be declared as abstract. |
| Interface Types and Polymorphism | If several classes implement a common interface, the methods declared as members of the interface can be executed polymorphically by using a variable of the interface type to store references to objects of the class types. |