
The previous section talked about how to communicate with SNMP agents. If you have a network device such as a router or Wi-Fi, WiMax, or DSL gateway, most probably it will also come with a built-in SNMP agent.
The next step is to set up the SNMP agent on one or more computers so that we can use SNMP to monitor servers or workstations. In this way, a majority of the networked equipment will allow monitoring from a single machine using the SNMP protocol.
Let's start with various Unix boxes. The SNMP agent is a part of Net-SNMP, and several distributions come with command line tools, libraries, and the SNMP agent, usually as optional packages.
In our case, we will install the SNMP agent on Ubuntu Linux. We will run the following command:
apt-get install snmpd
This will cause the SNMP daemon which is a part of Net-SNMP, to be installed. By default, the Ubuntu Linux SNMP agent only accepts connections on 127.0.0.1. This is for security reasons—in many cases, an SNMP agent is used mainly by tools such as MRTG to gather usage statistics.
To change it, we will need to either specify the IP address that SNMP agent should listen on in the /etc/default/snmpd file, SNMPDOPTS variable, or remove it completely—it should be the last argument in the SNMPDOPTS variable.
If the SNMP agent should listen on all available IP addresses, then the line should look similar to the following example:
SNMPDOPTS='-Lsd -Lf /dev/null -u snmp -I -smux -p /var/run/snmpd.pid'
The options above are standard snmpd options and may differ depending on Linux distribution and version.
Changing this option requires restarting the SNMP agent by invoking the /etc/init.d/snmpd restart command.
After a successful installation, the SNMP agent should be up and running and making a walk over the entire tree should produce some output.
To verify that the SNMP agent we have just set up is working properly, we can simply launch the following command on the same machine to see if it will return information retrieved from localhost:
snmpwalk -v 1 -c public 127.0.0.1
The agent that we have just installed supports the SNMPv1, SNMPv2c, and SNMPv3 protocol versions. It also features an extensive security model that you can configure to provide a more secure setup.
Net-SNMP agent allows you to define one or more OIDs along with all subnodes that can be retrieved, by specific security groups. These groups can be mapped to specific communities that originate from all or specific IP addresses. Security groups are also mapped using SNMP versions used by the remote machine.
A sample configuration that allows read-only access from all of the hosts is as follows:
com2sec readonly default public
group readonlyGroup v1  readonly
group readonlyGroup v2c readonly
group readonlyGroup usm readonly
view all    included  .1                               80
access readonlyGroup "" any noauth    exact  all    none   none
syslocation Home
syscontact Administrator <[email protected]>
The first line defines a mapping between the community and a security group readonly. The next three lines assign readonlyGroup access rights to this group. The next two lines grant read-only access to all objects from the .1 OID node and its children, which is the main OID node. The last two lines specify the system administrator and the location where the machines are stored.
For the SNMPv3 model, it is also required to specify one or more users by calling the snmpusm command (http://linux.die.net/man/1/snmpusm). It allows real-time configuration of the user list for local or remote SNMPv3 agents.
SNMP can also be set up on all modern Microsoft Windows operating systems. Similar to Unix systems, it is necessary to install an SNMP agent. In order to do this on Windows XP and Windows 2003 Server, we first need to go to the Control Panel. Next, we need to select the Add or Remove Programs applet and select the Add/Remove Windows Components option. The following window will be displayed:
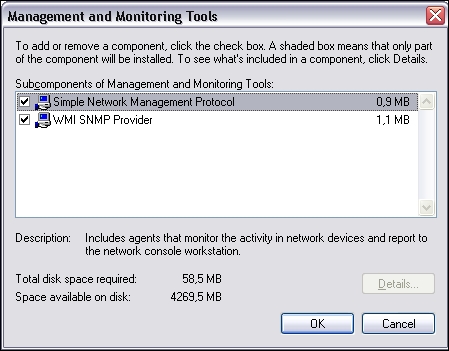
Then select both SNMP and WMI SNMP Provider from the next window to proceed with the installation of SNMP management and monitoring tools:
Next, we need to select Management and Monitoring Tools, as shown in the screenshot above. We can also select the Details button and choose Simple Network Management Protocol. The WMI SNMP Provider allows the retrieval of the SNMP parameters over WMI and can be left unchecked if you do not need it.
Windows SNMP agent exports information about the system in the same way as on other platforms. You can use it to query the underlying hardware, the operating system version, and the network configuration along with the currently-active connections. It is also possible to list active processes and monitor the systems load. The Windows SNMP agent also exports details of all of the installed applications along with security patches from Microsoft. This mechanism can be used to monitor whether all critical system patches are installed. It can also be used to track software license monitor compliance by checking installed and/or running software and keeping count of which machines have license-restricted software applied.
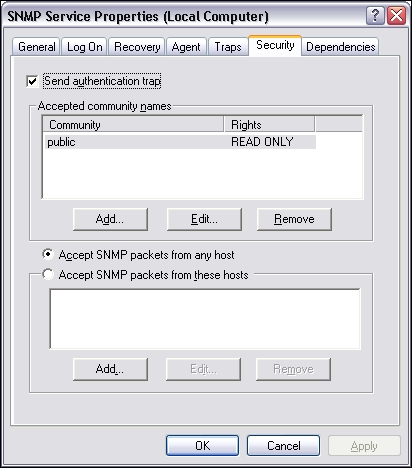
After a successful installation, we can go to the Administrative Tools folder and run the Services applet. When selecting SNMP Service and choosing Properties, the following Service Properties window, along with the SNMP configuration, is displayed:
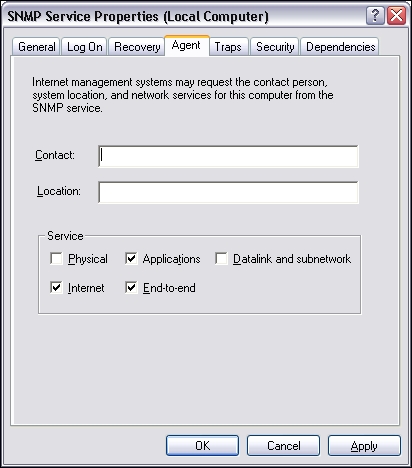
The window has three additional tabs—Agent, Traps, and Security. The Agent tab allows you to configure which parts are exported over SNMP, and offers the setting up of contact and location information.

The Security tab allows you to configure how SNMP information from this host can be accessed. The Windows SNMP agent offers support for SNMPv1 and SNMPv2c, so the security model is based on a community string and IP addresses for authentication.
The agent can either accept SNMP queries from all hosts or only from the specific hosts listed in the bottom part of the tab. There is also the possibility of specifying one or more readable and writable communities. By default, only queries on the public community string are accepted and allowed read-only access.
The Traps tab allows configuration of Windows to send or forward traps to specific IP addresses, and indicate which SNMP community is to be used for communication.