 Upgrading virtual machine compatibility
by Robert van den Nieuwendijk
Learning PowerCLI - Second Edition
Upgrading virtual machine compatibility
by Robert van den Nieuwendijk
Learning PowerCLI - Second Edition
- Learning PowerCLI Second Edition
- Learning PowerCLI Second Edition
- Credits
- About the Author
- About the Reviewer
- www.PacktPub.com
- Customer Feedback
- Preface
- 1. Introduction to PowerCLI
- Downloading and installing PowerCLI
- Participating in the VMware Customer Improvement Program
- Modifying the PowerShell execution policy
- Creating a PowerShell profile
- Connecting and disconnecting servers
- Using the credential store
- Retrieving a list of all of your virtual machines
- Retrieving a list of all of your hosts
- Summary
- 2. Learning Basic PowerCLI Concepts
- 3. Working with Objects in PowerShell
- 4. Managing vSphere Hosts with PowerCLI
- Adding hosts to a VMware vCenter Server
- Enabling and disabling maintenance mode
- Working with host profiles
- Working with host services
- Configuring the host firewall
- Using vSphere Image Builder and Auto Deploy
- Using Image Builder
- Adding ESXi software depots to your PowerCLI session
- Retrieving the ESXi software depots added to your PowerCLI session
- Retrieving the image profiles in your PowerCLI session
- Creating image profiles
- Retrieving VIB objects from all of the connected depots
- Adding VIBs to an image profile or updating existing VIBs
- Exporting an image profile to an ISO or ZIP file
- Configuring Auto Deploy
- Using Image Builder
- Using esxcli from PowerCLI
- Removing hosts from a VMware vCenter Server
- Summary
- 5. Managing Virtual Machines with PowerCLI
- Creating virtual machines
- Registering virtual machines
- Using OS customization specifications
- Importing OVF or OVA packages
- Starting and stopping virtual machines
- Modifying the settings of virtual machines
- Converting virtual machines into templates
- Moving virtual machines to another folder, host, cluster, resource pool, or datastore
- Updating VMware Tools
- Upgrading virtual machine compatibility
- Using snapshots
- Running commands in the guest OS
- Configuring Fault Tolerance
- Opening the console of virtual machines
- Removing virtual machines
- Using tags
- Summary
- 6. Managing Virtual Networks with PowerCLI
- Using vSphere Standard Switches
- Using host network adapters
- Using standard port groups
- Using vSphere Distributed Switches
- Creating vSphere Distributed Switches
- Retrieving vSphere Distributed Switches
- Configuring vSphere Distributed Switches
- Adding hosts to vSphere Distributed Switches
- Retrieving hosts connected to vSphere Distributed Switches
- Adding host physical network adapters to a vSphere Distributed Switch
- Removing host physical network adapters from a vSphere Distributed Switch
- Removing hosts from a vSphere Distributed Switch
- Exporting the configuration of vSphere Distributed Switches
- Removing vSphere Distributed Switches
- Using distributed virtual port groups
- Creating distributed virtual port groups
- Retrieving distributed virtual port groups
- Modifying distributed virtual port groups
- Configuring network I/O control
- Exporting the configuration of distributed virtual port groups
- Migrating a host network adapter from a standard port group to a distributed port group
- Removing distributed virtual port groups
- Configuring host networking
- Configuring the network of virtual machines
- Summary
- 7. Managing Storage
- Rescanning for new storage devices
- Creating datastores
- Retrieving datastores
- Setting the multipathing policy
- Configuring vmhba paths to an SCSI device
- Working with Raw Device Mappings
- Configuring storage I/O control
- Configuring Storage DRS
- Upgrading datastores to VMFS-5
- Removing datastores
- Using VMware vSAN
- Configuring VMware vSAN networking
- Enabling VMware vSAN on vSphere clusters
- Retrieving the devices available for VMware vSAN
- Creating VMware vSAN disk groups
- Retrieving VMware vSAN disk groups
- Adding a host SCSI disk to a VMware vSAN disk group
- Retrieving the host disks that belong to a VMware vSAN disk group
- Removing disks from a VMware vSAN disk group
- Removing VMware vSAN disk groups
- Using vSphere storage policy-based management
- Retrieving storage capabilities
- Using tags to define storage capabilities
- Creating SPBM rules
- Creating SPBM rule sets
- Creating SPBM storage policies
- Retrieving SPBM storage policies
- Modifying SPBM storage policies
- Retrieving SPBM compatible storage
- Using SPBM to create virtual machines
- Retrieving SPBM-related configuration data of clusters, virtual machines, and hard disks
- Associating storage policies with virtual machines and hard disks and enabling SPBM on clusters
- Exporting SPBM storage policies
- Importing SPBM storage policies
- Removing SPBM storage policies
- Summary
- 8. Managing High Availability and Clustering
- Creating vSphere HA and DRS clusters
- Retrieving clusters
- Modifying the cluster settings
- Moving hosts to clusters
- Moving clusters
- Using DRS rules
- Using DRS recommendations
- Using resource pools
- Using Distributed Power Management
- Removing clusters
- Summary
- 9. Managing vCenter Server
- Working with roles and permissions
- Managing licenses
- Adding license keys to the license inventory
- Retrieving license keys from the license inventory
- Removing license keys from the license inventory
- Assigning licenses to hosts
- Retrieving assigned licenses
- Using the LicenseDataManager
- Configuring alarms
- Retrieving events
- Summary
- 10. Patching ESXi Hosts and Upgrading Virtual Machines
- Downloading new patches into the Update Manager repository
- Retrieving patches in the Update Manager repository
- Using baselines and baseline groups
- Testing inventory objects for compliance with baselines
- Retrieving baseline compliance data
- Initializing staging of patches
- Remediating inventory objects
- Summary
- 11. Managing VMware vCloud Director and vCloud Air
- Connecting to vCloud Air servers and vCloud Director servers
- Retrieving organizations
- Retrieving organization virtual datacenters
- Retrieving organization networks
- Retrieving vCloud users
- Using vCloud virtual appliances
- Managing vCloud virtual machines
- Using the vCloud Director API with Get-CIView
- Disconnecting from vCloud Director servers
- Summary
- 12. Using Site Recovery Manager
- Installing SRM
- Connecting to SRM servers
- Downloading and installing the Meadowcroft.SRM module
- Pairing SRM sites
- Retrieving the SRM user info
- Managing protection groups
- Protecting virtual machines
- Retrieving protected virtual machines
- Unprotecting virtual machines
- Managing recovery plans
- Disconnecting from SRM servers
- Summary
- 13. Using vRealize Operations Manager
- Connecting to vRealize Operations Manager servers
- Retrieving vRealize Operations Manager resource objects
- Using alerts
- Retrieving recommendations
- Retrieving statistic keys
- Retrieving statistical data
- Retrieving local user accounts
- Using the vRealize Operations Manager API
- Disconnecting from vRealize Operations Manager servers
- Summary
- 14. Using REST API to manage NSX and vRealize Automation
- 15. Reporting with PowerCLI
To upgrade virtual machine compatibility, you can use the Set-VM cmdlet that you have seen before in the Modifying the settings of virtual machines section. You have to use the -Version parameter and specify the new compatibility version as a parameter value. At the time of writing this book, the only valid versions are v4, v7, v8, v9, v10, and v11.
New features in virtual machines compatible with version 9 or higher can no longer be edited with the vSphere C# client. Some devices may not appear in the devices list, and the settings of some devices may appear as Restricted. You will have to use the vSphere web client or PowerCLI to edit the configuration for these virtual machines.
The following example will upgrade the VM7 virtual machine to compatibility version 11:
PowerCLI C: > Get-VM -Name VM7 | `
>>  Set-VM -Version V11 -Confirm:$false
>>
The output of the preceding command is as follows:
Name                 PowerState Num CPUs MemoryGB
----                 ---------- -------- --------
VM7                  PoweredOff 1        0.250
The virtual machine has to be powered off, or you will get the following error message:
The attempted operation cannot be performed in the current state (Powered on).
It is not possible to downgrade to an earlier compatibility version. If you specify a version lower or equal to the version the virtual machine already has, you will get the following error message:
Virtual machine compatibility is already up-to-date.
The version numbers correspond to the following virtual machine compatibilities:
|
PowerCLI version |
Virtual machines compatible with |
|
v4 |
ESX/ESXi 3.5 and later |
|
v7 |
ESX/ESXi 4.0 and later |
|
v8 |
ESXi 5.0 and later |
|
v9 |
ESXi 5.1 and later |
|
v10 |
ESXi 5.5 and later |
|
v11 |
ESXi 6.0 and later |
|
v13 |
ESXi 6.5 and later |
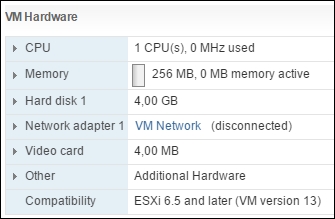
In the following screenshot of the vSphere web client, you will see the VM Hardware window containing the status of a virtual machine, with Compatibility showing ESXi 6.5 and later (VM version 13):
-
No Comment