
Chapter 17. Developing for Windows Phone 7
There has been a lot of hype and interest for years surrounding the release of Microsoft’s Windows Phone 7 series. Microsoft has been in the mobile communications device market before with previous versions of Windows Phone operating systems, but Windows Phone 7 is aimed at putting Microsoft in the copilot seat of the market that has long been dominated by the iPhone.
For developers, Windows Phone 7 offers something that has previously never been available: the ability to write rich, interactive applications in Silverlight and create 2D and 3D games using XNA. With tons of features, such as 480×800 screen resolution, a slick touchscreen interface, and an internal accelerometer, the possibilities for development on Windows Phone 7 are virtually endless.
This chapter focuses on issues specific to developing games for Windows Phone 7. Instead of porting one of the games from previous chapters to Windows Phone 7, you’ll be building a new game from scratch. Most of the code, however, will be similar to what you’ve done in previous chapters and, as a result, I’ll skim over most of it fairly quickly and concentrate on the distinct features of Windows Phone 7 development.
In addition to the game in this book, there are a large number of Windows Phone 7 samples available on the XNA Creator’s Club website and on the MSDN website.
Setting Up Your Windows Phone 7 Device
Visual Studio 2010 comes with an emulator for creating applications on Windows Phone 7 series devices. This emulator makes it possible to build applications for Windows Phone 7 without owning a Windows Phone 7 device. However, there are some aspects of Windows Phone 7 devices that are impossible to emulate (such as accelerometer input) and therefore are unavailable on the emulator.
This section will walk you through setting up your Windows Phone 7 device and getting it ready for development. If you don’t have a device or you want to start developing right away on the emulator, go ahead and skip to Creating a Windows Phone 7 Project.
Registering for a Developer Account
The first step to setting up your Windows Phone 7 device is to register for a developer account with Microsoft. This account allows you to deploy, test, and debug your applications on your physical device and grants you the right to publish and distribute your applications. The steps you’ll need to follow to register for an account are:
Create a Windows Live ID (or use a preexisting Windows Live ID account).
Sign the application provider agreement.
Choose an account type.
Pay the annual subscription fee.
Tip
Note that students registered at Microsoft DreamSpark do not have to pay the subscription fee. To register as a student with DreamSpark, visit https://www.dreamspark.com/.
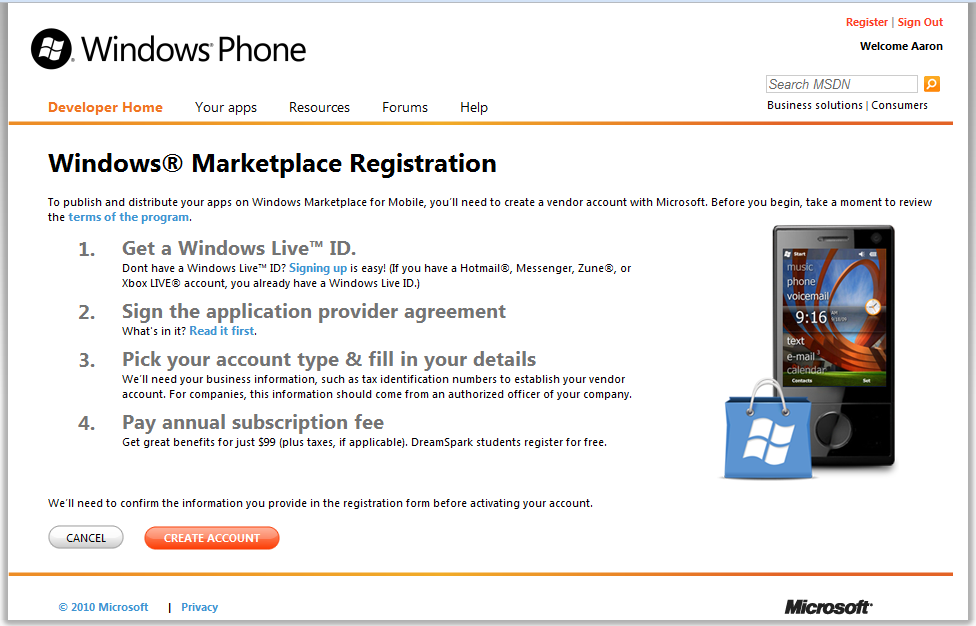
To begin the process of registering for a developer account, visit http://developer.windowsphone.com and click “Register for the Marketplace”. You’ll see a screen that looks like Figure 17-1.
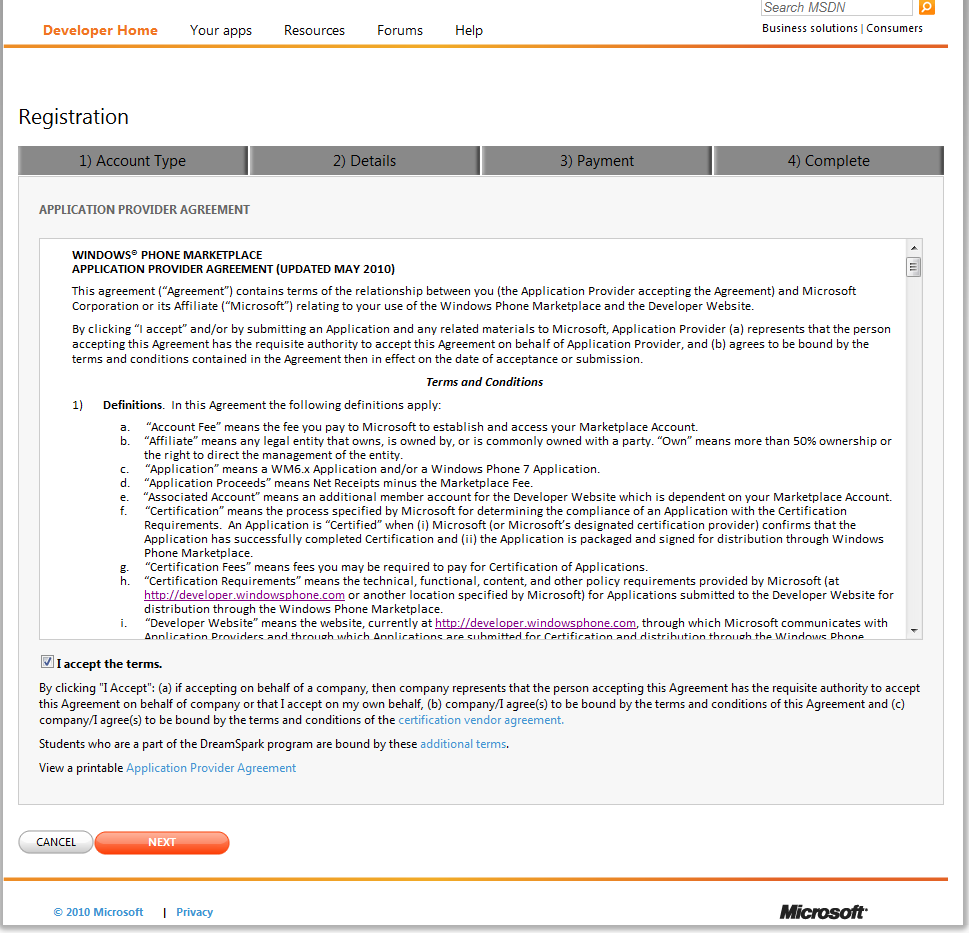
Once you click “Create Account”, you’ll be asked to sign the application provider agreement, as shown in Figure 17-2.
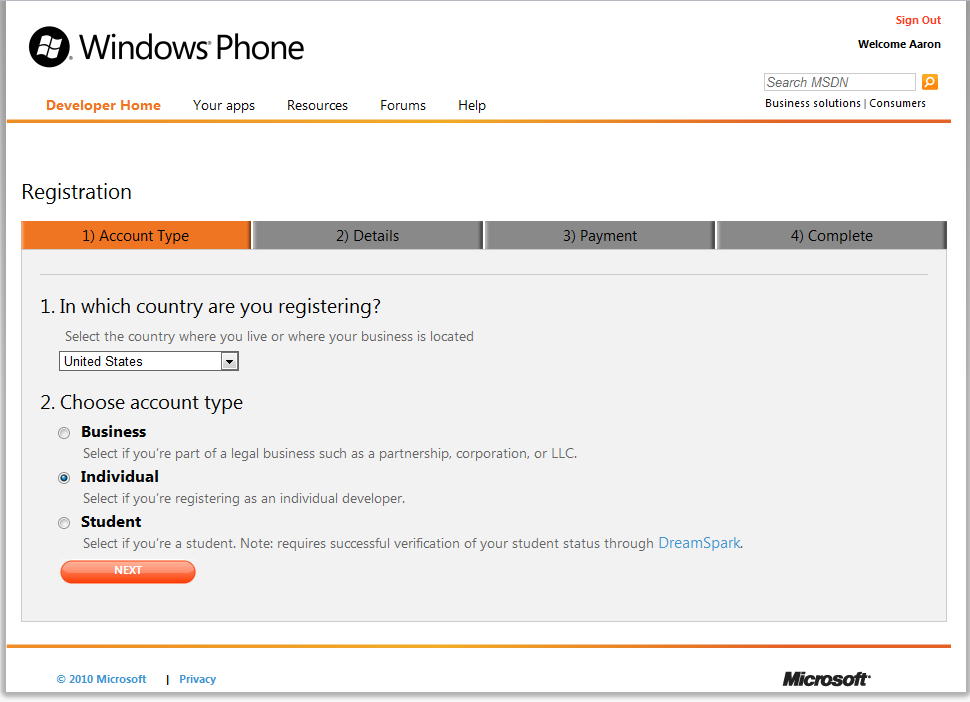
Next, you’ll be asked to select an account type, as shown in Figure 17-3. You can register as a business, an individual, or a student. What’s the difference between a business and an individual account, and why does it matter? One of the goals of the Windows Phone 7 marketplace is not only to create cool applications but also to earn a profit as a developer. The difference here in your account type really just comes down to how you want your profits to be taxed as a developer.
The next few screens will walk you through setting up the details on your account (contact info, etc.), selecting the payment method, and completing your registration. Once you’ve finished with the account registration, you’ll see the Windows Phone developer dashboard, as shown in Figure 17-4. From this page you can view your registered phone devices, the applications you’ve built and submitted, payment schedules, and so on.

Note that the status of the account might be incomplete at this point (see the red X’s at the top left under your account name). It takes a few days for the identity and bank verification to be processed. You’ll be able to start working on your applications without finishing these steps, but you won’t be able to proceed with publishing any applications until your account is completely set up.
Registering Your Windows Phone 7 Device
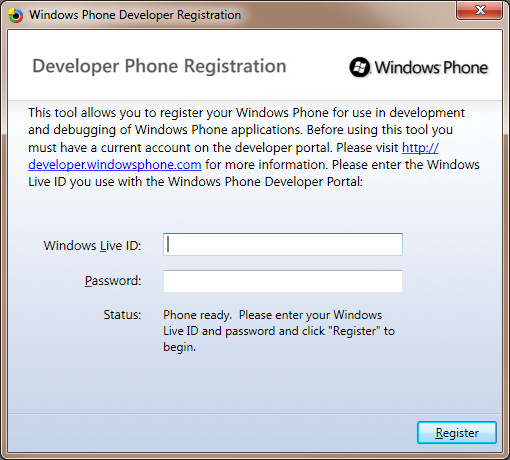
The next step is to register your Windows Phone 7 device. You do this from the computer on which you’ll be developing your applications. Click Start→All Programs→Windows Phone Developer Tools→Windows Phone Developer Registration.
This will bring up the screen shown in Figure 17-5. Enter the Windows Live ID you registered for as an application developer in the previous section. Also make sure your phone is plugged into your computer and that you’re logged into the phone with your Windows Live ID. If you aren’t, the status message at the bottom of the window will indicate that the system cannot communicate with your device.
Once you’ve entered your Live ID and password, you’re ready to move on to the next section.
Unlocking Your Phone
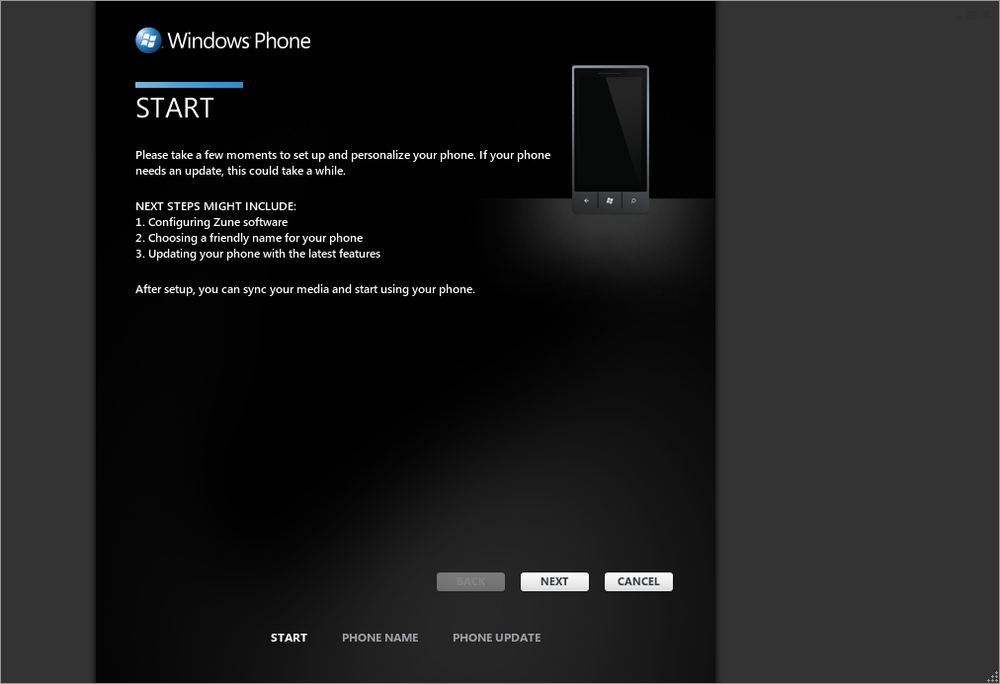
The final step to setting up your Windows Phone 7 device is to download the Microsoft Zune software. Why the Zune software? Windows Phone 7 incorporates all the Zune HD functionality, and is a portable media device (Zune HD), not just a phone. You’ll use the Zune software to add media files to your phone as well as transfer games you build in Visual Studio to your device. Download and install the Zune software from the Microsoft Zune website.
Once you’ve downloaded and installed your Zune software, plug your phone into your computer, and the phone registration page should appear (see Figure 17-6).
Follow the steps in the Zune Software to give your device a name and unlock it for development.
Creating a Windows Phone 7 Project
Once your device is unlocked via the Zune software, you can start writing your Windows Phone 7 game.
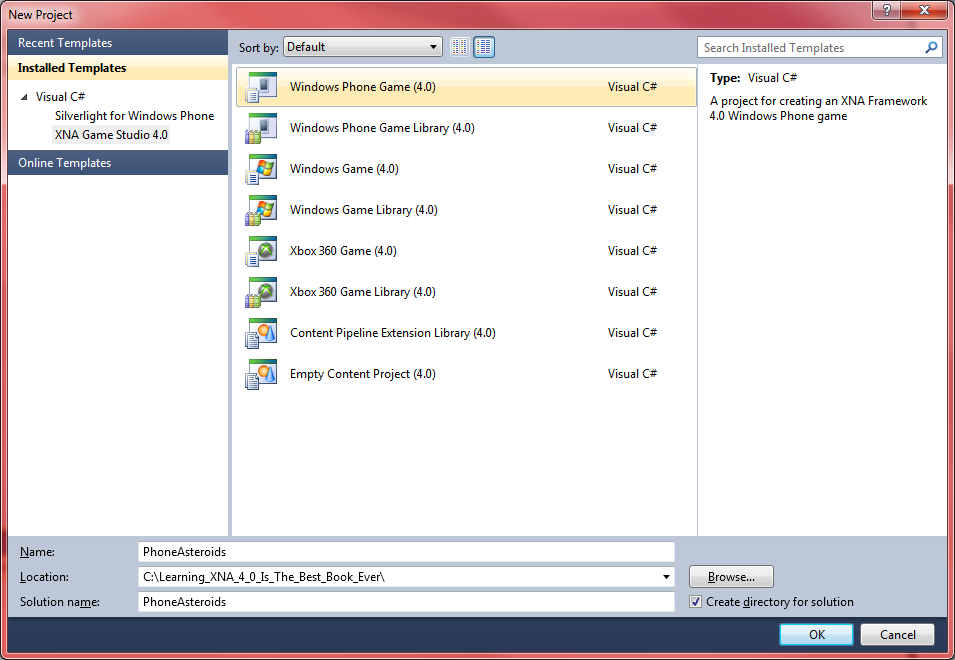
Open Visual Studio and create a new Windows Phone Game project by selecting Visual C#→XNA Game Studio 4.0 as the project type from the menu on the left side of the New Project window, and then select the Windows Phone Game (4.0) template on the right. Name your solution PhoneAsteroids, specify a directory for your game, and click OK (see Figure 17-7).
Once you click OK, your project will be created for you. Just like
when you develop a game for Windows, the code generated will have a
skeleton game application consisting of a Game1 class with a constructor and Initialize, LoadContent, UnloadContent, Update, and Draw methods, as well as additional helper
classes and content. The generated code will create the same familiar
cornflower-blue screen that you saw when you first began developing your
Windows game earlier in this book. The only difference of note thus far
between your Windows Phone game and your Windows games is the following
line in the constructor of your Game1 class:
TargetElapsedTime = TimeSpan.FromTicks(333333);
Whereas the default framerate of a Windows or Xbox 360 game is 60 frames per second, the default framerate of a Windows Phone game is 30 frames per second. This is the line of code that sets that framerate.
The content pipeline also has the same behavior as that covered in previous chapters. In fact, the entire architecture of a Windows Phone game is essentially identical to that of a Windows or Xbox 360 game. Most of the code that you write for those platforms will be directly compatible with Windows Phone 7—with a few exceptions.
Resources
Let’s get to it. You’re going to build an Asteroids-style game in this chapter, and we’ll call out some key differences in Windows Phone development in the process. The end game will look something like Figure 17-8.
Let’s go ahead and add all the resources you’ll need for your game
now. Under the PhoneAsteroidsContent project in
Solution Explorer, create three subfolders called Audio,
Models, and Textures.
If you haven’t already, download the code for this chapter. Within that code you will find three files in the PhoneAsteroidsPhoneAsteroidsContentAudio directory (collision.wav, shot.wav and track.wav). XACT is supported only in the HiDef profile and Windows Phone 7 supports only the Reach profile, so we won’t be able to use XACT to manage these audio files. Add them directly to your project in your PhoneAsteroidsContentAudio folder.
Next, look in the code for this chapter in the PhoneAsteroidsPhoneAsteroidsContentModels folder, and you’ll find four model files (ammo.x, asteroid1.x, asteroid2.x, and p1_wedge.fbx). Add each of those files to your project in your PhoneAsteroidsContentModels folder.
Finally, in the code for this chapter in the PhoneAsteroidsPhoneAsteroidsContentTextures folder, you’ll find four texture files (asteroid1.tga, asteroid2.tga, attack.png, and wedge_p1_diff_v1.tga). Add those four files to your project in your PhoneAsteroidsContentTextures folder.
I said we were going to go pretty quickly through all of this, right? You’ll see what each of these files is used for as we move through the chapter, but by now none of this should be new, and most likely you can guess what they’re for just by looking at the names of each file.
Tip
Please note that some of the content you just added to your project come from the online MSDN XNA samples available at http://creators.xna.com and http://msdn.microsoft.com. Review the license agreement for all such content at http://creators.xna.com/downloads/?id=15.
Digging In
Now let’s get to the actual code. Developing a game for Windows Phone 7 is nearly identical to creating a game for Windows or Xbox 360. In this case, we’re developing a 3D game, and just as in Windows and Xbox 360, you’ll need a camera and some classes to handle your models. Add a Camera.cs class to your project and modify it to use the following code:
using System;
using System.Collections.Generic;
using System.Linq;
using Microsoft.Xna.Framework;
using Microsoft.Xna.Framework.Audio;
using Microsoft.Xna.Framework.Content;
using Microsoft.Xna.Framework.GamerServices;
using Microsoft.Xna.Framework.Graphics;
using Microsoft.Xna.Framework.Input;
using Microsoft.Xna.Framework.Media;namespace PhoneAsteroids
{

    public class Camera : Microsoft.Xna.Framework.GameComponent
    {
        //Camera matrices
        public Matrix view { get; protected set; }
        public Matrix projection { get; protected set; }


        public Camera(Game game)
            : base(game)
        {
            // Build camera view matrix
            view = Matrix.CreateLookAt(new Vector3(0, 0, 200),
                Vector3.Zero, Vector3.Up);


            // Build camera projection matrix
            projection = Matrix.CreatePerspectiveFieldOfView(
                MathHelper.ToRadians(45.0f),
                1.6666f,
                1, 3000);

        }

        public override void Initialize()
        {

            base.Initialize();
        }

        public override void Update(GameTime gameTime)
        {


            base.Update(gameTime);
        }

    }
}
This code is basically the same as all the 3D camera code you’ve created several times already in this book, and so none of this should be too much of a surprise at this point.
Next, add a BasicModel.cs class to your project, and replace the default code with the following:
using System;
using System.Collections.Generic;
using System.Linq;
using System.Text;
using Microsoft.Xna.Framework;
using Microsoft.Xna.Framework.Graphics;

namespace PhoneAsteroids
{
    class BasicModel
    {
        public Model model { get; protected set; }
        protected Matrix world = Matrix.Identity;

        public BasicModel(Model m)
        {
            model = m;
        }

        public virtual void Update()
        {

        }

        public void Draw(Camera camera)
        {
            Matrix[] transforms = new Matrix[model.Bones.Count];
            model.CopyAbsoluteBoneTransformsTo(transforms);

            foreach (ModelMesh mesh in model.Meshes)
            {
                foreach (BasicEffect be in mesh.Effects)
                {
                    be.EnableDefaultLighting();
                    be.Projection = camera.projection;
                    be.View = camera.view;
                    be.World = GetWorld() * mesh.ParentBone.Transform;
                }

                mesh.Draw();
            }
        }

        public virtual Matrix GetWorld()
        {
            return world;
        }

        public virtual Matrix GetWorldForBoundingSphere()
        {
            return world;
        }
    }
}
Again, this BasicModel class is really…well…basic (ha!), and it’s virtually the same
base model class you’ve used several times in this book. All this one
really does is draw the model and declare variables for moving the model
about the 3D grid. There is a method called
GetWorldForBoundingSphere that might have you scratching your head. It’s a virtual
method that derived classes can override to modify their bounding sphere
for improved collision detection.
In this particular game, you’ll have three types of models floating around the screen: the asteroids, the shots fired by the player, and the player itself. Next, you’ll add the class you’ll use to handle your asteroids. Add a class to your project called AsteroidModel.cs, and replace the default code with the following:
using System;
using System.Collections.Generic;
using System.Linq;
using System.Text;
using Microsoft.Xna.Framework;
using Microsoft.Xna.Framework.Graphics;
using Microsoft.Xna.Framework.Input.Touch;

namespace PhoneAsteroids
{
    class AsteroidModel : BasicModel
    {
        // Size of asteroids
        public enum AsteroidSize { SMALL, MEDIUM, LARGE }
        public AsteroidSize size;
        Vector3 scale;

        // Rotation stuff
        Vector3 rotationAxis = Vector3.Zero;
        Vector3 randomRotation;
        float maxRotationSpeed = MathHelper.Pi;

        // Misc
        Random random;
        Vector3 direction;
        public Vector3 position;

        public AsteroidModel(Model m, Random random, Vector3 direction,
            AsteroidSize size, Vector3 position)
            : this(m, random, direction, size)
        {
            this.position = position;
        }

        public AsteroidModel(Model m, Random random,
            Vector3 direction, AsteroidSize size)
            : base(m)
        {
            this.random = random;

            // Initialize random rotation speed
            randomRotation = new Vector3(
                (float)random.NextDouble() *
                maxRotationSpeed - (maxRotationSpeed / 2),
                (float)random.NextDouble() *
                maxRotationSpeed - (maxRotationSpeed / 2),
                (float)random.NextDouble() *
                maxRotationSpeed - (maxRotationSpeed / 2));

            this.size = size;

            // Initialize random scale
            if (size == AsteroidSize.LARGE)
            {
                scale = new Vector3(((float)random.NextDouble() * .005f) + .035f,
                    ((float)random.NextDouble() * .005f) + .035f,
                    ((float)random.NextDouble() * .005f) + .035f);
            }
            else if (size == AsteroidSize.MEDIUM)
            {
                scale = new Vector3(((float)random.NextDouble() * .005f) + .015f,
                    ((float)random.NextDouble() * .005f) + .015f,
                    ((float)random.NextDouble() * .005f) + .015f);
            }
            else
            {
                scale = new Vector3(((float)random.NextDouble() * .005f) + .005f,
                    ((float)random.NextDouble() * .005f) + .005f,
                    ((float)random.NextDouble() * .005f) + .005f);
            }

            // Initialize random speed
            this.direction = direction * ((float)random.NextDouble() + 1f);

            position = new Vector3(-300, ((float)random.NextDouble() * 100) - 50, 0);

        }


        public override void Update()
        {
            // Update rotation and position
            rotationAxis += randomRotation;
            position += direction;

            base.Update();
        }

        override public Matrix GetWorld()
        {
            return world * Matrix.CreateScale(scale) *
                Matrix.CreateFromYawPitchRoll(MathHelper.ToRadians(rotationAxis.Y),
                MathHelper.ToRadians(rotationAxis.X),
                    MathHelper.ToRadians(rotationAxis.Z)) *
                Matrix.CreateRotationY(MathHelper.PiOver2) *
                Matrix.CreateRotationX(MathHelper.PiOver2) *
                Matrix.CreateTranslation(position);
        }

        override public Matrix GetWorldForBoundingSphere()
        {
            // Make the bounding sphere smaller but rotate the
            //same as the world is rotating
            return world * Matrix.CreateScale(scale / 2) *
                Matrix.CreateFromYawPitchRoll(MathHelper.ToRadians(rotationAxis.Y),
                MathHelper.ToRadians(rotationAxis.X),
                    MathHelper.ToRadians(rotationAxis.Z)) *
                Matrix.CreateRotationY(MathHelper.PiOver2) *
                Matrix.CreateRotationX(MathHelper.PiOver2) *
                Matrix.CreateTranslation(position);
        }
    }
    }
Once again, there’s nothing too new here. You have a model class
that has a direction, a position, and a random rotation. One thing worth
noting is the AsteroidSize enum and corresponding
variable. Essentially, in this game you’ll spawn larger asteroids to
begin with. When the player shoots a large asteroid, you’ll spawn a few
medium-sized asteroids to simulate the asteroid blowing into pieces
(nothing new here; if you’ve ever played any version of
Asteroids, you know how this works). When the
player shoots a medium asteroid, you’ll spawn a few small asteroids.
Finally, when the player shoots a small asteroid, you spawn nothing, and
the asteroid chunk just disappears. The second constructor uses the
AsteroidSize enum to set the size of the asteroid
accordingly (large, medium, or small).
Also, you’re going to build the game such that the large asteroids
that spawn come from the left of the screen and move to the right. All
other asteroids (medium and small ones) are created at the location of
an exploded asteroid rather than at the top of the screen, and they will
move in random directions all over the screen. That’s why you have two
constructors in this class. Notice the only difference in parameters is
that the first constructor has a parameter for position. Also notice
that the first constructor does nothing but
set the position variable and call the other constructor (with the line
this(m,
random, direction, size)).
The second constructor sets the position to a coordinate off the left side of the screen (-300 X) and at a random point along the height of the screen (a random value between -50 and 50 Y). Any time you wish to create a new large asteroid to spawn and move across the screen, you’ll call the second constructor. Any time you wish to create a medium or small asteroid at the point of an exploded asteroid, you’ll call the first constructor and pass in the position of the exploded asteroid.
Screen Rotation and Resolution
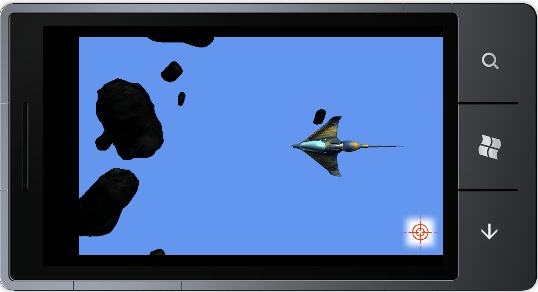
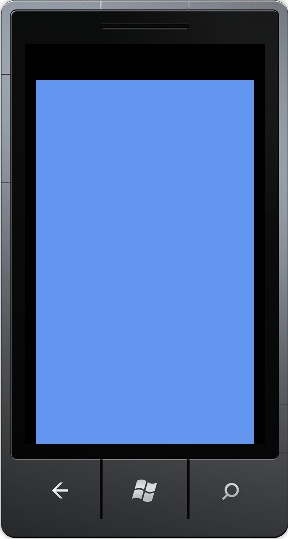
So, hold on just a second. Isn’t what I’m calling the “left” of the screen here technically the “top” of the screen on your Windows Phone 7? Actually, yes. But although the Windows Phone 7 device supports multiple rotations and can run games in landscape or portrait mode, XNA defaults to an 800×480 landscape left rotation for games. This means your game by default will appear as seen in Figure 17-9.
When rotating your device during gameplay, the display will automatically rotate for you. Input from the touchscreen is rotated for you as well, though input from the accelerometer must be rotated in your code.
Sometimes you might want to force your game to be played in a certain mode. This can be an advantage for you as a developer because you’ll be able to predict more accurately what the user experience will be. However, you do have to keep in mind that a user might expect to have the ability to rotate the screen, and taking that away might be a negative.
You can force the rotation of the game by setting the
graphics.SupportedOrientations property in the constructor of your Game1
class. For this game, let’s go ahead and force the game to be played
in landscape left. To do this, add the following line in the
constructor of your Game1 class:
graphics.SupportedOrientations = DisplayOrientation.LandscapeLeft;
While we’re talking about the screen, let’s address the issues
of screen resolution. The default Windows Phone 7 screen resolution is
480×800. However, the device will automatically scale other resolutions to
fit within the screen. You can elect to use a different
resolution by setting the
graphics.PreferredBackBufferWidth and graphics.PreferredBackBufferHeight properties in the constructor of your Game1
class. The device also will automatically scale input from
the touchscreen, etc. to fit your desired resolution. This is a very
powerful tool that will help developers working in nonstandard
resolutions more easily build games for Windows Phone 7.
The default resolution of 480×800 is fine for your game, so you won’t want to adjust it here.
More Model Classes
OK, so now you have a base model class and a class for your asteroids. Next, you’ll want to add a class for the shots fired by the player. Add a new class to your project and call it ShotModel.cs. Replace the code with the following:
using System;
using System.Collections.Generic;
using System.Linq;
using System.Text;
using Microsoft.Xna.Framework;
using Microsoft.Xna.Framework.Graphics;
using Microsoft.Xna.Framework.Input.Touch;


namespace PhoneAsteroids
{
    class ShotModel : BasicModel
    {
        // Position and rotation
        public Vector3 translationVector;
        Vector3 rotationAxis = Vector3.Zero;
        Vector3 randomRotation;
        float maxRotationSpeed = MathHelper.Pi;

        // Speed, scale, and random
        Vector3 speed = new Vector3(-10, 0, 0);
        Vector3 scale = new Vector3(3, 3, 3);
        Random random;

        // Regular asteroid constructor
        public ShotModel(Model m, Random random, Vector3 initialPosition)
            : base(m)
        {
            this.random = random;

            // Initialize random rotation speed
            randomRotation = new Vector3(
                (float)random.NextDouble() *
                maxRotationSpeed - (maxRotationSpeed / 2),
                (float)random.NextDouble() *
                maxRotationSpeed - (maxRotationSpeed / 2),
                (float)random.NextDouble() *
                maxRotationSpeed - (maxRotationSpeed / 2));

            // Initialize position
            translationVector = new Vector3(initialPosition.X - 25,
                initialPosition.Y, initialPosition.Z);

        }        public override void Update()
        {
            rotationAxis += randomRotation;
            translationVector += speed;

            base.Update();
        }

        override public Matrix GetWorld()
        {
            return world * Matrix.CreateScale(scale) *
                Matrix.CreateFromYawPitchRoll(MathHelper.ToRadians(rotationAxis.Y),
                MathHelper.ToRadians(rotationAxis.X),
                MathHelper.ToRadians(rotationAxis.Z)) *
                Matrix.CreateRotationY(MathHelper.PiOver2) *
                Matrix.CreateRotationX(MathHelper.PiOver2) *
                Matrix.CreateTranslation(translationVector);
        }

        public Matrix GetBoundingSphereWorld()
        {
            return world * Matrix.CreateScale(scale / 4f) *
                Matrix.CreateRotationY(MathHelper.PiOver2) *
                Matrix.CreateRotationX(MathHelper.PiOver2) *
                Matrix.CreateTranslation(new Vector3(50, 0, 0)) *
                Matrix.CreateTranslation(translationVector);
        }

        override public Matrix GetWorldForBoundingSphere()
        {
            return world * Matrix.CreateScale(scale / 2) *
                Matrix.CreateTranslation(translationVector);
        }
    }
}
This class is also very basic and nothing you haven’t seen before. You’re creating a shot at the position of the player’s ship (offset slightly so it comes from the nose of the ship) and giving it a random rotation. The speed is set to (-10, 0, 0), which will make the shots move from right to left on the screen.
Finally, add one more model class to your game that will represent the player itself, and name it PlayerModel.cs. Replace the code in that file with the following:
using System;
using System.Collections.Generic;
using System.Linq;
using System.Text;
using Microsoft.Xna.Framework;
using Microsoft.Xna.Framework.Graphics;
using Microsoft.Xna.Framework.Input.Touch;
using Microsoft.Devices.Sensors;namespace PhoneAsteroids
{
    class PlayerModel : BasicModel
    {
        Vector3 translationVector = Vector3.Zero;

        // Scale
        float scale = .025f;

        // Accelerometer stuff
        Accelerometer accelerometer;
        Vector3 accelerometerData = new Vector3();
        int speed = 5;

        public PlayerModel(Model m)
            : base (m)
        {
            accelerometer = new Accelerometer();

            // Create an accelerometer event handler
            accelerometer.ReadingChanged +=
                new EventHandler<AccelerometerReadingEventArgs>(
                AccelerometerDataChanged);

            // Start the accelerometer
            accelerometer.Start();
        }

        public override void Update()
        {
            // Move the ship based on accelerometer input
            translationVector.Y += accelerometerData.X * speed;
            translationVector.X += -accelerometerData.Y * speed;


            base.Update();
        }

        override public  Matrix GetWorld()
        {
            return world * Matrix.CreateScale(scale) *
                Matrix.CreateRotationY(MathHelper.PiOver2) *
                Matrix.CreateRotationX(MathHelper.PiOver2) *
                Matrix.CreateTranslation(GetTranslationVector());
        }

        override public Matrix GetWorldForBoundingSphere()
        {
            return world * Matrix.CreateScale(scale / 2) *
                Matrix.CreateRotationY(MathHelper.PiOver2) *
                Matrix.CreateRotationX(MathHelper.PiOver2) *
                Matrix.CreateTranslation(GetTranslationVector());
        }

        public Vector3 GetTranslationVector()
        {
            // Return current translation vector plus offset
            // to start player at far right of screen
            return new Vector3(50, 0, 0) + translationVector;
        }

        public void AccelerometerDataChanged(object sender,
            AccelerometerReadingEventArgs e)
        {
            // Store accelerometer data
            accelerometerData.X = (float)e.X;
            accelerometerData.Y = (float)e.Y;
        }
    }
}
This class isn’t really revolutionary either, and most of it
should be very familiar to you by now. You have a translation vector
used to store the player’s position, and you’re using the same methods
you’ve used in the previous classes to get the world for the object
and the bounding sphere. There is a
GetTranslationVector method as well, which you’ll
use in other classes to get the current position of the player.
However, there is something new
here that you haven’t seen before: the Accelerometer class and supporting methods and variables to
handle accelerometer input from your Windows Phone 7 device.
In this game, the player will move about the screen by tilting the
phone and using the accelerometer to control the player model’s
location.
The first thing you might have noticed is that in order to use the accelerometer, we’ve added a new namespace to the class via the following line of code:
using Microsoft.Devices.Sensors;
You might also notice that your game won’t compile with this
reference to the Microsoft.Devices.Sensors
namespace. That’s because you need to add a reference to this library
in your project before you can access that namespace. To add the
reference, right-click on the
PhoneAsteroidsReferences node in Solution
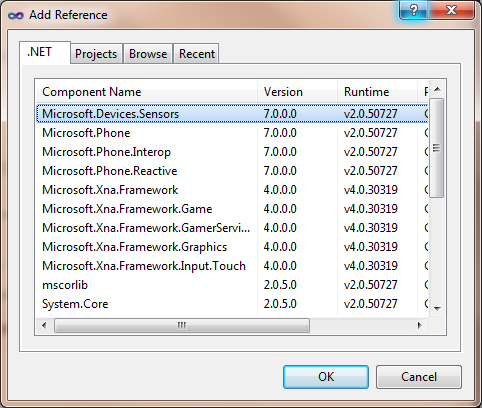
Explorer and select Add Reference. In the .NET tab of the resulting
window, select the Microsoft.Devices.Sensors
library and hit OK, as seen in Figure 17-10.
Now your code should at least compile. But before we see what
happens when you run the game, let’s discuss what’s going on here with
the accelerometer data. The Accelerometer class
provides the developer with access to the accelerometer on the device.
The class has an event called ReadingChanged that
fires when the accelerometer on the device receives new information.
To access this data, you have wired up an event handler to a method
called AccelerometerDataChanged with the following
line of code, which is in the constructor for the PlayerModel
class:
accelerometer.ReadingChanged += new EventHandler<AccelerometerReadingEventArgs>(
    AccelerometerDataChanged);
When the accelerometer device has new data to process, it will
now call the AccelerometerDataChanged method. That
method, shown again next for your review, stores the X and Y values
from the accelerometer (representing how far the accelerometer sensed
movement in each direction) in a Vector3 variable
called accelerometerData:
public void AccelerometerDataChanged(object sender,
    AccelerometerReadingEventArgs e)
{
    // Store accelerometer data
    accelerometerData.X = (float)e.X;
    accelerometerData.Y = (float)e.Y;
}
The last step in making all of this work is in your
Update method, where you update the translation
vector (representing the player’s position) with the accelerometer
data multiplied by a speed variable. That method currently looks like
this:
public override void Update()
{
// Move the ship based on accelerometer input
translationVector.Y += accelerometerData.X * speed;
translationVector.X += -accelerometerData.Y * speed;
base.Update();
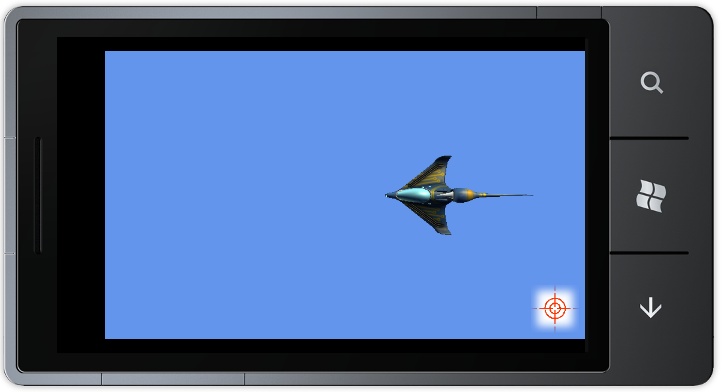
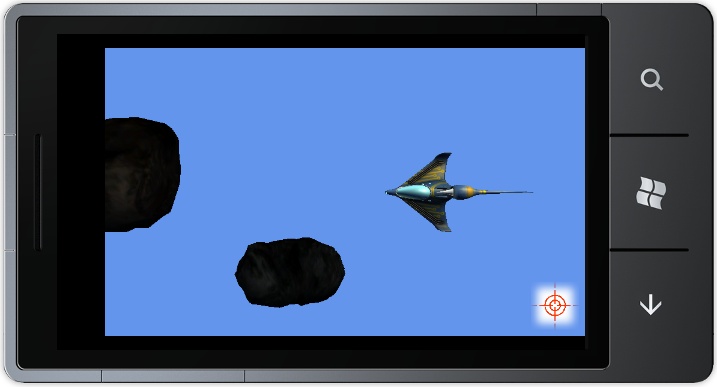
}Not bad, eh? You should now be able to use your accelerometer to move the player around the screen in your game. Go ahead and compile and run your game, and see what happens. You should see something similar to the screen shown in Figure 17-11.
Wow. Now that is one sweet-looking game. You can thank me later for helping you make such an impressive piece of software. For now, let’s look at what’s happening…well…not much. Why? That’s right, you have a bunch of models and model classes, but you aren’t drawing them on the screen. You need a model manager like the one you built in past chapters. Let’s tackle that next.
Adding a ModelManager
I hate to break it to you, but the hard part is over already for this chapter. Coding for Windows Phone 7 is so similar to coding for Windows and Xbox 360 that there really aren’t that many key differences. That’s awesome for developers wishing to build games across multiple platforms, but not too great for authors trying to explain the differences between those development platforms. That said, you still need to flesh out the rest of your game. To do that, add a class to your project called ModelManager.cs, and replace the default code with the following:
using System;
using System.Collections.Generic;
using System.Linq;
using Microsoft.Xna.Framework;
using Microsoft.Xna.Framework.Audio;
using Microsoft.Xna.Framework.Content;
using Microsoft.Xna.Framework.GamerServices;
using Microsoft.Xna.Framework.Graphics;
using Microsoft.Xna.Framework.Input;
using Microsoft.Xna.Framework.Media;

namespace PhoneAsteroids
{
    /// <summary>
    /// This is a game component that implements IUpdateable.
    /// </summary>
    public class ModelManager : DrawableGameComponent
    {
        // List of models
        List<AsteroidModel> asteroidList = new List<AsteroidModel>();
        List<ShotModel> shotList = new List<ShotModel>();
        PlayerModel player;

        // Spawning Asteroid stuff
        int timeSinceLastSpawn = 0;
        int nextSpawnTime = 0;
        int maxSpawnTime = 4000;
        int minSpawnTime = 2000;

        // Sounds
        SoundEffect trackSound;
        SoundEffect collisionSound;
        SoundEffectInstance trackSoundInstance;


        public ModelManager(Game game)
            : base(game)
        {
        }        /// <summary>
        /// Allows the game component to perform any initialization it needs to
        /// before starting to run.  This is where it can query for any required
        /// services and load content.
        /// </summary>
        public override void Initialize()
        {
            SetNextSpawnTime();

            base.Initialize();
        }

        protected override void LoadContent()
        {
            // Initialize player
            player = new PlayerModel(Game.Content.Load<Model>(@"modelsp1_wedge"));

            // Load audio
            collisionSound = Game.Content.Load<SoundEffect>(@"audiocollision");
            trackSound = Game.Content.Load<SoundEffect>(@"audio	rack");
            trackSoundInstance = trackSound.CreateInstance();
            trackSoundInstance.IsLooped = true;
            trackSoundInstance.Play();

            // Load all models
            Game.Content.Load<Model>(@"modelsasteroid1");
            Game.Content.Load<Model>(@"modelsasteroid2");
            Game.Content.Load<Model>(@"modelsammo");

            base.LoadContent();
        }

        /// <summary>
        /// Allows the game component to update itself.
        /// </summary>
        /// <param name="gameTime">Provides a snapshot of timing values.</param>
        public override void Update(GameTime gameTime)
        {
            // Time to spawn?
            timeSinceLastSpawn += gameTime.ElapsedGameTime.Milliseconds;
            if (timeSinceLastSpawn > nextSpawnTime)
            {
                if(((Game1)Game).random.Next(2) == 0)
                    asteroidList.Add(new AsteroidModel(Game.Content.Load<Model>(
                        @"modelsasteroid1"), ((Game1)Game).random,
                        new Vector3(1, 0, 0), AsteroidModel.AsteroidSize.LARGE));
                else
                    asteroidList.Add(new AsteroidModel(Game.Content.Load<Model>(
                        @"modelsasteroid2"), ((Game1)Game).random,
                        new Vector3(1, 0, 0), AsteroidModel.AsteroidSize.LARGE));
                SetNextSpawnTime();
            }


            // Update player
            player.Update();

            // Loop through all shots and call Update
            for (int i = 0; i < shotList.Count; ++i)
            {
                shotList[i].Update();
                if (shotList[i].translationVector.X < -300)
                {
                    shotList.RemoveAt(i);
                    --i;
                }
            }

            // Loop through all models and call Update
            for (int i = 0; i < asteroidList.Count; ++i)
            {
                asteroidList[i].Update();

                if (Collision(player, asteroidList[i]))
                {
                    // Game over
                    Game.Exit();
                    --i;
                    break;
                }

                // Check for asteroid out of bounds
                if (Math.Abs(asteroidList[i].position.X) > 300 ||
                    Math.Abs(asteroidList[i].position.Y) > 300)
                {
                    asteroidList.RemoveAt(i);
                    --i;
                    break;
                }

                // Check for shots hitting asteroids
                for (int j = 0; j < shotList.Count; ++j)
                {
                    if(Collision(shotList[j], asteroidList[i]))
                    {
                        SpawnCollisionAsteroids(asteroidList[i].position,
                            asteroidList[i].size);
                        collisionSound.Play();
                        shotList.RemoveAt(j);
                        asteroidList.RemoveAt(i);
                        i--;
                        break;
                    }
                }
            }


            base.Update(gameTime);
        }

        private void SpawnCollisionAsteroids(Vector3 position,
            AsteroidModel.AsteroidSize asteroidSize)
        {
            if (asteroidSize != AsteroidModel.AsteroidSize.SMALL)
            {
                // Spawn 2-4 smaller asteroids if collision was with a
                // large or medium asteroid
                int numberToSpawn = ((Game1)Game).random.Next(2, 5);
                for (int i = 0; i <= numberToSpawn; ++i)
                {
                    if (((Game1)Game).random.Next(2) == 0)
                        asteroidList.Add(new AsteroidModel(Game.Content.Load<Model>(
                            @"modelsasteroid1"),
                            ((Game1)Game).random,
                            new Vector3(
                                ((float)((Game1)Game).random.NextDouble() * 2) - 1,
                                ((float)((Game1)Game).random.NextDouble() * 2) - 1,
                                0),
                            asteroidSize - 1, position));
                    else
                        asteroidList.Add(new AsteroidModel(Game.Content.Load<Model>(
                            @"modelsasteroid2"),
                            ((Game1)Game).random,
                            new Vector3(
                                ((float)((Game1)Game).random.NextDouble() * 2) - 1,
                                ((float)((Game1)Game).random.NextDouble() * 2) - 1,
                                0),
                            asteroidSize - 1, position));
                }
            }
        }

        private bool Collision(BasicModel playerModel, BasicModel asteroidModel)
        {
            // Check two models for collision using their bounding spheres
            foreach(ModelMesh playerMesh in playerModel.model.Meshes)
            {
                foreach (ModelMesh asteroidMesh in asteroidModel.model.Meshes)
                {
                    if (asteroidMesh.BoundingSphere.Transform(
                        asteroidModel.GetWorldForBoundingSphere()).
                        Intersects(playerMesh.BoundingSphere.Transform(
                        playerModel.GetWorldForBoundingSphere())))
                    return true;
                }
            }
            return false;
        }

        public override void Draw(GameTime gameTime)
        {
            // Draw player
            player.Draw(((Game1)Game).camera);

            // Loop through and draw each asteroid
            foreach (AsteroidModel asteroid in asteroidList)
            {
                asteroid.Draw(((Game1)Game).camera);
            }

            // Loop through and draw each shot
            foreach (ShotModel shot in shotList)
            {
                shot.Draw(((Game1)Game).camera);
            }

            base.Draw(gameTime);
        }

        public void SetNextSpawnTime()
        {
            nextSpawnTime = ((Game1)Game).random.Next(minSpawnTime, maxSpawnTime);
            timeSinceLastSpawn = 0;
        }

        internal void FireShot()
        {
            shotList.Add(new ShotModel(Game.Content.Load<Model>(@"modelsammo"),
                ((Game1)Game).random, player.GetTranslationVector()));

        }

    }
}
As I mentioned previously, there isn’t anything here that you haven’t seen before. But that said, let’s walk through it really quickly.
The first set of variables includes a list of asteroid models, a list of shot models, and a model for the player. Next, you have spawning variables for the asteroids (which are very similar to variables that you’ve used in previous chapters for random spawning of enemies). Finally, you have a few variables to handle some sound effects.
Notice the call to SetNextSpawnTime in your
Initialize method. You’ve done this in previous
chapters as well, and it sets the initial spawn time for your first
enemy. The LoadContent method should be very
straightforward by now, as all you’re doing is loading resources and
playing the soundtrack sound effect.
The Update method is a bit more complicated but still should be nothing new
to you at this point. First, you’re checking to see whether it’s time to
spawn a new enemy. If it is, you randomly create one of two models for
asteroids (asteroid1 or
asteroid2). Next, after calling
Update on the player model, you loop through all the
shots in the list of shots and call Update on each of
them. Additionally, you’re checking to see whether any of those shots
are out of bounds and deleting any that are. Finally, you loop through
all the asteroids and update them, check for game-over criteria (when
the ship is hit with an asteroid), delete any asteroids that are out of
bounds, and check for collisions between shots and asteroids. When a
shot hits an asteroid, you spawn new asteroids, play an explosion sound
effect, and remove both the shot and the asteroid.
The SpawnCollisionAsteroids method is called to
create new, smaller asteroids when a shot hits an asteroid. This method
randomly picks a number between two and four and creates that many
asteroids of the next smaller size (with the asteroidSize -
1 parameter).
The Collision method uses the bounding spheres
from each model to determine any collisions, and the
Draw method does nothing more than loop through each
model and call that model’s Draw method. Finally,
SetNextSpawnTime and FireShot are
pretty self-explanatory.
Well, that’s about it. All you have left is your
Game1 class to tie it all together.
Finishing Details
The first thing you’ll need to do in your
Game1 class is add the following class-level
variables:
ModelManager modelManager;
public Camera camera { get; protected set; }
public Random random { get; protected set; }
Texture2D attackTexture;
SoundEffect shotSound;
The first two variables are your model manager and camera game
components. The random variable will be used for all the random
calculations in your game. The attackTexture variable
will be used to draw a small texture on the screen that the user will
press to fire shots. The final variable added is the sound effect for
firing shots.
Next, you’ll want to initialize your random variable in the
constructor of your Game1 class with the following
code:
// Initialize random number generator
random = new Random();
Then add the following code to your Initialize
method to initialize and add both of your game components:
// Initialize Camera
camera = new Camera(this);
Components.Add(camera);

// Initialize model manager
modelManager = new ModelManager(this);
Components.Add(modelManager);
Then you’ll need to add the following code to your
LoadContent method to load your texture and audio
resources:
// Load textures
attackTexture = Content.Load<Texture2D>(@"texturesattack");

// Load audio
shotSound = Content.Load<SoundEffect>(@"audioshot");
Now, in your Update method, add some code that
will fire shots when the user presses the texture on the screen. Add the
following code just before the call to
base.Update:
// Did the user press the attack button on the touch panel?
TouchCollection touchCollection = TouchPanel.GetState();
foreach (TouchLocation touchLocation in touchCollection)
{
    if (touchLocation.State == TouchLocationState.Pressed &&
        GetAttackTextureRect().Contains(
        new Point((int)touchLocation.Position.X, (int)touchLocation.Position.Y)))
    {
        shotSound.Play();
        modelManager.FireShot();
    }
}
What’s going on here? Let’s take a closer look at touch panel
input on the Windows Phone 7 to see how this works. First, you’ve used a
method called GetState on the
TouchPanel class. This method will return the current
state of the touch panel from your Windows Phone 7 device in the form of
a TouchCollection. This
TouchCollection stores a list of
TouchLocation objects that can be used to determine
how and where the user has pressed the touch panel.
The TouchLocation.State property can be
evaluated to figure out exactly how the user interacted with the touch
panel. Possible state values are shown in Table 17-1:
| State | Description |
Invalid | This touch location position is invalid. Typically, you will encounter this state when a new touch location attempts to get the previous state of itself. |
Moved | This touch location position was updated or pressed at the same position. |
Pressed | This touch location position is new. |
Released | This touch location position was released. |
In this case, you’re looking to see whether the
TouchLocation.State property is TouchLocationState.Pressed (indicating a
new touch location position, or in other words, the touch panel was
pressed). If it is, you check the position of the touch location (via
the TouchLocation.Position property) and see whether
it is within the bounds of your attack texture. If it is, then the
player intends to fire a shot, so you play the shot sound effect and
call the FireShot method from the
ModelManager.
Tip
Why do I keep saying that the user presses a texture to fire a shot? Isn’t a texture just a 2D image? Absolutely, a texture is nothing more than a 2D image. However, when designing the user interface for a game (or any software, for that matter) it’s important to make the interface as intuitive as possible. Gamers aren’t used to simply pressing anywhere on a screen to get a weapon to fire, because traditionally you think of firing a weapon by hitting a button or pulling a trigger of some sort. So here you’re keying off those typical senses of what’s normal and drawing a button for them to press. Even though it’s not a button, the user doesn’t understand that—nor do they need to. You know when they hit that texture you’re going to fire a shot, and they know when they see that texture that they should press it if they want to fire a shot.
All right, let’s move on. You might have noticed you referenced a
method that doesn’t exist yet in your code:
GetAttackTextureRect. This method is used to build a
rectangle defining the location of the attack button texture. Add the
method to your Game1 class as shown here:
protected Rectangle GetAttackTextureRect()
{
    return new Rectangle(
        graphics.PreferredBackBufferWidth - attackTexture.Width - 10,
        graphics.PreferredBackBufferHeight - attackTexture.Height - 10,
        attackTexture.Width,
        attackTexture.Height);
}
Using the
GraphicsDevice.PreferredBackBufferWidth and
GraphicsDevice.PreferredBackBufferHeight properties
as well as the size of the texture itself, you build a rectangle to
represent the location of the button on the screen. You also subtract 10
from the X and Y coordinates of the rectangle so the button will not
appear directly in the corner of the screen, but instead will be offset
slightly.
Finally, modify your Draw method and add the
ResetGraphicsDevice method as shown here:
protected override void Draw(GameTime gameTime)
{
    GraphicsDevice.Clear(Color.CornflowerBlue);

    spriteBatch.Begin();

    // Draw the attack texture on the screen
    spriteBatch.Draw(attackTexture,
        GetAttackTextureRect(),
        Color.White);

    spriteBatch.End();

    ResetGraphicsDevice();


    base.Draw(gameTime);
}

private void ResetGraphicsDevice()
{
    GraphicsDevice.BlendState = BlendState.Opaque;
    GraphicsDevice.DepthStencilState = DepthStencilState.Default;
    GraphicsDevice.RasterizerState = RasterizerState.CullCounterClockwise;
    GraphicsDevice.SamplerStates[0] = SamplerState.LinearWrap;
}
What’s happening here? First, you’re drawing the
attackTexture using your
spriteBatch variable. Then comes a call to the
ResetGraphicsDevice method, which is added below the
Draw method. What in the world is that doing? Well,
you’re mixing two very different drawing techniques here: 2D sprites and
3D models. XNA 4.0 uses a variety of state objects to tell the graphics
device how to draw different types of data. When you use
SpriteBatch.Begin and End to draw
the sprites here, it modifies those state objects and sets the graphics
device to a mode where it is prepared to draw 2D sprites. Drawing 3D
objects while the graphics device is in that state can cause
unpredictable results.
To counter that, after drawing 2D sprites you reset the graphics
device with the code in the ResetGraphicsDevice
method, which prepares the device to handle 3D models.
That’s all there is to it. Congratulations! You just wrote your first ever 3D Windows Phone 7 game! Compile and run the game at this point, and you should see something similar to Figure 17-12.
What You Just Did
Well, congratulations! You’ve just done what very few people on this planet actually know how to do—program a game for a mobile device. You’re in an elite club at this point, and your life is only going to get better. Let’s review some of the highlights of what you just did:
You learned how to register for a developer account, register your Windows Phone 7 device, and unlock your device using the Zune software.
You created your first Windows Phone 7 game.
You learned about changes required for development on Windows Phone 7 (accelerometer, touch panel input, screen size, and rotation issues).
You wrote a killer asteroids app that will make your family happy for generations to come.
Summary
To build games for your Windows Phone 7 device, you first need to register for a developer account.
You use the Microsoft Zune software to unlock your Windows Phone 7 device and connect to it via Visual Studio.
Developing on Windows Phone 7 is nearly identical to developing for Windows or Xbox 360, other than a few exceptions.
The accelerometer on Windows Phone 7 is readable via event handlers.
The touch panel on Windows Phone 7 devices is accessible via the
TouchPanelclass.Now that you’ve built a 3D game for Windows Phone 7, you’re kind of a big deal. People know you. You’re very important, and you have many leatherbound books, and your apartment smells of rich mahogany.
Test Your Knowledge: Quiz
What are the three types of developer accounts you can create for development on Windows Phone 7?
What software do you use to unlock your Windows Phone 7 device?
How do you read data from the Windows Phone 7 accelerometer?
What is the default screen resolution and screen rotation of a Windows Phone 7 game?
What are the possible states of a
TouchLocationobject?Why does Brody the Bootlegger get angry with Jerry Seinfeld during the movie Death Blow?