
Chapter 16. Deploying to the Xbox 360
One of the most compelling reasons to learn XNA and write games using the XNA Framework is the fact that it enables developers to develop their own games and play them on the Xbox 360. Prior to XNA, it was nearly impossible for hobbyist developers to gain access to the tools needed to develop games for a next-generation console. Now, developers can either write specifically for the Xbox 360 or take code they’ve written for the PC and port it to the Xbox 360 (usually with few, if any, changes to the code required). Not only can developers write games for a next-gen console, but with the XNA Framework, they can write games that will run on the PC and the Xbox 360 in one environment and with one code base.
In addition, Xbox LIVE Marketplace now enables users to share games easily with users worldwide. Never before has the window of opportunity been opened so widely for console development. Members of the XNA Creator’s Club who want to distribute games on Xbox LIVE Marketplace can submit games for review where testers preview them to ensure that they are safe to play. Once the game is approved by a group of peers within the Xbox Creators Club, the developer can set a price point for his game. The game is then made available to users worldwide as a purchasable download via Xbox LIVE Marketplace. What a great time to be an XNA game developer, eh? There are definitely some exciting times ahead of us!
This chapter covers the steps required to deploy a project to the Xbox 360, as well as specific topics that should be considered when targeting that platform.
Adding an Xbox 360 Device
To deploy a project to an Xbox 360, you need to let your PC know about the Xbox 360 machine. First, hook up your Xbox 360 to your PC’s network with a LAN cable. (The Xbox 360 also has a wireless network adapter that you can purchase to connect your Xbox 360 to a wireless network.)
When you add your Xbox 360 as a device, your PC will require a connection key, which is generated by your Xbox 360. To get a connection key, you’ll need to have at least a Silver Xbox LIVE membership (which is free), an XNA Creators Club membership, and a hard drive for your Xbox 360. Both membership options are available in the Xbox LIVE Marketplace. The Xbox LIVE Silver membership is free of charge; the Creators Club license costs $99/year. Four-month memberships are also available, and the cost varies in different countries.
Tip
Students can get a free trial membership through the DreamSpark program or through MSDNAA (the MSDN Academic Alliance). See http://forums.xna.com/forums/t/12661.aspx.
Once you’ve obtained your memberships, you’ll need to download XNA Game Studio Connect. You can get XNA Game Studio Connect in the Xbox LIVE Marketplace by selecting Game Marketplace→All Games→Browse→Genre→Other→Sort by Title→XNA Creators Club→Featured Downloads→XNA Game Studio Connect.
Now you’re ready to generate your connection key. To generate the key, follow these steps:
Select the Games Library under My Xbox in the Xbox 360 dashboard.
Select Collections.
Select All Games.
Select XNA Game Studio Connect.
Select Launch.
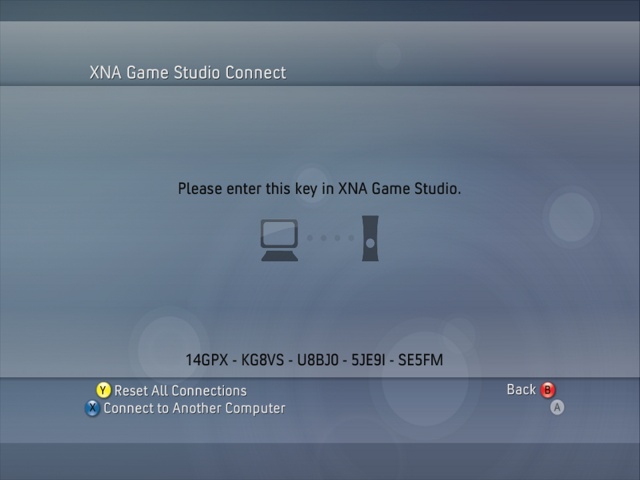
You should see the XNA Game Studio Connect screen, which will look something like Figure 16-1. Note that the key listed in Figure 16-1 will not be the same as the one that you have on your screen. Make sure you use the key on your screen rather than the one shown in the figure.
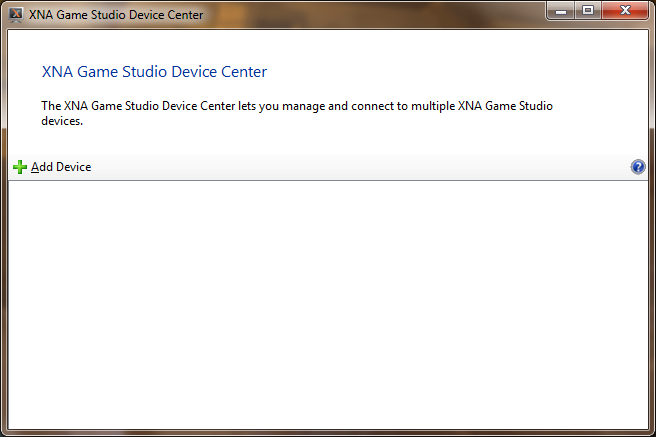
Now that you have a connection key, you’ll need to connect your PC to your Xbox 360 using this key. Start the XNA Game Studio Device Center on your PC. The Device Center is installed with XNA Game Studio 4.0; you can find it under Start→All Programs→Microsoft XNA Game Studio 4.0→XNA Game Studio Device Center.
Once you load the Device Center, it will display a list of known devices. Click Add Device to add your Xbox 360 to the Device Center (see Figure 16-2).
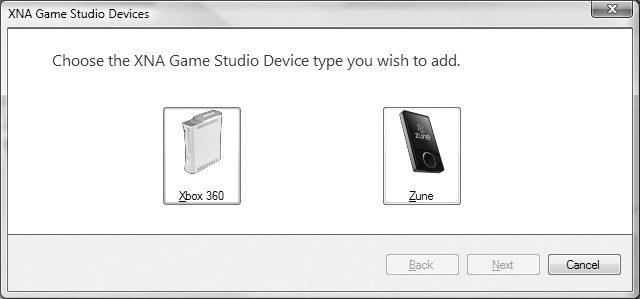
After clicking Add Device, XNA Game Studio Device Center will ask you which type of device you want to add by displaying the screen shown in Figure 16-3. Select Xbox 360 and click Next.
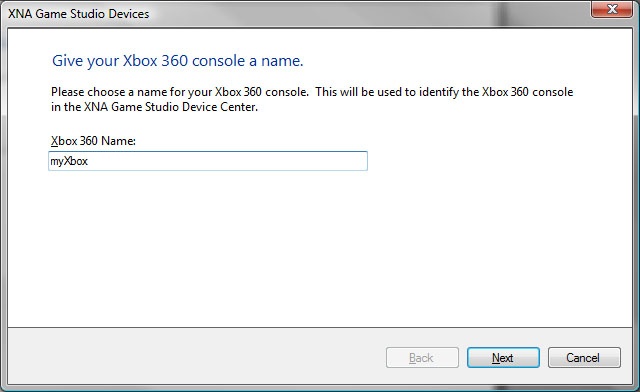
You’ll then be asked to give your Xbox 360 a name to distinguish it from other Xbox 360 machines you might connect to your PC in the future. Enter a name for your Xbox 360 in the screen shown in Figure 16-4.
Then, you’ll be prompted to enter the connection key for the Xbox 360 you wish to associate with your PC, as you can see in Figure 16-5. Enter the connection key that appears on your XNA Game Studio Connect screen.

Once you’ve entered your connection key, the XNA Game Studio Device Center will search for the Xbox 360 and add it to the device list.
Converting a Project to Run on the Xbox 360
Now that you have a connected Xbox 360, let’s see just how easy it is to deploy an XNA Game Studio project to your Xbox 360 machine.
The rest of this chapter deals with converting the 3D game you finished building in the previous chapter and preparing it for deployment to the Xbox 360. Open the project from Chapter 15 and use that project throughout the rest of this chapter.
While 99% of the code that you write can be ported from the PC to the Xbox 360 without any changes, the projects are compiled differently depending on which platform you’re targeting. As you created projects in previous chapters, you might have noticed that there were options to create projects for the Xbox 360. Using one of these options will generate the same type of project as its Windows counterpart, but the project will be wrapped in a project file that will compile the game to run on the Xbox 360.
A typical method for creating games for the Xbox 360 is to create the initial project for Windows and perform the majority of the coding, testing, and debugging in that project. Then, once the game is close to completion, you can create a copy of the project for development on the Xbox 360 and concentrate on Xbox 360‒specific debugging.
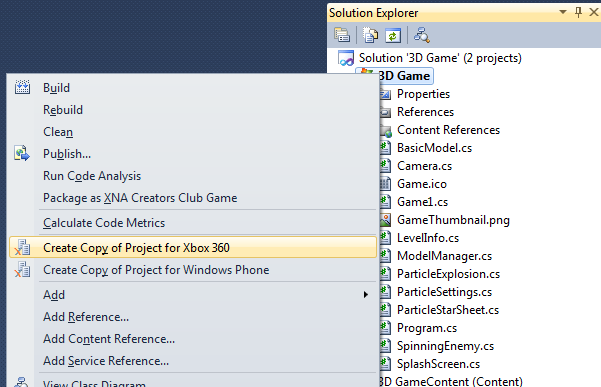
This is the method that is laid out in this book. You have, from the previous chapter, a complete game written using XNA for Windows. Open that project, and then create a copy of the project for the Xbox 360 by right-clicking the project in Solution Explorer and selecting “Create Copy of Project for Xbox 360…”, as shown in Figure 16-6.
Once you’ve chosen to create a copy of the project, XNA will create a new project within the same solution that shares the files with the original project. You’ll find that changing a file in one of the projects affects both projects.
Once your duplicate project is created, your Solution Explorer window will look something like Figure 16-7. It will now have three projects: one for Windows, one for Xbox 360, and one for your game content.
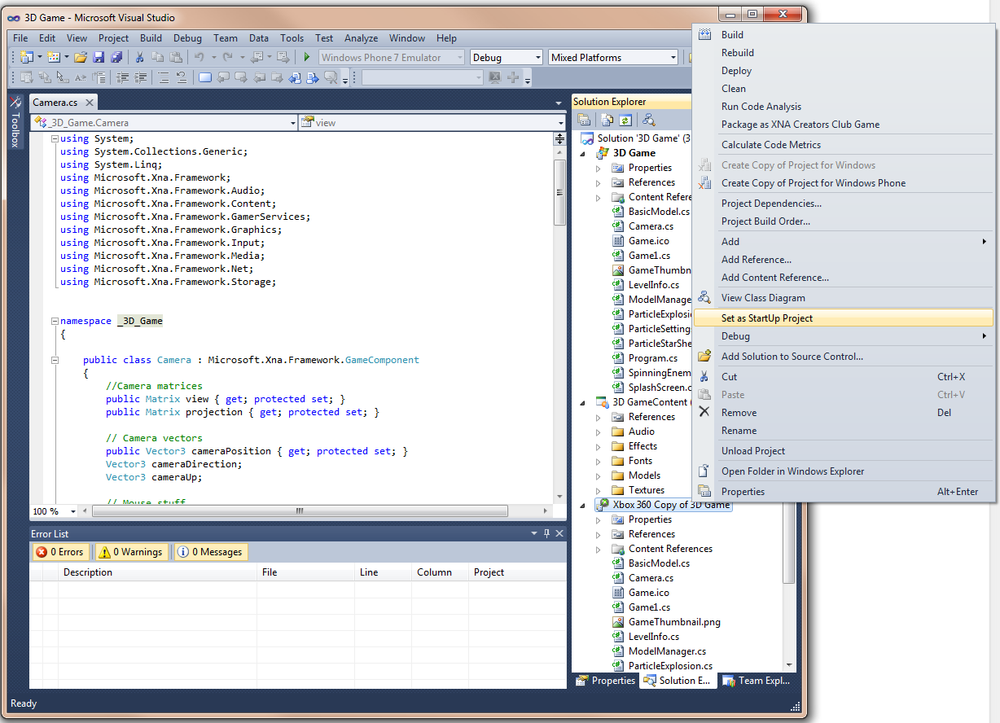
Set the new project you added as the startup project by right-clicking the new project in Solution Explorer and selecting “Set as StartUp Project” (Figure 16-7).
Once you’re ready to compile and test your game, you can start running the project the same way that you’ve done previously with Windows projects (by selecting the Debug→Start Debugging menu item in Visual Studio). Visual Studio will compile the project, and then, if the compilation was successful, it will begin a deployment step where it attempts to contact the Xbox 360 machine associated with your PC and install the project on that device. Once the project is installed, it will run on your Xbox 360.
Tip
Your Xbox 360 must be connected to your PC’s LAN, be on the same subnet as your PC, and be waiting at the XNA Game Studio Connect screen for Visual Studio to find the Xbox 360, copy the files, and run the project.
However, you’ll probably find that your project in its current state is not ready for deployment to the Xbox 360. Remember that you’re currently using the mouse to move the camera. You’re probably going to want to modify that code to use the Xbox 360 gamepad instead.
You might think there’s an easy solution: you’re using the mouse to move the camera and look around the world, so you can just remove the mouse stuff and add code to use the left thumbstick of the Xbox 360 gamepad, right?
Well, not exactly. Remember that the project files are shared between your Windows project and your Xbox 360 project. If you removed the mouse support in the Xbox 360 project, it would also be removed from the Windows project.
Luckily, XNA automatically defines two conditional compilation
symbols (XBOX and XBOX360) in all Xbox 360 projects to help
solve this problem.
Supporting Gamepad Input
The mouse is currently the only way to move the camera,
and without support for the Xbox 360 gamepad, the camera will be
immobile—which really won’t increase the entertainment value of your
game. To fix the Camera class, add support for the
gamepad instead of the mouse anywhere that you see mouse support code
being used. You can choose to surround the GamePad code with a preprocessor directive to
have it compile only in the Xbox 360 project, but you might as well
leave it in there for the Windows project as well because it’s not
uncommon to use a gamepad on a PC.
I’ve listed the modified Camera
class here, with the changes highlighted in bold:
using System;
using System.Collections.Generic;
using System.Linq;
using Microsoft.Xna.Framework;
using Microsoft.Xna.Framework.Audio;
using Microsoft.Xna.Framework.Content;
using Microsoft.Xna.Framework.GamerServices;
using Microsoft.Xna.Framework.Graphics;
using Microsoft.Xna.Framework.Input;
using Microsoft.Xna.Framework.Media;
using Microsoft.Xna.Framework.Net;
using Microsoft.Xna.Framework.Storage;


namespace _3D_Game
{

    public class Camera : Microsoft.Xna.Framework.GameComponent
    {
        //Camera matrices
        public Matrix view { get; protected set; }
        public Matrix projection { get; protected set; }

        // Camera vectors
        public Vector3 cameraPosition { get; protected set; }
        Vector3 cameraDirection;
        Vector3 cameraUp;

#if (!XBOX360)
        // Mouse support
        MouseState prevMouseState;
#endif

        // Max yaw/pitch variables
        float totalYaw = MathHelper.PiOver4 / 2;
        float currentYaw = 0;
        float totalPitch = MathHelper.PiOver4 / 2;
        float currentPitch = 0;

        public Vector3 GetCameraDirection
        {
            get { return cameraDirection; }
        }

        public Camera(Game game, Vector3 pos, Vector3 target, Vector3 up)
            : base(game)
        {
            // Build camera view matrix
            cameraPosition = pos;
            cameraDirection = target - pos;
            cameraDirection.Normalize();
            cameraUp = up;
            CreateLookAt();


            projection = Matrix.CreatePerspectiveFieldOfView(
                MathHelper.PiOver4,
                (float)Game.Window.ClientBounds.Width /
                (float)Game.Window.ClientBounds.Height,
                1, 3000);
        }

        public override void Initialize()
        {
#if (!XBOX360)
            // Set mouse position and do initial get state
            Mouse.SetPosition(Game.Window.ClientBounds.Width / 2,
                Game.Window.ClientBounds.Height / 2);

            prevMouseState = Mouse.GetState();
#endif
            base.Initialize();
        }

        public override void Update(GameTime gameTime)
        {
            // Yaw rotation
            float yawAngle = 0;
#if (!XBOX360)
            yawAngle = (-MathHelper.PiOver4 / 150) *
                (Mouse.GetState( ).X - prevMouseState.X);
#endif

            if (yawAngle == 0)
            {
                yawAngle = (-MathHelper.PiOver4 / 150) *
                GamePad.GetState(PlayerIndex.One).ThumbSticks.Left.X;
            }

            if (Math.Abs(currentYaw + yawAngle) < totalYaw)
            {
                cameraDirection = Vector3.Transform(cameraDirection,
                    Matrix.CreateFromAxisAngle(cameraUp, yawAngle));
                currentYaw += yawAngle;
            }

            // Pitch rotation
            float pitchAngle = 0;
#if(!XBOX360)
            pitchAngle = (MathHelper.PiOver4 / 150) *
            (Mouse.GetState( ).Y - prevMouseState.Y);
#endif
            if (pitchAngle == 0)
            {
                pitchAngle = (MathHelper.PiOver4 / 150) *
                GamePad.GetState(PlayerIndex.One).ThumbSticks.Left.Y;
            }

            if (Math.Abs(currentPitch + pitchAngle) < totalPitch)
            {
                cameraDirection = Vector3.Transform(cameraDirection,
                    Matrix.CreateFromAxisAngle(
                        Vector3.Cross(cameraUp, cameraDirection),
                    pitchAngle));

                currentPitch += pitchAngle;
            }

#if(!XBOX360)
            //Reset mouse state
            prevMouseState = Mouse.GetState();
#endif

            // Recreate the camera view matrix
            CreateLookAt();

            base.Update(gameTime);
        }

        private void CreateLookAt()
        {
            view = Matrix.CreateLookAt(cameraPosition,
                cameraPosition + cameraDirection, cameraUp);
        }
    }
}
While you’re working on input methods, you also have code that
supports keyboard input in your game. There are only two places where
you’re currently supporting keyboard input: in the Game1 class, where you fire a shot when the
space bar is pressed; and in the SplashScreen class, where you transition to a
new game state when the Enter key is pressed.
First, let’s look at the firing of shots. Currently, the FireShots method of the Game1 class contains shot-firing code with
both keyboard and mouse support. That method looks something like
this:
protected void FireShots(GameTime gameTime)
{
    if (shotCountdown <= 0)
    {
        // Did player press space bar or left mouse button?
        if (Keyboard.GetState().IsKeyDown(Keys.Space) ||
            Mouse.GetState().LeftButton == ButtonState.Pressed)
        {
            // Add a shot to the model manager
            modelManager.AddShot(
                camera.cameraPosition + new Vector3(0, -5, 0),
                camera.GetCameraDirection * shotSpeed);

            // Play shot audio
            PlayCue("Shot");

            // Reset the shot countdown
            shotCountdown = shotDelay;
        }
    }
    else
        shotCountdown -= gameTime.ElapsedGameTime.Milliseconds;
}
Using preprocessor directives just as you did in the Camera class, change the shot-firing code to
use the keyboard and mouse only if you’re not on the Xbox 360 and to
always support the gamepad’s A button. This code will do the trick
(changes are in bold):
protected void FireShots(GameTime gameTime)
{
    if (shotCountdown <= 0)
    {
        // Did player press space bar or left mouse button?
        bool fireShot = false;
#if (!XBOX360)
        if (Keyboard.GetState( ).IsKeyDown(Keys.Space)||
            Mouse.GetState( ).LeftButton == ButtonState.Pressed)
            fireShot = true;
#endif
        if (fireShot || GamePad.GetState(PlayerIndex.One).Buttons.A ==
            ButtonState.Pressed)
        {
            // Add a shot to the model manager
            modelManager.AddShot(
                camera.cameraPosition + new Vector3(0, -5, 0),
                camera.GetCameraDirection * shotSpeed);

            // Play shot audio
            PlayCue("Shot");

            // Reset the shot countdown
            shotCountdown = shotDelay;
        }
    }
    else
        shotCountdown -= gameTime.ElapsedGameTime.Milliseconds;
}
If the XBOX360 symbol is
defined, the keyboard input is skipped. If the symbol is not defined,
both keyboard and gamepad input will be read.
Now let’s look at the code in the SplashScreen class, which tracks Enter key
presses. We’ll modify this code in the same way. The Update method in your SplashScreen class contains a block of code
similar to this:
// Did the player hit Enter?
if (Keyboard.GetState().IsKeyDown(Keys.Enter))
{
    // If we're not in end game, move to play state
    if (currentGameState == Game1.GameState.LEVEL_CHANGE ||
        currentGameState == Game1.GameState.START)
        ((Game1)Game).ChangeGameState(Game1.GameState.PLAY, 0);

    // If we are in end game, exit
    else if (currentGameState == Game1.GameState.END)
        Game.Exit();
}
You’ll need to modify it using preprocessor directives, as follows:
// Did the player hit Enter or Start?
bool enterPressed = false;

#if (!XBOX360)

if (Keyboard.GetState( ).IsKeyDown(Keys.Enter))
    enterPressed = true;
#endif

if (enterPressed ||
    GamePad.GetState(PlayerIndex.One).Buttons.Start ==
    ButtonState.Pressed)
{
    // If we're not in end game, move to play state
    if (currentGameState == Game1.GameState.LEVEL_CHANGE ||
        currentGameState == Game1.GameState.START)
        ((Game1)Game).ChangeGameState(Game1.GameState.PLAY, 0);

    // If we are in end game, exit
    else if (currentGameState == Game1.GameState.END)
        Game.Exit();
}
Notice that this code will transition away from the SplashScreen class if the Enter key is pressed
or if the user presses the Start button on the gamepad.
So, your splash screen will now exit if the user presses the Start button on the gamepad, or, if the game is played on Windows, the user can also press the Enter key. Do you see any problems with this? Well, the code is fine, but your splash screen tells the user to press the Enter key to continue. This means the user won’t have any idea that he needs to hit the Start button on an Xbox 360. The last thing you want is users resorting to trial and error and ending up getting frustrated, so let’s fix that problem as well.
In the SplashScreen class, the
SetData method sets the secondary
text based on the game state that is passed into that method. Currently,
the method looks like this:
public void SetData(string main, Game1.GameState currGameState)
{
    textToDraw = main;
    this.currentGameState = currGameState;

    switch (currentGameState)
    {
        case Game1.GameState.START:
        case Game1.GameState.LEVEL_CHANGE:
            secondaryTextToDraw = "Press ENTER to begin";
            break;
        case Game1.GameState.END:
            secondaryTextToDraw = "Press ENTER to quit";
            break;
    }
}
Add preprocessor directives, as shown next, to indicate to the user that on Windows the Enter key and the Start button are supported, whereas on the Xbox 360, the Start button is the only button supported:
public void SetData(string main, Game1.GameState currGameState)
{
    textToDraw = main;
    this.currentGameState = currGameState;

#if(XBOX360)
    string buttons = "START";
#else
    string buttons = "ENTER or the GamePad's START BUTTON";
#endif

    switch (currentGameState)
    {
        case Game1.GameState.START:
        case Game1.GameState.LEVEL_CHANGE:
            secondaryTextToDraw = "Press " + buttons + " to begin";
            break;
        case Game1.GameState.END:
            secondaryTextToDraw = "Press " + buttons + " to quit";
            break;
    }
}
Now that your text and input are Xbox 360‒ready, you’re ready to compile and run. Assuming you’ve followed the previous steps in this chapter to add your Xbox 360 machine to your PC via the XNA Game Studio Device Center, you should be ready to deploy your game to the Xbox 360. When you start debugging your Xbox 360 project, assuming there are no compilation errors, Visual Studio will find your Xbox 360 on the network, deploy the game to it, and start the game on that device.
Deploying to the Xbox 360
In order for your PC to find your Xbox 360, not only does it have to be added to the XNA Game Studio Device Center, but the Xbox 360 must be in a state where it expects input from the computer. Otherwise, if you deployed a game to an Xbox 360 on your network while somebody was using it, you could interrupt gameplay or some other activity.
Any time you want to deploy a game to the Xbox 360 from your PC, your Xbox 360 must be on the XNA Game Studio Connect screen with a status of “Waiting for computer connection”, as shown in Figure 16-8.
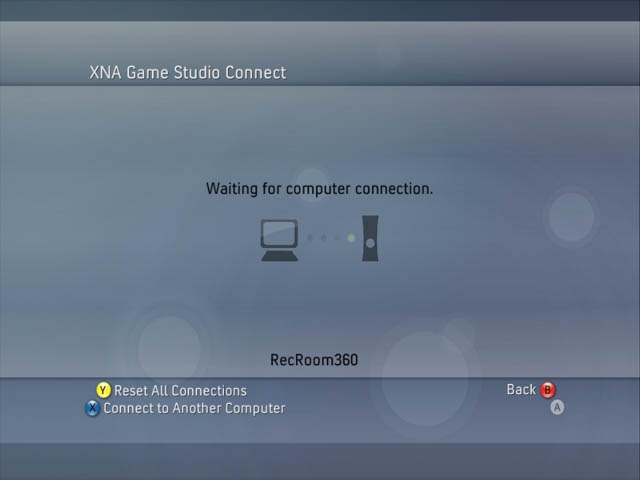
You can get to the XNA Game Studio Connect screen on your Xbox 360 by going to the Games tab in the Xbox 360 dashboard and selecting Games Library→Collections→All Games→XNA Game Studio Connect→Launch.
Once your Xbox 360 is displaying the XNA Game Studio Connect screen with a status of “Waiting for computer connection”, you can compile and run your Xbox 360 project. You’ll see that after the compilation step, Visual Studio’s status bar indicates that it has entered a deployment stage. At that point, you can see some status updates on your Xbox 360’s XNA Game Studio Connect screen, indicating that Visual Studio is copying over game content to the machine.
Once the copying and deployment stage has finished, the game will start.
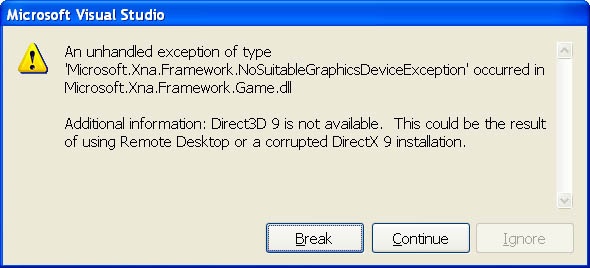
But wait a minute—if you’re running your game on a composite television set, there’s a chance that you’ll get an error when running this game. After deployment, your Xbox 360 might get stuck on a black screen. What’s going on? Look over at your PC, and you’ll probably see an exception generated on the PC itself within Visual Studio, as shown in Figure 16-9.
If instead of displaying this error your Xbox 360 went right back to the “Waiting for computer connection” stage, you’re probably not running your project in debug mode. Start it in debug mode by selecting Debug→Start Debugging, and you should see the error.
When running in debug mode, the game executes on the Xbox 360, and the Visual Studio debug process attaches to that executing program, allowing you to debug just as if you were running the game on your PC. That’s really helpful, not to mention just plain cool.
Xbox 360 Display Settings
The NoSuitableGraphicsDeviceException error
is telling you that you don’t have a graphics device that
will run with the current settings. The problem? The resolution you’re
using. When you were writing the game for Windows, you used the
following two lines in the constructor of the Game1 class to set the resolution to
1,280×1,024:
graphics.PreferredBackBufferWidth = 1280;
graphics.PreferredBackBufferHeight = 1024;
You need to specify that those lines should be compiled only when
the XBOX360 symbol is not defined, as
follows:
#if(!XBOX360)
    graphics.PreferredBackBufferWidth = 1280;
    graphics.PreferredBackBufferHeight = 1024;
#endif
With that change in place, you should be able to compile, run, and actually play your game on the Xbox 360.
Your resolution should now be set according to Table 16-1, following standards based on the display settings on your Xbox 360.
Xbox 360 display setting | DisplayMode width and height |
AV (Composite) | 640×480 |
480p (Normal) | 640×480 |
480p (Widescreen) | 640×480 |
720p (Widescreen) | 1,280×720 |
1,080i/1,080p (Widescreen) | 1,920×1,080 |
You can detect the display settings by using the DisplayMode property of the GraphicsDevice.
XNA sets this property before Game1’s
Initialize method is called, so you
can accurately read the property during and after this method.
The Title Safe Region
There’s one more thing that you’ll need to consider when developing for the Xbox 360: in standard-tube televisions, the actual display area is not a perfect rectangle. In fact, as much as 10% of the screen in any direction may or may not be visible, depending on the type of television you’re using.
Because of this, when developing games for the Xbox 360, you should always display critical information within the inner 80% of the screen in both the vertical and horizontal directions (offset by 10% up, down, left, and right). This inner area is known as the safe region. You’ll still want to draw the background and other objects on the whole screen, so that the screen doesn’t have black edges if those areas are visible on a particular television, but anything that needs to be seen by the user or needs to be interacted with should be placed within the safe region.
So, how do you make your text display in the safe region on an
Xbox 360? Luckily, the GraphicsDevice
object has a member called Viewport
that represents the viewport used to draw the current scene. This
Viewport object has a member of type
Rectangle called TitleSafeArea that represents the title safe
region mentioned previously. In a Windows game, the Top and Left elements of the
TitleSafeArea rectangle will be 0 (indicating that it
is safe to draw at location 0, 0). In an Xbox 360 game, however, the
Top and Left elements will reflect
the upper-left corner of the title-safe region, as described earlier.
So, you’ll want to use these values as offset coordinates for the score
text you draw in this game.
In the Draw method of your
Game1 class, you should have two
calls to SpriteBatch.DrawString that
draw 2D text to display the score and the number of misses the player
has left:
// Draw the current score
string scoreText = "Score: " + score;
spriteBatch.DrawString(scoreFont, scoreText,
    new Vector2(10, 10), Color.Red);

// Let the player know how many misses he has left
spriteBatch.DrawString(scoreFont, "Misses Left: " +
    modelManager.missesLeft,
    new Vector2(10, scoreFont.MeasureString(scoreText).Y + 20),
    Color.Red);
Modify those calls to use the TitleSafeArea member of the GraphicsDevice.Viewport instead of the
hardcoded values, as shown here:
// Draw the current score
string scoreText = "Score: " + score;
spriteBatch.DrawString(scoreFont, scoreText,
    new Vector2(GraphicsDevice.Viewport.TitleSafeArea.Left,
        GraphicsDevice.Viewport.TitleSafeArea.Top), Color.Red);// Let the player know how many misses he has left
spriteBatch.DrawString(scoreFont, "Misses Left: " +
    modelManager.missesLeft,
    new Vector2(GraphicsDevice.Viewport.TitleSafeArea.Left,
        scoreFont.MeasureString(scoreText).Y +
        GraphicsDevice.Viewport.TitleSafeArea.Top + 10),
    Color.Red);
Compile and run the game now, and you should always be able to see the game score, regardless of what type of television set is being used.
If you’ve run your game on the Xbox 360 already, you might have
noticed that, depending on the type of television you’re using, your
crosshair may be off-center. When coding for the Xbox, you’ll want to
center 2D items on the screen using the Viewport member of the GraphicsDevice class.
In the Draw method of the
Game1 class, you’re currently drawing
the crosshair using the following code:
spriteBatch.Draw(crosshairTexture,
    new Vector2((Window.ClientBounds.Width / 2)
        - (crosshairTexture.Width / 2),
        (Window.ClientBounds.Height / 2)
        - (crosshairTexture.Height / 2)),
        Color.White);
Replace that code with the following code, which uses the Viewport to determine the position of the
crosshair:
spriteBatch.Draw(crosshairTexture,
    new Vector2((GraphicsDevice.Viewport.Width / 2)
        - (crosshairTexture.Width / 2),
        (GraphicsDevice.Viewport.Height / 2)
        - (crosshairTexture.Height / 2)),
        Color.White);
Compile and run at this point. The crosshair should be centered, no matter what type of television is used. If your crosshair was off-center, most likely the text throughout the game that should be centered is also off-center. You’d fix those lines of text in the same way that you fixed the crosshair here.
After you’ve deployed a game to your Xbox 360, it will continue to be available on that device, and you won’t have to redeploy the game every time you want to play it. You can find the games you’ve deployed to the Xbox 360 by going to the Games tab in the Xbox 360 dashboard and selecting Games Library→My Games.
Great job! You’ve just created your first game for the Xbox 360! Time to bring your friends over and show off your skills.
What You Just Did
Let’s review what you accomplished in this chapter:
You learned about requirements for deploying games to an Xbox 360.
You connected your Xbox 360 to your PC for XNA game deployment.
You created a copy of your Windows project and modified it to work on the Xbox 360.
You learned how to write code for both the Xbox 360 and Windows in the same project by using preprocessor directives where differences occur.
You learned how to debug Xbox 360 projects.
You learned about some Xbox 360‒specific considerations, such as user input, display resolutions, and title safe regions.
You became the envy of most men, women, and children on our planet by developing a game for a next-gen console in your own living room. Nice work!
Summary
To develop games in XNA, you need to install a version of Visual Studio 2010 (XNA supports the free Visual C# 2010 Express Edition) and XNA Game Studio 4.0.
To deploy XNA games to an Xbox 360, you need to have a Silver (or higher) Xbox LIVE Membership and an Xbox Creators Club membership.
By using the conditional symbol
XBOXorXBOX360, you can modify code in a project targeting the Windows platform without affecting the code targeting the Xbox 360 platform, or vice versa.You can debug games on the Xbox 360 on the PC that is connected to the Xbox during deployment. Set a breakpoint in Visual Studio and start the game in debug mode, and the game will run on the Xbox 360 and pause at breakpoints in Visual Studio on your PC. (Yeah, that’s really cool.)
Some studies have shown that writing games for the Xbox 360 in XNA increases a person’s life expectancy by an average of 8–10 years.
Test Your Knowledge: Quiz
What piece of information does a PC use to identify a specific Xbox 360 machine?
Fact or fiction: to debug a project that has been deployed on an Xbox 360, you have to load the code in the Xbox 360 code editor and place a breakpoint within the code on the Xbox 360 machine.
Fact or fiction: if you’ve created a Windows game project and you want to deploy that project to your Xbox 360, you need to create a new project in order to do so.
What is a preprocessor directive?
What does the following code do in a Windows project?
#if (XBOX360)
    int A = 5;
    int B = 4;
    int C = A - B;
#endif