
Chapter 11. Creating a First-Person Camera
One of the most important things in a 3D game is the camera. Choosing the best type of camera and implementing it correctly can make or break a game. It matters as much as the storyline, audio, or graphics quality. Although the camera implementation is of paramount importance, in many ways it is a matter of personal preference—a camera that works well for some gamers may not be preferred by others. Many games, therefore, allow players to switch in and out of different camera angles, allowing them to choose the camera that best fits their style of play.
In this chapter, we’ll implement a first-person camera and discuss issues related to moving that camera in 3D space (as in a flight simulator) versus moving a land-based camera.
Components of a Moving 3D Camera
In this chapter, you’ll be starting with the code you finished in Chapter 10. Open that project for use throughout the rest of this chapter.
In Chapters 9 and 10, we discussed setting up a 3D camera
and the basic components that make up a camera in XNA 3D. You created a
camera GameComponent, which you added
to your solutions in previous chapters to enable you to see the
triangles and spaceship models you drew.
As a quick review, the camera is made up of two different matrices: the projection matrix and the view matrix. The projection matrix defines the camera’s viewing frustum, or field of view. Remember that the field of view defines an area in front of the camera that is visible to the camera. The field of view has several components: a camera angle, an aspect ratio, and near and far clipping planes. The projection matrix typically will not change during your game. While your camera will move and rotate in 3D, the viewing frustum usually remains constant.
The view matrix defines where the camera sits in the world and how it is rotated. The view matrix is created from three vectors: the camera’s position, the point the camera is looking at, and a vector indicating which direction is up for the camera. In contrast to the projection matrix, which does not need to change when a camera moves, the view matrix will change constantly to reflect new rotations and positions of the camera.
Let’s take a look at your current Camera class:
using System;
using System.Collections.Generic;
using System.Linq;
using Microsoft.Xna.Framework;
using Microsoft.Xna.Framework.Audio;
using Microsoft.Xna.Framework.Content;
using Microsoft.Xna.Framework.GamerServices;
using Microsoft.Xna.Framework.Graphics;
using Microsoft.Xna.Framework.Input;
using Microsoft.Xna.Framework.Media;
using Microsoft.Xna.Framework.Net;
using Microsoft.Xna.Framework.Storage;


namespace _3D_Game
{

    public class Camera : Microsoft.Xna.Framework.GameComponent
    {
        //Camera matrices
        public Matrix view { get; protected set; }
        public Matrix projection { get; protected set; }

        public Camera(Game game, Vector3 pos, Vector3 target, Vector3 up)
            : base(game)
        {
            view = Matrix.CreateLookAt(pos, target, up);

            projection = Matrix.CreatePerspectiveFieldOfView(
                MathHelper.PiOver4,
                (float)Game.Window.ClientBounds.Width /
                (float)Game.Window.ClientBounds.Height,
                1, 3000);
        }

        public override void Initialize()
        {
            // TODO: Add your initialization code here

            base.Initialize();
        }        public override void Update(GameTime gameTime)
        {
            // TODO: Add your update code here

            base.Update(gameTime);
        }
    }
}
Notice that you have specified two variables at the class level: one for the view matrix and one for the projection matrix. The camera represented by this class was designed to be stationary. As mentioned previously, the view matrix represents the location and rotation of the camera. If you’re going to create a camera that can be moved through 3D space, you’re going to have to be able to modify the view matrix.
In fact, rather than modifying the view matrix, you’ll be rebuilding the matrix every frame. Remember that the view matrix is composed of a position vector, a direction vector, and an up vector. By creating class-level variables for each of those vectors, you can modify things like the position of the camera, the direction of the camera, and which direction is up for the camera by simply modifying the appropriate vector variable and then rebuilding the view matrix of the camera with the new vectors.
To move and rotate your camera, you’ll need to add the following
three class-level variables to your Camera class:
// Camera vectors
public Vector3 cameraPosition { get; protected set; }
Vector3 cameraDirection;
Vector3 cameraUp;
These three variables will be used to recreate your camera’s view matrix each frame.
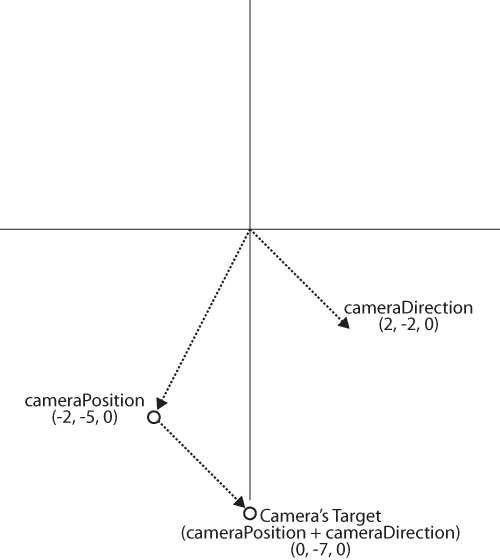
Note that the cameraDirection
variable is not the same as the camera’s target (or the actual
point at which the camera is looking). The view matrix is created by the
Matrix.CreateLookAt method, which takes three parameters: the position, target, and
up vectors for the camera. The second parameter, the camera’s target,
represents the actual point at which your camera will be looking. In
contrast, the cameraDirection
variable represents a relative direction in which your camera is facing,
rather than a target at which the camera is looking. In order to
determine the actual target point that the camera is looking at, you
need to add your cameraPosition and
cameraDirection vectors together (see
Figure 11-1).
This means two important things in relation to your cameraDirection vector. First, instead of passing
cameraDirection as the second
parameter of your Matrix.CreateLookAt method, you’ll need to pass
cameraPosition + cameraDirection.
Second, your cameraDirection vector cannot be (0, 0,
0); the variable must contain a value representing something other than
the origin because it represents the direction in which your camera is
looking, and the vector (0, 0, 0) has no direction.
OK, now that that’s cleared up, go ahead and create a method in
your Camera class that will define
your new view matrix using your three new camera vectors:
private void CreateLookAt(  )
{
    view = Matrix.CreateLookAt(cameraPosition,
        cameraPosition + cameraDirection, cameraUp);
}
Next, you’ll want to set your camera’s Vector3 variables in your constructor. You’re
already accepting those three parameters in the constructor, but
currently you’re not storing them separately; you’re just using them in
the constructor to create a view matrix with the call to Matrix.CreateLookAt. Remove the line of code
in the constructor that builds your view matrix:
view = Matrix.CreateLookAt(pos, target, up);
and replace it with the following code:
// Build camera view matrix
cameraPosition = pos;
cameraDirection = target - pos;
cameraDirection.Normalize(  );
cameraUp = up;
CreateLookAt(  );
This code sets the position and up vectors directly from the parameters received. The direction is derived from the target of the camera minus the position of the camera. Why? Because the target parameter that was passed in is currently treated as the actual camera target, whereas your direction variable represents the general direction in which the camera is facing. If you derive the target from the camera position plus the camera direction, you can also derive the camera direction from the camera target minus the camera position.
Notice that a call to Normalize is being used on the cameraDirection. The Normalize method takes any vector and converts
it to a vector with a magnitude (or length) of one. Why this is done
will become evident shortly. Basically, you’ll be using this vector not
only to represent the direction of the camera, but also to move the
camera forward.
Finally, the call to CreateLookAt creates an initial view matrix
based on the vectors specified.
Moving in a First-Person Camera
With the cameraDirection vector being normalized and representing the direction in which the camera is looking, you can
easily move the camera forward by simply adding the cameraDirection to the cameraPosition. Doing this will move the
camera toward the camera’s target in a straight line. Moving backward is
just as easy: simply subtract the cameraDirection from the cameraPosition.
Because the cameraDirection
vector is normalized (i.e., has a magnitude of one), the camera’s speed
will always be one. To allow yourself to change the speed of the camera,
add a class-level float variable to
represent speed:
float speed = 3;
Next, in your Camera class’s
Update method, add code to move the
camera forward and backward with the W and S keys:
// Move forward/backward
if (Keyboard.GetState(  ).IsKeyDown(Keys.W))
    cameraPosition += cameraDirection * speed;
if (Keyboard.GetState(  ).IsKeyDown(Keys.S))
    cameraPosition −= cameraDirection * speed;
At the end of the Update
method, you’ll want to call your Camera’s CreateLookAt method to rebuild the camera
based on the changes you’ve made to its vectors. Add this line of code
just above the call to base.Update:
// Recreate the camera view matrix
CreateLookAt(  );
Compile and run the game at this point, and you’ll see that when you press the W and S keys, the camera moves closer to and farther from the spaceship. It’s important to note what’s happening here: in our previous 3D examples, you’ve moved objects around by changing the world matrix for those objects, but in this example, instead of moving the object, you’re moving the camera itself.
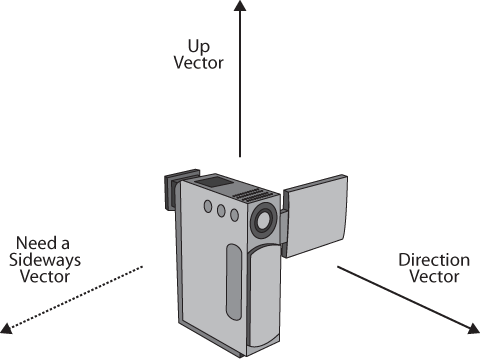
Now that you can move your camera forward and backward, you’ll want to add other movement features. Any good 3D first-person camera also has strafing (or side-to-side movement) support. Your camera vectors are position, direction, and up, so how can you find a vector that will move your camera sideways? We might be able to solve this problem with a little bit of vector math. Think about what you need in order to move sideways: you’ll need a vector that points in the direction that is sideways-on to your camera. If you had that vector, moving sideways would be just as easy as moving forward because you could simply add the sideways vector to the camera’s position vector. As shown in Figure 11-2, you currently have a vector for the camera’s up direction as well as a vector for the direction in which the camera is facing, but you don’t have a vector representing the direction that is sideways-on to the camera.
Here’s where the vector math can help: a cross product is a binary operation performed on two vectors in 3D space that results in another vector that is perpendicular to the two input vectors. Therefore, by taking the cross product of the up and direction vectors of your camera, you will end up with a vector perpendicular to those two vectors (i.e., coming from the side of your camera). This is illustrated in Figure 11-3. The cross product of your negative up and direction vectors will yield a perpendicular vector coming from the other direction (sideways-on to the other side of the camera).
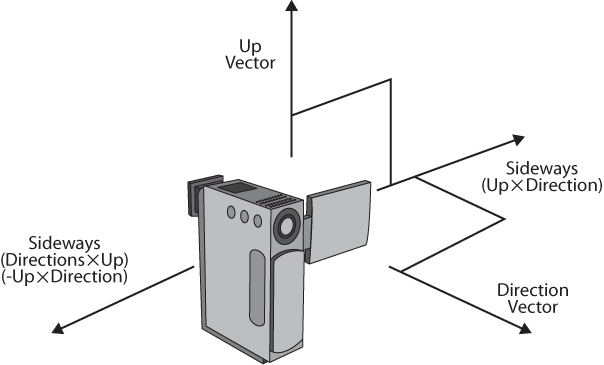
Tip
It’s not critical that you understand how this vector math works, but if you’re curious, feel free to investigate in some math textbooks. All you need to understand for now is that it does indeed work: the cross product of any two vectors yields a third vector perpendicular to the other two, and the cross product of the up and direction vectors of your camera yields a vector indicating the sideways direction for your camera.
It may help to picture a person standing and looking forward. The person’s direction vector would be pointing straight ahead, whereas his up vector would be pointing straight up. The cross product of the up and direction vectors would essentially be the direction the person’s left arm would be pointing in if it were held out perpendicular to both his up and direction vectors. The only vector that fits that criterion would be one that was pointing directly outward from the person’s side.
XNA provides a method that will create a vector based on the cross
product of two other vectors. It’s a static method in the Vector3 class called Cross. Pass in any two vectors to the Cross method, and the resulting vector will be
the cross product of the two vectors passed in.
To enable the camera to move from side to side using the A and D keys, insert the following code immediately after the code you just added, which moves the camera forward and backward:
// Move side to side
if (Keyboard.GetState(  ).IsKeyDown(Keys.A))
    cameraPosition += Vector3.Cross(cameraUp, cameraDirection) * speed;
if (Keyboard.GetState(  ).IsKeyDown(Keys.D))
    cameraPosition −= Vector3.Cross(cameraUp, cameraDirection) * speed;
Compile and run the game, and you’ll see that you now have full camera movement with the WASD keys. Very cool! You’re ready to work on rotating your camera in 3D space.
Rotations in a First-Person Camera
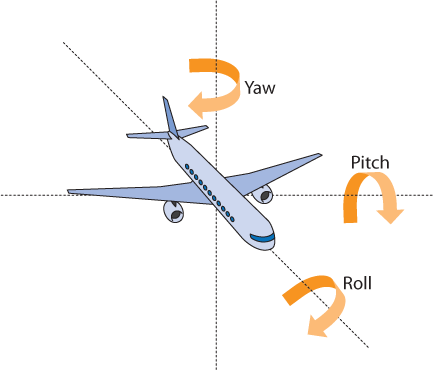
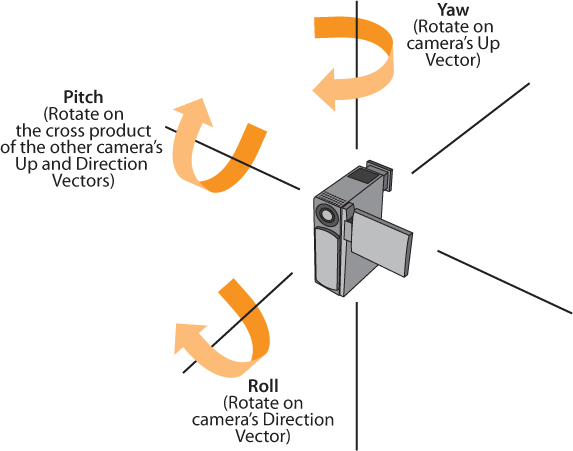
All camera rotations are related to the same rotations that were discussed previously in relation to the rotation of 3D objects in XNA. Essentially, a camera can yaw, pitch, and roll just like an object can. As a reminder, yaw, pitch, and roll rotations are pictured in Figure 11-4.
In the classes in which I’ve taught XNA, one of the things that has traditionally been difficult for some students to understand is the fact that yaw, pitch, and roll rotations applied to objects or cameras that move and rotate in 3D don’t necessarily correspond to rotations around the X-, Y-, and Z-axes.
For example, picture the camera you currently have in your game. The camera sits on the Z-axis and faces in the negative Z direction. If you wanted to rotate the camera in a roll, you could rotate the camera around the Z-axis. However, what would happen if the camera rotated to turn 90° and was now looking in the direction of positive X? If you performed a rotation around the Z-axis at this point, you’d rotate in a pitch rather than a roll.
It’s easier to think of yaw, pitch, and roll as related to the vectors available to you in your camera. For example, a yaw, rather than rotating around the Y-axis, rotates around the camera’s up vector. Similarly, a roll rotates around the camera’s direction vector, and a pitch rotates around a vector coming out of the side of the object, perpendicular to the up and direction vectors. Any idea how you’d get that perpendicular vector? That’s right, you’ve used it before to add strafing ability: it’s the cross product of the up and direction vectors. Figure 11-5 illustrates how yaw, pitch, and roll rotations are accomplished in a 3D camera.
Which of these rotations you choose to implement in your particular game completely depends on what type of experience you want to give the player. For example, a typical space simulator will have the ability to yaw, pitch, and roll in an unlimited fashion. A helicopter simulator may allow yaw, pitch, and roll to some extent, but might not allow you to perform a complete roll (a fairly difficult task in a helicopter). A land-based shooter may allow only a yaw and a pitch, though some games allow roll rotations for special moves such as tilting your head to look around a corner.
Once you’ve decided which of these rotations you’ll allow in your camera, the next step is to implement them. Each of these camera rotations can be accomplished by rotating one or more of your camera’s vectors. For a yaw, pitch, or roll, it helps to evaluate the rotation using these steps: first, determine which of the three camera vectors need to rotate; second, figure out what axis you will need to rotate those vectors around; and third, determine which methods will be needed to accomplish this.
Rotating a Camera in a Yaw
Let’s start by creating a yaw for the camera. Of the three camera vectors (position, direction, and up), the only one that changes when performing a yaw is the direction vector. Picture a person standing up and performing a yaw rotation (moving her head from side to side). The person’s up vector doesn’t change, and neither does her position, but the direction vector (the direction in which she is looking) definitely changes.
The axis you want to rotate the direction vector around for a
yaw is the camera’s up vector. The method used to rotate a Vector3 is Vector3.Transform, which takes two
parameters: the source or original vector, and a matrix representing a
rotation or translation to apply to the vector.
Tip
When performing a yaw rotation for a camera, why rotate around the camera’s up vector instead of the Y-axis?
The Y-axis might not always be up for a camera. It might be for a land-based shooter game, but consider a flight simulator that freely flies and rotates in three dimensions. In that case, you’d always want to yaw around the up vector of the camera.
Before you add the Vector3.Transform to perform the yaw, you’ll
want to add some code to allow your camera to capture mouse movement.
A typical first-person configuration uses the WASD keys for movement
and the mouse for rotating the camera. So, to capture mouse movement,
add the following class-level variable to your Camera class:
MouseState prevMouseState;
Next, in the Initialize
method of your Camera class, set
the initial position of the mouse cursor to the middle of the screen.
Also, add the code to initialize the new variable:
// Set mouse position and do initial get state
Mouse.SetPosition(Game.Window.ClientBounds.Width / 2,
    Game.Window.ClientBounds.Height / 2);
prevMouseState = Mouse.GetState(  );
Remember that the Mouse.GetState call returns the mouse
position. To find out how far the mouse has actually moved, you need
to capture the state from the previous frame and compare it to the
current state in each frame. You initialize the state variable in the
Initialize method so that you have
something to compare against in the first frame (the first time
Update is called).
Now you’re ready to code your yaw rotation. In the Update method of your Camera class, add the following code just
above the call to CreateLookAt:
// Yaw rotation
cameraDirection = Vector3.Transform(cameraDirection,
    Matrix.CreateFromAxisAngle(cameraUp, (-MathHelper.PiOver4 / 150) *
    (Mouse.GetState(  ).X − prevMouseState.X)));

// Reset prevMouseState
prevMouseState = Mouse.GetState(  );
In this code, you’re assigning the cameraDirection vector the value given in
the Vector3.Transform call. By passing in
cameraDirection as the first
parameter, you ensure that the Vector3.Transform method will apply the
rotation specified in the second parameter to the cameraDirection and return the resulting
vector. The matrix specified in the second parameter is created from
the CreateFromAxisAngle method,
which creates a rotation around a specific axis (in this case, the
camera’s up vector). The angle of rotation is determined by how much
the mouse has moved horizontally.
Compile and run the game at this point, and you’ll see that not only can you move in 3D space, but now you can yaw the camera left and right. It may seem a bit awkward because you don’t have full rotation of your camera yet, but that will come shortly.
Tip
If your camera moves backward relative to your mouse (e.g., if
you move the mouse right and it rotates the camera left), you’ve
probably left off the negative sign in front of the MathHelper.PiOver4 in the code. Add that,
and it should work properly.
Rotating a Camera in a Roll
When rotating in a roll, follow the same steps to figure out what to do: ask yourself what vectors rotate when performing a roll, what axis you would rotate those vectors on, and what methods need to be used.
In a roll, the only camera vector that changes is the camera’s
up vector. The vector that you want to rotate your camera’s up vector
around is the camera’s direction vector. Add the following code to the
Update method of your Camera class, just before the prevMouseState = Mouse.GetState( )
line:
// Roll rotation
if (Mouse.GetState(  ).LeftButton == ButtonState.Pressed)
{
    cameraUp = Vector3.Transform(cameraUp,
        Matrix.CreateFromAxisAngle(cameraDirection,
        MathHelper.PiOver4 / 45));
}
if (Mouse.GetState(  ).RightButton == ButtonState.Pressed)
{
    cameraUp = Vector3.Transform(cameraUp,
        Matrix.CreateFromAxisAngle(cameraDirection,
        −MathHelper.PiOver4 / 45));
}
Run the game now, and you’ll see that with the left and right mouse buttons you can roll your camera left or right. It will probably look a little strange in this example because the only thing that you’re drawing is the spaceship and it is rotating as well, which makes the rotation of your camera seem off.
Let’s make the ship not spin anymore, so you can get a better
sense of how your camera is working. In the ModelManager’s LoadContent method, change the type of ship
that’s being created from a SpinningEnemy to a BasicModel:
models.Add(new BasicModel(
    Game.Content.Load<Model>(@"modelsspaceship")));
Run the game again, and your camera rotations and movements should feel more accurate without the ship spinning on its own.
Rotating a Camera in a Pitch
Coding a pitch is slightly more complicated than coding a yaw or a roll. First, think of what needs to change when you pitch. You may think that just your direction changes, but here’s a question: does your up vector change in a pitch?
This is one place where you’ll need to stop and think about what kind of functionality you want in your camera. Typically, in a flight simulator, you’d rotate both your direction and your up vector in a pitch. The reason? Remember that in a yaw you rotate around your up vector. In a flight simulator, you’ll want to have your up vector change in a roll and a pitch to make your yaw rotation more realistic.
What about pitching in a land-based shooter? Would you want to rotate your up vector in a pitch in that scenario? Again, remember that when you yaw, you do so around the up vector. Imagine hunting down an enemy and looking two or three stories up a wall to see if he’s perched on a ledge. Then, you rotate in a yaw to scan the rest of that level of the building. You’d expect your rotation in that case to be based on the Y-axis—rotating around the up vector (if it was changed by your pitch) would cause an unexpected rotation.
One solution to this is to use the up vector for rotating in a yaw with a flight simulator and use the Y-axis for yaw rotations with land-based cameras. However, there’s another thing to consider here: typically in a land-based shooter you can’t pitch a full 360°. When looking up, typically you can’t look straight up; you can pitch your camera until it is maybe 10–15° away from exactly up, but no further. One reason for this is that in XNA, if the angle between your up vector and your direction vector is small enough, XNA doesn’t know how to draw what you’re telling it to draw, and it will freak out on you a little bit. To avoid this, it’s common to set a limit on how far you can pitch your camera. But if you’re going to set a limit on how much you can pitch, you might as well just not rotate your up vector in a pitch on a game like this.
Either way, these are some things to think about. In this
example, you’re going to use a flight simulator approach, so you’ll be
rotating both the up and the direction vectors. Now that you know what
you’re going to rotate, you need to figure out which axis to rotate
around. The pitch rotates around a vector that runs out from the side
of your camera. Remember using Vector3.Cross to get a vector perpendicular
to the up and direction vectors of your camera when strafing? You’ll
be using that same vector to rotate your direction and up vectors in a
pitch.
In the Update method of the
Camera class, add the following
code just before the prevMouseState = Mouse.GetState( )
line:
// Pitch rotation
cameraDirection = Vector3.Transform(cameraDirection,
Matrix.CreateFromAxisAngle(Vector3.Cross(cameraUp, cameraDirection),
(MathHelper.PiOver4 / 100) *
(Mouse.GetState( ).Y − prevMouseState.Y)));
cameraUp = Vector3.Transform(cameraUp,
Matrix.CreateFromAxisAngle(Vector3.Cross(cameraUp, cameraDirection),
(MathHelper.PiOver4 / 100) *
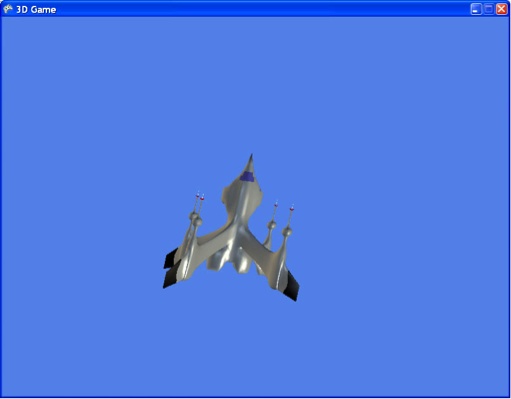
(Mouse.GetState( ).Y − prevMouseState.Y)));Your camera now has full movement and full yaw, pitch, and roll rotation. Run the game and fly around the world to see different angles of the ship that weren’t previously available, as shown in Figure 11-6.
Coding the Camera for the 3D Game
In the previous sections of this chapter, you created a free-flying 3D camera. You’re now going to take that camera and change it to work for the game that you’ll be building throughout the rest of this book. If you want to keep your free-flying camera code, you should make a copy of your project to save the existing code that you have written.
If you download the source code for this chapter, you’ll find the free-flying camera code that you just created in the folder called Flying Camera. The code that will be written and used through the rest of this chapter is located with the source code as well, in the folder called 3D Game.
The game that you’re going to build in the rest of this book will use a stationary camera that can rotate a total of 45° in a pitch and 45° in a yaw. Later, you’ll add some code to send ships flying toward the camera, which you’ll have to shoot down.
Because you won’t be moving your camera and you won’t be rotating
in a roll, you can go into the
Camera class’s Update method and remove the code that enables
that functionality.
To do this, remove the following code (which moves the camera
forward and backward and side to side) from the Update method of the Camera class:
// Move forward/backward
if (Keyboard.GetState(  ).IsKeyDown(Keys.W))
    cameraPosition += cameraDirection * speed;
if (Keyboard.GetState(  ).IsKeyDown(Keys.S))
    cameraPosition −= cameraDirection * speed;// Move side to side
if (Keyboard.GetState(  ).IsKeyDown(Keys.A))
    cameraPosition +=
        Vector3.Cross(cameraUp, cameraDirection) * speed;
if (Keyboard.GetState(  ).IsKeyDown(Keys.D))
    cameraPosition −=
        Vector3.Cross(cameraUp, cameraDirection) * speed;
Also remove the following code, which rolls the camera (also
located in the Update method of the
Camera class):
// Roll rotation
if (Mouse.GetState(  ).LeftButton == ButtonState.Pressed)
{
    cameraUp = Vector3.Transform(cameraUp,
        Matrix.CreateFromAxisAngle(cameraDirection,
        MathHelper.PiOver4 / 45));
}
if (Mouse.GetState(  ).RightButton == ButtonState.Pressed)
{
    cameraUp = Vector3.Transform(cameraUp,
        Matrix.CreateFromAxisAngle(cameraDirection,
        −MathHelper.PiOver4 / 45));
}
In addition, you can also remove the class-level speed variable from the Camera class, as you won’t be using it
anymore.
What you’re left with is a camera that yaws and pitches 360° in each direction. However, you want to cap that at 22.5° in each direction (for a total of 45° in a yaw and 45° in a pitch).
To do this, you’ll need to add four variables at the class level
in the Camera class (two representing
the total rotation allowed in pitch and yaw and two representing the
current rotation in pitch and yaw):
// Max yaw/pitch variables
float totalYaw = MathHelper.PiOver4 / 2;
float currentYaw= 0;
float totalPitch = MathHelper.PiOver4 / 2;
float currentPitch = 0;
Next, you’ll need to modify the code that performs the yaw and
pitch rotations in the Update method
of your Camera class. Each time you
rotate, you’ll need to add the angle of rotation to the currentYaw and currentPitch variables, respectively. Then,
you’ll perform the yaw rotation only if the absolute value of the
currentYaw variable plus the new yaw
angle is less than the value of the totalYaw variable. You’ll place the same
restriction on pitch rotation as well.
Replace the following yaw code in the Camera class’s Update method:
// Yaw rotation
cameraDirection = Vector3.Transform(cameraDirection,
    Matrix.CreateFromAxisAngle(cameraUp, (-MathHelper.PiOver4 / 150) *
    (Mouse.GetState(  ).X − prevMouseState.X)));
with this:
// Yaw rotation
float yawAngle = (-MathHelper.PiOver4 / 150) *
        (Mouse.GetState(  ).X − prevMouseState.X);

if (Math.Abs(currentYaw + yawAngle) < totalYaw)
{
    cameraDirection = Vector3.Transform(cameraDirection,
        Matrix.CreateFromAxisAngle(cameraUp, yawAngle));
    currentYaw += yawAngle;
}
Next, replace the following pitch code in the Camera class’s Update method:
// Pitch rotation
cameraDirection = Vector3.Transform(cameraDirection,
    Matrix.CreateFromAxisAngle(Vector3.Cross(cameraUp, cameraDirection),
    (MathHelper.PiOver4 / 100) *
    (Mouse.GetState(  ).Y − prevMouseState.Y)));

cameraUp = Vector3.Transform(cameraUp,
    Matrix.CreateFromAxisAngle(Vector3.Cross(cameraUp, cameraDirection),
    (MathHelper.PiOver4 / 100) *
    (Mouse.GetState(  ).Y − prevMouseState.Y)));
with this:
// Pitch rotation
float pitchAngle = (MathHelper.PiOver4 / 150) *
    (Mouse.GetState(  ).Y − prevMouseState.Y);

if (Math.Abs(currentPitch + pitchAngle) < totalPitch)
{
    cameraDirection = Vector3.Transform(cameraDirection,
        Matrix.CreateFromAxisAngle(
            Vector3.Cross(cameraUp, cameraDirection),
        pitchAngle));

    currentPitch += pitchAngle;
}
Compile and run your game again, and you’ll see that you can rotate the camera in pitch and yaw, but the angle is limited to 45° in the yaw and pitch directions.
In the next chapter, you’ll take this camera setup and add some logic for the 3D game. But first, let’s look at what you did in this chapter.
What You Just Did
You’ve made some real progress in this chapter. Here’s a recap:
You created a 3D flying camera that moves forward and backward as well as from side to side.
You added rotations to the flying camera to rotate in yaw, pitch, and roll.
You modified the 3D flying camera code to build a customized, stationary camera with 45° rotation limits in the yaw and pitch directions.
Summary
Choosing the best type of camera for your game is often as important as creating great graphics, exciting plots, or any other aspect of the game.
Certain cameras rotate differently (e.g., a 3D space simulator typically has complete rotation in all directions, a helicopter has some limited yaw and roll capabilities, and a land-based camera typically will always yaw around the Y-axis rather than the up vector).
When moving a camera in 3D space, the projection matrix typically won’t change, but the view matrix changes to reflect changing positions and rotations.
Chuck Norris doesn’t code XNA in 3D. Instead, he uses four dimensions: X, Y, Z, and Power.
Test Your Knowledge: Quiz
When performing a yaw rotation with a camera, what camera vector(s) rotate(s)? What axis would you rotate on?
When performing a roll rotation with a camera, what camera vector(s) rotate(s)? What axis would you rotate on?
When performing a pitch rotation with a camera, what camera vector(s) rotate(s)? What axis would you rotate on?
What famous holiday includes an event titled the “Airing of Grievances”?
Test Your Knowledge: Exercise
Remember that to move a 3D camera forward, you use the following code:
cameraPosition += cameraDirection * speed;
There
is a small problem with this method, however, when it’s applied to
land-based cameras. Essentially, to eliminate the ability to “fly” when
looking up, you remove the Y component of the cameraDirection vector prior to moving the
camera with this line of code. This causes your camera to stay at the
same Y value, which keeps the camera on the ground.
However, consequently the higher you pitch your camera, the slower
you end up moving. For example, if your cameraDirection vector was (10, 2, 0) when you
removed the Y component, you would end up with the vector (10, 0, 0) and
you’d move at that speed. If your camera was pitched at a larger angle
and your cameraDirection vector was
(2, 10, 0), the resulting vector after removing the Y component would be
(2, 0, 0) and you’d move forward at that speed.
Convert your 3D Flying Camera solution to a land-based camera and solve this problem so that when moving forward and backward your camera moves at the same speed, regardless of the pitch angle. Use the code you created in the first half of this chapter.
Hint: remember that Vector3.Normalize will take any Vector3 and give it a magnitude or length of
1.