
Chapter 6. Sound Effects and Audio
All right, you have a solid design and you’re ready to move forward. At the end of the previous chapter, you ended up with something that actually resembles a game: you have a user-controlled sprite that can move around the screen, and once it comes in contact with one of the “enemy” sprites, the game ends. The main drawback is that the enemy sprites don’t move or do anything yet, so the game really isn’t all that great—but nonetheless, it’s a good start.
For now, let’s focus on another problem: there’s no audio in your game. What kind of game has no audio or sound effects? I’ll tell you: a lame game. We aren’t in the business of making idiotic applications—we’re XNA developers, and that means we’re going to make something awesome. So let’s do it. In this chapter, you’ll add some audio and sound effects to your application.
With the XNA Framework 4.0, there are a couple of different ways to implement sound. In previous versions of XNA, developers used a tool called the Microsoft Cross-Platform Audio Creation Tool (XACT) exclusively for audio. Using XACT, developers can create compilations of sound files that are processed by the content pipeline and implemented using the XNA Framework’s sound API. With XNA 3.0, the XNA team added a separate API for use in Microsoft Zune development. In XNA 4.0, both methods are still available. XACT is more robust and powerful but is available only in the HiDef game profile, whereas the simplified sound API is supported in both profiles. In this chapter, I show you how to implement sound using both methods.
Why use the more complicated XACT method when the simplified sound API is supported on all platforms? In many respects, XACT provides you with a mini sound studio. You can easily edit the volume, pitch, looping, and other properties of sounds without manipulating any code. In addition, there are other great features of XACT that you’ll use throughout this book.
The XACT method of implementing audio offers features beyond those available using the simplified sound API, but as a trade-off, it is more complicated. In order to help you learn more about it, most of the examples in this chapter and the rest of the book will use XACT for audio. However, using the simplified audio API for the examples in this book will also work (with some additional coding to handle things that XACT can take care of for you at design time). Feel free to use XNA’s simplified audio API rather than XACT throughout the rest of this book if you prefer, but keep in mind that the audio portions of your code will differ from the code examples used in these chapters.
Using XACT
When developing games for the PC and the Xbox 360, developers can use either the XACT engine or the simplified sound API. However, there are some unique advantages to implementing sound using XACT, such as the ability to create custom tracks, edit sound quality, and create looping and other effects outside of your code.
This chapter uses the code you ended with in Chapter 5. Open that solution and add a new folder where you’ll put all the audio files that you work with in this chapter. Do this by right-clicking the AnimatedSpritesContent project in Solution Explorer and selecting Add→New Folder. Name the new folder Audio.
To implement sound using XACT, you need some .wav files. Download the source code for this chapter and save it to your hard drive. You’ll find two .wav files (start.wav and track.wav) with the Chapter 6 source code, located in the AnimatedSpritesAnimatedSpritesAnimatedSpritesContentAudio folder.
Copy the start.wav and track.wav files to your project’s AnimatedSpritesContentAudio directory in Windows Explorer. In previous examples, when you’ve copied resources into the Content node of your project directory, you’ve then gone into Visual Studio and added the items to your project in Solution Explorer as well. Remember that adding the files to the project in this way allows the resources to be picked up and processed by the content pipeline. In this case, however, you don’t want to do that, because sound is treated slightly differently than other resource types. When dealing with audio files using XACT, you’ll want to have the actual sound files located within the project directory, but you’ll be building an audio project made up of those sounds through the XACT tool, and that is the only file that will actually be added to your project in Visual Studio. The content pipeline will process only the XACT audio project file and will process your audio files through that XACT audio project file.
In this example, you’ll add a sound that will play when the game is first launched, and another sound that you’ll use as a looping soundtrack during gameplay. The start.wav file will be played when the game starts, and the track.wav file will be looped as a soundtrack.
Once you’ve copied the files to your project’s AnimatedSpritesContentAudio directory, launch the XACT tool by selecting Start→All Programs→Microsoft XNA Game Studio 4.0→Tools→Microsoft Cross-Platform Audio Creation Tool3 (XACT3).
Tip
On Windows Vista and Windows 7, you’ll want to launch XACT with administrator privileges. To do that, right-click on the previously-mentioned Start menu item and select “Run as Administrator.”
When the XACT window opens, select File→New Project. Save your project in your XNA game project’s AnimatedSpritesContentAudio directory, and call it GameAudio.xap.
Once you’ve created your new project, you need to create wave and sound banks. Right-click the Wave Banks node on the left, and select New Wave Bank. XACT will open a new window for your wave bank, and you’ll be able to edit its name under the Wave Banks node on the left side of the XACT window. Hit Enter to accept the default wave bank name, “Wave Bank.”
Next, you’ll need to create a sound bank. You’ll do this in the same way that you just created the new wave bank. Right-click Sound Banks on the left and select New Sound Bank. Hit Enter to accept the default sound bank name, “Sound Bank.”
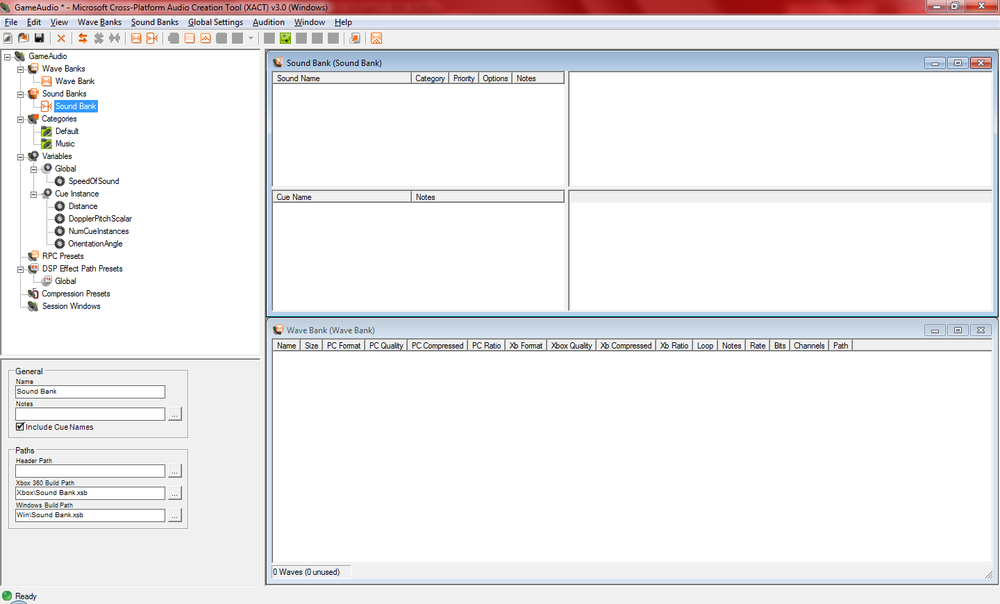
XACT will have opened two windows for you (one for your new sound bank and one for your new wave bank). You can rearrange them to make it easier to work with this project by selecting Window→Tile Horizontally. The resulting window should look something like Figure 6-1.
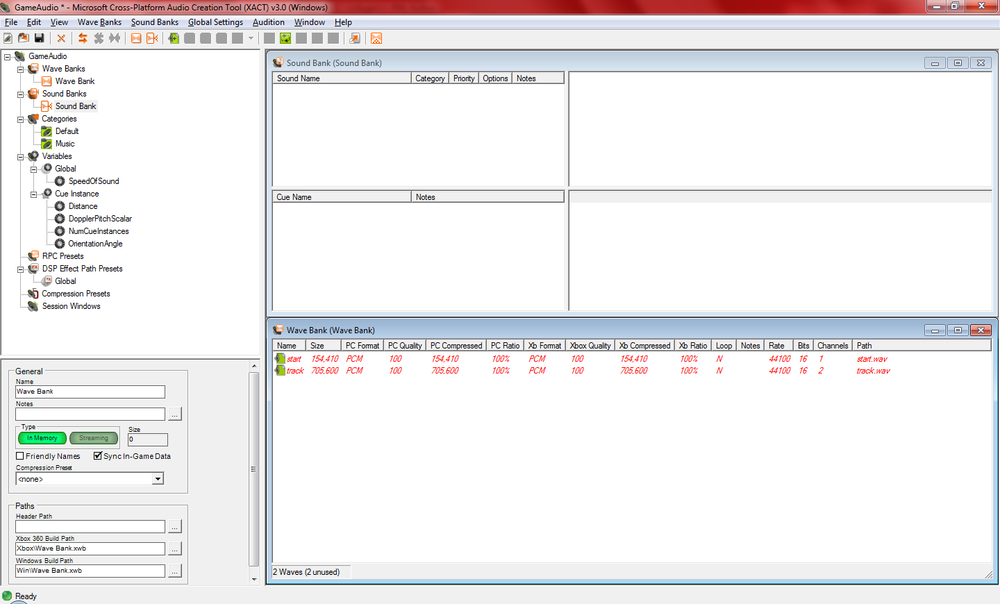
Now you’ll need to add your wave files to your wave bank. Right-click anywhere in the wave bank window and select Insert Wave File(s)…. Browse to the start.wav and track.wav files, which should now be in your game project’s AnimatedSpritesContentAudio directory, and select them to add them to the wave bank. You should see the .wav files appear in red in the Wave Bank window, as shown in Figure 6-2.
Now look at the sound bank window. It is divided into two sections: the top section contains a list of sound names, and the bottom section contains a list of cue names. When dealing with audio using XACT in XNA, you use something called a cue to access audio and sound effects. In the XACT project file, cues are made up of one or more sounds, and sounds are made up of one or more wave bank entries. Cues and sounds are listed in the two sections of the Sound Bank window, and wave bank entries are listed in the Wave Bank window.
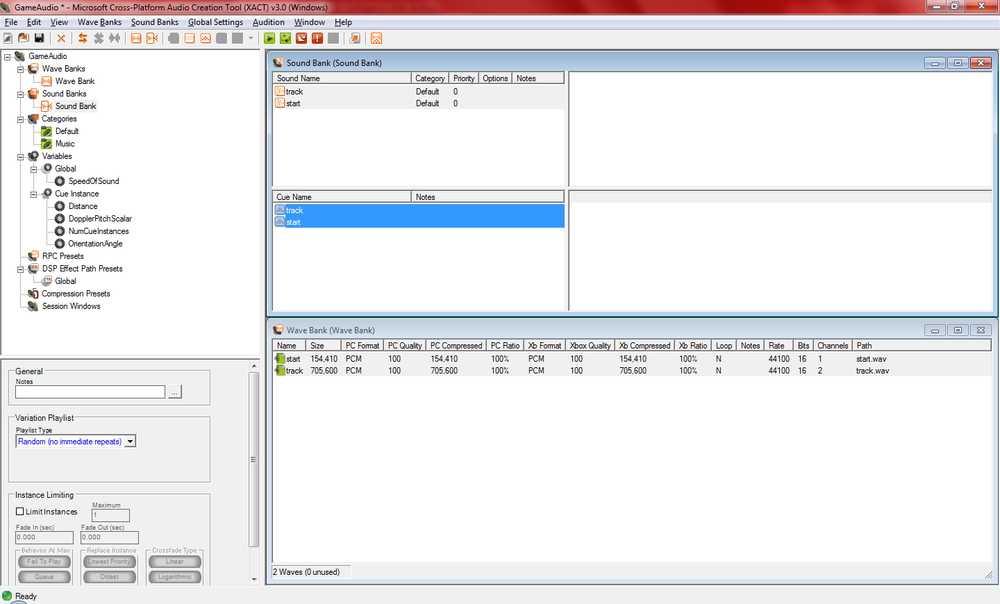
You need to create a cue and a sound entry for your start.wav file and your track.wav file. To do this, drag both items from the Wave Bank window (where you just added them) and drop them into the Sound Bank window, in the Cue Name section.
Tip
If you drop the wave entries into the Sound Bank window in the Sound Name section, XACT will only create a sound name for your wave bank entries. You need a sound entry and a cue entry for each wave bank item, and dropping the wave bank items into the Cue Name section of the Sound Bank window will create both of these for you.
After you’ve dropped your wave bank items into the Cue Name section of the Sound Bank window, your XACT project window should look something like Figure 6-3.
You’re ready to save your project and start working on the XNA code in Visual Studio, but before you do that, let’s talk about a few of the added features of XACT. You can play your sounds, cues, and waves from XACT to ensure that you have the correct sound files and to make sure everything sounds the way you want. However, to play sounds from XACT, you’ll need to start the XACT Auditioning Utility.
XACT communicates with the XACT Auditioning Utility to play sounds for development purposes while you’re working in XACT. To start the XACT Auditioning Utility, select Start→All Programs→Microsoft XNA Game Studio 4.0→Tools→XACT Auditioning Utility.
Tip
As with the XACT tool, when using Windows Vista and Windows 7, you should start the XACT Auditioning Utility with administrator privileges (right-click and select “Run as Administrator”).
Because XACT uses networking protocols to communicate with the Auditioning Utility, you will need to unblock the ports for both XACT and the Auditioning Utility. If you followed the steps in Chapter 2, these ports should have been unblocked when you installed XNA Game Studio 4.0.
Warning
If you have anything running on port 80, the auditioning tool will not work, because it uses that port to communicate with XACT. Also, if you have Internet Information Services (IIS) installed on your PC, be aware that when IIS is running, it will block the communication between XACT and the XACT Auditioning Utility. You’ll need to stop the service before you’ll be able to play audio files through the XACT Auditioning Utility.
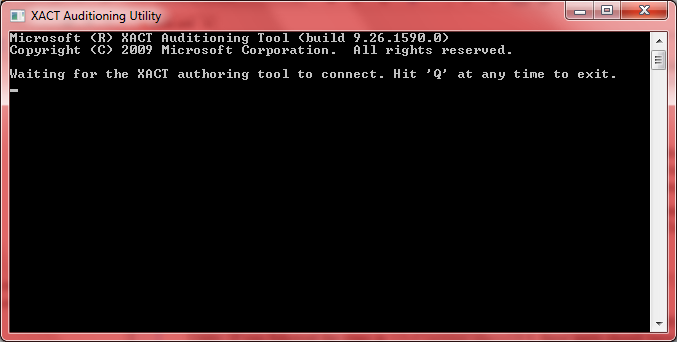
Once you’ve started the XACT Auditioning Utility, it will sit in a “Waiting for the XACT authoring tool to connect” state (see Figure 6-4) until you play sounds from within XACT itself.
With the Auditioning Utility running, you can right-click on any sound, cue, or wave within XACT and select Play to hear the sound.
In addition to playing sounds within XACT, you can modify some properties of the sounds themselves. When you select a sound name in the sound bank, XACT will display properties for that sound in the lower-left pane of the XACT project window. You’ll notice some options here that allow you to modify the volume, pitch, priority, and looping for that sound. In regard to this current project, the start.wav file may be a bit quiet for some people’s tastes, so feel free to modify the volume and play the sound until you find a volume that sounds good to you.
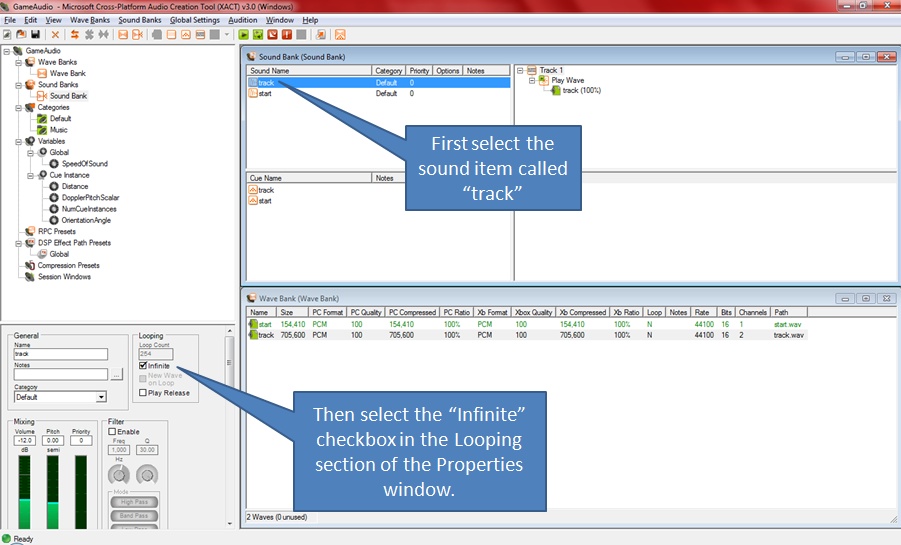
You want your track.wav file to loop indefinitely in your application, and you can change a setting within XACT to accomplish that without any need for extra coding in XNA. To set the looping property of the track sound, select the item named track in the Sound Name section of the Sound Bank window. In the properties pane located in the lower-left corner of the project window, click the Infinite checkbox under the Looping section (see Figure 6-5). This setting will cause the sound to loop indefinitely when you start the associated cue from your XNA code.
Finally, if you click on a cue name rather than a sound name in the Sound Bank window, you’ll see some different options in the lower-left pane of the XACT window. This pane allows you to modify how the cue will play different sounds associated with that cue. Currently, you only have one sound associated with this cue, but you can add as many as you like. If you have multiple sounds for a cue, XACT will select a different one of those sounds to play each time you call that particular cue from your XNA code. This is helpful for sounds such as explosions or crashes that are similar yet slightly different from each other. For example, in real life, all explosions sound slightly different, and this gives you a way to simulate that. In the properties pane, you can also specify different weights or likelihoods that a particular sound will play when the selected cue is called.
Once you’re satisfied with your sounds, save your project, close XACT and the Auditioning Utility, and head back to your game project in Visual Studio.
Implementing XACT Audio Files in Code
The first step in implementing the XACT audio project in your XNA project is to include the file you saved from XACT in your XNA project. Remember that previously you copied the .wav files to the AnimatedSpritesContentAudio directory within your project, but you didn’t include those files in your XNA project through Visual Studio. As I mentioned earlier, the only file that you actually need to include in the XNA game project is the project file you created in XACT. Hopefully, you named the XACT project file GameAudio.xap and saved it in the project’s AnimatedSpritesContentAudio directory. If so, add it to your project now by right-clicking the AnimatedSpritesContentAudio folder in Solution Explorer, selecting Add→Existing Item, and browsing to your GameAudio.xap file.
To load the data from your XACT project file into objects that you
can use to play the sounds in XNA, you need to add the following
class-level variables at the top of your Game1 class:
AudioEngine audioEngine;
WaveBank waveBank;
SoundBank soundBank;
Cue trackCue;
The first variable represents something called a sound
engine. This object will be used in the creation of your
WaveBank and SoundBank objects and is the core object used
for XNA sound. As you’ve probably already guessed, the WaveBank and SoundBank objects will correspond to the sound
and wave bank sections of your XACT file. The Cue object is used to pull out individual cues
from the sound bank to play those cues. You can play a cue
without holding onto a variable for that particular cue, but without
holding onto the cue itself, you cannot pause, stop, start, resume, or
interact with that sound once it has begun playing.
Once you’ve added those variables, you need to initialize them. To
do so, add the following lines of code in your Game1’s LoadContent method:
audioEngine = new AudioEngine(@"ContentAudioGameAudio.xgs");
waveBank = new WaveBank(audioEngine, @"ContentAudioWave Bank.xwb");
soundBank = new SoundBank(audioEngine, @"ContentAudioSound Bank.xsb");
This is one area where the content pipeline treats sound files
differently than most other resources. To load sound into memory, you
don’t use the Content.Load method you
used for the resources you’ve dealt with thus far; instead, you use a
more traditional constructor call to instantiate each object.
However, the content pipeline is still involved in the parsing of this audio data. At compile time, the content pipeline takes the file created by XACT, parses it, and splits it into different files for use in your code at runtime. After compiling your game, take a look at your project’s binx86DebugContentAudio folder in Windows Explorer, and you’ll see the actual files that are referenced in your constructors.
For each .xap file (XACT project file), the content pipeline generates an .xgs file. For each wave bank within those project files, it generates an .xwb file, and for each sound bank it generates an .xsb file. These files are then loaded in your code via the constructors of their respective objects. Notice that the sound and wave banks also require that the audio engine object be passed into their constructors. Finally, note that the parameters passed to these objects in your code are actual filenames and paths, rather than the asset names that are used for most resources in XNA.
Once the objects have been instantiated, you’re ready to use them
to play audio. Audio is played by identifying and playing cues that you
created in your XACT file. When you dropped the
start.wav entry from the wave bank into the cue
section of the sound bank, XACT created a cue called
start and associated that cue with the sound that
plays that particular .wav file. To play that cue,
you get the Cue object from the
SoundBank object using the SoundBank.GetCue method. You then call the
Cue object’s Play method. For example, the following code
will play the start cue:
trackCue = soundBank.GetCue("start");
trackCue.Play(  );
If you play the cue and hold onto an instance of that cue with a
Cue object, as is done in this
example, you have access to the Cue’s
Stop, Pause, and other methods, which allow you to
modify the sound as it plays. If you don’t need that kind of
functionality, you can instead play the sound directly from the SoundBank object without using a Cue object:
soundBank.PlayCue("start");In this case, you’re going to want to hold onto the Cue object for the soundtrack so that you can
pause it if needed, but you don’t need to do that for the start sound
(once the start sound plays, you won’t ever need to stop it or pause
it).
You’ll want both of these sounds to play as soon as the game
begins. You can accomplish this by playing both sounds immediately after
you initialize the objects in the LoadContent method of your Game1 class.
Add the following lines of code at the end of your LoadContent method:
// Start the soundtrack audio
trackCue = soundBank.GetCue("track");
trackCue.Play(  );

// Play the start sound
soundBank.PlayCue("start");
Note that if you hold onto the Cue object when you play a sound, you need to
make sure that your Cue object stays
in scope for as long as you need it. Otherwise, the garbage collector
will pick it up, and the sound will no longer be usable.
The final change that you need to
make is to call the Update method of
the AudioEngine object
once per frame to keep the AudioEngine in sync with the game. You
can do this in the Update method of your Game1 class. Omitting the call to AudioEngine.Update can
result in sounds becoming out of sync. Add the following line of
code immediately before
the call to base.Update in the
Update method of your Game1 class:
audioEngine.Update( );
Compile and run the game, and you should hear both the starting intro noise and the background soundtrack. Also, the background track should loop until the game is over because you set it to infinitely loop in your XACT project. As you can see, XACT is a pretty powerful tool that allows you to modify different aspects of a sound file at design time. It’s a great way to speed up development, as well as to fine-tune your sounds and sound effects.
Using the Simplified API for Sound and Audio
When developing with the HiDef game profile, it can save time and add flexibility to your game audio if you take advantage of the benefits that XACT offers. However, XACT isn’t supported on the Reach game profile, so the XNA Framework 4.0 provides a simplified sound API that allows developers to play audio when using Reach. You can also use the simplified API in projects developed with the HiDef profile if you don’t require the additional features provided by XACT.
Close your current XNA game project and create a new XNA Windows Game project in Visual Studio called SimpleSounds.
To play a sound using the simplified sound API, the first step is to add a sound file to your project. Remember that when dealing with XACT, the actual sound files themselves are not added to the project in Visual Studio. That is not the case, however, when dealing with the simplified sound API. In this case, audio files are treated like other resources in the content pipeline and have to be added to the Visual Studio project just as you’ve done with your 2D images thus far in this book.
The sound API in XNA 4.0 supports the .wav, .wma, and .mp3 file types. In this example, you’ll be using the start.wav file from the previous example in this chapter. You should already have this file on your hard drive, but if not, you’ll find it with the Chapter 6 source code in the SimpleSoundsSimpleSoundsContentAudio folder.
Add a new content folder to your project by right-clicking the SimpleSoundsContent project in Solution Explorer and selecting Add→New Folder. Name the folder Audio. Then, add the start.wav file to the project by right-clicking the new SimpleSoundsContentAudio folder in Solution Explorer, selecting Add→Existing Item…, navigating to the start.wav file, and selecting it.
As with the other resources, when you’ve added the file to the project, you should be able to view its properties in Visual Studio and see that the content pipeline has assigned it an asset name and other properties.
Once you’ve loaded the sound into your project, you need to create
a variable of type SoundEffect into
which you’ll load the sound file through the content pipeline. Add the
following class-level variable to your Game1 class:
SoundEffect soundEffect;
Once you’ve created the SoundEffect variable, load the file into the
variable by adding the following code to your LoadContent method:
soundEffect = Content.Load<SoundEffect>(@"Audiostart");
You can play your sound effect in two different ways. First, you
can call the Play method of the SoundEffect
object. This will play the sound and, in one of the overloads of
Play, allow you to adjust the sound’s
volume, pitch, and pan (stereo effects).
If you want more control over your sound effect, such as the
ability to loop the sound or to stop it before it ends, you need to use
a SoundEffectInstance
object. This object is captured by
calling CreateInstance on the
SoundEffect object. With the
SoundEffectInstance, you’ll be able to loop the
sound, adjust the volume, stop and resume the sound, and more.
To play the sound when the game begins using a SoundEffectInstance, add the following code to
the end of your LoadContent method,
immediately after loading the sound from the content pipeline:
SoundEffectInstance soundEffectInstance = soundEffect.CreateInstance();
soundEffectInstance.Play();
Although it lacks the design-time sound development options available when using XACT, the sound API in XNA 4.0 gets the job done. As mentioned previously, the majority of the examples throughout the rest of this book use XACT for audio, mainly to familiarize the reader with the tool. However, feel free to use the simplified audio API instead if you prefer.
Adding More Sound to Your Game
Let’s take a minute now and add another sound feature to your XNA game. Close the SimpleSounds project and open the AnimatedSprites project you used at the beginning of this chapter.
In the game that you’re building, a user-controlled sprite will be moving around the screen, with the objective of avoiding the automated sprites that are flying in from all directions. (That’s right, plunk your money down now; this is going to be one amazing game.) You’re moving along in that direction, and you’ll get there soon enough.
Even though the automated sprites in the game currently don’t move, you can still add some code to play a sound effect whenever your user-controlled sprite collides with an automated sprite.
You’ll be passing the name of a cue to be played in the event of a collision into each
Sprite object, so you’ll first need
to open your Sprite.cs file and add to the Sprite class a class-level variable that will
hold the name of the cue to be used. In addition, you’ll need to use the
auto-implemented properties feature of C# 3.0 to create a public get accessor and a private set accessor for this variable:
public string collisionCueName { get; private set; }If you’re new to C# 3.0 and are unfamiliar with this feature, auto-implemented properties allow developers to create accessors for a given variable at the point in code where the variable is declared. This streamlines the code, making it easier to implement and read. (Feel free to read up on auto-implemented properties further on the Internet if you’d like to find out more about this or other features added in C# 3.0.)
Finally, add a parameter of type string to the end of the parameter list in
both constructors. In the first constructor, pass the new parameter on
to the call to the second constructor. In the body of the second
constructor, assign the new parameter’s value to the collisionCueName variable. Your new Sprite class constructors should look like
this:
public Sprite(Texture2D textureImage, Vector2 position, Point frameSize,
    int collisionOffset, Point currentFrame, Point sheetSize, Vector2 speed,
    string collisionCueName)
    : this(textureImage, position, frameSize, collisionOffset, currentFrame,
    sheetSize, speed, defaultMillisecondsPerFrame, collisionCueName)
{
}

public Sprite(Texture2D textureImage, Vector2 position, Point frameSize,
    int collisionOffset, Point currentFrame, Point sheetSize, Vector2 speed,
    int millisecondsPerFrame, string collisionCueName)
{
    this.textureImage = textureImage;
    this.position = position;
    this.frameSize = frameSize;
    this.collisionOffset = collisionOffset;
    this.currentFrame = currentFrame;
    this.sheetSize = sheetSize;
    this.speed = speed;
    this.collisionCueName = collisionCueName;
    this.millisecondsPerFrame = millisecondsPerFrame;
}
Next, open your AutomatedSprite.cs file.
You’ll need to add a string parameter
representing the collision cue name to both of the constructors in the
AutomatedSprite class. Each of these
constructors will accept the cue name parameter and pass that value on
to the base class’s constructors. Your AutomatedSprite constructors should look like
this:
public AutomatedSprite(Texture2D textureImage, Vector2 position,
    Point frameSize, int collisionOffset, Point currentFrame, Point sheetSize,
    Vector2 speed, string collisionCueName)
    : base(textureImage, position, frameSize, collisionOffset, currentFrame,
    sheetSize, speed, collisionCueName)
{
}

public AutomatedSprite(Texture2D textureImage, Vector2 position,
    Point frameSize, int collisionOffset, Point currentFrame, Point sheetSize,
    Vector2 speed, int millisecondsPerFrame, string collisionCueName)
    : base(textureImage, position, frameSize, collisionOffset, currentFrame,
    sheetSize, speed, millisecondsPerFrame, collisionCueName)
{
}
Your UserControlledSprite class
won’t be using the collision sounds, because when the player collides
with a sprite, you’ll be playing the sound of the object she runs into,
not a sound for the player object itself. Therefore, you don’t need to
add a parameter to the constructors for the UserControlledSprite class, but you do need to
pass the value null on to the base
class constructors for that parameter. The UserControlledSprite class constructors should
now look like this:
public UserControlledSprite(Texture2D textureImage, Vector2 position,
    Point frameSize, int collisionOffset, Point currentFrame, Point sheetSize,
    Vector2 speed)
    : base(textureImage, position, frameSize, collisionOffset, currentFrame,
    sheetSize, speed, null)
{
}

public UserControlledSprite(Texture2D textureImage, Vector2 position,
    Point frameSize, int collisionOffset, Point currentFrame, Point sheetSize,
    Vector2 speed, int millisecondsPerFrame)
    : base(textureImage, position, frameSize, collisionOffset, currentFrame,
    sheetSize, speed, millisecondsPerFrame, null)
{
}
You’ll be accessing the Game1
class from the SpriteManager to play
the Cue. In the Game1 class, add the following public method, which you’ll be calling from
within the SpriteManager
class:
public void PlayCue(string cueName)
{
    soundBank.PlayCue(cueName);
}
You currently don’t have a cue to play for collisions with the skull ball sprite. The only files that you added to your XACT project previously were the start and soundtrack sounds. There is a file called skullcollision.wav located with the source code for Chapter 6, in the AnimatedSpritesAnimatedSpritesContentAudio folder. Copy this file to your game project’s AnimatedSpritesContentAudio folder using Windows Explorer. Again, because you’ll be using XACT to play this sound file, don’t add the file to your project in Visual Studio.
Start XACT and open up the game’s audio file (GameAudio.xap), which you created earlier in this chapter. The file should be located in your game project’s AnimatedSpritesContentAudio folder. Once the project is loaded, open the Wave Bank and Sound Bank windows by double-clicking on the Wave Bank and Sound Bank nodes in the tree menu on the left side of the XACT project window.
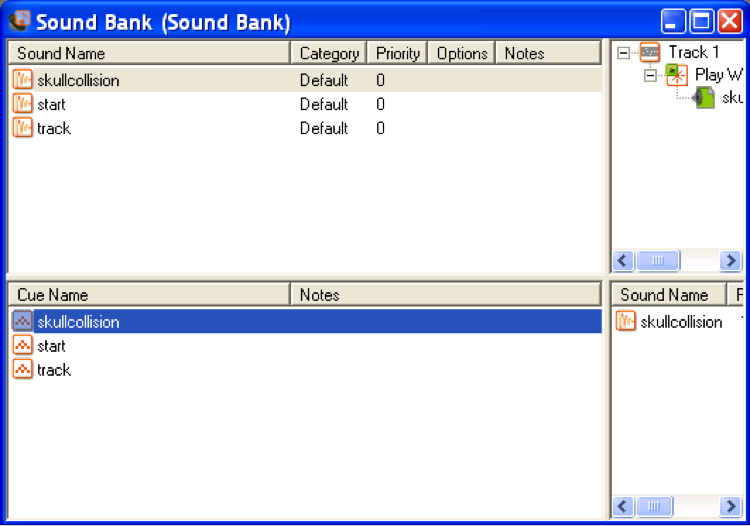
Add the skullcollision.wav sound file to the Wave Bank window by right-clicking somewhere in the blank portion of that window and selecting Insert Wave File(s)…. Then, drag the newly created skullcollision item from the Wave Bank window and drop it in the Cue Name section of the Sound Bank window to generate a cue name for the sound.
Your Sound Bank window in XACT should now look something like Figure 6-6.
You might want to adjust the volume of the skullcollision sound, as it is somewhat quiet by default. Do this by selecting the item in the Sound Name section of the Sound Bank window and editing the volume property in the lower-left pane.
Save the XACT file and return to the code in Visual Studio.
The final code changes take place in the SpriteManager class. First, you’ll need to
pass the name of the cue used for
collisions to the constructor of each instance of AutomatedSprite that
you’re creating. Each of the AutomatedSprite objects is created in the
LoadContent method of the SpriteManager class. Add the name of the cue
as the final parameter of each of those constructors, as shown
here:
spriteList.Add(new AutomatedSprite(
    Game.Content.Load<Texture2D>(@"Images/skullball"),
    new Vector2(150, 150), new Point(75, 75), 10, new Point(0, 0),
    new Point(6, 8), Vector2.Zero, "skullcollision"));
spriteList.Add(new AutomatedSprite(
    Game.Content.Load<Texture2D>(@"Images/skullball"),
    new Vector2(300, 150), new Point(75, 75), 10, new Point(0, 0),
    new Point(6, 8), Vector2.Zero, "skullcollision"));
spriteList.Add(new AutomatedSprite(
    Game.Content.Load<Texture2D>(@"Images/skullball"),
    new Vector2(150, 300), new Point(75, 75), 10, new Point(0, 0),
    new Point(6, 8), Vector2.Zero, "skullcollision"));
spriteList.Add(new AutomatedSprite(
    Game.Content.Load<Texture2D>(@"Images/skullball"),
    new Vector2(600, 400), new Point(75, 75), 10, new Point(0, 0),
    new Point(6, 8), Vector2.Zero, "skullcollision"));
Finally, you’ll need to change the Update method of the SpriteManager class to play the AutomatedSprite’s collision cue when a
collision with a UserDefinedSprite is
detected. While you’re at it, modify the code to remove the AutomatedSprite when a collision is detected,
rather than exiting the game. Because you can’t modify the number of
items in a list when using a foreach
statement, you’ll need to change the foreach statement to a for loop. Your new Update method in the SpriteManager class should look something like
this:
public override void Update(GameTime gameTime)
{
    // Update player
    player.Update(gameTime, Game.Window.ClientBounds);

    // Update all sprites
    for (int i = 0; i < spriteList.Count; ++i)
    {
        Sprite s = spriteList[i];

        s.Update(gameTime, Game.Window.ClientBounds);

        // Check for collisions
        if (s.collisionRect.Intersects(player.collisionRect))
        {            // Play collision sound
            if(s.collisionCueName != null)
                ((Game1)Game).PlayCue(s.collisionCueName);

            // Remove collided sprite from the game
            spriteList.RemoveAt(i);
            −−i;
        }
    }

    base.Update(gameTime);
}
Nice work! Compile and run the game, and now when you move the user-controlled sprite to collide with another object on the screen, you should hear the collision noise, and the sprite with which the user-controlled sprite collided should be removed from the game.
Not bad, eh? The project is moving along. Obviously, you’ll need to add some more features to make the game more exciting, but we’ll look to wrap that up in the next chapter. Even though this is a simple game with no clear purpose as of yet, you can still see how sound adds a whole new level of interaction and entertainment to any game.
What You Just Did
Let’s look back at what you’ve accomplished in this chapter:
You added sound effects to your game using XACT.
You added a looping background soundtrack to your game using XACT.
You learned how to add sound using the simplified sound API.
You fine-tuned some sound code to add sound effects for colliding sprites.
Summary
The Microsoft Cross-Platform Audio Creation Tool (XACT) is used to build sound files for use in XNA games.
At design time, XACT allows developers to modify sound properties such as volume, pitch, looping, and more.
To support development on the Reach game profile, the XNA Framework 4.0 includes a simple sound API that allows developers to implement sound without using XACT.
“There are only two forces in the world: the sword and XNA. In the long run, the sword will always be conquered by XNA.” —Napoleon Bonaparte (slightly modified)
Test Your Knowledge: Quiz
What do you use to reference a sound that has been included in an XACT audio file?
What are the pros and cons of using the simple sound API available in XNA 4.0 instead of using XACT?
Fact or fiction: the only way to get a soundtrack to loop during gameplay is to manually program the sound in code to play over and over.
Fact or fiction: you can adjust the volume of your sounds using XACT.
How do you pause and restart a sound in XNA when using XACT audio files?
What was the best-selling video game of 2009?