
Chapter 18. Multiplayer Games
In earlier sections of this book, we discussed the difficulty of creating true artificial intelligence. Although we dabbled in some light artificial intelligence earlier, the really complex algorithms used in the latest games are well beyond the scope of this book. You’ve probably realized by now how complicated it would be to really mimic a human player. It’s so complicated that in many cases, depending on the game, it’s downright impossible.
Chances are you’ve played a Real-Time Strategy (RTS) game where the computer player leaves his base too unguarded, or a football simulation game where there’s one defensive play that stops the offense every single time, no matter what offensive play was called. This is one reason why multiplayer gaming is such an enjoyable experience; there really is nothing like playing against a real, live human opponent. Throw in the fun of trash talking and stat crunching and the general pride that typically results from winning these games, and multiplayer gaming can really become addicting.
In this chapter, we discuss different means of implementing multiplayer functionality in your games. First, we look at adding split-screen functionality to your game, and then we walk through building a new game using the XNA Framework networking API.
Split-Screen Functionality
One way to add multiplayer functionality to your games is to implement a split screen on a single monitor (for the PC) or television set (for the Xbox 360). Split screens will typically support one, two, three, or four players simultaneously playing on the same machine.
When implementing a split screen in your game, you need to consider several factors:
- Input controls
Typically, you’ll want to support only the Xbox gamepad as input, because you won’t want two, three, or four people huddled around a single keyboard.
- Cameras and angles
You’ll probably have an independent camera for each player. You’ll need to think about what camera angle gives each player the best view of the action from his perspective in the game.
- Real estate
Screen real estate will be at a premium when you’re trying to squeeze multiple views into one screen. If you’re implementing a two-player game, do the different views function more effectively side by side or top and bottom?
When drawing a scene in XNA, there’s a property of the graphics
device called Viewport that hasn’t
been mentioned in this book yet. The Viewport property is essentially a rectangle
that represents the screen coordinates to which the graphics device will
map its scene when drawing. By default, the Viewport is set to the size of the client
window, which causes the graphics device to draw on the entire game
window.
Split screens are implemented by modifying the Viewport of the graphics device and then
drawing a particular scene multiple times (once for each player), using
the camera for that player as the perspective from which to draw the
scene.
That might sound like a lot of information, but don’t let it scare you. Take a look at Figure 18-1 for a graphical view of a two-player split screen.
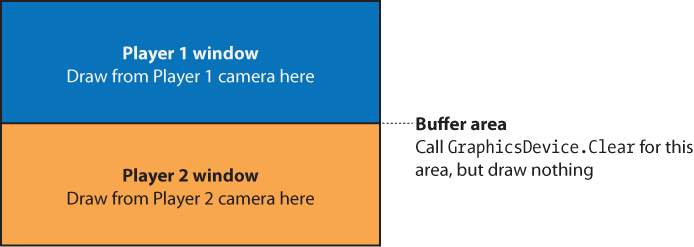
To draw a screen with a typical vertically stacked two-player setup, as shown in Figure 18-1, you’d create a viewport for each of the players, which would contain screen coordinates representing the areas to be drawn for those players.
In your Draw method, you’d
first want to call GraphicsDevice.Clear for the entire screen.
This will clear the middle buffer area. The color that you specify in
the Clear method will be the color of
the border between the two split screens.
Tip
Why clear the entire screen just to clear the buffer area? Clearing the entire back buffer is a very fast and optimized operation for the GPU. It also resets other states that make rendering the scene very fast.
Next, you’d set the GraphicsDevice.Viewport property to the viewport for Player 1 and draw the scene
from the perspective of Player 1’s camera. You’d then do the same for
Player 2.
So, how do you draw the scene from the perspective of Player 1’s
camera? You’re most likely going to have a different camera for each
player (after all, what use is a split screen if you draw the exact same
thing on each player’s section of the screen?). Remember that a camera
has two matrices representing the view and the projection, respectively.
These matrices are passed to your BasicEffect or your HLSL effect when you draw.
To draw using Player 1’s camera, you pass in the matrices representing
that camera. To draw from a different camera’s perspective, you just
pass in the matrices corresponding to that camera instead.
That’s the basic idea. Now, let’s walk through the implementation of a two-player split screen. For this section, you’re going to use the code that you built in Chapter 10. If you don’t have this code any longer or you skipped Chapter 10, you can download the code for that chapter with the rest of the source code for this book.
Open the code for Chapter 10, and you’ll see that
in this project you’ve implemented a camera component, as you’ve done
with all of the 3D examples in this book. Because all of the players
will have their own cameras and their own viewports, and because a viewport represents the projection of what
a camera sees in 3D to a rectangle on the game window in 2D, it makes
sense to add the viewport to the Camera class.
Open the Camera class and add
the following variable:
public Viewport viewport { get; set; }Next, you’ll need to make a few changes to the constructor of your
Camera class. You’ll need to accept a
Viewport as a parameter and use that
value to initialize the viewport
variable you just added. In addition, the aspect ratio you’re using in
your constructor in the call to CreatePerspectiveFieldOfView is currently
derived from the screen width and height. You’re going to need to use
the width and height of the viewport instead because the aspect ratio of
each player’s part of the split screen will no longer correspond to the
size of the game window.
Your current constructor should look something like this:
public Camera(Game game, Vector3 pos, Vector3 target, Vector3 up) : base(game)
{
    view = Matrix.CreateLookAt(pos, target, up);

    projection = Matrix.CreatePerspectiveFieldOfView(
        MathHelper.PiOver4,        (float)Game.Window.ClientBounds.Width /
        (float)Game.Window.ClientBounds.Height,
        1, 3000);
}
Modify the constructor to accept a Viewport parameter and set the viewport
variable as well, to use the viewport instead of the window size in the
call to CreatePerspectiveFieldOfView,
as shown here:
public Camera(Game game, Vector3 pos, Vector3 target,
    Vector3 up, Viewport viewport)
    : base(game)
{
    view = Matrix.CreateLookAt(pos, target, up);

    projection = Matrix.CreatePerspectiveFieldOfView(
        MathHelper.PiOver4,
        (float)viewport.Width /
        (float)viewport.Height,
        1, 3000);

    this.viewport = viewport;
}
Next, open the Game1 class.
You’ve declared a Camera variable
named camera at the class level.
However, as you’ll now be using two Camera objects (one for Player 1 and one for
Player 2), remove the camera variable
and add the following class-level variables instead:
public Camera camera1 { get; protected set; }
public Camera camera2 { get; protected set; }
Next, you’ll need to initialize both of the new Camera objects. You’re currently initializing
the camera you just removed at the beginning of the Initialize method of the Game1 class with the following code:
// Camera component
camera = new Camera(this, new Vector3(0, 0, 50),
    Vector3.Zero, Vector3.Up);
Components.Add(camera);
Remove that code and replace it with the following code, which
initializes the two new Camera
objects after creating appropriate Viewport objects for each:
// Create viewports
Viewport vp1 = GraphicsDevice.Viewport;
Viewport vp2 = GraphicsDevice.Viewport;
vp1.Height = (GraphicsDevice.Viewport.Height / 2);

vp2.Y = vp1.Height;
vp2.Height = vp1.Height;


// Add camera components
camera1 = new Camera(this, new Vector3(0, 0, 50),
    Vector3.Zero, Vector3.Up, vp1);
Components.Add(camera1);

camera2 = new Camera(this, new Vector3(0, 0, -50),
    Vector3.Zero, Vector3.Up, vp2);
Components.Add(camera2);
Notice that when creating the new Viewport objects, you initially set them both
equal to GraphicsDevice.Viewport.
Remember that by default, the viewport of the graphics device is a
rectangle encompassing the entire game window. Neither of your new
viewports is significantly different from the rectangle representing the
game window, so this is a good place to start. The X, Y, and
Width properties of the top viewport
(vp1) are all the same as those for
the game window, so all you need to change for vp1 is the height of the window. You’re
setting it to half the original viewport’s height.
The X and Width properties of the vp2 viewport are also the same as those of the
game window, so you only need to change the Y property to make the top of the viewport be
just below the bottom of the vp1
viewport and change the height of the viewport to be the same as the
height of the vp1 viewport.
You then create each camera and pass the corresponding viewports to the constructor.
Next, you’ll need to modify the code that draws the scene. You’re
drawing in two different places: within the Game1 class and within the ModelManager class. Well, technically you
don’t draw in the ModelManager class,
but you’re calling Draw on each of the models in your
models list and passing in a camera object from which to draw. You do so
with the following code in your ModelManager class:
public override void Draw(GameTime gameTime)
{
    // Loop through and draw each model
    foreach (BasicModel bm in models)
    {
        bm.Draw(((Game1)Game).camera);
    }

    base.Draw(gameTime);
}
Remember that you’re going to have to draw the scene once for
every viewport. You can have the Draw
method in your ModelManager class be
called multiple times from within your Game1 class (every time you call base.Draw in Game1, the Draw method in all game components is called
as well). However, you’re going to need to provide a way for the
ModelManager class to know which
camera to draw with. Add the following variable to the Game1 class, which you’ll use to set which
camera is currently drawing:
public Camera currentDrawingCamera { get; protected set; }Next, modify the bm.Draw call
in the Draw method of your ModelManager class to use the currentDrawingCamera object from the Game1 class to draw each model:
bm.Draw(((Game1)Game).currentDrawingCamera);
The last thing you’ll need to do is modify the code that draws the
scene in your Game1 class. Currently,
the code in the Draw method of your
Game1 class looks pretty bare:
protected override void Draw(GameTime gameTime)
{
    GraphicsDevice.Clear(Color.CornflowerBlue);

    // TODO: Add your drawing code here

    base.Draw(gameTime);
}
Modify the Draw method just
shown as follows:
protected override void Draw(GameTime gameTime)
{
    // Clear border between screens
    GraphicsDevice.Clear(Color.Black);

    // Set current drawing camera for Player 1
    // and set the viewport to Player 1's viewport,
    // then clear and call base.Draw to invoke
    // the Draw method on the ModelManager component
    currentDrawingCamera = camera1;
    GraphicsDevice.Viewport = camera1.viewport;

    base.Draw(gameTime);

    // Set current drawing camera for Player 2
    // and set the viewport to Player 2's viewport,
    // then clear and call base.Draw to invoke
    // the Draw method on the ModelManager component
    currentDrawingCamera = camera2;
    GraphicsDevice.Viewport = camera2.viewport;

    base.Draw(gameTime);
}
It may seem kind of silly to implement all the logic of setting
the camera and the viewport and then do nothing but clear the screen and
call base.Draw, but remember that the
ModelManager will actually be drawing
the models, and when you call base.Draw the Draw method in the ModelManager will be called. The viewport that
you set on the graphics device in the Draw method of the Game1 class will also be used until you set
the viewport on the graphics device to something else. That means that
by setting the viewport in the
Draw method of the Game1 class, you are also affecting the
Draw method of the ModelManager class.
Compile and run the game at this point, and you should see two ships in two different viewports, as shown in Figure 18-2.
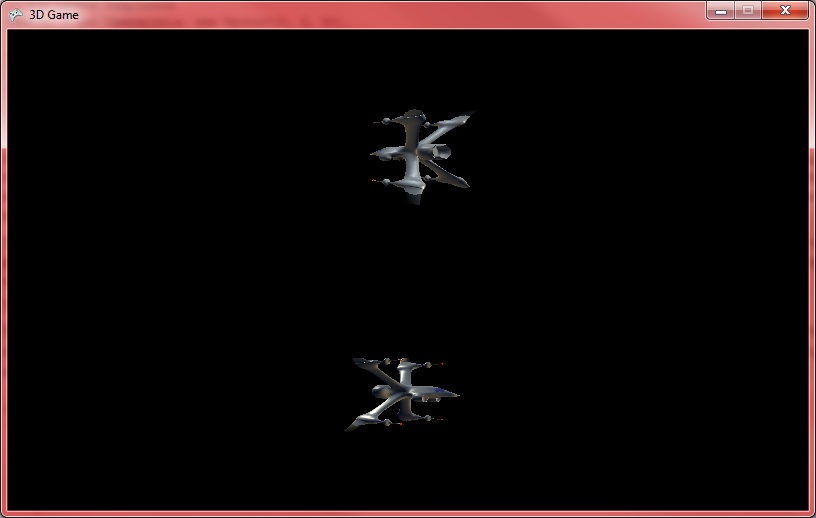
It’s important to note that you’re not actually seeing two different ships. You’re only drawing one model, so you’re actually seeing the same ship from two different perspectives. When you created your two cameras, you placed one camera at (0, 0, 50) looking at the origin (where the ship is drawn) and the other at (0, 0, −50), also looking at the origin. This explains why one viewport shows the ship facing right and one shows it facing left—both are viewing the same ship, but from opposite sides.
There’s still one problem with this game: it doesn’t do anything. As exciting as it is to stare at a ship, you probably ought to offer the player a little bit more. We’re not going to develop this example into an actual game, but it will help you to see the two different cameras moving independently in this example. Right now, you’re drawing a ship at the origin and looking at it from one side with one camera and from the opposite side with a different camera. Each camera is used to draw the ship in a viewport the size of half the game window, which gives the split-screen look shown in Figure 18-2.
Because you’re going to make the two cameras move in this example,
you should first make the ship stop spinning. This will make it easier
to see what’s happening with each camera when you’re moving it in 3D
space. To stop the ship from spinning, use the BasicModel class instead of the SpinningEnemy class for the ship you
create.
In the LoadContent method of
the ModelManager class, change the
line that creates the ship to use BasicModel, as follows:
models.Add(new BasicModel(
    Game.Content.Load<Model>(@"modelsspaceship")));
If you compile and run the game now, you’ll see the same ship with
one view showing the front of the ship and the other view looking at the
back of the ship. Now you’ll need to add some code to move your cameras
in 3D space. Add the following variables to the Camera class:
// Vectors for the view matrix
Vector3 cameraPosition;
Vector3 cameraDirection;
Vector3 cameraUp;

// Speed
float speed = 3;
The first three variables added here will be used to recreate the
view matrix of the camera. This should be somewhat familiar, as this is
the same technique used in Chapter 11 of this book. Because you’re
going to move your camera in 3D space, you need to be able to recreate
your view matrix with a new camera position, direction, and up vector
every time the Update method is
called. These variables allow you to do that.
The final variable will be used to determine the speed of the camera movement.
Next, you’ll need to add the following method to the Camera class to take care of recreating the view matrix:
private void CreateLookAt(  )
{
    view = Matrix.CreateLookAt(cameraPosition,
        cameraPosition + cameraDirection, cameraUp);
}
Currently, the Camera class
creates the view matrix only once, within the constructor, with the
following line of code:
view = Matrix.CreateLookAt(pos, target, up);
Replace that line with the following code, which will set the position, direction, and up variables appropriately and create the view matrix by calling the method you just added:
// Create view matrix
cameraPosition = pos;
cameraDirection = target - pos;
cameraDirection.Normalize(  );
cameraUp = up;
CreateLookAt(  );
Again, this is the same technique used in Chapter 11. You’re deriving a direction
vector based on the difference between the position and the target of
the camera. This vector will be used in the movement and rotation of the
camera. The vector is normalized with the call to Normalize, which will give the vector a
magnitude of one. This is done so that when the cameraDirection vector is multiplied by the
speed variable, the resulting vector
has a magnitude the size of the value represented by speed (meaning that your camera will move at
the speed represented by the speed
variable).
Because your camera now will need to recreate the view matrix
every time the Update method is
called, add the following line of code to the Update method of the Camera class:
CreateLookAt( );
Next, add to the Camera class
the following methods, which will let you move your camera forward and
backward as well as strafe left and right:
public void MoveForwardBackward(bool forward)
{
    // Move forward/backward
    if (forward)
        cameraPosition += cameraDirection * speed;
    else
        cameraPosition −= cameraDirection * speed;
}

public void MoveStrafeLeftRight(bool left)
{

    // Strafe
    if (left)
    {
        cameraPosition +=
           Vector3.Cross(cameraUp, cameraDirection) * speed;
    }
    else
    {
        cameraPosition −=
            Vector3.Cross(cameraUp, cameraDirection) * speed;
    }
}
Now all that’s left is to move the cameras. Add the following code
to the Update method of the Game1 class:
// Move the cameras
KeyboardState keyboardState = Keyboard.GetState(  );

// Move camera1 with WASD keys
if (keyboardState.IsKeyDown(Keys.W))
    camera1.MoveForwardBackward(true);
if (keyboardState.IsKeyDown(Keys.S))
    camera1.MoveForwardBackward(false);
if (keyboardState.IsKeyDown(Keys.A))
    camera1.MoveStrafeLeftRight(true);
if (keyboardState.IsKeyDown(Keys.D))
    camera1.MoveStrafeLeftRight(false);

// Move camera2 with IJKL keys
if (keyboardState.IsKeyDown(Keys.I))
    camera2.MoveForwardBackward(true);
if (keyboardState.IsKeyDown(Keys.K))
    camera2.MoveForwardBackward(false);
if (keyboardState.IsKeyDown(Keys.J))
    camera2.MoveStrafeLeftRight(true);
if (keyboardState.IsKeyDown(Keys.L))
    camera2.MoveStrafeLeftRight(false);
This code will allow you to move the top view (camera 1) with the WASD keys and move the bottom view (camera 2) with the IJKL keys. Compile and run the game at this point, and you’ll see that both cameras move independently of each other. If you want to add rotation to your camera, you can do so by using the camera rotation code discussed in previous chapters, implementing it in a way similar to how you just added the code to move each camera.
That’s all there is to it! You can easily add split-screen functionality to any game this way. To add support for three players, use three viewports and three cameras. To add support for four players, use four viewports and four cameras.
Depending on the specifics of your game, you may also need to add functionality to move each camera independently as well as functionality to perform other actions to interact with the world independently, based on input from the player assigned to that camera.
Network Game Development
Networking has been a hot topic in graphics API circles at Microsoft for a long time. Since the days of DirectX and the DirectPlay libraries, there have been numerous iterations that have met with varying levels of success. However, DirectPlay was created before TCP/IP became the standard that it is today, so it was eventually deprecated. Instead of DirectPlay, DirectX developers were told that the Windows sockets libraries were ultimately going to be the tool of choice for developing games with network play functionality.
XNA 1.0 followed suit with no support for networking API outside of System.net and no support for network play on the Xbox 360. The result? A new and complete networking API was the XNA 1.0 developers’ most requested feature. Because of that, beginning with XNA Game Studio 2.0, Microsoft allowed developers to use the Live for Windows APIs on Windows and the Xbox 360.
According to a presentation by Shawn Hargreaves (engineer on the XNA Community Game Platform team at Microsoft) at the Game Developers Conference in 2008, the design goals for the XNA team included:
Enable networked multiplayer games
Make the API easy to use
Make the API handle lower-level networking details for the user
Support both Xbox LIVE and Games for Windows LIVE
Allow development with a single Xbox 360 and PC
Don’t require dedicated servers
The best thing about the XNA networking API is how simple it is to use. If you’ve ever dealt with networking code in other languages or libraries, you’ll most likely find the XNA implementation a refreshing upgrade in terms of ease of use.
XNA uses the Xbox LIVE and Games for Windows LIVE platforms for multiplayer connections. You’re probably somewhat familiar with how Xbox LIVE works, but you might be new to Games for Windows LIVE. Essentially, Games for Windows LIVE ties Windows games to gamertags and online identities the same way that Xbox LIVE does. In fact, they use the same online gamertags and identities. As you’ll see later in this chapter, the Games for Windows LIVE platform even uses a series of screens that closely resembles the Xbox 360 dashboard for sign-in and other account maintenance activities.
A list of XNA Creators Club and LIVE membership requirements for different game types on the PC and the Xbox 360 is shown in Table 18-1.
Xbox 360 | PC | |
Run an XNA Framework game | LIVE Silver membership and Creators Club membership | No membership requirements |
Use | LIVE Silver membership and Creators Club membership | No membership requirements |
Sign on to Xbox LIVE and Games for Windows LIVE servers | LIVE Silver membership and Creators Club membership | LIVE Silver membership and Creators Club membership |
Use Xbox LIVE Matchmaking | LIVE Gold membership and Creators Club membership | LIVE Gold membership and Creators Club membership |
Amazingly, most of the code that you write for a PC game using Games for Windows LIVE will be compatible with the Xbox 360 and Windows Phone 7. The networking API will work with any of those platforms, although there are fewer details to worry about with Windows Phone 7 (e.g., no support for gamertags).
Network Configurations
One of the most important things to consider when writing a networked game is what type of network you’ll be using (peer-to-peer, client/server, or a hybrid). The type of network you choose will have a big impact on how you handle your in-game network traffic, and on the performance of your application.
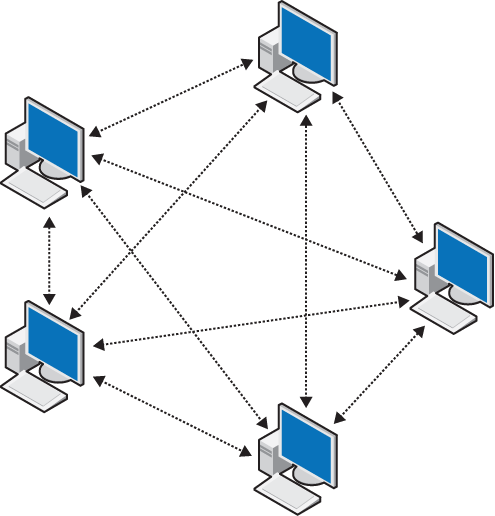
In a peer-to-peer network, all the participants are clients of each other. When something changes on one computer, that computer sends a message to all other computers telling them what’s happened. In space shooter game terms, let’s say you’re playing a game with five participants. If one computer’s player shoots a bullet, that computer sends a message to all other computers telling them that a bullet has been fired. A typical peer-to-peer architecture diagram is shown in Figure 18-3.
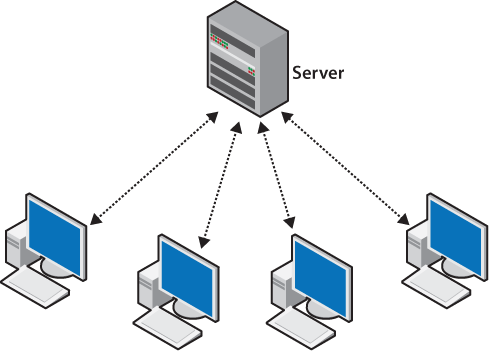
In contrast to a peer-to-peer network, a client/server network configuration typically has one server, and the rest of the machines are clients. All communication is run through the server. If you took the previous example of five people playing a space shooter game and one player firing a shot, in a client/server network that computer would send a message to the server (unless that computer is the server), and then the server would send the message out to all the clients.
A typical client/server configuration is shown in Figure 18-4.
You might think at first that a client/server configuration is a bit of a bottleneck because all communication runs through one machine. In some cases, it might be. However, look at all the arrows (representing network messages) in the peer-to-peer network diagram in Figure 18-3. Imagine this network being applied to a game like World of Warcraft, where hundreds or even thousands of players are playing simultaneously. With messages going back and forth between every single computer in that game, you can see how communications and handling messages would quickly get out of hand.
That’s not to say that a peer-to-peer network is never a good idea, though. In a client/server model, if the server goes down, the game ends. In peer-to-peer networks that’s less of an issue, and the “host” of the game can more easily transition from one computer to another. The best network configuration really depends on how much information you have to keep track of in a game and how many players are going to be involved at the same time.
Writing an XNA Network Game
Throughout the rest of this chapter, we’ll be building a game that uses the XNA networking APIs to enable multiplayer functionality across a Windows network. The same code can be applied to the Xbox 360 system link networking functionality.
In this section, you’ll start with a new project, but you’ll be using some code and resources from the project you completed in Chapter 8 of this book. If you don’t have the code for Chapter 8, it can be downloaded with the rest of the code for this book.
Tip
I debated creating this chapter as a simple introduction to the networking API, and instead opted to demonstrate the API in a network game. However, because of that decision, this chapter has a large amount of code in it.
If you’re weary of typing so much code, feel free to download the source code for this chapter and walk through it while reading the chapter. It might save you some headaches in the long run.
This chapter assumes that you’ve read through the book and are pretty familiar with Visual Studio 2010 and XNA Game Studio 4.0. If you find yourself not understanding those principles in this chapter, please refer back to the earlier chapters in this book.
Also, because all other games written in this book have used XACT for audio, I assume that by now you have a good feel for XACT and how it works. Hence, this chapter will instead implement sound using the simplified sound API provided with the XNA Framework 4.0. If you’re looking to learn more about XACT, please refer to the other examples in this book.
To start things off, create a new XNA 4.0 Windows Game project in Visual Studio. Call your project Catch.
You’re going to need to add two files to your project from the source code for Chapter 8 of this book. Right-click your project in Solution Explorer, select Add→Existing Item…, and navigate to the source code for Chapter 8. Select the following files to add to your project:
Sprite.cs
UserControlledSprite.cs
You’re going to create a 2D networked game in which one player chases another player around the screen, with the goal of colliding with the other player. The player being chased will earn more points the longer he stays away from the chaser. You’ll be modifying your existing sprite classes to handle the sprite objects in the multiplayer networked game.
Modifying the Sprite Class
The first thing you’ll need to do in the Sprite class is change the namespace of the
class from AnimatedSprites to
Catch:
namespace Catch
In this game, players will take turns chasing each other. There
will be two sprite objects: a gears sprite and a dynamite sprite. The
dynamite sprite will always chase the gears sprite around the screen.
Because players will be switching back and forth from gears sprites to
dynamite sprites, you’ll need to expose a few variables with
auto-implemented properties. To do this, change the following
class-level variables of your Sprite
class to have public accessors, as shown here:
public Texture2D textureImage { get; set; }
public Point sheetSize { get; set; }
public Vector2 speed { get; set; }
public Vector2 originalSpeed { get; set; }
You’re also going to need to set the positions of the sprites
between rounds, so that the chaser and chased players don’t start next
to each other. Change the GetPosition
property accessor to Position and add
a set accessor:
public Vector2 Position
{
    get { return position; }
    set { position = value; }
}
Modifying the UserControlledSprite Class
Next let’s work on changes to the
UserControlledSprite class. First, change the
namespace from AnimatedSprites to
Catch:
namespace Catch
When you worked on the 2D game using these classes in previous
chapters, you were dealing with a one-player game and the score was kept
in the Game1 class. You’re now
dealing with a two-player game. So, you’ll need to either add a second
score variable to the Game1 class or
figure out a better solution. Because a UserControlledSprite represents a player, it
would make sense to add the score to this class. Add the following
class-level variable to the UserControlledSprite class:
public int score { get; set; }Also, as mentioned earlier, you’re going to be swapping players back and forth between the chasing sprite and the chased sprite. That means you’ll need to add a variable that will keep track of which role this particular player sprite is currently playing:
public bool isChasing { get; set; }Then, modify both constructors of the UserControlledSprite class to receive the
chasing parameter. Also add code
in the bodies of both constructors to initialize the isChasing and score variables:
public UserControlledSprite(Texture2D textureImage, Vector2 position,
    Point frameSize, int collisionOffset, Point currentFrame, Point sheetSize,
    Vector2 speed, bool isChasing)
    : base(textureImage, position, frameSize, collisionOffset, currentFrame,
    sheetSize, speed, null, 0)
{
    score = 0;
    this.isChasing = isChasing;
}

public UserControlledSprite(Texture2D textureImage, Vector2 position,
    Point frameSize, int collisionOffset, Point currentFrame, Point sheetSize,
    Vector2 speed, int millisecondsPerFrame, bool isChasing)
    : base(textureImage, position, frameSize, collisionOffset, currentFrame,
    sheetSize, speed, millisecondsPerFrame, null, 0)
{
    score = 0;
    this.isChasing = isChasing;
}
Finally, modify the Update
method of the UserControlledSprite
class to accept a parameter indicating whether the Update method should move the sprite. Then,
use that parameter to run the code that will move the sprite only if the
parameter is true. Note that because the base class’s Update method does not have this parameter,
you’ll have to remove the override
keyword in the method definition.
The modified Update method
should look like this:
public void Update(GameTime gameTime,
    Rectangle clientBounds, bool moveSprite)
{
    if (moveSprite)
    {
        // Move the sprite according to the direction property
        position += direction;

        // If the sprite is off the screen, put it back in play
        if (position.X < 0)
            position.X = 0;
        if (position.Y < 0)
            position.Y = 0;
        if (position.X > clientBounds.Width - frameSize.X)
            position.X = clientBounds.Width - frameSize.X;
        if (position.Y > clientBounds.Height - frameSize.Y)
            position.Y = clientBounds.Height - frameSize.Y;
    }

    base.Update(gameTime, clientBounds);
}
Now the Update method will only
update the frame of the sprite, rather than moving it, when the moveSprite parameter is set to false. Why
would you ever want to only update the frame and not move a UserControlledSprite?
This is a good time for a little discussion about network data. Passing data through a network is a bottleneck in terms of performance. Although performance over a network is extremely fast, it simply cannot keep up with the internal speed of your PC or Xbox 360. Because of this, you’ll want to limit the amount of data that you pass around the network.
In this game, you’ll be implementing a peer-to-peer network, which means that each PC will send data to the other PC letting it know what’s happening in its instance of the game. A good example of this is when a player moves a sprite in his instance of the game. Let’s say you have two computers playing this game. One player is chasing the other player around the screen. If the chasing player moves left by pressing a key on his keyboard or pressing the thumbstick on his gamepad, how will the other computer know that he moved? The answer is, it won’t.
That’s where the messaging comes in. When the chasing player moves
left, the instance of the game that he is playing on needs to update
that player’s position and then notify the other instance of the game on
the other computer that this player has moved to the left. One way to do
that is to send over the entire UserControlledSprite object from the chasing player’s computer to the other computer.
The other computer could then pull it off the network and use it as the
chasing player in its instance of the game.
However, while the UserControlledSprite may have all the data
that the other computer would need, it also has a lot of other data
(e.g., texture, frame size, sheet size, scale, and other information).
The other computer already has all this information, and doesn’t need to
be given it again. A much more efficient way of doing things is to send
the other computer a message that contains only the information that has
changed (in this case, the player’s position). The receiving computer
can pull the chasing player’s position off the network and use it as the
new position of the chasing player in its instance of the game. This
way, the chasing player will move around the screen on the chased
player’s computer, even though the chasing player is playing on a
different computer.
The complication is that in addition to updating the position of the chasing player, the chased player’s computer also needs to animate that sprite. Another way you could do this would be to pass not only the position of the sprite to the other computer, but also the current frame of the sprite. But why would you not want to do that?
There are two reasons: it would involve sending more data across the network, and it’s not necessary. Will anybody notice if the chasing player’s sprite is a frame or two behind in its animation sequence on the second computer? Not in this game. In other games it might matter, but in this game you have a single, continuous animation for each sprite, and nobody will notice if it is slightly out of sync. Consequently, it’s not worth sending the extra data across the network.
Instead, you need a way to update the position of the UserControlledSprite that represents the other
player and then update that player’s animation without moving it based
on user input—hence the parameter you just added that will cause the
Update method to update the animation
frame only.
Coding Your Game1 Class
The first thing you’ll need to do in your Game1 class is add an enum that you’ll use to represent game states.
We’ve discussed game states in previous chapters, but they’re never more
important than in networked games. Beyond the typical states in a game
(a start state where you display instructions or splash screens, an
in-game state, and an end-game state), in a networked game you’ll
usually also have a sign-in state where the player signs into Xbox LIVE
or Games for Windows LIVE, a state where you find sessions of your game,
and a state where you create sessions.
You’ll actually want to add the following enum outside of the Game1 class, between the Catch namespace declaration and the class
declaration. This will allow any other classes you may add later to
access the game states more easily:
namespace Catch
{
    // Represents different states of the game
    public enum GameState { SignIn, FindSession,
        CreateSession, Start, InGame, GameOver }

    public class Game1 : Microsoft.Xna.Framework.Game
    {
       ...
In addition, you’ll need to add another enum that represents different types of
messages that are sent across the network. Why? You need this because,
as you’ll see shortly, when your game reads data from the network, it
needs to know in advance what type of data is coming in (an int, a string, a Vector2, etc.). You’ll also need to know how
much data is coming (two ints? three
ints? one int and two strings?). That’s not a problem if you’re
always sending the exact same datatypes and the same number of them in
every message. However, your messaging will most likely be more
complicated than that.
To solve this problem, you can send a value at the beginning of
every message that tells the receiving computers what type of message is
coming. In this case, you’re going to be sending data telling other
computers to either start the game, end the game, restart the game,
rejoin the lobby, or update the player position. So, add the following
enum immediately after the GameState enum:
// Represents different types of network messages
public enum MessageType { StartGame, EndGame, RestartGame,
    RejoinLobby, UpdatePlayerPos }
You’ll be adding network code to your Game1
class, so add the following using statement at the
top of the file:
using Microsoft.Xna.Framework.Net;
Next, add the following class-level variables to your Game1 class:
// Fonts
SpriteFont scoreFont;

// Current game state
GameState currentGameState = GameState.SignIn;

// Audio variables
SoundEffectInstance trackInstance;

// Sprite speeds
Vector2 chasingSpeed = new Vector2(4, 4);
Vector2 chasedSpeed = new Vector2(6, 6);

// Network stuff
NetworkSession networkSession;
PacketWriter packetWriter = new PacketWriter(  );
PacketReader packetReader = new PacketReader(  );
Most of these should look familiar to you. You’re going to use the
scoreFont variable to draw text on
the screen. The currentGameState
variable holds a value from the GameState
enum indicating the current state of the game. The trackInstance variable holds the instance of
the soundtrack sound, so you can stop it when the game ends. The two
Vector2 variables hold data
representing the speed of each sprite (the chasing sprite will move
slightly slower than the chased sprite).
Three new variables that you’ve never seen before are listed at
the end of that code block: networkSession, packetWriter, and packetReader.
The backbone of any networked game in XNA is the NetworkSession class. This class represents a
single multiplayer session of your game. Through this class you can
access all members of the session (via the AllGamers property, which is a collection of
Gamer objects), the host of the game
(via the Host member, which is a
NetworkGamer object), and other
properties pertinent to the multiplayer session.
The other two variables are used to send data across the network
to other computers. The PacketWriter writes packets of information to
the network, and the PacketReader reads packets of information from
the network.
The next thing you’re going to need to do is add the following
code to the Initialize method of your
Game1 class, just before the call to
base.Initialize:
Components.Add(new GamerServicesComponent(this));
You’re already familiar with game components, and as you can see,
this code adds a game component of the type GamerServicesComponent to your list of
components in this game. The obvious question is, what’s a GamerServicesComponent? This component enables
all networking and gamer services functionality. It will automatically
enable your game to use Xbox LIVE and Games for Windows LIVE
functions.
Tip
If you use the gamer services component, any PC on which you run your game will have to have the full XNA Game Studio install because the basic redistributable for XNA does not support gamer services.
Next, add a new folder in Solution Explorer under the
CatchContent project and name the folder
Fonts. Add a new spritefont file to that folder
called ScoreFont.spritefont. Then, load the font in
the LoadContent method of the
Game1 class:
scoreFont = Content.Load<SpriteFont>(@"fontsScoreFont");
Adding Update Code
Now you’ll need to modify the Update method of your Game1 class to call a different method based
on the current game state (you’ll add those methods shortly):
protected override void Update(GameTime gameTime)
{
    if (GamePad.GetState(PlayerIndex.One).Buttons.Back == ButtonState.Pressed)
        this.Exit(  );

    // Only run the Update code if the game is currently active.
    // This prevents the game from progressing while
    // gamer services windows are open.
    if (this.IsActive)
    {
        // Run different methods based on game state
        switch (currentGameState)
        {
            case GameState.SignIn:
                Update_SignIn(  );
                break;
            case GameState.FindSession:
                Update_FindSession(  );
                break;
            case GameState.CreateSession:
                Update_CreateSession(  );
                break;
            case GameState.Start:
                Update_Start(gameTime);
                break;
            case GameState.InGame:
                Update_InGame(gameTime);
                break;
            case GameState.GameOver:
                Update_GameOver(gameTime);
                break;
        }
    }

    // Update the network session and pump network messages
    if (networkSession != null)
        networkSession.Update(  );

    base.Update(gameTime);
}
Besides the methods that you haven’t coded yet, there are a couple
of other things here that are worth mentioning. First, the game logic is
surrounded by an if statement
containing this.IsActive. This
relates to the GamerServicesComponent
you added earlier. That component will automatically render sign-in
screens and account dashboards upon request. When it does so, your game
becomes inactive (even though it is drawn in the same window). You don’t
want processing to take place while the player is working in the gamer
services screens, so this is a way to essentially pause your game logic
while those screens are visible.
Second, near the end of the method is a call to Update on the NetworkSession object. As mentioned earlier,
the NetworkSession handles all
session information, player information, and so on, related to the
current session of the game. You have to call Update on that object in order to update the
session and pump the network messages through the session. If you don’t
call Update on the NetworkSession object, you will not be able to
receive messages sent from other players.
Updating While in the SignIn Game State
Next, add the Update_SignIn method to the Game1 class:
protected void Update_SignIn(  )
{
    // If no local gamers are signed in, show sign-in screen
    if (Gamer.SignedInGamers.Count < 1)
    {
        Guide.ShowSignIn(1, false);
    }
    else
    {
        // Local gamer signed in, move to find sessions
        currentGameState = GameState.FindSession;
    }
}
This method checks to see how many local gamers are signed into
the game by using the Gamer.SignedInGamers property. If there are
no gamers signed into the game, the gamer services sign-in screen
(pictured in Figure 18-5) is shown by
calling Guide.ShowSignIn.
Parameters for this method include the pane count, which indicates how
many sign-in window panes to show (on Windows only one is allowed, but
on the Xbox 360 one, two, or four are allowed), and the online only
flag, which is a Boolean indicating whether the game will allow local
players or force players to sign in online.
If you have never signed in with an account on this computer previously, the gamer services sign-in window will look something like Figure 18-5.
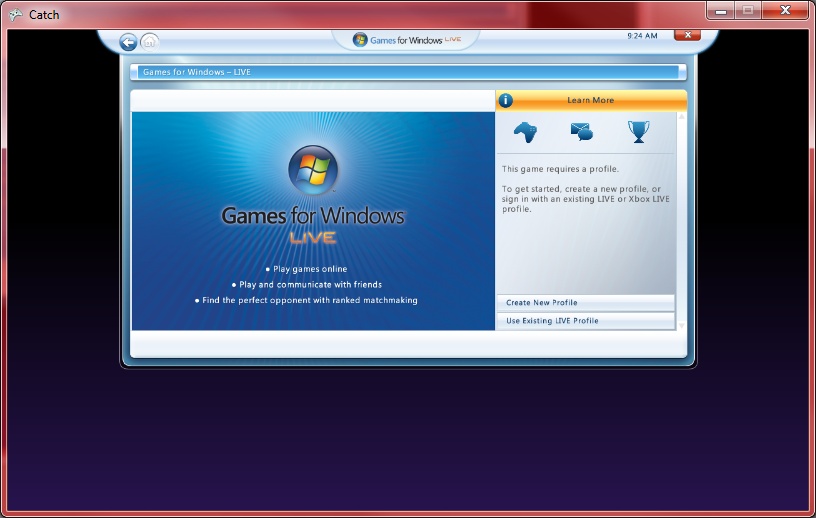
If you’ve signed in on this computer before, the Games for Windows Live screen will give you an option of either creating a new account or selecting a previously used profile.
Note
Games for Windows Live is provided on the PC only for the
purpose of testing Xbox 360 games. As a result, when playing on
your PC under Games for Windows Live, you must sign in with a
premium XNA Creator’s Club profile. Signing in with a nonpremium
account may result in an unhandled
GamerServicesNotAvailableException
exception.
Once a gamer has signed in, the game state moves forward to the
FindSession state.
Updating While in the FindSession Game State
The next thing you’ll need to do is add the Update_FindSession method:
private void Update_FindSession(  )
{
    // Find sessions of the current game
    AvailableNetworkSessionCollection sessions =
        NetworkSession.Find(NetworkSessionType.SystemLink, 1, null);
    if (sessions.Count == 0)
    {
        // If no sessions exist, move to the CreateSession game state
        currentGameState = GameState.CreateSession;
    }
    else
    {
        // If a session does exist, join it, wire up events,
        // and move to the Start game state
        networkSession = NetworkSession.Join(sessions[0]);
        WireUpEvents(  );
        currentGameState = GameState.Start;
    }

}
This method will search for a running session of the current
game using the NetworkSession.Find
method. Because you’re using the NetworkSessionType SystemLink to create the
game, the computer creating the session and the computer searching for
the session must be on the same subnet in order to find each other.
You’re also specifying some specific criteria for finding another
session by passing in parameters to the Find method: you’re looking for games that
use SystemLink and that allow only
one local player.
If no session is found, the game state is moved to the CreateSession state, where a new session is
created. If a session is found, the game joins that session. You then
wire up some gamer events using the WireUpEvents method, which you’ll write in a
moment. Finally, the game state is then moved to the Start state.
Now, add the WireUpEvents
method and the event-handler methods, as follows:
protected void WireUpEvents(  )
{
    // Wire up events for gamers joining and leaving
    networkSession.GamerJoined += GamerJoined;
    networkSession.GamerLeft += GamerLeft;
}

void GamerJoined(object sender, GamerJoinedEventArgs e)
{
    // Gamer joined. Set the tag for the gamer to a new UserControlledSprite.
    // If the gamer is the host, create a chaser; if not, create a chased.
    if (e.Gamer.IsHost)
    {
        e.Gamer.Tag = CreateChasingSprite(  );
    }
    else
    {
        e.Gamer.Tag = CreateChasedSprite(  );
    }
}
The WireUpEvents method first
wires up two events: when a gamer joins the session and when a gamer
leaves the session. You’re wiring these up because you’ll need to add
some special functionality in each scenario.
When a gamer joins the game, the GamerJoined method will be called. This
method will assign a property named Tag for the player to a new UserControlledSprite. This Tag property is an object type, which means
that you can use it to store virtually anything. Typically you’ll use
it to hold data representing a particular player in the game—in this
case, a UserControlledSprite.
It’s important to note that the Tag property of the NetworkGamer object will not be sent across
the network. You don’t use this property to sync up your objects.
However, you can use this object to track each player locally in each
instance of the game. What you’ll be doing here is storing a UserControlledSprite in the Tag property of the NetworkGamer object for each player. As one
player moves, that player’s computer will send a message to the other
computer telling it the player’s new position. That computer will then
assign the position property of the
UserControlledSprite object (stored
in the NetworkGamer.Tag property)
for that player to the position received over the network and will use
the NetworkGamer.Tag property
(which is a UserControlledSprite)
to draw the opposing player.
If this doesn’t make sense just yet, it’s OK. Follow the code in the rest of this chapter, and hopefully it will become clearer as we move on.
The NetworkGamer.Tag property
is set depending on whether the gamer who joined is the host, by using
one of two methods:
private UserControlledSprite CreateChasedSprite(  )
{
    // Create a new chased sprite
    // using the gears sprite sheet
    return new UserControlledSprite(
            Content.Load<Texture2D>(@"Images/gears"),
            new Vector2((Window.ClientBounds.Width / 2) + 150,
                (Window.ClientBounds.Height / 2) + 150),
            new Point(100, 100), 10, new Point(0, 0),
            new Point(6, 8), chasedSpeed, false);
}

private UserControlledSprite CreateChasingSprite(  )
{
    // Create a new chasing sprite
    // using the dynamite sprite sheet
    return new UserControlledSprite(
            Content.Load<Texture2D>(@"Images/dynamite"),
            new Vector2((Window.ClientBounds.Width / 2) − 150,
                (Window.ClientBounds.Height / 2) − 150),
            new Point(100, 100), 10, new Point(0, 0),
            new Point(6, 8), chasingSpeed, true);
}
These should be pretty straightforward: you’re creating a new
sprite that will be chased using the gears sprite sheet in the
CreateChasedSprite method and
creating a sprite that will do the chasing using the dynamite sprite
sheet in the CreateChasingSprite
method.
You’ll need to add these images to your project before moving on. The images are located with the source code for this chapter in the CatchCatchContentImages folder. Add a new folder under the CatchContent node in Solution Explorer called Images, and add the dynamite.png and gears.png files from the source code for this chapter to your project in the new folder.
Finally, if a gamer leaves, you’ll want to check to see whether
that gamer was the local gamer. If so, dispose of the session and move
the game state to the FindSession
state:
void GamerLeft(object sender, GamerLeftEventArgs e)
{
    // Dispose of the network session, set it to null.
    // Stop the soundtrack and go
    // back to searching for sessions.
    networkSession.Dispose(  );
    networkSession = null;

    trackInstance.Stop(  );

    currentGameState = GameState.FindSession;
}
Updating While in the CreateSession GameState
Next, add the Update_CreateSession method:
private void Update_CreateSession(  )
{
    // Create a new session using SystemLink with a max of 1 local player
    // and a max of 2 total players
    networkSession = NetworkSession.Create(NetworkSessionType.SystemLink, 1, 2);
    networkSession.AllowHostMigration = true;
    networkSession.AllowJoinInProgress = false;

    // Wire up events and move to the Start game state
    WireUpEvents(  );
    currentGameState = GameState.Start;
}
This method creates a new session using the NetworkSession.Create method. The parameters are session type (in this
case, SystemLink), max local
players (one player allowed per
computer), and max total players (two players allowed per
session).
After it’s created, the session is set to allow host migration (meaning if the host drops, the other player becomes the host), and not to allow gamers to join when the game is in progress.
The same events that you used for joining a session are then
wired up, and the game state is set to Start.
Updating While in the Start Game State
Now you’ll want to add the logic that will run when
Update is called and the game is in
the Start game state:
private void Update_Start(GameTime gameTime)
{
    // Get local gamer
    LocalNetworkGamer localGamer = networkSession.LocalGamers[0];

    // Check for game start key or button press
    // only if there are two players
    if (networkSession.AllGamers.Count == 2)
    {
        // If space bar or Start button is pressed, begin the game
        if (Keyboard.GetState(  ).IsKeyDown(Keys.Space) ||
            GamePad.GetState(PlayerIndex.One).Buttons.Start ==
            ButtonState.Pressed)
        {            // Send message to other player that we're starting
            packetWriter.Write((int)MessageType.StartGame);
            localGamer.SendData(packetWriter, SendDataOptions.Reliable);

            // Call StartGame
            StartGame(  );
        }
    }

    // Process any incoming packets
    ProcessIncomingData(gameTime);
}
This method first gets the local gamer’s LocalNetworkGamer object by using networkSession.LocalGamers[0]. You know that
the local gamer you want is the first one in the list because you’re
allowing only one local gamer per computer. This LocalNetworkGamer object will be used later
in the method to send network data to the other computers in the
session.
The main purpose of this method is to determine whether the game
will start. When you draw during the Start game state, you’ll be drawing some
text telling the player to wait
for other players (if there is only one player in the
session) or to hit the space bar or Start button on the gamepad to
begin the game (if there are two players in the session).
There are two ways this game can start, for each instance of the game:
The local player can hit the space bar or the Start button. In this method, you’ve added code to start the game if that happens.
The other player (on the other computer) can start the game, in which case you’ll receive a network message telling you that the other player has started the game and that you should start the game now (in this case, the local player doesn’t need to hit the space bar or Start button to begin, as the other player has already done so).
When the local player starts the game
For the first scenario, you’re looking for space bar
or Start button presses in the Update_Start method, but only when there
are two gamers in the session. If the local user starts the game
that way, you send a message to the other computer by writing data
to the packetWriter object using
the Write method. As was
discussed earlier in this chapter, you’ll always start your packets
with a MessageType enum value (in
this case, MessageType.StartGame). This will tell the
game instance that reads the packet that the packet is a start-game
message. No other data is needed for a start-game message, so that’s
all that’s written in this particular packet.
The packet is then sent using the local gamer object’s
SendData method. In this method,
you pass the packetWriter and
specify some SendDataOptions. The
send options include:
NonePacket delivery is not guaranteed, and packets are not guaranteed to be delivered in any specific order (some packets sent after others may arrive before those others).
InOrderPacket delivery is not guaranteed, but the order is guaranteed (packets that are delivered will not be delivered out of order).
ReliablePackets are guaranteed to be delivered, but in no specific order. Because a little more work is being done to guarantee packet delivery, this is slower than
NoneandInOrder.ReliableInOrderPackets are guaranteed to be delivered, and guaranteed to be in the correct order (this is the slowest way to send packets and should be used sparingly).
Tip
Why did we use
SendDataOptions.Reliablein the preceding code, when that’s one of the slowest options?These are critical messages—they must arrive. It’s one thing to miss a packet that updates a sprite position. The next packet will also contain the sprite position, so it won’t be a big deal. Missing a command telling the game to end or start or move from one state to another, however, would be a major problem.
Next, the StartGame method
is called. That method should look like this:
protected void StartGame(  )
{
    // Set game state to InGame
    currentGameState = GameState.InGame;

    // Start the soundtrack audio
    SoundEffect se = Content.Load<SoundEffect>(@"audio	rack");
    trackInstance = se.CreateInstance();
    trackInstance.IsLooped = true;
    trackInstance.Play();

    // Play the start sound
    se = Content.Load<SoundEffect>(@"audiostart");
    se.Play(  );
}
This method sets the current game state to InGame and then plays some sound effects
to start the game. For these sounds to work, you’ll need to include
them in your project (remember, you’ll be using the simplified audio
API in this project rather than XACT).
Located with the source code for this chapter, in the CatchCatchContentAudio folder, are three audio files: boom.wav, start.wav, and track.wav. Create a folder under the CatchContent node in Solution Explorer called Audio and add these files to that folder.
When the remote player starts the game
To take care of the second way of starting a game
(when the other player starts it and you receive a network message
telling you to start the game), the Update_Start method calls another method:
ProcessIncomingData. All game
states that can receive data will use this method. Essentially, all
the ProcessIncomingData method
does is read the MessageType enum value from the start
of the incoming packet and call the appropriate method to handle
whatever type of message was received. Add the ProcessIncomingData method, as
follows:
protected void ProcessIncomingData(GameTime gameTime)
{
    // Process incoming data
    LocalNetworkGamer localGamer = networkSession.LocalGamers[0];

    // While there are packets to be read...
    while (localGamer.IsDataAvailable)
    {
        // Get the packet
        NetworkGamer sender;
        localGamer.ReceiveData(packetReader, out sender);

        // Ignore the packet if you sent it
        if (!sender.IsLocal)
        {
            // Read messagetype from start of packet
            // and call appropriate method
            MessageType messageType = (MessageType)packetReader.ReadInt32(  );
            switch (messageType)
            {
                case MessageType.EndGame:
                    EndGame(  );
                    break;
                case MessageType.StartGame:
                    StartGame(  );
                    break;
                case MessageType.RejoinLobby:
                    RejoinLobby(  );
                    break;
                case MessageType.RestartGame:
                    RestartGame(  );
                    break;
                case MessageType.UpdatePlayerPos:
                    UpdateRemotePlayer(gameTime);
                    break;
            }
        }
    }
}
First, this method gets the local gamer object from the
network session and uses the IsDataAvailable property to determine
whether any other gamers in this session have sent any packets to this local gamer object. If
so, the packet is read from the PacketReader object. If the sender turns
out to be the local gamer (i.e., if it was broadcast to all
computers and thus was also sent to himself), the message is
ignored. Otherwise, the PacketReader reads an int32 value from the packet, which
represents the MessageType
(assuming that the first thing you always write in your packets when
you send them is a MessageType
enum value). Based on this value, the appropriate method
is called to handle the message.
In this particular case, the packet you wrote in the Update_Start method contained a message
type of MessageType.StartGame.
After sending the message, the method called the StartGame method. Notice also in the
ProcessIncomingData method that
when a message type of MessageType.StartGame is received, the
StartGame method is called. This
way, the StartGame method ends up
being called on both computers.
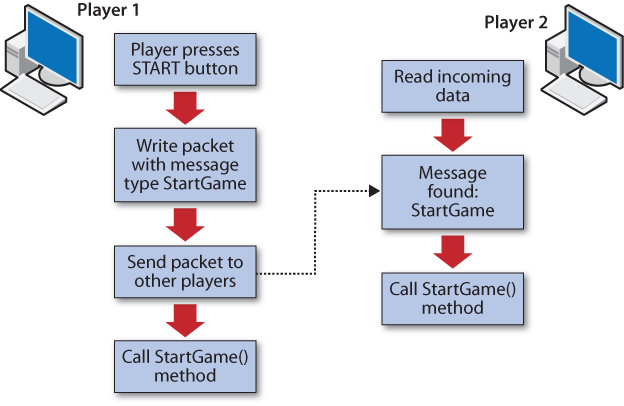
Figure 18-6 shows a flow diagram
indicating how this process works and how the StartGame method ends up being called on
both PCs. When Player 1 starts the game, a message is sent to Player
2, and Player 1’s computer then calls StartGame. Player 2’s computer constantly
looks for new messages. When a StartGame message is read, StartGame is called on Player 2’s computer
as well.
Before moving on to the other methods called in the Update method based on the different game
states, let’s add the rest of the methods referenced in the ProcessIncomingData method. These methods
will all function like the StartGame method, in that they’ll be
called on both computers using the messaging technique just
described.
First, add the EndGame
method:
protected void EndGame(  )
{
    // Play collision sound effect
    // (game ends when players collide)
    SoundEffect se = Content.Load<SoundEffect>(@"audiooom");
    se.Play(  );

    // Stop the soundtrack music
    trackInstance.Stop(  );

    // Move to the game-over state
    currentGameState = GameState.GameOver;
}
There’s nothing really impressive going on here: you’re
playing the collision sound effect because the game will end when
players collide, and then stopping the soundtrack music and setting
the game state to GameOver.
Tip
It’s critical that methods such as StartGame and EndGame are called on
both computers in the session because
otherwise your data and game states will be out of sync. Why this
is the case might be more obvious when you realize that both of
these methods play audio effects.
If you have two computers in a session and EndGame is called on only one of them,
the end-game sound effect would play on only that computer. Also,
the soundtrack will stop on only that computer and the game state
will not be set on the other computer, which means that the two
computers will be in totally different game states. Not
good!
The RejoinLobby and
RestartGame methods are pretty
similar:
private void RejoinLobby(  )
{
    // Switch dynamite and gears sprites
    // as well as chaser versus chased
    SwitchPlayersAndReset(false);
    currentGameState = GameState.Start;
}

private void RestartGame(  )
{
    // Switch dynamite and gears sprites
    // as well as chaser versus chased
    SwitchPlayersAndReset(true);
    StartGame(  );
}
Both of these methods first switch the players and reset the
game (scores, positions of players, etc.). The RejoinLobby method then sets the game
state to Start, causing the
“Waiting for players” or “Press Spacebar or Start button to begin”
message screen to be displayed.
The RestartGame method
calls the StartGame method, which
actually restarts the game.
Both of these methods use the SwitchPlayersAndReset method to switch the
players. That method should look like this:
private void SwitchPlayersAndReset(bool switchPlayers)
{
    // Only do this if there are two players
    if (networkSession.AllGamers.Count == 2)
    {
        // Are we truly switching players or are we
        // setting the host as the chaser?
        if (switchPlayers)
        {
            // Switch player sprites
            if (((UserControlledSprite)networkSession.AllGamers[0].Tag).isChasing)
            {
                networkSession.AllGamers[0].Tag = CreateChasedSprite(  );
                networkSession.AllGamers[1].Tag = CreateChasingSprite(  );
            }
            else
            {
                networkSession.AllGamers[0].Tag = CreateChasingSprite(  );
                networkSession.AllGamers[1].Tag = CreateChasedSprite(  );
            }
        }
        else
        {
            // Switch player sprites
            if (networkSession.AllGamers[0].IsHost)
            {
                networkSession.AllGamers[0].Tag = CreateChasingSprite(  );
                networkSession.AllGamers[1].Tag = CreateChasedSprite(  );
            }
            else
            {
                networkSession.AllGamers[0].Tag = CreateChasedSprite(  );
                networkSession.AllGamers[1].Tag = CreateChasingSprite(  );
            }
        }

    }
}
This method will switch the gears and dynamite sprites for each player, switch the chasing/chased variable, and reset things such as the scores and positions of each player.
The last method called in the ProcessIncomingData method is one that
updates the remote player. This process is similar to the one
followed when calling StartGame,
EndGame, and other such methods.
What happens here is that when a local player moves, that player’s
UserControlledSprite object on
the local computer is updated. A message is then sent to the other
computer with the new position of that player’s sprite. On the other
end, the message is read and the following method is called:
protected void UpdateRemotePlayer(GameTime gameTime)
{
    // Get the other (nonlocal) player
    NetworkGamer theOtherGuy = GetOtherPlayer(  );

    // Get the UserControlledSprite representing the other player
    UserControlledSprite theOtherSprite = ((UserControlledSprite)theOtherGuy.Tag);

    // Read in the new position of the other player
    Vector2 otherGuyPos = packetReader.ReadVector2(  );

    // If the sprite is being chased,
    // retrieve and set the score as well
    if (!theOtherSprite.isChasing)
    {
        int score = packetReader.ReadInt32(  );
        theOtherSprite.score = score;
    }

    // Set the position
    theOtherSprite.Position = otherGuyPos;

    // Update only the frame of the other sprite
    // (no need to update position because you just did!)
    theOtherSprite.Update(gameTime, Window.ClientBounds, false);
}

protected NetworkGamer GetOtherPlayer(  )
{
    // Search through the list of players and find the
    // one that's remote
    foreach (NetworkGamer gamer in networkSession.AllGamers)
    {
        if (!gamer.IsLocal)
        {
            return gamer;
        }
    }

    return null;
}
This method will retrieve the remote player by calling the
GetOtherPlayer method (also shown
in the preceding code), which searches through all gamers in the
session and finds the one that is not local. Next, the method
retrieves the UserControlledSprite object for that
player from the Tag property and
reads a Vector2 from the packet
reader, which you send for all UpdatePlayerPos MessageTypes. You’ll also
be sending the score for the player if the remote player was the
player being chased. The method reads that data and sets the
appropriate members in the UserControlledSprite. Then, the method
updates the animation frame of the remote player’s sprite.
Updating While in the InGame Game State
Now you’ll need to add the Update_InGame method that the Update method will call when the game is in
the InGame game state:
private void Update_InGame(GameTime gameTime)
{
    // Update the local player
    UpdateLocalPlayer(gameTime);

    // Read any incoming data
    ProcessIncomingData(gameTime);


    // Only host checks for collisions
    if (networkSession.IsHost)
    {
        // Only check for collisions if there are two players
        if (networkSession.AllGamers.Count == 2)
        {
            UserControlledSprite sprite1 =
                (UserControlledSprite)networkSession.AllGamers[0].Tag;
            UserControlledSprite sprite2 =
                (UserControlledSprite)networkSession.AllGamers[1].Tag;

            if (sprite1.collisionRect.Intersects(
                sprite2.collisionRect))
            {
                // If the two players intersect, game over.
                // Send a game-over message to the other player
                // and call EndGame.
                packetWriter.Write((int)MessageType.EndGame);
                networkSession.LocalGamers[0].SendData(packetWriter,
                    SendDataOptions.Reliable);

                EndGame(  );
            }
        }
    }
}
First, this method updates the local player. This method, which
will be shown shortly, will update the animation frame as well as the
movement of the player based on local player input. Then, any incoming
data is read in the ProcessIncomingData method.
Next, the end-game collision check is run, but only when the player is the host. Why have only the host check for collisions? If both players checked for collisions, they’d probably both send messages saying there was a collision at the same time—or even worse, one might think there was a collision when the other didn’t. You could add some code to parse the messages to avoid that problem, but that would still involve more work than doing it this way. It’s often useful to have one client be the master of things such as collision detection, game start, game stop, and so on.
So, the host checks for collisions and, if one occurs, sends a
message to the other player saying that the game is over. It then
calls EndGame.
The method that updates the local player (which was called at
the beginning of Update_InGame) is
listed here. Add this method to your Game1 class next:
protected void UpdateLocalPlayer(GameTime gameTime)
{
    // Get local player
    LocalNetworkGamer localGamer = networkSession.LocalGamers[0];

    // Get the local player's sprite
    UserControlledSprite sprite = (UserControlledSprite)localGamer.Tag;

    // Call the sprite's Update method, which will process user input
    // for movement and update the animation frame
    sprite.Update(gameTime, Window.ClientBounds, true);

    // If this sprite is being chased, increment the score
    // (score is just the num milliseconds that the chased player
    // survived)
    if(!sprite.isChasing)
        sprite.score += gameTime.ElapsedGameTime.Milliseconds;

    // Send message to other player with message tag and
    // new position of sprite
    packetWriter.Write((int)MessageType.UpdatePlayerPos);
    packetWriter.Write(sprite.Position);

    // If this player is being chased, add the score to the message
    if (!sprite.isChasing)
        packetWriter.Write(sprite.score);

    // Send data to other player
    localGamer.SendData(packetWriter, SendDataOptions.InOrder);

}
This method gets the local player and then the local player’s
sprite. It then calls Update on
that sprite, which will process user input and update the animation
frame.
If this player is being chased, the score (which is just the number of milliseconds he has survived) is incremented. Then, a message is sent to the other player with the new position of the player and the score.
Updating While in the GameOver Game State
The last part of the Update code is for the GameOver game state. Add this method to the
Game1 class:
private void Update_GameOver(GameTime gameTime)
{
    KeyboardState keyboardState = Keyboard.GetState(  );
    GamePadState gamePadSate = GamePad.GetState(PlayerIndex.One);

    // If player presses Enter or A button, restart game
    if (keyboardState.IsKeyDown(Keys.Enter) ||
        gamePadSate.Buttons.A == ButtonState.Pressed)
    {
        // Send restart game message
        packetWriter.Write((int)MessageType.RestartGame);
        networkSession.LocalGamers[0].SendData(packetWriter,
            SendDataOptions.Reliable);

        RestartGame(  );
    }
    // If player presses Escape or B button, rejoin lobby
    if (keyboardState.IsKeyDown(Keys.Escape) ||
        gamePadSate.Buttons.B == ButtonState.Pressed)
    {
        // Send rejoin lobby message
        packetWriter.Write((int)MessageType.RejoinLobby);
        networkSession.LocalGamers[0].SendData(packetWriter,
            SendDataOptions.Reliable);

        RejoinLobby(  );
    }

    // Read any incoming messages
    ProcessIncomingData(gameTime);
}
This method will read player input and, if the player indicates
she wants to restart the game, sends a message to the other player and
calls RestartGame. The same is done
for RejoinLobby. Then, any incoming
data is read.
Adding Draw Code
The final step is adding code to draw the game. Replace
your existing Draw method in the
Game1 class with the
following:
protected override void Draw(GameTime gameTime)
{
    // Only draw when game is active
    if (this.IsActive)
    {
        // Based on the current game state,
        // call the appropriate method
        switch (currentGameState)
        {
            case GameState.SignIn:
            case GameState.FindSession:
            case GameState.CreateSession:
                GraphicsDevice.Clear(Color.DarkBlue);
                break;            case GameState.Start:
                DrawStartScreen(  );
                break;


            case GameState.InGame:
                DrawInGameScreen(gameTime);
                break;

            case GameState.GameOver:
                DrawGameOverScreen(  );
                break;

        }

    }

    base.Draw(gameTime);
}
This method, like the Update
method, will perform certain actions only when the game is active. This
is to prevent drawing when the gamer services windows are open. The
method then calls other methods based on the game state.
Notice that the SignIn,
FindSession, and CreateSession game states do nothing but draw
a blank screen by calling GraphicsDevice.Clear. This is because other
gamer services activities are going on during these game states, and no
drawing on the screen is needed.
So, let’s start with the next one. Add the following DrawStartScreen method to your Game1 class:
private void DrawStartScreen(  )
{
    // Clear screen
    GraphicsDevice.Clear(Color.AliceBlue);

    // Draw text for intro splash screen
    spriteBatch.Begin(  );

    // Draw instructions
    string text = "The dynamite player chases the gears
";
    text += networkSession.Host.Gamertag +
        " is the HOST and plays as dynamite first";
    spriteBatch.DrawString(scoreFont, text,
        new Vector2((Window.ClientBounds.Width / 2)
        - (scoreFont.MeasureString(text).X / 2),
        (Window.ClientBounds.Height / 2)
        - (scoreFont.MeasureString(text).Y / 2)),
        Color.SaddleBrown);

    // If both gamers are there, tell gamers to press space bar or Start to begin
    if (networkSession.AllGamers.Count == 2)
    {        text = "(Game is ready. Press Spacebar or Start button to begin)";
        spriteBatch.DrawString(scoreFont, text,
            new Vector2((Window.ClientBounds.Width / 2)
            - (scoreFont.MeasureString(text).X / 2),
            (Window.ClientBounds.Height / 2)
            - (scoreFont.MeasureString(text).Y / 2) + 60),
            Color.SaddleBrown);
    }
    // If only one player is there, tell gamer you're waiting for players
    else
    {
        text = "(Waiting for players)";
        spriteBatch.DrawString(scoreFont, text,
            new Vector2((Window.ClientBounds.Width / 2)
            - (scoreFont.MeasureString(text).X / 2),
            (Window.ClientBounds.Height / 2) + 60),
            Color.SaddleBrown);
    }

    // Loop through all gamers and get their gamertags,
    // then draw list of all gamers currently in the game
    text = "

Current Player(s):";
    foreach (Gamer gamer in networkSession.AllGamers)
    {
        text += "
" + gamer.Gamertag;
    }
    spriteBatch.DrawString(scoreFont, text,
        new Vector2((Window.ClientBounds.Width / 2)
        - (scoreFont.MeasureString(text).X / 2),
        (Window.ClientBounds.Height / 2) + 90),
        Color.SaddleBrown);

    spriteBatch.End(  );
}
This method shouldn’t include anything you haven’t seen before, apart from at the end of the method where you’re looping through all gamers in the network session and pulling their gamertags to display on the screen. The rest of the method draws simple instructions that the player should read at the start splash screen.
Next, add the following method to draw the screen during the game:
private void DrawInGameScreen(GameTime gameTime)
{
    // Clear device
    GraphicsDevice.Clear(Color.White);

    spriteBatch.Begin(  );

    // Loop through all gamers in session
    foreach (NetworkGamer gamer in networkSession.AllGamers)
    {
        // Pull out the sprite for each gamer and draw it
        UserControlledSprite sprite = ((UserControlledSprite)gamer.Tag);
        sprite.Draw(gameTime, spriteBatch);

        // If the sprite is being chased, draw the score for that sprite
        if (!sprite.isChasing)
        {
            string text = "Score: " + sprite.score.ToString(  );
            spriteBatch.DrawString(scoreFont, text,
                new Vector2(10, 10),
                Color.SaddleBrown);
        }
    }

    spriteBatch.End(  );
}
This method loops through all gamers in the session and pulls out
their UserControlledSprite objects,
which it then draws. If the sprite being drawn is the one being chased,
the score for that sprite is also drawn on the screen.
Finally, add the DrawGameOverScreen method, which will loop
through all the sprites, find the one that was chased, and draw its
score on the screen. It will then draw instructions to the players for
further input:
private void DrawGameOverScreen(  )
{
    // Clear device
    GraphicsDevice.Clear(Color.Navy);

    spriteBatch.Begin(  );

    // Game over. Find the chased sprite and draw his score.
    string text = "Game Over
";
    foreach (NetworkGamer gamer in networkSession.AllGamers)
    {
        UserControlledSprite sprite = ((UserControlledSprite)gamer.Tag);
        if (!sprite.isChasing)
        {
            text += "Score: " + sprite.score.ToString(  );
        }
    }

    // Give players instructions from here
    text += "
Press ENTER or A button to switch and play again";
    text += "
Press ESCAPE or B button to exit to game lobby";

    spriteBatch.DrawString(scoreFont, text,
        new Vector2((Window.ClientBounds.Width / 2)
        - (scoreFont.MeasureString(text).X / 2),
        (Window.ClientBounds.Height / 2)
        - (scoreFont.MeasureString(text).Y / 2)),
        Color.WhiteSmoke);

    spriteBatch.End(  );
}
Wow. That’s a lot of code! You’re now ready to give it a whirl, though. Grab a friend and run the game on two different computers that are on the same domain, subnet, and workgroup. You might need to turn off the firewalls on both computers as well.
Once the game is running, you should see a sign-in screen similar to that shown previously in Figure 18-5.
After you’ve both signed in, the first computer to get to that point should create a session, which the other computer will join. At that point you’ll see a screen similar to Figure 18-7.
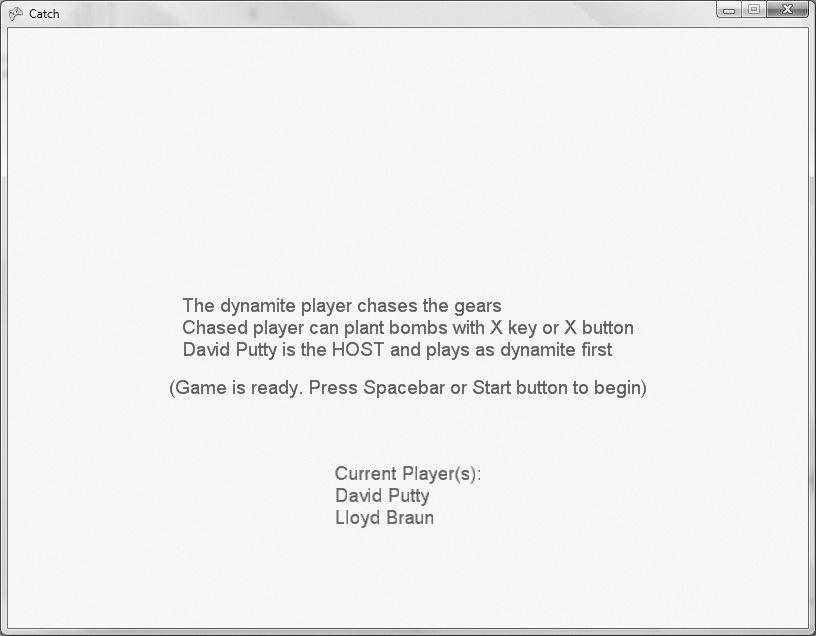
The game will begin after someone hits the space bar or the Start button on either computer. Both players will be able to move on their own computers and have that movement reflected on the other player’s computer through the network messaging you’ve implemented. Your game will look something like Figure 18-8.
Finally, when the sprites collide, the game-over screen will display (as shown in Figure 18-9).
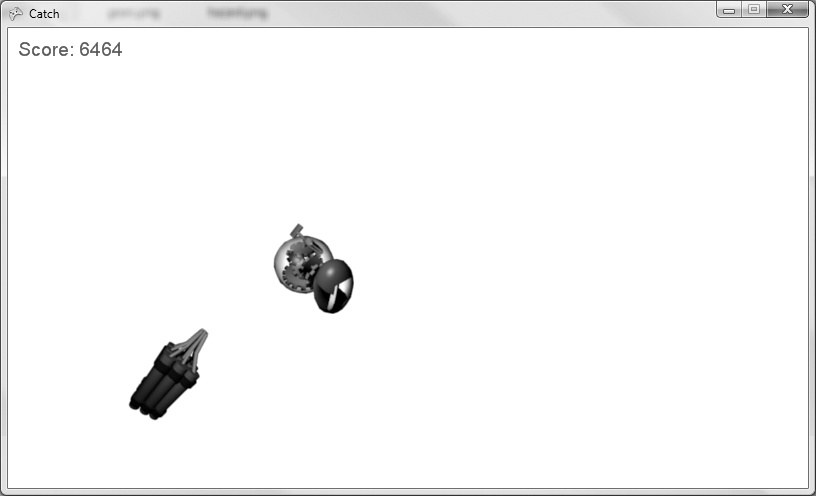
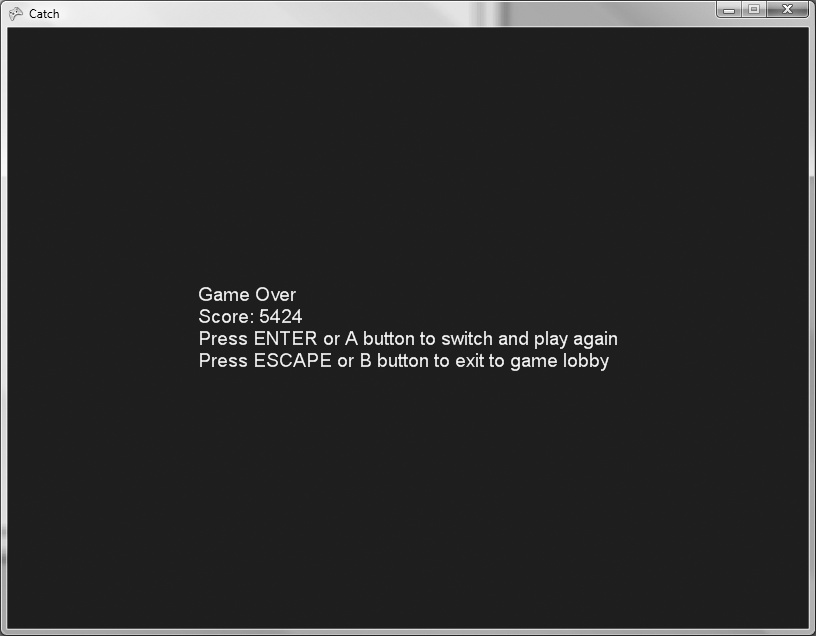
Adding Biohazard Bombs of Insanity!
Let’s modify this game to make things a little more interesting. Rather than just having one player chase another player around the screen, we’ll let the chased player drop biohazard bombs every 5 seconds, which will cut the movement speed of the chasing sprite by 50% for 5 seconds. That should spice things up a bit.
First, you’ll need to add a few more resources. Add the hazardhit.wav and hazardplant.wav files to your CatchContentAudio folder in Visual Studio (the files are located with the source code for this chapter in the CatchCatchContentAudio folder), and then add the hazard.png image to your project’s CatchContentImages folder (that file is located with the source code for this chapter in the CatchCatchContentImages folder).
Next, you’re going to need to send two new message types between
the two computers, for when the chased sprite plants a bomb and when the
chasing sprite hits a bomb. Add two new message types to the MessageTypes enum:
// Represents different types of network messages
public enum MessageType { StartGame, EndGame, RestartGame,
    RejoinLobby, UpdatePlayerPos, DropBomb, ChaserHitBomb }
Next, add the following class-level variables to the Game1 class:
// Bomb variables
int bombCooldown = 0;
List<UserControlledSprite> bombList = new List<UserControlledSprite>(  );
int bombEffectCooldown = 0;
The bombCooldown will be a
cooldown timer indicating when the next bomb can be planted. The
bombList is a list of bomb objects.
The bombEffectCooldown will tell you
when the effect of the bomb expires.
Because you added two new message types for bombs, you’ll need to
go to the ProcessIncomingData
method and add some code to do something when those messages are
received. Add the following case
statements to the switch statement in
that method:
case MessageType.DropBomb:
    AddBomb(packetReader.ReadVector2(  ));
    break;
case MessageType.ChaserHitBomb:
    ChaserHitBomb(packetReader.ReadInt32(  ));
    break;
Then, add the AddBomb method,
as follows:
protected void AddBomb(Vector2 position)
{
    // Add a bomb to the list of bombs
    bombList.Add(new UserControlledSprite(
        Content.Load<Texture2D>(@"imageshazard"),
        position, new Point(100, 100), 10, new Point(0, 0),
        new Point(6, 8), Vector2.Zero, false));    // Play plant bomb sound effect
    SoundEffect se = Content.Load<SoundEffect>(@"audiohazardplant");
    se.Play(  );
}
This method will add a bomb to the bomb list and then play the
appropriate sound. The position of the bomb (read in from the packet in
the ProcessIncomingData method) is
passed in as a parameter.
Next, add the following methods:
private void ChaserHitBomb(int index)
{
    // Get the chaser player
    NetworkGamer chaser = GetChaser(  );

    // Set the chaser's speed to 50% its current value
    ((UserControlledSprite)chaser.Tag).speed *= .5f;

    // Set the effect cooldown to 5 seconds
    bombEffectCooldown = 5000;

    // Remove the bomb
    bombList.RemoveAt(index);

    // Play the hazardhit sound
    SoundEffect se = Content.Load<SoundEffect>(@"audiohazardhit");
    se.Play(  );
}

protected NetworkGamer GetChaser(  )
{
    // Loop through all gamers and find the one that is chasing
    foreach (NetworkGamer gamer in networkSession.AllGamers)
    {
        if (((UserControlledSprite)gamer.Tag).isChasing)
        {
            return gamer;
        }
    }

    return null;
}
The ChaserHitBomb method first
gets the chasing sprite by calling a method called GetChaser, which is also defined in the
preceding code. GetChaser loops
through all gamer sprites and finds the one that is currently chasing.
Then, the ChaserHitBomb method
reduces the chaser’s speed by 50%, sets the timer, removes the bomb, and
plays a deadly sound effect. (Yeah…scary!)
Next, you’ll need to have a way for the player to set a bomb.
You’ll want your local player to set the bombs, and then that computer
will send a message telling the other computer that a bomb was set. To
do this, add the following block of code at the end of your UpdateLocalPlayer method:
// If the sprite is being chased, he can plant bombs
if (!sprite.isChasing)
{
    // If it's time to plant a bomb, let the user do it;
    // otherwise, subtract gametime from the timer
    if (bombCooldown <= 0)
    {
        // If user pressed X or X button, plant a bomb
        if (Keyboard.GetState(  ).IsKeyDown(Keys.X) ||
            GamePad.GetState(PlayerIndex.One).Buttons.X == ButtonState.Pressed)
        {
            // Add a bomb
            AddBomb(sprite.Position);
            bombCooldown = 5000;

            packetWriter.Write((int)MessageType.DropBomb);
            packetWriter.Write(sprite.Position);
            localGamer.SendData(packetWriter, SendDataOptions.InOrder);
        }
    }
    else
        bombCooldown −= gameTime.ElapsedGameTime.Milliseconds;

}
This section of code will execute only if the player is being chased (only that player can plant bombs). It checks to see whether the bomb cooldown timer has expired, and then it checks to see whether the player has pressed a key or button that plants a bomb. If the cooldown timer has not expired, the cooldown timer is decreased by the amount of game time that has elapsed.
If the player plants a bomb, AddBomb is called, the bomb cooldown timer is
set to 5 seconds, and a message is sent to the other player with the
position of the bomb.
Next, because you can restart the game after it’s ended, you’ll
want to clear the bomb list in the StartGame method so you start with a clean
game window each time you play. Add the following code at the beginning
of the StartGame method:
// Remove all bombs from previous game played
// during this instance of the application
bombList.Clear(  );
You’ll then need to update the animation frames of each bomb. In
the Update_InGame method, add the
following code immediately after the call to UpdateLocalPlayer:
// Loop through each bomb and update only the animation
foreach (UserControlledSprite bomb in bombList)
    bomb.Update (gameTime, Window.ClientBounds, false);
Now you need to check to see whether the chaser has hit a bomb.
Because this is collision
detection, let one computer handle it. You’re already using the host to
handle collision detection between the two players, so you might as well
add the bomb collision-detection
logic there as well. In the Update_InGame method, you check for player
versus player collisions with the following code:
// Only host checks for collisions
if (networkSession.IsHost)
{
    // Only check for collisions if there are two players
    if (networkSession.AllGamers.Count == 2)
    {
        UserControlledSprite sprite1 =
            (UserControlledSprite)networkSession.AllGamers[0].Tag;
        UserControlledSprite sprite2 =
            (UserControlledSprite)networkSession.AllGamers[1].Tag;

        if (sprite1.collisionRect.Intersects(
            sprite2.collisionRect))
        {
            // If the two players intersect, game over.
            // Send a game-over message to the other player
            // and call EndGame.
            packetWriter.Write((int)MessageType.EndGame);
            networkSession.LocalGamers[0].SendData(packetWriter,
                SendDataOptions.Reliable);

            EndGame(  );
        }
    }
}
Add some code at the end of that block to be executed after the comparison for player versus player collisions. The same block of code is shown again here, with the added lines in bold:
// Only host checks for collisions
if (networkSession.IsHost)
{
    // Only check for collisions if there are two players
    if (networkSession.AllGamers.Count == 2)
    {
        UserControlledSprite sprite1 =
            (UserControlledSprite)networkSession.AllGamers[0].Tag;
        UserControlledSprite sprite2 =
            (UserControlledSprite)networkSession.AllGamers[1].Tag;

        if (sprite1.collisionRect.Intersects(
            sprite2.collisionRect))
        {
            // If the two players intersect, game over.
            // Send a game-over message to the other player
            // and call EndGame.
            packetWriter.Write((int)MessageType.EndGame);
            networkSession.LocalGamers[0].SendData(packetWriter,
                SendDataOptions.Reliable);

            EndGame(  );
        }

        // Check for collisions between chaser and bombs.
        // First, get chaser.
        UserControlledSprite chaser =
            (UserControlledSprite)GetChaser(  ).Tag;

        // Loop through bombs
        for (int i = 0; i < bombList.Count; ++i)
        {
            UserControlledSprite bomb = bombList[i];

            // If bombs and chaser collide, call ChaserHitBomb
            // and send message to other player passing the index
            // of the bomb hit
            if (bomb.collisionRect.Intersects(
                chaser.collisionRect))
            {
                ChaserHitBomb(i);

                packetWriter.Write((int)MessageType.ChaserHitBomb);
                packetWriter.Write(i);
                networkSession.LocalGamers[0].SendData(packetWriter,
                    SendDataOptions.Reliable);
            }
        }

    }
}
You’ll also need to add some code in the Update_InGame method that will check to see
whether the bomb effect has expired. Add the following methods to the
Game1 class:
private void ExpireBombEffect(GameTime gameTime)
{
    // Is there a bomb effect in place?
    if (bombEffectCooldown > 0)
    {
        // Subtract game time from the timer
        bombEffectCooldown −= gameTime.ElapsedGameTime.Milliseconds;

        // If the timer has expired, expire the bomb effect
        if (bombEffectCooldown <= 0)
        {
            ExpireBombEffect(  );
        }
    }
}private void ExpireBombEffect(  )
{
    // Get the chaser and restore the speed
    // to the original speed
    NetworkGamer chaser = GetChaser(  );
    ((UserControlledSprite)chaser.Tag).speed =
        ((UserControlledSprite)chaser.Tag).originalSpeed;
}
The first method checks to see whether the bomb effect has expired. If it has, it calls the second method, which gets the chaser sprite and restores its original speed.
Now, call the first method at the end of your Update_InGame method:
ExpireBombEffect(gameTime);
Next, you’ll need to draw the bombs. In the DrawInGameScreen method, add the following
code immediately after the call to spriteBatch.Begin:
// Loop through and draw bombs
foreach (UserControlledSprite sprite in bombList)
    sprite.Draw(gameTime, spriteBatch);
Finally, you need to let the players know that hitting the X key
or X button will plant a bomb. You’re currently drawing instructions on
the start screen during the DrawStartScreen method. The first instructions
given to the user are stored in the text variable in the following line of
code:
string text = "The dynamite player chases the gears
";
Add another line of code below that one to tell the player that the chased sprite can plant bombs:
string text = "The dynamite player chases the gears
";
text += "Chased player can plant bombs with X key or X button
";
There you have it. Compile and run the game now, and your chased sprite should be able to plant bombs that will reduce the speed of the chaser by 50% for 5 seconds. Your game window should look something like Figure 18-10.
As you can see, the team at Microsoft did a great job with the networking API. It’s easy to use, and once you get a handle on what type of network you need to simulate, what type of data you’ll be sending across it, and how you’re going to represent players and other objects in your game, you’ll be well on your way to creating the next great networked XNA game.
Although the code in this chapter focused on creating a network game in Windows using Games for Windows LIVE, the same code that sends messages back and forth from PC to PC can be used on the Xbox 360 and Windows Phone 7. You can also apply the same concepts to those platforms with regard to network architecture, game states, and so on.

What You Just Did
We covered an awful lot in this chapter. Let’s take a look back at what you just did:
You created a split-screen two-player game.
You learned about network architectures (peer-to-peer versus client/server).
You learned about critical networking classes in XNA, including the
NetworkSession,PacketWriter, andPacketReaderclasses.You implemented a 2D networked game using Games for Windows LIVE.
You made use of the gamer services windows for signing in and managing gamer identities in your networked game.
You implemented game states and peer-to-peer messaging in your networked game.
You added a cool slow-down bomb to the game.
Summary
You can easily add multiplayer functionality to a game by allowing multiple players to play on the same machine and implementing a split screen. Each split-screen view will typically have its own camera and be independent of the other views.
The
Viewportclass represents the area on the 2D screen to which the projection of the camera will be mapped. To implement a split screen, you modify theViewportproperty of the graphics device to draw each camera’s view and projection on only a portion of the game window rather than the entire surface of the game window.An important decision to make when developing networked games is to determine which type of network architecture to implement (peer-to-peer, client/server, or a hybrid). Factors that go into determining which is the best choice include the number of players and the number of objects that need to be updated or continually tracked.
The
NetworkSessionclass represents a single session of a network game. This class keeps track of all players in the session, the host of the session, and other properties related to the session itself.Communication between PCs, Xbox 360s, or Windows Phone 7 devices is done by writing packets using the
PacketWriterclass and reading packets using thePacketReaderclass.A packet is a single communication (which may contain a variable amount of data) sent from one entity to another on a network.
The
GamerServicesComponentallows your networked game to make use of gamer services windows and messaging throughout the game.A key part of network game development is determining how to store the data for player and nonplayer objects and deciding what types of messages should be sent between machines to update each machine’s copies of those objects. It’s better to minimize the data sent by sending only critical data that has changed on one machine and needs to be updated on the other machine(s) in the game (such as a player’s position, whether a collision occurred, etc.).
You’ve finished the book! Great job. You are now flowing with XNA power from head to toe. You’re probably realizing the responsibility you have with such power and thinking, “I wish XNA had never come to me. I wish none of this had happened.” Well, let me give you some advice: “So do all who live to see such times in XNA. But that is not for them to decide. All XNA developers have to decide is what to do with the time that is given us.”
Test Your Knowledge: Quiz
If you create a two-player split screen, what should you use for the camera’s aspect ratio to ensure that your graphics don’t look squished?
Fact or fiction: networked games in XNA use a networking API that works on the PC and Xbox 360 but is different on Windows Phone 7.
What’s the difference between a peer-to-peer and a client/server network architecture?
Which network type (peer-to-peer or client/server) is better?
What will happen if you don’t call
NetworkSession.Updatein your game?How do you force a user to sign in using the gamer services sign-in windows?
How do you send a message to another player in a networked XNA game?
How do you read a message from another player?
When receiving a network message in XNA, how do you know what type of data is going to be read from the
PacketReaderand what that data means?What, according to Harry Dunne, is worse than his roommate, Lloyd Christmas, getting robbed by an old lady?