
Chapter 15. Wrapping Up Your 3D Game
Here we go—you’re at the final stage in the development of your first 3D game. It looks good, sounds good, and plays well, and all that’s left to do is to add some game logic and wrap it up. First things first: you need a splash screen when your game starts. In addition, you’ll need to provide the player with some kind of an indicator when she reaches another level in the game. Why not use a splash screen between levels, too? Finally, you’ll need to have a screen that displays the final score when the game is over. Sounds like a good solution to these problems would be to create a splash screen game component that will let you display text on the screen. That way, you can reuse the same class for all three purposes just mentioned—and let’s face it, anytime you can reuse code, you’re saving yourself all kinds of time and headaches.
This chapter picks up where Chapter 14 left off. Open the project that you were working on at the end of Chapter 14 and use it throughout this chapter.
Adding a Splash Screen Game Component
Before we jump in and code your splash screen component,
let’s step back and look at how this is going to work. Your Game1 class is going to manage different game
states. Several states are possible: starting the game, playing
the game, pausing the game between levels, and showing a game-over
screen at the end of the game.
To help you manage these states, create an enum in your Game1 class that you will use to track changes
from state to state during gameplay. Add the following lines of code at
the class level of your Game1
class:
public enum GameState { START, PLAY, LEVEL_CHANGE, END}
GameState currentGameState = GameState.START;
In these lines, you first define an enum called GameState that enumerates all the possible
game states, and then you create a variable that you’ll use to track the
current game state and initialize that variable to the START game state. That should be helpful as
you move through this chapter.
You’ll also need to add a way for the splash screen game component
and the model manager game component to notify the Game1 class when a change in game state
occurs. To that end, add the following method to the Game1 class:
public void ChangeGameState(GameState state, int level)
{
    currentGameState = state;
}
Later, you’ll add more logic to this method that will make use of the second parameter and will perform different tasks based on the changed game state. For now, this will do.
To add a splash screen game component, first you’ll need to create a blank game component class. Add a game component to your project and call the file SplashScreen.cs.
Remember that by default a game component does not have a Draw method and therefore will not draw
anything. But what good would a splash screen component be if you
couldn’t use it to draw text? Change the base class of the new game
component from GameComponent to
DrawableGameComponent, which will let
your game component tie into the game loop’s Draw sequence.
Next, add the following class-level variables to your splash screen game component:
string textToDraw;
string secondaryTextToDraw;
SpriteFont spriteFont;
SpriteFont secondarySpriteFont;
SpriteBatch spriteBatch;
Game1.GameState currentGameState;
Your splash screen will have the ability to display a header in a
larger font and some other text in a smaller font. The two SpriteFont variables and the SpriteBatch variable are included to
facilitate the drawing of that text. Your currentGameState variable will track the
current game state, so your splash screen will know what to do based on
what state the game is currently in.
As you’ve probably guessed based on the SpriteFont variables you added, you now need
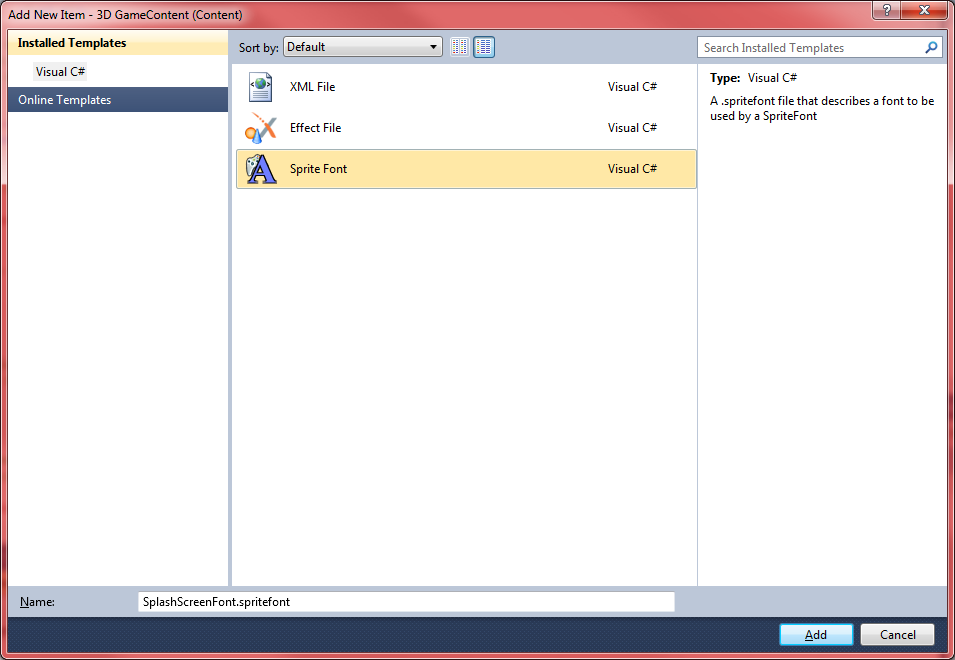
to add a couple of spritefonts to your project. Right-click the
3D GameContent node in Solution Explorer and select
Add→New Folder. Name the new folder
Fonts. Then, right-click the new
Fonts folder and select Add→New Item…. Select the Sprite Font template on
the right and name your font
SplashScreenFont.spritefont, as shown in Figure 15-1.
Next, add another spritefont (following the same steps), and call this one SplashScreenFontLarge.spritefont.
You’re going to use the SplashScreenFontLarge
spritefont for the larger title text in the window. Open that file, and
you’ll see that the content is XML-based. The second element of the font
is a <Size> element. Change
your SplashScreenFontLarge spritefont’s size to 16 by
modifying that element as follows:
<Size>16</Size>
To make the larger text stand out a bit more, go ahead and modify
the size of the SplashScreenFont spritefont as well.
Open the SplashScreenFont.spritefont file and
change the font to be smaller (size 10):
<Size>10</Size>
Next, in your SplashScreen
class, you’ll need to add an override for the LoadContent method so you can load the
spritefonts and initialize your SpriteBatch object. Add the following code in
the SplashScreen class:
protected override void LoadContent(  )
{
    // Load fonts
    spriteFont = Game.Content.Load<SpriteFont>(@"fontsSplashScreenFontLarge");
    secondarySpriteFont = Game.Content.Load<SpriteFont>(@"fontsSplashScreenFont");

    // Create sprite batch
    spriteBatch = new SpriteBatch(Game.GraphicsDevice);

    base.LoadContent(  );
}
Your splash screen will display at the beginning of the game, at the end of the game, and between levels. But how will you make the game transition from splash screen to gameplay or game exit? What’s the best way to do that? That’s a good question, and there really is no right answer. This is another aspect of game development that comes down to personal preference. Often, splash screens are time-based and will fade to the next game state after a few moments. Others may disappear when a key is pressed or a mouse button is clicked. Still others aren’t even separate screens, but are just overlaid during gameplay and fade out slowly. Exactly how you want to do this is all up to you.
For the purposes of this book, we’re going to make the screens
transition by pressing the Enter key. To implement that, you’ll need to
catch any Enter key presses in the Update method of your SplashScreen class. If an Enter key press is
detected, you’ll either notify the Game1 class that a change in game state is
needed or exit the game completely. Which of those you do depends on the
current game state (i.e., is the SplashScreen component currently showing a
start, level-change, or game-over screen?).
Change the Update method of
your SplashScreen class to the
following:
public override void Update(GameTime gameTime)
{
    // Did the player hit Enter?
    if (Keyboard.GetState(  ).IsKeyDown(Keys.Enter))
    {
        // If we're not in end game, move to play state
        if (currentGameState == Game1.GameState.LEVEL_CHANGE ||
            currentGameState == Game1.GameState.START)
            ((Game1)Game).ChangeGameState(Game1.GameState.PLAY, 0);

        // If we are in end game, exit
        else if (currentGameState == Game1.GameState.END)
            Game.Exit(  );
    }

    base.Update(gameTime);
}
Because the splash screen should never be displayed during the
PLAY game state, the only states that
you’re checking for are START,
LEVEL_CHANGE, and END. If the current state is either of the
first two, you’re going to transition to a PLAY state, so you call the Game1 class’s ChangeGameState and notify the class of that
change. If the current state is END,
the game exits when the player presses the Enter key.
Next, you need to add the code that will actually draw the text.
Of course, this is done in a Draw
method, which you currently do not have. You’ll need to create an
override of the Draw method and add
the code to draw the large title text and the smaller subtitle
text:
public override void Draw(GameTime gameTime)
{
    spriteBatch.Begin(  );

    // Get size of string
    Vector2 TitleSize = spriteFont.MeasureString(textToDraw);

    // Draw main text
    spriteBatch.DrawString(spriteFont, textToDraw,        new Vector2(Game.Window.ClientBounds.Width / 2
            - TitleSize.X / 2,
            Game.Window.ClientBounds.Height / 2),
            Color.Gold);

    // Draw subtext
    spriteBatch.DrawString(secondarySpriteFont,
        secondaryTextToDraw,
        new Vector2(Game.Window.ClientBounds.Width / 2
            - secondarySpriteFont.MeasureString(
                secondaryTextToDraw).X / 2,
            Game.Window.ClientBounds.Height / 2 +
            TitleSize.Y + 10),
            Color.Gold);

    spriteBatch.End(  );

    base.Draw(gameTime);
}
Notice that the first call to DrawString uses the larger SpriteFont object and centers the text using
the screen width and height, as well as the TitleSize Vector2 object, which holds the size
of the title text as given by the SpriteFont.MeasureString method. The second
DrawString call also centers the text
horizontally the same way, but it places the text vertically just below
the title text by using the size of the title text as an offset.
The final piece of the SplashScreen class is a method that will
enable the Game1 class to set the
text that needs to be displayed and to set the current game state. Add
this method to the SplashScreen
class:
public void SetData(string main, Game1.GameState currGameState)
{
    textToDraw = main;
    this.currentGameState = currGameState;

    switch (currentGameState)
    {
        case Game1.GameState.START:
        case Game1.GameState.LEVEL_CHANGE:
            secondaryTextToDraw = "Press ENTER to begin";
            break;
        case Game1.GameState.END:
            secondaryTextToDraw = "Press ENTER to quit";
            break;
    }
}
The secondary text is set depending on the game state, whereas the
primary text is passed into the method with the new game state. Now that
your SplashScreen class is ready to
go, all you need to do is hook up the component to your game. Add a
SplashScreen variable at the class
level of your Game1 class, together
with a variable to keep track of scoring. You’ll be adding scoring to
the game later, and you’ll want to display the player’s score when the
game is over:
SplashScreen splashScreen;
int score = 0;
Next, you’ll need to initialize the SplashScreen component and add it to the list
of game components in Game1’s
Initialize method. Currently, the
method looks like this:
protected override void Initialize()
{
    // Initialize Camera
    camera = new Camera(this, new Vector3(0, 0, 50),
        Vector3.Zero, Vector3.Up);
    Components.Add(camera);

    // Initialize model manager
    modelManager = new ModelManager(this);
    Components.Add(modelManager);

    base.Initialize();
}
Modify the Initialize method as
shown here (added lines are in bold):
protected override void Initialize(  )
{
    // Initialize Camera
    camera = new Camera(this, new Vector3(0, 0, 50),
        Vector3.Zero, Vector3.Up);
    Components.Add(camera);

    // Initialize model manager
    modelManager = new ModelManager(this);
    Components.Add(modelManager);
    modelManager.Enabled = false;
    modelManager.Visible = false;

    // Splash screen component
    splashScreen = new SplashScreen(this);
    Components.Add(splashScreen);
    splashScreen.SetData("Welcome to Space Defender!",
        currentGameState);

    base.Initialize(  );
}
The first two lines are added directly after the Components.Add(modelManager) line. These lines
disable the modelManager component.
Why are you doing this? Because you’re going to begin your game with the
splash screen. When the splash screen is active, the model manager needs
to be inactive, and vice versa. Next, you initialize the SplashScreen component, add it to the list of
components, and set its initial values via the SetData method.
The next thing you’ll need to look at is the Update method. Currently, every time Update is called, you’re checking the keyboard
for a space bar key press and, if one occurs, firing a shot. You’re
going to want to do this now only if the current game state is set to
PLAY.
The current Update method of
your Game1 class should look
something like this:
protected override void Update(GameTime gameTime)
{
    // Allows the game to exit
    if (GamePad.GetState(PlayerIndex.One).Buttons.Back ==
        ButtonState.Pressed)
        this.Exit(  );

    // See if the player has fired a shot
    FireShots(gameTime);

    base.Update(gameTime);
}
Surround the call to the FireShots method with an if statement so that new shots will be fired
only if the game is in the PLAY
state:
// Only check for shots if you're in the play game state
if (currentGameState == GameState.PLAY)
{
    // See if the player has fired a shot
    FireShots(gameTime);
}
Next, you’ll need to do the same sort of thing in the Draw method, as you’re currently drawing a
crosshair every time that method is called. Surround that code with a
similar if statement so that the
crosshair is drawn only if the game is in the PLAY state (the added code is in bold):
protected override void Draw(GameTime gameTime)
{
    GraphicsDevice.Clear(Color.Black);

    base.Draw(gameTime);

    // Only draw crosshair if in play game state
    if (currentGameState == GameState.PLAY)
    {
        // Draw the crosshair
        spriteBatch.Begin(  );

        spriteBatch.Draw(crosshairTexture,
            new Vector2((Window.ClientBounds.Width / 2)
                - (crosshairTexture.Width / 2),
                (Window.ClientBounds.Height / 2)
                - (crosshairTexture.Height / 2)),
                Color.White);

        spriteBatch.End(  );
    }
}
Finally, you’ll need to flesh out the ChangeGameState method. Currently, all it does
is set the currentGameState variable.
You’ll need to add some action to stop or play the soundtrack music and
enable/disable the splash screen and model manager components, based on
the game state to which the game is transitioning. Modify the method as
follows:
public void ChangeGameState(GameState state, int level)
{
    currentGameState = state;

    switch (currentGameState)
    {
        case GameState.LEVEL_CHANGE:
            splashScreen.SetData("Level " + (level + 1),
                GameState.LEVEL_CHANGE);
            modelManager.Enabled = false;
            modelManager.Visible = false;
            splashScreen.Enabled = true;
            splashScreen.Visible = true;

            // Stop the soundtrack loop
            trackCue.Stop(AudioStopOptions.Immediate);
            break;

        case GameState.PLAY:
            modelManager.Enabled = true;
            modelManager.Visible = true;
            splashScreen.Enabled = false;
            splashScreen.Visible = false;

            if (trackCue.IsPlaying)
                trackCue.Stop(AudioStopOptions.Immediate);

            // To play a stopped cue, get the cue from the soundbank again
            trackCue = soundBank.GetCue("Tracks");
            trackCue.Play();
            break;

        case GameState.END:
            splashScreen.SetData("Game Over.
Level: " + (level + 1) +
                "
Score: " + score, GameState.END);
            modelManager.Enabled = false;
            modelManager.Visible = false;
            splashScreen.Enabled = true;
            splashScreen.Visible = true;

            // Stop the soundtrack loop
            trackCue.Stop(AudioStopOptions.Immediate);
            break;
    }
}
OK, we’re almost there. You have a game that starts in a splash
screen mode based on the START state.
Your splash screen transitions to the PLAY state or exits the game, based on the
current state. The last step in this process is to add the logic to
transition from PLAY to LEVEL_CHANGE or END.
First, let’s take care of the PLAY→LEVEL_CHANGE transition. Remember that you
coded the game to spawn X number of enemy ships per level. The
transition to a new level should take place when the final ship has
passed the camera or been destroyed. To make the game flow a little
better, let’s also add the stipulation that all explosions should be
finished as well. That way, when you destroy the final ship, the game
won’t immediately go to a splash screen but instead will let you witness
the explosion, and then make the transition.
In the CheckToSpawnEnemy method
of your ModelManager class, you have
an if statement that checks to see
whether the number of enemies spawned in this level is less than the
number of enemies allowed in this level
(if (enemiesThisLevel <
levelInfoList[currentLevel].numberEnemies)). If this
condition is true, there are more enemies to be spawned in this level,
and you’re checking to see whether it’s time to spawn a new enemy.
However, if it’s false, that is your first indication that it’s time to
move to a new level. Add to that if
statement the following else block,
which will check to see whether all explosions have been wrapped up and,
if so, transition to a new level (the entire method is shown here for
clarity):
protected void CheckToSpawnEnemy(GameTime gameTime)
{
// Time to spawn a new enemy?
if (enemiesThisLevel <
      levelInfoList
[currentLevel].numberEnemies)
{
timeSinceLastSpawn += gameTime.ElapsedGameTime.Milliseconds;
if (timeSinceLastSpawn > nextSpawnTime)
{
SpawnEnemy( );
}
}
else
{
if (explosions.Count == 0 && models.Count == 0)
{
// ALL EXPLOSIONS AND SHIPS ARE REMOVED AND THE LEVEL IS OVER
++currentLevel;
enemiesThisLevel = 0;
missedThisLevel = 0;
((Game1)Game).ChangeGameState(
Game1.GameState.LEVEL_CHANGE,
currentLevel);
}
}
}If all ships and explosions have been removed from their
respective lists and the number of enemies to be spawned in this level
has been reached, you have nothing else to do in this level and it’s
time to move to the next. To move to the next level, you need to
increment the currentLevel variable,
reset a couple of counters (enemiesThisLevel and missedThisLevel), and notify the Game1 class of the change in game
state.
That’s all there is to it. Now, let’s add a transition from the
PLAY to the END game state.
In the UpdateModels method of
the ModelManager class, you have two
places where you remove ships from the list of ships using models.RemoveAt. One of these is the case
where a player shoots a ship, and the other is the case where a ship
gets past the camera and escapes. The game will end when more ships
escape than are allowed per level. You have a variable set up to track
that already (missedThisLevel), but
you aren’t doing anything with it. The current UpdateModels method looks like this:
protected void UpdateModels(  )
{
    // Loop through all models and call Update
    for (int i = 0; i < models.Count; ++i)
    {
        // Update each model
        models[i].Update(  );

        // Remove models that are out of bounds
        if (models[i].GetWorld(  ).Translation.Z >
            ((Game1)Game).camera.cameraPosition.Z + 100)
        {
            models.RemoveAt(i);
            −−i;
        }
    }
}
Modify the UpdateModels method
to increment the missedThisLevel
variable when a ship escapes and to move the game to an end-game state
when the maximum number of missed ships is reached. The new method
should look like this (added lines are in bold):
protected void UpdateModels(  )
{
    // Loop through all models and call Update
    for (int i = 0; i < models.Count; ++i)
    {
        // Update each model
        models[i].Update(  );

        // Remove models that are out of bounds
        if (models[i].GetWorld(  ).Translation.Z >
            ((Game1)Game).camera.cameraPosition.Z + 100)
        {
            // If player has missed more than allowed, game over
            ++missedThisLevel;
            if (missedThisLevel >
                levelInfoList[currentLevel].missesAllowed)
            {
                ((Game1)Game).ChangeGameState(
                    Game1.GameState.END, currentLevel);
            }

            models.RemoveAt(i);
            −−i;
        }
    }
}
Basically, what’s happening here is that every time a ship
escapes, you increment the missedThisLevel variable. When that variable
exceeds the number of misses allowed, the game is over and the Game1 class is notified.
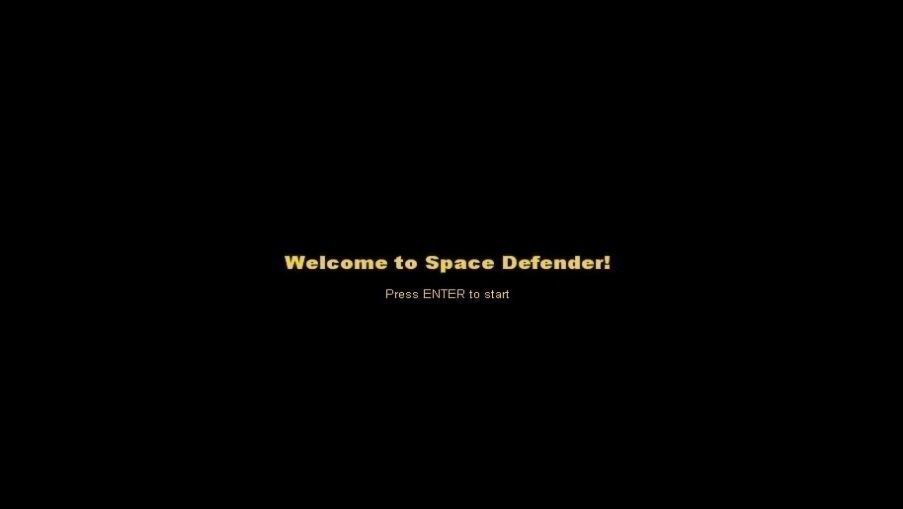
OK, let’s give it a shot. Compile and run your game, and you should be greeted with a nice intro splash screen (see Figure 15-2). You can also play the game now, and it should transition from level to level and display another splash screen when the game is over.
Because your splash screen is a game component, you can customize it just like you would when programming a game. Add a fancy background image, add sound…do whatever you want to make it more exciting and fun.
Keeping Score
You have levels and end-game logic now, but what’s the fun
when your score is always zero? In this section, you’ll flesh out
scoring for the game. You’re already displaying the score at the end of
the game, but you’ll want to let players see their scores as they play.
To do that, add a class-level SpriteFont variable to your Game1 class, with which you’ll draw the
score:
SpriteFont scoreFont;
And yes, that’s right: the next thing that you’ll need to do is add a new spritefont to your project. Right-click the 3D GameContentFonts folder in Solution Explorer and select Add→New Item…. Select the Sprite Font template on the right and name the file ScoreFont.spritefont.
To make your scoring font stand out a bit more, open the
ScoreFont.spritefont file and find the <Style> element. This element lets you
tweak properties such as setting the text in bold, italics, etc. Change
the spritefont to use a bold font by changing the <Style> tag as follows:
<Style>Bold</Style>
Tip
The <Style> tag entries
are case-sensitive, as it says in the actual spritefont file. Make
sure you use the text Bold instead
of bold or BOLD.
Next, in the LoadContent method
of your Game1 class, add the
following code to load the font:
scoreFont = Content.Load<SpriteFont>(@"FontsScoreFont");
Now you’ll want to use that spritefont to draw the score on the screen. In addition to just drawing the score, though, it would be helpful for players to see how many more ships they can miss in each level.
To do that, you’ll need to add a way for the Game1 class to check how many misses are left
(that data is stored in your ModelManager class). Add the following public
accessor to the ModelManager
class:
public int missesLeft
{
    get { return
        levelInfoList[currentLevel].missesAllowed
        - missedThisLevel; }
}
Now that you have the information you need to display on the
screen, it’s time to look at drawing the text on the screen. Being as
brilliant as you are (yes, being smart enough to purchase this book
denotes a certain level of brilliance), you’ve probably already realized
that you need to do this in the Draw
method of your Game1 class. Remember
that spritefonts are drawn with the SpriteBatch.DrawString method, and because
they use a SpriteBatch object, that
code must be between the SpriteBatch.Begin and SpriteBatch.End calls.
So, add the following code between the SpriteBatch.Begin and SpriteBatch.End calls in the Draw method of your Game1 class:
// Draw the current score
string scoreText = "Score: " + score;
spriteBatch.DrawString(scoreFont, scoreText,
    new Vector2(10, 10), Color.Red);

// Let the player know how many misses he has left
spriteBatch.DrawString(scoreFont, "Misses Left: " +
    modelManager.missesLeft,
    new Vector2(10, scoreFont.MeasureString(scoreText).Y + 20),
Color.Red);Finally, there has to be a way to adjust the score. The score variable is part of your Game1 class, but the means for detecting when
a change in score should occur (i.e., when a shot hits a ship) lies in
the ModelManager class. You’ll need
to add a method to your Game1 class
that will let your ModelManager
adjust the score:
public void AddPoints(int points)
{
    score += points;
}
This very simple method will add points passed in as a parameter to the overall point total.
Now all that’s left is to add the scoring mechanism to the
ModelManager class itself. First,
let’s figure out how many points each kill is worth. This is another
area where you can be creative and figure out a formula that works for
you. A couple of common methods are using either a flat system (i.e.,
all ships are always worth X points) or an increased payoff method
(i.e., ships are worth more and more points as the game progresses). For
this game, you’re going to implement the latter strategy. But first, you
need a starting point. Add the following class-level variable to your
ModelManager class:
const int pointsPerKill = 20;
You’ll take this initial value and multiply it by the current
level to give the actual point value for each kill (e.g., level-1 kills
are worth 20, level-2 kills are worth 40, etc.). The last step here is
to add the actual score change. Remember that in the ModelManager class there are two places where
you call models.RemoveAt to remove an
enemy ship: in the UpdateModels method, when a ship escapes and
is out of bounds, and in the UpdateShots method, when a shot hits a
ship.
You’re going to need to add some code that will update the score
when a shot hits a ship. At the end of the UpdateShots method there is a call to models.RemoveAt that removes the ship, followed by a call to
shots.RemoveAt that removes the shot
that hit the ship. Immediately before those calls to RemoveAt, add the following line, which will
adjust the game score:
((Game1)Game).AddPoints(pointsPerKill * (currentLevel + 1));
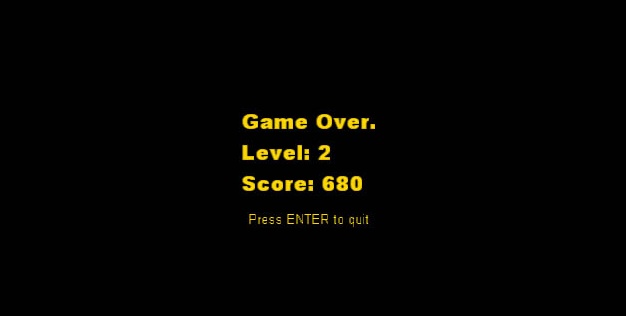
There you have it. Now all that’s left to do is play your game and challenge your friends to beat your score. The end-game screen is shown in Figure 15-3, with a stellar score.
Adding a Power-Up
You’ve done well here: you’ve built your first 3D game, complete with scoring and increasingly difficult levels, and packed with a ton of fun! Before we end this chapter, though, let’s do one more thing. Not that games are boring, but anything that breaks up the monotony of regular gameplay goes a long way toward making a game even more exciting and addicting.
In this section, you’ll add a power-up feature that will be awarded when a player gets three consecutive kills. The power-up will let the player shoot in a rapid-fire mode for 10 seconds. I know…that sounds really exciting, so let’s get to it.
First, you’ll want to add a sound effect that you’ll play when the rapid-fire power-up is awarded. With the source code for this chapter, in the 3D Game3D GameContentAudio folder, you’ll find a sound effect called RapidFire.wav. Copy that file to your project’s 3D GameContentAudio directory in Windows Explorer. Remember not to add the file to your project in Visual Studio, because you’ll be adding it to your XACT project file.
Open your XACT project file from within XACT, add the RapidFire.wav sound to the wave bank, and create a sound cue for that sound. Then, save the XACT project file and close XACT (see Chapter 6 if you need more help editing an XACT project file).
In addition to including an audio sound effect when the player receives the power-up, it would be a good idea to include a text indicator. This will help alleviate any confusion as to why all of a sudden the player can shoot so quickly. To do this, add a new spritefont to your project in Visual Studio by right-clicking the 3D GameContentFonts folder and selecting Add→New Item…. Select the Sprite Font template on the right and name the file PowerupFont.spritefont.
Open the PowerupFont.spritefont file and
change the size of the font by modifying the <Size> element as follows:
<Size>26</Size>
Also, modify the style to display in bold:
<Style>Bold</Style>
OK, now let’s dig into the code and see how this will work. You’re
going to give the player a power-up when she hits three ships in a row
without letting any ships get past her. To do this, you’ll need to keep
track of consecutive kills without letting a ship escape. The power-up
decreases the delay between shots and expires after 10 seconds, so
you’ll have to keep that in mind as well. Open your Game1 class and add the following class-level
variables:
int originalShotDelay = 300;
public enum PowerUps { RAPID_FIRE }
int shotDelayRapidFire = 100;
int rapidFireTime = 10000;
int powerUpCountdown = 0;
string powerUpText = "";
int powerUpTextTimer = 0;
SpriteFont powerUpFont;
Let’s look at these variables and what they’re for:
originalShotDelayWhen the power-up starts, you’ll modify the
shotDelayvariable to give the rapid-fire functionality. After 10 seconds, you’ll need to set it back to its original value. This variable simply holds the original value so you can reset it when the power-up expires.PowerUps enumThis enumerates all possible power-ups, in case you want to add more later.
shotDelayRapidFireThis represents the shot delay in rapid-fire mode. Normally, it’s 300, so you’ll be firing three times as fast. Sweet!
rapidFireTimeThis is the time (in milliseconds) that the power-up will last.
powerUpCountdownThis is the time counter that keeps track of how long the power-up has been in effect.
powerUpTextThis is the text to display when a power-up is awarded.
powerUpTextTimerThis is the time counter that keeps track of how long the power-up text has been on the screen.
powerUpFontThis specifies the font with which to draw the power-up text.
Next, you’ll need to load the spritefont you just created into
your powerUpFont variable. Add the
following line of code to the LoadContent method of your Game1 class:
powerUpFont = Content.Load<SpriteFont>(@"fontsPowerupFont");
Now you need a way to turn off the power-up. All that happens when
the power-up expires is that the shotDelay variable is set back to its original
value. Add to your Game1 class the
following method, which you’ll use to cancel your power-up:
private void CancelPowerUps(  )
{
    shotDelay = originalShotDelay;
}
In the Update method of your Game1 class, you’ll do the check to determine
when a power-up expires. This is time-based, so you’ll be using the
gameTime variable to decrement your powerUpCountdown timer. Once that timer
reaches zero, you’ll cancel the power-up(s) by calling the CancelPowerUps method. Add to the Game1 class the following method, which will update your
power-up timer and expire the power-up when needed:
protected void UpdatePowerUp(GameTime gameTime)
{
    if (powerUpCountdown > 0)
    {
        powerUpCountdown −= gameTime.ElapsedGameTime.Milliseconds;
        if (powerUpCountdown <= 0)
        {
            CancelPowerUps(  );
            powerUpCountdown = 0;
        }
    }
}
Next, call the UpdatePowerUp
method at the end of the Update
method of your Game1 class, just
before the call to base.Update:
// Update power-up timer
UpdatePowerUp(gameTime);
You’re going to need to add a public method to Game1 that will let the model manager activate
a power-up as well. Add the following method to your Game1 class:
public void StartPowerUp(PowerUps powerUp)
{
    switch (powerUp)
    {
        case PowerUps.RAPID_FIRE:
            shotDelay = shotDelayRapidFire;
            powerUpCountdown = rapidFireTime;
            powerUpText = "Rapid Fire Mode!";
            powerUpTextTimer = 1000;
            soundBank.PlayCue("RapidFire");
            break;
    }
}
Why the switch statement using
the PowerUps enum? It’s just setting
up the code to let you add other power-ups if you want. In the case of
the rapid-fire power-up, first you set the new shot delay, and then you
set the power-up countdown. Next, you set the power-up text to indicate
rapid-fire mode and set the text timer to show that text for one second.
Finally, you play the sound notifying the player that a power-up has
been received.
Because the shotDelay variable
is already being used to determine the delay between shots, there’s
nothing more to do in terms of enabling the rapid-fire functionality.
However, you will want to draw the power-up text on the screen while the
value of the powerUpTextTimer is
greater than zero. To do that, add the following code to the Draw method of your Game1 class, immediately before the call to
spriteBatch.End:
// If power-up text timer is live, draw power-up text
if (powerUpTextTimer > 0)
{
    powerUpTextTimer −= gameTime.ElapsedGameTime.Milliseconds;
    Vector2 textSize = powerUpFont.MeasureString(powerUpText);
    spriteBatch.DrawString(powerUpFont,
        powerUpText,
        new Vector2((Window.ClientBounds.Width / 2) -
        (textSize.X / 2),
        (Window.ClientBounds.Height / 2) -
        (textSize.Y / 2)),
        Color.Goldenrod);
}
This isn’t anything you haven’t seen before. If the text timer is
greater than zero, decrement it
with the elapsed time and then draw the string. You center the string
just as you’ve done previously, using the SpriteFont.MeasureString method to determine
the size of the string being drawn.
The last thing you’ll need to do in the Game1 class is cancel any power-ups that are
in effect when a level ends. For example, you don’t want somebody to get
a power-up at the end of level 2 and then have that power-up continue
into the beginning of level 3.
Tip
Why shouldn’t the power-up carry over from one level to the next? Well, like so many things in game development, this is a personal decision. Maybe you would prefer it to carry over, and maybe you wouldn’t. In my opinion, it’s better to cancel it between levels, so that’s what we’re doing in this book. However, feel free to create the world the way you want it. You can add different power-ups of your own and/or customize the current one. This is your world, and you get to do whatever you want with it.
Add a call to the CancelPowerUps method at the top of the
ChangeGameState method in your
Game1 class:
CancelPowerUps( );
Now let’s move on to the ModelManager class. This class doesn’t have a
lot to do with this particular power-up because the power-up affects
only shots, which are primarily handled in the Game1 class. However, you’ll still need to
keep track of when to start a power-up. Because this power-up is based
on consecutive kills and kills are handled in the ModelManager, it makes sense to have this
logic reside in this class.
Add the following class-level variables to your ModelManager class:
public int consecutiveKills = 0;
int rapidFireKillRequirement = 3;
The first variable will keep track of how many consecutive kills
the player currently has, whereas the second variable tracks the number
of consecutive kills required to grant the power-up. Note the first
variable is public; that’s because you’ll be accessing it from the
Game1 class to reset the count once a power-up has
finished.
The only times when you’re removing ships from the list of ships
are when a ship escapes and when one is shot. In both cases, you’ll be
modifying the value of the consecutiveKills variable (when a ship
escapes, consecutiveKills becomes
0, and when a ship is shot, consecutiveKills is incremented).
First, find the models.RemoveAt
call at the end of the UpdateModels
method that indicates a ship has escaped. In that same block of code,
you’re setting the game state to END
with the Game1.ChangeGameState method
if the game is over.
Add a line of code immediately before the call to models.RemoveAt, at the end of the UpdateModels method:
// Reset the kill count
consecutiveKills = 0;
The other place where you call models.RemoveAt indicates that a ship has been
hit with a shot. This is at the end of the UpdateShots method. In this block, you’re also
playing the explosion sound with the Game1.PlayCue method. Add the following code
immediately after the call to play the Explosions
cue (the line reads PlayCue("Explosions")):
// Update consecutive kill count
// and start power-up if requirement met
++consecutiveKills;
if (consecutiveKills == rapidFireKillRequirement)
{
    ((Game1)Game).StartPowerUp(Game1.PowerUps.RAPID_FIRE);
}
After every kill, you increment the number of consecutive kills.
If that counter ever equals the number required to grant the power-up,
the power-up is granted via the Game1.StartPowerUp method.
Finally, you’ll want to reset the kill count once a power-up has
completed. Do this by adding the following line to the beginning of the
CancelPowerUps method in your
Game1 class:
modelManager.consecutiveKills = 0;
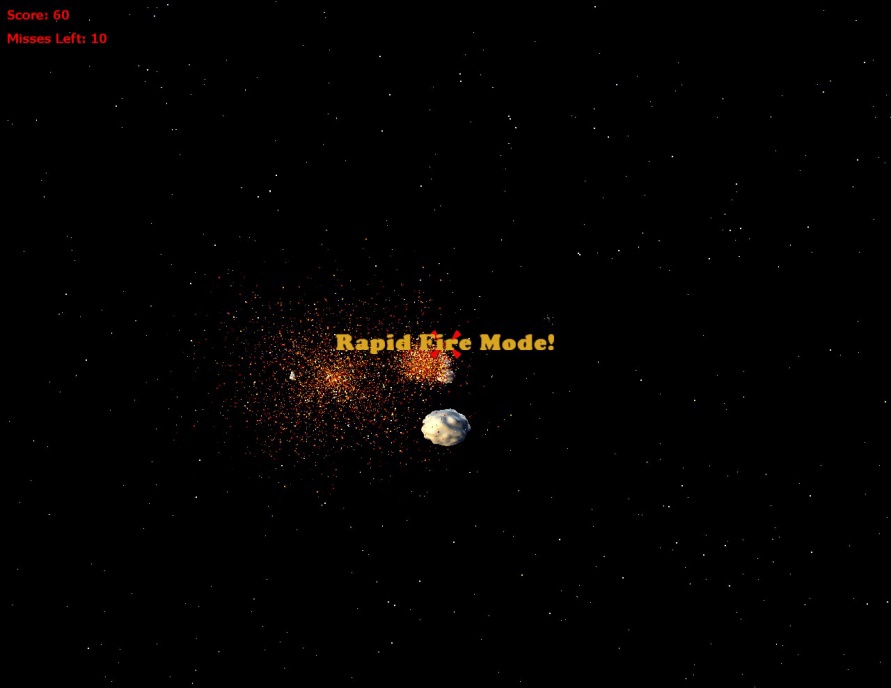
Oh yeah! You’re ready to test it out. Compile and run the game. If your aim is good enough, you’ll see that the power-up is granted after you’ve hit three ships in a row, as shown in Figure 15-4.
Not bad at all. The game is complete! Feel free to add other power-ups, notification indicators, sound effects, and whatever else you want to make this game yours and have it play exactly the way you want.
What You Just Did
There’s only one thing left to do to this game, and that’s make the thing work on an Xbox 360. We’ll look at how to do that in the next chapter. But first, let’s review what you did here:
You added a splash screen game component.
You implemented game states and transitions between the start, play, level change, and end game states.
You implemented a scoring system based on the current level.
You added a rapid-fire power-up.
You made all of your wildest dreams come true. (Well…at least a couple of them.)
Test Your Knowledge: Exercise
Create a multishot power-up that, when active, will fire four shots instead of one. Instead of shooting one shot in the center of the camera, when the multishot is active, shoot one shot from above and right of the camera, one from above and left, one from below and right, and one from below and left.
When the player shoots three ships in a row, the game will randomly choose which power-up to activate (rapid fire or multishot).