
Chapter 5. Applying Some Object-Oriented Design
Congratulations! You built the beginnings of a rudimentary game at the end of the previous chapter. You’re making some real progress here. However, the way that we’ve done things thus far, though good for educational purposes, is very inefficient from a design standpoint. A sound design will always increase development efficiency.
You probably noticed how painful it was to add a new sprite object to your project. Especially if you need to add an object that will animate, use collision detection, and move, there are a lot of variables and other code that must be duplicated, and as a result your code is becoming quite a mess. If you continue down this path, things will quickly get out of hand. So, let’s take a few minutes to apply some sound object-oriented design to your system. This will make things a lot easier for you down the road.
Designing Your Classes
If you were doing serious game development, you’d want to expand further on the design in this chapter and fine-tune it to meet your needs. We don’t have time to tweak your design to how you’d want it for a commercial-quality application, but there are some changes you can make that will result in a huge improvement over what you have thus far.
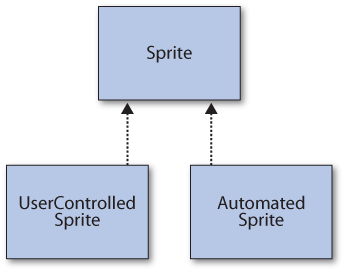
First things first, let’s look at your objects. The basic visual object in a 2D game is a sprite. Based on the code you put together in previous chapters, you have two different types of objects: objects that are controlled by the player, and objects that are not. Aside from that, all other functionality of the animated sprites you’ve worked on thus far is exactly the same.
Think about what type of functionality those two objects share. They both get drawn on the screen, and they both animate using a sprite sheet. Thinking about that more in depth, you’d probably agree that all animated sprites will have those two functional elements. Based on that logic, it would make sense to create a base class that represents a standard sprite and has the ability to draw itself and animate via a sprite sheet. For more customized functionality, you could then look at deriving from that base class to create classes with added behavior. Based on the examples you’ve run through thus far, you can anticipate that your class hierarchy eventually will look something like the image in Figure 5-1.
Creating a Sprite Class
Now you can go ahead and get started on your Sprite base class. What might you want to
include in that class? Table 5-1
lists the members, and Table 5-2
lists the methods.
Member | Type | Description |
| Sprite or sprite sheet of image being drawn | |
| Position at which to draw sprite | |
| Size of each individual frame in sprite sheet | |
| Offset used to modify frame-size rectangle for collision checks against this sprite | |
| Index of current frame in sprite sheet | |
| Number of columns/rows in sprite sheet | |
| Number of milliseconds since last frame was drawn | |
| Number of milliseconds to wait between frame changes | |
| Speed at which sprite will move in both X and Y directions |
This chapter will build upon the code that you created in Chapter 4. Open the code from that chapter and add a new class to your project by right-clicking on the project in Solution Explorer and selecting Add→Class. Name the new class file Sprite.cs.
Because you’ll probably never find a reason to create an instance
of the Sprite class, it makes sense
to mark the class as abstract, forcing you to use one of the derived
classes to instantiate objects. Make the base Sprite class abstract by adding the keyword
abstract to the definition of the
class:
abstract class Sprite
Add two XNA namespaces to your new class, which you’ll need to enable the use of XNA objects:
using Microsoft.Xna.Framework;
using Microsoft.Xna.Framework.Graphics;
Then, add the following variables, which correspond to the members of the class shown in Table 5-1. Make sure you mark the protected variables appropriately, or the subclasses you build later will not work properly:
Texture2D textureImage;
protected Point frameSize;
Point currentFrame;
Point sheetSize;
int collisionOffset;
int timeSinceLastFrame = 0;
int millisecondsPerFrame;
const int defaultMillisecondsPerFrame = 16;
protected Vector2 speed;
protected Vector2 position;
In addition to the variables listed in Table 5-1, you’re defining a constant that will represent the default animation speed if no animation speed is specified.
Next, add the two constructors, as follows:
public Sprite(Texture2D textureImage, Vector2 position, Point frameSize,
    int collisionOffset, Point currentFrame, Point sheetSize, Vector2 speed)
    : this(textureImage, position, frameSize, collisionOffset, currentFrame,
    sheetSize, speed, defaultMillisecondsPerFrame)
{
}public Sprite(Texture2D textureImage, Vector2 position, Point frameSize,
    int collisionOffset, Point currentFrame, Point sheetSize, Vector2 speed,
    int millisecondsPerFrame)
{
    this.textureImage = textureImage;
    this.position = position;
    this.frameSize = frameSize;
    this.collisionOffset = collisionOffset;
    this.currentFrame = currentFrame;
    this.sheetSize = sheetSize;
    this.speed = speed;
    this.millisecondsPerFrame = millisecondsPerFrame;
}
The only difference between the two constructors is that the
second one requires a millisecondsPerFrame variable, used to
calculate the animation speed. Hence, the first constructor will just
call the second constructor (using the this keyword) and pass to that constructor all
of its parameters, as well as the constant representing the default
animation speed.
At a minimum, all animated sprites do two things: animate by moving a
current frame index through the images on a sprite sheet, and draw the
current image from the animation on the screen. Beyond that, you might
want to add additional functionality to this class, or you may prefer to
add it to a derived class to create a more specialized object. At the
very least, though, you’ll want to animate and draw in all animated
sprites, so let’s add the functionality to do that in the base Sprite class.
You’ve already written the code to animate and draw in previous
chapters. All you need to do now is take that same code, which uses
variables from the Game1 class, and
apply it to the variables that you’ve defined in your Sprite base class. Once again, to perform the
animation, all you do is move a current frame index through a sprite
sheet, making sure to reset the index once it’s passed through the
entire sheet.
The following code, which should be familiar from previous
chapters, does just that. Code the Update method of your Sprite base class as follows:
public virtual void Update(GameTime gameTime, Rectangle clientBounds)
{
    timeSinceLastFrame += gameTime.ElapsedGameTime.Milliseconds;
    if (timeSinceLastFrame > millisecondsPerFrame)
    {
        timeSinceLastFrame = 0;
        ++currentFrame.X;
        if (currentFrame.X >= sheetSize.X)
        {
            currentFrame.X = 0;
            ++currentFrame.Y;
            if (currentFrame.Y >= sheetSize.Y)
                currentFrame.Y = 0;
        }
    }
}
You probably noticed the keyword virtual in the method declaration. This marks the method itself
as virtual, which enables you to create overrides for this method in
subclasses so you can modify its functionality in those classes if
needed.
You may also have noticed the Rectangle parameter. This parameter represents the game window’s client
rectangle and will be used to detect when objects cross the edges of the
game window.
Just as you’ve previously written code for animation, you’ve also
already written code to draw a single frame of an animated sprite. Now
you just need to take that code and plug it into your Sprite class, changing it to use the variables
you’ve defined here.
The one difference between the drawing code from previous chapters
and the code you need to add to your Sprite class is that in this case you have no
access to a SpriteBatch object
(which, as you hopefully remember, is required to draw Texture2D objects). To get around that, you
need to accept a GameTime parameter
and add a SpriteBatch parameter to
the Draw method of your Sprite base class.
Your Sprite base class’s
Draw method should look something like this:
public virtual void Draw(GameTime gameTime, SpriteBatch spriteBatch)
{
    spriteBatch.Draw(textureImage,
        position,
        new Rectangle(currentFrame.X * frameSize.X,
            currentFrame.Y * frameSize.Y,
            frameSize.X, frameSize.Y),
        Color.White, 0, Vector2.Zero,
        1f, SpriteEffects.None, 0);
}
In addition to the Update and
Draw methods, you’re going to want to
add a property to this class that represents the direction in which this
sprite is moving. The direction will always be a Vector2, indicating movement in the X and Y
directions, but it will also always be defined by the subclasses (i.e.,
automated sprites will move differently than user-controlled sprites).
So, this property needs to exist in the base class, but it should be
abstract, meaning that in the base class it has no body and therefore
must be defined in all subclasses.
Add the abstract direction
property to the base class as follows:
public abstract Vector2 direction
{
    get;
}
There’s one more thing to add to your Sprite base class: a property that returns a
rectangle that can be used for collision detection. Add the following
property to your Sprite class:
public Rectangle collisionRect
{    get
    {
        return new Rectangle(
            (int)position.X + collisionOffset,
            (int)position.Y + collisionOffset,
            frameSize.X - (collisionOffset * 2),
            frameSize.Y - (collisionOffset * 2));
    }
}
Your base class is pretty well ironed out at this point. The class
will draw itself via the Draw method
and will cycle through a sprite sheet via the Update method. So, let’s turn our attention to
the user-controlled sprite for a moment.
Creating a User-Controlled Sprite Class
Now you’ll create a class that derives from your base
Sprite class, adding functionality to
let the user control the sprite. Add a new class to your project by
right-clicking on the project in Solution Explorer and selecting
Add→Class. Name the new class file
UserControlledSprite.cs. Once the
file is ready, mark this class as a subclass of the Sprite class:
class UserControlledSprite: Sprite
Next, you’ll need to add some XNA using statements. Use the same ones as you did
in the Sprite base class, plus an
additional one (Microsoft.Xna.Framework.Input) that will allow
you to read data from input devices:
using Microsoft.Xna.Framework;
using Microsoft.Xna.Framework.Graphics;
using Microsoft.Xna.Framework.Input;
Next, add the constructors for the UserControlledSprite class. These will be
basically the same as the constructors for the Sprite class and will just pass the parameters
on to the base class:
public UserControlledSprite(Texture2D textureImage, Vector2 position,
    Point frameSize, int collisionOffset, Point currentFrame, Point sheetSize,
    Vector2 speed)
    : base(textureImage, position, frameSize, collisionOffset, currentFrame,
    sheetSize, speed)
{
}


public UserControlledSprite(Texture2D textureImage, Vector2 position,
    Point frameSize, int collisionOffset, Point currentFrame, Point sheetSize,
    Vector2 speed, int millisecondsPerFrame)
    : base(textureImage, position, frameSize, collisionOffset, currentFrame,
    sheetSize, speed, millisecondsPerFrame)
{
}
Then, you need to add the code for the overloaded direction property. The direction property will be used in the
Update method to modify the position
of the sprite (or in other words, to move the sprite in the direction
indicated by this property). Direction in the case of the UserControlledSprite class will be defined as a combination of the speed member of the base class and the
direction in which the player is pressing the gamepad’s left thumbstick,
or the arrow keys the user is pressing.
Users will also be able to control the sprite using the
mouse, but mouse input will be handled a bit differently. When
the mouse is being used to control the sprite, you are going to move the
sprite to the position of the mouse on the screen. So, there’s really no
need for a direction property when
dealing with mouse movement. This property, therefore, will reflect
player input only from the keyboard or the Xbox 360 gamepad. To build
the direction property from the data
read from the thumbstick and keyboard, code the property as
follows:
public override Vector2 direction
{
    get
    {
        Vector2 inputDirection = Vector2.Zero;

        if (Keyboard.GetState(  ).IsKeyDown(Keys.Left))
            inputDirection.X −= 1;
        if (Keyboard.GetState(  ).IsKeyDown(Keys.Right))
            inputDirection.X += 1;
        if (Keyboard.GetState(  ).IsKeyDown(Keys.Up))
            inputDirection.Y −= 1;
        if (Keyboard.GetState(  ).IsKeyDown(Keys.Down))
            inputDirection.Y += 1;

        GamePadState gamepadState = GamePad.GetState(PlayerIndex.One);
        if(gamepadState.ThumbSticks.Left.X != 0)
            inputDirection.X += gamepadState.ThumbSticks.Left.X;
        if(gamepadState.ThumbSticks.Left.Y != 0)
            inputDirection.Y -= gamepadState.ThumbSticks.Left.Y;

        return inputDirection * speed;
    }
}
This property will return a Vector2 value indicating the movement
direction (in the X and Y planes), multiplied by the speed member of the base class. Notice that
the keyboard and gamepad inputs are combined, allowing the player to
control the sprite with either input device.
To deal with mouse movement, you’re essentially going to detect whether the mouse has moved from frame to frame. If so, you’ll assume that the user wants to control the sprite with the mouse, and move the sprite to the location of the mouse cursor. If the mouse does not move from one frame to another, the keyboard and gamepad input will affect the movement of the sprite.
To determine whether the mouse has moved from one frame to the
next, add the following class-level variable to your UserControlledSprite class:
MouseState prevMouseState;
Now you can go ahead and code the Update method of your UserControlledSprite class. You’ll need to
override the Update method from the
base class and add to that method the code that will move the sprite
based on the direction property as
well as mouse movement (if the mouse has been moved). In addition,
you’ll add some logic in that method to keep the user-controlled sprite
in play if the sprite is moved off the screen. Your Update method should look like this:
public override void Update(GameTime gameTime, Rectangle clientBounds)
{
    // Move the sprite based on direction
    position += direction;

    // If player moved the mouse, move the sprite
    MouseState currMouseState = Mouse.GetState();
    if (currMouseState.X != prevMouseState.X ||
        currMouseState.Y != prevMouseState.Y)
    {
        position = new Vector2(currMouseState.X, currMouseState.Y);
    }
    prevMouseState = currMouseState;

    // If sprite is off the screen, move it back within the game window
    if (position.X < 0)
        position.X = 0;
    if (position.Y < 0)
        position.Y = 0;
    if (position.X > clientBounds.Width - frameSize.X)
        position.X = clientBounds.Width - frameSize.X;
    if (position.Y > clientBounds.Height - frameSize.Y)
        position.Y = clientBounds.Height - frameSize.Y;

    base.Update(gameTime, clientBounds);
}
There you have it. Your UserControlledSprite class is ready to go! You
don’t have to do anything with the Draw method in this class, because your base
class will take care of drawing the individual frames of your sprite.
Nice job!
Creating an Automated Sprite Class
Now that you have a class that allows the user to control
a sprite, it’s time to add a class that will generate an animated sprite
that moves on its own. Add a new class to your project by right-clicking
on the project in Solution Explorer and selecting Add→Class. Name the class file AutomatedSprite.cs. Once the file is ready,
mark the new class as a subclass of your Sprite class:
class AutomatedSprite: Sprite
Add the same XNA namespaces as before, but without the input namespace because you won’t be gathering input from any devices in this class:
using Microsoft.Xna.Framework;
using Microsoft.Xna.Framework.Graphics;
Next, add two constructors for the AutomatedSprite class. These constructors will
be identical to the ones used for the UserControlledSprite class:
public AutomatedSprite(Texture2D textureImage, Vector2 position, Point frameSize,
    int collisionOffset, Point currentFrame, Point sheetSize, Vector2 speed)
    : base(textureImage, position, frameSize, collisionOffset, currentFrame,
    sheetSize, speed)
{
}

public AutomatedSprite(Texture2D textureImage, Vector2 position, Point frameSize,
    int collisionOffset, Point currentFrame, Point sheetSize, Vector2 speed,
    int millisecondsPerFrame)
    : base(textureImage, position, frameSize, collisionOffset, currentFrame,
    sheetSize, speed, millisecondsPerFrame)
{
}
Your automated sprite will use the speed member of the base class to move around the screen. This
will be done through an overridden direction property because that property is
abstract in the base class and
therefore must be defined in this class. Create the override for the
direction property as follows:
public override Vector2 direction
{
    get { return speed; }
}
Now you need to add the code that will make your automated sprite
move. Because the direction property
is represented by a Vector2 value,
this property represents direction
and speed for your automated sprite. Any direction in 2D space can be
represented by a Vector2 value, and
the magnitude (or length) of that vector indicates the speed of the
object: the longer the vector is, the faster the automated sprite will
move.
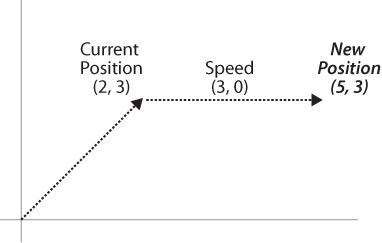
All you have to do is add the vector represented by the direction property to the position of your
sprite, and the sprite will move in the direction of that vector at the
speed indicated by the length of that vector. An illustration of how
this vector math works is shown in Figure 5-2.
Add to your AutomatedSprite
class an overridden Update method
that will move the sprite based on the direction property:
public override void Update(GameTime gameTime, Rectangle clientBounds)
{
    position += direction;

    base.Update(gameTime, clientBounds);
}
That’s all there is to it! You now have an automated sprite class that will draw itself and update its position based on a 2D vector.
So far you have two different types of sprites, both deriving from
a base class representing a generic animated sprite. In previous
chapters, when you wanted to add a new sprite you had to add a number of
variables and different settings to implement that new sprite. With this
model, you can add a new sprite to your application with the addition of
one new variable (either an AutomatedSprite or a UserControlledSprite).
However, thinking beyond just adding a few variables here and
there for different sprites, let’s look at a more modular approach. XNA
provides us with a great tool for separating logical portions of code
into different modules and allowing them to be plugged easily into a
game and coexist. That tool exists in the form of a GameComponent.
In this next section, you’ll learn about game components, and you’ll build one that will be used to manage all of the sprites in your game.
Game Components
XNA has a really nice way to integrate different logical
pieces of code (such as your soon-to-be-created SpriteManager class) into your application.
The GameComponent class allows you to modularly plug any code into your
application and automatically wires that component into the game loop’s
Update call (i.e., after your game’s
Update call is made, all associated
GameComponent classes have their
Update methods called).
Create a new game component by right-clicking on the project in Solution Explorer and selecting Add→New Item. Select Game Component as the template from the list on the right side of the window, and name the game component file SpriteManager.cs.
Looking at the code generated for your new game component, you
will notice that it contains constructor, Initialize, and Update methods. Also, the class derives from
GameComponent.
If you want to create a game component that will also be wired
into the game loop’s Draw method so
that your component has the ability to draw items as well, you can do so
by instead deriving from the DrawableGameComponent class.
You’re going to be using your sprite manager to invoke the
Draw methods of all the sprites it manages, so you’ll need to have
this game component wired up to the game’s Draw method. Change the base class of your
game component to DrawableGameComponent
to enable this functionality:
public class SpriteManager : Microsoft.Xna.Framework.DrawableGameComponent
After changing the base class, you’ll need to create an override
for the Draw method in your game
component:
public override void Draw(GameTime gameTime)
{
    base.Draw(gameTime);
}
To add your newly created component to your game and have the
Update and Draw methods in your component wired into your
game loop, you also have to add the component to the list of components
used by your Game1 class. To do this,
you’ll need to add a class-level variable of the type SpriteManager to your Game1 class:
SpriteManager spriteManager;
Then, in your Game1 class’s
Initialize method, you need to
instantiate the SpriteManager object, passing in a reference to
your Game1 class (this) to the
constructor. Finally, add the object to the list of components in your
Game1 class:
spriteManager = new SpriteManager(this);
Components.Add(spriteManager);
Bam! You’re wired up and ready to go. When the Update and Draw methods of your game are called, they
will also now be called in your new game component.
You can see how easy it is to add a GameComponent to your game. Imagine the
possible uses for this kind of tool. If, for example, you built a
component to draw the framerate and other performance-related debug
information on the screen, you could add it to any game with only two
lines of code! Very cool stuff.
Coding the SpriteManager
Although your SpriteManager class is wired up and
functional, it doesn’t do anything yet. You can draw in your SpriteManager’s Draw method, just as you can in your Game1 class. In fact, to clearly separate the
sprite logic from the rest of your game, you’ll want the SpriteManager to actually control all drawing
of sprites. To accomplish that, you’re going to have to add some code
that will draw your sprites to that class.
The first thing you’ll need is a SpriteBatch. Although you already have a SpriteBatch object in your Game1 class, it makes more sense to create
your own here for use within this class than to reuse that one. Only
that way will you be able to truly isolate and modularize your game
component code. Too much passing of data back and forth between the game
and the game component will break that model.
In addition to adding a SpriteBatch variable, you need to add a few
other variables: a list of Sprite
objects that will hold all the automated sprites and an object of type
UserControlledSprite that will
represent the player. Add each of these variables at the class level
inside your SpriteManager
class:
SpriteBatch spriteBatch;
UserControlledSprite player;
List<Sprite> spriteList = new List<Sprite>(  );
Just as the SpriteManager’s
Update and Draw methods are wired up to be called after
your Game1 class’s Update and Draw methods are called, the Initialize and LoadContent
methods will also be called after the equivalent Game1 methods. You’re going to need to add
some code to load textures, initialize your SpriteBatch, initialize your player object, and, for testing purposes, add
some sprites to your sprite manager’s list of sprites. Add an override
for LoadContent using the following
code to accomplish all of that:
protected override void LoadContent(  )
{
    spriteBatch = new SpriteBatch(Game.GraphicsDevice);

    player = new UserControlledSprite(
        Game.Content.Load<Texture2D>(@"Images/threerings"),
        Vector2.Zero, new Point(75, 75), 10, new Point(0, 0),
        new Point(6, 8), new Vector2(6, 6));    spriteList.Add(new AutomatedSprite(
        Game.Content.Load<Texture2D>(@"Images/skullball"),
        new Vector2(150, 150), new Point(75, 75), 10, new Point(0, 0),
        new Point(6, 8), Vector2.Zero));
    spriteList.Add(new AutomatedSprite(
        Game.Content.Load<Texture2D>(@"Images/skullball"),
        new Vector2(300, 150), new Point(75, 75), 10, new Point(0, 0),
        new Point(6, 8), Vector2.Zero));
    spriteList.Add(new AutomatedSprite(
        Game.Content.Load<Texture2D>(@"Images/skullball"),
        new Vector2(150, 300), new Point(75, 75), 10, new Point(0, 0),
        new Point(6, 8), Vector2.Zero));
    spriteList.Add(new AutomatedSprite(
        Game.Content.Load<Texture2D>(@"Images/skullball"),
        new Vector2(600, 400), new Point(75, 75), 10, new Point(0, 0),
        new Point(6, 8), Vector2.Zero));

    base.LoadContent(  );
}
What’s going on here? First, you initialize your SpriteBatch object; then, you initialize your
player object and add four automated
sprites to your list of sprites. These four sprites are for testing
purposes only, so that once you finish your sprite manager you can see
it in action.
Next, you need to call the Update method of the player object and that of all the sprites in
the list of sprites every time the Update method in your sprite manager is
called. In your sprite manager’s Update method, add this code:
public override void Update(GameTime gameTime)
{
    // Update player
    player.Update(gameTime, Game.Window.ClientBounds);

    // Update all sprites
    foreach (Sprite s in spriteList)
    {
        s.Update(gameTime, Game.Window.ClientBounds);
    }

    base.Update(gameTime);
}
Now, you need to do the same thing when drawing. The Sprite base class has a Draw method, so you’ll need to call each
sprite’s Draw method in your SpriteManger’s Draw method. Sprites must always be drawn
between calls to SpriteBatch.Begin
and SpriteBatch.End, so make sure
that you add SpriteBatch.Begin and
End method calls to surround your
calls to draw your sprites:
public override void Draw(GameTime gameTime)
{
    spriteBatch.Begin(SpriteSortMode.FrontToBack, BlendState.AlphaBlend);    // Draw the player
    player.Draw(gameTime, spriteBatch);

    // Draw all sprites
    foreach (Sprite s in spriteList)
        s.Draw(gameTime, spriteBatch);

    spriteBatch.End(  );

    base.Draw(gameTime);
}
There’s just one more thing you need to take care of in your
SpriteManager class: collision
detection. You’ll be handling collision detection in your sprite
manager rather than in individual sprites or in the game object
itself.
For this particular game, you don’t care whether automated sprites
collide with one another; you only need to check your player sprite for
collision against all your automated sprites. Modify your Update call to check for player collisions
with all AutomatedSprites:
public override void Update(GameTime gameTime)
{
    // Update player
    player.Update(gameTime, Game.Window.ClientBounds);

    // Update all sprites
    foreach (Sprite s in spriteList)
    {
        s.Update(gameTime, Game.Window.ClientBounds);

        // Check for collisions and exit game if there is one
        if (s.collisionRect.Intersects(player.collisionRect))
            Game.Exit(  );
    }

    base.Update(gameTime);
}
Now, each time the Update
method of your game is called, Update
will also be called in your SpriteManager. The SpriteManager will in turn call Update on all sprites and check them for
collisions against the player sprite. Beautiful, isn’t it?
Cleaning Up
Wow. That might seem like a lot of work, but I guarantee
you’ll be pleased with what this has done for your code. Your sprite
manager is complete and is already wired up to your Game1 class. However, you still have all the
code that you added to Game1 in
the previous chapters. You can now
go into that class and delete everything but the SpriteManager code and
the generated code that was there originally. Your Game1 class should look something like
this:
using System;
using System.Collections.Generic;
using System.Linq;
using Microsoft.Xna.Framework;
using Microsoft.Xna.Framework.Audio;
using Microsoft.Xna.Framework.Content;
using Microsoft.Xna.Framework.GamerServices;
using Microsoft.Xna.Framework.Graphics;
using Microsoft.Xna.Framework.Input;
using Microsoft.Xna.Framework.Media;
using Microsoft.Xna.Framework.Net;
using Microsoft.Xna.Framework.Storage;
namespace AnimatedSprites
{
public class Game1 : Microsoft.Xna.Framework.Game
{
GraphicsDeviceManager graphics;
SpriteBatch spriteBatch;
SpriteManager spriteManager;
public Game1()
{
graphics = new GraphicsDeviceManager(this);
Content.RootDirectory = "Content";
}
protected override void Initialize()
{
spriteManager = new SpriteManager(this);
Components.Add(spriteManager);
base.Initialize();
}
protected override void LoadContent()
{
// Create a new SpriteBatch, which can be used to draw textures.
spriteBatch = new SpriteBatch(GraphicsDevice);
}
protected override void UnloadContent()
{
// TODO: Unload any non-ContentManager content here
}
protected override void Update(GameTime gameTime)
{
// Allows the game to exit
if (GamePad.GetState(PlayerIndex.One).Buttons.Back ==
ButtonState.Pressed)
this.Exit();
base.Update(gameTime);
}
protected override void Draw(GameTime gameTime)
{
GraphicsDevice.Clear(Color.White);
base.Draw(gameTime);
}
}
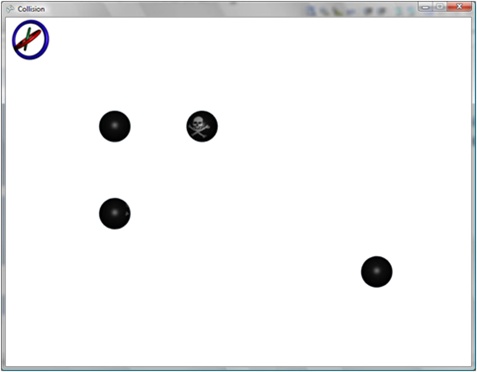
}Compile and run your application, and you’ll see the spinning rings object and four skull balls. You have control of the rings object via the keyboard, mouse, and gamepad, and the game will end when the three rings sprite collides with one of the skull balls (see Figure 5-3). One thing to watch out for in this example is that when the game starts, the rings will be placed at the position of the mouse cursor. If that position happens to be on top of one of the automated sprites, the collision check will be true right from the beginning and the game will end. If you have that problem, move the mouse to the corner of the screen when you start the game. This is a small problem that won’t cause any issues down the road because, as was mentioned before, the sprites that are being drawn currently are there only to test the sprite manager functionality.
Sweet! If you were wondering what the point of this chapter was,
take a look at the code in your Game1
class. Your application now features a very solid object-oriented
design, compared to what you were dealing with previously. Look at the
Draw method and the rest of the
Game1 class. There’s hardly anything
there! Even better, look at what it took to add an entire new animated
sprite: one line of code! Awesome! Remember how painful it was in the
previous chapter to add a new sprite? You had to add numerous variables
and code and do lots of copying, pasting, changing of variable names,
etc. With that in mind, you can start to see the benefit of a
modularized approach using powerful tools such as XNA’s GameComponents and a well-designed class
hierarchy.
Making Them Move
You may be thinking that something’s wrong with your
automated sprites. You remember adding code to make them move on their
own, yet they don’t do anything but sit there and spin. The reason your
automated sprites don’t move is that you created each of the automated
sprites shown in Figure 5-3 with a speed of
zero; that is, in the LoadContent
method of the SpriteManager class,
you passed Vector2.Zero as the final
parameter of the constructor for each of these objects.
To make your automated sprites move around the screen, try
modifying the speed parameter
you pass to those objects. Be aware that you have no logic
built in to do anything with these sprites other than move them forward,
though. The result will be that your sprites will move forward and
eventually will move off the screen. In upcoming chapters, you’ll be
adding some logic to dynamically create sprites and send them flying
from one side of the screen to the other. This chapter and the sprite
class hierarchy that you’ve built have laid the foundation for that
future development.
What You Just Did
Stop right here and give yourself a nice, hefty pat on the back. Solid software design is hard to master. Far too many developers dive into code without thinking ahead, and the result is a mass of spaghetti code that quickly becomes unmanageable. Let’s review what you’ve done here:
You created an inheritance hierarchy for sprites, including a base class handling animation and two derived classes handling user input and automated movement.
You learned about
GameComponents, which can be used to create a modular design of interchangeable components.You created a
SpriteManagerclass that handles updating and drawing of sprites as well as checking for collisions.You cleaned up the
Game1class to facilitate future development in coming chapters.
Summary
A solid design is just as important as accurate code. Time spent on design in a game development project is absolutely essential to speed up development, increase maintainability, and improve performance.
The use of a solid class hierarchy reduces duplicate code and improves maintainability of the system as a whole.
GameComponents are powerful tools that allow developers to isolate certain functionality and create components that can easily be plugged into different projects.In addition to being a great way to write video games, XNA has successfully been used as a treatment for many illnesses and diseases.
Test Your Knowledge: Quiz
What class does a game component derive from?
If you want to be able to draw on the screen with your game component, what class do you need to derive from?
Fact or fiction: time spent building a solid object-oriented design should not count as time spent developing software, because it is unnecessary and superfluous.
What is spontaneous dental hydroplosion?
Test Your Knowledge: Exercise
Modify the code that you worked on this chapter to create four
sprites that move and bounce off all four edges of the screen. To
accomplish this, create a new class called BouncingSprite that derives from AutomatedSprite. BouncingSprite should do the same thing that
AutomatedSprite does, with the
exception that it will check during the Update method to determine whether the sprite
has gone off the edge of the screen. If it has, reverse the direction of
the sprite by multiplying the speed
variable by −1.
Also, make two of the bouncing sprites use the skull image and two of them use the plus image (located with the source code for this chapter in the AnimatedSpritesAnimatedSpritesAnimatedSpritesContentImages directory).
Note that when running this game after making these changes, you’ll have four sprites moving around the screen and the game will exit when any of them collide with the user-controlled sprite. This could cause some issues in testing the game because the sprites may be colliding when the game first loads. Try moving your mouse to a far corner of the screen when loading the game to make sure your user-controlled sprite is out of the way to begin with.