
Chapter 12. 3D Collision Detection and Shooting
OK, here we go. Fasten your seatbelts; we’re coming to the final stretch. In the previous chapter, you built a flying camera and discussed differences between that and a land-based camera. Then, you took the code you’ve been building in this 3D section of the book and created a customized camera for your game. In this chapter, you’ll add some game logic and support for shooting and collision detection. We’ve got a lot to do, so let’s get to it.
This chapter picks up with the code that you finished with in Chapter 11. Open the 3D Game project and use it for the examples and walkthroughs in this chapter.
Tip
In the source code you’ve download for the book, you’ll find that Chapter 11 has two projects: Flying Camera, which holds the code for the 3D flying camera you created in the first portion of that chapter, and 3D Game, which holds the code for the stationary, customized camera you created in the second part of that chapter. Make sure you use the project called 3D Game for this chapter.
Creating a Moving Enemy
Right now, you have a customized camera that rotates in yaw and pitch directions while looking at a spinning spaceship. That’s pretty sweet, and you may be tempted to release your game now and see if you can pull some users away from World of Warcraft, making millions on monthly subscriptions. I’d caution you to take a step back for a minute, though, and realize that you still have some work to do before you get to that point.
In the game that you’ll be building in the next few chapters,
you’ll have a stationary camera from which you’ll shoot at enemies
flying toward you. It would make sense, then, to add a new subclass of
your BasicModel class to which you
can add functionality to fly forward in a given direction. To add a
sense of realism, you’re also going to make the enemies roll
randomly.
First, you’ll need to modify the SpinningEnemy class. Add the following
class-level variables to the
SpinningEnemy class:
float yawAngle = 0;
float pitchAngle = 0;
float rollAngle = 0;
Vector3 direction;
Next, modify the constructor of the SpinningEnemy class as follows:
public SpinningEnemy(Model m, Vector3 Position,
    Vector3 Direction, float yaw, float pitch, float roll)
    : base(m)
{
    world = Matrix.CreateTranslation(Position);
    yawAngle = yaw;
    pitchAngle = pitch;
    rollAngle = roll;
    direction = Direction;
}
You previously had a parameter for a Model in the constructor, but you’ve now added
several others. Let’s look at each of the parameters you’ve added to the
constructor and what they’re used for:
Vector3 PositionThe position parameter represents, strangely enough, the position of the object. Remember that in your
BasicModelclass, you have aworldvariable that is initially set toMatrix.Identity. In the constructor for theSpinningEnemyclass, you’re setting the world matrix of the base class to aMatrix.Translationusing the passed-in position vector. This will make the initial position of the object be the point represented by the position vector parameter.Vector3 DirectionThe direction parameter represents the direction in which the object moves, as well as the speed at which it moves. In the constructor, you’re simply assigning this parameter’s value to a class variable to keep track of it for later use. In the
Updatemethod, notice that theworldvariable (which you’re using to represent the position of the object) is multiplied by a newMatrix.Translationusing the direction vector. This will move the object in the direction specified by the parameter at a speed equal to the magnitude of that vector every timeUpdateis called.float yaw,float pitch,float rollThe yaw, pitch, and roll angle parameters represent how many degrees, in radians, to rotate the object on a yaw, pitch, or roll every time
Updateis called. In the constructor, you assign the values to class variables. In theUpdatemethod, notice that you are multiplying a new matrix calledrotation(which is a class-level variable initialized toMatrix.Identity) by aMatrix.CreateFromYawPitchRollusing the yaw, pitch, and roll angles as parameters. This will cause the object to rotate incrementally every time theUpdatemethod is called.
Next, modify the Update method
of your SpinningEnemy class to rotate
the model using the yaw, pitch, and roll variables passed into the
constructor and then to move the model using the direction
vector:
public override void Update(  )
{
    // Rotate model
    rotation *= Matrix.CreateFromYawPitchRoll(yawAngle,
        pitchAngle, rollAngle);

    // Move model
    world *= Matrix.CreateTranslation(direction);
}
Finally, modify the GetWorld
method as follows to return the rotation multiplied by the world
matrix:
public override Matrix GetWorld(  )
{
    return rotation * world;
}
Your newly modified SpinningEnemy class deals with two matrices to represent the position and
rotation of the model the class represents. First, the rotation matrix
is used to keep track of how much the object rotates. Second, the world
matrix is used to keep track of how far the object is moved (using the
CreateTranslation method). Returning
the rotation matrix multiplied by the world matrix causes the object to
spin in place while moving in the direction specified by the direction
vector.
Tip
So, here’s a question for you: what would be different if you
returned world * rotation in the
GetWorld method instead of rotation * world?
Whereas rotation * world will
cause the object to spin in place while moving in the direction
specified by the direction vector, world *
rotation will cause the object to move in the direction
specified by the direction vector while orbiting the origin. This
small change to the matrix multiplication causes some very different
functionality. A little later in this chapter, you’ll have some
objects of this class moving around the screen, and you can play with
the GetWorld method to get
different effects.
Adding Some Game Logic
Good times. Now that you have a class that will create a
moving enemy, you need to add some game logic. As with nearly any game,
there will be an element of randomness in this game, so you’ll need to add a random number
generator. Remember that you always want to have only one random number
generator that you use throughout your entire game. If you have multiple
random number generator variables, there’s a possibility that some of
the variables might end up with the same random seeds, in which case the
number sequences will be the same (and will no longer be random). Add a
Random object to your Game1 class and a public auto-property for that object:
public Random rnd { get; protected set; }Then, initialize the rnd
variable in the constructor of the Game1 class:
rnd = new Random( );
While you’re working in the Game1 class, go ahead and change the
background color of the game to black, to make it look more like we’re
in outer space (yay—outer space!!!). Remember that to change the
background color, you change the parameter sent to the Clear method in Game1’s Draw method:
GraphicsDevice.Clear(Color.Black);
Also, you’ll probably want to make your game play in full-screen
mode and in a decent resolution. Let’s go with 1,280×1,024 (you’ll
want to make sure that your resolution is a standard resolution
supported by most PC monitors, and the 1,280×1,024 resolution
definitely passes that test). To change the screen size and specify
full-screen mode, add the following code to the end of the constructor
of the Game1 class:
graphics.PreferredBackBufferWidth = 1280;
    graphics.PreferredBackBufferHeight = 1024;
#if !DEBUG
    graphics.IsFullScreen = true;
#endif
Tip
The resolution you specify only indicates the preferred resolution. If for some reason the PC the game is played on can’t support that resolution, your game will run in another resolution.
Also bear in mind that the Game.Window.ClientBounds method that you have been using in this book to detect the
edges of the screen depends on your screen being large enough to
accommodate the resolution you specify. For example, if you are
running a widescreen monitor at a resolution of 1,400×900, you won’t
be able to fit a 1,280×1,024-sized window on your screen. This will
cause issues with gameplay down the road. Make sure that the screen
size you choose will fit the monitor you’re using.
All right, now you’re going to want to add some functionality to
your ModelManager class that will
periodically spawn enemies. You did something like this in your 2D game
earlier in this book, but we’re going to take it a step further this
time and add increasingly difficult levels to the logic. The first thing
you’ll need to do is remove the line of code that creates the spinning
ship that you have currently. This line is the call to the models.Add method in your ModelManager’s LoadContent method. Remove the following code
entirely:
models.Add(new BasicModel(
Game.Content.Load<Model>(@"modelsspaceship")));Now, running your game will display a black screen with no objects
visible whatsoever. That’s weak sauce, and you can do better. In your
game, you’re going to be implementing a series of increasingly difficult
levels in which enemies spawn and fly toward the player, and the player
has to shoot them down to move to the next level. To begin, add a new
class to your game called LevelInfo,
and replace the code in that class with the following:
namespace _3D_Game
{
    class LevelInfo
    {
        // Spawn variables
        public int minSpawnTime { get; set; }
        public int maxSpawnTime { get; set; }

        // Enemy count variables
        public int numberEnemies { get; set; }
        public int minSpeed { get; set; }
        public int maxSpeed { get; set; }

        // Misses
        public int missesAllowed { get; set; }

        public LevelInfo(int minSpawnTime, int maxSpawnTime,
            int numberEnemies, int minSpeed, int maxSpeed,
            int missesAllowed)
        {
            this.minSpawnTime = minSpawnTime;
            this.maxSpawnTime = maxSpawnTime;
            this.numberEnemies = numberEnemies;
            this.minSpeed = minSpeed;
            this.maxSpeed = maxSpeed;
            this.missesAllowed = missesAllowed;
        }
    }
}
Basically, you’ll be creating an object of type LevelInfo for each level in your game. Let’s
take a look at what each of the variables in LevelInfo will be used for:
int[] minSpawnTimesThis array of integers represents the minimum spawn time (in milliseconds) for a new enemy. The reason for the array? Each element in the array represents the minimum spawn time for a different level of the game.
int[] maxSpawnTimesThis array of integers represents the maximum spawn time (in milliseconds) for a new enemy. Each element in the array represents the maximum spawn time for a different level.
int[] numberEnemiesThis represents how many enemies will spawn per level. Once this number is reached and all enemies are off the screen, the current level ends and the next level begins.
int maxSpeedandint minSpeedThis represents the maximum speed of an enemy. This is an
intinstead of aVector3because your enemies will move only in positive Z. When spawning a new enemy, you’ll be using a direction vector of (0, 0) and some random value betweenminSpeedandmaxSpeed.int[] missesAllowedThis will be used for your end-game logic. A player is allowed to let only a certain number of enemies get past her during each level. Once this number is reached in a given level, the game ends.
Now, add the following class-level variables to your ModelManager class. These variables are all
used to help create increasingly difficult levels of enemies flying
toward the camera:
// Spawn variables
Vector3 maxSpawnLocation = new Vector3(100, 100, −3000);
int nextSpawnTime = 0;
int timeSinceLastSpawn = 0;
float maxRollAngle = MathHelper.Pi / 40;

// Enemy count
int enemiesThisLevel = 0;

// Misses variables
int missedThisLevel = 0;

// Current level
int currentLevel = 0;
// List of LevelInfo objects
List<LevelInfo> levelInfoList = new List<LevelInfo>(  );
Let’s look at each of these variables and what you’ll be using them for:
Vector3
          maxSpawnLocation
This vector will be used to represent the starting location of the enemy ships. The Z value is a constant with all ships: all ships will start at −3,000. The X and Y values will be used as ranges from -X to +X and -Y to +Y, respectively. Essentially, when spawning an enemy, you’ll place it at some random location between -X and +X, between -Y and +Y, and at −3,000 Z.
int nextSpawnTimeThis variable will be used to identify when the next enemy should spawn. It will be generated as a random number between the
minSpawnTimeandmaxSpawnTimefor the current level.int timeSinceLastSpawnThis variable will be used to track how much time has passed since the last enemy spawned and compared against the
nextSpawnTimevariable to determine when a new enemy should spawn.float maxRollAngleThis value will represent the maximum roll angle to pass to your
SpinningEnemyclass. The value passed in will be some random value between-maxRollAngleand+maxRollAngle.int enemiesThisLevelThis variable will be used to keep track of how many enemies have been spawned so far in the current level and compared against the
numberEnemiesarray to determine when the level ends.int missedThisLevelThis variable will be used to keep track of how many enemies have eluded the player in the current level and compared against the
missesAllowedarray to determine game-over conditions.int currentLevelThis variable will hold the number reflecting the current level of the game. When the game starts, the value of
currentLevelis0, and the game is on level 1. This value is zero-based for easier access to the previously listed arrays.levelInfoListThis variable will store a list of
LevelInfoobjects that will describe spawn times, speeds, and so on for each game level.
Once you have added those variables to your ModelManager class, you need to initialize
your levelInfoList object with
information for each of the game levels you’ll be implementing. Add the
following code to the constructor of the ModelManager class:
// Initialize game levels
levelInfoList.Add(new LevelInfo(1000, 3000, 20, 2,  6,  10));
levelInfoList.Add(new LevelInfo(900,  2800, 22, 2,  6,  9));
levelInfoList.Add(new LevelInfo(800,  2600, 24, 2,  6,  8));
levelInfoList.Add(new LevelInfo(700,  2400, 26, 3,  7,  7));
levelInfoList.Add(new LevelInfo(600,  2200, 28, 3,  7,  6));
levelInfoList.Add(new LevelInfo(500,  2000, 30, 3,  7,  5));
levelInfoList.Add(new LevelInfo(400,  1800, 32, 4,  7,  4));
levelInfoList.Add(new LevelInfo(300,  1600, 34, 4,  8,  3));
levelInfoList.Add(new LevelInfo(200,  1400, 36, 5,  8,  2));
levelInfoList.Add(new LevelInfo(100,  1200, 38, 5,  9,  1));
levelInfoList.Add(new LevelInfo(50,   1000, 40, 6,  9,  0));
levelInfoList.Add(new LevelInfo(50,   800,  42, 6,  9,  0));
levelInfoList.Add(new LevelInfo(50,   600,  44, 8,  10, 0));
levelInfoList.Add(new LevelInfo(25,   400,  46, 8,  10, 0));
levelInfoList.Add(new LevelInfo(0,    200,  48, 18, 20, 0));
This code creates 15 different levels, each represented by an
instance of LevelInfo. In this code,
you’re setting the spawn times and speeds for each enemy created, as
well as the number of enemies to create in each level and how many
enemies the player can miss in each level before the game ends. You can
see by the numbers that the game will get increasingly more difficult
from level to level.
Tip
How did I know to use these values for each of the levels? And how did I know to start the enemy ships at −3,000 Z? Mostly by trial and error. When creating a game like this, you start working on the concept and then, as you play the game, you get a feel for how things are working. If the enemies seem to be moving too quickly, slow them down. If they start too close to the camera, move them back. Getting other people’s feedback on all of this is very important as well, because generally speaking, you’ll want your game to appeal to a wider audience than just you as the developer.
Next, you need to start thinking about when you’ll spawn your
first enemy. Right now, there is no logic indicating when a new enemy
will spawn. You’ll need to create a method that sets the nextSpawnTime variable in order to spawn your
first enemy. Add the following method to the ModelManager class:
private void SetNextSpawnTime(  )
{
    nextSpawnTime = ((Game1)Game).rnd.Next(
        levelInfoList[currentLevel].minSpawnTime,
        levelInfoList[currentLevel].maxSpawnTime);
    timeSinceLastSpawn = 0;
}
Note that in this method the nextSpawnTime variable is set to a random
number using the Random object in the
Game1 class. The resulting value is
some number between the minSpawnTime
and maxSpawnTime for the current
level, using the levelInfoList list
offset by the current level index. Then, the timeSinceLastSpawn variable is set to 0, which will let you count milliseconds from
the time of this method call until the next spawn time has been
reached.
Next, call the SetNextSpawnTime method in the Initialize method of your ModelManager class. This will set the nextSpawnTime and allow you to count down to
the time you’ll unleash your first enemy on the pitiful human
player:
// Set initial spawn time
SetNextSpawnTime(  );
Now you’ll need to code a method that will actually spawn a new enemy:
private void SpawnEnemy(  )
{
    // Generate random position with random X and random Y
    // between -maxX and maxX and -maxY and maxY. Z is always
    // the same for all ships.
    Vector3 position = new Vector3(((Game1)Game).rnd.Next(
        -(int)maxSpawnLocation.X, (int)maxSpawnLocation.X),
        ((Game1)Game).rnd.Next(
        -(int)maxSpawnLocation.Y, (int)maxSpawnLocation.Y),
        maxSpawnLocation.Z);

    // Direction will always be (0, 0, Z), where
    // Z is a random value between minSpeed and maxSpeed
    Vector3 direction = new Vector3(0, 0,
        ((Game1)Game).rnd.Next(
        levelInfoList[currentLevel].minSpeed,
        levelInfoList[currentLevel].maxSpeed));

    // Get a random roll rotation between -maxRollAngle and maxRollAngle
    float rollRotation = (float)((Game1)Game).rnd.NextDouble(  ) *
            maxRollAngle - (maxRollAngle / 2);

    // Add model to the list
    models.Add(new SpinningEnemy(
        Game.Content.Load<Model>(@"modelsspaceship"),
        position, direction, 0, 0, rollRotation));

    // Increment # of enemies this level and set next spawn time
    ++enemiesThisLevel;
    SetNextSpawnTime(  );
}
This method creates a new SpinningEnemy and adds it to the list of
models in your ModelManager. First,
the position is generated as a Vector3 with random values between -maxSpawnLocation.X and +maxSpawnLocation.X, -maxSpawnLocation.Y and +maxSpawnLocation.Y, and maxSpawnLocation.Z.
Then, the direction is calculated, using 0 for X and Y and a random value between
minSpeed and maxSpeed for Z, which will move the objects
toward the camera at different speeds in the direction of positive
Z.
Next, the roll rotation is calculated as a random value between
-maxRollAngle and +maxRollAngle. The enemy being created will
not rotate in a pitch or a yaw, so the only rotation generated is for
the roll.
The model is then created and added to the models list, the
enemiesThisLevel variable is
incremented, and the next spawn time is set via a call to SetNextSpawnTime.
When the next spawn time has been reached, you’ll need to actually
spawn your enemies. Add the following method to the ModelManager class to spawn a new enemy when
the time is right:
protected void CheckToSpawnEnemy(GameTime gameTime)
{
    // Time to spawn a new enemy?
    if (enemiesThisLevel <
        levelInfoList[currentLevel].numberEnemies)
    {
        timeSinceLastSpawn += gameTime.ElapsedGameTime.Milliseconds;
        if (timeSinceLastSpawn > nextSpawnTime)
        {
            SpawnEnemy(  );
        }
    }
}
Then, call the new method at the top of the Update method in your ModelManager class:
// Check to see if it's time to spawn
CheckToSpawnEnemy(gameTime);
The if statement at the
beginning of this code will prevent enemies from spawning if all of the
enemies allocated for the current level have already been spawned. Then,
using the gameTime variable, you
increment the timeSinceLastSpawn
variable. When the value of the timeSinceLastSpawn variable is greater than
the value of the nextSpawnTime
variable, the time has come to launch a new enemy. Calling SpawnEnemy will both create a new enemy and
reset the spawn timers, so that’s all you need to do at this
point.
Finally, because your game camera rotates only 45°, once an enemy
has passed out of the camera’s
field of view, it’s out of play and needs to be removed from the game.
You currently have a public accessor for the Vector3 cameraPosition variable in your
Camera class,
which will allow your ModelManager to
use that property to detect when an enemy has passed out of the camera’s
field of view.
The Matrix class has a Translation property that returns a Vector3 representing the net translations
applied to the Matrix. You can use
this property in the ModelManager
class on all of the enemy ships that you create and compare it against
the Z coordinate from your camera’s cameraPosition auto-implemented property to
determine whether the Z value of the ship’s translation is greater than
the Z value of the camera’s position (indicating that the ship has
passed out of view). If that is the case, the ship is out of bounds and
should be removed from the game.
Modify the code that calls the Update method on each model in the models list
(in the Update method of your
ModelManager class) to remove models
once they are out of play. Remove the following code from the Update method of your ModelManager class:
// Loop through all models and call Update
for (int i = 0; i < models.Count; ++i)
{
    models[i].Update(  );
}
and add the following method, which will loop through your ship models, update them, and remove them when they are out of bounds:
protected void UpdateModels(  )
{
    // Loop through all models and call Update
    for (int i = 0; i < models.Count; ++i)
    {
        // Update each model
        models[i].Update(  );

        // Remove models that are out of bounds
        if (models[i].GetWorld(  ).Translation.Z >
            ((Game1)Game).camera.cameraPosition.Z + 100)
        {
            models.RemoveAt(i);
            −−i;
        }
    }
}
Next, call the UpdateModels
method from the Update method of your
ModelManager class, just before the
call to base.Update:
// Update models
UpdateModels(  );
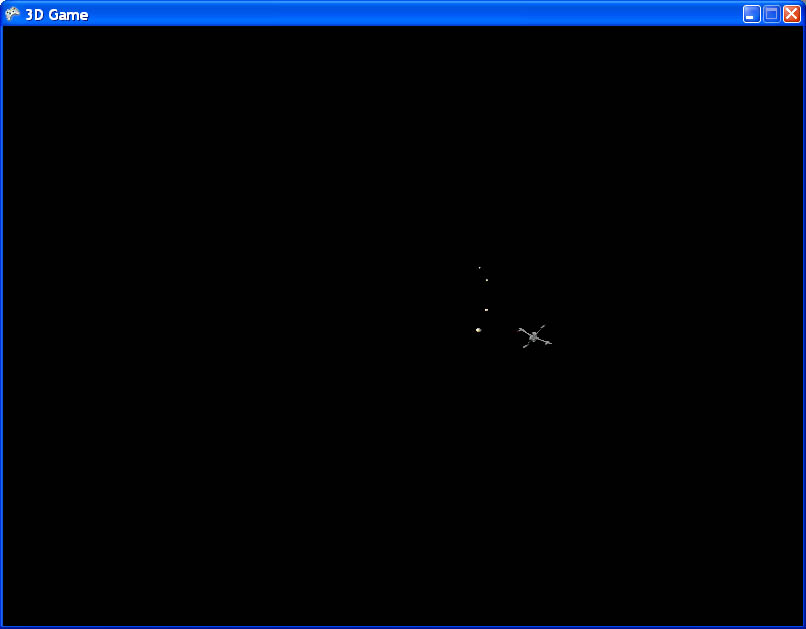
Wow! You just made a huge amount of progress. At this point, you should be able to compile and run your game and see that you have enemies that move toward the camera and roll randomly left or right for a bit of realism, as seen in Figure 12-1. You’re making some great strides in your game now. The next thing to do is add the ability to shoot down the enemies!
Firing Shots
Many types of games have some form of projectile that is thrown or shot toward other players or enemies. How would you go about adding the ability to shoot a projectile of some sort in your game? Think about it at its most basic level, and you’ll realize that a projectile flying through the air or through space is just like the moving camera and moving objects you’ve already implemented in previous chapters of this book. Essentially, your shots (or bullets) will each consist of a model, a position, and a direction, and potentially some form of rotation as well. Seems like an easy enough concept. Let’s see how you can add it to your game.
Your SpinningEnemy class
already has all the components that a shot requires, so you can use that
class for the shots as well as the enemy ships. Isn’t it great to have a
generic, multipurpose class that can be reused for different things?
Think of all the time you just saved! You’re already done coding your
shot class…nice job!
The next step to creating a shot is to add the shot model to your project. If you haven’t already, download the source code for this chapter of the book. With the source code for this chapter is a model file called ammo.x in the 3D Game3D GameContentModels folder. In Visual Studio, add the ammo.x file to your project by right-clicking the 3D GameContentModels folder in Solution Explorer, selecting Add→Existing Item…, browsing to the location of the ammo.x file, and selecting it.
Once you’ve added the ammo.x file to your
project, add a couple of class-level variables to your ModelManager class to help you keep track of
the shots you fire:
List<BasicModel> shots = new List<BasicModel>(  );
float shotMinZ = −3000;
The first variable is a new list of BasicModel objects. This list will contain all
shots fired. Because the shots use the same class as the ships, you
could store your shot objects in the same list as your enemy ships.
Although that method would work, some added processor time would be
required to identify which objects are ships and which ones are shots
when it comes to collision detection (you don’t care whether shots hit
shots or ships hit ships; all you care about in this particular game is
when a shot hits a ship). So, given that description of the game, the
best route is to have a list for ships and another list for
shots.
The second variable added in the preceding code is the minimum Z value for a shot. Once a shot travels beyond −3,000 in the Z direction, the shot is out of play and will be marked for removal from the list.
Next, you’ll need to create a way to add shots to the ModelManager. Your model manager is
responsible for adding enemy ships on its own because your enemies are
autogenerated at random intervals.
However, shots will be added based on user input, and that’s really
outside the scope of responsibilities of your ModelManager class; all that it should be
responsible for is managing models, not handling user input.
So, you’ll be adding shots from within your Game1 class, and you’ll need to have a way to
add shots to the ModelManager’s shot
list. Add the following method to your ModelManager to allow the Game1 class to add shots to the list:
public void AddShot(Vector3 position, Vector3 direction)
{
    shots.Add(new SpinningEnemy(
        Game.Content.Load<Model>(@"modelsammo"),
        position, direction, 0, 0, 0));
}
You’ll also need to update and draw your shots every time your
ModelManager’s Update and Draw methods are called. You’ll handle this in
the same way that you did with your enemy ships. In addition, when
updating your shots, you’ll want to check to make sure that the shots
are still in play (i.e., that they haven’t passed the shotMinZ value indicating that they’ve
traveled out of bounds). Any shots that are no longer in play should be
removed. Add the following method to your ModelManager class to update each shot and
remove those that are out of bounds:
protected void UpdateShots(  )
{
    // Loop through shots
    for (int i = 0; i < shots.Count; ++i)
    {
        // Update each shot
        shots[i].Update(  );

        // If shot is out of bounds, remove it from game
        if (shots[i].GetWorld(  ).Translation.Z < shotMinZ)
        {
            shots.RemoveAt(i);
            −−i;
        }
    }
}
Next, call the UpdateShots
method from your ModelManager’s
Update method, just before the call
to base.Update:
// Update shots
UpdateShots(  );
Notice that you can use the Translation property of your shot’s world
matrix to determine the position of the object and compare it against
the value of shotMinZ. You probably
noticed this already, but this is basically the same way that you are
comparing your enemy ships against the camera position to see whether
they are out of bounds.
To draw your shots, add the following code to your ModelManager’s Draw method, just before the base.Draw call:
// Loop through and draw each shot
foreach (BasicModel bm in shots)
{
    bm.Draw(((Game1)Game).camera);
}
All right, that’s all for the ModelManager class for now. Let’s move on to
the Camera class.
What? Wait a minute. Why are we modifying the Camera class to add shooting ability?
Well, remember when I mentioned that a shot is basically the same as a moving camera or a moving object with a position and a direction? That’s true, and the initial position of the shot will be the location where the shot originated (in your game’s case, that will be the camera position). But what direction will you give each shot? The direction of a shot is the direction of the object that created the shot. For example, if you have a gun pointing in some direction and it shoots a bullet, the bullet will have a direction vector, and that direction vector will be the same as the gun’s direction vector.
In your game, the camera will determine the direction of the shot,
and therefore the Game1 class needs
to be able to get the direction vector of the camera. So, you’ll need to
add a public accessor for your
Camera class’s cameraDirection variable:
public Vector3 GetCameraDirection
{
    get { return cameraDirection; }
}
Tip
Why create a traditional property accessor for the cameraDirection rather than using an
auto-implemented property, like you do with the cameraPosition?
In the constructor of the Camera class, you call Normalize on the cameraDirection. This will not work properly
on an auto-implemented property, so it’s best to leave the cameraDirection member alone and create a
new, traditional accessor for that property.
Now, in your Game1 class, let’s
take a look at what you’ll need to add to generate shots. First, add
three class-level variables to help with your shot logic:
float shotSpeed = 10;
int shotDelay = 300;
int shotCountdown = 0;
Let’s look at these variables. First, you added a shot speed variable, which will be multiplied by the direction vector to give the shot some added power in the velocity department.
Next, you added shot delay and shot countdown variables. What are
these for? Well, consider that you’re going to be checking for user
input in order to fire a shot. The player will be able to fire a shot by
pressing the space bar or the left mouse button, and you’ll be checking
for that user input in your Game1’s
Update method. Remember how many
times a second the Update method is
called? If all goes well, it’ll be called around 60 times per second.
Now, imagine if you simply fired a shot in the Update method every time the space bar was
pressed or the left mouse button was clicked. If you hold down the space
bar for a half a second, you’ve just fired around 30 shots! I’m all in
favor of cool rapid-fire action, but that’s a bit too much.
To prevent this overload, a common behavior for a weapon is to have a delay period after a shot is fired during which no more shots can be fired.
The shotDelay variable you
added represents the duration of your weapon’s shot delay, and the
shotCountdown variable will be used
to determine when the shot delay expires and another shot can be
fired.
Add the following method to the Game1 class, which will cause shots to be
fired when the player presses the left mouse button or the space bar,
but only if the shot delay has expired:
protected void FireShots(GameTime gameTime)
{
    if (shotCountdown <= 0)
    {
        // Did player press space bar or left mouse button?
        if (Keyboard.GetState(  ).IsKeyDown(Keys.Space) ||
            Mouse.GetState(  ).LeftButton == ButtonState.Pressed)
        {
            // Add a shot to the model manager
            modelManager.AddShot(
                camera.cameraPosition + new Vector3(0, −5, 0),
                camera.GetCameraDirection * shotSpeed);

            // Reset the shot countdown
            shotCountdown = shotDelay;
        }
    }
    else
        shotCountdown −= gameTime.ElapsedGameTime.Milliseconds;
}
Next, call the FireShots method
in your Game1’s Update method, just before the call to
base.Update:
// See if the player has fired a shot
FireShots(gameTime);
Essentially, you fire the weapon only when the shotCountdown has reached or passed zero. If
that is the case, you check to see whether the space bar or the left
mouse button is pressed. If one of them is pressed, you’re ready to fire
a shot. Yeah, get ready…and hide the children, this is getting very
exciting!
First, you call the ModelManager’s AddShot method, which you added earlier to add
a shot to its list of shots. For the position parameter, you pass in the
camera’s position, but you also add a vector to that position that
pushes the vector toward negative Y. This is because if you fired the
shot from the actual camera position, you would see a huge blob of a
model on the screen as the model moved away from the camera position. To
prevent this and give a more realistic effect, you add some negative Y
to the position so your shot will appear to come from just below the
camera.
The direction of the shot is composed of the direction of the
camera multiplied by the shotSpeed
variable.
Once the shot is added, you assign the value of the shotDelay variable to the shotCountdown variable, preventing another
shot from being fired until the shotCountdown variable reaches zero
again.
If the shotCountdown is not
zero or less during a call to Update,
the initial if statement in the
FireShots method evaluates as false
and the shotCountdown variable is
decremented by the elapsed time in the else portion of that statement.
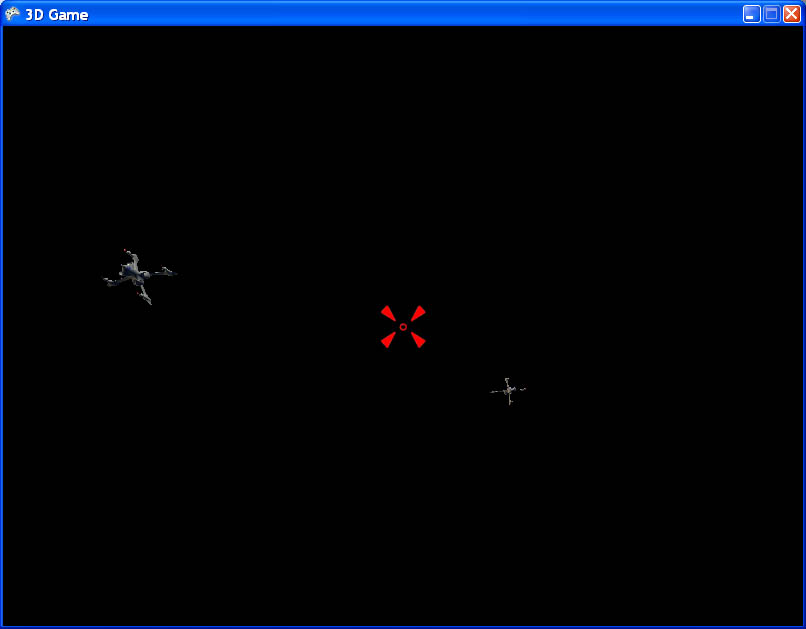
Compile and run your game, and you should see that shots are fired when you press the space bar or the left mouse button (see Figure 12-2). Also, notice that holding down the space bar or left mouse button causes the shots to be fired every 300 milliseconds (or the equivalent of the shot delay time). Who needs Unreal Tournament when you have this kind of sweet gameplay?
Well, great job getting to this point. The ships are flying and
the shots are looking great. There’s one problem, though: the shots
don’t do anything when they collide with a ship. Yeah, yeah, yeah…minor
detail, right? It’s probably worth fixing anyway. Let’s look at how you
can add some collision detection using XNA’s BoundingSphere class.
3D Collision Detection and Bounding Spheres
In the 2D section of this book, we covered a bounding-box algorithm for collision detection. Essentially, the algorithm uses an invisible box that surrounds an object and is used to determine whether another object’s box intersects with it. The bounding-box algorithm is one of the fastest collision-detection algorithms.
A similar approach is to use spheres surrounding the objects, rather than boxes. The same concept applies: you check an object’s sphere to determine whether it has collided with another object’s sphere.
When you use models in XNA, bounding spheres are generated for you
as part of the model. Each model contains one or more ModelMesh objects, and each ModelMesh has a property called BoundingSphere that defines a sphere
surrounding that part of the model.
The tricky part of this is that when you apply a translation or
scale to the model, the BoundingSphere of the model is not affected.
So, to use the BoundingSphere
specified in the model, you have to apply the same translations and
scales to it that you apply to your model.
To do this, you’ll be adding a collision-detection method inside
the BasicModel class, to which you’ll
pass another BasicModel’s model and
world to check for collisions against all of its ModelMesh’s BoundingSpheres.
This collision-detection method will receive a different model and
world matrix in its parameter list. The method will loop through all of
its own ModelMeshes and then loop
through the other Model’s ModelMeshes and check its own ModelMesh’s BoundingSpheres for collisions with the other
model’s BoundingSpheres. Before
comparing the BoundingSpheres for
each object, the method will have to apply the world matrix to the
BoundingSphere using the Transform method, which will move and rotate
the BoundingSphere to the same place
that you have already moved and rotated its model.
Tip
Although it’s important to apply any translations or scaling
operations that have been applied to the model’s world matrix to the
BoundingSphere, any rotations
applied to the model don’t need to be applied to the BoundingSphere. This is because the BoundingSphere is a sphere: any rotation
applied to it won’t affect its shape. That said, it won’t do any harm
to apply the rotations to the BoundingSphere anyway.
Add the following method to your BasicModel class:
public bool CollidesWith(Model otherModel, Matrix otherWorld)
{
    // Loop through each ModelMesh in both objects and compare
    // all bounding spheres for collisions
    foreach (ModelMesh myModelMeshes in model.Meshes)
    {
        foreach (ModelMesh hisModelMeshes in otherModel.Meshes)
        {
            if (myModelMeshes.BoundingSphere.Transform(
                GetWorld(  )).Intersects(
                hisModelMeshes.BoundingSphere.Transform(otherWorld)))
                return true;
        }
    }
    return false;
}
That’s really all there is to it. Not too shabby, eh? Now you’re
going to have to add some code to your ModelManager to handle collisions.
In the UpdateShots method of
your ModelManager class, you’ve
already added some code to remove shots when they are out of bounds,
using the shotMinZ variable as a
gauge. Change your if statement that
checks for shots that are out of bounds to an if/else
statement. In the else portion of the
statement, call the shot’s CollidesWith method, passing in the model and
world matrix of each enemy ship in a loop. If a collision is detected,
remove the ship and the shot and exit the loop.
Change the UpdateShots method
from the following:
protected void UpdateShots(  )
{
    // Loop through shots
    for (int i = 0; i < shots.Count; ++i)
    {
        // Update each shot
        shots[i].Update(  );

        // If shot is out of bounds, remove it from game
        if (shots[i].GetWorld(  ).Translation.Z < shotMinZ)
        {
            shots.RemoveAt(i);
            −−i;
        }
    }
}
to this:
protected void UpdateShots(  )
{
    // Loop through shots
    for (int i = 0; i < shots.Count; ++i)
    {
        // Update each shot
        shots[i].Update(  );

        // If shot is out of bounds, remove it from game
        if (shots[i].GetWorld(  ).Translation.Z < shotMinZ)
        {
            shots.RemoveAt(i);
            −−i;
        }
        else
        {
            // If shot is still in play, check for collisions
            for (int j = 0; j < models.Count; ++j)
            {
                if (shots[i].CollidesWith(models[j].model,
                    models[j].GetWorld(  )))
                {
                    // Collision! remove the ship and the shot.
                    models.RemoveAt(j);
                    shots.RemoveAt(i);
                    −−i;
                    break;
                }
            }
        }
    }
}
Bam! You have collision detection using BoundingSpheres! Run the game at this point
and shoot at your enemies. You may find it difficult to keep track of
where the enemies are spawning from and to keep your camera facing in
that direction. We’ll fix that shortly. Also, you may find the collision
detection as it’s currently implemented is good enough for you, or you
may find it too forgiving or not forgiving enough. You can tweak the
size of the BoundingSpheres by
applying a uniform scale in addition to the world matrix to modify the
size, which will make the collision detection more or less
forgiving.
Also, if you find the ships are too fast and too hard to hit, you
can tweak the speed of the ships using the minSpeed and maxSpeed variables in the list of LevelInfo objects. This is your game, and you
want it to play the way that you like it, so you can really tweak
whatever you want to fit your needs.
Adding a Crosshair
One other thing that you’ve probably noticed is missing at this point is some way to make sure you’re aiming at the correct place. Typically, this is done by placing a crosshair on the screen. Even though you’re working in XNA 3D, you can still draw 2D sprites on the screen, just as you did earlier in this book. Drawing the crosshair on the screen in 2D rather than in the world in 3D will make it a lot easier to work with. Imagine if you wanted it to be drawn in the world in 3D. In this case you’d have to draw it a few units in front of the camera, and every time your camera rotated or moved, you’d have to adjust the crosshair accordingly.
When drawing a crosshair on the screen, you can basically “set it and forget it,” just like in that annoying rotisserie chicken infomercial. However, this isn’t annoying—this is pretty cool stuff. (Although, if you’re interested in rotisserie chicken ovens, I can get you a sweet deal for five easy installments of only $29.99. But that’s a different book—now back to XNA.)
The first thing you’ll need to do is add an image of a crosshair to your project. To start, create a new folder under the 3D GameContent project in Solution Explorer for textures. Right-click the 3D GameContent project in Solution Explorer, select Add→New Folder, and name the new folder Textures.
With the source code for this chapter is a file called crosshair.png in the 3D Game3D GameContentTextures folder. Add the file to your project by right-clicking the 3D GameContentTextures folder in Solution Explorer, choosing Add→Existing Item…, browsing to the crosshair.png file, and selecting it.
Next, in your Game1 class,
you’ll need to add a Texture2D
class-level variable to hold your image:
Texture2D crosshairTexture;
In the LoadContent method of
your Game1 class, you’ll need to load
the crosshair.png image into your new crosshairTexture variable via the content
pipeline:
crosshairTexture = Content.Load<Texture2D>(@"texturescrosshair");
Now all you have to do is draw your texture on the screen using
the spriteBatch provided. You’ll have
to use the screen size and the size of the texture to center the
crosshair exactly in the middle of the screen (what good is a slightly
off-center crosshair?). You’ll add the code to draw the crosshair to the
Draw method of the Game1 class, after the call to base.Draw.
Add the following code at the end of the Draw method in the Game1 class:
spriteBatch.Begin(  );

spriteBatch.Draw(crosshairTexture,
    new Vector2((Window.ClientBounds.Width / 2)
        - (crosshairTexture.Width / 2),
        (Window.ClientBounds.Height / 2)
        - (crosshairTexture.Height / 2)),
        Color.White);

spriteBatch.End( );There you have it. Run the game now and see if adding a crosshair has helped your aim. You should see the crosshair in the center of the screen, as shown in Figure 12-3.
Adding Sound
Another thing your game really lacks is the atmosphere and pizzazz that only audio can give. In this section, you’ll add some sound effects and soundtracks to your game.
In Visual Studio, use the Solution Explorer to add a new folder under the 3D GameContent project called Audio (right-click the 3D GameContent project and select Add→New Folder).
Launch the Microsoft Cross-Platform Audio Creation Tool (XACT) by clicking on your Windows Start button and selecting All Programs→Microsoft XNA Game Studio 4.0→Tools→Microsoft Cross-Platform Audio Creation Tool (XACT).
In XACT, select File→New Project, navigate to your project’s 3D GameContentAudio directory, and save the file as GameAudio.xap. Once your project is ready, create a new wave bank and a new sound bank by right-clicking on the Wave Banks and Sound Banks tree items on the left and selecting New Wave Bank and New Sound Bank, respectively. Accept the default names for the wave and sound banks. Once both are created, select Window→Tile Horizontally to organize your windows for easier use.
There are six .wav files located in the 3D Game3D GameContentAudio folder of the source code for this chapter. Copy those files to your project’s 3D GameContentAudio folder in Windows Explorer. Here are the files:
Explosion1.wav
Explosion2.wav
Explosion3.wav
Shot.wav
Track1.wav
Track2.wav
Again, remember that when dealing with audio in XACT, you don’t add the actual .wav files to your project in Visual Studio; you only copy the files to the project’s 3D GameContentAudio folder in Windows Explorer. You’ll add these files to an XACT project, and that project file is the only audio file that you’ll need to add to the project from within Visual Studio.
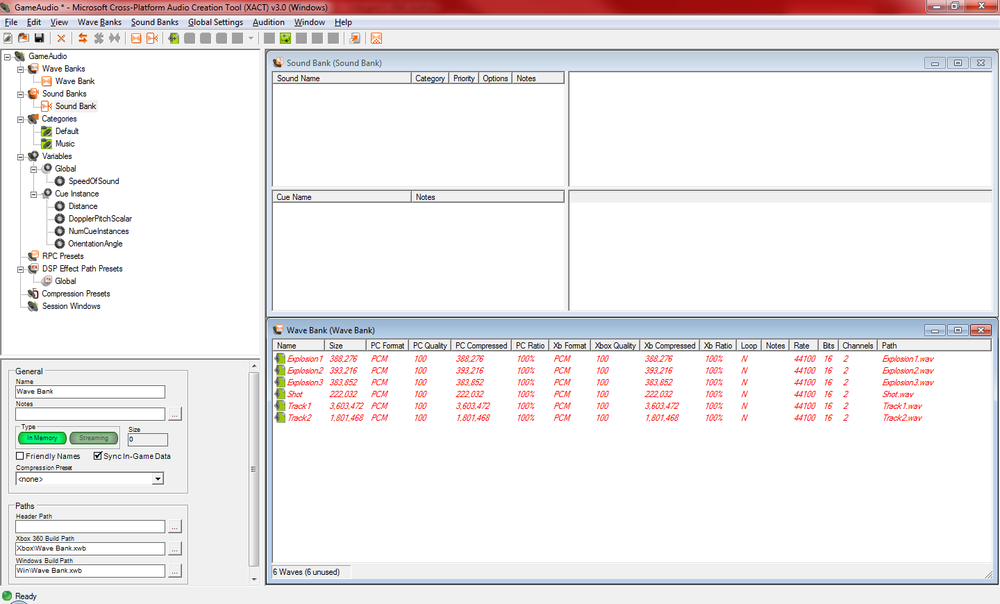
In the Wave Bank window, right-click in an empty section and select Insert Wave File(s)…. Browse to the six .wav files just listed, and add each of them to your wave bank. The files should show up in your Wave Bank window in red, indicating that they aren’t currently used (see Figure 12-4).
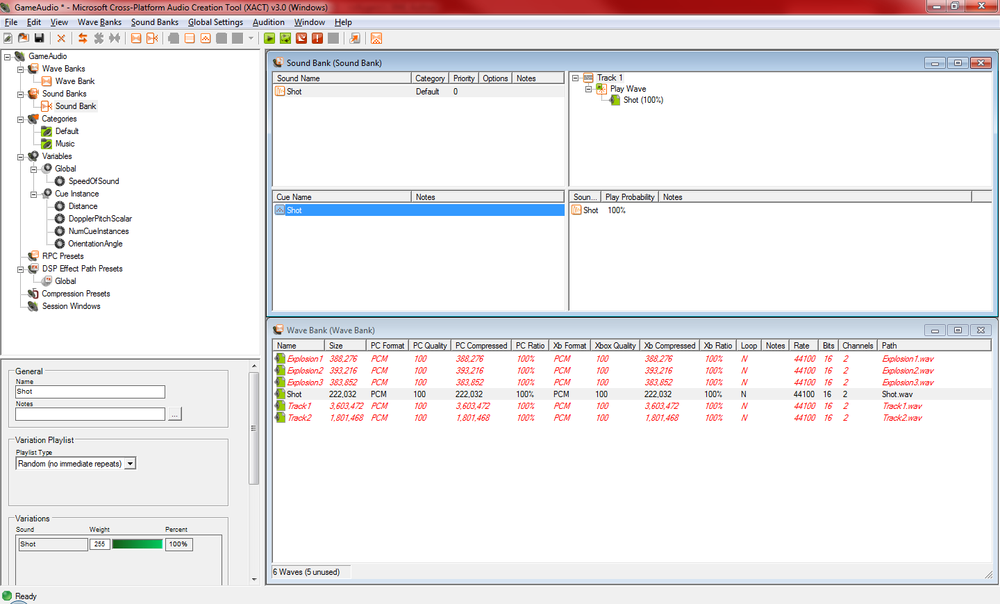
Drag the Shot sound from the Wave Bank window to the Cue Name portion of the Sound Bank window. This will create both a cue and a sound for the Shot in the Sound Bank window, as pictured in Figure 12-5.
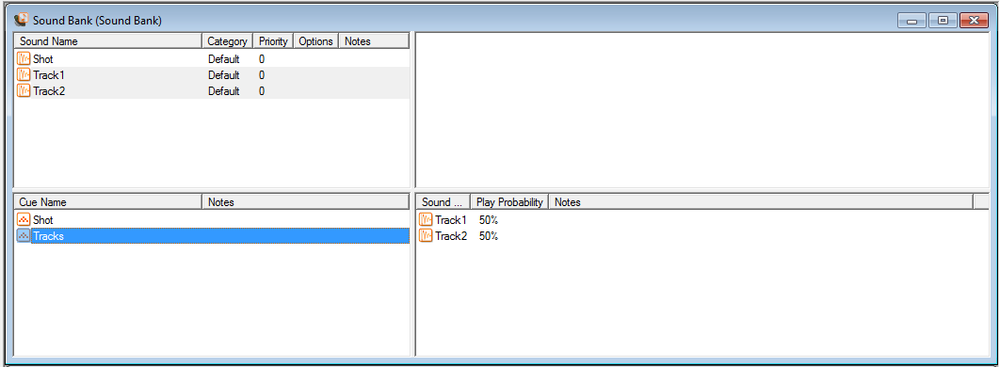
Next, you’re going to create a single cue that will play both of the sound files, with a 50% probability assigned to each. This will allow you to call that particular cue from code and have it play one track 50% of the time and the other track the rest of the time.
To do this, drag the Track1.wav and Track2.wav files from the Wave Bank window to the Sound Name section of the Sound Bank window. Until now, I’ve always told you to make sure that you drop the sounds into the Cue Name section of the Sound Bank window. In this case, however, you want to drop them into the Sound Name section because you don’t want to create cue names for each of these sounds; instead, you’ll be creating a single cue name for both of the sounds.
Next, right-click somewhere in the open space in the Cue Name section of the Sound Bank window and select New Cue. A new cue name will be created with the name “New Cue”. Select the new cue and hit F2 to rename it. Name the new cue Tracks.
Next, drag the Track1 and Track2 sounds from the Sound Name section of the Sound Bank window and drop them onto the new Tracks cue that you’ve created in the Cue Name section of the Sound Bank window. This will add both sounds to the new Tracks cue and will give each track a 50% probability of playing. Basically what happens here is when you play the Tracks cue from XNA, it will play one of the sounds associated with that cue, selecting which one to play based on the probabilities listed here.
Your Sound Bank window should now look like Figure 12-6.
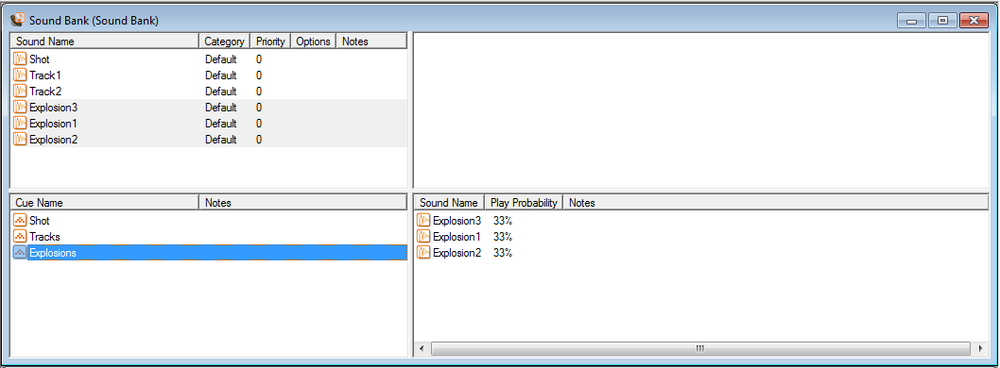
You’ll now need to do the same thing with the explosion sounds. You have three sounds for explosions loaded in your wave bank. Drag all three explosion sounds from the Wave Bank window and drop them into the Sound Name section of the Sound Bank window.
Right-click somewhere in the Cue Name section of the Sound Bank window and select New Cue. Select the new cue and hit F2 to rename it. Call the new cue Explosions.
Then, drag each of the explosion sounds from the Sound Name section of the Sound Bank window and drop them onto the new Explosions cue in the Cue Name section of the Sound Bank window. Notice that each of the explosion sounds is automatically assigned a 33% chance of being played when the Explosions cue is played.
Your Sound Bank window should now look something like Figure 12-7.
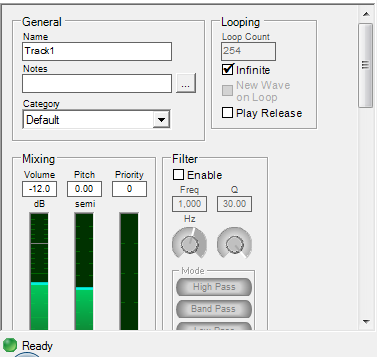
Before closing XACT, you’ll want to set the looping properties of both the Track1 and Track2 sounds to infinite. First, select the Track1 sound in the Sound Name section of the Sound Bank window. Then, in the lower-left corner of the screen, click the Infinite checkbox in the looping section, as shown in Figure 12-8. Repeat this step for Track2 as well.
You’re finished with XACT, so save your project, close XACT, and go back to Visual Studio.
In Visual Studio, you’ll need to add the .xap file from XACT to your project. Right-click the 3D GameContentAudio folder in Solution Explorer, select Add→Existing Item…, and navigate to your GameAudio.xap file (which should be saved in your project’s 3D GameContentAudio folder). Add the file to your solution by browsing to it and selecting it.
Once the .xap file is part of your solution,
you’ll need to add some code to your Game1 class. Add the following class-level
variables:
AudioEngine audioEngine;
WaveBank waveBank;
SoundBank soundBank;
Cue trackCue;
Next, you’ll need to initialize those variables via the content
pipeline. Load the sounds from your XACT project by adding the following
lines to the LoadContent method of
your Game1 class:
// Load sounds and play initial sounds
audioEngine = new AudioEngine(@"ContentAudioGameAudio.xgs");
waveBank = new WaveBank(audioEngine, @"ContentAudioWave Bank.xwb");
soundBank = new SoundBank(audioEngine, @"ContentAudioSound Bank.xsb");
trackCue = soundBank.GetCue("Tracks");
trackCue.Play(  );
The first three lines load the sounds and cues from the XACT file,
whereas the fourth line sets the trackCue variable by retrieving the cue for
your soundtracks. This is done so that you can pause/resume/stop/restart
the soundtrack music. The other sound effects do not need to be
manipulated that way, so you don’t need to save the cue information for
those sounds.
Finally, the soundtrack cue is played with the last line of the code in the preceding listing.
To allow your ModelManager to
play sounds when collisions occur, add the following method to your
Game1 class:
public void PlayCue(string cue)
{
    soundBank.PlayCue(cue);
}
Before heading to the ModelManager, you’ll need to call the PlayCue method from the FireShots method of your Game1 class when a shot is fired. To do that,
add this line immediately after the call to modelManager.AddShot:
// Play shot audio
PlayCue("Shot");
In the ModelManager, you’ll
need to add a line of code that will call the PlayCue method when a collision occurs. In the
UpdateShots method of your ModelManager, find the if/else
statement that determines whether a collision has occurred. The current
code should look something like this:
if (shots[i].CollidesWith(models[j].model,
    models[j].GetWorld()))
{
    // Collision! remove the ship and the shot.
    models.RemoveAt(j);
    shots.RemoveAt(i);
    --i;
    break;
}
Add a call to the PlayCue
method of the Game1 class just before
the break keyword that breaks from
that for loop (the added line is
shown in bold):
if (shots[i].CollidesWith(models[j].GetModel,
    models[j].GetWorld(  )))
{
    // Collision! Remove the ship and the shot.
    models.RemoveAt(j);
    shots.RemoveAt(i);
    −−i;
    ((Game1)Game).PlayCue("Explosions");
    break;
}
Nice! Fire up the game now and see how much difference the audio makes. You might want to tweak the volume levels of the different sounds—the explosions and shot sounds seemed a little weak to me, and I wanted to crank them up a little bit. Remember from Chapter 6 that you can do that by selecting the sound name in XACT and editing its volume properties in the window in the lower-left corner. This is all down to personal preference, however, and you can tweak the sounds in any way you prefer.
What You Just Did
You’re cruising along now with some good game logic, shooting, and sound effects. Before we move on to explosions and particle effects and other fine-tunings, let’s review what you did in this chapter:
You created a moving model class, which you were able to use for both enemies and shots.
You created a shooting projectile.
You used the bounding spheres provided by XNA to perform 3D collision detection.
You added a crosshair 2D image to a 3D game.
You implemented sounds using single cues with multiple sounds based on probabilities.
Summary
Moving objects through 3D space is very similar to moving a camera through 3D space. Your object typically will have a position and a direction (which also indicates its speed).
Every
ModelMeshhas aBoundingSphereobject associated with it, which defines a sphere for collision-detection purposes. TheBoundingSpheredoes not move, scale, or rotate with the model, however, so you have to apply those matrices to theBoundingSphereseparately to use it for collision detection.Adding 2D images to a 3D game is done exactly the same way it is done in a 2D game.
With the XACT tool, you can specify a single cue to play numerous sounds based on given probabilities for those sounds.
People who code in XNA not only are more popular and wealthy, but also live longer, happier lives.
Test Your Knowledge: Quiz
When firing a shot in a 3D (or 2D, for that matter) game, how do you determine the direction of the shot?
Fact or fiction: every model has a
BoundingSphereobject that surrounds the entire model and can be used for collision detection.When using
BoundingSpheres associated with a moving model for collision detection, what must be done to theBoundingSpherein order to accurately detect collisions?What is the difference between drawing 2D images on screen in a 3D game and drawing 2D images on the screen in a 2D game?
Why does Kramer’s advice to Elaine regarding his karate class and the power of the inner katra backfire on Elaine?
Test Your Knowledge: Exercise
To familiarize yourself further with what was covered in this chapter, customize the shot firing mechanism by modifying the code to do the following: