
7 Working with Audio and Apple Loops
NOW THAT YOU’VE EXPLORED MANIPULATING AND EDITING REGIONS, it’s time to address manipulating and editing the data within those regions. Logic’s handling of audio has always been one of its most lauded features. In this chapter, you’ll examine how Logic Pro X handles audio and Apple Loops, as well as some useful and creative tips and tutorials for using these features.
Let’s start by going into greater detail about the various audio channel strips types available in Logic Pro X.
Types of Channel Strips
Logic offers many different types of audio channel strips. Software instrument and audio channel strips are automatically assigned their own Tracks area tracks, but you can assign any of the other audio channel strips to a Tracks area track. They will then appear as channel strips in the main window Inspector, in the Mixer, and in the Mixer layer of the Environment.
A brief description of the different types of channel strips follows:
![]() Audio channel strips: The audio channel strip is analogous to the standard audio track on a hardware mixer. You record, edit, and play back audio files on audio tracks. You will normally record or place audio onto an audio track in the Tracks area and then use the audio track as a playback track. Audio tracks can be mono, stereo, or surround. They can use a hardware input or a bus as an input. A Logic project can include up to 255 stereo, mono, or surround audio tracks.
Audio channel strips: The audio channel strip is analogous to the standard audio track on a hardware mixer. You record, edit, and play back audio files on audio tracks. You will normally record or place audio onto an audio track in the Tracks area and then use the audio track as a playback track. Audio tracks can be mono, stereo, or surround. They can use a hardware input or a bus as an input. A Logic project can include up to 255 stereo, mono, or surround audio tracks.
![]() Software instrument channel strips: Like external MIDI tracks, software instrument tracks use MIDI regions instead of audio regions. Unlike external MIDI channel strips, software instrument channel strips actually pass the audio from software instruments through the effects and routing defined in each software instrument channel strip. Software instrument channel strips allow you to access the built-in or third-party plug-in software synthesizers that can be integrated into Logic. When you play back the MIDI regions of a software instrument, those MIDI regions trigger the DSP algorithms of the software instrument to generate sound. Software instruments can be mono, stereo, surround, or multi-output. Multi-output software instruments use aux objects for their additional outputs. (See Chapter 9, “Working with Software Instruments.”) A Logic project can include up to 255 software instruments. Although the Drummer track uses its own channel strip, it is in essence a software instrument channel strip.
Software instrument channel strips: Like external MIDI tracks, software instrument tracks use MIDI regions instead of audio regions. Unlike external MIDI channel strips, software instrument channel strips actually pass the audio from software instruments through the effects and routing defined in each software instrument channel strip. Software instrument channel strips allow you to access the built-in or third-party plug-in software synthesizers that can be integrated into Logic. When you play back the MIDI regions of a software instrument, those MIDI regions trigger the DSP algorithms of the software instrument to generate sound. Software instruments can be mono, stereo, surround, or multi-output. Multi-output software instruments use aux objects for their additional outputs. (See Chapter 9, “Working with Software Instruments.”) A Logic project can include up to 255 software instruments. Although the Drummer track uses its own channel strip, it is in essence a software instrument channel strip.
![]() Aux channel strips: Aux (auxiliary) channel strips in Logic do not record or play back audio regions. Instead, aux channel strips are routing destinations that can accept their input from a number of sources. They can accept the input of a bus, becoming a send destination for any send-capable channel strip. (See the upcoming “Channel Strip Components” section.) That also means you can assign the output of a channel strip to a bus and assign the input of an aux channel strip to that bus. If you assign the outputs of multiple channel strips to the same bus, you can then assign an aux channel strip’s input to that bus and use the aux channel strip as a master fader for those channels. Aux channel strips can accept their input from a multi-output software instrument, so each aux channel strip becomes the destination of a different output from the software instrument, and can send and receive channel-specific MIDI information. If you are using Logic as a ReWire master, you use aux channel strips to bring the ReWire slave’s audio into Logic. Finally, aux channel strips can take their inputs from your audio interface, allowing for complex routing of live audio. Aux channel strips can be bused to other aux channel strips via either their sends or their output assignment. Aux channel strips can be mono, stereo, or surround. Logic supports up to 255 aux channel strips.
Aux channel strips: Aux (auxiliary) channel strips in Logic do not record or play back audio regions. Instead, aux channel strips are routing destinations that can accept their input from a number of sources. They can accept the input of a bus, becoming a send destination for any send-capable channel strip. (See the upcoming “Channel Strip Components” section.) That also means you can assign the output of a channel strip to a bus and assign the input of an aux channel strip to that bus. If you assign the outputs of multiple channel strips to the same bus, you can then assign an aux channel strip’s input to that bus and use the aux channel strip as a master fader for those channels. Aux channel strips can accept their input from a multi-output software instrument, so each aux channel strip becomes the destination of a different output from the software instrument, and can send and receive channel-specific MIDI information. If you are using Logic as a ReWire master, you use aux channel strips to bring the ReWire slave’s audio into Logic. Finally, aux channel strips can take their inputs from your audio interface, allowing for complex routing of live audio. Aux channel strips can be bused to other aux channel strips via either their sends or their output assignment. Aux channel strips can be mono, stereo, or surround. Logic supports up to 255 aux channel strips.
![]() Input channel strips: Input channel strips are used as a live audio play-through track in Logic. Unlike audio tracks, on which you record audio and then play back audio regions, main window tracks with input channel strips are used for tracks that are always live—for example, a hardware synthesizer that you want to mix with the rest of your tracks in the Logic Mixer but you do not want to record onto an audio track. Input channel strips can be mono or stereo and can output in mono, stereo, or surround. The number of hardware inputs on your audio interface determines how many input channel strips are available in Logic.
Input channel strips: Input channel strips are used as a live audio play-through track in Logic. Unlike audio tracks, on which you record audio and then play back audio regions, main window tracks with input channel strips are used for tracks that are always live—for example, a hardware synthesizer that you want to mix with the rest of your tracks in the Logic Mixer but you do not want to record onto an audio track. Input channel strips can be mono or stereo and can output in mono, stereo, or surround. The number of hardware inputs on your audio interface determines how many input channel strips are available in Logic.
![]() Output channel strips: Output channel strips are used to send audio to your external hardware. They are usually the output destination of your other channel strips. You can use output objects to “bounce” audio, which means to create an audio file that contains the summation of all the channel strips routing their output to that particular output channel strip. Output channel strips can be mono, stereo, or surround. The number of hardware outputs on your audio interfaces determines how many output channel strips are available in Logic.
Output channel strips: Output channel strips are used to send audio to your external hardware. They are usually the output destination of your other channel strips. You can use output objects to “bounce” audio, which means to create an audio file that contains the summation of all the channel strips routing their output to that particular output channel strip. Output channel strips can be mono, stereo, or surround. The number of hardware outputs on your audio interfaces determines how many output channel strips are available in Logic.
![]() Master channel strip: Logic offers a master channel strip. This channel strip does exactly what it says: It serves as a master volume for your song. The master channel strip does not stream any audio or MIDI data itself; it simply is used to adjust volume. If you are doing a surround mix or are sending each track to a hardware mixer and using many output channel strips, having a master channel strip offers a convenient way to adjust the overall level.
Master channel strip: Logic offers a master channel strip. This channel strip does exactly what it says: It serves as a master volume for your song. The master channel strip does not stream any audio or MIDI data itself; it simply is used to adjust volume. If you are doing a surround mix or are sending each track to a hardware mixer and using many output channel strips, having a master channel strip offers a convenient way to adjust the overall level.
![]() External MIDI channel strip: This isn’t an audio channel strip at all, but it’s included here for completeness, since it appears in the Mixer along with your other channels if you create external MIDI tracks. Like software instrument channel strips, these channel strips use MIDI data. If you are using a ReWire application with Logic and sending that application MIDI from Logic, you will use an external MIDI track assigned to your ReWire application. (Chapter 9 goes into using ReWire applications in more detail.) If you are using hardware synthesizers or other instruments and not using the External Instrument plug-in (again, see Chapter 9), the MIDI on this track will be directed to them.
External MIDI channel strip: This isn’t an audio channel strip at all, but it’s included here for completeness, since it appears in the Mixer along with your other channels if you create external MIDI tracks. Like software instrument channel strips, these channel strips use MIDI data. If you are using a ReWire application with Logic and sending that application MIDI from Logic, you will use an external MIDI track assigned to your ReWire application. (Chapter 9 goes into using ReWire applications in more detail.) If you are using hardware synthesizers or other instruments and not using the External Instrument plug-in (again, see Chapter 9), the MIDI on this track will be directed to them.
The aforementioned channel strips are the only channel strips you’ll ever need to use in Logic Pro X. However, there is one other channel strip type that existed in Logic 7 and is still included in Logic Pro X for compatibility purposes: the bus channel strip. I’m including its description here in case you are working on a project that began in Logic 7, but otherwise you will not need to use this channel strip. In fact, I’d strongly advise against using it, because it has been superseded by the much more flexible aux track, which you should use instead.
The bus channel strip does not play or record audio files at all. It is more of a patch bay track. Often, buses on mixers were push buttons that sent the audio on an audio channel to an auxiliary track or auxiliary output. Buses in Logic Pro X serve a similar purpose of being a patch bay between destinations for your audio, although in Logic you can also use an actual bus channel strip as a destination itself. Still, it’s best to think of a bus as an internal routing between other channel strips in Logic because the more flexible aux channel strip has supplanted the bus channel strip. The bus channel strip offers no input choice, and offers no sends. Bus channel strips are, in effect, single destination objects with no routing options, while aux channel strips have incredibly flexible routing options.
Here are some of the things you can do with buses:
![]() You can have a bus route audio from other channel strips to hardware outputs.
You can have a bus route audio from other channel strips to hardware outputs.
![]() Aux and audio channel strips may use buses as their input source.
Aux and audio channel strips may use buses as their input source.
![]() Other channel strips can use their sends to route signal through or to a bus. As mentioned, buses do not have sends on their own channel strips because buses are the destination of sends from other channel strips, but you can put effects directly in the channel strip of a bus if you want. Bus channel strips can be mono, stereo, or surround. Logic offers up to 64 buses.
Other channel strips can use their sends to route signal through or to a bus. As mentioned, buses do not have sends on their own channel strips because buses are the destination of sends from other channel strips, but you can put effects directly in the channel strip of a bus if you want. Bus channel strips can be mono, stereo, or surround. Logic offers up to 64 buses.
Channel Strip Components
You’ve seen the channel strip in previous chapters. Now that I’ve described the different channel strip types, I’ll go over the components of the channel strip and the subtle differences in the strips for various channel strip types. The channel strip is mostly used during mixing, which is covered in Chapter 11, “Mixing in Logic.” However, editing audio requires some knowledge of the channel strip. You can use the channel strip in Figure 7.1 as your reference.
Figure 7.1 An audio channel strip.

© Apple Inc.
Each of the components of this channel strip can be toggled on or off in the View menu in the Mixer or by right-clicking in the Mixer and selecting items from the menu that appears. The channel strips in the Mixer layer of the Environment are not as full featured as the channel strips in the main Mixer, and they look nothing like the channel strips in the Mixer. Both the Mixer and the Mixer layer of the Environment are covered in detail in Chapter 11. The following descriptions of the various components of the channel strip explain any differences that exist for a specific type of channel strip:
![]() Channel strip Setting menu: Each channel strip’s Setting menu allows you to browse for and select, as well as manage, channel strip settings.
Channel strip Setting menu: Each channel strip’s Setting menu allows you to browse for and select, as well as manage, channel strip settings.
![]() Gain Reduction meters: Double-clicking inside this rectangle enables a realtime Gain Reduction meter (which is used by the Dynamics Audio FX Compressor, Limiter, and Adaptive Limiter, discussed in Chapter 11) inside the rectangle and instantiates the Compressor effect in the first Audio FX slot. (Audio FX slots are covered in this section.) If there is already a plug-in inserted in the first insert slot, you can Option-double-click inside the rectangle, and the Compressor will be instantiated in the first insert. If you have instantiated the Limiter or the Adapted Limiter instead, then any gain reduction those effects perform will be shown as your project plays. If the Gain Reduction meters are active in the channel strip, double-clicking on the Gain Reduction meter opens the respective Dynamics effect’s editor. All audio and software instrument channel strips contain the Gain Reduction meter.
Gain Reduction meters: Double-clicking inside this rectangle enables a realtime Gain Reduction meter (which is used by the Dynamics Audio FX Compressor, Limiter, and Adaptive Limiter, discussed in Chapter 11) inside the rectangle and instantiates the Compressor effect in the first Audio FX slot. (Audio FX slots are covered in this section.) If there is already a plug-in inserted in the first insert slot, you can Option-double-click inside the rectangle, and the Compressor will be instantiated in the first insert. If you have instantiated the Limiter or the Adapted Limiter instead, then any gain reduction those effects perform will be shown as your project plays. If the Gain Reduction meters are active in the channel strip, double-clicking on the Gain Reduction meter opens the respective Dynamics effect’s editor. All audio and software instrument channel strips contain the Gain Reduction meter.
![]() EQ graph: If you double-click inside this rectangle, you will enable a thumbnail of the Channel EQ effect graph (using Logic’s EQs is discussed in Chapter 11) inside the rectangle, and the Channel EQ effect is instantiated in the first Audio FX slot. If there is already a plug-in inserted in the first insert slot, you can hold the Option key down while double-clicking inside the rectangle, and the Channel EQ will be instantiated in the first insert. If you have instantiated the Linear Phase EQ, then the EQ graph from this effect will be shown in the EQ rectangle. If the thumbnail image of the Channel or Linear Phase EQ is already showing in the channel strip, double-clicking on the thumbnail opens the respective EQ’s Editor window. All audio and software instrument channel strips contain the EQ section.
EQ graph: If you double-click inside this rectangle, you will enable a thumbnail of the Channel EQ effect graph (using Logic’s EQs is discussed in Chapter 11) inside the rectangle, and the Channel EQ effect is instantiated in the first Audio FX slot. If there is already a plug-in inserted in the first insert slot, you can hold the Option key down while double-clicking inside the rectangle, and the Channel EQ will be instantiated in the first insert. If you have instantiated the Linear Phase EQ, then the EQ graph from this effect will be shown in the EQ rectangle. If the thumbnail image of the Channel or Linear Phase EQ is already showing in the channel strip, double-clicking on the thumbnail opens the respective EQ’s Editor window. All audio and software instrument channel strips contain the EQ section.
![]() Input slot: Below the EQ is the Input slot, which gives you combined control over the format and input of the channel strip. The Format button is on the left end of the Input slot. If the button is a single circle, the channel strip format is mono. If the button is a double circle, the channel strip format is stereo. Clicking the button toggles between mono and stereo. If you click and hold on an audio, aux, or bus channel strip’s Format button, you can assign the channel strip to mono, stereo, left, right, or surround. If you select left or right, the Format button displays two separate circles, and the circle on the side you have chosen will be darkened. If you choose surround, the Format button will display five small circles. Software instrument channel strips do not have this button because the type of software synthesizer you selected will determine whether the software instrument channel strip is mono, stereo, or surround. The right side of the Input slot lets you assign an input for the audio or software instrument channel strip. Each channel strip type features a different method of handling its input slot:
Input slot: Below the EQ is the Input slot, which gives you combined control over the format and input of the channel strip. The Format button is on the left end of the Input slot. If the button is a single circle, the channel strip format is mono. If the button is a double circle, the channel strip format is stereo. Clicking the button toggles between mono and stereo. If you click and hold on an audio, aux, or bus channel strip’s Format button, you can assign the channel strip to mono, stereo, left, right, or surround. If you select left or right, the Format button displays two separate circles, and the circle on the side you have chosen will be darkened. If you choose surround, the Format button will display five small circles. Software instrument channel strips do not have this button because the type of software synthesizer you selected will determine whether the software instrument channel strip is mono, stereo, or surround. The right side of the Input slot lets you assign an input for the audio or software instrument channel strip. Each channel strip type features a different method of handling its input slot:
![]() Audio channel strips: You may select any of your audio interface’s physical inputs as the input for this slot. You may also select any bus. You can configure an audio channel strip as a surround channel strip if your audio interface has enough inputs. If you choose surround, the input configuration is dictated in the Input tab of the I/O Assignments pane of the Audio Preferences window, which was covered in Chapter 3, “The Logic Project.”
Audio channel strips: You may select any of your audio interface’s physical inputs as the input for this slot. You may also select any bus. You can configure an audio channel strip as a surround channel strip if your audio interface has enough inputs. If you choose surround, the input configuration is dictated in the Input tab of the I/O Assignments pane of the Audio Preferences window, which was covered in Chapter 3, “The Logic Project.”
![]() Software instrument channel strips: You may select any available software synthesizer as the input for this slot.
Software instrument channel strips: You may select any available software synthesizer as the input for this slot.
![]() Aux channel strips: You may select your hardware inputs, buses, ReWire channels, or multi-output instrument outputs as the input for this slot. You can also choose to use your hardware inputs in surround if your audio interface has enough inputs.
Aux channel strips: You may select your hardware inputs, buses, ReWire channels, or multi-output instrument outputs as the input for this slot. You can also choose to use your hardware inputs in surround if your audio interface has enough inputs.
![]() Input channel strips: Input channel strips’ input is determined by the selected hardware input in the input channel strip’s Channel parameter in the Inspector of the Mixer layer in the Environment, so the Input slot does not appear in the input channel strip. Currently, you can only configure input channel strips in mono or stereo.
Input channel strips: Input channel strips’ input is determined by the selected hardware input in the input channel strip’s Channel parameter in the Inspector of the Mixer layer in the Environment, so the Input slot does not appear in the input channel strip. Currently, you can only configure input channel strips in mono or stereo.
![]() Output channel strips: These channel strips do not have rectangles for input because they can be used only as destinations for other channel strips. They do have Format buttons, although outputs are limited to mono and stereo formats.
Output channel strips: These channel strips do not have rectangles for input because they can be used only as destinations for other channel strips. They do have Format buttons, although outputs are limited to mono and stereo formats.
![]() Audio FX slots: These rectangles represent slots into which you can insert effects. Logic Pro comes with 67 built-in effects, and you can also use various third-party plug-in effects. (This is discussed further in Chapter 11.) To add effects to an Audio FX slot, click the Audio FX slot. A menu of effects opens. When you select an effect, it appears in that Audio FX slot and the insert glows blue, indicating the effect is functioning. You can have up to 15 effects per channel strip in Logic. If you see fewer than the maximum number of Audio FX slots on your channel strip, don’t worry; when you fill the last slot on the screen, another slot will appear beneath it. This will continue until you reach the maximum number of effects. All audio and software instrument channel strips can have effects, although the nature of your project defines whether your output channel strips or the master channel strip has effects. Your master channel strip will not have effects unless you are working in surround, and then your outputs will not have the slots.
Audio FX slots: These rectangles represent slots into which you can insert effects. Logic Pro comes with 67 built-in effects, and you can also use various third-party plug-in effects. (This is discussed further in Chapter 11.) To add effects to an Audio FX slot, click the Audio FX slot. A menu of effects opens. When you select an effect, it appears in that Audio FX slot and the insert glows blue, indicating the effect is functioning. You can have up to 15 effects per channel strip in Logic. If you see fewer than the maximum number of Audio FX slots on your channel strip, don’t worry; when you fill the last slot on the screen, another slot will appear beneath it. This will continue until you reach the maximum number of effects. All audio and software instrument channel strips can have effects, although the nature of your project defines whether your output channel strips or the master channel strip has effects. Your master channel strip will not have effects unless you are working in surround, and then your outputs will not have the slots.
![]() Sends: Send knobs are used to route (send) a variable amount of the audio signal from channel strips through buses. When empty, sends appear as empty rectangles (slots) with empty circles next to them. When you click and hold on a send rectangle and add a send destination, not only does the destination appear in the slot, but a small dial appears in the circle to the right of the send for you to adjust the send level. If you see fewer than the maximum number of send rectangles on your channel strip, don’t worry; when you fill the last send slot on the screen, another rectangle will appear beneath it. This will continue until you reach the maximum of eight sends. Because buses are the destinations of sends, bus channel strips do not have sends themselves—one major reason aux channel strips should be used rather than bus channel strips. When you assign an unused bus to a send, a new aux channel strip is automatically created as the destination for the bus. Bus channel strips are not automatically created—another reason to go with auxes.
Sends: Send knobs are used to route (send) a variable amount of the audio signal from channel strips through buses. When empty, sends appear as empty rectangles (slots) with empty circles next to them. When you click and hold on a send rectangle and add a send destination, not only does the destination appear in the slot, but a small dial appears in the circle to the right of the send for you to adjust the send level. If you see fewer than the maximum number of send rectangles on your channel strip, don’t worry; when you fill the last send slot on the screen, another rectangle will appear beneath it. This will continue until you reach the maximum of eight sends. Because buses are the destinations of sends, bus channel strips do not have sends themselves—one major reason aux channel strips should be used rather than bus channel strips. When you assign an unused bus to a send, a new aux channel strip is automatically created as the destination for the bus. Bus channel strips are not automatically created—another reason to go with auxes.
![]() Output setting: The output for all channel strips, except actual output channel strips, can be any available bus or output channel strip. If you are using a channel strip in surround, the master channel strip will automatically function as its output. The hardware output is selected in an output channel strip’s channel in the Inspector of the Mixer layer of the Environment, so output channel strips do not have an output rectangle. Changing a channel strip’s output setting to an unused output automatically creates the selected output channel strip.
Output setting: The output for all channel strips, except actual output channel strips, can be any available bus or output channel strip. If you are using a channel strip in surround, the master channel strip will automatically function as its output. The hardware output is selected in an output channel strip’s channel in the Inspector of the Mixer layer of the Environment, so output channel strips do not have an output rectangle. Changing a channel strip’s output setting to an unused output automatically creates the selected output channel strip.
![]() Group display: This shows the group number of the selected channel strip. If the channel strip is not assigned to a group, this display is a darker gray than the rest of the channel strip. Groups are explained in Chapter 11. All types of channel strips, including external MIDI channel strips, may belong to groups.
Group display: This shows the group number of the selected channel strip. If the channel strip is not assigned to a group, this display is a darker gray than the rest of the channel strip. Groups are explained in Chapter 11. All types of channel strips, including external MIDI channel strips, may belong to groups.
![]() Automation Mode display: This display shows whether the channel strip is currently using Logic’s track-based automation. If the channel strip is using automation, the display indicates whether the track is currently reading automation data or which mode it is using to write automation data. Automation is explained in Chapter 10, “Using Automation in Logic.” All channel strips, including external MIDI channel strips, have automation slots.
Automation Mode display: This display shows whether the channel strip is currently using Logic’s track-based automation. If the channel strip is using automation, the display indicates whether the track is currently reading automation data or which mode it is using to write automation data. Automation is explained in Chapter 10, “Using Automation in Logic.” All channel strips, including external MIDI channel strips, have automation slots.
![]() Track icon: The track icon, assigned in the Track Inspector in the main window and covered in Chapter 6, “The Logic Pro Main Window,” appears beneath the Automation Mode display.
Track icon: The track icon, assigned in the Track Inspector in the main window and covered in Chapter 6, “The Logic Pro Main Window,” appears beneath the Automation Mode display.
![]() Pan knob: The large rotary knob below the track icon is the Pan knob. This knob allows you to adjust the panorama—or stereo position—of the channel strip’s audio in the stereo field. If you are in surround mode, you may adjust the channel strip’s panorama on more than two axes. All channel strips except the master channel strip (but including external MIDI channel strips) have Pan knobs.
Pan knob: The large rotary knob below the track icon is the Pan knob. This knob allows you to adjust the panorama—or stereo position—of the channel strip’s audio in the stereo field. If you are in surround mode, you may adjust the channel strip’s panorama on more than two axes. All channel strips except the master channel strip (but including external MIDI channel strips) have Pan knobs.
![]() Volume slider: This long slider below the Pan knob, directly to the left of the channel strip audio meter, allows you to adjust the volume of the channel strip. The box above the Volume slider displays the Volume slider setting. You can use it to manually enter a volume setting. To do so, double-click it and enter a value. All channel strips, including external MIDI channel strips, have Volume sliders.
Volume slider: This long slider below the Pan knob, directly to the left of the channel strip audio meter, allows you to adjust the volume of the channel strip. The box above the Volume slider displays the Volume slider setting. You can use it to manually enter a volume setting. To do so, double-click it and enter a value. All channel strips, including external MIDI channel strips, have Volume sliders.
![]() Channel strip meter: This meter displays a bar line that represents the volume of the audio passing through the channel strip. It changes with each variation in volume of the channel strip’s audio. The small box above the channel strip meter displays the highest volume peak that the channel strip’s audio has hit up to that point in the project in the Clip Detector, directly above the channel strip meter. The channel strip meter has a range from—60 dB to +0 dBfs. There are two display scale options for the channel strip meters: Sectional dB-linear and Exponential. The Exponential scale gives you a higher metering resolution the closer the signal gets to +0 dBfs. The Sectional dB-linear scale provides a very high level of resolution along the entire metering range. You can change the channel strip meters’ display mode in the Mixer tab of the Display Preferences window. All audio and software instrument channel strips have audio meters.
Channel strip meter: This meter displays a bar line that represents the volume of the audio passing through the channel strip. It changes with each variation in volume of the channel strip’s audio. The small box above the channel strip meter displays the highest volume peak that the channel strip’s audio has hit up to that point in the project in the Clip Detector, directly above the channel strip meter. The channel strip meter has a range from—60 dB to +0 dBfs. There are two display scale options for the channel strip meters: Sectional dB-linear and Exponential. The Exponential scale gives you a higher metering resolution the closer the signal gets to +0 dBfs. The Sectional dB-linear scale provides a very high level of resolution along the entire metering range. You can change the channel strip meters’ display mode in the Mixer tab of the Display Preferences window. All audio and software instrument channel strips have audio meters.
![]() Channel Mute button: Clicking this button, marked with the letter M, mutes the channel strip, and all the tracks in the main window assigned to the muted channel strip are silenced. All channel strips have the Channel Mute button.
Channel Mute button: Clicking this button, marked with the letter M, mutes the channel strip, and all the tracks in the main window assigned to the muted channel strip are silenced. All channel strips have the Channel Mute button.
![]() Channel Solo button: Clicking this button, marked with an S, silences all other currently unsoloed channel strips; only those main window tracks assigned to the soloed track will be heard. All audio and software instrument channel strips have Solo buttons.
Channel Solo button: Clicking this button, marked with an S, silences all other currently unsoloed channel strips; only those main window tracks assigned to the soloed track will be heard. All audio and software instrument channel strips have Solo buttons.
![]() Input Monitoring button: Enabling this button, marked with an I, allows you to monitor the signal through an audio channel strip without record-enabling the track.
Input Monitoring button: Enabling this button, marked with an I, allows you to monitor the signal through an audio channel strip without record-enabling the track.
![]() Record-Enable button: If you click this button, marked with an R, the audio channel strip is ready to record audio through your audio interface. Only audio channel strips have R buttons because they are the only channel strips that can record audio.
Record-Enable button: If you click this button, marked with an R, the audio channel strip is ready to record audio through your audio interface. Only audio channel strips have R buttons because they are the only channel strips that can record audio.
![]() Bounce: The Bounce (Bnc or Bnce) button is found only on output channel strips or, in the case of surround projects, the master channel strip. Clicking this button opens a dialog box that enables you to create a mono or stereo audio file from all the channel strips routed to that output channel strip or a surround bounce through the master channel strip. Bouncing is discussed further in Chapter 11.
Bounce: The Bounce (Bnc or Bnce) button is found only on output channel strips or, in the case of surround projects, the master channel strip. Clicking this button opens a dialog box that enables you to create a mono or stereo audio file from all the channel strips routed to that output channel strip or a surround bounce through the master channel strip. Bouncing is discussed further in Chapter 11.
![]() Dim button: This button, marked with a D, is found only on the master channel strip. Selecting the Dim button drops the level of your audio to the predetermined level set in the General tab of the Audio Preferences window.
Dim button: This button, marked with a D, is found only on the master channel strip. Selecting the Dim button drops the level of your audio to the predetermined level set in the General tab of the Audio Preferences window.
The Project Audio Browser
The Project Audio Browser (formerly the Audio Bin) is, in a sense, a repository for recorded and imported audio files. You do not have to use every audio file listed in the Project Audio Browser in your project, but every audio file used in your project will be listed in the Project Audio Browser.
The Project Audio Browser is far more than a simple list of files, however. The Project Audio Browser also keeps track of every audio region into which an audio file has been split. You can drag audio regions from the Project Audio Browser directly onto an audio track in the Tracks area. The Project Audio Browser also offers many ways to manage, group, and manipulate audio files and audio regions. The Project Audio Browser is available in the Browsers area of the main window and as its own window.
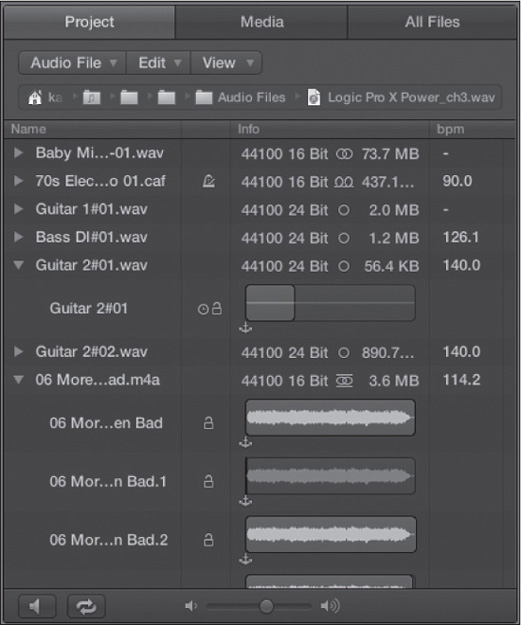
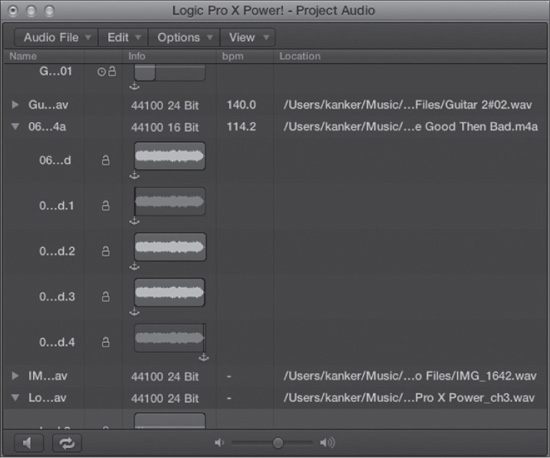
The Project Audio Browser window is unlike many other integrated browsers and their separate windows in that the Project Audio Browser window is slightly different in look and is a little more powerful in functionality than its integrated twin. If I mention that an operation can be performed in the Project Audio Browser, then that operation can performed in either the integrated Project Audio Browser or the Project Audio Browser window. But if I specifically mention that something can be done in the Project Audio Browser window, then that operation cannot be performed in the integrated Project Audio Browser. Figure 7.2 shows an integrated Project Audio Browser filled with audio files and audio regions. Figure 7.3 shows an Project Audio Browser window filled with the same audio files and regions.
Figure 7.2 The Project Audio Browser.
© Apple Inc.
Figure 7.3 The Project Audio Browser window.
© Apple Inc.
The Project Audio Browser consists of local menus, buttons, and a Volume slider around its perimeter. The center contains an audio list containing the names of all your audio files and audio regions, along with text and graphic information about your audio regions represented in relation to the entire audio file to which they belong, sample rate, bit depth, size, BPM, and location information for all your audio files. To see the actual waveforms of your audio files and their anchor points, click the disclosure triangle for the file in the Name column; they will be displayed beneath the text in the Info column for the selected audio file. Let’s start our exploration of the Project Audio Browser with the local menus.
The Project Audio Browser Local Menus
Like all windows and editors in Logic, the Project Audio Browser features its own local menus containing commands—in this case, commands that specifically affect audio and audio files. Keep in mind that for those commands that do not have key commands assigned by default, you can assign keys to them in the Key Commands window.
The Audio File Menu
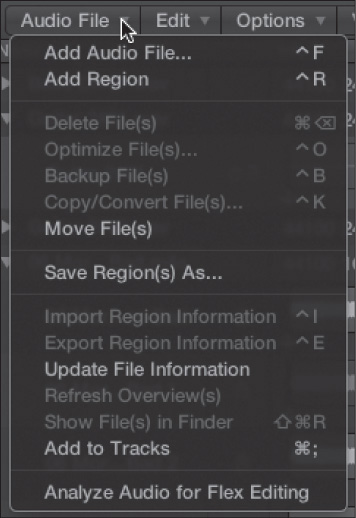
The Audio File menu contains commands that operate on the audio files themselves. Figure 7.4 shows the Audio File menu of the Project Audio Browser.
Figure 7.4 The Audio File menu of the Project Audio Browser.
© Apple Inc.
An explanation of the Audio File menu commands follows:
![]() Add Audio File: This command opens an Open File dialog box, which allows you to import audio files from your hard drive into the Project Audio Browser of your Logic project. You can then drag your file into the Tracks area or process it further in the Project Audio Browser. Logic can import files in WAV, Broadcast WAV, AIFF, CAF, SDII (Sound Designer II), MP3, and AAC format. The key command for this is Control+F.
Add Audio File: This command opens an Open File dialog box, which allows you to import audio files from your hard drive into the Project Audio Browser of your Logic project. You can then drag your file into the Tracks area or process it further in the Project Audio Browser. Logic can import files in WAV, Broadcast WAV, AIFF, CAF, SDII (Sound Designer II), MP3, and AAC format. The key command for this is Control+F.
![]() Add Region: If you select an audio file in the Project Audio Browser, this command creates a new audio region for that audio file. The new audio region will initially be the full length of the audio file, but you can adjust this length. The key command for this is Control+R.
Add Region: If you select an audio file in the Project Audio Browser, this command creates a new audio region for that audio file. The new audio region will initially be the full length of the audio file, but you can adjust this length. The key command for this is Control+R.
![]() Delete File(s): This command deletes all selected files permanently from your storage drive. This is the only way to accomplish this within Logic. The key command for this is Command+Delete.
Delete File(s): This command deletes all selected files permanently from your storage drive. This is the only way to accomplish this within Logic. The key command for this is Command+Delete.
![]() Optimize File(s): This command deletes sections of audio files that are not used anywhere in your project. You can use this command to save hard drive space by eliminating unnecessary data, but make sure you don’t accidentally erase a piece of audio that might prove useful. Because of this, you should use this command only when you are reasonably sure that you are completely finished with a song. The key command for this is Control+O.
Optimize File(s): This command deletes sections of audio files that are not used anywhere in your project. You can use this command to save hard drive space by eliminating unnecessary data, but make sure you don’t accidentally erase a piece of audio that might prove useful. Because of this, you should use this command only when you are reasonably sure that you are completely finished with a song. The key command for this is Control+O.
![]() Backup File(s): This command creates a duplicate of all selected audio files. These files are given the extension .dup. Generally, because edits to regions are nondestructive (that is, they don’t touch the file), this command is mostly useful if you are using time and pitch processing or editing samples, both of which affect the actual audio file itself. The key command for this is Control+B.
Backup File(s): This command creates a duplicate of all selected audio files. These files are given the extension .dup. Generally, because edits to regions are nondestructive (that is, they don’t touch the file), this command is mostly useful if you are using time and pitch processing or editing samples, both of which affect the actual audio file itself. The key command for this is Control+B.
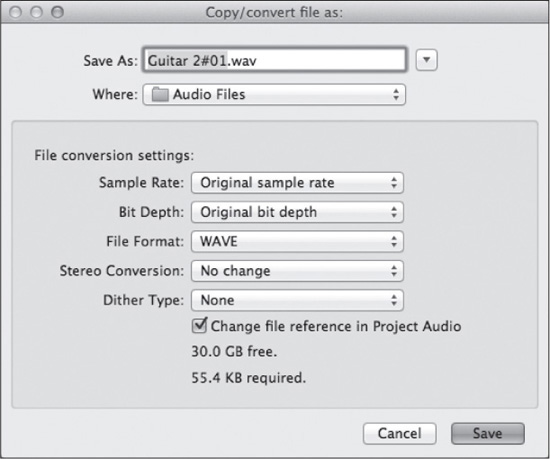
![]() Copy/Convert File(s): This command opens a dialog box in which you can duplicate or convert your selected audio file or files to AIFF, WAV, SDII, CAF, Apple Lossless, AAC, or MP3. For example, you could convert an AIFF file into a WAV file or an SDII file into an AIFF file. You can, of course, choose the original format and simply make duplicate files. This function is particularly useful when you want to export one or more files to a different format. You can also perform stereo conversion from a split format to an interleaved one or from an interleaved format to a split one; you can dither your audio file if you are changing bit rates; and you can choose to have the results of the process added to the Project Audio Browser. Figure 7.5 shows the Copy/Convert File As dialog box. These copy and conversion options are basically identical to the options you are given when you perform a bounce in Logic, which is covered in detail in Chapter 11. The key command for this is Control+K.
Copy/Convert File(s): This command opens a dialog box in which you can duplicate or convert your selected audio file or files to AIFF, WAV, SDII, CAF, Apple Lossless, AAC, or MP3. For example, you could convert an AIFF file into a WAV file or an SDII file into an AIFF file. You can, of course, choose the original format and simply make duplicate files. This function is particularly useful when you want to export one or more files to a different format. You can also perform stereo conversion from a split format to an interleaved one or from an interleaved format to a split one; you can dither your audio file if you are changing bit rates; and you can choose to have the results of the process added to the Project Audio Browser. Figure 7.5 shows the Copy/Convert File As dialog box. These copy and conversion options are basically identical to the options you are given when you perform a bounce in Logic, which is covered in detail in Chapter 11. The key command for this is Control+K.
Figure 7.5 In the Copy/Convert File As dialog box, you can duplicate files and convert them from one format to another.
© Apple Inc.
![]() Move File(s): When you choose this command, a dialog box appears, prompting you for a new location on your hard drive to move one or more selected audio files in the Project Audio Browser. If you move audio files without using this command, Logic will not know the new location of your audio file and will prompt you to find it. If you use this command, Logic will be able to keep track of where you moved your audio files, even if you move the files to another storage drive.
Move File(s): When you choose this command, a dialog box appears, prompting you for a new location on your hard drive to move one or more selected audio files in the Project Audio Browser. If you move audio files without using this command, Logic will not know the new location of your audio file and will prompt you to find it. If you use this command, Logic will be able to keep track of where you moved your audio files, even if you move the files to another storage drive.
![]() Save Region(s) As: This command allows you to save one or more specific audio regions as separate audio files. It opens a dialog box with identical commands to the Copy/Convert File As dialog box in Figure 7.5. This command is very useful if you want to export only those selected regions to another application.
Save Region(s) As: This command allows you to save one or more specific audio regions as separate audio files. It opens a dialog box with identical commands to the Copy/Convert File As dialog box in Figure 7.5. This command is very useful if you want to export only those selected regions to another application.
![]() Import Region Information: This command allows you to import information from AIFF, CAF, WAV, and SDII audio regions you have added to your project. This allows you to add the information embedded in your audio file, such as position data, to the Project Audio Browser. The key command for this is Control+I.
Import Region Information: This command allows you to import information from AIFF, CAF, WAV, and SDII audio regions you have added to your project. This allows you to add the information embedded in your audio file, such as position data, to the Project Audio Browser. The key command for this is Control+I.
![]() Export Region Information: This command allows you to export the information for the current audio file into the selected audio file. The key command for this is Control+E.
Export Region Information: This command allows you to export the information for the current audio file into the selected audio file. The key command for this is Control+E.
![]() Update File Information: If one or more of your audio regions is grayed out, that means Logic couldn’t find the original audio file used by that audio region. If you select those grayed-out audio regions and choose this command, Logic presents a dialog box prompting you to navigate to the missing audio files. After using this command (and saving your song), Logic will remember the new file information.
Update File Information: If one or more of your audio regions is grayed out, that means Logic couldn’t find the original audio file used by that audio region. If you select those grayed-out audio regions and choose this command, Logic presents a dialog box prompting you to navigate to the missing audio files. After using this command (and saving your song), Logic will remember the new file information.
![]() Refresh Overview(s): When you add a file to the Project Audio Browser, an overview, or graphical representation of the audio in the file, is created. If for some reason during the process of working with your audio, the overview does not represent your files, you can select this command to create a new overview for the file.
Refresh Overview(s): When you add a file to the Project Audio Browser, an overview, or graphical representation of the audio in the file, is created. If for some reason during the process of working with your audio, the overview does not represent your files, you can select this command to create a new overview for the file.
![]() Show File(s) in Finder: If you select one or more audio regions, this command will open Finder windows showing you the actual audio files on your hard drive to which these regions point. The key command for this is Shift+Command+R.
Show File(s) in Finder: If you select one or more audio regions, this command will open Finder windows showing you the actual audio files on your hard drive to which these regions point. The key command for this is Shift+Command+R.
![]() Add to Tracks: You can select one or more audio regions and use this command to place them in the Tracks area. See the section “Adding Audio to the Tracks Area” later in this chapter for more details. The key command for this is Command+; (semicolon).
Add to Tracks: You can select one or more audio regions and use this command to place them in the Tracks area. See the section “Adding Audio to the Tracks Area” later in this chapter for more details. The key command for this is Command+; (semicolon).
![]() Analyze Audio for Flex Editing: Although audio is analyzed for Flex Time and Flex Pitch editing in the Tracks area when you enable Flex editing for a track, this command lets you batch-process the flex analysis for some or all of your audio files at once.
Analyze Audio for Flex Editing: Although audio is analyzed for Flex Time and Flex Pitch editing in the Tracks area when you enable Flex editing for a track, this command lets you batch-process the flex analysis for some or all of your audio files at once.
The Edit Menu
This menu consists of some standard application editing functions and some functions specific to Logic. Figure 7.6 shows the Edit menu of the Project Audio Browser.
Figure 7.6 The Edit menu of the Project Audio Browser.

© Apple Inc.
The first eight commands in this menu—Undo, Redo, Undo History, Delete Undo History, Cut, Copy, Paste, and Delete—are the same commands you find in the global and local main window Edit menus. See the previous chapter for detailed information. Definitions of the rest of the commands follow:
![]() Select All: You can select every audio file and audio region in the Project Audio Browser with this command. The key command for this is Command+A.
Select All: You can select every audio file and audio region in the Project Audio Browser with this command. The key command for this is Command+A.
![]() Select Used: This command selects all the audio regions that are currently used in your project.
Select Used: This command selects all the audio regions that are currently used in your project.
![]() Select Unused: This selects all the audio regions that are not currently used in the Tracks area. The key command for this is Shift+U.
Select Unused: This selects all the audio regions that are not currently used in the Tracks area. The key command for this is Shift+U.
![]() Snap Edits to Zero Crossings: A zero crossing occurs when the amplitude of the audio wave is at the zero line. If you enable this option, all adjustments to audio regions fall at the nearest zero point. The advantage to this option is that you are far more likely to have seamless playback between two adjacent audio regions, since the amplitude of both audio regions will be at the zero crossing when they meet. The disadvantage is that this will sometimes interfere with where you want to make an edit if there doesn’t happen to be a zero crossing at that point. Keep in mind that if you enable this option, it also holds true for audio region resizing and splitting in the main window.
Snap Edits to Zero Crossings: A zero crossing occurs when the amplitude of the audio wave is at the zero line. If you enable this option, all adjustments to audio regions fall at the nearest zero point. The advantage to this option is that you are far more likely to have seamless playback between two adjacent audio regions, since the amplitude of both audio regions will be at the zero crossing when they meet. The disadvantage is that this will sometimes interfere with where you want to make an edit if there doesn’t happen to be a zero crossing at that point. Keep in mind that if you enable this option, it also holds true for audio region resizing and splitting in the main window.
![]() Disconnect Selected Split Stereo File: This command converts a split stereo file into two unlinked mono audio files. This is useful if you want to process or edit each side of the split stereo file separately.
Disconnect Selected Split Stereo File: This command converts a split stereo file into two unlinked mono audio files. This is useful if you want to process or edit each side of the split stereo file separately.
![]() Reconnect All Split Stereo File(s): This command reconnects all unlinked mono files that used to be part of a split stereo file. This is especially useful when you import audio tracks that were originally split stereo files, but their link was broken in the process of exporting them from their original application.
Reconnect All Split Stereo File(s): This command reconnects all unlinked mono files that used to be part of a split stereo file. This is especially useful when you import audio tracks that were originally split stereo files, but their link was broken in the process of exporting them from their original application.
![]() Open in Soundtrack Pro: If you have Apple’s Soundtrack Pro on your system, you can use this command to open the selected audio in Soundtrack Pro. The key command for this is Shift+W.
Open in Soundtrack Pro: If you have Apple’s Soundtrack Pro on your system, you can use this command to open the selected audio in Soundtrack Pro. The key command for this is Shift+W.
The View Menu
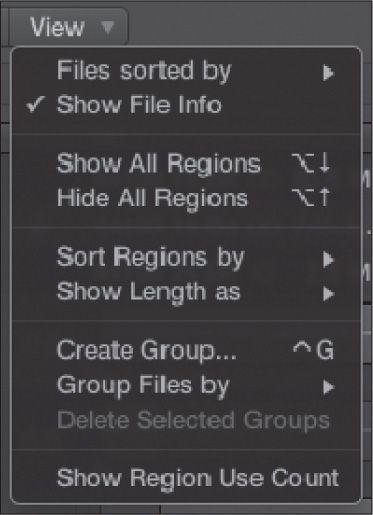
The View menu offers options for viewing and sorting audio regions and audio files in the Project Audio Browser. Figure 7.7 shows the View menu of the Project Audio Browser.
Figure 7.7 The View menu of the Project Audio Browser.
© Apple Inc.
The various options in the View menu are as follows:
![]() Files Sorted By: This entry opens a submenu that enables you to select one of six options for sorting audio files in the audio list: None, Name, Size, Drive, Bit Depth, and File Type. When you re-sort your audio files, all the audio regions that originate from that file always move with the file. The default category is None, meaning your audio files are sorted by the order in which you added them. If you find it useful to have all your files in alphabetical order or in order of their file size, hard drive, or audio file bit depth, select the appropriate option.
Files Sorted By: This entry opens a submenu that enables you to select one of six options for sorting audio files in the audio list: None, Name, Size, Drive, Bit Depth, and File Type. When you re-sort your audio files, all the audio regions that originate from that file always move with the file. The default category is None, meaning your audio files are sorted by the order in which you added them. If you find it useful to have all your files in alphabetical order or in order of their file size, hard drive, or audio file bit depth, select the appropriate option.
![]() Show File Info: If this is checked, Logic displays the file information for all audio files in the audio list to the right of their names. The information displayed in the Project Audio Browser is, from left to right, the sample rate of the audio file, the bit rate, the file format, and the file size. The file format tells you whether the file is mono (single circle), stereo (overlapping circles), surround (five small circles), or an audio Apple Loop (an oval between two horizontal lines).
Show File Info: If this is checked, Logic displays the file information for all audio files in the audio list to the right of their names. The information displayed in the Project Audio Browser is, from left to right, the sample rate of the audio file, the bit rate, the file format, and the file size. The file format tells you whether the file is mono (single circle), stereo (overlapping circles), surround (five small circles), or an audio Apple Loop (an oval between two horizontal lines).
![]() Show All Regions: This command expands the disclosure triangle of all audio files so that all audio regions are displayed in the Project Audio Browser. The key command for this is Option+down arrow.
Show All Regions: This command expands the disclosure triangle of all audio files so that all audio regions are displayed in the Project Audio Browser. The key command for this is Option+down arrow.
![]() Hide All Regions: This command contracts the disclosure triangle of each audio file so that none of the audio regions appears in the Project Audio Browser. The key command for this is Option+up arrow.
Hide All Regions: This command contracts the disclosure triangle of each audio file so that none of the audio regions appears in the Project Audio Browser. The key command for this is Option+up arrow.
![]() Sort Regions By: This entry opens a submenu that enables you to check one of three options for sorting audio regions used by a given audio file: Start Point, Length, or Name. This sorts only the audio regions attached to each audio file; the files themselves do not change positions in the audio list.
Sort Regions By: This entry opens a submenu that enables you to check one of three options for sorting audio regions used by a given audio file: Start Point, Length, or Name. This sorts only the audio regions attached to each audio file; the files themselves do not change positions in the audio list.
![]() Show Length As: If you want to display the length of each audio region above the graphical representation of the region in the Project Audio Browser window, you can choose one of the options offered in the submenu that opens when you select this command. These are your options:
Show Length As: If you want to display the length of each audio region above the graphical representation of the region in the Project Audio Browser window, you can choose one of the options offered in the submenu that opens when you select this command. These are your options:
![]() None: This is the default. The audio region length is not displayed above the region.
None: This is the default. The audio region length is not displayed above the region.
![]() Min:Sec:Ms: This displays the length of the region in the following format: minutes:seconds:milliseconds.
Min:Sec:Ms: This displays the length of the region in the following format: minutes:seconds:milliseconds.
![]() Samples: This command displays the number of samples in the region.
Samples: This command displays the number of samples in the region.
![]() SMPTE Time: This displays the length of the region in SMPTE timecode.
SMPTE Time: This displays the length of the region in SMPTE timecode.
![]() Bar/Beat: This command displays how long the region is in bars and beats.
Bar/Beat: This command displays how long the region is in bars and beats.
![]() Create Group: This command allows you to create a new grouping of audio files in the Project Audio Browser. Audio groups are discussed further in this chapter in the upcoming “Project Audio Browser Groups” section. The key command for this is Control+G.
Create Group: This command allows you to create a new grouping of audio files in the Project Audio Browser. Audio groups are discussed further in this chapter in the upcoming “Project Audio Browser Groups” section. The key command for this is Control+G.
![]() Group Files By: You can automatically create Project Audio Browser groups by grouping files by location, file attributes, or selection in tracks. Audio groups are discussed later in the chapter.
Group Files By: You can automatically create Project Audio Browser groups by grouping files by location, file attributes, or selection in tracks. Audio groups are discussed later in the chapter.
![]() Delete Selected Groups: This command deletes any selected Project Audio Browser group(s).
Delete Selected Groups: This command deletes any selected Project Audio Browser group(s).
![]() Show Region Use Count: If this option is checked, there will be a number representing how many times that region appears in the Tracks area beside the overview of each audio region in the integrated Project Audio Browser.
Show Region Use Count: If this option is checked, there will be a number representing how many times that region appears in the Tracks area beside the overview of each audio region in the integrated Project Audio Browser.
The Options Menu
The Options local menu is available only in the standalone Project Audio Browser window. This menu contains one command: Strip Silence. The key command for this is Control+X. This command is also available in the Project Audio Browser if you right-click on a file. When you select an audio region, you can choose Strip Silence to scan the audio region for points in which the audio material is below a threshold you define, and then create a number of new audio regions out of those regions above the threshold. This command is extremely useful for removing any pauses in a recording. The section “Using Strip Silence” later in this chapter covers this command in more detail.
The Project Audio Browser Buttons
The bottom of the Project Audio Browser houses two buttons that affect how the Project Audio Browser operates, along with a Volume slider. Figure 7.8 shows the bottom of the Project Audio Browser.
Figure 7.8 The Project Audio Browser’s buttons and Volume slider.
© Apple Inc.
The Project Audio Browser buttons do the following:
![]() Playback button: When the speaker icon in the Playback button is glowing green, the selected audio region plays back. If you have an audio file selected, the first audio region of that audio file plays back. If you have nothing selected, you cannot activate the button. If you click and hold the mouse button over any audio region, the cursor itself will become a speaker icon, your audio region will play back as long as you hold the button down, and the Playback button will remain lit during playback.
Playback button: When the speaker icon in the Playback button is glowing green, the selected audio region plays back. If you have an audio file selected, the first audio region of that audio file plays back. If you have nothing selected, you cannot activate the button. If you click and hold the mouse button over any audio region, the cursor itself will become a speaker icon, your audio region will play back as long as you hold the button down, and the Playback button will remain lit during playback.
![]() Cycle button: With this button glowing yellow, the selected audio region cycles continuously. This is especially useful when you are adjusting loop points in the Project Audio Browser. (See the section “Using Cycling in the Project Audio Browser” later in this chapter.)
Cycle button: With this button glowing yellow, the selected audio region cycles continuously. This is especially useful when you are adjusting loop points in the Project Audio Browser. (See the section “Using Cycling in the Project Audio Browser” later in this chapter.)
Cursor Modes in the Project Audio Browser Window
Although neither the integrated Project Audio Browser nor the Project Audio Browser window has a Tool menu, the cursor does serve a variety of functions in the Project Audio Browser window. Obviously, you can perform standard pointer functions in the Project Audio Browser window, such as selecting, dragging, and dropping files, but where you place the cursor over an audio region in the Project Audio Browser window changes the function of the cursor.
If you drag the cursor near either edge of an audio region, the cursor will change into a Resize cursor, which you can then use to change the start or end point of the region. If you keep the cursor inside the lower half of the region and move it in from a start point or an end point, the cursor will become a two-headed arrow. You can use this cursor mode to move the entire selected area that comprises the audio region over the parent audio file. If you move the cursor over the anchor-point indicator, which is the anchor icon under a region overview in the Project Audio Browser, the cursor will change into a finger, which allows you to drag the anchor to a new position in the selected audio region. Anchor points are covered in detail later in this chapter. If you have the cursor inside the top half of a region, it becomes a hand tool capable of dragging the region into the Tracks area (although you could just as easily drag the file by dragging its name).
Finally, if you drag the cursor over the top half of an audio region, the cursor will change into a speaker icon. If you click and hold on a region when the cursor is in speaker mode, the selected region will play from the point in the region that you clicked until either you release the mouse button or you reach the end of the region. If Cycle mode is engaged, then playback will begin at the point in the region where the cursor is, but the entire region will then loop until the mouse button is released.
Protecting Regions in the Project Audio Browser
Because there are so many different ways you could inadvertently edit your audio regions in the Project Audio Browser, Logic offers you the choice of protecting audio regions by locking them. A region that is locked in the Project Audio Browser cannot have its start or end point altered, and the anchor point is protected, too. To lock or unlock an audio region, simply click on the padlock icon next to the audio region’s name in the Project Audio Browser. Figure 7.9 shows one locked audio region and one unlocked audio region in the Project Audio Browser.
Figure 7.9 Locking audio regions protects them from inadvertent edits while you are working in the Project Audio Browser. Here you see one region that has been locked and another that is unlocked.
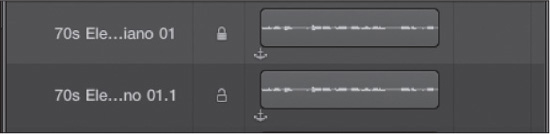
© Apple Inc.
You can still perform Strip Silence on a locked audio region, you can still edit a locked audio region in the Tracks area, and you can still delete a locked audio region from the Project Audio Browser. When an audio region is locked, the only cursor mode that is available for use with that region is the speaker cursor. (You can still drag it into the Tracks area by dragging its name field.)
The Prelisten Channel Strip
When you are working in the Project Audio Browser, any audio region you play back will by default play back through the prelisten channel strip, which is an audio channel strip that you can find in the Mixer next to the last audio channel strip when the Mixer is in the All view mode. (The Mixer and Mixer view modes are covered in detail in Chapter 11.) The prelisten channel strip is directly tied to the slider shown in Figure 7.8. The prelisten channel strip also services the Audio File editor, the Loops Browser, and the All Files Browser. Therefore, if you change the volume of the prelisten channel strip using the slider in the Project Audio Browser, for example, the slider in the Loops Browser will reflect that change. The Audio File editor and the Loops Browser are covered later in this chapter, and the All Files Browser is covered in Chapter 12, “Working with and Sharing Files.”
At first, the need for a prelisten channel strip might seem counterintuitive. Why doesn’t the Project Audio Browser simply play back each region using the audio channel to which that region is already assigned? Remember, the Project Audio Browser is a repository for all the audio files and regions that you have imported or recorded for your project, regardless of whether you use them. That means a good number of your audio regions may not be assigned to any audio channel. By offering an assignment of a single track for playback of everything in the Project Audio Browser, Logic ensures that each region, regardless of whether it is currently used in the project, will be able to play back. It also ensures that Logic is far more resource-efficient than if it had to constantly use resources to enable it to switch to any audio channel, turn on new effects processing, and so on for the various windows that use the prelisten channel. It also allows you to easily hear any changes you make to an audio file in the Project Audio Browser without any effects that may be instantiated on the audio file’s parent channel strip.
Looking at it another way, the prelisten channel strip is not a limitation, but a feature. Many other DAWs don’t include a prelisten channel strip at all. Instead, when you play audio from any editor or window except the main editor and Mixer, the audio is simply routed directly to the master outputs. You have no opportunity to adjust the volume, add effects, or otherwise process the “audition” channel. Logic gives you the ability to do that, thanks to the prelisten channel strip.
Still, if you want to monitor the audio files in the Project Audio Browser that have been assigned to a Tracks area track through their parent channel strips, you can right-click on the Playback button in the lower-left corner of the Project Audio Browser. This opens the contextual menu shown in Figure 7.10.
Figure 7.10 Right-clicking on the Playback button in the Project Audio Browser opens a contextual menu in which you can assign the playback routing of audio files in the Project Audio Browser.

© Apple Inc.
Selecting the Auto-Select Channel Strip option ensures that audio files that have been assigned to a main window track will play through their parent channel strip. Note that this playback setting applies to both the Project Audio Browser and the Audio File editor. If you change the playback setting in the Project Audio Browser, you also change the playback setting for the Audio File editor, and vice versa.
Adding Audio Files to the Project Audio Browser
Every time you record using Logic, the resulting audio file is automatically placed in the Project Audio Browser. Sometimes, however, you’ll want to use audio in your song that you didn’t record. If you want the audio to be in your song, you can, of course, add an audio file from the Tracks area, drag audio from the Finder to the Tracks area, or drag audio files from the All Files Browser. Sometimes, however, you’ll want to have a number of prerecorded audio files available for your song but not placed in the Tracks area yet. In this case, you’ll need to add them to the Project Audio Browser yourself. Luckily, this is very easy to do.
The easiest way to add audio to your song is simply to drag the audio files from your desktop or a Finder window into your Project Audio Browser. At that point, Logic creates an overview for the file, and it appears in your audio list like all the rest of your audio. You can select as many audio files as you want on your desktop or in the Finder; when you drag them into the Project Audio Browser, all of them will be added.
You can also use the Add Audio File command described previously. This command opens an Open File dialog box with one Logic-specific addition: a Play button. This button auditions the selected audio file on the prelisten channel. You can select one or more files to add; when you click the Add button at the bottom-right corner of the dialog box (or press Return), Logic will add any selected files to the audio list in the Project Audio Browser.
Exporting Audio from the Project Audio Browser
Sometimes, you may want to use an audio file you have recorded in Logic in another application. In that case, you’ll want to export your audio. The usual way to export audio is to do a bounce, discussed in Chapter 11, or to export one or more tracks, discussed in Chapter 12. However, this section discusses a couple of options for exporting audio directly from the Project Audio Browser.
You can use the Copy/Convert File(s) or the Save Region(s) As commands to save your file in the same or a different format. When you select one of these commands, the resulting dialog box prompts you for a name and a destination for your file and then exports the audio file in the format you have selected.
Using Strip Silence
Earlier in this chapter, Strip Silence was mentioned. Now it’s time to give this essential function a closer look. When you record an audio performance of an instrument that does not play constantly throughout the entire performance—for example, a vocal that weaves through the music or instruments that come and go for the duration of a song—your audio file will play back with moments of silence. At best, these moments take up unnecessary CPU cycles as Logic plays and processes segments of an audio file that are empty. At worst, the portions where your instruments or vocals aren’t performing aren’t truly silent at all, but are filled with background noise, guitar amplifier hiss, and the like. The Strip Silence command is designed to search your audio file for these segments of low or no audio and remove them from your song.
Strip Silence does not actually remove anything from the audio file on your hard drive. Because Logic plays audio regions in the Tracks area or Project Audio Browser, Strip Silence divides the selected audio region into several audio regions, leaving out those portions in which it did not detect any audio. The command allows you to set the threshold or minimum level for audio to be considered “not silence,” so you have a certain amount of control over how many new audio regions the command will create. To access the Strip Silence window for a selected region, as shown in Figure 7.11, choose the Strip Silence command in the Project Audio Browser window or the Remove Silence from Audio Region command in the Tracks area Functions menu. Alternatively, use the key command Control+X.
Figure 7.11 In the Strip Silence window, you can fine-tune the Strip Silence function.
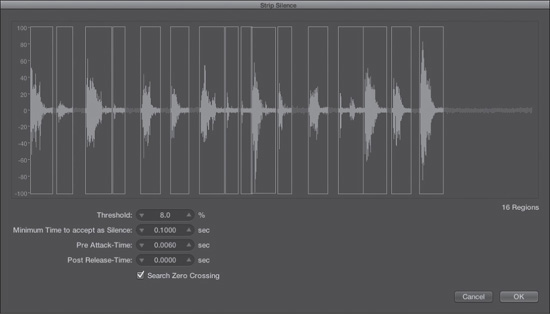
© Apple Inc.
The Strip Silence window gives you a number of settings:
![]() Threshold: This is the amplitude above which Strip Silence detects the audio as audio and not as silence. Logic’s default value is 4%, which is good for removing the silence in quiet tracks. If you have a noisier performance, such as a vocal that recorded a fair amount of background noise when there was no singing or a guitar amplifier with a loud hum or hiss when it wasn’t playing, you will get better results if you set the threshold higher.
Threshold: This is the amplitude above which Strip Silence detects the audio as audio and not as silence. Logic’s default value is 4%, which is good for removing the silence in quiet tracks. If you have a noisier performance, such as a vocal that recorded a fair amount of background noise when there was no singing or a guitar amplifier with a loud hum or hiss when it wasn’t playing, you will get better results if you set the threshold higher.
![]() Minimum Time to Accept as Silence: You don’t want Strip Silence to detect any moment below a threshold as silence; otherwise, Logic will split up those nanoseconds between notes into their own audio regions! This parameter allows you to set how much time must pass before Logic detects silence. The default is 0.1 seconds, which is generally a very good setting. You might want to raise the setting if you find that Strip Silence is chopping off the decay of very quiet notes.
Minimum Time to Accept as Silence: You don’t want Strip Silence to detect any moment below a threshold as silence; otherwise, Logic will split up those nanoseconds between notes into their own audio regions! This parameter allows you to set how much time must pass before Logic detects silence. The default is 0.1 seconds, which is generally a very good setting. You might want to raise the setting if you find that Strip Silence is chopping off the decay of very quiet notes.
![]() Pre Attack-Time: This parameter ensures that Strip Silence will not cut off the attack of notes with slower amplitudes (or rise times). If you find that Strip Silence is cutting off your notes, increase this value.
Pre Attack-Time: This parameter ensures that Strip Silence will not cut off the attack of notes with slower amplitudes (or rise times). If you find that Strip Silence is cutting off your notes, increase this value.
![]() Post Release-Time: Similar to the preceding parameter, this setting is used to ensure that the decay of notes isn’t removed. If you find that Strip Silence is cutting off your notes, increase this value.
Post Release-Time: Similar to the preceding parameter, this setting is used to ensure that the decay of notes isn’t removed. If you find that Strip Silence is cutting off your notes, increase this value.
![]() Search Zero Crossing: This command ensures that Logic always begins and ends audio regions at the point that the amplitude crosses the zero line. That way, no glitches or clicks will be audible at the beginning or end of newly created regions. You’ll pretty much always want this option to be checked.
Search Zero Crossing: This command ensures that Logic always begins and ends audio regions at the point that the amplitude crosses the zero line. That way, no glitches or clicks will be audible at the beginning or end of newly created regions. You’ll pretty much always want this option to be checked.
The actual operation of the command is quite simple:
1. Select an audio region.
2. Choose the Strip Silence command.
3. Use the graphic display of your waveform to adjust the settings. Your goal is for Logic to create exactly as many regions as you need, with no extra regions and without excess silence being included within the regions.
4. Click OK. The Strip Silence dialog box will close and your new regions will appear in the Tracks area and/or Project Audio Browser.
As you can see, Strip Silence is a powerful tool for quickly splitting the musically relevant portions of a performance or audio file into separate audio regions. If you want the silenced audio to also be removed from your hard drive after using Strip Silence, you can use the Edit > Select Unused command followed by the Audio Files > Optimize Files command in the Project Audio Browser. You can also use this function as a creative tool. For example, you can set the Pre Attack-Time and Post Release-Time parameters to cut off audio for a unique gated audio effect or to split different beats from a drum loop apart and then rearrange them to create an entirely new rhythm. Don’t be afraid to experiment with Strip Silence. Creativity is the name of the game, and remember, you can always undo it later!
Using Strip Silence and Folder Tracks to Loop Audio: This information appears in the “Working with Audio and Apple Loops” chapter instead of the chapter on the main window so that it follows the section on the Strip Silence function, but this process really should be done completely in the Tracks area. Remember that the same command as the Strip Silence command in the Project Audio Browser appears in the local Tracks area Functions > Remove Silence from Audio Region menu path.
Sometimes you might want to use Strip Silence to remove the irrelevant segments of an audio region but retain the ability to manipulate the result as a single region. For example, suppose you want to loop a four-bar drum performance throughout the choruses of a song. You want to use Strip Silence to eliminate the noise between the beats, but trying to loop eight tiny audio regions representing a part of a whole would interfere with your looping. Folder tracks to the rescue! After using Strip Silence, you can place all resulting audio regions in a folder in the Tracks area by using the Functions > Folder > Pack Folder command in the Tracks area to pack that track into a folder. You can now manipulate the folder track as you would any other region in the Tracks area.
As you get more familiar with Logic, you can expand on this trick. For example, you could put each of the audio regions on a separate track, being careful not to alter their spacing from one another In fact, you’ll find there’s even an assignable key command, New Tracks for Selected Regions, that is really handy for this. You would select the right-most new region, use the key command to assign that region to a new track, then move to the previous region, select it, then use the key command to assign it to its own track, and so on. That way, you end up with each audio region on its own track. Now select the regions and pack them in a folder. Because each audio region in the folder gets its own channel strip, you could have different effects on every audio region, as well as submix the audio regions in the folder track. (More on mixing in Chapter 11.)
Using Cycling in the Project Audio Browser
As mentioned, you can loop playback of a region by clicking the Cycle button on the Project Audio Browser, selecting an audio region, then clicking on the Playback button (the one represented by the speaker icon). That audio region will then repeat until you disengage the Playback button. This may not seem particularly useful at first, but let’s look at how you can use this functionality in the Project Audio Browser window in tandem with the Tracks area.
If you have an audio region in the Tracks area that just doesn’t seem to begin and/or end where you’d like it to, and your attempts to resize it in the Tracks area are not giving you the desired results, the Project Audio Browser window is your answer. With the Loop button engaged, click the Playback button, and your region will repeat. Use the Project Audio Browser Resize cursor to adjust the start and end points of your audio region. The Tracks area track immediately reflects any changes you make, so you need not drag or move anything between windows.
Using this method to adjust regions can be a timesaver. If you have painstakingly set the locators, cycle, and/or autodrop points in the main window, this method gives you a way to loop the audio region you need to adjust without affecting any other aspect of your main window setup. Give it a try—you’ll find using looping in the Project Audio Browser is a great way to resize individual audio regions.
Project Audio Browser Groups
Logic gives you the ability to organize audio files into groups inside the Project Audio Browser. You’ll find this to be a great organizational help if you have lots of different types of audio material. For example, you could create one group called Guitars, one called Drums, one called Synths, and so on, and use these to keep your audio files organized within the Project Audio Browser.
Creating groups in the Project Audio Browser couldn’t be easier. Simply select those audio files (not regions representing segments of a larger file, but regions representing a complete file) in the Project Audio Browser that you wish to group together and then select the View > Create Groups command. A text box will appear for you to name the new group, and the selected audio files will be placed inside the group. You can also use the Create Groups command without any audio files selected in the Project Audio Browser and then simply drag audio files into the group later. Finally, Logic can automatically group your audio files together by their location on your hard drive or their file attributes, or it can group those files selected in the Tracks area with the View > Group Files By commands. (If you already have groups created, you will be prompted about whether you want them to be deleted.)
The names of audio file groups will be in a bolder font than the names of your audio files, and the audio list will identify the group as an audio file group. (If you double-click this text, you can add your own comment.) Figure 7.12 shows the Project Audio Browser with two audio file groups created.
Figure 7.12 This Project Audio Browser has two audio file groups: Guitars and Keyboards. You can see the audio regions in the expanded Keyboards group with some of the region data hidden; the Guitars group has been collapsed, so its audio files are not displayed.
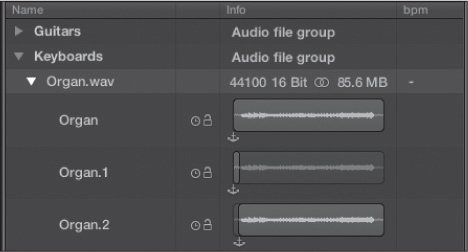
© Apple Inc.
You can open and close audio file groups by clicking on their disclosure triangles. You can also Option-click on a group triangle to open or close all the disclosure triangles within a group.
Keep in mind that audio file groups are strictly organizational groups. Grouping audio files does not affect their location on your hard drive, their use or placement in the Tracks area, and so on.
Adding Audio to the Tracks Area
The Project Audio Browser is a great organizational and processing tool for audio, but to actually use your audio in a project, you’ll need to add it to the Tracks area. You can do this either by selecting one or more audio regions and dragging them from the Project Audio Browser (or the Finder) to the Tracks area or by using the Add to Tracks command. Regardless of which method you choose, the dialog box shown in Figure 7.13 will prompt you to instruct Logic how to handle the audio region(s).
Figure 7.13 The Add Selected Files to Arrange dialog box. Perhaps in a future update, this will be changed to the Add Selected Files to Tracks dialog box.
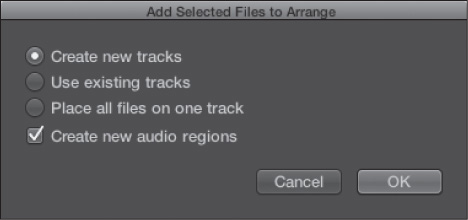
© Apple Inc.
Depending on your selections in this dialog box, Logic Pro will do the following:
![]() Create a new audio track in the Tracks area for each audio region you wish to add.
Create a new audio track in the Tracks area for each audio region you wish to add.
![]() Use the existing audio tracks in the Tracks area and add one audio region to each.
Use the existing audio tracks in the Tracks area and add one audio region to each.
![]() Place all the audio regions you are adding to the Tracks area on the selected audio track.
Place all the audio regions you are adding to the Tracks area on the selected audio track.
As you can see, Logic makes adding audio from the Project Audio Browser to the Tracks area simple and intuitive, and gives you plenty of options to make sure it handles the audio the way you want it to.
The Logic Audio Editors
For years, the only heavy-lifting audio editing options in Logic have been in the Arrange window and in the Sample editor. In the Arrange window, you could edit regions, but you weren’t actually changing the audio file itself, just how Logic referenced the file. The Sample editor allowed you to destructively edit the actual audio file itself. Logic Pro X has changed this paradigm. Along with the name changes to these two parts of Logic—the Arrange window to the main window and Sample editor to Audio File editor—comes a new audio editor, the Audio Track editor.
What’s the difference between these two audio editors? Quite a bit, as you’ll soon see. The main thing to understand is that the Audio Track editor simply works on the selected audio region in a similar manner to editing in the Tracks area. You simply edit Logic’s handling of the file, the sections of the file it plays, and how it plays them. Work you perform on an audio file in the Audio Track editor does not transfer to other applications in which you may choose to use the file (unless, of course, you bounce the region or track) because it is not editing the file itself.
In contrast, the Audio File editor, like the Sample editor before it, does destructive editing to the actual audio file, permanently altering the audio file on your storage drive. This means that after you perform work on a file in the Audio File editor, opening the file in another application reflects the work you did without any need to bounce the result. While the Audio Track editor has access to global tracks, the Audio File editor does not. The Audio File editor does, however, have unique audio processing capabilities throughout Logic. Both editors have their uses, their advantages, and their disadvantages, and both will likely become essential to your workflow when handling audio. Let’s dig into the Audio Track editor first, and then we’ll get into the Audio File editor.
The Audio Track Editor
The Audio Track editor, shown in Figure 7.14, is in essence an extension of the Tracks area. Much of the editing power in the Audio Track editor is identical to that of the Tracks area. Indeed a task as simple as selecting an area in an audio region in the Audio Track editor selects that same area of the same region in the Tracks area. They are truly linked. This begs the question: Why bother with the Audio Track editor at all? First, it provides an instantly focused area in the main window where you can perform edits without having your vision field crowded by other regions on other tracks. Simply double-click an audio region in the Tracks area, and it will open in the Audio Track editor, ready for you to work on it. Second, and more importantly, the Audio Track editor is where you have access to Flex Pitch editing.
Figure 7.14 The Audio Track editor. There are many familiar components in the Audio Track editor. You can see the local menus, global tracks buttons, zoom controls, and so forth. We’ll start by exploring the Audio Track editor local menus.
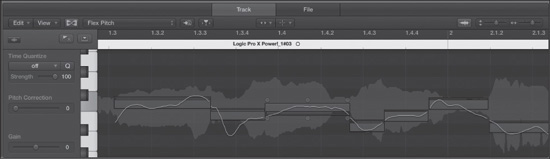
© Apple Inc.
Local Menus
As you can see in Figure 7.14, the Audio Track editor has two local menus, Edit and View. Many of the commands in these menus are identical to the same commands in the Tracks area Edit and View menus. When you use commands like Cut, Copy, and Paste in the Audio Track editor, they are immediately updated in the Tracks area; again, the Audio Track editor is fundamentally an extension of the Tracks area. For more information on these duplicate commands, review their descriptions in Chapter 6. For commands that may function a little differently, an explanation will be given here. First, the Edit menu.
THE AUDIO TRACK EDITOR EDIT MENU
The Audio Track editor Edit menu is shown in Figure 7.15.
Figure 7.15 The Audio Track editor Edit menu.
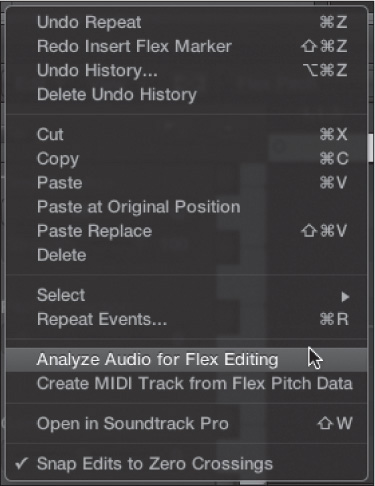
© Apple Inc.
This menu offers a few unique options:
![]() Repeat Events: This command is similar to the Repeat command in the Tracks area. You can repeat the selected region with this command. Additionally, when in Flex Pitch mode, you can select a Flex Pitch note, which is a more advanced version of the Flex Pitch bars in the Tracks area, and use this command to repeat the audio surrounding the selected note from its initial zero crossing to its final zero crossing. This command opens the Repeat Regions/Events dialog box, covered in Chapter 6. Repeating Flex Pitch notes is covered in the section “Flex Pitch Editing in the Audio Track Editor” later in this chapter.
Repeat Events: This command is similar to the Repeat command in the Tracks area. You can repeat the selected region with this command. Additionally, when in Flex Pitch mode, you can select a Flex Pitch note, which is a more advanced version of the Flex Pitch bars in the Tracks area, and use this command to repeat the audio surrounding the selected note from its initial zero crossing to its final zero crossing. This command opens the Repeat Regions/Events dialog box, covered in Chapter 6. Repeating Flex Pitch notes is covered in the section “Flex Pitch Editing in the Audio Track Editor” later in this chapter.
![]() Analyze Audio for Flex Editing: This command analyzes the pitch and transients of the selected audio region.
Analyze Audio for Flex Editing: This command analyzes the pitch and transients of the selected audio region.
![]() Create MIDI Track from Flex Pitch Data: Because Flex Pitch analyzes the pitch of monophonic audio files, translating that data to MIDI is a fairly straightforward operation. This command lets you convert that pitch data into MIDI data. When you use this command, a new software instrument track is created under the currently selected track header in the main window, along with a region containing MIDI notes derived from your audio. The Piano Roll editor, covered in Chapter 8, “Working with MIDI,” opens in the main window, giving you the ability to immediately edit the new region. This command is great for doubling or replacing a monophonic audio region with a software instrument sound. Because the new software instrument track is placed under the currently highlighted track header, you can select the place in the Track list where you would like your new software instrument track to be, and then select the audio region you wish to use. I highly recommend you take the time to perform all the Flex Pitch editing you plan on doing before you use this command. The results you achieve with this command can be very surprising, depending on the accuracy of the pitch editing!
Create MIDI Track from Flex Pitch Data: Because Flex Pitch analyzes the pitch of monophonic audio files, translating that data to MIDI is a fairly straightforward operation. This command lets you convert that pitch data into MIDI data. When you use this command, a new software instrument track is created under the currently selected track header in the main window, along with a region containing MIDI notes derived from your audio. The Piano Roll editor, covered in Chapter 8, “Working with MIDI,” opens in the main window, giving you the ability to immediately edit the new region. This command is great for doubling or replacing a monophonic audio region with a software instrument sound. Because the new software instrument track is placed under the currently highlighted track header, you can select the place in the Track list where you would like your new software instrument track to be, and then select the audio region you wish to use. I highly recommend you take the time to perform all the Flex Pitch editing you plan on doing before you use this command. The results you achieve with this command can be very surprising, depending on the accuracy of the pitch editing!
![]() Open In: If you have configured Logic to work with an external sample editor in the Audio File Editor tab of the Audio Preferences window, you can use this command to open the selected audio in your external sample editor. Setting up an external sample editor is covered in the section “Configuring Logic to Use an External Sample Editor” later in this chapter. The key command for this is Shift+W.
Open In: If you have configured Logic to work with an external sample editor in the Audio File Editor tab of the Audio Preferences window, you can use this command to open the selected audio in your external sample editor. Setting up an external sample editor is covered in the section “Configuring Logic to Use an External Sample Editor” later in this chapter. The key command for this is Shift+W.
![]() Snap Edits to Zero Crossings: You learned about zero crossings earlier in this chapter. If you select this command, Logic always looks for the point at which the amplitude crosses the zero mark while you are editing. This is to ensure glitch-and click-free playback, but it might restrict you from making edits at the exact location you want.
Snap Edits to Zero Crossings: You learned about zero crossings earlier in this chapter. If you select this command, Logic always looks for the point at which the amplitude crosses the zero mark while you are editing. This is to ensure glitch-and click-free playback, but it might restrict you from making edits at the exact location you want.
THE AUDIO TRACK EDITOR VIEW MENU
The Audio Track editor View menu, shown in Figure 7.16, has only one command that is not in the Tracks area View menu: Show Local Inspector. This command is available only when the Audio Track editor is in Flex Pitch Editing mode. The Audio Track editor Inspector is covered later in this chapter in the discussion of Flex Pitch Editing, but if you’re curious about what it looks like, it can be seen at the left end of the Audio Track editor in Figure 7.14.
Figure 7.16 The Audio Track editor View menu.
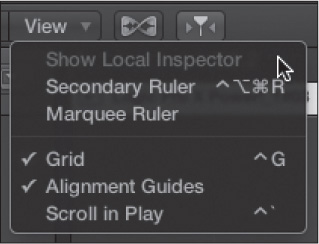
© Apple Inc.
The Audio Track Editor Buttons
The Audio Track editor includes four buttons, shown in Figure 7.17.
Figure 7.17 The Audio Track editor buttons.
© Apple Inc.
The Audio Track editor buttons, from left to right, are as follows:
![]() Show/Hide Flex: Use this button to enable and disable Flex editing in the Audio Track editor. When Flex editing is engaged, a Flex Mode menu identical to the one found in audio track headers in the Tracks area is displayed to the right of the Show/Hide Flex button. You can see this in Figure 7.17.
Show/Hide Flex: Use this button to enable and disable Flex editing in the Audio Track editor. When Flex editing is engaged, a Flex Mode menu identical to the one found in audio track headers in the Tracks area is displayed to the right of the Show/Hide Flex button. You can see this in Figure 7.17.
![]() MIDI IN: As of this writing, with Logic Pro X 10.0.4, there is no use for the MIDI IN button in the Audio Track editor. This button is displayed only when Flex editing is enabled in the Audio Track editor.
MIDI IN: As of this writing, with Logic Pro X 10.0.4, there is no use for the MIDI IN button in the Audio Track editor. This button is displayed only when Flex editing is enabled in the Audio Track editor.
![]() Catch Playhead: The Catch Playhead button enables Catch Playhead mode. If this button is lit, the Audio Track editor is linked to the current song position in the Tracks area, and vice versa. If there is no audio, the playhead simply stops at the end of the audio region. It is particularly helpful to leave this engaged in the Audio Track editor because edits and actions performed on the selected regions in either the Audio Track editor or the Tracks area are immediately reflected in both areas. It’s especially helpful for keeping track of where you are in a region when your Tracks area and Audio File editor are using very disparate horizontal zoom settings.
Catch Playhead: The Catch Playhead button enables Catch Playhead mode. If this button is lit, the Audio Track editor is linked to the current song position in the Tracks area, and vice versa. If there is no audio, the playhead simply stops at the end of the audio region. It is particularly helpful to leave this engaged in the Audio Track editor because edits and actions performed on the selected regions in either the Audio Track editor or the Tracks area are immediately reflected in both areas. It’s especially helpful for keeping track of where you are in a region when your Tracks area and Audio File editor are using very disparate horizontal zoom settings.
![]() Waveform Zoom: This button lets you increase or decrease the vertical zoom of the waveform displayed in the Audio Track editor. If you click and hold on this button, a vertical slider appears, allowing you more control over the vertical waveform zoom. Clicking the button again returns the waveform to its previous zoom setting.
Waveform Zoom: This button lets you increase or decrease the vertical zoom of the waveform displayed in the Audio Track editor. If you click and hold on this button, a vertical slider appears, allowing you more control over the vertical waveform zoom. Clicking the button again returns the waveform to its previous zoom setting.
The Audio Track Editor Tool Menu
The Audio Track editor Tool menu, shown in Figure 7.18, contains all the tools found in the Tracks area Tool menu (with one exception that will be noted in the Audio Track editor Tool menu details to follow), plus two other unique tools.
Figure 7.18 The Audio Track editor Tool menu.
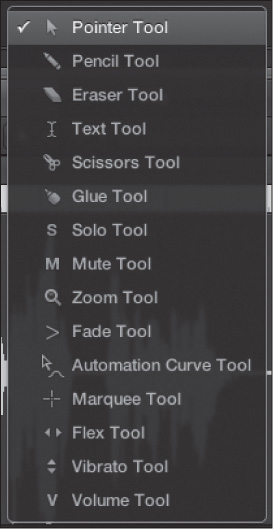
© Apple Inc.
The Audio Track editor Tool menu tools are as follows:
![]() Pointer: The Pointer tool is very versatile in the Audio Track editor. It can be used to drag the selected region along the timeline as in the Tracks area, but its real power comes when in Flex Edit mode, as you’ll discover later in this chapter.
Pointer: The Pointer tool is very versatile in the Audio Track editor. It can be used to drag the selected region along the timeline as in the Tracks area, but its real power comes when in Flex Edit mode, as you’ll discover later in this chapter.
![]() Pencil: This tool is used to add or alter the length of pitch notes in Flex Pitch edit mode.
Pencil: This tool is used to add or alter the length of pitch notes in Flex Pitch edit mode.
![]() Eraser: This tool can be used to erase the current Audio Track editor region, to erase Flex Pitch notes, and to erase Flex Time transients.
Eraser: This tool can be used to erase the current Audio Track editor region, to erase Flex Pitch notes, and to erase Flex Time transients.
![]() Text: This tool looks like a text-entry bar. It is used to name regions in the Audio Track editor. Click under the region header with this tool to open a text box, which lets you rename the region.
Text: This tool looks like a text-entry bar. It is used to name regions in the Audio Track editor. Click under the region header with this tool to open a text box, which lets you rename the region.
![]() Scissors: This tool is used to split regions. You hold the Option key down while splitting regions to divide the entire region into multiple equally spaced regions the same length as your initial split. You can also use the Scissors tool to split Flex Pitch notes.
Scissors: This tool is used to split regions. You hold the Option key down while splitting regions to divide the entire region into multiple equally spaced regions the same length as your initial split. You can also use the Scissors tool to split Flex Pitch notes.
![]() Glue: This tool is used to join selected regions into one single region, which is given the name and track position of the initial region. The Glue tool can also be used to join Flex Pitch notes.
Glue: This tool is used to join selected regions into one single region, which is given the name and track position of the initial region. The Glue tool can also be used to join Flex Pitch notes.
![]() Solo: This tool can be used to solo any selected regions when you aren’t in Flex Edit mode.
Solo: This tool can be used to solo any selected regions when you aren’t in Flex Edit mode.
![]() Mute: This tool mutes any selected regions when you aren’t in Flex Edit mode.
Mute: This tool mutes any selected regions when you aren’t in Flex Edit mode.
![]() Zoom: This tool is used to zoom in on the region you’re editing in the Audio Track editor.
Zoom: This tool is used to zoom in on the region you’re editing in the Audio Track editor.
![]() Fade: This tool, when dragged over two adjacent audio regions, creates a crossfade between them. It can also be used to create fade-ins and fade-outs. It works in the Audio Track editor only if Flex edit mode is turned off both in the Audio Track editor and the parent track in the Tracks area. Crossfades are covered later in this chapter.
Fade: This tool, when dragged over two adjacent audio regions, creates a crossfade between them. It can also be used to create fade-ins and fade-outs. It works in the Audio Track editor only if Flex edit mode is turned off both in the Audio Track editor and the parent track in the Tracks area. Crossfades are covered later in this chapter.
![]() Automation Select: The Automation Select tool can select automation data in the automation lane. Although it doesn’t appear in the Audio Track editor Tool menu, it does appear in the Audio Track editor shortcut menu when a Show Tools option is selected in the Right Mouse Button menu in the Editing tab of the General Preferences window. It also serves no purpose in the Audio Track editor.
Automation Select: The Automation Select tool can select automation data in the automation lane. Although it doesn’t appear in the Audio Track editor Tool menu, it does appear in the Audio Track editor shortcut menu when a Show Tools option is selected in the Right Mouse Button menu in the Editing tab of the General Preferences window. It also serves no purpose in the Audio Track editor.
![]() Automation Curve: The Automation Curve tool can create curves between two automation nodes. It also serves no purpose in the Audio Track editor.
Automation Curve: The Automation Curve tool can create curves between two automation nodes. It also serves no purpose in the Audio Track editor.
![]() Marquee: This tool functions exactly as it does in the Tracks area when Flex Pitch edit mode is disabled. Marquee selections and edits in the Audio Track editor are immediately reflected in the Tracks area. You can also use the Marquee tool to make selections for Flex Time editing as you would in the Tracks area.
Marquee: This tool functions exactly as it does in the Tracks area when Flex Pitch edit mode is disabled. Marquee selections and edits in the Audio Track editor are immediately reflected in the Tracks area. You can also use the Marquee tool to make selections for Flex Time editing as you would in the Tracks area.
![]() Flex: The Flex tool allows you to perform some Flex Time edits when the Audio Track editor is not in Flex view.
Flex: The Flex tool allows you to perform some Flex Time edits when the Audio Track editor is not in Flex view.
![]() Vibrato: The Vibrato tool lets you adjust the extent of the vibrato drift from the analyzed pitch when Flex Pitch editing. The Vibrato tool is covered in more detail in the section “Flex Pitch Editing in the Audio Track Editor” later in this chapter.
Vibrato: The Vibrato tool lets you adjust the extent of the vibrato drift from the analyzed pitch when Flex Pitch editing. The Vibrato tool is covered in more detail in the section “Flex Pitch Editing in the Audio Track Editor” later in this chapter.
![]() Volume: The Volume tool lets you adjust the gain of Flex Pitch notes when in Flex Pitch edit mode. The Volume tool is covered in more detail in the section “Flex Pitch Editing in the Audio Track Editor” later in this chapter.
Volume: The Volume tool lets you adjust the gain of Flex Pitch notes when in Flex Pitch edit mode. The Volume tool is covered in more detail in the section “Flex Pitch Editing in the Audio Track Editor” later in this chapter.
The Audio Track Editor Zoom Controls
The Audio Track editor features a horizontal zoom control, unless you are in Flex Pitch edit mode, which add a vertical zoom control. Increasing Vertical zoom in Flex Pitch edit mode can make it easier to make adjustments to different Flex Pitch parameters, which are covered in the section “Flex Pitch Editing in the Audio Track Editor” later in this chapter.
Editing Audio Regions in the Audio Track Editor
Editing audio regions in the Audio Track editor is identical to editing audio in the Tracks area. In fact, using the Audio Track editor is the ideal way to focus on a single audio region or a selection of audio regions on a track without having to change the zoom setting in the Tracks area. You can resize regions at their edges, use the Scissors tool to split regions, use the Glue tool to join regions, use the Marquee tool and manipulate Marquee selections, and use the various Tracks area key commands to edit regions, among other things. When not in Flex edit mode you should, quite literally, treat the Audio Track editor as an extension of the Tracks area, letting you focus on a region or multiple regions of an audio track, using its independent zoom level from the Tracks area to let you work on the specifics of your audio edits while seeing the grander scheme of your arrangement. The more you get used to using the Audio Track editor in conjunction with editing in the Tracks area, the more efficient your workflow will become!
Flex Time Editing in the Audio Track Editor
Flex Time editing in the Audio Track editor also functions identically to Flex Time editing in the Tracks area. You can create and delete Flex Time markers, time stretch and compress by moving Flex Time markers, use the Marquee tool to flex audio, and use any of the Flex Time modes in the Audio Track editor. Mastery of the Flex Time editing procedures detailed in Chapter 6 is highly recommended. Just like editing audio regions, using the Audio Track editor can speed your workflow by giving you that additional focused area for performing Flex Time edits.
Flex Pitch Editing in the Audio Track Editor
This is where things get interesting in the Audio Track editor: with Flex Pitch editing. Although Flex Pitch editing in the Tracks area can be good for quick and dirty tweaks, and is sometimes all the editing that’s needed, the Flex Pitch editing tools in the Audio Track editor are vast by comparison. Of course, you can analyze an audio region or regions on a track in the Flex Pitch editor and alter the pitch of those monophonic audio regions, but you can also use Flex Pitch notes to edit the extent of the analyzed vibrato, affect the formants in Flex Pitch notes to help make your tweaks sound more natural, alter the gain of Flex Pitch notes nondestructively, quantize your audio, and more. Flex Pitch notes look quite different from the Flex Pitch bars found in the Tracks area, as you can see in Figure 7.19.
Figure 7.19 An audio region shown in the Tracks area and the Audio Track editor in Flex Pitch Editing mode. With both tracks at a similar horizontal zoom level, you can see how different Flex Pitch notes are compared to the Flex Pitch bars in the Tracks area.
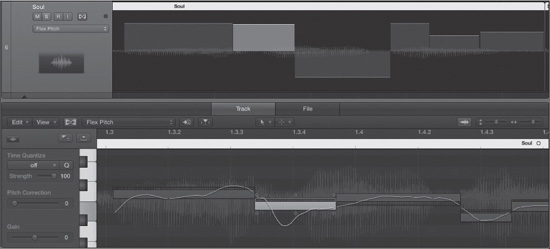
© Apple Inc.
Note the vibrato line running through the Audio Track editor—each section of the line a part of its parent note—and the six circles surrounding the highlighted Flex Pitch note in the middle of the Audio Track editor. Along with the functions in the Audio Track editor Inspector and the Audio Track editor tools, these characteristics of Flex Pitch notes offer you extremely broad control for Flex Pitch editing.
CHARACTERISTICS OF FLEX PITCH NOTES
There are some fundamental characteristics of Flex Pitch notes—namely the vibrato line and the six Flex Pitch editing circles, or hotspots, surrounding a Flex Pitch note—that are central to deeper Flex Pitch editing. These characteristics and their functions are as follows:
![]() Vibrato line: The vibrato line shows the amount of analyzed vibrato or pitch drift for the note. You can edit the vibrato line using the pitch drift hotspots (covered next in this list) with the vibrato hotspot and the Vibrato tool, which are detailed later in this chapter in the section “Using the Vibrato Tool.”
Vibrato line: The vibrato line shows the amount of analyzed vibrato or pitch drift for the note. You can edit the vibrato line using the pitch drift hotspots (covered next in this list) with the vibrato hotspot and the Vibrato tool, which are detailed later in this chapter in the section “Using the Vibrato Tool.”
![]() Pitch drift hotspots: The hotspots at the upper-left and upper-right of a Flex Pitch note are the pitch drift hotspots. You can drag these to increase or decrease the amount of pitch drift at the beginning or end of a Flex Pitch note, respectively. These changes will be reflected in the amplitude of the vibrato line. Note that changing the pitch drift setting at either end of a Flex Pitch note will alter the pitch drift of any adjacent Flex Pitch notes.
Pitch drift hotspots: The hotspots at the upper-left and upper-right of a Flex Pitch note are the pitch drift hotspots. You can drag these to increase or decrease the amount of pitch drift at the beginning or end of a Flex Pitch note, respectively. These changes will be reflected in the amplitude of the vibrato line. Note that changing the pitch drift setting at either end of a Flex Pitch note will alter the pitch drift of any adjacent Flex Pitch notes.
![]() Fine pitch hotspot: The fine pitch hotspot is the hotspot in the center at the top of a Flex Pitch note. This hotspot functions like the Flex Pitch bar in the Tracks area. Drag it vertically to fine-tune the pitch of the Flex Pitch note. The more you alter the flex pitch hotspot’s setting, the more or less blue you’ll see in the note. Notes that are sharp will fill with blue from the bottom of the note.
Fine pitch hotspot: The fine pitch hotspot is the hotspot in the center at the top of a Flex Pitch note. This hotspot functions like the Flex Pitch bar in the Tracks area. Drag it vertically to fine-tune the pitch of the Flex Pitch note. The more you alter the flex pitch hotspot’s setting, the more or less blue you’ll see in the note. Notes that are sharp will fill with blue from the bottom of the note.
![]() Gain hotspot: The Gain hotspot, found at the lower-left corner of a Flex Pitch note, lets you alter the gain of its Flex Pitch note by dragging it vertically. Use this hotspot to boost the volume of any bit of audio that’s too quiet or to decrease the volume of something that’s sticking out too much.
Gain hotspot: The Gain hotspot, found at the lower-left corner of a Flex Pitch note, lets you alter the gain of its Flex Pitch note by dragging it vertically. Use this hotspot to boost the volume of any bit of audio that’s too quiet or to decrease the volume of something that’s sticking out too much.
![]() Vibrato hotspot: The vibrato hotspot, at the center-bottom of the Flex Pitch note, allows you to alter the extent of the vibrato or pitch drift across the entire note by dragging it vertically. As with the pitch drift hotspots, any changes to the vibrato hotspot alter the pitch drift of adjacent notes.
Vibrato hotspot: The vibrato hotspot, at the center-bottom of the Flex Pitch note, allows you to alter the extent of the vibrato or pitch drift across the entire note by dragging it vertically. As with the pitch drift hotspots, any changes to the vibrato hotspot alter the pitch drift of adjacent notes.
![]() Formant shift hotspot: The formant shift hotspot, at the lower-right of the Flex Pitch note, lets you alter the extent of formant shift for a Flex Pitch note. Similar to the Formant Shift setting in the parent track, covered in Chapter 6, this hotspot lets you fine-tune the formant shift for its Flex Pitch note.
Formant shift hotspot: The formant shift hotspot, at the lower-right of the Flex Pitch note, lets you alter the extent of formant shift for a Flex Pitch note. Similar to the Formant Shift setting in the parent track, covered in Chapter 6, this hotspot lets you fine-tune the formant shift for its Flex Pitch note.
It is not essential to select a note to access its hotspots. Simply drag the cursor to the note, and its hotspots appear. When you put the cursor over a hotspot, the cursor becomes a Finger tool, and a help tag appears to show you the value of any changes you make. As you drag the hotspot the cursor becomes a –, as in Figure 7.20.
Figure 7.20 Using help tags, you can fine-tune the setting of a hotspot. Here, the Vibrato amount has been decreased to 24% of its original value. Note the extreme change in the vibrato line compared to Figure 7.19. You can also see how this affects the slope of the pitch drift of the adjacent Flex Pitch notes at their borders.
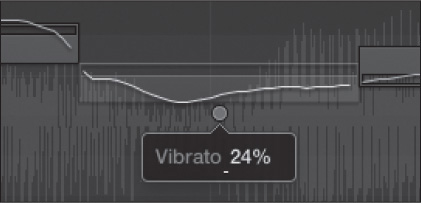
© Apple Inc.
Remember that you can increase or decrease the vertical zoom in the Audio Track editor. With so much visual feedback available for Flex Pitch notes, increasing the vertical zoom can really be helpful for fine-tuning a note. Figure 7.21 shows the same note in Figure 7.20 at the maximum vertical zoom setting.
Figure 7.21 Use the vertical zoom control to enhance editing of Flex Pitch notes.
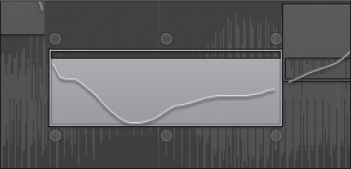
© Apple Inc.
Tip: You can use the same zoom key commands, Command+arrows, as in the Tracks area to adjust vertical and horizontal zoom when the Audio Track editor is in focus.
Tip: If you have made any edits to the vibrato line of a note using the Pitch Drift and/or vibrato hotspots or by using the Vibrato tool covered later in this chapter, you can easily undo all those edits and return the vibrato line of the selected note back to its original state by right-clicking on the note and selecting the Reset Pitch Curve command.
SELECTING AND EDITING MULTIPLE HOTSPOTS
One other very handy trick for using hotspots is to select multiple Flex Pitch notes and use the hotspots for one of the selected notes to edit the group. This can be done with the same methods you use to select multiple regions in the Tracks area:
![]() You can select multiple notes by dragging the mouse pointer and “lassoing” a collection of notes.
You can select multiple notes by dragging the mouse pointer and “lassoing” a collection of notes.
![]() You can Command-click non-contiguous notes.
You can Command-click non-contiguous notes.
![]() You can select the first note and Shift-click the last note you’d like to edit for a contiguous group of notes.
You can select the first note and Shift-click the last note you’d like to edit for a contiguous group of notes.
![]() You can use the keyboard at the left end of the Audio Track editor to select all notes of that pitch.
You can use the keyboard at the left end of the Audio Track editor to select all notes of that pitch.
![]() You can Shift-click on the keyboard to select all notes of multiple pitches. (Note that this method does not select all pitches between two selected pitches. For example, you can use this method to select all C2 notes and all Bb1 notes, as shown in Figure 7.22.)
You can Shift-click on the keyboard to select all notes of multiple pitches. (Note that this method does not select all pitches between two selected pitches. For example, you can use this method to select all C2 notes and all Bb1 notes, as shown in Figure 7.22.)
Figure 7.22 Shift-click to select all notes of various pitches using the Audio Track editor keyboard.

© Apple Inc.
Editing multiple selected notes can be useful for a variety of reasons. Perhaps the formant shift of all the notes of a pitch isn’tto your liking. Maybe there were a couple of specific pitches a particular instrument produced that were consistently louder than all the rest, so instead of compressing the track, you quickly reduce the gain of all those notes. These methods for selecting multiple notes will be useful for many other Flex Pitch editing processes, as you’ll soon see.
AUDITIONING FLEX PITCH NOTES
There can be several Flex Pitch notes found in a small area across the Bar ruler, even in one word of a vocal performance. It would be frustrating to have to set an extremely small Cycle region or chop your audio into a bunch of regions to use the Set Locators by Regions command and use Varispeed to slow playback enough to get meaningful feedback for edits you make—although it is a useful method. Fortunately, there is a quicker and easier way to audition your Flex Pitch notes. If you place the cursor over a Flex Pitch note, the cursor becomes a Hand tool. Click and hold with the Hand tool at any spot within the boundaries of a Flex Pitch note, and the audio at that exact location will play until you release the mouse button. Take care not to move the Hand tool horizontally when you do this or your note could be stretched or compressed. Move to a different place in the note, and you can hear the audio at that exact location. This allows you to truly fine-tune your edits across a Flex Pitch note in a way that is more effective than only hearing playback of the note. Keep both of these methods in mind as you learn more about editing Flex Pitch notes. You’ll find that both methods have their uses, but that the Hand tool approach will generally be the most useful.
USING THE VIBRATO TOOL
The Vibrato tool gives you another means to adjust the vibrato line for a selected event(s). Its function is identical to the vibrato hotspots, but instead of having to drag a small hotspot, you can drag vertically anywhere in a selected note to alter the vibrato line for any selected notes. If you have multiple notes selected and you drag the Vibrato tool on a non-selected note, it will affect the Vibrato setting of the selected notes as well.
CHANGING THE GAIN OF NOTES
There are a few different methods available for changing the gain of notes in the Audio Track editor. The gain hotspot offers one method. You can also use the Volume tool. As with the Vibrato tool, you can use the Volume tool to edit the gain of any selected notes by dragging vertically anywhere in a selected note. If you have multiple notes selected and you drag the Volume tool on a non-selected note, it will affect the Gain setting of the selected notes as well. Using the gain hotspot or Volume tool gives you instant feedback because the size of the audio waveform scales immediately as you change the Gain setting. Don’t forget to use the Waveform Zoom control to provide even more feedback for your Gain setting edits by increasing the zoom of the waveforms in the Audio Track editor.
There is one other method for changing the gain of notes: the Gain slider in the Audio Track editor Inspector, shown in Figure 7.23. As with the gain hotspot and the Volume tool, the Gain slider lets you change the volume of all selected notes. Drag the slider left to decrease the Gain setting, right to increase the Gain setting. Unlike the gain hotspot and the Volume tool, there is no instant feedback in the edited waveforms. You have to release the mouse button before the waveform is redrawn. Figure 7.24 shows two notes, one with its normal Gain setting, the other with its Gain setting reduced drastically. You can see that the two notes are connected—in this case, parts of the same vocal performance of a word. For this example in the real world, it would have been more desirable to select both notes and alter their gain collectively.
Figure 7.23 Use the Gain slider to change the volume of selected notes.

© Apple Inc.
Figure 7.24 Two note events in the same word of a vocal performance. The first note has its normal Gain setting. The second note’s Gain has been reduced drastically.
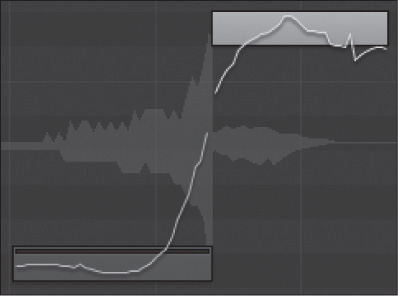
© Apple Inc.
CHANGING THE PITCH OF NOTES
The Audio Track editor offers multiple ways to alter the pitch of a note. Obviously, the fine pitch, pitch drift, and vibrato hotspot and the Vibrato tool can accomplish this, but there are a number of other ways to do this, too.
Changing the Fine-Tuning of Notes The fine pitch hotspot can be used to increase or decrease the fine-tuning of a note. Not only can you drag the fine pitch hotspot to tune the note to the analyzed pitch, but you can keep dragging the hotspot up or down to move the note to other pitches. This is one way to correct the coarse-tuning of a note performed so poorly that the analysis returned a different pitch entirely.
In addition to the fine pitch hotspot, there is another method you can use to change the fine-tuning of notes. While there is no Pitch tool, there’s something just as useful in the Inspector: the Pitch Correction slider in the Audio Track editor Inspector, shown in Figure 7.25.
Figure 7.25 The Pitch Correction slider in the Audio Track editor Inspector.
© Apple Inc.
The Pitch Correction slider is limited to correcting the pitch in relation to the analyzed pitch. In other words, if your note is 15 cents sharp of the analyzed note, the Pitch Correction slider will only let you move the selected note down toward the analyzed note. You can’t change the coarse-tuning of a note using the Pitch Correction slider.
Changing the Coarse-Tuning of Notes To change the coarse-tuning of notes—in other words, move a note or notes to an entirely different pitch—simply drag a selected note to the desired pitch. This is an example of the usefulness of selecting multiple notes using the Audio Track editor keyboard. For example, suppose all the F3s performed in a region should have been E3s. If you click F3 in the keyboard to select all F3 notes and drag one of the selected notes to E3, all the selected notes will be moved to E3. This is one way to quantize the pitch of notes, but there are two other methods available.
Quantizing the Pitch of Notes If you want to move notes in your audio region to pitch in an automated fashion, the Audio Track editor offers two options. The first option is very quick and easy: Right-click in the Audio Track editor to access its shortcut menu, shown in Figure 7.26. There are two options in the shortcut menu: Set All to Perfect Pitch and Set All to Original Pitch. If you select Set All to Perfect Pitch, all the notes in the Audio Track editor will be quantized to their analyzed pitch, although their vibrato/pitch drift will remain.
Figure 7.26 The Audio Track editor shortcut menu.

© Apple Inc.
Figure 7.27 shows some of the notes you’ve seen in other figures after being quantized to pitch. You can see that the notes are completely filled in, showing that they are pitched to their analyzed pitches. You can also see that although some notes are selected, the unselected notes have also been pitch quantized. To return notes back to their original pitch, select the Set All to Original Pitch option. Additionally, note that the vibrato line still varies the pitch of the note around the perfect pitches. If you want notes to be set to perfect pitch, it’s sensible to quantize the pitch first, and then start editing vibrato, pitch drift, and formant shift, the idea being to handle the coarse changes before handling the finer edits.
Figure 7.27 Flex Pitch notes that have been quantized using the Set All to Perfect Pitch command in the Audio Track editor shortcut menu.

© Apple Inc.
The second option is to quantize pitches to scales using the Scale Quantize controls in the Audio Track editor Inspector, shown in Figure 7.28. There are two menus and one button for Scale Quantize operations. The first menu, labeled Off in Figure 7.28, offers all 12 keys and the Off setting. The second menu, labeled Major in Figure 7.28, offers 19 different scales that you can use to quantize the pitch of your audio.
Figure 7.28 The Scale Quantize controls in the Audio Track editor Inspector.
© Apple Inc.
To use these tools to quantize your pitches, follow these steps:
1. Select a key in the first menu.
2. Select a scale in the second menu.
3. Select any notes you wish to pitch quantize.
4. Click the Q button to apply the Scale Quantize settings to your selected notes. Figure 7.29 shows the notes from Figure 7.27 pitch-quantized to the key of G major.
Figure 7.29 The same notes shown in Figure 7.27 after using Scale Quantize to quantize their pitches to G major.

© Apple Inc.
You can compare the notes in Figures 7.27 and 7.29 with their pitch positions relative to the Audio Track editor keyboard. Note that all the notes in Figure 7.29 were selected to quantize them to G major after they had been set to perfect pitch. If you haven’t quantized the selected notes to perfect pitch, your notes will be quantized to the selected scale relative to their original pitches.
You can also use the Q button with Scale Quantize set to Off to perform a Set All to Perfect Pitch operation only on selected notes. If you find any of your Scale Quantize results to be less desirable than the original analyzed Flex Pitch notes, you can use the Set All to Original Pitch command in the Audio Track editor shortcut menu or use the Undo command (Command+Z). Remember, the Audio Track editor edits your audio completely nondestructively, so experiment freely!
I recommend using the Set All to Perfect Pitch command or a Scale Quantize operation along with your other edits before using the Create MIDI Track from Flex Pitch Data command for optimal results. This won’t necessarily prevent the need for further tweaks to the generated MIDI data, but as you’ll deduce from the following sections about splitting, joining, moving, resizing, and quantizing the timing of notes, once your audio has been perfectly edited, the resulting MIDI region will require much less editing.
SPLITTING AND JOINING NOTES
There may be times when the length of the Flex Pitch notes returned after analysis don’t meet your expectations or make editing difficult. Perhaps the note is too long for you to fix a small section of a note to your satisfaction, or two events were returned where you would like to have one. If you find that to be the case, the Scissors and Glue tools are exactly what you need.
Use the Scissors tool to create two notes from one note by clicking with the Scissors tool at the desired location. If you click and hold with the Scissors tool, a vertical line appears, allowing you to line up your edit along the Bar ruler or along an exact part of your waveform. You can create as many notes from a single note as you wish using the Scissors tool. Be aware that if you haven’t done any pitch editing, the new notes will be pitch shifted closer to their own new vibrato lines. The new notes will have their own hotspots for editing.
You can repair cuts you’ve made to notes or join analyzed notes together by selecting the notes you’d like to join and then clicking one of the selected notes with the Glue tool.
MOVING AND RESIZING NOTES
Moving and resizing notes not only gives you control over the size of the note itself, but it also performs some Flex Time–like expansion and compression at the same time. When you look at how Flex Pitch notes compare to Flex Time markers for the same bit of audio, you’ll notice that transients aren’t necessarily considered. The analyzed pitch is what’s important, not what transients exist within the notes. What this means is that you have access to time stretching and compression based on an entirely different process.
Think about Flex Pitch editing a vocal track. Flex Pitch analysis returns notes. Often, one word may be sung across multiple notes, and words with multiple syllables may not produce transients clearly enough for Flex Time to return meaningful results. Because Flex Pitch analysis produces results for all the sung notes, and notes within a word can be split if need be, these unique results compared to Flex Time markers give you a different way to achieve time compression or stretching. You can lengthen and shorten them, either on their own or in relation to adjacent notes, to achieve a greater level of control of the performance in time, not just in pitch.
In essence, moving and resizing notes achieve similar results. You can use the Hand tool to stretch or compress a note by dragging a note horizontally. Dragging to the left stretches the note, dragging to the right compresses it. There is one limitation: You can only move the note in relation to the right end of the note. The right end of the note is fundamentally locked in place. If there is a note to the right within the waveform of the note being moved, it will be stretched or compressed compared to the moved note. Figure 7.30 shows the same notes from Figure 7.29 with the second note moved so that it is stretched, leaving the first note compressed.
Figure 7.30 The second note has been moved using the Hand tool, stretching it and compressing the first note.

© Apple Inc.
Resizing a note is more flexible. You can resize either end of a note using the Resize cursor, which appears when you move the cursor to an end of a note. As with moving a note, resizing a note affects the adjacent note to the side you resize.
QUANTIZING THE TIMING OF NOTES
One of the coolest features of Flex Pitch editing in the Audio Track editor has nothing to do with pitch. After a monophonic audio file has been analyzed and Flex Pitch notes have been created for the audio, the resulting notes contain pitch and length data, but they also have position data. That the notes are displayed not only as elements of their parent waveform but also against the length of the Bar ruler reveals this. The location data, by extension, makes it easy for Logic to quantize your audio. The Audio Track editor facilitates this in an incredibly simple and elegant manner using the Time Quantize controls in the Inspector, shown in Figure 7.31.
Figure 7.31 The Time Quantize controls in the Audio Track editor Inspector.
© Apple Inc.
If the Time Quantize parameters look familiar, it’s because they function identically to the Quantize menu and Quantize Strength parameters in the region, covered in Chapter 6. The Quantize menu, labeled 1/16 note in Figure 7.31, has the same division options as the Time Quantize menu in the region. Likewise, the Strength slider has an identical purpose as the Strength setting does in the region, defining the extent to which notes are quantized exactly to the selected division setting in the Time Quantize menu. To quantize selected notes, simply set the quantize resolution in the Time Quantize parameters, adjust the Strength setting to taste, and click Q. Figure 7.32 shows notes shown quantized to 1/16 note resolution with a Strength setting of 100. You can see that they line up with the Bar ruler divisions at the top of the figure.
Figure 7.32 Use the Time Quantize controls in the Audio Track editor Inspector to quantize the timing of Flex Pitch notes.

© Apple Inc.
Hopefully now you can see the full scope of the power of Flex Pitch editing—and audio region editing in general—in the Audio Track editor. Not only can you fine-tune notes; edit their vibrato, gain, and formant shift; coarse-tune notes; quantize the pitch and time of notes; and time stretch and compress notes in the Audio Track editor, but you can also use it as a place to work with Flex Time and edit audio regions in exactly the same way as you would in the Tracks area, but in a much more focused environment. Now that you have a greater understanding of Logic’s nondestructive audio-editing capabilities, let’s take a look at the destructive audio editing section in Logic, the Audio File editor.
The Audio File Editor
Sometimes, resizing or editing audio regions won’t be enough; you’ll want to alter the audio data itself permanently. This is where the Audio File editor comes in. The Audio File editor operates on the actual data in the audio file. That means the Audio File editor’s edits are destructive. They forever alter the contents of the actual audio file, unlike edits to audio regions, which are nondestructive, meaning that the audio data itself is never touched. Figure 7.33 shows the Audio File editor window.
Figure 7.33 The Audio File editor window.
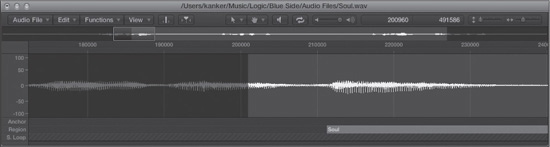
© Apple Inc.
Double-clicking an audio region in the Tracks area opens that region in the main window’s integrated audio editors. The Audio Track and Audio File editors open in the same pane in the main window; if the Audio Track editor is displayed, simply click the File tab to access the Audio File editor. When the Audio File editor is displayed, selecting an audio region in the Project Audio Browser opens that region in the Audio File editor. In either case, the region will be displayed inside the waveform overview and detailed waveform display. You can also launch the Audio File editor by choosing Window > Open Audio File editor, by using the key command Command+6, or by opening the integrated Audio File editor in the main window by pressing W. You can also drag the File tab in the integrated Audio File editor to open a separate Audio File editor window. As with the other windows, we’ll start with a discussion of the Audio File editor’s local menus.
Local Menus
The local menus provide file, editing, and processing commands specific to the Audio File editor. A description of the local menus follows.
THE AUDIO FILE MENU
This menu contains the file operations that are possible from the Audio File editor. Figure 7.34 shows the Audio File local menu of the Audio File editor.
Figure 7.34 The Audio File menu of the Audio File editor.
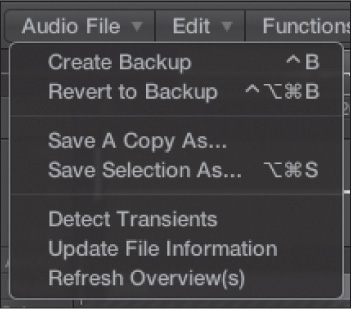
© Apple Inc.
An explanation of the commands follows:
![]() Create Backup: Because the actions that you make in the Audio File editor are destructive, you may want to make a backup of your file so that if you do something you don’t like, you still have your original audio. The key command for this is Control+B.
Create Backup: Because the actions that you make in the Audio File editor are destructive, you may want to make a backup of your file so that if you do something you don’t like, you still have your original audio. The key command for this is Control+B.
![]() Revert to Backup: If you’ve previously made a backup of your audio file, this command replaces your current processed and edited audio file with the backup. You can use this command if you’ve made a backup and are not happy with the changes you’ve made to your audio file. The key command for this is Control+Option+Command+B.
Revert to Backup: If you’ve previously made a backup of your audio file, this command replaces your current processed and edited audio file with the backup. You can use this command if you’ve made a backup and are not happy with the changes you’ve made to your audio file. The key command for this is Control+Option+Command+B.
![]() Save a Copy As: You can create a copy of an audio file using this command.
Save a Copy As: You can create a copy of an audio file using this command.
![]() Save Selection As: Using this command, you can save only the portion of your file that you have selected with your mouse. The key command for this is Option+Command+S.
Save Selection As: Using this command, you can save only the portion of your file that you have selected with your mouse. The key command for this is Option+Command+S.
![]() Detect Transients: This command detects transients in your audio file and marks them with transient markers, which can aid you in general editing but also gives you a very powerful tool for customizing the transients for flexing, deriving a groove template from your audio, and for use with the Convert Regions to New Sampler Instrument command. You’ll look into this in a little more detail in the section “Editing Transient Markers” later in this chapter.
Detect Transients: This command detects transients in your audio file and marks them with transient markers, which can aid you in general editing but also gives you a very powerful tool for customizing the transients for flexing, deriving a groove template from your audio, and for use with the Convert Regions to New Sampler Instrument command. You’ll look into this in a little more detail in the section “Editing Transient Markers” later in this chapter.
![]() Update File Information: This updates the information that Logic has stored for the file you are editing. Saving your project performs this updating, but you can use this command to update the file information without saving the project.
Update File Information: This updates the information that Logic has stored for the file you are editing. Saving your project performs this updating, but you can use this command to update the file information without saving the project.
![]() Refresh Overview(s): This command refreshes the waveform overview of the audio region you are editing in the Audio File editor.
Refresh Overview(s): This command refreshes the waveform overview of the audio region you are editing in the Audio File editor.
THE EDIT MENU
The Edit menu contains functions that involve the selection and manipulation of audio and audio regions. Figure 7.35 shows the local Edit menu of the Audio File editor.
Figure 7.35 The Edit menu of the Audio File editor.
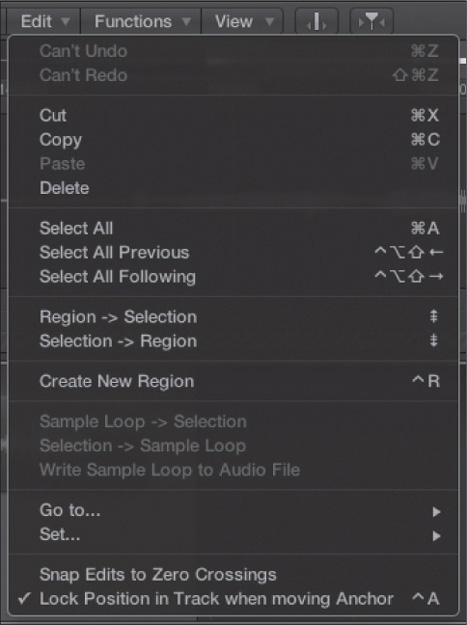
© Apple Inc.
Although the Audio File editor Edit menu has a number of familiar Edit menu commands, many of these commands function differently in the Audio File editor. Following are details about the commands in this menu:
![]() Undo: This command undoes the last action made to your audio in the Audio File editor. You can have as many levels of undo as you set in the Preferences > Audio > Audio File Editor tab. The key command for this is Command+Z.
Undo: This command undoes the last action made to your audio in the Audio File editor. You can have as many levels of undo as you set in the Preferences > Audio > Audio File Editor tab. The key command for this is Command+Z.
![]() Redo: This command will redo the last undone action in the Audio File editor. Note that the Audio File editor Undo and Redo functions are unique to the Audio File editor (meaning you can’t undo a main window action in the Audio File editor, whereas in a MIDI editor, for example, Undo will include windows outside the MIDI editor). The key command for this is Shift+Command+Z.
Redo: This command will redo the last undone action in the Audio File editor. Note that the Audio File editor Undo and Redo functions are unique to the Audio File editor (meaning you can’t undo a main window action in the Audio File editor, whereas in a MIDI editor, for example, Undo will include windows outside the MIDI editor). The key command for this is Shift+Command+Z.
![]() Cut: This command removes a selected area of audio and places it on the Clipboard. The cut selection can be pasted only in the Audio File editor. The key command for this is Command+X.
Cut: This command removes a selected area of audio and places it on the Clipboard. The cut selection can be pasted only in the Audio File editor. The key command for this is Command+X.
![]() Copy: This command copies a selected area of audio and places it on the Clipboard. The copied section can be pasted only in the Audio File editor. The key command for this is Command+C.
Copy: This command copies a selected area of audio and places it on the Clipboard. The copied section can be pasted only in the Audio File editor. The key command for this is Command+C.
![]() Paste: This command pastes audio from the Clipboard at the current locator position. Only audio that has been cut or copied from the Audio File editor may be pasted in the Audio File editor with the Paste command. The key command for this is Command+V.
Paste: This command pastes audio from the Clipboard at the current locator position. Only audio that has been cut or copied from the Audio File editor may be pasted in the Audio File editor with the Paste command. The key command for this is Command+V.
![]() Delete: This command removes the selected audio from your audio file.
Delete: This command removes the selected audio from your audio file.
![]() Select All: This command selects your entire audio file. The key command for this is Command+A.
Select All: This command selects your entire audio file. The key command for this is Command+A.
![]() Select All Previous: This command adds the area from the beginning of the audio file to the currently selected area. The key command for this is Control+Option+Shift+left arrow.
Select All Previous: This command adds the area from the beginning of the audio file to the currently selected area. The key command for this is Control+Option+Shift+left arrow.
![]() Select All Following: This command adds the area from the end of the audio file to the currently selected area. The key command for this is Control+Option+Shift+right arrow.
Select All Following: This command adds the area from the end of the audio file to the currently selected area. The key command for this is Control+Option+Shift+right arrow.
![]() Region -> Selection: This command selects the entire audio region that you are currently editing. The key command for this is Page Up.
Region -> Selection: This command selects the entire audio region that you are currently editing. The key command for this is Page Up.
![]() Selection -> Region: This command redefines the existing region boundaries to match the selection. The key command for this is Page Down.
Selection -> Region: This command redefines the existing region boundaries to match the selection. The key command for this is Page Down.
![]() Create New Region: This creates a new audio region from your current selection. The original audio region you are editing remains unchanged. The key command for this is Control+R.
Create New Region: This creates a new audio region from your current selection. The original audio region you are editing remains unchanged. The key command for this is Control+R.
![]() Sample Loop -> Selection: This function turns a loop you have loaded into the Audio File editor from the EXS24 Sampler into a normal audio selection that you can edit.
Sample Loop -> Selection: This function turns a loop you have loaded into the Audio File editor from the EXS24 Sampler into a normal audio selection that you can edit.
![]() Selection -> Sample Loop: This turns a selection of audio into a loop for use with Logic’s EXS24 Sampler.
Selection -> Sample Loop: This turns a selection of audio into a loop for use with Logic’s EXS24 Sampler.
![]() Write Sample Loop to Audio File. This command saves an audio file from the contents of an EXS24 loop.
Write Sample Loop to Audio File. This command saves an audio file from the contents of an EXS24 loop.
![]() Go To: The Go To submenu is covered in the following section, “The Go To Submenu.”
Go To: The Go To submenu is covered in the following section, “The Go To Submenu.”
![]() Set: The Set submenu will be covered in its own section, “The Set Submenu.”
Set: The Set submenu will be covered in its own section, “The Set Submenu.”
![]() Snap Edits to Zero Crossings: You learned about zero crossings earlier in this chapter. If you select this command, Logic always looks for the point at which the amplitude crosses the zero mark while you are editing. This is to ensure glitch-and click-free playback, but it might restrict you from making edits at the exact location you want.
Snap Edits to Zero Crossings: You learned about zero crossings earlier in this chapter. If you select this command, Logic always looks for the point at which the amplitude crosses the zero mark while you are editing. This is to ensure glitch-and click-free playback, but it might restrict you from making edits at the exact location you want.
![]() Lock Position in Track When Moving Anchor: With this command engaged, the left boundary of an audio region will stay fixed in its parent track regardless of any changes you make to an audio region anchor in the Audio File editor. If this is not engaged, anchor points will remain fixed in the audio regions in the Tracks area. The key command for this is Control+A.
Lock Position in Track When Moving Anchor: With this command engaged, the left boundary of an audio region will stay fixed in its parent track regardless of any changes you make to an audio region anchor in the Audio File editor. If this is not engaged, anchor points will remain fixed in the audio regions in the Tracks area. The key command for this is Control+A.
The Go To Submenu The Go To submenu gives you a variety of commands for quickly navigating to specific points in your audio file. Figure 7.36 shows the Go To submenu.
Figure 7.36 The Go To submenu.
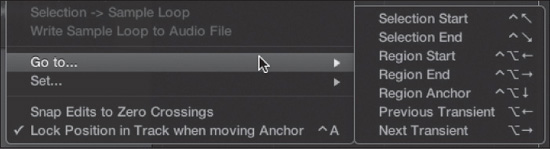
© Apple Inc.
The functions in the Go To submenu are as follows:
![]() Selection Start: This command moves the waveform display and the highlighted area in the waveform overview to the beginning of the selected area of the audio region. The key command for this is Fn+Control+left arrow.
Selection Start: This command moves the waveform display and the highlighted area in the waveform overview to the beginning of the selected area of the audio region. The key command for this is Fn+Control+left arrow.
![]() Selection End: This command moves the waveform display and the highlighted area in the waveform overview to the end of the selected area of the audio region. The key command for this is Fn+Control+right arrow.
Selection End: This command moves the waveform display and the highlighted area in the waveform overview to the end of the selected area of the audio region. The key command for this is Fn+Control+right arrow.
![]() Region Start: This command moves the waveform display and the highlighted area in the waveform overview to the beginning of the audio region. The key command for this is Control+Option+left arrow.
Region Start: This command moves the waveform display and the highlighted area in the waveform overview to the beginning of the audio region. The key command for this is Control+Option+left arrow.
![]() Region End: This command moves the waveform display and the highlighted area in the waveform overview to the end of the audio region. The key command for this is Control+Option+right arrow.
Region End: This command moves the waveform display and the highlighted area in the waveform overview to the end of the audio region. The key command for this is Control+Option+right arrow.
![]() Region Anchor: This command moves the waveform display and the highlighted area in the waveform overview to the anchor point of the audio region. The key command for this is Control+Option+down arrow.
Region Anchor: This command moves the waveform display and the highlighted area in the waveform overview to the anchor point of the audio region. The key command for this is Control+Option+down arrow.
![]() Previous Transient: This command moves the waveform display and the highlighted area in the waveform overview to the closest transient before the current selection. The key command for this is Option+left arrow.
Previous Transient: This command moves the waveform display and the highlighted area in the waveform overview to the closest transient before the current selection. The key command for this is Option+left arrow.
![]() Next Transient: This command moves the waveform display and the highlighted area in the waveform overview to the closest transient after the current selection. The key command for this is Option+right arrow.
Next Transient: This command moves the waveform display and the highlighted area in the waveform overview to the closest transient after the current selection. The key command for this is Option+right arrow.
The Set Submenu The Set submenu gives you a variety of commands for assigning start, end, and anchor points for your audio file. Figure 7.37 shows the Set submenu.
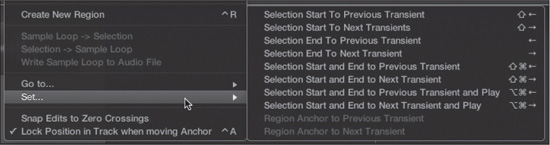
© Apple Inc.
The functions in the Set submenu are as follows:
![]() Selection Start to Previous Transient: This command moves the start of the selected area to the first transient immediately before the selected area. The key command for this is Shift+left arrow.
Selection Start to Previous Transient: This command moves the start of the selected area to the first transient immediately before the selected area. The key command for this is Shift+left arrow.
![]() Selection Start to Next Transients: This command moves the start of the selected area to the first transient immediately after the current start point of the selected area. The key command for this is Shift+right arrow.
Selection Start to Next Transients: This command moves the start of the selected area to the first transient immediately after the current start point of the selected area. The key command for this is Shift+right arrow.
![]() Selection End to Previous Transient: This command moves the end of the selected area to the first transient immediately before the current end of the selected area. The key command for this is left arrow.
Selection End to Previous Transient: This command moves the end of the selected area to the first transient immediately before the current end of the selected area. The key command for this is left arrow.
![]() Selection End to Next Transient: This command moves the end of the selected area to the first transient immediately after the selected area. The key command for this is right arrow.
Selection End to Next Transient: This command moves the end of the selected area to the first transient immediately after the selected area. The key command for this is right arrow.
![]() Selection Start and End to Previous Transient: This command moves the start and end points of the selected area to the first transients immediately before the current start and end points, respectively. The key command for this is Shift+Command+left arrow.
Selection Start and End to Previous Transient: This command moves the start and end points of the selected area to the first transients immediately before the current start and end points, respectively. The key command for this is Shift+Command+left arrow.
![]() Selection Start and End to Next Transient: This command moves the start and end points of the selected area to the first transients immediately after the current start and end points, respectively. The key command for this is Shift+Command+right arrow.
Selection Start and End to Next Transient: This command moves the start and end points of the selected area to the first transients immediately after the current start and end points, respectively. The key command for this is Shift+Command+right arrow.
![]() Selection Start and End to Previous Transient and Play: This command moves the start and end points of the selected area to the first transients immediately before the current start and end points, respectively, and then the selection is played. The key command for this is Option+Command+left arrow.
Selection Start and End to Previous Transient and Play: This command moves the start and end points of the selected area to the first transients immediately before the current start and end points, respectively, and then the selection is played. The key command for this is Option+Command+left arrow.
![]() Selection Start and End to Next Transient and Play: This command moves the start and end points of the selected area to the first transients immediately after the current start and end points, respectively, and then the selection is played. The key command for this is Option+Command+right arrow.
Selection Start and End to Next Transient and Play: This command moves the start and end points of the selected area to the first transients immediately after the current start and end points, respectively, and then the selection is played. The key command for this is Option+Command+right arrow.
![]() Region Anchor to Previous Transient: This command moves the region anchor to the transient immediately before its current position.
Region Anchor to Previous Transient: This command moves the region anchor to the transient immediately before its current position.
![]() Region Anchor to Next Transient: This command moves the region anchor to the transient immediately after its current position.
Region Anchor to Next Transient: This command moves the region anchor to the transient immediately after its current position.
THE FUNCTIONS MENU
The Functions menu consists of Audio File editor functions that process your audio in one way or another. These functions operate only on the area of your audio region that is selected. (If you want to process your entire file, choose Edit > Select All or use the key command Command+A first.) You can generally cancel any process in progress by pressing Command+. (period). Figure 7.38 shows the Functions menu of the Audio File editor.
Figure 7.38 The Functions menu of the Audio File editor.
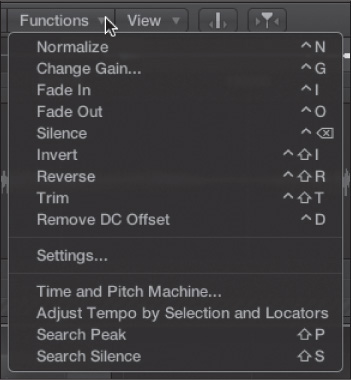
© Apple Inc.
These functions are as follows:
![]() Normalize: To normalize audio means to increase its level as much as possible without changing the dynamics or distorting the audio file. Logic does this by finding the loudest point in the currently selected audio, determining its distance from the maximum attainable level for the audio passage, and then increasing the audio for the entire selection by that amount. This way, the dynamics are preserved, the audio is not maximized to the point that it distorts, and the entire selection is louder by a specified amount. You can set the desired maximum level in the Settings dialog box. The key command for this is Control+N.
Normalize: To normalize audio means to increase its level as much as possible without changing the dynamics or distorting the audio file. Logic does this by finding the loudest point in the currently selected audio, determining its distance from the maximum attainable level for the audio passage, and then increasing the audio for the entire selection by that amount. This way, the dynamics are preserved, the audio is not maximized to the point that it distorts, and the entire selection is louder by a specified amount. You can set the desired maximum level in the Settings dialog box. The key command for this is Control+N.
NOTE: The Audio File editor Normalize feature is not the same as the Normalize feature in the Bounce dialog box. The Audio File editor Normalize feature operates directly on your audio file. That means it is destructive—it permanently changes the audio file—and it is limited to the bit depth (16- or 24-bit) of your audio file. The Normalize function in the Bounce dialog box is really a nondestructive, 64-bit, floating-point precision bitmapping function. It normalizes the audio in your bounced file but does not affect the audio in your project. Don’t mix up the two! See Chapter 11 for more information on the Normalize feature of the Bounce dialog box.
![]() Change Gain: This command raises or lowers the level of the selected audio by a specified amount. You can determine this amount in the dialog box that appears when you select this command. You can choose to change the gain by either inputting a percentage of the current level or entering absolute decibels. If you click Search Maximum, Logic finds the highest peak in the selection and calculates how much it can safely raise the gain (much as it does with the Normalize function). You can also view the results in absolute, which shows you an absolute value rather than a percentage. Keep in mind that if you raise the gain more than 100%, you will clip your file, producing a very nonmusical digital clipping. The key command for this is Control+G.
Change Gain: This command raises or lowers the level of the selected audio by a specified amount. You can determine this amount in the dialog box that appears when you select this command. You can choose to change the gain by either inputting a percentage of the current level or entering absolute decibels. If you click Search Maximum, Logic finds the highest peak in the selection and calculates how much it can safely raise the gain (much as it does with the Normalize function). You can also view the results in absolute, which shows you an absolute value rather than a percentage. Keep in mind that if you raise the gain more than 100%, you will clip your file, producing a very nonmusical digital clipping. The key command for this is Control+G.
![]() Fade In: This allows you to create a destructive fade-in at the front of your selection. This is in contrast to creating a fade-in in the Tracks area or Audio Track editor, which affects only how the audio region is played back and is nondestructive. You can adjust the curves of the fade-out in the Settings dialog box. The key command for this is Control+I.
Fade In: This allows you to create a destructive fade-in at the front of your selection. This is in contrast to creating a fade-in in the Tracks area or Audio Track editor, which affects only how the audio region is played back and is nondestructive. You can adjust the curves of the fade-out in the Settings dialog box. The key command for this is Control+I.
![]() Fade Out: With this command, you can create a destructive fade-out at the end of your selection. This contrasts with creating a fade-out in the Tracks area or Audio Track editor, which affects only how the audio region is played back and is nondestructive. You can adjust the curve of the fade-out in the Settings dialog box. The key command for this is Control+O.
Fade Out: With this command, you can create a destructive fade-out at the end of your selection. This contrasts with creating a fade-out in the Tracks area or Audio Track editor, which affects only how the audio region is played back and is nondestructive. You can adjust the curve of the fade-out in the Settings dialog box. The key command for this is Control+O.
![]() Silence: Silence zeroes the amplitude of all audio data inside your selection. The key command for this is Control+Delete.
Silence: Silence zeroes the amplitude of all audio data inside your selection. The key command for this is Control+Delete.
![]() Invert: This inverts the phase of the audio selection. In other words, what originally was the peak of the amplitude of the waveform becomes the bottom, and so on. This command doesn’t affect the sound, but it can help fix phase cancellation problems with your audio file that become apparent during mixing. The key command for this is Control+Shift+I.
Invert: This inverts the phase of the audio selection. In other words, what originally was the peak of the amplitude of the waveform becomes the bottom, and so on. This command doesn’t affect the sound, but it can help fix phase cancellation problems with your audio file that become apparent during mixing. The key command for this is Control+Shift+I.
![]() Reverse: This command reverses the audio in your selection. (In other words, the audio plays backward.) The key command for this is Control+Shift+R.
Reverse: This command reverses the audio in your selection. (In other words, the audio plays backward.) The key command for this is Control+Shift+R.
![]() Trim: Trim erases any part of the current region outside of the area you have selected. Make sure you don’t delete any areas that you’ll need for your song! If you try to trim away portions of a region you are using in the Tracks area, a warning screen will appear, asking you to confirm that you want to do so. The key command for this is Control+Shift+T.
Trim: Trim erases any part of the current region outside of the area you have selected. Make sure you don’t delete any areas that you’ll need for your song! If you try to trim away portions of a region you are using in the Tracks area, a warning screen will appear, asking you to confirm that you want to do so. The key command for this is Control+Shift+T.
![]() Remove DC Offset: When you are using lower-quality audio hardware, it is common for stray direct current (DC) to be layered over your audio signal. This causes the waveform to look like it’s not centered around the zero line, but is shifted vertically up or down. This can cause crackling and artifacts at the beginning and end of audio regions. This command removes the effect of DC and centers the audio around the zero bar. The key command for this is Control+D.
Remove DC Offset: When you are using lower-quality audio hardware, it is common for stray direct current (DC) to be layered over your audio signal. This causes the waveform to look like it’s not centered around the zero line, but is shifted vertically up or down. This can cause crackling and artifacts at the beginning and end of audio regions. This command removes the effect of DC and centers the audio around the zero bar. The key command for this is Control+D.
![]() Settings: Settings isn’t a function itself, but rather a command that opens a dialog box of parameters for other functions. Figure 7.39 shows the Function Settings dialog box. Here, you can set the maximum value to which you want the Normalize function to increase the selection’s level, either as a percentage of the maximum amplitude or in decibels. The dialog box also presents options to adjust the curves for the fade-in and fade-out. If you select their checkboxes and adjust the curve value from –100 to 100, the graphic display will change to illustrate the current shape of the curve.
Settings: Settings isn’t a function itself, but rather a command that opens a dialog box of parameters for other functions. Figure 7.39 shows the Function Settings dialog box. Here, you can set the maximum value to which you want the Normalize function to increase the selection’s level, either as a percentage of the maximum amplitude or in decibels. The dialog box also presents options to adjust the curves for the fade-in and fade-out. If you select their checkboxes and adjust the curve value from –100 to 100, the graphic display will change to illustrate the current shape of the curve.
Figure 7.39 The Function Settings dialog box offers settings for the normalize, fade-in, and fade-out functions.
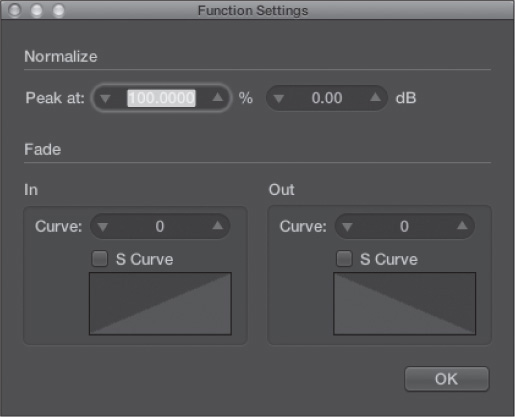
© Apple Inc.
![]() Time and Pitch Machine: The Time and Pitch Machine command enables you to independently adjust the tempo and pitch of your selected audio.
Time and Pitch Machine: The Time and Pitch Machine command enables you to independently adjust the tempo and pitch of your selected audio.
![]() Adjust Tempo by Selection and Locators: This command adjusts the tempo of your audio by stretching or compressing it to fit the length of the current locator positions while maintaining the integrity of its pitch. This is very similar to the global Edit > Tempo > Adjust Tempo Using Region Length and Locators command.
Adjust Tempo by Selection and Locators: This command adjusts the tempo of your audio by stretching or compressing it to fit the length of the current locator positions while maintaining the integrity of its pitch. This is very similar to the global Edit > Tempo > Adjust Tempo Using Region Length and Locators command.
![]() Search Peak: If you select this option, Logic will search the currently selected audio for the sample with the greatest amplitude value and will center the cursor in the waveform display around this point. The key command for this is Shift+P.
Search Peak: If you select this option, Logic will search the currently selected audio for the sample with the greatest amplitude value and will center the cursor in the waveform display around this point. The key command for this is Shift+P.
![]() Search Silence: With this option, Logic searches the currently selected audio for silence and places the cursor at the start of the first section of silence detected. The key command for this is Shift+S.
Search Silence: With this option, Logic searches the currently selected audio for silence and places the cursor at the start of the first section of silence detected. The key command for this is Shift+S.
THE VIEW MENU
The View menu offers you a number of options for changing the units of measurement on the waveform display and the way the audio wave itself is displayed. Figure 7.40 shows you the View menu of the Audio File editor.
Figure 7.40 The View menu of the Audio File editor.
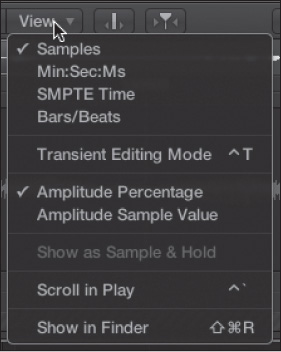
© Apple Inc.
The View menu options are as follows:
![]() Samples: This displays the actual number of the sample or the samples you are currently viewing on the Bar ruler.
Samples: This displays the actual number of the sample or the samples you are currently viewing on the Bar ruler.
![]() Min:Sec:Ms: This shows the elapsed time on the Bar ruler.
Min:Sec:Ms: This shows the elapsed time on the Bar ruler.
![]() SMPTE Time: This displays the SMPTE position on the Bar ruler.
SMPTE Time: This displays the SMPTE position on the Bar ruler.
![]() Bars/Beats: This shows the musical location of the audio on the Bar ruler.
Bars/Beats: This shows the musical location of the audio on the Bar ruler.
![]() Transient Editing Mode: This enables Transient Editing mode, allowing you to modify your audio file’s transients. The key command for this is Control+T.
Transient Editing Mode: This enables Transient Editing mode, allowing you to modify your audio file’s transients. The key command for this is Control+T.
![]() Amplitude Percentage: This specifies that the vertical axis of the waveform display measures the amplitude of the audio wave as a percentage of the maximum amplitude.
Amplitude Percentage: This specifies that the vertical axis of the waveform display measures the amplitude of the audio wave as a percentage of the maximum amplitude.
![]() Amplitude Sample Value: This specifies that the vertical axis of the waveform display measures the amplitude of the audio wave in sample units.
Amplitude Sample Value: This specifies that the vertical axis of the waveform display measures the amplitude of the audio wave in sample units.
![]() Show as Sample & Hold: This displays the actual data structure of the waveform (that is, the wave appears blocky, not rounded). This is very useful if you are using the Pencil tool to remove pops and clicks.
Show as Sample & Hold: This displays the actual data structure of the waveform (that is, the wave appears blocky, not rounded). This is very useful if you are using the Pencil tool to remove pops and clicks.
![]() Scroll in Play: This moves the audio file past a stationary playhead instead of moving the playhead across your audio file when you play the audio file. The key command for this is Control+`.
Scroll in Play: This moves the audio file past a stationary playhead instead of moving the playhead across your audio file when you play the audio file. The key command for this is Control+`.
![]() Show in Finder: This opens a Finder window displaying the location on your hard drive of the audio file being edited. The key command for this is Shift+Command+R.
Show in Finder: This opens a Finder window displaying the location on your hard drive of the audio file being edited. The key command for this is Shift+Command+R.
THE AUDIO FILE EDITOR TOOL MENU
The Audio File editor Tool menu contains the six tools available to you in the Audio File editor. Figure 7.41 shows the Audio File editor Tool menu.
Figure 7.41 The Audio File editor Tool menu.
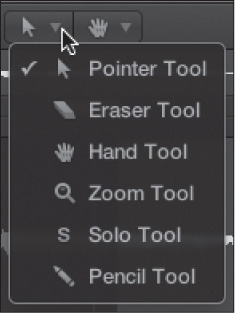
© Apple Inc.
A description of how each tool functions in the Audio File editor follows:
![]() Pointer: Drag the Pointer tool across the audio in the waveform display to select audio.
Pointer: Drag the Pointer tool across the audio in the waveform display to select audio.
![]() Eraser: The Eraser tool is used for removing transients from your audio file.
Eraser: The Eraser tool is used for removing transients from your audio file.
![]() Hand: The Hand tool allows you to reposition a selection box (made previously with the pointer) to the right or left.
Hand: The Hand tool allows you to reposition a selection box (made previously with the pointer) to the right or left.
![]() Zoom: Drag the selection “rubber band” over a portion of audio to increase the magnification of the selected audio down to the single-sample level. Double-click anywhere to return the selection to its original zoom resolution. If you have already used the zoom rectangles or key commands to zoom in on your audio, this tool has no further effect.
Zoom: Drag the selection “rubber band” over a portion of audio to increase the magnification of the selected audio down to the single-sample level. Double-click anywhere to return the selection to its original zoom resolution. If you have already used the zoom rectangles or key commands to zoom in on your audio, this tool has no further effect.
![]() Solo: This tool will scrub (play back slowly) a selection of audio as you drag across the file.
Solo: This tool will scrub (play back slowly) a selection of audio as you drag across the file.
![]() Pencil: This tool will allow you to redraw the audio waveform at high zoom levels. If you are not at a high zoom level, the Pencil tool can be used as a Zoom tool to increase the zoom setting by rubber-banding an area of the waveform. The main use for this tool is to smooth out sudden sharp peaks in your audio, as these usually represent pops or clicks. This tool works well in tandem with Show as Sample & Hold, which enables you to see exactly which samples are peaking. Be very careful when redrawing waveforms, however—if you don’t know what you are doing, you are likely to redraw a waveform incorrectly and compromise the sound of your audio.
Pencil: This tool will allow you to redraw the audio waveform at high zoom levels. If you are not at a high zoom level, the Pencil tool can be used as a Zoom tool to increase the zoom setting by rubber-banding an area of the waveform. The main use for this tool is to smooth out sudden sharp peaks in your audio, as these usually represent pops or clicks. This tool works well in tandem with Show as Sample & Hold, which enables you to see exactly which samples are peaking. Be very careful when redrawing waveforms, however—if you don’t know what you are doing, you are likely to redraw a waveform incorrectly and compromise the sound of your audio.
The Audio File Editor Mode Buttons
On either side of the Tool menus are the Audio File editor’s four mode buttons. In addition, two more buttons appear when you engage Transient Editing mode. Figure 7.42 shows the Audio File editor buttons.
Figure 7.42 The Audio File editor buttons.
© Apple Inc.
The functions of the Audio File editor buttons, going from left to right across the top of the Audio File editor, are as follows:
![]() Transient Editing Mode: The Transient Editing Mode button enables Transient Editing mode. This gives you the ability to increase and decrease the number of transients Logic uses when flexing audio and stretching Apple Loops. To do this, you use the minus (–) and plus (+) buttons that appear to the right of the Transient Editing Mode button when it’s engaged. It also gives you the ability to move transient markers.
Transient Editing Mode: The Transient Editing Mode button enables Transient Editing mode. This gives you the ability to increase and decrease the number of transients Logic uses when flexing audio and stretching Apple Loops. To do this, you use the minus (–) and plus (+) buttons that appear to the right of the Transient Editing Mode button when it’s engaged. It also gives you the ability to move transient markers.
![]() Catch Playhead Mode: The playhead button enables Catch Playhead mode. If this button is lit, the Audio File editor is linked to the current song position. If there is no audio, the playhead simply stops at the end of the audio region.
Catch Playhead Mode: The playhead button enables Catch Playhead mode. If this button is lit, the Audio File editor is linked to the current song position. If there is no audio, the playhead simply stops at the end of the audio region.
![]() Prelisten Mode: The speaker icon represents Prelisten mode. If the Cycle button is also enabled, Logic will continuously play back your selection from start to finish. If the Cycle button is not also enabled, it will play through your selected audio one time. If the Prelisten button is not enabled, your selection will not play back. You can right-click on the Prelisten button to open a shortcut menu that lets you select an auto-select channel strip or a prelisten channel strip as your ouptut options, like in the Project Audio Browser.
Prelisten Mode: The speaker icon represents Prelisten mode. If the Cycle button is also enabled, Logic will continuously play back your selection from start to finish. If the Cycle button is not also enabled, it will play through your selected audio one time. If the Prelisten button is not enabled, your selection will not play back. You can right-click on the Prelisten button to open a shortcut menu that lets you select an auto-select channel strip or a prelisten channel strip as your ouptut options, like in the Project Audio Browser.
![]() Cycle Mode: If you enable Cycle mode, playback of the selected portion of audio repeats continuously if the Prelisten button is also enabled.
Cycle Mode: If you enable Cycle mode, playback of the selected portion of audio repeats continuously if the Prelisten button is also enabled.
Volume Slider
The Volume slider, to the right of the Cycle button, controls the output volume of the prelisten channel strip.
The Audio File Editor Region Locators Display
To the left of the Volume slider is a position display that shows you the start point and length of the audio region in the Audio File editor using the unit display you selected in the local View menu. You obviously cannot place audio regions graphically using the Audio File editor, only numerically. When you open the Audio File editor from the Tracks area, the Bar ruler reflects the region’s location in the main window; when you open the Audio File editor from the Project Audio Browser, the Bar ruler instead measures from the start of the audio region.
The Waveform Display
The main feature of the Audio File editor is the waveform display (see Figure 7.43). This is the main window you use to edit your audio and transients in the Audio File editor. You can use the zoom controls in the upper-right of the Audio File editor, as well as key commands and the Zoom and Pencil tools, to zoom in and out of your audio and display and edit your audio region down to single-sample accuracy.
Figure 7.43 The waveform display of the Audio File editor. Notice the anchor point, the region area bar, and the sample loop bar of the audio region under the waveform.
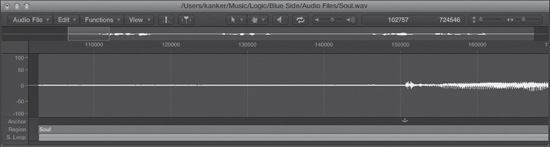
© Apple Inc.
Beneath your audio on the waveform display is the anchor point, represented by a graphic version of a ship’s anchor. The anchor point represents the first musically relevant point on which you want the audio region to pivot. It is the anchor point that gets placed at a specific time position when you drag regions around the Tracks area. For example, if your audio region begins with a fade-in, you might want to place the anchor point at the end of the fade-in so that the audio past the fade-in falls exactly on the bar as you move the region in the Tracks area. Notice in Figure 7.43 that the anchor point has been moved to the beginning of any meaningful audio in the region to allow it to lock to the grid in the Tracks area at exactly that point.
Beneath the anchor point is the region area, which displays a bar that runs the entire length of the selected region. You can change the start and end points of the region by dragging the ends of the region area bar with the Resize cursor, which automatically appears when you move the cursor over either end of the bar.
Under the region area is the Sample Loop (S. Loop) display. If you choose the Edit > Selection -> Sample Loop command, a sample loop bar similar to the region area bar will appear. You can change the length of the sample loop by dragging the ends of the sample loop bar in the same manner as the region area bar. When you select Edit > Write Sample Loop to Audio File, the sample loop information is added to the looped audio file’s file header. This information can be used by other applications capable of reading loop data in the file header and, more importantly to Logic, by the EXS24 sampler instrument.
As you use the Audio File editor to process or edit your audio, the waveform display reflects your changes. Use the Bar ruler to ensure that the audio region is still positioned where you want it to be as you process and edit your audio.
Editing Transient Markers
Among the many editing functions that can be performed in the Audio File editor, transient marker editing gives you some of the most varied possibilities. Any action that involves using transient markers can be affected by judicious use of transient marker editing. From altering Apple Loops, to defining a groove template, to improving the reliability of your transient markers for flexing, to creating musically, technically, or creatively meaningful selections in the Audio File editor, Transient Editing mode can open multiple paths for the manipulation of a single audio file.
Before you begin working with a file’s transient markers, choose the Detect Transients command from the Audio File menu. This will analyze your audio file for transients (which can take a while with longer audio files) and enable Transient Editing mode automatically. Figure 7.44 shows an audio file in the Audio File editor after running the Detect Transients command. Notice that the Transient Editing mode button has been selected, and that the minus and plus buttons are shown next to it.
Figure 7.44 An audio file in the Audio File editor with transients displayed after running the Detect Transients command.
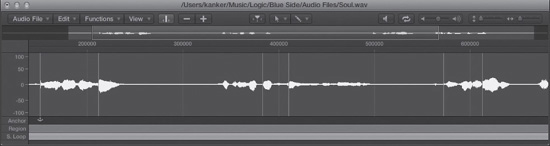
© Apple Inc.
Just looking at an audio file, or looking at it while it’s playing back, can give you a good indication of whether you need to increase or decrease the number of transient makers in your audio file. You can quickly increase or decrease the number of transients for your audio file by clicking the plus or minus button, respectively. Figure 7.45 shows the same audio file with fewer transients detected.
Figure 7.45 The same audio file as seen in Figure 7.44, but with fewer transients displayed.
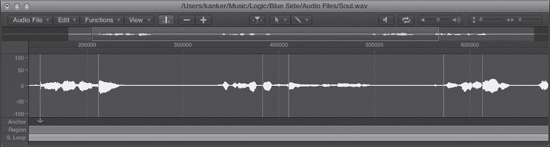
© Apple Inc.
You create new transient markers with the Pencil tool while in Transient Editing mode. You can delete transient markers by double-clicking them, by clicking them with the Eraser tool, or by selecting the area containing the transient markers you wish to remove and pressing Delete.
When you move the mouse pointer near a transient marker, the pointer changes to a Transient Editing tool, which allows you to grab and drag a transient to a new position. Figure 7.46 shows the Transient Editing tool moving the transient marker to its left. You can toggle Transient Editing mode by clicking the Transient Editing Mode button or by using the key command Control+T.
Figure 7.46 Use the Transient Editing tool to move transient markers.
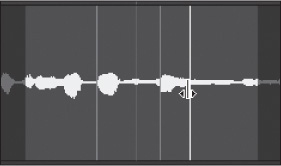
© Apple Inc.
Time and Pitch Machine
The Time and Pitch Machine can change the tempo of audio by stretching or compressing that audio. In fact, when you stretch and compress audio in the Tracks area without using any Flex tools, you are technically invoking the tempo-adjusting function of the Time and Pitch Machine. When you access the Time and Pitch Machine in the Audio File editor—by selecting the local Functions > Time and Pitch Machine command—you can also transpose audio up or down in pitch. You can link these functions together, or they can be independent. Figure 7.47 shows the Time and Pitch Machine dialog box.
Figure 7.47 You can access the Time and Pitch Machine via the Audio File editor.
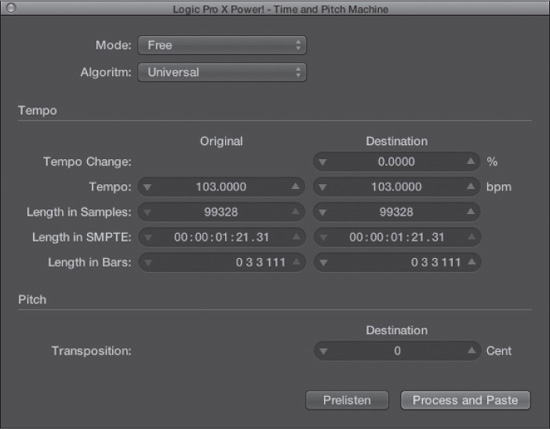
© Apple Inc.
Most parameters include a text field for the Original (current) value of the audio and a text field to input the desired new Destination value. If you know the specific numeric values you want to use for your parameters, you can enter those numbers in the text fields to the right. The parameters are as follows:
![]() Mode: The Mode menu in the Time and Pitch Machine contains two options: Free and Classic. Free mode indicates that tempo and pitch adjustments are independent. Classic mode means that pitch and tempo are adjusted together, like on an old tape machine, which gets higher in pitch when the tape speeds up and lower in pitch as the tape slows down.
Mode: The Mode menu in the Time and Pitch Machine contains two options: Free and Classic. Free mode indicates that tempo and pitch adjustments are independent. Classic mode means that pitch and tempo are adjusted together, like on an old tape machine, which gets higher in pitch when the tape speeds up and lower in pitch as the tape slows down.
![]() Algorithm: This selects which algorithm the Time and Pitch Machine uses to adjust the tempo of the audio. These options are already detailed in the section “The Time Machine Algorithm Submenu” in Chapter 6. Remember that any additional Time and Pitch Machine–compatible plug-ins you have installed will need to be 64-bit in order to integrate into Logic.
Algorithm: This selects which algorithm the Time and Pitch Machine uses to adjust the tempo of the audio. These options are already detailed in the section “The Time Machine Algorithm Submenu” in Chapter 6. Remember that any additional Time and Pitch Machine–compatible plug-ins you have installed will need to be 64-bit in order to integrate into Logic.
![]() Tempo Change: This parameter tells you how drastic your tempo change will be by giving you the percentage of change from the original tempo. For example, if the tempo of your original audio track was 120 BPM and you change the tempo to 240 BPM, the parameter will indicate a 100% tempo change. You cannot increase the Tempo Change parameter to more than 300% or reduce it by more than –75%.
Tempo Change: This parameter tells you how drastic your tempo change will be by giving you the percentage of change from the original tempo. For example, if the tempo of your original audio track was 120 BPM and you change the tempo to 240 BPM, the parameter will indicate a 100% tempo change. You cannot increase the Tempo Change parameter to more than 300% or reduce it by more than –75%.
![]() Tempo: The Original field lists the current tempo of your audio. You can input a new tempo in the Destination field. You can increase the tempo as much as 300% or decrease it as much as 75% depending on the algorithm used.
Tempo: The Original field lists the current tempo of your audio. You can input a new tempo in the Destination field. You can increase the tempo as much as 300% or decrease it as much as 75% depending on the algorithm used.
![]() Length in Samples: This is the exact length of the audio in samples. If you know exactly how many samples you want your processed audio to be, you can enter that value in the Destination field. You cannot adjust the number of samples so drastically that the result would be beyond the boundaries of the tempo restrictions mentioned for the Tempo setting.
Length in Samples: This is the exact length of the audio in samples. If you know exactly how many samples you want your processed audio to be, you can enter that value in the Destination field. You cannot adjust the number of samples so drastically that the result would be beyond the boundaries of the tempo restrictions mentioned for the Tempo setting.
![]() Length in SMPTE: The length of your audio in SMPTE frames is listed here. If you know exactly how many SMPTE frames you want your processed audio to be, you can enter that value in the Destination field. You cannot adjust the SMPTE frames beyond the boundaries of the Tempo setting’s restrictions.
Length in SMPTE: The length of your audio in SMPTE frames is listed here. If you know exactly how many SMPTE frames you want your processed audio to be, you can enter that value in the Destination field. You cannot adjust the SMPTE frames beyond the boundaries of the Tempo setting’s restrictions.
![]() Length in Bars: This is perhaps the most musically useful setting and the closest to the way the Time Machine is used in the Tracks area. Here you see how long your audio is in bars. You can enter the number of bars you want your audio to be in the Destination field. Again, you cannot adjust the bar length beyond the Tempo setting’s restrictions.
Length in Bars: This is perhaps the most musically useful setting and the closest to the way the Time Machine is used in the Tracks area. Here you see how long your audio is in bars. You can enter the number of bars you want your audio to be in the Destination field. Again, you cannot adjust the bar length beyond the Tempo setting’s restrictions.
![]() Transposition: Now you are getting into the transposition settings that affect pitch, not tempo. The Destination field allows you to enter the number of cents, or hundredths of a semitone, by which you want to adjust your audio. Positive numbers raise the pitch, whereas negative numbers reduce the pitch.
Transposition: Now you are getting into the transposition settings that affect pitch, not tempo. The Destination field allows you to enter the number of cents, or hundredths of a semitone, by which you want to adjust your audio. Positive numbers raise the pitch, whereas negative numbers reduce the pitch.
Because using the Time and Pitch Machine is destructive, Logic offers a Prelisten button to the left of the Process and Paste button. Prelisten gives you a sample of what your new audio will sound like before you commit to processing your audio and pasting the newly processed audio into your song.
NOTE: If you’re transitioning from an earlier version of Logic, you’re probably wondering what happened to the other Digital Factory options. Many of those options have been supplanted by newer and better methods of achieving the same results. For example, Audio to Score functions are handled by the Create MIDI Track from Flex Pitch Data command in the Audio Track editor, with universally better results. The same holds true for the Quantize Engine, which has been bested by the Time Quantize function in the Audio Track editor. To be honest, there is no need for the former Digital Factory options because the continued development of Logic has made them obsolete!
Setting Up Audio File Editor Undo Preferences
As you now see, the Audio File editor is a very powerful destructive audio editor. Because of this, you might be wondering what happens if you perform a process whose results are less than satisfactory, but you forgot to make a backup of your original audio file. Never fear! Not only does the Audio File editor have its own set of preferences that specifically deal with the facility and extent of the Undo command in the Audio File editor, but it also has its own Undo History that is separate from Logic’s global Undo History! Unfortunately, given the destructive nature of the Audio File editor’s processing, there is no way to open the Audio File editor’s Undo History. You can access the Audio File editor’s Undo Preferences by opening the Audio File editor tab of the Audio Preferences window, shown in Figure 7.48.
Figure 7.48 The Audio File Editor tab of the Audio Preferences window.
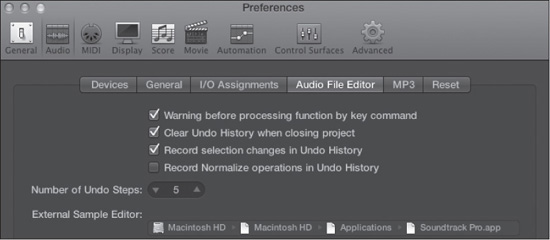
© Apple Inc.
The functions of the Audio File editor’s Undo Preferences are as follows:
![]() Warning Before Processing Function by Key Command: Selecting this option ensures that when you use a key command to process audio in the Audio File editor, a warning dialog box will open, asking you whether you are sure you want to process the selected audio.
Warning Before Processing Function by Key Command: Selecting this option ensures that when you use a key command to process audio in the Audio File editor, a warning dialog box will open, asking you whether you are sure you want to process the selected audio.
![]() Clear Undo History When Closing Project: With this option selected, the Audio File editor’s Undo History is automatically cleared when you quit Logic or close the current project.
Clear Undo History When Closing Project: With this option selected, the Audio File editor’s Undo History is automatically cleared when you quit Logic or close the current project.
![]() Record Selection Changes in Undo History: This option enables or disables the Audio File editor’s Undo capability for selection changes. It is best to leave this option selected.
Record Selection Changes in Undo History: This option enables or disables the Audio File editor’s Undo capability for selection changes. It is best to leave this option selected.
![]() Record Normalize Operations in Undo History: This option allows you to record normalize operations in the Undo History. Since normalization is typically the last process performed on an audio file, when you leave this selection unchecked, the Undo History is automatically deleted when you normalize an audio file. Just to be on the safe side, if this option is not selected, Logic will open a dialog box that asks whether you want to add the normalize process to the Undo History when you invoke the Normalize command.
Record Normalize Operations in Undo History: This option allows you to record normalize operations in the Undo History. Since normalization is typically the last process performed on an audio file, when you leave this selection unchecked, the Undo History is automatically deleted when you normalize an audio file. Just to be on the safe side, if this option is not selected, Logic will open a dialog box that asks whether you want to add the normalize process to the Undo History when you invoke the Normalize command.
![]() Number of Undo Steps: You can set the number of Undo steps that are stored for the Audio File editor in this field by clicking on the up and down arrows, by clicking on the number and scrolling with your mouse, or by double-clicking in the field and entering a number manually.
Number of Undo Steps: You can set the number of Undo steps that are stored for the Audio File editor in this field by clicking on the up and down arrows, by clicking on the number and scrolling with your mouse, or by double-clicking in the field and entering a number manually.
![]() External Sample Editor: The final option is for setting up an external sample editor to use for processing and editing your audio files, and it’s covered in the next section.
External Sample Editor: The final option is for setting up an external sample editor to use for processing and editing your audio files, and it’s covered in the next section.
Configuring Logic to Use an External Sample Editor
Although Logic’s Audio File editor is a great place to edit and process your audio files, you might be more comfortable performing those processes in another application. Logic makes this a piece of cake. To tell Logic which 64-bit application to use as an external sample editor, simply open the Audio File editor tab of the Audio Preferences window and click in the External Sample Editor field, shown in Figure 7.48. A file dialog box will open, allowing you to browse for your sample editor of choice.
Once you have selected an external sample editor, you can open audio regions from Logic in your external sample editor by pressing Shift+W. Your external sample editor will automatically launch and open with the selected audio region.
Audio Fades and Crossfades
There are three types of audio fades:
![]() Fade-ins, in which audio ramps up in volume from its beginning
Fade-ins, in which audio ramps up in volume from its beginning
![]() Fade-outs, in which audio ramps down in volume toward its end
Fade-outs, in which audio ramps down in volume toward its end
![]() Crossfades, in which two audio regions fade into each other. Often, fading is used as a creative effect, such as fading out a song over a 20-second coda, building in an effect, or crossfading between two songs. Sometimes, however, you will want to use fades as tools to cover up clicks at the beginning or end of audio regions or caused by overlapping audio regions. These fades, rather than being seconds long, are usually measured in milliseconds. For these micro-fades, Logic allows each audio region to have one fade-in and one fade-out or crossfade associated with it. When a fade is associated with an audio region, the length of the fade will appear in the Region Inspector and the fade will appear as a light shading on the region itself, as shown in Figure 7.49.
Crossfades, in which two audio regions fade into each other. Often, fading is used as a creative effect, such as fading out a song over a 20-second coda, building in an effect, or crossfading between two songs. Sometimes, however, you will want to use fades as tools to cover up clicks at the beginning or end of audio regions or caused by overlapping audio regions. These fades, rather than being seconds long, are usually measured in milliseconds. For these micro-fades, Logic allows each audio region to have one fade-in and one fade-out or crossfade associated with it. When a fade is associated with an audio region, the length of the fade will appear in the Region Inspector and the fade will appear as a light shading on the region itself, as shown in Figure 7.49.
Figure 7.49 The audio region here has a fade-out that is 300ms long, as you can see on the region and in the Region Inspector.

© Apple Inc.
Creating Audio Fades
There are three ways to create fades in the Tracks area:
![]() By typing fade settings into the Region Inspector
By typing fade settings into the Region Inspector
![]() By using the Fade tool in the Tracks area Tool menu
By using the Fade tool in the Tracks area Tool menu
TIP: Remember, as covered in Chapter 6, you can enable the Fade Tool Click Zones option in the Editing tab of the General Preferences window to have the Fade tool as a constantly available mode of the Pointer tool in the Tracks area.
![]() By setting the Tracks area Drag mode to X-Fade and overlapping two audio regions
By setting the Tracks area Drag mode to X-Fade and overlapping two audio regions
You can also create fades—in, out, and cross—in the Audio Track editor using the Fade tool.
Fade Files
Whenever you set up a fade, Logic creates a fade file. This is a very short temporary audio file that contains just the faded segment. This file is stored in a Fade Files folder in your Project folder. These files cannot be edited. Whenever you adjust a fade in the main window, the fade file will be re-created.
Adjusting Audio Fades
If you want your fade to have a curve (in other words, instead of a linear increase or decrease in volume, a logarithmic increase or decrease) you can adjust the Curve parameter from –99 to 99 to create various symmetrical curves in the Region Inspector. This number determines the strength and direction of the curve. You can also select whether the right region fade will be a fade-out, a linear crossfade (X), an equal power crossfade (EqP) for crossfading between two regions that are not phase coherent (for example, two completely different instruments), or an S-shaped crossfade (X S) for material that is hard to crossfade with a standard-shaped crossfade. Sticking with a straight crossfade (X) will work in most situations, and you should try the other curves only if you find yourself getting audio dropouts with a linear crossfade. The Time and Curve parameters for the X-Fade drag mode’s crossfades can be set in the General tab of the Audio Preferences dialog box.
You can also use the Fade tool to adjust the curve of a fade or crossfade. To do this, simply click and drag the fade using the Fade tool and to change its curve. You can also adjust the length of a fade by dragging the fade node at the end of a fade-in or the beginning of a fade-out. To delete a fade, just change the value of the Fade In or Fade Out parameter to 0 (zero) or Option-click on the fade with the Fade tool.
Apple Loops
If you are a new Logic user but are familiar with the Apple audio application GarageBand, you will already be familiar with Apple Loops. Users familiar with ACIDized WAV files will already have an idea of what Apple Loops can do, although Apple Loops go much further than ACIDized WAVs.
To put it simply, Apple Loops are special audio or MIDI regions that contain embedded pitch, tempo, channel strip, and even sample information.
Audio Apple Loops
Audio Apple Loops are AIFF or CAF audio files with specially embedded tempo and pitch information. Audio Apple Loops do the following:
![]() They automatically play at the current song tempo, regardless of the tempo at which the audio was originally recorded.
They automatically play at the current song tempo, regardless of the tempo at which the audio was originally recorded.
![]() They automatically adjust to the key of the current song, regardless of the key of the original performance.
They automatically adjust to the key of the current song, regardless of the key of the original performance.
Audio Apple Loops behave just like normal audio regions. You can loop them, resize them, cut them, and so on. They even appear in the Project Audio Browser like other audio regions. However, you cannot edit an Apple Loop in the Audio File editor because this would compromise the embedded information in the Apple Loop. If you want to edit an Apple Loop, make a copy of it that is a normal audio file and edit that. You can then convert the edited audio file into Apple Loop format. Creating Apple Loops is covered in the section “Creating Your Own Apple Loops” later in this chapter.
To add an audio Apple Loop to your Logic song, simply drag it into an audio track in the Tracks area as you would any other audio file. That’s it! You don’t need to set up anything—Logic automatically will handle it as an Apple Loop. You can even drag the audio Apple Loop to a blank area of the Tracks area, and a new track will be created.
Software Instrument Apple Loops
Software instrument Apple Loops are MIDI files with specially embedded information. In addition to their MIDI notes, software instrument Apple Loops include the following:
![]() Channel strip settings: This means the software instruments and effects that the loop uses will be instantly recalled as soon as you add the loop to a software instrument track. You can also drag a software instrument Apple Loop to a blank area of the Tracks area, and a new track will be created with the correct channel strip setting!
Channel strip settings: This means the software instruments and effects that the loop uses will be instantly recalled as soon as you add the loop to a software instrument track. You can also drag a software instrument Apple Loop to a blank area of the Tracks area, and a new track will be created with the correct channel strip setting!
![]() Sample information: If the software instrument Apple Loop uses a sample-based instrument, all the samples it uses will automatically load and be ready for use.
Sample information: If the software instrument Apple Loop uses a sample-based instrument, all the samples it uses will automatically load and be ready for use.
![]() Audio information: If you drag a software instrument Apple Loop to an audio track, it will behave exactly as an audio Apple Loop!
Audio information: If you drag a software instrument Apple Loop to an audio track, it will behave exactly as an audio Apple Loop!
To use a software instrument Apple Loop, just drag it into a MIDI, software instrument, or audio track. Remember that unlike audio Apple Loops, which work only on audio tracks, software instrument Apple Loops also contain an embedded audio version of the Apple Loop and can be used on either MIDI or audio tracks. If you drag a software instrument Apple Loop to a blank area of the Tracks area, it will create a software instrument track with the Apple Loop.
Software Instrument Apple Loops: Audio Versus Instrument Track? As mentioned, software instrument Apple Loops also include audio information and can be used on either audio or MIDI tracks. So when would you want to use a software instrument Apple Loop in an audio or MIDI track? There are advantages and disadvantages to both uses.
Software instrument Apple Loops allow you far more ability to adjust the software instrument, effects, and MIDI data in the loop itself. However, loading software instruments and effects can take up significant CPU power, depending on the individual plug-ins that are part of the loop.
Audio Apple Loops don’t let you fine-tune the notes inside the loops themselves or the recorded tone of the loop, since it’s a prerecorded audio performance that is looped. However, audio Apple Loops take up very little CPU, but they do take up RAM; the longer the loop, the more RAM they require.
If you don’t need to adjust the loop itself, and you want to conserve CPU, you might want to place your software instrument Apple Loop on an audio track. However, if you want to adjust the instrument used in the loop itself or to conserve RAM, you want to load your software instrument Apple Loop onto a software instrument track.
The Loop Browser
Because Apple Loops are a special kind of file, there is a special kind of window to organize them. Those of you who are used to Soundtrack or GarageBand are already familiar with the concept of the Loop Browser. Basically, the Loop Browser allows you to search and audition your loops by various criteria. The Loop Browser can index more than just Apple Loops; if you have many ACID loops, for example, you can use the Loop Browser to index them as well. The Loop Browser is available in the Media area of the main window and can also be accessed by using the key command O. Figure 7.50 shows the Loop Browser.
Figure 7.50 The Loop Browser allows you to search for your Apple Loops via category, text search, and more.
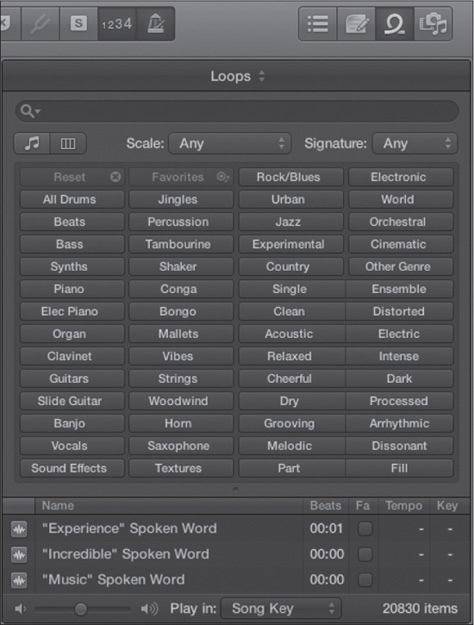
© Apple Inc.
Browsing Loops
Searching for loops couldn’t be simpler. You can either type in search words in the search field or click the category buttons to limit your search to various instrument and sound effects categories and genres (or both). If you prefer lists of categories instead of buttons, the buttons at the top left of the Loop Browser will switch you between button view and column view, shown in Figure 7.51. You can also select a scale and time signature of Apple Loop to look for and limit your search to specific Jam Packs in the Loops menu.
Figure 7.51 The Loop Browser in column view. Notice that there is also text in the text search field, further restricting the results.
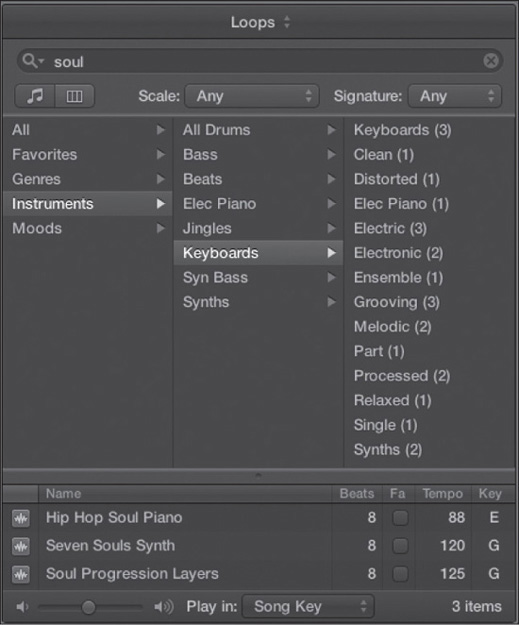
© Apple Inc.
The left column in the results window displays either a blue audio wave or a green MIDI note to indicate whether the loop is an audio Apple Loop or a software instrument Apple Loop. To the right of the loop name is the Beats column, telling you how many beats are in the Apple Loop. If you want to store a loop in your Favorites category in the Loop Browser, just select the checkbox in the Fa column. The Tempo column displays the original tempo of the loop. Finally, the Key column tells you the original key of the loop, if any.
Auditioning Loops
To audition a loop, simply click the name of the loop (or anywhere on the same line). The loop will play back using the prelisten channel strip (as discussed), with the volume determined by the Volume slider at the bottom of the Loop Browser and the key determined by the Play In menu. The Play In menu gives you the option to play the loop in the song key, the loop’s original key, or any other key you define. To stop the loop from playing, click the loop again.
Adding Loops to the Loop Browser
You add new loops to the Loop Browser by dragging them from the Finder to the results window of the Loop Browser. If you are adding a single Apple Loop, your Apple Loop will then be added to ~/Library/Audio/Apple Loops/User Loops/SingleFiles. If you add a folder with multiple Apple Loops, an alias of the folder will be added to ~/Library/Audio/Apple Loops/User Loops. If the Apple Loop is on a different drive, you will be asked whether you want to copy the loop to the Loop Browser’s default loop location or if you’d rather that the Loop Browser just index your loop in its current location. After you make your selection, your loop will be entered into the Loop Browser’s database and will be ready for use in Logic. If you are adding ACID loops, be sure to drag the entire folder (or CD) containing the ACID loops onto the Loop Browser because with Apple Loops, the folder name is used as the category name.
Adding Loops from the Loop Browser to Your Logic Song
If you find a loop you want to use in your song, simply drag it to an appropriate track in the Tracks area—an audio track for an audio Apple Loop (or another kind of loop, such as an ACID loop) or a software instrument Apple Loop, or a MIDI or audio instrument track for a software instrument Apple Loop. The loop will now be part of your song, and if it’s an audio loop, it will be added to the Project Audio Browser as well.
If, for example, you want a number of audio loops in your song, but not necessarily placed in the Tracks area yet, you can also add audio loops directly to your Project Audio Browser. Just drag the audio loops to the Project Audio Browser like you would any other audio file.
Creating Your Own Apple Loops
At this point, you may be very excited by the potential of Apple Loops. It won’t be long before you’ll want to make your own Apple Loops. In Logic Pro X, you can create audio and software instrument Apple Loops quickly and easily.
Creating Apple Loops in Logic
In the main window, select the audio or software instrument region that you want to convert into an Apple Loop. Next, select Functions > Open in Apple Loops Utility. You can also drag an audio or software instrument region to the Loop Browser and drop it. Either action opens the dialog box shown in Figure 7.52.
Figure 7.52 The Add Region to Apple Loops Library dialog box. You can use the options in this dialog box to name, tag, and otherwise define properties of your Apple Loop.
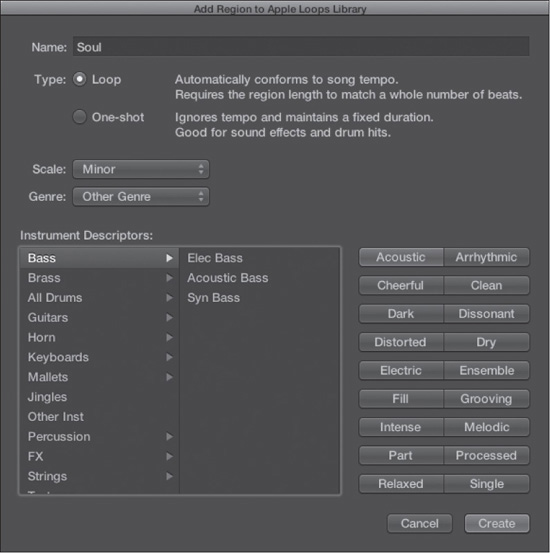
© Apple Inc.
The Add Region to Apple Loops Library dialog box allows you to tag your Apple Loop with the following information:
![]() Name: You can name your Apple Loop in this field.
Name: You can name your Apple Loop in this field.
![]() Type: The Type options define whether the Apple Loop will follow the tempo or key of any project it is used in (Loop) or play for its normal duration and pitch regardless of tempo or transposition (One-Shot). If you are trying to convert an audio region that is not an exact number of bars in length, then One-Shot will automatically be selected. If you want to use the audio region as a loop-type Apple Loop, then you need to process it in the Apple Loops Utility.
Type: The Type options define whether the Apple Loop will follow the tempo or key of any project it is used in (Loop) or play for its normal duration and pitch regardless of tempo or transposition (One-Shot). If you are trying to convert an audio region that is not an exact number of bars in length, then One-Shot will automatically be selected. If you want to use the audio region as a loop-type Apple Loop, then you need to process it in the Apple Loops Utility.
![]() Scale: This menu allows you to define the tonality of your Apple Loop.
Scale: This menu allows you to define the tonality of your Apple Loop.
![]() Genre: This menu allows you to define a genre for your Apple Loop.
Genre: This menu allows you to define a genre for your Apple Loop.
![]() Instrument Descriptors: This consists of a list area, which allows you to define an instrument type for your Apple Loop, and a button area, which allows you to add other descriptive tags to your Apple Loop. In the list area, the list on the left allows you to define a general instrument family for your Apple Loop. Most of the general instrument families have a secondary list that appears in the list on the right when you select a general instrument family. This secondary list allows you to define a more specific instrument type. For example, in Figure 7.52, Bass is selected in the general instrument list on the left, and the list on the right contains three more specific options from which you can select: Elec Bass, Acoustic Bass, and Syn Bass. In the button area, you can add up to nine of the descriptors to your Apple Loop. You can select only one descriptor from each horizontal pair of buttons, so if you chose Single from the first row, clicking on Ensemble would automatically deselect Single.
Instrument Descriptors: This consists of a list area, which allows you to define an instrument type for your Apple Loop, and a button area, which allows you to add other descriptive tags to your Apple Loop. In the list area, the list on the left allows you to define a general instrument family for your Apple Loop. Most of the general instrument families have a secondary list that appears in the list on the right when you select a general instrument family. This secondary list allows you to define a more specific instrument type. For example, in Figure 7.52, Bass is selected in the general instrument list on the left, and the list on the right contains three more specific options from which you can select: Elec Bass, Acoustic Bass, and Syn Bass. In the button area, you can add up to nine of the descriptors to your Apple Loop. You can select only one descriptor from each horizontal pair of buttons, so if you chose Single from the first row, clicking on Ensemble would automatically deselect Single.
When you are finished tagging your Apple Loop, click the Create button. Your new Apple Loop will automatically be added to the Loop Browser.
NOTE: When you make your own custom Apple Loop using the Open in Apple Loops Utility command, it uses the currently detected and edited transients from the Audio File editor to determine where to stretch your loop. So if you want to adjust the “stretch points” of your Apple Loop, you can use Transient Editing mode as described earlier to set and adjust the transients. If you create an Apple Loop without adjusting the transients, Logic simply creates its own grid based on the project’s beat divisions.
Adding ACID Loops to the Loop Browser
ACID loops are audio loops that are designed to work in Sony Creative Software’s ACID programs. ACID Loops are similar to Apple Loops in that they are designed to automatically adjust to the tempo and key of a project in an ACID program. They are in WAV format, unlike Apple Loops.
Suppose you have a bunch of ACID loops, but you want to find some way to integrate them into Logic. You can add the ACID loops to the Loop Browser; this allows you to manage all your loop libraries in one location. Because ACID loops aren’t embedded with tags like Apple Loops are, you can’t import ACID loops without the context of their folder structure. So, if you want to add ACID loops to the Loop Browser, simply drag the highest-level folder in your ACID loops’ folder structure into the Loop Browser. You can now access your ACID loops in the Loop Browser.
Using ReCycle Files in Logic
ReCycle is a file format originally designed to work in Propellerhead Software’s Reason program. A file that is in ReCycle format contains an audio file that has been sliced into smaller pieces to allow the file to be played back at different tempos with little degradation in sound quality.
Importing ReCycle Files into Logic
If you have some ReCycle files you’d like to incorporate into your Logic project, Logic offers you a variety of options regarding how the ReCycle file is handled. First, you need to import a ReCycle file by selecting File > Import Audio File, by pressing Shift+Command+I, or by right-clicking on an audio track in the main window and choosing Add Audio File from the menu that appears. Logic Pro can import ReCycle files with an .ryc, .rex, or .rx2 suffix. When you import a ReCycle file, the ReCycle File Import dialog box shown in Figure 7.53 opens.
Figure 7.53 The ReCycle File Import dialog box.
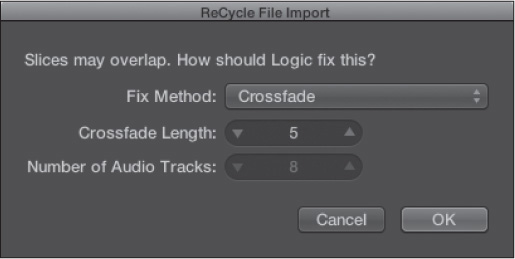
© Apple Inc.
Because the ReCycle file probably will not match your project tempo, there is a possibility that the slices could overlap each other. Logic allows you to define how it handles your ReCycle file in the ReCycle File Import dialog box. The options in the Fix Method menu determine how Logic handles the imported ReCycle file. The different Fix Method menu options and their functions are as follows:
![]() Don’t Fix: This option imports the files as they are, without performing any extra processing. If you import your ReCycle file using this option, the slices may overlap.
Don’t Fix: This option imports the files as they are, without performing any extra processing. If you import your ReCycle file using this option, the slices may overlap.
![]() Crossfade: If you select this option, Logic adds all the slices to the same audio track and automatically crossfades the slices per the Crossfade Length setting. The Crossfade Length setting is in milliseconds.
Crossfade: If you select this option, Logic adds all the slices to the same audio track and automatically crossfades the slices per the Crossfade Length setting. The Crossfade Length setting is in milliseconds.
![]() Add Tracks: If you select the Add Tracks option, Logic will distribute the slices onto the original audio track, plus any additional tracks as defined in the Number of Audio Tracks field.
Add Tracks: If you select the Add Tracks option, Logic will distribute the slices onto the original audio track, plus any additional tracks as defined in the Number of Audio Tracks field.
![]() Render into Single File: This option renders the ReCycle file into a single audio file per the current project tempo.
Render into Single File: This option renders the ReCycle file into a single audio file per the current project tempo.
![]() Render into Apple Loop: Selecting this option imports the ReCycle file as an Apple Loop. If you import the ReCycle file using the Don’t Fix, Crossfade, or Add Tracks option, then Logic will create a ReCycle folder in the Tracks area on the selected track. You can then open the folder and manipulate the individual slices as audio regions.
Render into Apple Loop: Selecting this option imports the ReCycle file as an Apple Loop. If you import the ReCycle file using the Don’t Fix, Crossfade, or Add Tracks option, then Logic will create a ReCycle folder in the Tracks area on the selected track. You can then open the folder and manipulate the individual slices as audio regions.
Converting ReCycle Files into Apple Loops
As you know, you can import ReCycle files into Logic and have them converted into Apple Loops in the process. You can also use the All Files Browser to convert ReCycle files into Apple Loops. To convert ReCycle files into Apple Loops in the Browser, you need to navigate to the folder containing your ReCycle files in the All Files Browser. Next, select Convert ReCycle Files to Apple Loops from the Action menu at the bottom of the All Files Browser, as shown in Figure 7.54. After you select this command, a file browser dialog box appears, asking you to choose which folder to put your new Apple Loop(s) in.
Figure 7.54 The Action menu in the All Files Browser. Selecting Convert ReCycle Files to Apple Loops allows you to convert ReCycle files to Apple Loops in the All Files Browser.
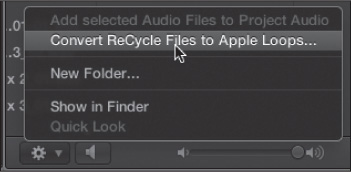
© Apple Inc.
Now that you’ve explored how to work with Apple Loops and audio data inside audio regions, the next chapter will look at working with the MIDI data inside MIDI regions.