
9 Working with Software Instruments
WITHOUT A DOUBT, one of the most exciting developments in the world of computer music is the software synthesizer. Knowing a bit about the development of software synthesis will help you understand the philosophy, uses, and limitations of software instruments, so the next few paragraphs will explain how software instruments came to be and what they are.
From the late 1960s through the 1980s, synthesizers were electronic devices that used physical oscillators and filters to make sound. These devices sounded spectacular (at least to synthesizer enthusiasts!) but were incredibly bulky and expensive. Starting at the end of the 1970s and into the 1980s, the first steps in digital synthesizers were being made—in effect, a dedicated computer chip that had specially written software to control sound production, including the development of “virtual” oscillators and filters. Digital synthesizers took over in the 1980s and 1990s, and even though these synthesizers were housed in rackmount boxes or in keyboards, it was in fact the software that was doing the synthesis.
With the rise of home computers in the 1980s and 1990s, programmers began to experiment with writing programs that used the built-in sound potential of the computer for making music. Although fun and innovative, these initial forays into desktop software synthesis were limited by the primitive sound-delivery components, CPU power, and memory. As the 1990s progressed, however, computers became more powerful and more sophisticated. With digital signal processing (DSP), programmers began to bring their understanding of programming hardware digital synthesizers to bear in the desktop computer world. Some of the standalone software synthesizers developed in these days, while rudimentary, were orders of magnitude better than anything previously available. In the late 1990s, Steinberg blew the computer-music world off its collective feet when the second version of its audio plug-in format, Virtual Studio Technology (VST), allowed for not only audio processing plug-ins, but also synthesizer plug-ins. These were small pieces of code that “plugged in” to the host audio sequencer, accepted MIDI data, and translated that MIDI data into sound. All this happened just like with any hardware synthesizer, but completely inside the computer, with no cabling required, with sample-accurate timing, and with total integration into your software mixing environment. The computer-music world has never been the same.
As time passes, software synthesizers keep getting better and better, reaching the quality of hardware synthesizers and in many cases surpassing it in terms of ease of use, integration into computer recording environments, and their ability to draw on the vast amount of processing power in modern computers. There is a downside to all of this, however: The more processing we ask our computers to do, the sooner they run out of power for other things. For example, suppose that simply playing back, editing, and mixing your 32-track audio and MIDI project required 30 percent of your available CPU power. Now suppose that you wanted to add your favorite software synthesizer plug-in, which requires 25 percent of your available CPU by itself. As you can see, your computer could comfortably handle only two such processor-intensive software synthesizers with your project.
Logic is very efficient with CPU resources and offers the Freeze and Bounce in Place functions described in Chapter 6, “The Logic Pro Main Window,” to help manage CPU resources even further. This enables you to get more power out of your computer than ever before. But, as you can see, although software synthesizers are a spectacular new development in the computer-music world, they require some compromises and, occasionally, careful resource management.
Logic and Software Instruments
Emagic embraced the idea of software synthesizers (softsynths) very early. In fact, Emagic’s release of its ES1 synthesizer and EXS24 24-bit software sampler represented two of the very first integrated synthesizers available for any sequencer. Unlike VST plug-ins, Logic’s own softsynths are not additional programs that can be integrated into Logic. Rather, Logic’s software instruments are actual extensions of the main Logic application and are already 100-percent integrated into the application. In addition to offering Logic’s own software instruments, Logic can also accept third-party 64-bit softsynths compatible with Apple’s Audio Units format. These plug-ins are called components on your hard drive because Audio Units are technically a “component” of the audio architecture of the Macintosh OS X operating system.
Although incorporating softsynths is typical in the modern DAW, the software instrument channel strip object (the Environment’s extension of the software instrument) sets Logic apart. Not only does it allow you to insert a software instrument and enter MIDI data onto its associated Tracks area track, producing audio from the software instrument, but it also allows you to apply any of the large array of MIDI tools in the Environment to your softsynths and to insert MIDI and audio effects in the channel strip to enhance or affect the softsynth’s output.
NOTE: For a complete guide and “master class” tutorial on how to use Logic Pro’s many excellent built-in synthesizers, pick up Using Logic Pro’s Synthesizers by Kevin Anker (Course Technology PTR, 2012).
Accessing Logic Software Instruments
Logic’s own software instruments don’t need any special installation; they are part of the Logic code itself. This means there’s no procedure necessary to install them; your installation of Logic includes all of them. Be aware, though, that—like Apple Loops, Space Designer, and Drummer—EXS24 has a lot of additional content available for download that you very well may want to install by opening the Logic Pro X menu and choosing the Download Additional Content command.
Remember, when you create a new software instrument track, if you have Open Library checked in the New Tracks dialog box, a default software instrument channel strip will be created that includes the Vintage Electric Piano instrument. If you want to start a software instrument track from scratch, deselect the Open Library option and you’ll get a new, empty software instrument channel strip.
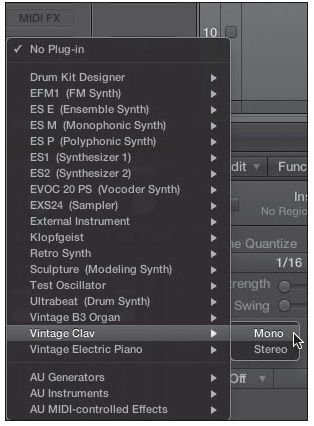
To instantiate any of Logic’s softsynths into an empty software instrument channel, simply click the Instrument slot of the channel strip. A menu appears, allowing you to select the Logic instrument you want from its submenu. Each submenu lists the available channel format options for the instrument, such as Mono, Stereo, Multi-Output, and 5.1 (surround). Simply select the Logic instrument in the format you want to use, and it will be loaded into the software instrument channel strip. The channel strip will automatically be configured to the correct format. Figure 9.1 shows Logic’s Vintage Clav being instantiated into a software instrument channel strip in the main window.
Figure 9.1 This main window channel strip for a software instrument track shows Logic’s Vintage Clav softsynth being selected from the Instrument menu.
© Apple Inc.
The selected software instrument automatically opens its graphic editor when you instantiate it, giving you full access to all the parameters and functions of the instrument. Figure 9.2 shows the graphic editor of Logic’s ES1 software instrument and its parent channel strip.
Figure 9.2 A software instrument channel strip with Logic’s built-in ES1 softsynth instantiated. If you double-click on the Instrument slot displaying the name of the instrument, you launch the graphic editor for that instrument.

© Apple Inc.
Using the Instrument Slot Buttons
After you have a software instrument instantiated on your channel strip, the Instrument button gains three functions:
![]() You can turn the instrument on and off using a power button on the left end of the Instrument slot.
You can turn the instrument on and off using a power button on the left end of the Instrument slot.
![]() If you close the editor and want to access it again, you can click on the middle of the Instrument slot of the software instrument, which shows two sliders when you hover the cursor over it. The softsynth’s graphic editor will reopen.
If you close the editor and want to access it again, you can click on the middle of the Instrument slot of the software instrument, which shows two sliders when you hover the cursor over it. The softsynth’s graphic editor will reopen.
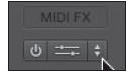
![]() If you want to change the instrument, you can access the Instruments menu on the right end of the Instrument slot by clicking on the arrows. Figure 9.3 shows these buttons in the Instrument slot.
If you want to change the instrument, you can access the Instruments menu on the right end of the Instrument slot by clicking on the arrows. Figure 9.3 shows these buttons in the Instrument slot.
Figure 9.3 After an instrument is loaded on a software instrument channel strip, the Instrument slot offers three buttons allowing you to turn the instrument on and off, open or close the graphic editor, or browse the instrument menu for another instrument.
© Apple Inc.
Loading Instruments and Settings Using the Library
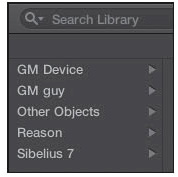
You can use the Library in the main window to select and load a setting for the currently selected software instrument track by browsing through the available Library options or by using the Search Library function. In the process of selecting a setting, you can even switch the instrument and effects used by the selected software instrument track—for example, selecting a setting in the Clav directory when the current software instrument is the Vintage B3 Organ.
Installing and Accessing Non-Logic Software Instruments
You need to install any third-party 64-bit software instruments into either the local (system-wide) or user (yours specifically) Components folder of your Macintosh. The exact method of installation depends on whether the developer included an installer application that automatically places files where they need to go or whether you need to manually move the plug-in file, with the extension .component, to where it belongs.
If you have to install a plug-in manually, the local Components folder resides at/Library/Audio/Plug-ins/Components, and the user Components folder is at ~/Library/Audio/Plug-ins/Components. It shouldn’t make a difference which location you choose or whether your components are split among both Components folders. Logic sees all Audio Unit plug-ins in both folders.
You instantiate third-party softsynths into software instrument channel strips using the same procedure as with Logic’s softsynths, except that you navigate the AU Instruments portion of the Instrument menu. The AU Instruments menu contains additional submenus that divide software instruments into groups based on the manufacturer of the instrument. Figure 9.4 shows the Zebra2 software synthesizer by u-he being selected.
Figure 9.4 A third-party synthesizer—in this case, Zebra2 by u-he—is being instantiated on this software instrument channel strip.
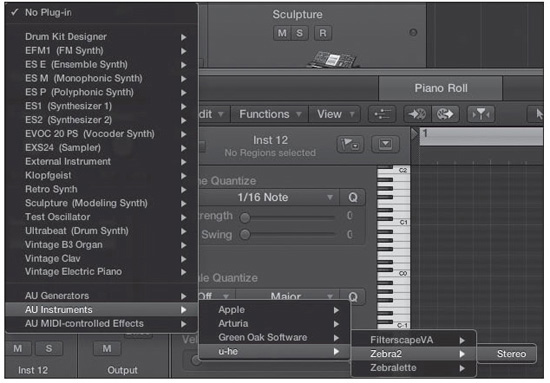
© Apple Inc.
Just as with the Logic softsynths, the Instrument slot gives you access to the three buttons—power, graphic editor launcher, and Instrument menu—once a plug-in is instantiated.
Method Tip: Using the External Instrument to Connect MIDI Synthesizers: Considering how many software instruments and effects Logic comes with, it is impossible for this book to go into them all. However, one of Logic’s software instruments is so special that it warrants going over. And it’s not even a true software instrument, in that it makes no sound itself.
Many times, you might want to send MIDI performances to an external MIDI device, such as a MIDI sound module or a MIDI synthesizer, and then send the stereo audio from your MIDI hardware back into the Logic Mixer to be processed and summed with all your other tracks. This used to take a fair amount of preparation. You needed to create an instrument or multi-instrument object for your MIDI hardware device in the Environment. This object would then need to have a track created for it in the Arrange window in order for Logic to record MIDI from and send MIDI to the device. Then you needed to configure audio channels for the audio outputs of your MIDI device.
The External Instrument plug-in is designed expressly for this situation. You still need to have created an instrument, multi-instrument, or mapped-instrument track for your MIDI device. Select either a mono or a stereo external instrument in a software instrument channel strip’s Instrument slot. The plug-in editor gives you only a few options. First, set its MIDI channel to your instrument, multi-instrument, or mapped-instrument’s MIDI channel. Then set its input to the input(s) on your audio interface into which you plugged your MIDI hardware device and adjust the input volume.
That’s it! You now have a single track that both sends and receives information from your hardware MIDI device. Keep in mind that you can use only one (mono) or two (stereo) outputs of your MIDI hardware with this instrument. There is not a multichannel option.
Plug-in Window Controls
Software instruments and audio effects (which are discussed in Chapter 11, “Mixing in Logic”) use the same basic form of plug-in window. Each plug-in window features Link, Bypass, Compare, Copy, and Paste buttons, two arrow buttons, and either two or three pull-down menus, as shown in Figure 9.5.
Figure 9.5 The two varieties of controls you’ll find on software instrument plug-in windows. They are identical except for the number of pull-down menus. Software instrument windows (left) typically have two menus; some software instruments (right) have side chains, which gives them three menus, with the Side Chain menu offset from the others.
© Apple Inc.
The elements of the plug-in window in which your software instrument will open are described in the following sections.
Plug-in Window Buttons
There are seven buttons at the top of the plug-in window. From left to right they are as follows:
![]() Power: The power button turns the plug-in on and off. This has the same effect as using the power button or Option-clicking in the plug-in’s Instrument slot in the channel strip in which the plug-in is instantiated.
Power: The power button turns the plug-in on and off. This has the same effect as using the power button or Option-clicking in the plug-in’s Instrument slot in the channel strip in which the plug-in is instantiated.
![]() Next Setting and Previous Setting: These are the two arrow buttons, which allow you to select the next or previous preset.
Next Setting and Previous Setting: These are the two arrow buttons, which allow you to select the next or previous preset.
![]() Compare: The Compare button allows you compare any changes you have made to a plug-in’s settings to the last saved setting.
Compare: The Compare button allows you compare any changes you have made to a plug-in’s settings to the last saved setting.
![]() Copy: Use this button to copy a plug-in’s setting.
Copy: Use this button to copy a plug-in’s setting.
![]() Paste: Use this button to paste a copied plug-in setting.
Paste: Use this button to paste a copied plug-in setting.
![]() Link: This button, at the upper-right of the plug-in window, looks like two chain links. By default, the Link button is disengaged, so multiple plug-in windows can be on the screen simultaneously. If the Link button is engaged, only a single plug-in window at a time is allowed onscreen. This is useful if you have a limited amount of screen space. You can also open a number of windows with the Link button disengaged and then engage the Link button on one of the open plug-in windows so that all subsequent plug-ins will appear in this window.
Link: This button, at the upper-right of the plug-in window, looks like two chain links. By default, the Link button is disengaged, so multiple plug-in windows can be on the screen simultaneously. If the Link button is engaged, only a single plug-in window at a time is allowed onscreen. This is useful if you have a limited amount of screen space. You can also open a number of windows with the Link button disengaged and then engage the Link button on one of the open plug-in windows so that all subsequent plug-ins will appear in this window.
Plug-in Window Menus
The plug-in window contains either two or three menus in its top bar, depending on the capabilities of the plug-in.
![]() View menu: This menu always contains these two options: Editor, which offers the standard graphic editor view of plug-ins, and Control, which simply lists the parameters of the synth and offers a slider with number field or a menu for each parameter. Most plug-ins have too many parameters to offer useful graphic feedback in Control view, so you’ll almost always want to use the Editor view. Control view is particularly suited to fine-tuning particular parameters. When in Editor view, you also have extra parameters that let you resize the graphic editor from 50% to 200% in increments of 25%. You can also resize the graphic editor by click-dragging the lower-right corner of the window.
View menu: This menu always contains these two options: Editor, which offers the standard graphic editor view of plug-ins, and Control, which simply lists the parameters of the synth and offers a slider with number field or a menu for each parameter. Most plug-ins have too many parameters to offer useful graphic feedback in Control view, so you’ll almost always want to use the Editor view. Control view is particularly suited to fine-tuning particular parameters. When in Editor view, you also have extra parameters that let you resize the graphic editor from 50% to 200% in increments of 25%. You can also resize the graphic editor by click-dragging the lower-right corner of the window.
![]() Side Chain menu: Some softsynths can process the audio from an audio channel. To do this, you will need to use the Side Chain menu to select which audio channel to process. Side chains are discussed in detail in Chapter 11.
Side Chain menu: Some softsynths can process the audio from an audio channel. To do this, you will need to use the Side Chain menu to select which audio channel to process. Side chains are discussed in detail in Chapter 11.
![]() Settings field: The Settings field is the pull-down menu to the right of the Next Setting and Previous Setting buttons. This menu has commands for loading and saving Logic plug-in setting files. These files store the current parameter conditions of your plug-in, which you can then reload later and even reuse in other songs. This is useful for creating your own unique collection of commonly used settings for your various plug-ins. As you save your settings, they appear in this pull-down menu for easy access. The presets for Logic’s own instruments and effects are listed at the bottom of this menu as well. Plug-in settings are stored in the Plug-In Settings folder inside the ~/Music/Audio Music Apps directory, as well as in the Logic Application Support folder. You can also manually add settings collected from other users by copying them to this folder. This field also displays the name of the currently selected preset. Note that many third-party plug-ins have their own methods for loading and saving presets and do not rely on the host application for preset handling. You can still use the commands in this menu if you want to create and manage settings for a plug-in within Logic’s preset hierarchy rather than the plug-in’s.
Settings field: The Settings field is the pull-down menu to the right of the Next Setting and Previous Setting buttons. This menu has commands for loading and saving Logic plug-in setting files. These files store the current parameter conditions of your plug-in, which you can then reload later and even reuse in other songs. This is useful for creating your own unique collection of commonly used settings for your various plug-ins. As you save your settings, they appear in this pull-down menu for easy access. The presets for Logic’s own instruments and effects are listed at the bottom of this menu as well. Plug-in settings are stored in the Plug-In Settings folder inside the ~/Music/Audio Music Apps directory, as well as in the Logic Application Support folder. You can also manually add settings collected from other users by copying them to this folder. This field also displays the name of the currently selected preset. Note that many third-party plug-ins have their own methods for loading and saving presets and do not rely on the host application for preset handling. You can still use the commands in this menu if you want to create and manage settings for a plug-in within Logic’s preset hierarchy rather than the plug-in’s.
Extended Parameters
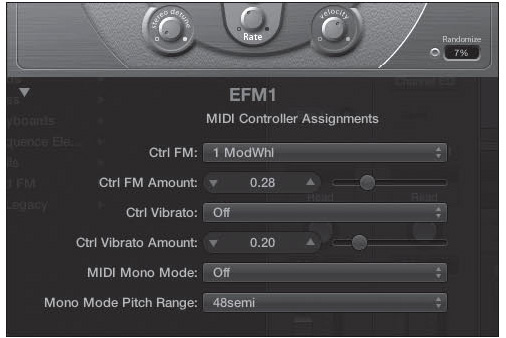
Not all of Logic’s plug-ins have every parameter available in their Editor view. In such cases, a disclosure triangle at the bottom-left corner of the plug-in window allows you to open an extended parameters area, giving you access to any remaining controls the plug-in offers. Figure 9.6 shows the bottom of EFM1 with the extended parameters area opened.
Figure 9.6 The extended parameters area of the EFM1 plug-in. Some Logic plug-ins have parameters that are not found in the plug-in’s Editor view but are available by clicking on the window’s disclosure triangle in the lower-left corner.
©Apple Inc.
Software Instruments and the Environment
As discussed, a software instrument channel strip is both a channel strip object and a MIDI object. As such, you can route software instrument objects to other MIDI objects to create unique MIDI effects and routings, just like you can any other MIDI device. If this sounds interesting to you, I’d encourage you to spend time exploring the Environment.
Using Multi-Output Software Instruments
The vast majority of the software instruments you use will be either mono or stereo instruments. Moreover, you’ll probably only need stereo outputs from softsynths that allow for more than two outputs. However, sometimes you might want to have an independent output for each sample from a sampler, each voice of a synthesizer, or each drum from a drum instrument to allow for more precise mixing, processing, or automation control. For these situations, you can instantiate a multi-output instrument in a software instrument channel strip.
Logic is far more efficient than other DAWs in the management of resources when using software instruments. The price for this efficiency, unfortunately, is that accessing the additional outputs of softsynths takes a few more steps than in other applications. Most other applications automatically create every allowable output channel for multiple-output instruments as soon as you instantiate the plug-in. This is very convenient because there are no steps required to access the additional outputs. There are two drawbacks to this, however. The first is that if your instrument is set up to allow 32 outputs, your Mixer will be cluttered with 32 additional output channels, making it huge and unwieldy—especially if you only wanted to use, say, four outputs! The other drawback is that all of those unused outputs may drain your computer’s CPU power and RAM. Logic allows you to activate only those outputs that you will actually use, conserving both screen real estate and computer resources, but giving you this flexibility means that activating the additional outputs requires some configuration.
The first step is to make sure that you have instantiated a multi-output softsynth like EXS24 in a software instrument channel strip by selecting the Multi Output option. Then, you may need to change the output assignments in the softsynth’s graphical interface. For details, consult the documentation for your specific software instrument.
Next, open the Mixer and use the plus (+) button on the multi-output instrument’s channel strip to add as many aux channels as you need for routing your multi-output instrument. Figure 9.7 shows the plus button on a multi-output channel strip in the Mixer. After you have used the plus button to add aux channel strips to the Mixer, the minus (−) button next to it is enabled, allowing you to delete that multi-output instrument’s dependent aux channels one by one.
Figure 9.7 Use the plus button to add more aux channel strips to the Mixer for the outputs of a multi-output instrument. Use the minus button to delete any unused auxes you created for the multi-output instrument.

© Apple Inc.
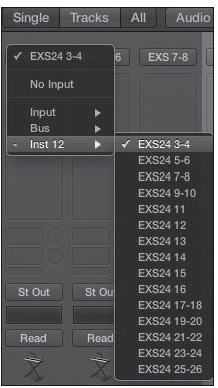
Now you need to assign your aux channels to the outputs of the multi-output instrument. In addition to submenus for hardware inputs and available buses in each aux channel strip’s Input pull-down menu, you will find a menu of all the outputs available for your multi-output instrument. If the aux channel’s Format button shows a single circle, mono outputs are displayed; if the Format button shows two overlapping circles, stereo outputs are displayed. Choose the output (or outputs, if you are using stereo) that you want this aux channel to use as its input(s). Figure 9.8 shows an aux channel’s input being assigned to a multi-output instrument’s output.
Figure 9.8 To access the additional outputs of multi-output instruments, create an aux channel and select the desired output from its input menu. Here, the EXS24 output 3–4 is chosen as the input for this aux channel.
© Apple Inc.
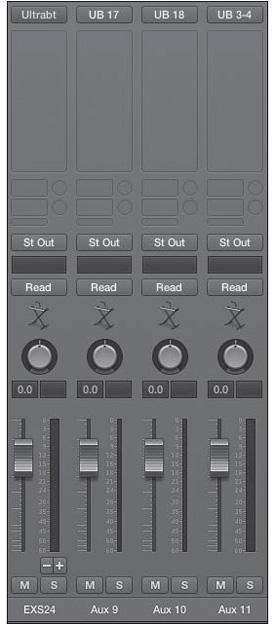
If your Mixer’s display mode is set to Tracks, the new aux channel strips will be shown directly to the right of their parent multi-output channel strip. Different Mixer display modes will be covered in detail in Chapter 11; for the moment, you can find the display mode buttons at the top center of the Mixer window’s local menu bar. (Some of these are shown in Figure 9.8.) Figure 9.9 shows the Ultrabeat multi-output instrument channel strip in the Mixer. Note that in addition to the main software instrument channel strip that serves as the main stereo output pair, this multi-output instrument has been configured with two additional mono aux channel strips and then a stereo aux channel strip. This is the power of Logic: Only six of Ultrabeat’s 24 outputs were needed, and the configuration matches exactly the user’s desired combination of mono and stereo outputs.
Figure 9.9 The multichannel Ultrabeat has been configured to include the main outputs, two additional mono outputs, and an additional stereo output. If you need more outputs, you can easily continue creating aux objects and choose more Ultrabeat outputs, to the limit of the instrument’s capacity.
© Apple Inc.
The Tracks area track for this multi-output instrument is where you will record, program, and edit the MIDI data that will operate the software instrument. The multi-output instrument’s own outputs will be the “master outputs.” That means, depending on how the specific softsynth you are using operates, it may serve as your master stereo output or it may be a summation output of all the other outputs for the entire instrument. You’ll need to consult your instrument’s documentation for specifics on how it utilizes its master outputs.
For multi-output instruments, you won’t need to have any of the additional outputs in the Tracks area if you don’t want them there. However, you might want to put some or all of them in the main window to automate those outputs. Automation is discussed in Chapter 10, “Using Automation in Logic.” You can add your aux channels to the main window in a couple of different ways. In the Mixer, you can right-click on an aux channel strip and choose Create Track from the resulting menu, as shown in Figure 9.10. Alternatively, select the aux for which you want to create a track and press Control+T. (Note that this key command works only in the Mixer.)
Figure 9.10 To create a Tracks area track for an aux in the Mixer, simply Control-click on an aux channel strip and choose Create Track from the menu or press Control+T.

© Apple Inc.
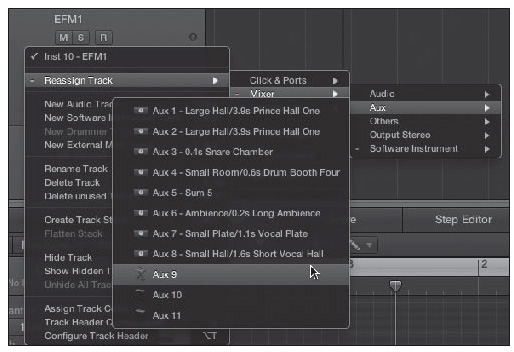
In the main window, you can also change a newly created track or a currently unused one to an aux channel by right-clicking on the track header. Under the Mixer submenu of the Reassign Track Object menu, go to the Aux submenu and select the aux channel you want, as shown in Figure 9.11.
Figure 9.11 The Aux submenu of the Mixer submenu of the Reassign Track Object menu. You can assign a Tracks area track to the aux channel output of a multi-output instrument using this menu.
© Apple Inc.
Another way to add your multi-output instrument’s dependent aux channels to the main window is to do the following:
1. Create a new channel of any type in the Tracks area for each aux you want to add.
2. Open the Environment Mixer.
3. Select the aux channels you want to add to the main window and then drag them to the Tracks area over the new tracks. You will see boxes highlighting the track headers of the channels that the aux channels will be affecting.
4. Once you have selected the desired tracks, release the mouse button. The selected tracks will automatically be changed to aux channels.
Be careful, though—if you release the aux over any channel, even one with regions on it, it will be converted into an aux channel. If this happens, you can simply undo the action (press Command+Z). You can also assign any aux to an automation mode, and it will automatically be added in the Tracks area.
This is a perfect example of the “Logic way.” It might take a little extra initial configuration, but when you understand how it works and how to do it, not only is it simple, but you can really take advantage of the power and flexibility it offers over other applications!
Using Multitimbral Software Instruments
Some software instruments allow for multitimbral operation, meaning they’ll allow you to load completely different plug-in settings, presets, and so on for each different MIDI channel the instrument can receive. Not all instruments allow for this—in fact, Apple doesn’t currently make any software instruments that are multitimbral—but if you do have some Audio Units instruments that allow this function, here’s how you would access them from within Logic. One method is to simply have the MIDI regions on your software instrument track send different MIDI events to different MIDI channels. For example, you could create a single MIDI region with a bass line sending to MIDI channel 1 and a high lead part sending to MIDI channel 2. Your software instrument will take care of routing the different notes to the proper MIDI channels.
This technique comes in handy for scoring, when you might want several voices in a single MIDI region going to different channels. However, if you want separate tracks for each MIDI part being routed to different channels, you can easily create them in the main window. Here’s how:
1. Open the New Tracks dialog box to create a new software instrument. To do so, either click the plus button in the upper-left corner of the Tracks area or press the Option+Command+N key command.
2. Specify the number of new tracks you wish to create.
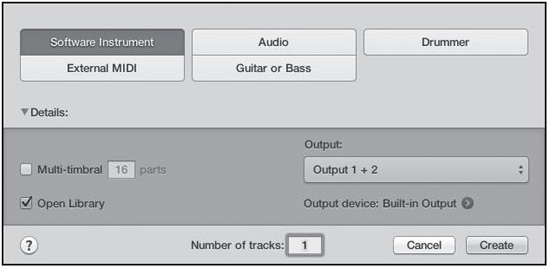
3. Select the Multi-timbral checkbox in the Details area of the New Tracks dialog box, as shown in Figure 9.12. The initial channel strip and region parameters will be identical for all of the new tracks because the exact same software instrument channel strip is being used on all the newly created software instrument tracks.
Figure 9.12 The New Tracks dialog box. Selecting the Multi-timbral checkbox creates the defined number of multitimbral instruments and their dependent tracks in the Tracks area.
© Apple Inc.
Now you can create new MIDI regions on these tracks and send those MIDI regions to different MIDI channels of your multichannel software instrument. This way, you have the MIDI parts for each channel separated on different tracks.
Using MIDI FX
Among the many new features in Logic Pro X, one of the coolest is MIDI FX. In previous versions of Logic, if you wanted an arpeggiator—for example, to arpeggiate a synth that didn’t have its own built-in arpeggiator—you had to build one in the Environment. The more complicated the arpeggiations, the more complicated an Environment layer you would have to construct. Although there are still many things that can be accomplished only in the Environment, the inclusion of these nine new MIDI FX reduces the need for most users to ever have to worry about the Environment significantly. These MIDI FX are very versatile and programmable, and you can have up to eight MIDI FX instantiated per software instrument channel strip. To access Logic’s MIDI FX, click the MIDI FX slot, below the EQ thumbnail, on a software instrument channel strip. Figure 9.13 shows the MIDI FX menu.
Figure 9.13 The MIDI FX menu, found only in software instrument channel strips.
© Apple Inc.
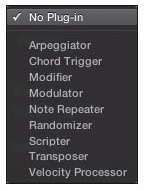
Although it’s outside the scope of this book to cover these MIDI FX in depth, the following are brief descriptions of each MIDI FX:
![]() Arpeggiator: This is the MIDI FX available when you access Smart Controls for a software instrument. It can produce very simple or extremely complex arpeggiations.
Arpeggiator: This is the MIDI FX available when you access Smart Controls for a software instrument. It can produce very simple or extremely complex arpeggiations.
![]() Chord Trigger: This lets you trigger chords with a single MIDI note.
Chord Trigger: This lets you trigger chords with a single MIDI note.
![]() Modifier: This lets you reassign an incoming MIDI control change message, such as velocity, to another controller.
Modifier: This lets you reassign an incoming MIDI control change message, such as velocity, to another controller.
![]() Modulator: This lets you create custom LFO modulation and envelopes to affect the selected MIDI control change parameters.
Modulator: This lets you create custom LFO modulation and envelopes to affect the selected MIDI control change parameters.
![]() Note Repeater: This has similar effect on MIDI notes as a delay effect has on audio.
Note Repeater: This has similar effect on MIDI notes as a delay effect has on audio.
![]() Randomizer: This lets you define a MIDI control change parameter whose incoming signal will be randomized.
Randomizer: This lets you define a MIDI control change parameter whose incoming signal will be randomized.
![]() Scripter: This includes an editor that lets you use JavaScript to create custom MIDI FX processes, which the Scripter plug-in will then run. If you are familiar with software samplers that use scripting to enhance and expand the performance of those samplers, then you have at least some notion of what Scripter can do, the important difference being that Scripter woks with any software instrument.
Scripter: This includes an editor that lets you use JavaScript to create custom MIDI FX processes, which the Scripter plug-in will then run. If you are familiar with software samplers that use scripting to enhance and expand the performance of those samplers, then you have at least some notion of what Scripter can do, the important difference being that Scripter woks with any software instrument.
![]() Transposer: This can be used for simple transposition, but can also be used similarly to the Scale Quantize parameter in the Piano Roll editor, forcing incoming MIDI notes to the defined key and scale selection.
Transposer: This can be used for simple transposition, but can also be used similarly to the Scale Quantize parameter in the Piano Roll editor, forcing incoming MIDI notes to the defined key and scale selection.
![]() Velocity Processor: This lets you create alternate velocity curves for incoming MIDI messages.
Velocity Processor: This lets you create alternate velocity curves for incoming MIDI messages.
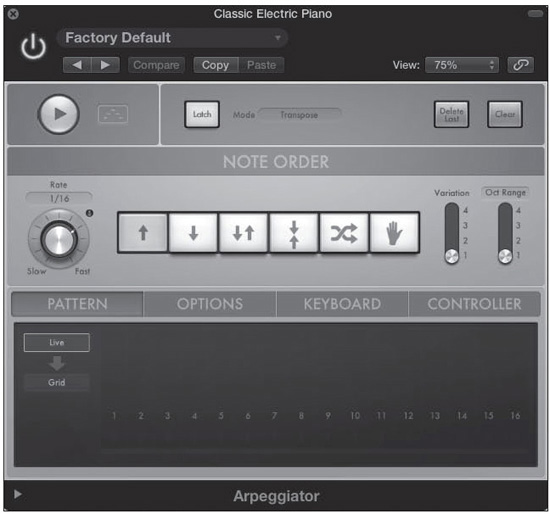
When you select a MIDI FX plug-in, its graphic editor window will open, letting you edit the parameters of the plug-in, save those settings, and load factory and user settings. MIDI FX plug-ins have the same buttons and menus found at the top of software instruments’ graphic editor windows. This can be seen in Figure 9.14, which shows the Arpeggiator MIDI FX. Most of the MIDI FX plug-ins also have an Extended Parameters area. I encourage you to explore the Logic Pro Instruments manual, available as an option in the Logic Pro X Help menu, to learn more about using these incredible MIDI FX plug-ins. If you work with MIDI a lot, you will likely find at least one or two of these effects quite useful!
Figure 9.14 The Arpeggiator MIDI FX plug-in graphic editor window.
© Apple Inc.
Using ReWire 2 Instruments
Chapter 3, “The Logic Project,” briefly described how to create ReWire instruments, but now we’ll go into more detail. As mentioned, ReWire 2 is a protocol developed by Propellerhead Software through which one program can access and control another music software program, with both applications running on the same computer. ReWire 2 slaves function as software instruments because all their processing is done inside the host computer, but they are different from software instruments in the sense that they are not part of the Logic application like Logic’s own softsynths, nor are they literally “plugged in” to the Logic application like third-party plug-ins. So although all the connections that Logic needs to make are “virtual connections” that do not require hardware interfaces and cables, Logic must still create these connections out of Logic into another application. The Environment’s ReWire object, therefore, is a virtual MIDI cable between Logic and the ReWire 2 application, and is also a virtual audio cable between Logic and the ReWire 2 application. This section explains how to configure these objects to use a ReWire 2 application with Logic.
Working with ReWire 2 Applications
ReWire 2 has two modes: master and slave. Generally, the application launched first is the default ReWire master, and the ReWire 2 application launched subsequently is the ReWire slave. The master application controls the synchronization between the two applications, and the sound from the ReWire slave application plays through the ReWire master application. Logic is only capable of being a ReWire master, so be sure that the ReWire 2–capable application you want to use can be operated in ReWire 2 slave mode. Also, because Logic Pro X is a 64-bit application, any ReWire slave you use with Logic must also be 64-bit.
No special configuration is required to initialize ReWire operation. Be sure to launch Logic first, then launch your ReWire 2 slave application. The application should automatically load in ReWire slave mode.
Creating ReWire Instruments for MIDI Transmission
Before you can use Logic with your ReWire slave, you need to create and configure the necessary tracks in the Tracks area. First, create as many new external instrument tracks as you will need for your ReWire slave, as discussed in Chapter 3. Next, open the Library, as shown in Figure 9.15.
Figure 9.15 The Library in the main window. You can see your ReWire-capable applications in the Library when you select an external instrument track.
© Apple Inc.
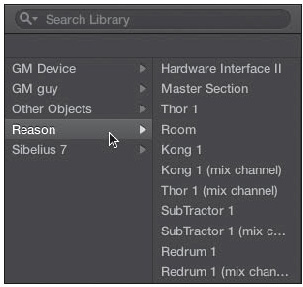
After a ReWire slave has launched, you will see a list of the available ReWire sources in the Library, as shown in Figure 9.16. You can assign a ReWire slave instrument to an external instrument track by simply clicking on the name of the desired instrument.
Figure 9.16 You can select the desired ReWire instrument directly in the Library in the main window.
© Apple Inc.
If at any time you want to change a ReWire track’s settings, you can do so in the Inspector. Following are descriptions of each parameter:
![]() Type: The Type menu lets you select the type of external instrument, including ReWire and QuickTime.
Type: The Type menu lets you select the type of external instrument, including ReWire and QuickTime.
![]() Device: This refers to the specific ReWire 2 application to which the ReWire instrument is connecting. For example, if you were using three different ReWire 2 applications, all three applications would appear in this pull-down menu, and you could select which of the three applications to connect this ReWire instrument to.
Device: This refers to the specific ReWire 2 application to which the ReWire instrument is connecting. For example, if you were using three different ReWire 2 applications, all three applications would appear in this pull-down menu, and you could select which of the three applications to connect this ReWire instrument to.
![]() Bus: This parameter allows you to choose which ReWire bus to use from your available ReWire buses.
Bus: This parameter allows you to choose which ReWire bus to use from your available ReWire buses.
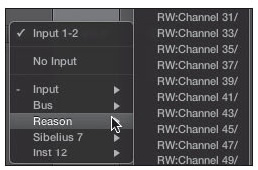
![]() Channel: This parameter specifies the MIDI channel on which you want your ReWire instrument to send and receive MIDI data. Clicking the Channel menu would show a mixture of available MIDI channels and Reason instruments assigned to different channels, so picking the right channel for the desired instrument is effortless.
Channel: This parameter specifies the MIDI channel on which you want your ReWire instrument to send and receive MIDI data. Clicking the Channel menu would show a mixture of available MIDI channels and Reason instruments assigned to different channels, so picking the right channel for the desired instrument is effortless.
In the Devices tab of the Audio Preferences dialog box, which you access by clicking the Logic Pro menu, choosing Preferences, and selecting Audio, you will find a menu for ReWire mode with two options: Playback and Live. For normal use, leave this setting in Playback mode. If you are going to use your ReWire slave for live performance of its instruments over the ReWire connection, set the ReWire mode to Live. This diverts extra CPU resources to ensure the best possible synchronization between Logic and your ReWire application during live performance. If you use ReWire applications extensively, even if not strictly for live use, you will want to keep the Live option selected. Note that by default, Logic Pro X has ReWire turned off, so you will need to set the ReWire mode parameter to use ReWire.
Setting Up ReWire Objects for Audio Transmission
Now that you have set up your ReWire instrument’s MIDI connection between Logic and your ReWire 2 application, you need to create and configure aux channels to receive audio from the ReWire slave. To create a new aux, simply open the Mixer either in the main window or in its own window, open the Mixer’s local Options menu, select Options, and choose Create New Auxiliary Channel Strips. Alternatively, press Control+N. You can then define the ReWire bus of your aux channel strip using the Input menu, shown in Figure 9.17.
Figure 9.17 Use the Input menu in an aux channel strip to define the ReWire bus of your aux channel strip.
© Apple Inc.
You can now use Logic’s internal effects on your ReWired audio. You can also add the aux channel to the Tracks area to use automation on your ReWired audio.