
10 Using Automation in Logic
IN THE EARLY DAYS OF RECORDING, if you wanted to capture the sound of moving one of the controls—for example, to create a wild stereo panning effect with an instrument, to have sound fade out gradually, or simply to level out the volume of a track that fluctuated wildly in level—you would need to move the control carefully by hand while the mixdown was happening. Any error in movement meant starting the whole thing over from scratch, and there was no way to exactly repeat anything. If you wanted to repeat the move for a new mixdown, the only option was to do it again manually and hope that the result was close to that of the original mixdown.
In the 1970s, large mixing consoles began to offer automation—a way to write, rewrite, and save these moves in memory so that as you mixed your material, it would automatically make your move for you. This was not only more convenient, but it meant that you could audition, change, and repeat any move an infinite number of times, and it would be the same each time. This opened the door not only for more accurate mixing, but also for much more creative mixing by experimental artists who wanted to use the studio itself as an instrument.
With the advent of computer sequencers, automation has become an even more powerful tool, available to all. You can use automation to turn static effects into living, dynamic parts of a track’s sound; you can tailor the volume of a track exactly to the source material; you can perfect mixes to previously unimaginable accuracy; and you can use your DAW not only as a tool, but as an instrument in its own right. Logic’s automation system is fairly intuitive, but it still takes a while to get used to its “logic!”
Types of Automation
As discussed in Chapter 6, “The Logic Pro Main Window,” there are two ways to automate your song data in Logic. Both methods are useful and are very similar in many ways, but each has distinct advantages and disadvantages.
The first method is called track automation (TA), so named because the automation data is stored with the Tracks area track lane. This paradigm of storing the automation data with the track harkens back to the days of hardware mixing consoles, where you automated a specific channel of the mixer. TA allows for incredibly high (sample-accurate) resolution, which gives you precise control over automation points and lines. Because TA is the more recent and powerful automation system, you will probably use TA for most of your automation in Logic.
Unlike using a hardware mixing console, where the console doesn’t know what type of data you are sending through a channel, a computer does know what sort of data you have in your song. That means that unlike a hardware console, a computer sequencer doesn’t need to automate a channel, but can instead include automation information as part of the audio or MIDI region itself. This type of automation in Logic is called MIDI Draw (formerly called Hyper Draw), which is a region-based automation (RA). Emagic developed Hyper Draw long before TA, back when all automation of MIDI hardware and audio tracks was based on MIDI (hence the term MIDI Draw, as it is basically a lane set of the MIDI control messages). That means RA is limited to controlling parameters that have MIDI control message values, as you learned in Chapter 8, “Working with MIDI,” and that RA’s values are limited to the standard MIDI range of 0–127 (as opposed to TA’s 32-bit resolution). While RA is definitely limited compared to TA, it still has its uses.
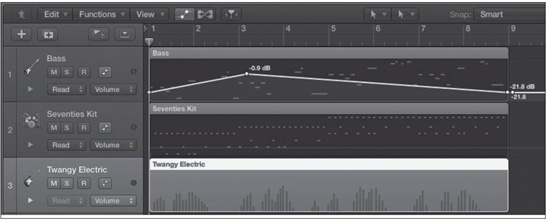
Both forms of automation can be used together, so you can have a region in which you’ve automated some plug-in parameters using MIDI Draw as well as done some track-based automation. When you have Track Automation view enabled, there will be a disclosure triangle on the left side of the track; if you click on the triangle, you can get as many additional lanes for viewing MIDI Draw and for viewing, creating, and editing track automation as you need. Figure 10.1 shows a track that has track-based automation and another where the MIDI region itself has some RA on it. You can even turn RA into TA and vice versa, as you’ll explore later in this chapter. But be careful not to use TA and RA for the same parameter—the results will be random and unusable.
Figure 10.1 This shows both MIDI Draw (region-based automation) and track-based automation. You can see the Stage Piano Mk I region with volume RA above the Bass region with TA automating its volume. You can use both of them interchangeably, depending on your needs. Because TA is the newer and more robust automation system, you will most likely use TA more often.

© Apple Inc.
Using Track-Based Automation
Using TA couldn’t be simpler. If you’ve already turned on track-based automation using the Show/Hide Automation button in the main window or by using the Mix > Show Automation command, the automation display is visible for all your tracks. If you haven’t done that, click the Show/Hide Automation button, select Mix > Show Automation, or press the A key. Once you show automation, each track header gets its own Enable Automation button, letting you activate automation on a per-track basis. You can also use the Control+Command+O key command to toggle automation for the selected track. To turn off automation for all tracks while leaving automation mode on, use the Control+Shift+Command+O key command. Figure 10.2 shows a few tracks in the Track List. Two tracks have Automation view enabled, one does not have automation enabled, and only one of the tracks actually has any automation. You can also see the Show/Hide Automation button next to the View menu.
Figure 10.2 By choosing Mix > Show Automation, enabling the Show/Hide Automation button, or pressing the A key, you ensure that each track in the Track List contains track-based automation controls. Note that only the first of the three visible tracks actually has automation data visible in the track lane, the second track is ready to be automated, and the third track has automation disabled.
© Apple Inc.
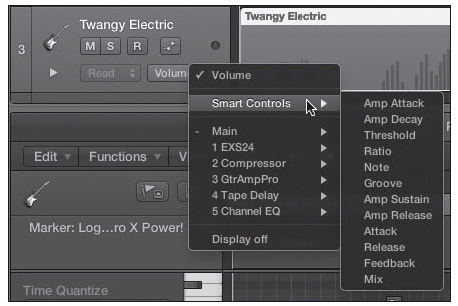
The menu on the right of each track header is the Automation Parameter menu. Here you can select from all the available parameters for all the automatable elements of the track itself (volume, pan, solo, mute, send, insert bypass, and so on), from Smart Controls, as well as each automatable plug-in and software instrument parameter. Choose from this menu the parameter you want to automate. Figure 10.3 shows the submenus in the Automation Parameter menu.
Figure 10.3 You can see in the Automation Parameter menu of this track that in addition to the shortcuts to Display Off and Volume, there are hierarchical menus to choose to display parameters from the main track, Smart Controls, software instruments, or effects.
© Apple Inc.
As you automate more parameters, they appear in the automation lane behind the currently live parameter. Volume appears as a yellow line, pan as a green line, and other parameters appear in a range of other colors.
There are two ways to create automation: in real time or in the track lane (non–real time). Both methods yield excellent results, and you’ll find that both are useful, even when working with one automation parameter on a track. If you want to create automation in real time, you need to choose the automation mode in the Automation Mode menu to the left of the Automation Parameter menu. There are four automation modes:
![]() Read: This mode tells Logic to “read” the automation data on the track. When you play your song, Logic automates your track. You cannot write automation data in real time in this mode, but you can create and edit automation data in the track lane itself (as explained later in the section “Manipulating Automation Data”). You can set all tracks to Read using the Shift+Control+Command+R key command.
Read: This mode tells Logic to “read” the automation data on the track. When you play your song, Logic automates your track. You cannot write automation data in real time in this mode, but you can create and edit automation data in the track lane itself (as explained later in the section “Manipulating Automation Data”). You can set all tracks to Read using the Shift+Control+Command+R key command.
![]() Touch: In Touch mode, if you “touch” an element of the channel strip with your mouse or a hardware control surface, such as the Avid Artist Control or Mackie controller, Logic starts writing automation data for that element. This is realtime, live automating, so any move you make is recorded live into Logic’s track automation, although you can of course edit the data later. As soon as you release the mouse or the control surface or stop “touching” the onscreen element, Logic stops writing automation data and returns the chosen parameter to its original value at the playhead position where you quit “touching” the parameter. For example, if you are in Touch mode and, during playback, you use the mouse to click on the Pan knob and move it from its current value—say, −25—you will write pan automation data in real time. When you release the mouse button, you will stop writing pan automation data, and the pan value will return to −25 at the current playhead position, at a rate defined by the Ramp Time parameter in the Automation Preferences window. Keep in mind that if you already have pan data written in the specific place in which you wrote new data, the new data recorded in Touch mode will overwrite the previous data. Touch mode is the standard mode for realtime onscreen or software controller automation. You can set all tracks to Touch using the Shift+Control+Command+T key command.
Touch: In Touch mode, if you “touch” an element of the channel strip with your mouse or a hardware control surface, such as the Avid Artist Control or Mackie controller, Logic starts writing automation data for that element. This is realtime, live automating, so any move you make is recorded live into Logic’s track automation, although you can of course edit the data later. As soon as you release the mouse or the control surface or stop “touching” the onscreen element, Logic stops writing automation data and returns the chosen parameter to its original value at the playhead position where you quit “touching” the parameter. For example, if you are in Touch mode and, during playback, you use the mouse to click on the Pan knob and move it from its current value—say, −25—you will write pan automation data in real time. When you release the mouse button, you will stop writing pan automation data, and the pan value will return to −25 at the current playhead position, at a rate defined by the Ramp Time parameter in the Automation Preferences window. Keep in mind that if you already have pan data written in the specific place in which you wrote new data, the new data recorded in Touch mode will overwrite the previous data. Touch mode is the standard mode for realtime onscreen or software controller automation. You can set all tracks to Touch using the Shift+Control+Command+T key command.
![]() Latch: Latch mode is like Touch mode except that once you click your mouse or move your control surface to start writing automation, Logic continues to write new data for that parameter even after you release the control. Only when playback stops will Logic stop writing automation for that parameter. Latch mode is desirable when you know that after a certain point in your song, you want to overwrite all the remaining data for a particular parameter. You can set all tracks to Latch using the Shift+Control+Command+L key command.
Latch: Latch mode is like Touch mode except that once you click your mouse or move your control surface to start writing automation, Logic continues to write new data for that parameter even after you release the control. Only when playback stops will Logic stop writing automation for that parameter. Latch mode is desirable when you know that after a certain point in your song, you want to overwrite all the remaining data for a particular parameter. You can set all tracks to Latch using the Shift+Control+Command+L key command.
![]() Write: Write mode deletes all existing track automation as the playhead passes it. If you write new data, the new data is recorded. If you do not write new data, Write mode acts as a “realtime eraser” of previous automation data, which it replaces with nothing. Write mode is useful only if you want to start your mix over without using any of the Delete commands described later in this chapter. You will probably find this mode to be less useful than the other automation modes.
Write: Write mode deletes all existing track automation as the playhead passes it. If you write new data, the new data is recorded. If you do not write new data, Write mode acts as a “realtime eraser” of previous automation data, which it replaces with nothing. Write mode is useful only if you want to start your mix over without using any of the Delete commands described later in this chapter. You will probably find this mode to be less useful than the other automation modes.
After setting the parameter you want to display and the automation mode you wish to use, all that’s left to do is to actually write the automation data!
You can automate in real time by clicking on the various elements of the channel strip (Volume fader, Pan knob, Solo button, Mute button, insert and send slots) or the graphic interface of a plug-in or software instrument, then adjusting those elements by dragging them (or just clicking on them, if the parameter is controlled by a button) as your project plays. As you change the values of various elements, you will create automation points, which are points in which the value of an automatable parameter has changed. When you do realtime automation, as you might imagine, you may create hundreds of these points at a time in a mix with lots of complex motion.
You can also use a control surface, such as the Avid Artist controllers, Mackie Control, or any other MIDI hardware controller that you have set up, using the Learn Controller Assignment function described in Chapter 3, “The Logic Project.” In this case, you would use the hardware controls on your controller to manipulate the onscreen channel strip and plug-in elements. If you are used to hardware mixers, automating by using a controller will seem more natural to you. Also, unlike with a mouse, using hardware controllers gives you the ability to manipulate more than one parameter at the same time. Finally, some hardware controllers offer 10-bit or greater resolution in their faders and knobs, which means that you’ll be able to make finer-resolution moves with the controller than you could with a mouse.
If you don’t want to automate in real time, you can also directly add automation points (points) and drag them up and down with your mouse in the track lane itself. This offers more precise placement of automation data than realtime mixing but also less feedback, because you can’t hear what you’re doing as you make the move.
You can also quickly create points on the borders of a selected region or regions by using two commands found in the Mix > Create Automation menu: Create 1 Automation Point at Region Borders (Shift+Control+Command+1) and Create 2 Points at Region Borders (Shift+Control+Command+1). There are also key command–only commands for creating one or two points at every region border of the selected track: Control+Command+1 and Control+Command+2, respectively. The benefit of these commands is that they create new points at the precise region borders, allowing you to easily control any automatable parameters on a per-region basis. With one point at each region border, you can create single-region fades, panorama movement, or filter sweeps without having to worry about creating precisely placed points on a region border. With two points at each region border, you can add quick volume, compressor threshold, or individual EQ band gain changes that affect only the region(s) you choose to automate. In essence, these commands bring region-based automation–like benefits to the more flexible track-based automation.
Automation Parameter Versus Parameter Write: Although you need to select a parameter for the automation lane to display automation data, in fact you can write automation data for any parameter that is automatable, even if it is not currently being displayed. For example, say you select Volume as the parameter displayed in the automation lane. Then, while in Touch mode, you write some volume automation data, but you also make some panning moves. Logic will write both the volume and the pan moves, even though the automation lane will reflect only the volume moves while you are recording automation data.
Keep in mind that you are not limited to any one method of writing automation data. You can use the mouse to automate volume in a track in real time, then add a few more points and adjust them in the track lane, and use one of the Create Points commands on a few of the track’s regions. This is discussed further in the upcoming “Expert Automation Editing” section.
Method Tip: Viewing Multiple Automation Lanes: A track’s automation lane lets you choose only one live parameter to display. However, you can automate more than one parameter at a time with a software controller. What if you want to view more than one parameter that you are automating? As mentioned, you can view multiple parameters on separate displays by clicking the small disclosure triangle at the bottom-left of a track displaying automation to open a new track lane to display another automation parameter. The new automation display lane will contain a plus sign (+) button, which opens another track automation lane when clicked. You can use this technique to open as many new automation display lanes as you need for each track you are automating. Click the disclosure triangle to collapse the automation lanes. Figure 10.4 shows a track that is displaying more than one automation lane this way.
Figure 10.4 This track displays volume automation on its track lane. By clicking the triangle in the lower-left corner, the user created two additional automation display lanes automating elements of plug-ins on the track’s parent channel strip.

© Apple Inc.
A Tale of Two View Modes: Both Automation and Flex Time views offer view modes that add information to every track in the main window. That means Automation view and Flex view are mutually exclusive. In other words, you can’t have the Automation view displaying on one track and the Flex view displaying on another track simultaneously. If you have both Flex and Automation enabled, you can toggle between both views with main window buttons and key commands.
Manipulating Automation Data
Because you can write automation either by using the mouse or a hardware controller in real time or by simply adding it to a Tracks area track while not in playback, you can use the methods in this section to alter existing data or to create new data. All you need to do is turn on track-based automation and select a parameter in the Automation Parameter menu.
Using the Pointer Tool
To move a point, simply grab it with the Pointer tool and then move the point in any direction you want. Notice that the position line representing the continuous parameter value simply shifts positions and values depending on where you move the point. If you click somewhere on the automation line in the automation lane in which there isn’t currently a point, Logic creates a point in that location, which you can manipulate as described. You can also create points using the Pencil tool.
The Pointer tool can manipulate automation data in additional ways:
![]() Double-clicking on a point deletes it.
Double-clicking on a point deletes it.
![]() Clicking and holding on a line between two points enables you to move the line by dragging it.
Clicking and holding on a line between two points enables you to move the line by dragging it.
![]() If you click and hold a point and then press the Shift key, you restrict the movement of the point to one plane, horizontal or vertical, whichever direction you move first.
If you click and hold a point and then press the Shift key, you restrict the movement of the point to one plane, horizontal or vertical, whichever direction you move first.
![]() If you click and hold a point and press the Control key, you gain fine control of the point in the vertical plane, moving 0.1 units at a time.
If you click and hold a point and press the Control key, you gain fine control of the point in the vertical plane, moving 0.1 units at a time.
![]() Option-clicking selects the area from the point to the right of the pointer to the last point on the track lane.
Option-clicking selects the area from the point to the right of the pointer to the last point on the track lane.
![]() Option-double-clicking selects all automation data in the current track lane.
Option-double-clicking selects all automation data in the current track lane.
![]() You can move a selected area by clicking and dragging anywhere in that selected area.
You can move a selected area by clicking and dragging anywhere in that selected area.
![]() If you Option-drag the selection, it will copy selected automation data to the new location.
If you Option-drag the selection, it will copy selected automation data to the new location.
![]() Shift+Control-clicking in an automation lane changes the pointer into the Automation Curve tool, discussed in the next section.
Shift+Control-clicking in an automation lane changes the pointer into the Automation Curve tool, discussed in the next section.
To change the value of a group of points, simply alter the value of one of the selected points inside the selected area. All the selected points then change by the same amount. If you click on a line away from a point but inside a selected area, or you alter the value of either of the two points at the edges of the selected area, you alter the values proportionally to where you clicked, but the values do not change by the same absolute amount.
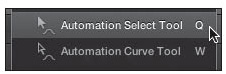
Using the Automation Tools
You can also use the Automation tools described in the section “The Tracks Area Tool Menu” in Chapter 6. There are two Automation tools: Curve and Select. Figure 10.5 shows the Automation tools in the Tool menu.
Figure 10.5 The Automation Select tool is the solid arrow with the jagged stem. The Automation Curve tool is the open arrow with the jagged stem.
© Apple Inc.
In Curve mode, you can use the Automation tool to grab the line between any two points and bend it into a curve. Logic offers a number of preset curve types: convex, concave, and S-curves. Which variety of curve you create depends on where on the line you start your bend and in which direction you bend the line.
In Select mode, the Automation tool can make “rubber band” selections in the automation lane. If you click outside the automation lane in a region title bar, you select all the automation that falls within that region, up to the right-most point if that point falls outside the region. You can make noncontiguous selections of automation with this tool by holding down the Shift key while selecting additional automation data on the track. You can also extend a selection by Shift-clicking on a point in front of or behind an existing selection; everything from the selected area to the point you clicked is then selected.
Expert Automation Editing
As you would expect, Logic offers myriad key commands to control various automation functions. Figure 10.6 shows a sampling of the automation key commands. I would encourage you to search for “automation” in the Key Commands window to see the full extent of the assigned automation key commands, much less the unassigned commands!
Figure 10.6 The Key Commands window showing some automation-related commands.

© Apple Inc.
Feel free to assign keys to any of the options you want. You’ll find using Logic’s automation even faster and more natural when you master the key commands. The Automation Event List key command, Control+Command+E, opens the Event List window to show all automation data for the selected track. These views of automation data are normally invisible. The Automation Event List is an “expert option” because unless you know what you are doing, you will probably find it too confusing to be of much use. If you want to explore it, however, the following subsection describes it briefly.
Automation Event List
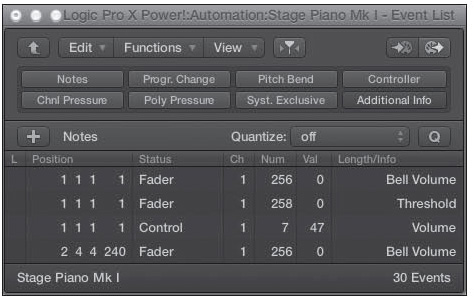
You can view automation data in the Automation Event List, just like other command data, such as MIDI control messages. Because automation data is technically a special proprietary type of data known as fader messages, you’ll notice that the Automation Event List consists exclusively of fader and control data, depending on what the entry is automating. Figure 10.7 shows an Automation Event List.
Figure 10.7 An Automation Event List. Because this is displayed in the Event List Editor, you have all the options previously described in Chapter 8 to edit your automation data.
© Apple Inc.
As you can see, the Automation Event List is a specialized view in the Event List Editor. Therefore, you can use all the options and techniques described in Chapter 8 regarding the Event List Editor to edit your MIDI automation. You may find the Automation Event List useful if you know exactly what you want to edit or if you are more comfortable editing data numerically rather than graphically.
Moving Automation Data from One Parameter to Another
If you have automation data written for one parameter but you’d like to move it to another parameter—say you automated a filter cutoff for a software instrument, and now you want that data to control the envelope level—you can do this easily. With the parameter you want to move displayed in the automation lane, press the Command key while opening the Automation Parameter menu. (Be sure to continue pressing the Command key after you release the mouse button.) Now when you choose a destination parameter, a dialog box appears, asking whether you want to convert (move) the current automation to the new parameter or copy and convert it, which leaves the data you have recorded in the current parameter but also adds it to the new parameter. Select the option you prefer, and that’s it!
Moving Automation with Regions
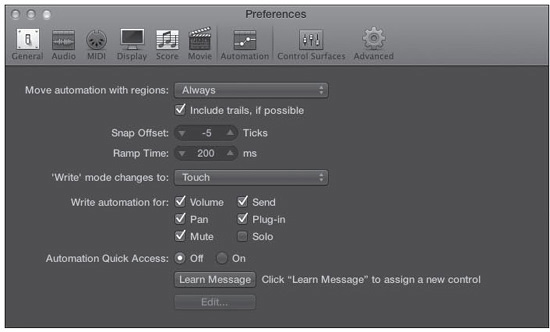
As with so many other things, Logic gives you options for controlling its behavior when you move regions on tracks that contain automation. To define how Logic handles automation data when you move a region, choose Logic Pro > Preferences > Automation, or press Option+A. Figure 10.8 shows the Automation Preferences window.
Figure 10.8 The Automation Preferences window.
© Apple Inc.
The Move Automation with Regions menu gives you three options: Never, Always, and Ask. If you select Never, Logic will not move any associated automation data when you move a region. If you select Always, Logic will always move all associated automation data when you move a region. If you select Ask, then Logic will open a dialog box asking whether you would like to move the automation data with the region. It is generally best to select Ask because this gives you the power to choose what happens to automation data on a per-case basis.
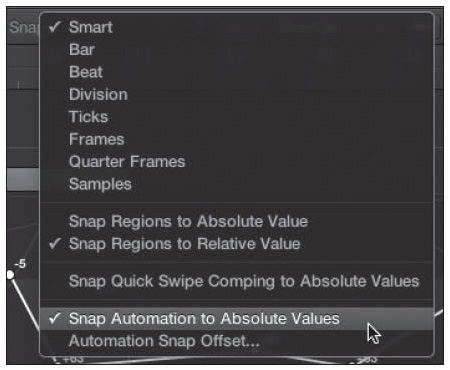
Snapping Automation
If you want to snap automation points to a grid, you can select Snap Automation to Absolute Values from the Snap menu in the main window, shown in Figure 10.9.
Figure 10.9 To snap automation points to the grid, select Snap Automation to Absolute Values from the Snap menu in the main window.
© Apple Inc.
You can offset the placement of points created with Snap Automation to Absolute Values enabled by changing the Snap Offset value in the Automation Preferences window (refer to Figure 10.8). Changing the Snap Offset value will automatically offset the snap position of newly created points by the defined number of ticks.
Deleting and Converting Automation Data
Eventually, you may find yourself wanting to completely rid a track of all the automation for a given parameter you have recorded and start over. Perhaps you want to attach your track-based automation to a track’s regions, or maybe you want to convert MIDI control information into TA. Luckily, Logic allows you to delete automation and convert between RA and TA easily.
THE MIX > DELETE AUTOMATION SUBMENU
The Mix > Delete Automation submenu, shown in Figure 10.10 gives you options for deleting automation data.
Figure 10.10 The Mix > Delete Automation submenu.

© Apple Inc.
Here is a brief description of these commands:
![]() Delete Visible Automation on Selected Track: This command erases all the automation data on the selected track for the parameter in the Parameter Display. The key command is Control+Command+Delete.
Delete Visible Automation on Selected Track: This command erases all the automation data on the selected track for the parameter in the Parameter Display. The key command is Control+Command+Delete.
![]() Delete All Automation on Selected Track: This command erases all automation data on the selected track. The key command is Control+Shift+Command+Delete.
Delete All Automation on Selected Track: This command erases all automation data on the selected track. The key command is Control+Shift+Command+Delete.
![]() Delete Orphaned Automation on Selected Track: This command erases all orphaned automation data from the selected track. The key command for this is Control+Shift+Delete.
Delete Orphaned Automation on Selected Track: This command erases all orphaned automation data from the selected track. The key command for this is Control+Shift+Delete.
![]() Delete Redundant Automation Points: Selecting this command removes any redundant points. For example, suppose you are automating the volume of a track and you have created a few points in a row that share the same value. Using the Delete Redundant Automation Points command will remove all but the first and last of these points. The key command for this is Control+Delete.
Delete Redundant Automation Points: Selecting this command removes any redundant points. For example, suppose you are automating the volume of a track and you have created a few points in a row that share the same value. Using the Delete Redundant Automation Points command will remove all but the first and last of these points. The key command for this is Control+Delete.
![]() Delete All Automation: This command erases all automation data on all tracks.
Delete All Automation: This command erases all automation data on all tracks.
THE MIX > CONVERT AUTOMATION SUBMENU
You can find the basic commands to convert automation data by choosing the Mix > Convert Automation submenu, shown in Figure 10.11.
Figure 10.11 The Mix > Convert Automation submenu.

© Apple Inc.
Here is a brief description of these commands:
![]() Convert Visible MIDI Draw to Track Automation: This command converts the MIDI Draw information currently displayed into TA data. When you use this command, TA data in the automation lane replaces the MIDI Draw display inside your region. The key command is Control+Command+Up Arrow.
Convert Visible MIDI Draw to Track Automation: This command converts the MIDI Draw information currently displayed into TA data. When you use this command, TA data in the automation lane replaces the MIDI Draw display inside your region. The key command is Control+Command+Up Arrow.
![]() Convert Visible Track Automation to MIDI Draw: You can convert your currently displayed TA data to MIDI Draw with this command. When you use this command, your TA data turns into MIDI Draw information that is part of the region. The key command is Control+Command+Down Arrow.
Convert Visible Track Automation to MIDI Draw: You can convert your currently displayed TA data to MIDI Draw with this command. When you use this command, your TA data turns into MIDI Draw information that is part of the region. The key command is Control+Command+Down Arrow.
![]() Convert All MIDI Draw to Track Automation: This command converts all of a region’s MIDI Draw information into TA data. When using this command, TA data in the automation lane replaces the MIDI Draw display inside your region. The key command is Control+Shift+Command+Up Arrow.
Convert All MIDI Draw to Track Automation: This command converts all of a region’s MIDI Draw information into TA data. When using this command, TA data in the automation lane replaces the MIDI Draw display inside your region. The key command is Control+Shift+Command+Up Arrow.
![]() Convert All Track Automation to MIDI Draw: You can convert all your current TA data to MIDI Draw with this command. When you use this command, your TA data turns into MIDI Draw information that is part of the region. Because MIDI Draw is MIDI data, keep in mind you’ll need a MIDI region under the TA for this to work. (For audio tracks, you can always create a MIDI region on an external MIDI or software instrument track, then move it under the TA with your mouse.) The key command is Control+Shift+Command+Down Arrow.
Convert All Track Automation to MIDI Draw: You can convert all your current TA data to MIDI Draw with this command. When you use this command, your TA data turns into MIDI Draw information that is part of the region. Because MIDI Draw is MIDI data, keep in mind you’ll need a MIDI region under the TA for this to work. (For audio tracks, you can always create a MIDI region on an external MIDI or software instrument track, then move it under the TA with your mouse.) The key command is Control+Shift+Command+Down Arrow.
Automation Quick Access
Sometimes, you may want to record a single parameter live to track automation as part of a MIDI performance. For example, say you want to perform a synthesizer track, but you want to record your pitch shifting as TA instead of as MIDI Draw information. You can, of course, record the information as normal MIDI and then convert it to TA using one of the commands discussed previously, but Logic offers you an even more elegant shortcut: Automation Quick Access. This feature allows you to use any single hardware controller able to send MIDI data to write track-based automation data. Automation Quick Access is very easy to set up, thanks to Logic’s very intuitive Learn function.
To configure and engage Automation Quick Access, open the Automation Preferences dialog box that contains the Automation Quick Access controls shown in Figure 10.12. To do so, choose Mix > Automation Preferences or press Control+ Option+Command+A. You can, of course, also access this window via the Automation Preferences window.
Figure 10.12 The Automation Preferences window contains the options to configure Automation Quick Access.

© Apple Inc.
You’ll immediately notice that the bottom of the Automation Preferences window consists of settings for Automation Quick Access. All you need to do is click the large Learn Message button at the bottom of the window. As soon as you engage this button, Logic is ready to “learn” the specifications of the controller you want to use as your Automation Quick Access control. The text to the right of the button reads, “Slowly move/turn the control up and down you want to assign.” In other words, simply take hold of the control you want to assign, slowly adjust the control to its maximum value, and then adjust the control to its minimum value.
That’s it! Click Done, and you’re ready to use your control to input TA data. You can now engage or disengage Automation Quick Access by selecting Mix > Enable Automation Quick Access or by pressing Control+Option+Command+A.