
2 A Quick Tour of Logic Pro
NOW THAT YOU HAVE A BASIC UNDERSTANDING OF WHAT LOGIC CAN DO, it’s time to start exploring. This chapter gives you a broad overview of the application, and the following chapters delve into the details of the individual areas. At this point, don’t worry if you look at the various elements in Logic Pro X and are left with all sorts of questions. As you proceed, I promise that things will become clear!
Terminology in Logic
As you begin your examination of Logic, you should already be comfortable with some of the terms that are used in Logic to describe the most common functions and concepts. Of course, every sequencer uses its own terminology, and if you understand this, you’ll find it far easier to comprehend the “logic” of the application, both figuratively and literally. Here are the key terms that you’ll need to know to work with Logic effectively:
![]() Project: A Logic project contains information about all your editing, MIDI performances, mixing, and recording. A project can also contain audio files, sampler instruments, effects presets, and so on that are used by the song or songs that make up the project. These files are called the project’s assets. Saving Logic projects with their assets (you’ll learn more about that in Chapter 12, “Working with and Sharing Files”) is a great way to keep every necessary piece of data used in one place.
Project: A Logic project contains information about all your editing, MIDI performances, mixing, and recording. A project can also contain audio files, sampler instruments, effects presets, and so on that are used by the song or songs that make up the project. These files are called the project’s assets. Saving Logic projects with their assets (you’ll learn more about that in Chapter 12, “Working with and Sharing Files”) is a great way to keep every necessary piece of data used in one place.
![]() Audio file: Audio files are files on your computer that contain digital audio information. When you record into Logic, it saves your recording as a digital audio file on your storage drive. When you use Logic to manipulate audio data, that data will always originate from an audio file, regardless of whether it was initially recorded in Logic.
Audio file: Audio files are files on your computer that contain digital audio information. When you record into Logic, it saves your recording as a digital audio file on your storage drive. When you use Logic to manipulate audio data, that data will always originate from an audio file, regardless of whether it was initially recorded in Logic.
![]() Track: Audio and MIDI data are recorded into horizontal lanes in the Tracks area of the Logic Pro main window that are known as—wait for it—tracks. The term tracks is a holdover from the days of recording onto tape, where each separate strip of a tape recording was known as a track (so a stereo cassette would have two tracks, left and right, and an old eight-track tape had—you guessed it—eight tracks).
Track: Audio and MIDI data are recorded into horizontal lanes in the Tracks area of the Logic Pro main window that are known as—wait for it—tracks. The term tracks is a holdover from the days of recording onto tape, where each separate strip of a tape recording was known as a track (so a stereo cassette would have two tracks, left and right, and an old eight-track tape had—you guessed it—eight tracks).
![]() Audio region: An audio region is a graphical representation of a section of audio from an audio file. These graphical representations appear in the Project Audio Browser and Project Audio window, Audio File editor, Audio Track editor, or Tracks area. An audio region can be as long as the entire audio file in which it is located, or it may be only a few milliseconds long. A single audio file can contain a virtually limitless number of audio regions. When you record or load audio into Logic, it will always contain at least one audio region that is, by default, the length of the entire audio file.
Audio region: An audio region is a graphical representation of a section of audio from an audio file. These graphical representations appear in the Project Audio Browser and Project Audio window, Audio File editor, Audio Track editor, or Tracks area. An audio region can be as long as the entire audio file in which it is located, or it may be only a few milliseconds long. A single audio file can contain a virtually limitless number of audio regions. When you record or load audio into Logic, it will always contain at least one audio region that is, by default, the length of the entire audio file.
![]() Audio channel: Every audio channel strip in the Mixer is assigned to an audio channel internal to Logic, and every audio track in the Tracks area has an audio channel assigned to it. You can have more than one audio track assigned to the same audio channel, but only one at a time can be playing sound. There are 256 internal audio channels available in Logic.
Audio channel: Every audio channel strip in the Mixer is assigned to an audio channel internal to Logic, and every audio track in the Tracks area has an audio channel assigned to it. You can have more than one audio track assigned to the same audio channel, but only one at a time can be playing sound. There are 256 internal audio channels available in Logic.
![]() Software instrument: Software instruments are basically synthesizers that you can play, program, and record in Logic. Software instruments are controlled by MIDI, but produce audio. They use their own special software instrument channel strips in the Mixer, and software instrument tracks in the Tracks area. Logic includes a host of its own built-in instruments, such as Sculpture, ES2, and Vintage Electric Piano. It can also host software instruments from third-party vendors. We’ll explore software instruments in detail in Chapter 9, “Working with Software Instruments.”
Software instrument: Software instruments are basically synthesizers that you can play, program, and record in Logic. Software instruments are controlled by MIDI, but produce audio. They use their own special software instrument channel strips in the Mixer, and software instrument tracks in the Tracks area. Logic includes a host of its own built-in instruments, such as Sculpture, ES2, and Vintage Electric Piano. It can also host software instruments from third-party vendors. We’ll explore software instruments in detail in Chapter 9, “Working with Software Instruments.”
![]() Apple Loop: An Apple Loop is a special type of region. I discuss Apple Loops in depth in Chapter 7, “Working with Audio and Apple Loops”; for now, just know that Apple Loops have digital audio information that has been specifically “tagged” so that they will automatically play back at the correct time and in the correct musical key as your Logic project, regardless of the tempo or key in which the original audio was recorded. Apple Loops may also contain MIDI and channel strip information in addition to audio information.
Apple Loop: An Apple Loop is a special type of region. I discuss Apple Loops in depth in Chapter 7, “Working with Audio and Apple Loops”; for now, just know that Apple Loops have digital audio information that has been specifically “tagged” so that they will automatically play back at the correct time and in the correct musical key as your Logic project, regardless of the tempo or key in which the original audio was recorded. Apple Loops may also contain MIDI and channel strip information in addition to audio information.
![]() MIDI region: Similar to audio regions, a MIDI region is a graphical representation of MIDI data. Unlike audio regions, however, MIDI regions are not necessarily related to any external information stored in a file on your hard disk. MIDI regions representing sections of MIDI data can be saved to files if you so choose, but they do not need to be stored anywhere other than the Logic project file. If you do save a MIDI file to your storage drive, the MIDI data will still remain in the Logic song as well. Software instrument and external MIDI instrument tracks utilize MIDI regions.
MIDI region: Similar to audio regions, a MIDI region is a graphical representation of MIDI data. Unlike audio regions, however, MIDI regions are not necessarily related to any external information stored in a file on your hard disk. MIDI regions representing sections of MIDI data can be saved to files if you so choose, but they do not need to be stored anywhere other than the Logic project file. If you do save a MIDI file to your storage drive, the MIDI data will still remain in the Logic song as well. Software instrument and external MIDI instrument tracks utilize MIDI regions.
![]() MIDI channel: This refers to one of the 16 channels that each MIDI port can transmit, or all 16 channels if you have selected the All option. Every software instrument and external MIDI track is assigned to a MIDI channel except in the case of the All option, in which case the track itself is not assigned to a MIDI channel, but the individual messages are. You can have more than one software instrument or external MIDI track assigned to the same MIDI port and channel.
MIDI channel: This refers to one of the 16 channels that each MIDI port can transmit, or all 16 channels if you have selected the All option. Every software instrument and external MIDI track is assigned to a MIDI channel except in the case of the All option, in which case the track itself is not assigned to a MIDI channel, but the individual messages are. You can have more than one software instrument or external MIDI track assigned to the same MIDI port and channel.
![]() Event: An event is a single occurrence of any MIDI message. This can be as simple as a single MIDI message, such as a program change, or it can be a note message, which is actually a compound MIDI message consisting of multiple MIDI messages that are represented as a single MIDI event in Logic.
Event: An event is a single occurrence of any MIDI message. This can be as simple as a single MIDI message, such as a program change, or it can be a note message, which is actually a compound MIDI message consisting of multiple MIDI messages that are represented as a single MIDI event in Logic.
![]() Object: The term object can broadly apply to nearly anything graphically represented on your display, but in Logic, object specifically refers to a virtual studio building block in Logic’s MIDI Environment.
Object: The term object can broadly apply to nearly anything graphically represented on your display, but in Logic, object specifically refers to a virtual studio building block in Logic’s MIDI Environment.
The Logic Pro Main Window
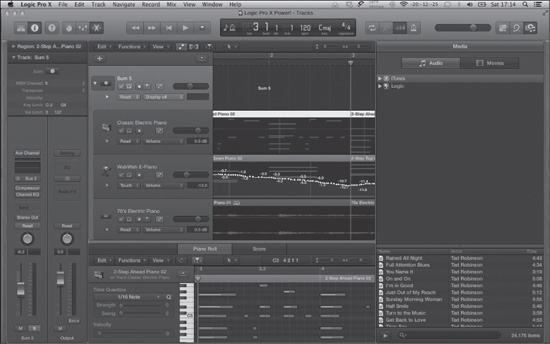
Those upgrading from pre–Logic 8 versions of Logic will notice that the former Arrange window, now called the Logic Pro main window, shown in Figure 2.1, has undergone a major transformation. Not only is it where you create tracks, record audio and MIDI, slice and splice MIDI and audio regions, and “arrange” them, but you can now access all the various editors, lists, and browsers directly in the Logic Pro main window! If you spent some time working with Logic 8 or 9, the main window in Logic X looks familiar, but there have been some significant changes. For those who are new to Logic, the Logic Pro main window is the first window you see when you launch Logic, and it is the window in which you will do the majority of your work. Figure 2.1 shows the Logic Pro main window in full-screen mode, which you access by clicking the arrows in the upper-right corner of the Logic Pro main window.
Figure 2.1 The Logic Pro main window, shown in full-screen mode, contains most of the commonly used setup, arrangement, recording, and editing functions.

© Apple Inc.
At the top of the main window is the control bar, a customizable selection of buttons for many common functions, such as accessing the Toolbar (now hidden by default in Logic Pro X) or accessing the main window Mixer and editors. The control bar also contains the transport controls, which have buttons to activate recording, turn on Cycle mode, and turn the metronome on and off, and it also includes the LCD, a display area that shows information about the position of the playhead, the project tempo and key, and so forth.
If you click the List Editors button or the Browser button at the right end of the control bar, a new pane will open on the right side of the main window, giving you access to items like the Event list and the Project Audio Browser. The Note Pads button gives you access to notes panes for your entire Logic project or for each individual track, and the Loop Browser button gives you access to your Apple Loops. Figure 2.1 shows the Lists area with the Event list displayed.
The left side of the screen includes the Inspector, which consists of a Region parameter box, a Track parameter box, and the main window channel strips. You can show or hide the Inspector by clicking the Inspector button in the control bar or by using the I key command. (Key commands are introduced later in this chapter in “The Key Commands Window.”) If you click the Library button at the right end of the control bar, the Library will open on the left side of the main window. In the Library, you can view and select the available patches for the selected track. Clicking the Library button again will hide the Library. To the right of the Inspector is the track list, which shows the track headers for all tracks in your project and the global tracks. Global tracks are covered in Chapter 4, “Global Elements of Logic.” The middle of the window is the Tracks area, which displays horizontal strips for each track and regions of audio or MIDI that are on your tracks. If you have automation mode on, as in Figure 2.1, you will also see track automation data in a track lane, meaning that track contains some automation data. The bar rule above the track list displays the measures of the song, and the playhead is the vertical line you see at measure 3, beat 1; it shows your exact location. The Tracks area is where you can perform Quick Swipe Comping, and you can also perform Flex Time and Flex Pitch directly in the Tracks area, along with much of your other region editing tasks.
You can also access the Mixer; the Audio Track and Audio File editors; the Piano Roll, Score, and Step editors; and the Smart Controls. As you can see, there are a lot of tools at your disposal, all in one window. In Chapter 6, “The Logic Pro Main Window,” we’ll explore in depth all the possibilities that the main window offers.
For those of you upgrading from GarageBand or who are new to computer-based recording entirely and who may feel overwhelmed by all the possibilities in Logic Pro X, you can work from a more manageable interface. It offers less access to the more powerful features in the main window, and less access to other windows available in Logic. As you become more comfortable with the features in Logic, you can add different capabilities selectively, growing your tools as you grow your knowledge. That said, this book will be diving into all the advanced features head first, so while you may want to manage the features while you do your own work, you will want full access to them while you work through this book. We’ll cover all of that in more detail in Chapter 3, “The Logic Project.” In the meantime, Figure 2.2 shows the Logic Pro main window with the advanced features disabled. Note that the MIDI editors at the bottom of the window offer one less option, and the browser on the right side of the window offers only the Media option.
The Mixer
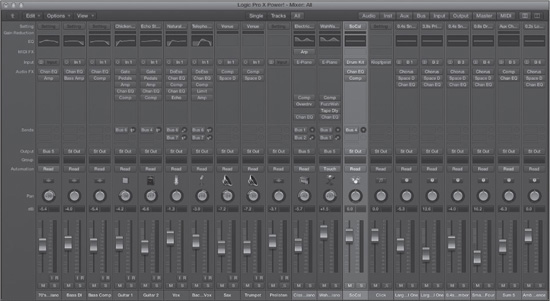
The Mixer contains a separate channel strip for every audio and MIDI track in the Tracks area, along with Auxiliary and Output channel strips. Normally, it instantly adapts to your current tracks setup, adding, deleting, and rearranging channel strips based on the contents of the Tracks area. As you can see in Figure 2.3, the Mixer resembles a standard mixing desk, with a channel strip for each channel.
You can use the Mixer to mix the volume, panorama, routings, effects, and so on of the audio and MIDI tracks in your song. You can move effects from one slot to another either within or between channel strips in the Mixer. You can choose to view only certain types of channels, all your Tracks area channels, or every channel strip in your entire project. You can adjust single or multiple channel strips at the same time. Finally, you can print a final stereo or surround audio file of your entire song from the Mixer.
Using the Mixer to mix your song is explained further in Chapter 11, “Mixing in Logic.”
Figure 2.2 For those of you who are new to computer-based recording or who are making the move from GarageBand to Logic, you can choose to work in a more managed environment with fewer advanced options.
© Apple Inc.
Figure 2.3 The Mixer automatically adjusts itself to reflect the audio and MIDI channels currently in your Tracks area.
© Apple Inc.
The Project Audio Browser
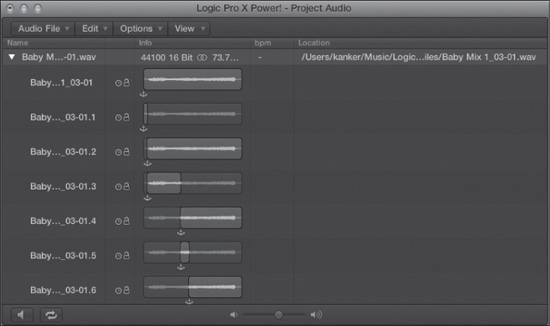
The Project Audio Browser is a catalog of all the audio files and audio regions used in a given Logic song. The Project Audio Browser can be found in the Browsers area of the main window or opened as its own separate window, the Project Audio window. The Project Audio Browser may look unassuming compared to some of the others, but don’t be fooled—as you can see in Figure 2.4, the Project Audio Browser is far more than a simple list of audio regions.
Figure 2.4 In the Project Audio Browser, shown here in its own separate window, you can add, subtract, loop, convert, and otherwise manipulate the audio files and regions in your Logic song.
© Apple Inc.
Using the various tools and menu options in the Project Audio Browser, you can audition, group, and adjust regions, as well as perform all sorts of file processes and conversions. You can also easily add audio regions to your Tracks area by simply dragging regions from the Project Audio Browser. The Project Audio Browser is easily one of the most important areas in Logic when you are using audio in your songs, as you’ll see in Chapter 7.
The Audio Editors
For those of you who are upgrading from earlier versions of Logic, you read that right: editors. Previously, there were only two areas in Logic where you could do heavy audio editing: the Arrange area and the Sample editor. Logic Pro X not only changed the name of the Arrange area to the Tracks area, but the Sample editor is now known as the Audio File editor. Additionally, Logic Pro X has introduced the Audio Track editor.
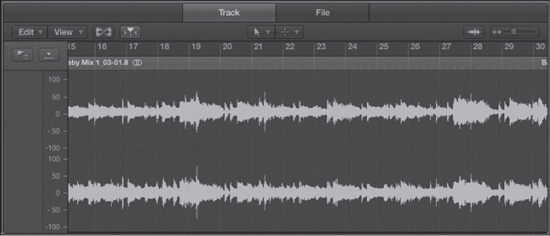
When you manipulate audio regions in the Tracks area, you are really only editing Logic’s pointers to a given audio file. The Audio Track editor gives you this same ability. However, in the Audio File editor, you can operate on the actual audio file itself. Both of these editors can be opened in the main window or in their own separate window. Figure 2.5 shows a stereo audio file in the Audio Track editor in the main window.
You can edit audio at the sample level in the Tracks area and both of the audio editors. One major benefit of using either audio editor is that you can work on your audio in a more focused setting, independent of all the other elements in your Tracks area. Additionally, the Audio File editor allows you to manipulate your audio destructively (in other words, permanently). Chapter 7 will give you more explanation on how to work with and edit audio in the Tracks area and both audio editors.
Figure 2.5 The Audio Track editor allows you to process and edit an audio file and offers amazingly precise resolution and editing tools.
© Apple Inc.
The Event List
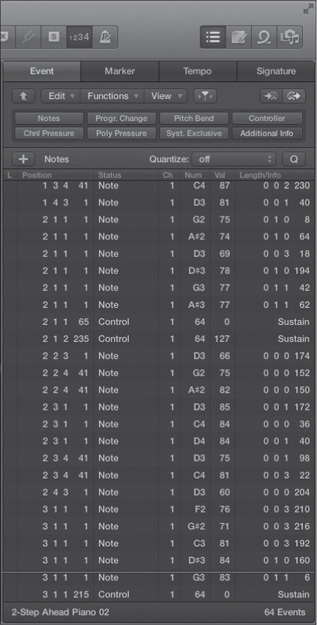
As you would imagine, the Event list gives you a detailed list of all the events for the selected window or region. If you are looking at the entire main window, the Event list shows you what region is coming up next; if you’re on a MIDI track, the Event list displays a detailed list of all the MIDI events in the track; and so on. Figure 2.6 shows an Event list of a MIDI track in the main window’s Lists area. It can also be opened in its own separate window and as a one-line floating window.
The Event list is not simply a textual view of information. It is a very powerful editor, offering you precise access to more parameters than any other editor. The Event list is also an excellent tool to use in tandem with the other editors. For example, you can use an Event list window to give yourself a precise view of your data while using another editor to operate on your song. You’ll learn more about methods of using the Event list in Chapter 8, “Working with MIDI.”
The Piano Roll Editor
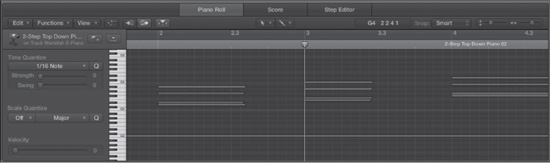
The Piano Roll editor is a MIDI note editor that displays MIDI note events as horizontal bars across the screen. The Piano Roll editor resembles a “piano roll” style of editor (so named because of its similarity to an old-time player piano song roll), with notes scrolling to the right of a graphic keyboard. It can be opened in the main window or in its own separate window, as shown in Figure 2.7.
If you want to program and edit your MIDI notes graphically, the Piano Roll editor is the place to do it. You not only can create and manipulate notes and control messages using the Piano Roll editor, but you can also use its more advanced features, including some new ones in Logic Pro X, which are detailed in Chapter 8.
The Step Editor
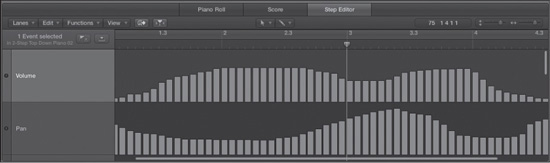
The Step editor (previously called the Hyper editor) is one of the least understood editors in Logic. It is a controller editor, a drum editor, and a grid editor all in one. It allows you to save event definitions as lane sets—or MIDI view filter templates, if you will—and complements the other Logic editors very well. Figure 2.8 shows a Step editor being used to create and edit MIDI controller data in the main window. It can also be opened in its own separate window.
Figure 2.6 The Event list allows users to view and edit data in a text list.
© Apple Inc.
Figure 2.7 The Piano Roll editor is just one of the powerful MIDI editors in Logic. It allows you to edit MIDI notes and controller values graphically.
© Apple Inc.
Figure 2.8 The Step editor can be a grid editor, a drum editor, or a controller editor. Here, it’s being used to create and edit MIDI controller data.
© Apple Inc.
Don’t worry if this definition seems a bit confusing right now. Chapter 8 will describe the many different uses for this powerful and often-overlooked MIDI editor. The Step editor might seem unusual at first, but its uniqueness and functionality are among the many features that set Logic apart from the pack.
The Score Editor
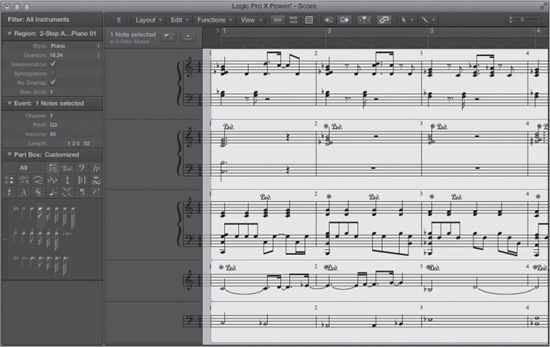
If you are comfortable working with musical notation, you will be comfortable with the Score editor. Logic’s Score editor not only allows you to view, create, and edit MIDI as if you were writing on sheet music instead of a computer, but it allows you to print out professional-quality score charts as well. Figure 2.9 shows a piano part of a song displayed as musical notation in a Score editor window. You can also open a Score editor in the main window.
Figure 2.9 The Score editor allows you to create, view, edit, and print your MIDI tracks in musical notation.
© Apple Inc.
The Score editor offers traditional musicians and composers complete access to the world of sequencing in a familiar format, while being as customizable and powerful as the rest of Logic. For Score editor users upgrading from earlier versions of Logic, you’ll be happy to know that the Score editor has seen improvements in Logic Pro X. You’ll learn about it all in detail in Chapter 8!
The Loop Browser
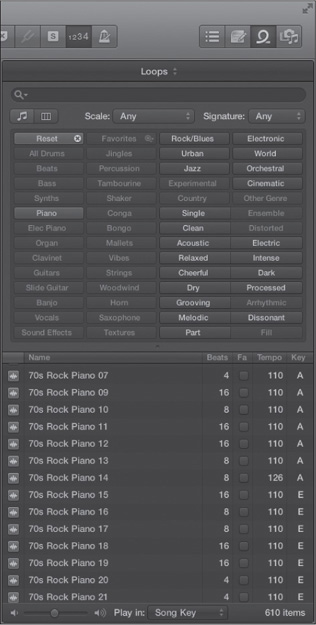
As discussed earlier in this chapter, Apple Loops are a special kind of audio file. To help distinguish them from the normal audio files in your Project Audio Browser, Apple Loops get their own special browser, as shown in Figure 2.10.
Figure 2.10 The Loop Browser lets you quickly locate and audition Apple Loops, as well as certain other types of loops such as ACID loops, and add them to the Tracks area.
© Apple Inc.
The Loop Browser allows you to quickly search, audition, and drag loops into your song. Apple Loops that you buy and drag onto the Loop window will automatically be indexed with the rest of your Apple Loops. You can index Apple Loops that you create however you choose. Other types of loops, such as ACID loops, may be accessible through the Loop Browser, but will not be indexed as thoroughly as Apple Loops. The Loop browser is available either as a tab in the main window or as its own window.
The Browsers
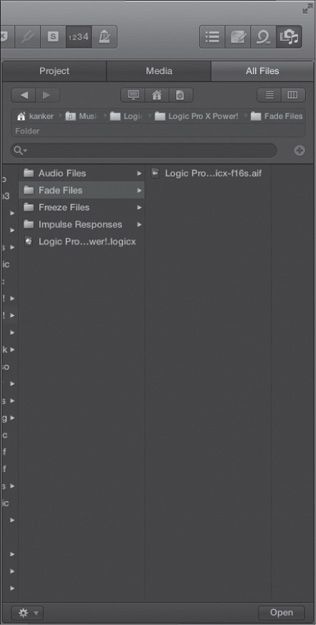
In addition to the Project Audio Browser, there are two other browsers that give you full access to all files on your computer or any connected drives that are usable in Logic. Figure 2.11 shows the contents of a folder in All Files view.
Figure 2.11 The browser gives you access to all the different files on your drives that Logic can use directly in the main window.
© Apple Inc.
The Media Browser allows you to see all the music and video files on your system, to audition audio files, and to add them directly to the Tracks area or to the Project Audio Browser for further processing. The All Files browser gives you access to your entire file system, allowing you to browse for and open other Logic or GarageBand projects, for example. We’ll go into more depth about the browsers in Chapter 6.
The Library
Sifting through banks of presets across different instruments to find the perfect sound can be difficult at best. The Library tab in the main window, shown in Figure 2.12, makes this problem virtually disappear.
Figure 2.12 The Library makes finding the right plug-in preset fast and convenient, giving you instant access to all your Logic presets.

© Apple Inc.
The Library gives you immediate access to presets for all the Logic instruments and effects, channel strip presets, settings for your Audio Units plug-ins that you save via the plug-in control bar, and patches. Additionally, ReWire instruments and External MIDI instruments you have configured either in the Environment window or in Audio MIDI Setup (found in your/Applications/Utilities folder) can be accessed in the Library.
A Note on Logic’s Use of Mac OS X Directories: You may have already noticed that the Logic Pro file in your Applications directory does not have a folder around it, as some other programs you may own do. This is because Logic Pro follows Apple Inc.’s guidelines for where the support files for applications should go.
Logic Pro files are in one of two places:
![]() Factory presets and support files are in the “local” directory (meaning, at the level of your hard drive): /Library/Application Support/Logic.
Factory presets and support files are in the “local” directory (meaning, at the level of your hard drive): /Library/Application Support/Logic.
![]() User presets and support files are in your user directory (with “~” being the UNIX symbol for the Home directory for a given user): ~/Library/Application Support/Logic. They can also be found in ~/Music/Audio Music Apps.
User presets and support files are in your user directory (with “~” being the UNIX symbol for the Home directory for a given user): ~/Library/Application Support/Logic. They can also be found in ~/Music/Audio Music Apps.
As you see, there’s really only a single folder to which you’ll be adding information, and that’s the user folder. It’s also very convenient to back up just this one folder and know that all your presets, templates, sampler instruments, and so on have been backed up.
The Marker, Tempo, and Signature Lists
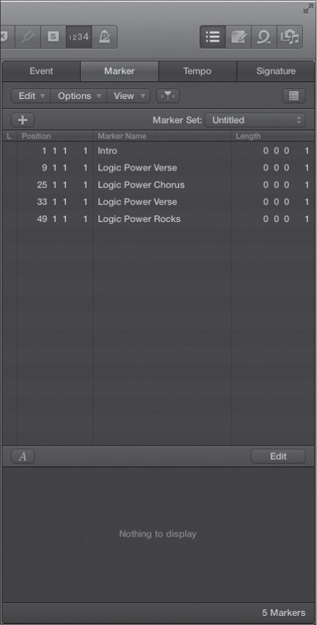
There are three other lists that can be found in the List Editors area of the Logic Pro main window—the Marker list, the Tempo list, and the Signature list. Each list allows you to create, edit, and delete events for its respective global track. Figure 2.13 shows a Marker list open in the List Editors area of the main window. Each of these lists can also be opened in a separate window. These lists will be covered in detail in Chapter 4.
Smart Controls
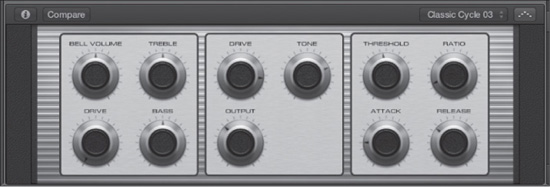
Smart Controls are one of the cool new features in Logic Pro X. Basically, Smart Controls give you access in the main window to the essential parameters for whatever plug-ins you have activated on the selected track. In other words, if you want to make quick edits to the effects on a given audio track or to a software instrument and the effects loaded in that track, opening that track’s Smart Controls lets you work on all the plug-ins on a track simultaneously, without having to open each individual plug-in window. Figure 2.14 shows the Smart Controls for the channel strip patch Classic Electric Piano. This channel strip patch includes the Vintage Electric Piano software instrument and the Overdrive and Compressor effects. The Smart Controls for those three plug-ins are arranged left to right, respectively.
You can also edit existing Smart Controls and create your own Smart Controls for Logic’s built-in instruments and effects and for third-party plug-ins and save them in a patch. You can map Smart Controls to your hardware controller, and even use Smart Controls to write track automation! Smart Controls also feature built-in access to the MIDI effect, Arpeggiator. Smart Controls are covered in detail in Chapter 6.
Track Stacks
Another powerful new feature in Logic Pro X is Track Stacks. A Track Stack is a handy way to group tracks for mixing and processing. You can combine several tracks into a stack, giving you a main track at the top of the stack that can be used to control all the other tracks in the stack.
Figure 2.13 A Marker list open in the List Editors area of the main window. The Marker, Tempo, and Signature lists make creating, editing, and deleting events for their respective global tracks very easy.
© Apple Inc.
Figure 2.14 Smart Controls give you quick access to the most essential parameters of any software instrument and/or effects on a given track.
© Apple Inc.
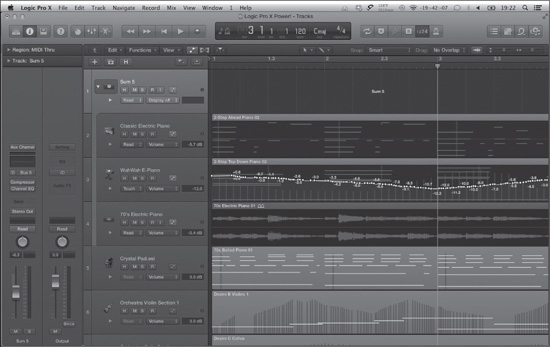
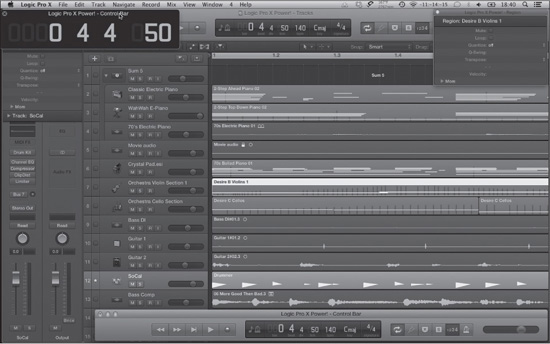
There are two types of Track Stacks: Folder Stacks, which give basic control over volume, mute, solo, and automation for all tracks in the stack as a group, and Summing Stacks, which give you all the capabilities of the Folder Stack and let you process the output of all the tracks as a group. Figure 2.15 shows a Summing Track Stack in the Tracks area. Note the top track, Sum 5, contains three electric piano tracks, two with MIDI regions and one with an audio region. Also note that the left channel strip in the Inspector is the master channel strip for the Sum 5 Track Stack, and that it allows you to insert effects and route the output of the channel to sends.
Figure 2.15 Track Stacks let you combine several tracks into one group for mixing and processing.
© Apple Inc.
Drummer
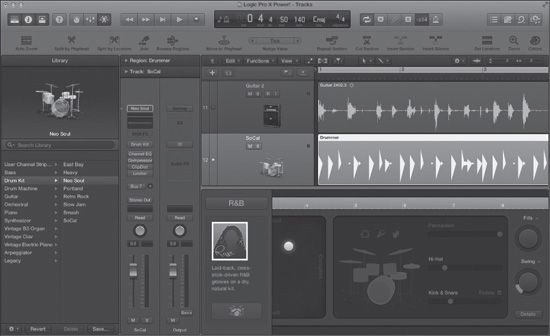
One other feature introduced in Logic Pro X is Drummer, a new type of track that is an editable virtual drummer. There are four different musical styles represented by Drummer, and multiple different “drummers” available per style. A Drummer track will contain at least one Drummer region, and a Drummer editor can be opened in the Editors area of the main window. Figure 2.16 shows a Drummer track with a Drummer region and the Drummer editor. You can also see some drum kit options in the Library, and the Drummer channel strip with pre-loaded effects.
Drummer also includes a Drum Kit Designer, allowing you to make custom kits. You can even have access to channel strips associated with each drum in the kit. Drummer will be covered in more detail in Chapter 6.
Figure 2.16 The new Drummer track puts a virtual drummer at your disposal, day or night.
© Apple Inc.
The Environment
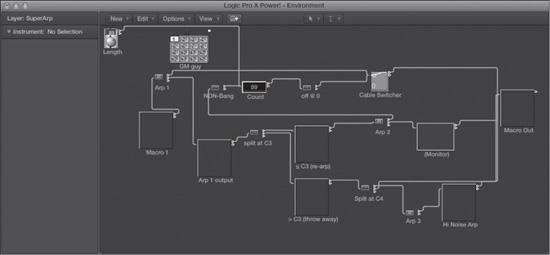
The Environment is a window that offers you a library of graphical, onscreen objects that allow you to set up a virtual studio inside Logic, including all your studio objects and hardware routings (see Figure 2.17). The Environment also allows you to route external hardware with virtual processes and transformers. It’s perhaps the most flexible, powerful, and (for some) daunting aspect of Logic.
For a long time, working in the Environment was essential to using Logic. Fortunately, the last few revisions of Logic have removed the need for most Logic users to ever have to tinker with the Environment. The introduction of Smart Controls with arpeggiators in the main window in Logic Pro X further distances the user from the need to work in the Environment. That said, if customizing your system for full control of a huge array of MIDI functions, including building a custom programming interface for your hardware synthesizers, then you will want to spend time learning about the power of the Environment. No other sequencer allows you to get under the hood to create unique devices and routings like Logic’s Environment, and it will take time for you to feel comfortable using this power.
Notice that the Environment window itself is just an expansive open workspace, and that’s exactly what the Environment offers you—an open surface on which to create your ideal studio. Let’s look at another aspect of the Environment: layers.
Environment Layers
The Environment offers nearly infinite routing possibilities. Without some sort of organization, the Environment window would quickly become an unmanageably large space in which you would find yourself scrolling constantly to get to any structure you have created. To simplify and organize the Environment, Logic includes the concept of Environment layers. Notice that the left frame of the Environment window in Figure 2.17 includes a box called Layer. In this case, the layer is named SuperArp.
Figure 2.17 The Environment offers you nearly unlimited options for the construction of your own devices and routings inside Logic.
© Apple Inc.
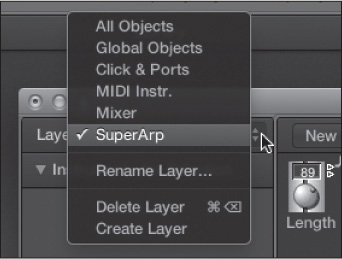
If you click on the layer name, Logic displays a menu that contains all the available layers in that song’s Environment, as shown in Figure 2.18.
Figure 2.18 This pop-up menu shows all the different layers available in the Environment of this song and enables you to create new layers on the fly.
© Apple Inc.
Layers allow you to organize your Environment into different levels, into which you can put as much or as little as you like to keep each Environment construction easily accessible. Putting different objects on different layers doesn’t affect the way Logic processes the signals, but it does allow you to organize the Environment into more manageable sections.
You’ll notice that Logic includes a few Environment layers out of the box. There is a special one worth looking at here: the Environment Mixer layer.
The Environment Mixer Layer
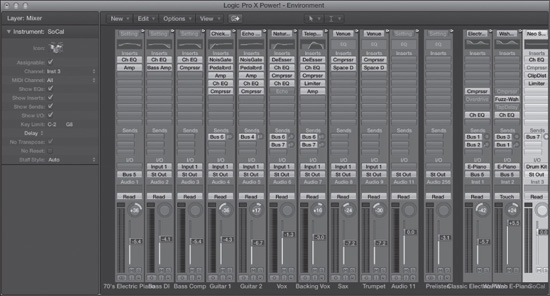
Every main window and Mixer channel strip has a corresponding Environment channel strip object. For your convenience, Logic automatically creates an Environment layer, called the Mixer layer, that consists of every audio, software instrument, input, output, aux, bus, and master channel strip in your project. By placing all these objects in the Mixer layer of the Environment, you keep the layer’s contents separate from all the other layers in the Environment. You can access this layer from the Layer pop-up menu. Figure 2.19 shows a Mixer layer for a Logic project.
Figure 2.19 The Mixer layer of the Environment contains a complete mixer representing every audio and MIDI channel and routing for your current project.
© Apple Inc.
At first blush, this screen looks a lot like the Mixer shown in Figure 2.3, but the Environment Mixer layer doesn’t contain any MIDI channel strips. You’ll learn more about both mixers later; for now, you should just know you have a choice.
Unfortunately, exploring the full potential of the Environment is outside the scope of this book. For those of you who are keen to master the potential of the Environment, there are resources on the Internet, such as www.logic-users-group.com. Here, you can find expert Environment users willing to answer questions from beginners to very advanced users.
The MIDI Transform Window
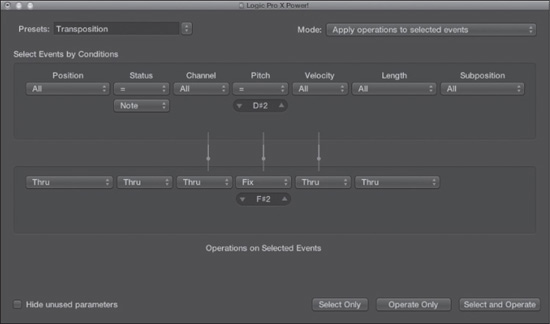
The MIDI Transform window allows you to alter events according to definable parameters. If that sounds confusing, you’re not alone—the MIDI Transform window is definitely complicated. To give you a quick example of a use for the MIDI Transform window, if you wanted to change all the D#2 notes in a given track to F#2 without manually editing the notes, you could quickly perform that action in the MIDI Transform window, as shown in Figure 2.20.
You can design your own transformations using amazingly complex data manipulations involving multiple criteria and data mapping, or use the transformations that Apple includes for you with Logic. If all that sounds difficult, don’t worry; Chapter 8 explains this feature in detail.
Figure 2.20 The MIDI Transform window is powerful enough to make complex global data transformations based on a custom set of criteria. You can also use it to make relatively uncomplicated changes, such as the simple note transposition here.
© Apple Inc.
The Key Commands Window
Every program allows you to access its features through keyboard shortcuts in addition to selecting commands with the mouse. This is nothing new. However, Logic makes more extensive use of key commands than most applications. In fact, the Key Commands window by itself offers many more options than most applications, as you can see in Figure 2.21.
For most users, accessing functions via key commands is much quicker than using the mouse, so most professional applications offer a vast selection of their functions via key commands. The more flexible applications often allow users to define their own keys to personalize the application to reflect their preferences. Logic takes this a step further—not only can nearly every feature be accessed via a key command, but, in fact, many commands in Logic can only be accessed via key command. Also, many key command–only functions do not come with those commands preassigned to keys, so to access such commands, the user first must define them. Setting up your own key commands in Logic is discussed in the following chapter.
It might seem counterintuitive for some commands to be available only via key commands, fueling Logic’s reputation for being difficult to learn. In truth, it is for ease of use that some of the advanced, expert features are available only via key commands. Rather than crowd each menu with large numbers of commands that most people would never use, Logic makes the least accessed and most obscure functions available for those who need them, but keeps them out of the way of everyone else.
Right–Mouse Button Preferences
If you are using a two-button mouse, you can configure Logic to perform one of four functions when you right-click (or Control-click):
![]() You can assign it to a specific tool.
You can assign it to a specific tool.
![]() You can assign it to open the Tool menu.
You can assign it to open the Tool menu.
![]() You can assign it to open contextual shortcut menus.
You can assign it to open contextual shortcut menus.
![]() You can assign it to open combined Tool and contextual menus.
You can assign it to open combined Tool and contextual menus.
Figure 2.21 Key commands are an integral part of Logic, as you can see by the features of the Key Commands window and the number of commands that are available only as key commands.

© Apple Inc.
If you are using a trackpad, you can assign a secondary click gesture in the System Preferences Trackpad pane to access the right–mouse button preference you assign. Each option has its uses, but it’s up to you to decide which one works best for you.
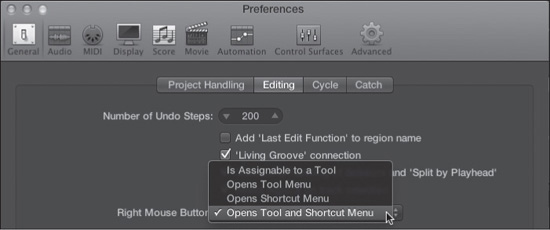
It’s easy to configure your right-click preference in Logic. Simply open the Editing tab in the General Preferences window by selecting Logic Pro > Preferences > General or by choosing General in the Preferences menu in the Toolbar and selecting the Editing tab. Figure 2.22 shows the Editing tab of the General Preferences window. Then open the Right Mouse Button pop-up menu and choose one of the following:
![]() If you choose Is Assignable to a Tool, you will have three tool options at your immediate disposal at all times—one for when you click, one for when you Command-click, and one for when you right-click.
If you choose Is Assignable to a Tool, you will have three tool options at your immediate disposal at all times—one for when you click, one for when you Command-click, and one for when you right-click.
![]() If you select Opens Tool Menu, then every time you click the right mouse button, a menu will open in which you can select the tool you would like to use.
If you select Opens Tool Menu, then every time you click the right mouse button, a menu will open in which you can select the tool you would like to use.
![]() If you want to have access to contextual menus with your right mouse button, then select the Opens Shortcut Menu option.
If you want to have access to contextual menus with your right mouse button, then select the Opens Shortcut Menu option.
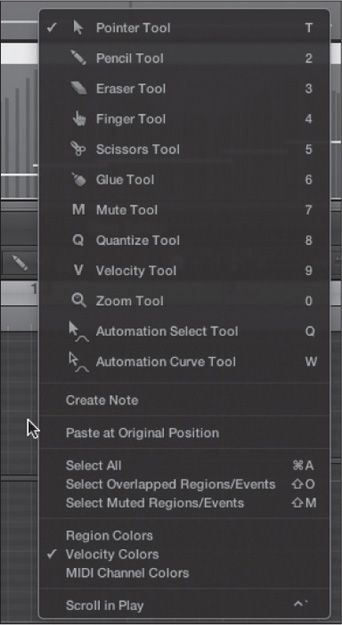
![]() If you think that having access to both tools and contextual menus would work best, you can assign your right-click preference to Opens Tool and Shortcut Menu, like the one shown in Figure 2.23.
If you think that having access to both tools and contextual menus would work best, you can assign your right-click preference to Opens Tool and Shortcut Menu, like the one shown in Figure 2.23.
It’s important to note that the Tool menu and Shortcut menu contents will vary depending on the window, and sometimes even the area of the window, in which you are working, and that not all shortcut menus will have tools. (If it’s not the Tracks area or an editor, it’s likely not to have tools.) Also remember that although you may choose to assign the right-click preference to a third tool or to access the Tool menu, whenever you see the phrase “right-click” in this book, it means any of the different methods you can use to open a contextual menu: right-click, Control-click, or your assigned trackpad gesture. For the purposes of this book, I will be using the Opens Shortcut Menu setting to cover the different contextual menu items available the majority of the time. In my own general workflow, I find having both the tools and the menus available to be the more elegant approach.
Figure 2.22 The Editing tab of the General Preferences window. You can configure your right-click preference in the Right Mouse Button pop-up menu.
© Apple Inc.
Figure 2.23 If you assign your right–mouse button preference to Opens Tool and Shortcut Menu, then whenever you right-click, a menu featuring both tools and contextual shortcuts will open.
© Apple Inc.
Screensets
Most sequencers allow you to arrange the various windows and editors onscreen and save these screen formats. As with key commands, however, Logic takes the concept and runs with it in its own uniquely powerful ways. Screensets are not simply an available option in Logic; they are an integral part of how you use the application. Notice that a number appears in the Logic menu bar, as shown in Figure 2.24. This number (4 in Figure 2.24) indicates the designated number of the screenset that you are currently accessing. You can access up to 90 screensets directly from the numeric keypad, and you can access additional screensets from the Next Screenset and Previous Screenset key commands. As you open, close, and move windows around, Logic automatically remembers them; the next time you launch your Logic song, it will automatically have the same windows, open in the same location, in each screenset.
Figure 2.24 Screensets are not an afterthought or a hidden option in Logic. The active screenset is prominently displayed in Logic’s menu bar. Here the menu bar shows that screenset 4 is active.
© Apple Inc.
Setting up your screensets helps you create your own ideal workspace and is one of the ways in which Logic is unique—allowing every user to customize Logic to suit himself or herself. In fact, setting up screensets is one of the first things you’ll want to do as you customize Logic for yourself, as you will see in the next chapter.
Speaking of customizing Logic to suit your needs, now that you have an idea of the possibilities of Logic, it’s time to set up your default template. The next chapter, “The Logic Project,” will explain how.