
13 Advanced Tempo Operations
TEMPO, MEANING SPEED AND TIMING, is one of the most important elements in music. Tempo management can be as simple as agreeing on the tempo of a song and asking all the musicians to play in time, or it can be as complicated as keeping track of multiple tempo changes throughout a musical movement—or even continuous tempo changes. With digital audio sequencers being the nerve center for both electronic and acoustic, programmed and performed tracks, it becomes vital that the sequencer keeps everything synchronized and gives the user the tools to fully implement whatever tempo requirements he has.
Luckily, Logic is up to the task. Logic offers many different tempo functions and, in typical Logic fashion, many ways to use them, depending on your own personal style. It can sync with external hardware through a number of common protocols, and it keeps perfect internal sync.
We have already discussed the most innovative and intuitive controls Logic gives you over tempo: the tempo and beat-mapping tracks, discussed in detail in Chapter 4, “Global Elements of Logic.” By contrast, in this chapter, you’ll explore Logic Pro’s other tools to work with tempo and synchronization
Tempo Operations Versus Flex Time: If you’re not familiar with the musical concept of tempo, I forgive you for thinking that “tempo operations” are part of Logic Pro’s Flex Time functions. After all, Flex Time is supposed to adjust audio to the tempo, right? But in fact, it is the reverse: Flex Time relies on Logic’s facility with tempo. Here’s a quick explanation.
As explained, Logic includes lots of functions to manage the tempo—that is, the speed and timing—of your project. Flex Time is a subset of features that lets you manage the tempo of your audio regions. So for example, say you use Flex Time’s quantize features to adjust your audio to the song tempo. Flex is relying on Logic’s tempo operations to define and manage the project tempo, which then determines how Flex will quantize the “flexed” audio region. As you can see, because Flex relies on Logic’s tempo management to work its magic, Logic’s tempo operations are far more than simply an aspect of Flex Time.
The Tempo Display
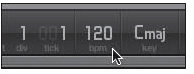
The first step in tempo management is to know what the tempo is. As discussed in Chapter 5, “Transport Controls and Recording,” the tempo is shown in the Tempo display in the LCD area of the transport in the control bar. Figure 13.1 shows this.
Figure 13.1 As you recall from Chapter 5, the Tempo display in the LCD area in the transport shows the current song tempo. Chapter 5 also explained how to change the display preferences for the Tempo display if you want.
© Apple Inc.
The Tempo display will show the current song tempo even if an external device to which Logic is synced is determining the tempo. If your Logic project has only a single tempo, and Logic is the master of any external devices (or if you have no external devices and Logic is the only tempo master), the easiest way to set the tempo is simply to double-click the tempo in the Tempo display and manually enter the correct number. For more involved tempo manipulation, Logic offers a number of methods to edit tempo.
Recording and Editing Tempo
Whether you want to add only a few subtle tempo changes or a complex set of evolving tempos for different movements, Logic gives you a number of methods to record and edit tempo changes. This section discusses the variety of ways you can perform or program tempo changes.
Programming Tempo Changes on the Tempo Track
The tempo track discussed in Chapter 4 not only displays any tempo changes in your song, but also gives you an intuitive track on which to enter your tempo changes. Please refer to the section titled “The Tempo Track” in Chapter 4 for the complete details.
Recording Tempo Changes
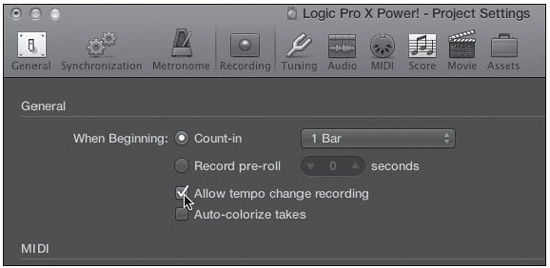
To record tempo changes while you are performing (for example, by adjusting a Tempo slider on external hardware), make sure the Allow Tempo Change Recording checkbox is selected in the Recording screen of the Project Settings window. To access this screen, open the File menu, choose Project Settings, and click the Recording option. Figure 13.2 shows this preference turned on.
Figure 13.2 Select the Allow Tempo Change Recording checkbox in the Recording screen of the Project Settings window if you want to record tempo changes in real time.
© Apple Inc.
After you select this checkbox, any tempo changes you make while recording will be saved into the tempo track, which is the internal list of tempo changes that Logic maintains to manage a song’s tempo. The next subsections discuss the two ways to access, add to, and edit that tempo track.
Tap Tempo and the Tempo Interpreter
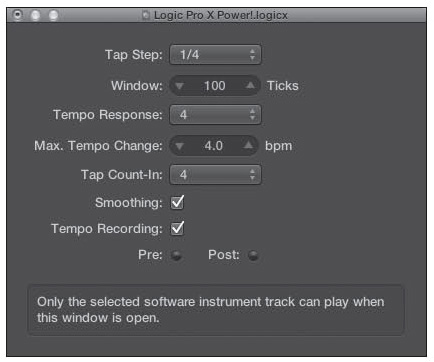
If you want to record your tempo live, perhaps the best way to do so is to tap your tempo into Logic as you are performing. To accomplish this, Logic includes a Tap Tempo key command (which you would need to assign) and a Tempo Interpreter window.
To access the Tempo Interpreter window, in the Tracks area or Tempo List editor, open the Edit menu, choose Tempo, and select Tempo Interpreter. Alternatively, click and hold the Sync button on the transport (see Chapter 5) to reveal its pull-down menu and select Open Tempo Interpreter. Figure 13.3 shows the Tempo Interpreter window.
Figure 13.3 The Tempo Interpreter window.
© Apple Inc.
This window enables you to configure how Logic will interpret those tempos that you tap in with the Tap Tempo key command. A description of the parameters follows.
![]() Tap Step: This sets the note value that Logic will assign to each of your taps. Generally, the best possible selection is 1/4 notes. Smaller figures will give you too much variation, and larger divisions will not accurately capture the tempo.
Tap Step: This sets the note value that Logic will assign to each of your taps. Generally, the best possible selection is 1/4 notes. Smaller figures will give you too much variation, and larger divisions will not accurately capture the tempo.
![]() Window (Ticks): This adjusts how much of a window in time there is in which taps will be interpreted as tempo taps. In other words, if you set a huge window, only taps that are a very large number of ticks apart will be counted as taps for determining tempo. If you set a tiny window, nearly every tick will be counted. In general, you’ll want this value to be large enough that double-clicks or ghost-clicks won’t be counted but anything else will.
Window (Ticks): This adjusts how much of a window in time there is in which taps will be interpreted as tempo taps. In other words, if you set a huge window, only taps that are a very large number of ticks apart will be counted as taps for determining tempo. If you set a tiny window, nearly every tick will be counted. In general, you’ll want this value to be large enough that double-clicks or ghost-clicks won’t be counted but anything else will.
![]() Tempo Response: This sets Logic’s internal sensitivity for tempo changes. The higher the value, the more responsive Logic will be—meaning, the more often Logic will change the tempo of the song. If you are hoping for a constant tempo, a value of 2 should work. If you are expecting some tempo changes, a value of 4 is recommended.
Tempo Response: This sets Logic’s internal sensitivity for tempo changes. The higher the value, the more responsive Logic will be—meaning, the more often Logic will change the tempo of the song. If you are hoping for a constant tempo, a value of 2 should work. If you are expecting some tempo changes, a value of 4 is recommended.
![]() Max. Tempo Change: You probably don’t want wild changes in your song. You should set as small a value as possible here so that any inconsistencies in your tapping don’t result in outlandishly large tempo variations.
Max. Tempo Change: You probably don’t want wild changes in your song. You should set as small a value as possible here so that any inconsistencies in your tapping don’t result in outlandishly large tempo variations.
![]() Tap Count-In: This enables you to tap a count into your song. Type in the number of taps you want as a count (if any).
Tap Count-In: This enables you to tap a count into your song. Type in the number of taps you want as a count (if any).
![]() Smoothing: If you select this checkbox, any jumps in tempo will be smoothed out. If you want your taps to be followed exactly, do not select this checkbox.
Smoothing: If you select this checkbox, any jumps in tempo will be smoothed out. If you want your taps to be followed exactly, do not select this checkbox.
![]() Tempo Recording: This will create a realtime Tempo List editor if you are creating tap tempo events in Record mode. Normally, you will not need this, so you’ll want to leave it off.
Tempo Recording: This will create a realtime Tempo List editor if you are creating tap tempo events in Record mode. Normally, you will not need this, so you’ll want to leave it off.
![]() Pre and Post: These have to do with how your taps are displayed onscreen. If you select the Pre option, every tap that is input will be displayed. If you select the Post option, only those taps that are in the accepted timeframe defined in the Window parameter above will be displayed. Accepted taps flash yellow; unaccepted taps flash red. If you do not select either option, of course, no taps will flash at all.
Pre and Post: These have to do with how your taps are displayed onscreen. If you select the Pre option, every tap that is input will be displayed. If you select the Post option, only those taps that are in the accepted timeframe defined in the Window parameter above will be displayed. Accepted taps flash yellow; unaccepted taps flash red. If you do not select either option, of course, no taps will flash at all.
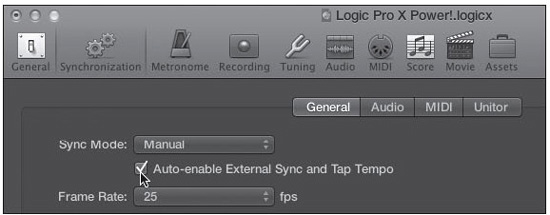
In the General screen of the Synchronization window, you will need to set the Sync Mode menu to Manual and ensure that the Auto-Enable External Sync and Tap Tempo checkbox is selected, as shown in Figure 13.4. To access this screen, open the File menu, choose Project Settings, and click Synchronization. Alternatively, click and hold the Sync button in the transport and select Synchronization Settings. You can also change the sync mode by clicking and holding the Sync button and selecting the desired sync setting.
Figure 13.4 The Synchronization screen of the Project Settings window. Under the General tab, set the Sync Mode setting to Manual and select the Auto-Enable External Sync for Logic checkbox to recognize tap tempo.
© Apple Inc.
Remember, you will need to assign a key command or MIDI command to record tempo this way.
Realtime Tempo Fader
One of the special Environment fader objects is a Tempo fader. To create this object, in the Environment, open the local New menu, choose Fader, select Specials, and choose Tempo Control. You can use this fader to create realtime tempo changes in Logic by using the mouse to adjust the fader value. The range of this fader is 50–177 BPM.
If you only want to adjust the tempo during playback, you do not need to cable the fader to anything. You can simply click and drag the fader, and the playback tempo will change. However, if you want to record your tempo changes or control the fader from something like a hardware MIDI device’s pitch bend wheel (you can set this to another controller if you like, but using the pitch bend wheel generally works best during a MIDI performance), you’ll need to connect the fader between the physical input and sequencer input objects. Fortunately, when you create the Tempo fader, a window opens, reminding you how to cable the tempo fader!
If you’d like to configure a MIDI controller for your Tempo fader, select Control in the Tempo fader’s Object Inspector, set the channel to the correct MIDI channel, and set the 1 parameter to the desired MIDI controller number.
Tempo List Editor
The Tempo List editor is available in the Lists area of the main window and as a floating window. You can create and edit tempo events in a text-based format using the Tempo List editor. If you click and hold the transport’s Sync button, you can select Open Tempo List from the pull-down menu, which will open the Tempo List editor. You also can access the Tempo List editor via the Tracks area and the Lists area Tempo List editor by opening the Edit menu, choosing Tempo, and selecting Show Tempo List, via the Option+Shift+T key command, or by clicking and dragging the Tempo heading in the Lists area. Figure 13.5 shows the Tempo List editor.
Figure 13.5 The Tempo List editor.
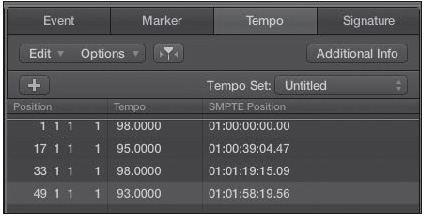
© Apple Inc.
You will notice that this basically looks like a standard Event list. You can manipulate the events in the Tempo List editor similarly to how you would in a normal Event list, as described in Chapter 8, “Working with MIDI.” You can add tempo events at the current playhead position by clicking the Create New Tempo Event button (the plus sign [+] below the Tempo List Edit menu). A new tempo event will appear, which you can edit by double-clicking on any parameter (Position, Tempo, or SMPTE Position). Press Return to enter the data. Also, you can click on any of the parameters and drag up or down with your mouse to change the value. If you have created any tempo curves in the tempo track, engaging the Additional Info button will display more events along the tempo curves. Finally, you can delete tempo events by pressing the Delete key or using the Eraser tool.
TIP: Sometimes, you may want more than a single Tempo List editor in order to experiment with different tempos, changes in different places, and so on. To facilitate this, Logic allows you to store several alternative Tempo List editors, called tempo sets. The Tempo Set menu, accessible in the Tempo List editor or by clicking on Tempo in the tempo track header, lets you create, delete, and rename tempo sets, and also select what tempo set is in use. Remember that because the Tempo List editor and the global tempo track are showing the same information in different ways, any changes you make to tempo events in one editor will show up in the other editor.
Tempo Operations
You can access the Tempo Operations window in a number of ways. You can open the Edit menu in the Tracks area and Tempo List editor, select Tempo, and choose Tempo Operations. You can also open the Tempo Operations window from the pull-down menu accessible from the Sync button, as with the Tempo editors. Figure 13.6 shows the Tempo Operations window.
Figure 13.6 The Tempo Operations window.
© Apple Inc.
As with the tempo track and Tempo List editor already discussed, the Tempo Operations window provides another option for creating and editing tempo changes. To use the Tempo Operations window, you’ll need to make a selection in another Tempo List editor; your tempo will be shown in the window. You might have to re-open the Tempo Operations window to reflect any recent tempo changes.
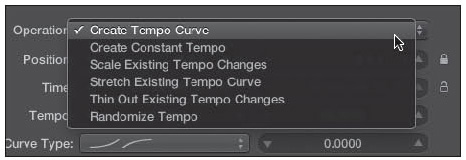
The Operation pull-down menu, shown in Figure 13.7, contains the six functions possible in the Tempo Operations window.
Figure 13.7 The Operation pull-down menu lists the six functions possible in the Tempo Operations window.
© Apple Inc.
The following sections describe each of the Tempo Operations window functions. You will find that most of these processes can be accomplished more quickly and intuitively in the tempo track.
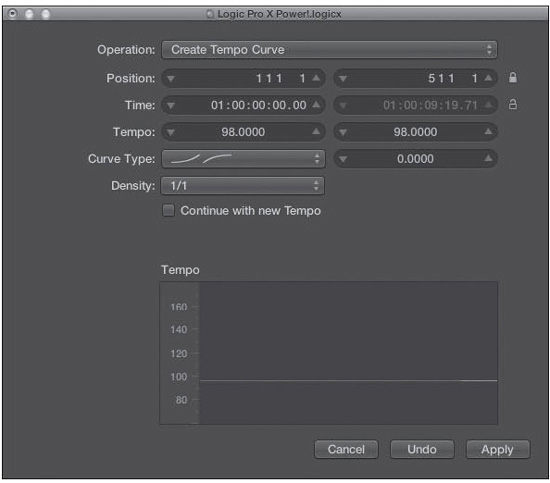
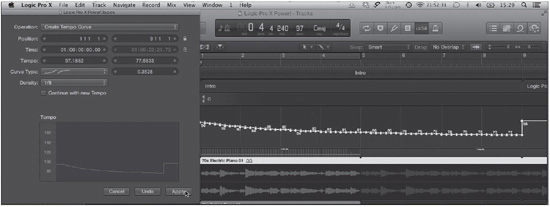
Create Tempo Curve
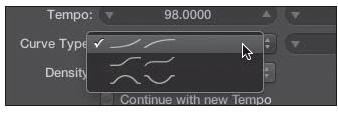
This function enables you to create a tempo curve. To generate a curve, first choose one of the three curves available from the Curve Type pull-down menu, shown in Figure 13.8.
Figure 13.8 The Curve Type pull-down menu in the middle left of the Tempo Operations window contains the three curve shapes that you can choose for your tempo curve.
© Apple Inc.
After you’ve chosen a curve, adjust the Position or Time settings to set the start position and end position of your tempo change curve. Below those parameters, enter the starting and ending tempos you want in the tempo track. Finally, set the Curvature parameter in the field to the right of the Curve Type menu, which determines the curve on which your tempo will speed up or slow down, depending on whether you enter a positive or a negative number. Values between 1.0000 and −1.0000 are allowed. After that, clicking the Apply button will create your tempo curve.
If you need more tempo events for a smoother curve, you can enter a smaller note denomination in the Density parameter. Figure 13.9 shows a descending tempo curve created using 1/8 notes.
Figure 13.9 This curve was created by the Create Tempo Curve operation generating one tempo event every 1/8 note over the area specified by the chosen parameters.
© Apple Inc.
You can select the Continue with New Tempo checkbox if you want your song to maintain the tempo at which your curve ends. If you want to revert to the original song tempo after your curve, leave this checkbox unchecked.
As you can see, creating tempo curves on the tempo track is far simpler than using the Tempo Operations window!
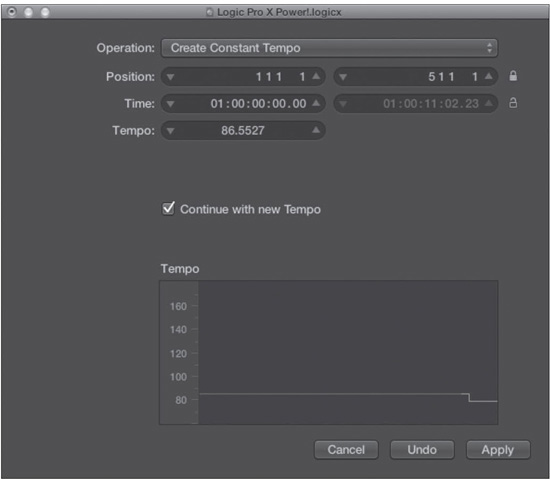
Create Constant Tempo
If you want to eliminate all tempo events for a given area and simply set one tempo for a given length of time, this operation will do it. As you can see in Figure 13.10, the only options with this function are the Position and Time settings for the start and end positions your constant tempo should be set and the Tempo field to enter what the tempo should be.
Figure 13.10 The Create Constant Tempo screen of the Tempo Operations window.
© Apple Inc.
You can use the Continue with New Tempo checkbox to either maintain this tempo for the rest of the song or revert to the original tempo after your section of constant tempo. Again, this process has been superseded by the tempo track.
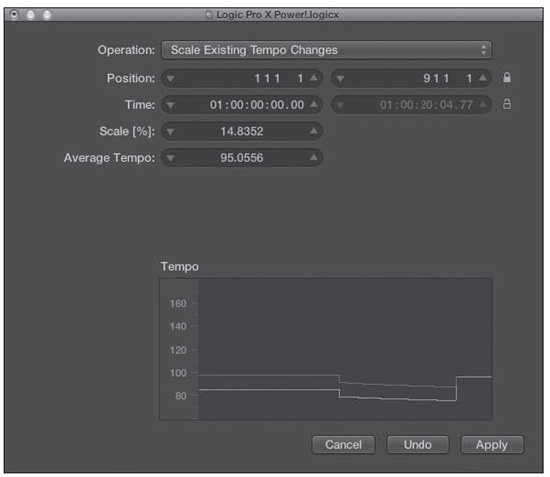
Scale Existing Tempo Changes
This lets you adjust currently existing tempo functions proportionally. You can set the Position and Time settings to determine the start and end positions across which you want your scaling to occur. You then enter the percentage of scaling you want to apply to the current tempo events and the average tempo. Figure 13.11 shows the Scale Existing Tempo Changes settings.
Figure 13.11 The Scale Existing Tempo Changes settings.
© Apple Inc.
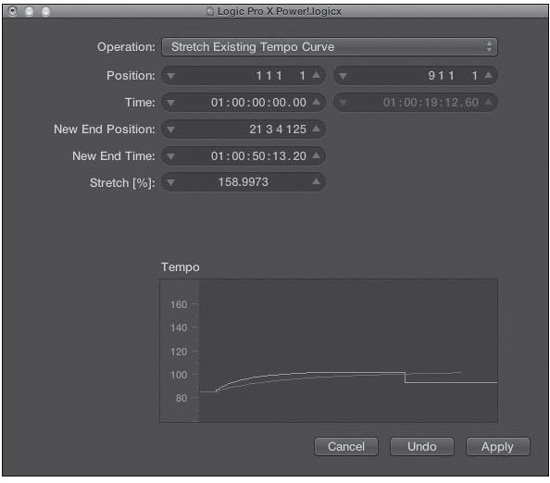
Stretch Existing Tempo Curve
This enables you to shrink or elongate an existing tempo curve. You can adjust New End Position and New End Time settings as well as the percentage of stretching you want as you adjust the length of the existing tempo curve. Figure 13.12 shows the Stretch Existing Tempo Curve screen.
Figure 13.12 The Stretch Existing Tempo Curve settings.
© Apple Inc.
Thin Out Existing Tempo Changes
This lets you remove tempo events from a given length of time. You can set the position or time at which you want the thinning to occur and the density of events you want to remain after processing. Figure 13.13 shows the Thin Out Existing Tempo Changes screen.
Figure 13.13 The Thin Out Existing Tempo Changes settings.
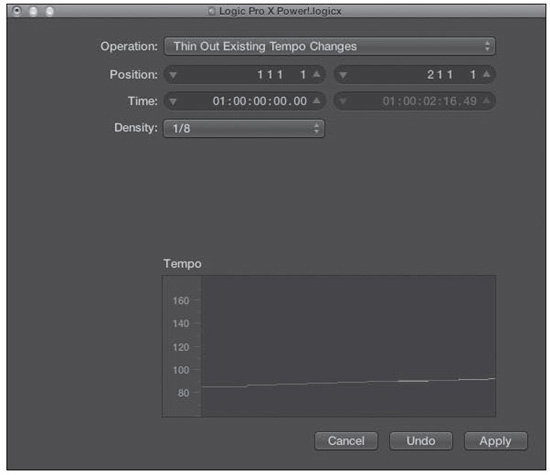
© Apple Inc.
This is something that the Tempo Operations window might come in handy for. The tempo track doesn’t offer a simpler way to thin out specific tempo changes, and manually deleting tempo events from the Tempo List editor could be time consuming.
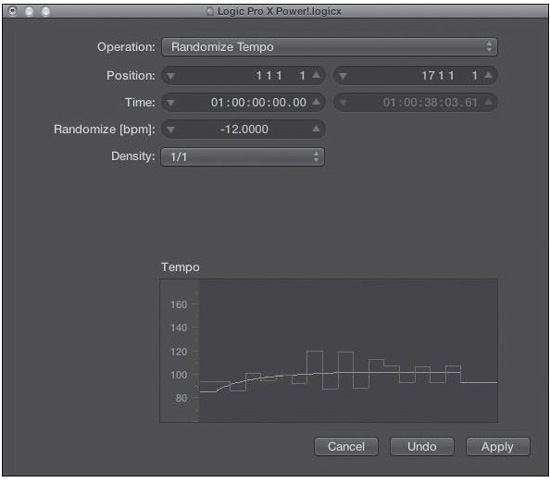
Randomize Tempo
Finally, you can randomize your tempo—create a random deviation in beats per minute (BPM) from your current tempo. The Position and Time parameters determine the start and end positions of the section of random tempo deviation, and the Density setting defines how many program changes will appear per bar. The Randomize parameter defines the extent the random tempos will deviate from the current tempo(s) of the defined region, with larger positive and negative values creating larger deviations. Figure 13.14 shows the Randomize Tempo screen.
Figure 13.14 The Randomize Tempo settings.
© Apple Inc.
This is another thing that you might want to use the Tempo Operations window for, because the tempo track doesn’t lend itself to randomizing tempo changes.
Matching the Project Tempo to an Audio Region
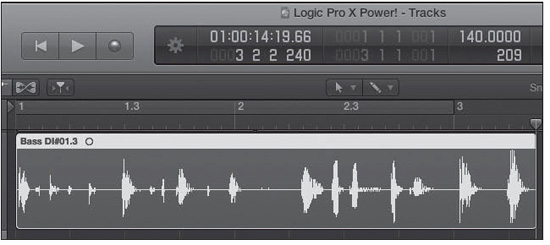
There might be times when you want to build a song, or even just a section of a song, around an audio clip. For example, suppose you have a two-bar bass pattern, but you don’t know its tempo. Now you have a problem: how to set the project’s tempo to a value that matches the tempo of your audio. Logic allows you to set your project’s tempo to match your audio region with ease.
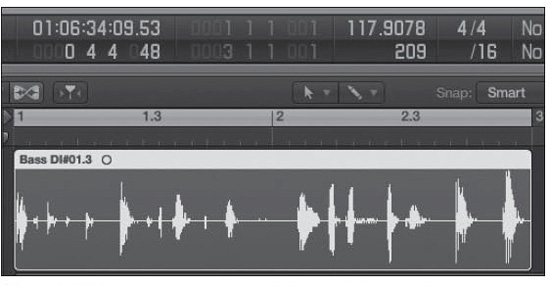
First, you need to select the audio region you will use to define the tempo. Next, set the locators either in the Bar ruler or in the transport to start at the beginning of your audio region and end at a musically meaningful location, typically the end of a bar. Using the two-bar bass pattern as an example, you would set the cycle length to two bars, as shown in Figure 13.15.
Figure 13.15 To match the project tempo to an audio region, first set the locators to match the length you want your audio region to define.
© Apple Inc.
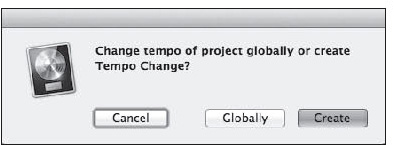
Next, open the local Tracks area Edit menu, select Tempo, and choose Adjust Tempo Using Region Length and Locators. This opens the dialog box shown in Figure 13.16, which asks whether you want to change the project’s global tempo or simply change the tempo inside the locators.
Figure 13.16 The Change Tempo of Project Globally or Create Tempo Change dialog box.
© Apple Inc.
Selecting the Globally option changes the entire project tempo to match that of your audio region. Selecting the Create option allows you to change the tempo of the area inside the locators only. Figure 13.17 shows the end result of this process: The selected audio region now fits the locators, and the project’s tempo has changed to reflect the length of the audio region.
Figure 13.17 After matching the tempo to an audio region, the audio region fits the locators, and the project’s tempo has changed.
© Apple Inc.
Using Beat Detection to Adjust the Project Tempo
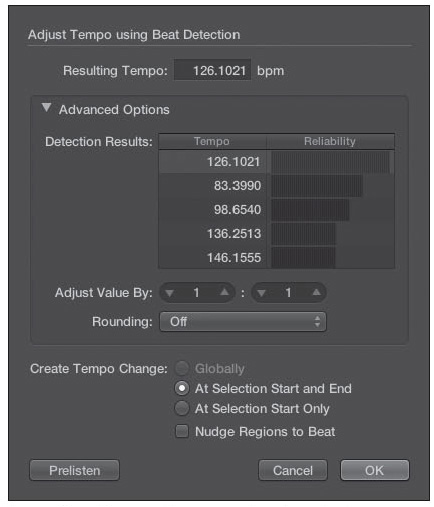
Using beat detection as a guide, you can have Logic analyze a region and offer a number of suggestions for possible tempos derived from the selected region. First you need to select one or more regions. Use the Transients buttons in the Beat Mapping global track header to adjust the beat detection sensitivity. The more sensitive the beat detection, the more tempo options Logic will present to you when you invoke the Adjust Tempo Using Beat Detection command. You can access this command by opening the Tracks area local Edit menu, choosing Tempo, and selecting Adjust Tempo Using Beat Detection or by pressing the Option+Command+T key command. The Adjust Tempo Using Beat Detection command opens the Adjust Tempo Using Beat Detection dialog box, shown in Figure 13.18. (To open the Advanced Options area, click its disclosure triangle.)
Figure 13.18 The Adjust Tempo Using Beat Detection dialog box.
© Apple Inc.
The parameters in the Adjust Tempo Using Beat Detection dialog box are as follows:
![]() Resulting Tempo: The Resulting Tempo field displays the tempo that will result from using the settings assigned throughout the rest of the Adjust Tempo Using Beat Detection dialog box.
Resulting Tempo: The Resulting Tempo field displays the tempo that will result from using the settings assigned throughout the rest of the Adjust Tempo Using Beat Detection dialog box.
![]() Detection Results: The Detection Results area lists the potential results from which you can choose. The more transients you have detected, the more results you will see. The Tempo column lists the tempo of each result and the Reliability column shows bars to demonstrate graphically the extent to which Logic believes a particular tempo to be correct. Logic automatically selects the first result. To select a different result, simply click on the desired result. The Resulting Tempo field will update to reflect the tempo of the selected result.
Detection Results: The Detection Results area lists the potential results from which you can choose. The more transients you have detected, the more results you will see. The Tempo column lists the tempo of each result and the Reliability column shows bars to demonstrate graphically the extent to which Logic believes a particular tempo to be correct. Logic automatically selects the first result. To select a different result, simply click on the desired result. The Resulting Tempo field will update to reflect the tempo of the selected result.
![]() Adjust Value By: The Adjust Value By fields enable you to set a ratio that will affect the value in the Resulting Tempo field. A ratio of 3:1 will triple the tempo. A ratio of 1:3 will cut the tempo to one third of its original setting. You can set each Adjust Value By field from 1 to 16 by clicking and dragging in the desired field, by clicking the up or down arrows in the desired field, or by double-clicking in the desired field and entering a value manually.
Adjust Value By: The Adjust Value By fields enable you to set a ratio that will affect the value in the Resulting Tempo field. A ratio of 3:1 will triple the tempo. A ratio of 1:3 will cut the tempo to one third of its original setting. You can set each Adjust Value By field from 1 to 16 by clicking and dragging in the desired field, by clicking the up or down arrows in the desired field, or by double-clicking in the desired field and entering a value manually.
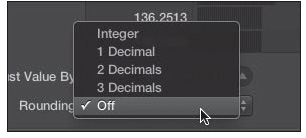
![]() Rounding: The Rounding menu lets you define the type of rounding Logic will apply to the tempo value the Adjust Tempo Using Beat Detection command creates. Figure 13.19 shows the Rounding menu.
Rounding: The Rounding menu lets you define the type of rounding Logic will apply to the tempo value the Adjust Tempo Using Beat Detection command creates. Figure 13.19 shows the Rounding menu.
Figure 13.19 The Rounding menu lets you define what type of rounding, if any, will be applied to the tempo value resulting from the Adjust Tempo Using Beat Detection command.
© Apple Inc.
If you select Off, the tempo will not be rounded. Selecting 1 Decimal, 2 Decimals, or 3 Decimals will round the tempo to tenths, hundredths, or thousandths place, respectively. Selecting Integer rounds the tempo to a whole number.
![]() Create Tempo Change: Create Tempo Change gives you three options to define the extent to which the Adjust Tempo Using Beat Detection command affects the project tempo. If you select the Globally option, the tempo of the entire project will be altered to reflect the result of the Adjust Tempo Using Beat Detection command. If you select At Selection Start and End, the tempo of the area defined by the selected region(s) will be altered to reflect the result of the Adjust Tempo Using Beat Detection command, and the previous tempo will begin again at the end of the selected region(s). If you select At Selection Start Only, the tempo of the project will be altered at the beginning of the first selected region to reflect the result of the Adjust Tempo Using Beat Detection command. That tempo will remain in effect through the end of the project unless there is another tempo change event later in the project.
Create Tempo Change: Create Tempo Change gives you three options to define the extent to which the Adjust Tempo Using Beat Detection command affects the project tempo. If you select the Globally option, the tempo of the entire project will be altered to reflect the result of the Adjust Tempo Using Beat Detection command. If you select At Selection Start and End, the tempo of the area defined by the selected region(s) will be altered to reflect the result of the Adjust Tempo Using Beat Detection command, and the previous tempo will begin again at the end of the selected region(s). If you select At Selection Start Only, the tempo of the project will be altered at the beginning of the first selected region to reflect the result of the Adjust Tempo Using Beat Detection command. That tempo will remain in effect through the end of the project unless there is another tempo change event later in the project.
![]() Nudge Regions to Beat: With this checkbox selected, all selected regions will be nudged by the same amount as it takes to move the first transient in the first selected region to the closest beat.
Nudge Regions to Beat: With this checkbox selected, all selected regions will be nudged by the same amount as it takes to move the first transient in the first selected region to the closest beat.
![]() Prelisten: Click the Prelisten button to hear the tempo change the Adjust Tempo Using Beat Detection command will create before finalizing the command.
Prelisten: Click the Prelisten button to hear the tempo change the Adjust Tempo Using Beat Detection command will create before finalizing the command.
Once you have set the parameters in the Adjust Tempo Using Beat Detection dialog box to your liking, click the OK button, and the project tempo will change!
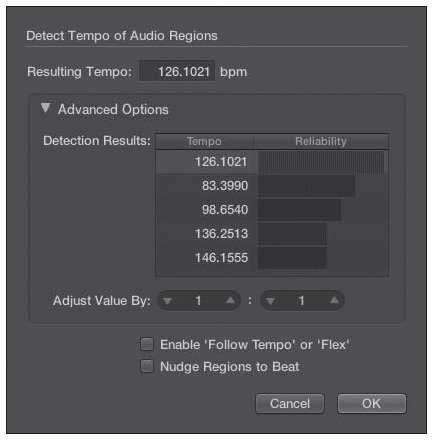
Detecting the Tempo of an Audio Region
You can use Logic’s beat detection to detect the tempo of an audio region by opening the local Edit menu, choosing Tempo, and selecting Detect Tempo of Selected Region. This opens the Detect Tempo of Audio Regions dialog box, shown in Figure 13.20.
Figure 13.20 Use the Detect Tempo of Selected Region command to use beat detection find out the possible tempos of an audio region.
© Apple Inc.
You can see that the Detect Tempo of Audio Regions dialog box looks similar to the Adjust Tempo Using Beat Detection dialog box (refer to Figure 13.18). It includes many of the same advanced options, which you access by clicking the disclosure triangle. The Resulting Tempo, Detection Results, Adjust Value By, and Nudge Regions to Beat functions are identical to those in the Adjust Tempo Using Beat Detection dialog box. There is one other command unique to the Detect Tempo of Audio Regions dialog box, however: Enable ‘Follow Tempo’ or ‘Flex.’ Selecting this option automatically enables the Follow Tempo checkbox in the selected region’s Region Inspector when you click the OK button. The selected region will then automatically be adjusted to match the project’s tempo.
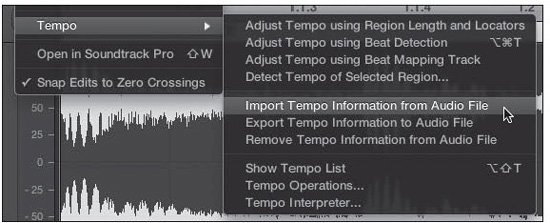
Working with Tempo Data in Audio Files
Logic automatically saves tempo data into audio files bounced or exported from Logic. The Tempo submenu in the local Edit menu gives you three options for handling this data, as shown in Figure 13.21.
Figure 13.21 The Tempo submenu offers three options for dealing with tempo information in audio files.
© Apple Inc.
![]() Import Tempo Information from Audio File: Simply select an audio region, select this command, and the tempo data from the region will automatically be added to the global tempo track.
Import Tempo Information from Audio File: Simply select an audio region, select this command, and the tempo data from the region will automatically be added to the global tempo track.
![]() Export Tempo Information to Audio File: You can export data from the tempo track into an audio region by selecting this command.
Export Tempo Information to Audio File: You can export data from the tempo track into an audio region by selecting this command.
![]() Remove Tempo Information from Audio File: This command removes all tempo data from the selected region.
Remove Tempo Information from Audio File: This command removes all tempo data from the selected region.