
8 Working with MIDI
UNLIKE AN AUDIO FILE, MIDI files are simply numerical messages rather than actual sound. You can move, alter, program, and view those MIDI messages in many different ways. Thanks to these properties and Logic’sorigins as a MIDI-only application, there are far more editors and windows relating to MIDI information than to audio. Each MIDI editor offers its own unique view of MIDI data and allows you to work with your MIDI information in whichever way seems most comfortable. Logic offers perhaps the most comprehensive and powerful MIDI editing and re-imagining functions of any sequencer, and these obviously take some time to master.
This chapter is not going to explore every possible detail and use of every possible option in all the editors, but it will go over the functionality, operation, and potential of each one specifically enough for you to explore more deeply on your own.
MIDI Editors and MIDI Regions
You’ve already explored MIDI regions. Just as double-clicking an audio region brings you to the Audio Track editor in which you edit your audio, double-clicking a MIDI region opens the MIDI editor of your choice in the main window. To choose which MIDI editor opens automatically when you double-click a MIDI region, choose Logic Pro > Preferences > General, select the Editing tab, and open the Double-Clicking a MIDI Region Opens menu. Logic presents you with a menu of the four MIDI editors in Logic, as shown in Figure 8.1.
Figure 8.1 You can choose any of the four MIDI editors as the default editor in the Global Preferences.

© Apple Inc.
Logic defaults to opening up the Event editor when you double-click a MIDI region. You may prefer to use the Piano Roll editor or another editor, however. When you get used to the various editors and how you like to use Logic, you can change the default to reflect your personal working method.
Double-clicking a MIDI region in the main window is not the only way to view it in a MIDI editor. In addition, each editor can be viewed not only in the main window, but also in its own dedicated window. Most MIDI editors have Link functions, which allow you to keep one or more of the MIDI editors in your screenset, and those editors automatically contain the data from any MIDI region selected in the main window. The Event list, Piano Roll, and Score editors even allow you to view multiple regions at one time. There are also key commands you can use when selecting regions to open specific editors.
In addition, you can always open the various MIDI editors by using menu and key commands, regardless of what is selected on the main window.
The Piano Roll Editor
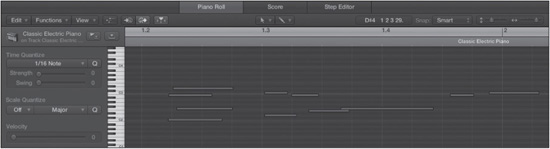
The Piano Roll editor offers a graphical piano roll–like view of MIDI data. It displays MIDI notes as colored bars in different positions, with different lengths, colors, and velocities. You can even use the Piano Roll editor to visually edit MIDI controller data (called MIDI Draw data), as you’ll see later in this section. Figure 8.2 shows the Piano Roll editor.
Figure 8.2 The Piano Roll editor allows you to edit your MIDI notes graphically.
© Apple Inc.
The Piano Roll editor contains now-familiar elements of local menus, buttons, a position display, and a Tool menu, but its most striking feature is the large window that displays the MIDI notes. The playhead moves across all the notes of the MIDI region as you play the song, much like a piano roll spins as a song plays. You can use the Piano Roll editor not only to edit notes but also to create MIDI parts. The Piano Roll editor also has zoom controls and a Bar ruler display, complete with global tracks to help you navigate and edit. Logic Pro X also brings a few new features to the Piano Roll: Time Quantize, Scale Quantize, and Velocity controls.
This section explores the various elements of the Piano Roll editor and how you can use them.
Local Menus
The Piano Roll editor contains three local menus: the Edit, Functions, and View menus. Figure 8.3 shows the local menus of the Piano Roll editor.
Figure 8.3 The local menus of the Piano Roll editor.
© Apple Inc.
The following subsections contain descriptions of each local menu.
The Edit Menu
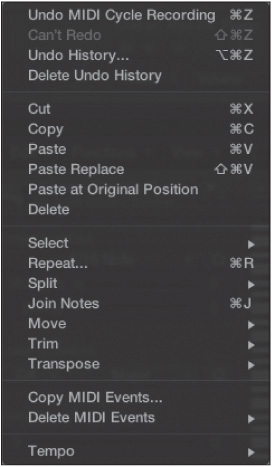
The Edit menu contains options for moving and selecting data. Figure 8.4 shows the Edit menu of the Piano Roll editor.
Figure 8.4 The Edit menu of the Piano Roll editor.
© Apple Inc.
The commands in this menu are as follows:
![]() Undo: This undoes your last action in the Piano Roll editor. The key command for this is Command+Z.
Undo: This undoes your last action in the Piano Roll editor. The key command for this is Command+Z.
![]() Redo: This command redoes your last undone action in the Piano Roll editor. The key command for this is Command+ Shift+Z.
Redo: This command redoes your last undone action in the Piano Roll editor. The key command for this is Command+ Shift+Z.
![]() Undo History: This command opens the Undo History window. See the Tracks area local Edit menu for details. The key command for this is Option+Command+Z.
Undo History: This command opens the Undo History window. See the Tracks area local Edit menu for details. The key command for this is Option+Command+Z.
![]() Delete Undo History: Choose this command to delete the Undo History. See the main window local Edit menu for details.
Delete Undo History: Choose this command to delete the Undo History. See the main window local Edit menu for details.
![]() Cut: This removes all selected notes from the grid and places them in the Clipboard. The key command for this is Command+X.
Cut: This removes all selected notes from the grid and places them in the Clipboard. The key command for this is Command+X.
![]() Copy: This command copies any selected MIDI notes into the Clipboard. The key command for this is Command+C.
Copy: This command copies any selected MIDI notes into the Clipboard. The key command for this is Command+C.
![]() Paste: This command places any MIDI notes in the Clipboard on the grid at the current playhead position. The key command for this is Command+V.
Paste: This command places any MIDI notes in the Clipboard on the grid at the current playhead position. The key command for this is Command+V.
![]() Paste Replace: This command replaces notes you select in the Piano Roll editor with those from the Clipboard. It pastes notes at the current playhead and replaces all notes within the time range of the pasted notes. The key command for this is Shift+Command+V.
Paste Replace: This command replaces notes you select in the Piano Roll editor with those from the Clipboard. It pastes notes at the current playhead and replaces all notes within the time range of the pasted notes. The key command for this is Shift+Command+V.
![]() Paste at Original Position: This command places MIDI notes from the Clipboard back into the notes’ original location. This is useful if you cut notes and decide you still want them where they were, or if you copy notes, subsequently delete them from their original positions, and decide you want them back. You can also use this command to paste notes in a region on a different MIDI or software instrument track as a means of doubling those notes with another instrument.
Paste at Original Position: This command places MIDI notes from the Clipboard back into the notes’ original location. This is useful if you cut notes and decide you still want them where they were, or if you copy notes, subsequently delete them from their original positions, and decide you want them back. You can also use this command to paste notes in a region on a different MIDI or software instrument track as a means of doubling those notes with another instrument.
![]() Delete: Delete removes the selected MIDI information from the Piano Roll editor. You can also use the Delete key to delete the selected information.
Delete: Delete removes the selected MIDI information from the Piano Roll editor. You can also use the Delete key to delete the selected information.
![]() Select: The Select submenu is covered at the end of this bulleted list.
Select: The Select submenu is covered at the end of this bulleted list.
![]() Repeat: This command repeats the selected notes. It presents a small dialog box for you to select the number of repetitions, whether you want real or alias copies, and whether you want to quantize the copies (in other words, force the repeats to end on an exact bar line, even if the original does not). The key command is Command+R.
Repeat: This command repeats the selected notes. It presents a small dialog box for you to select the number of repetitions, whether you want real or alias copies, and whether you want to quantize the copies (in other words, force the repeats to end on an exact bar line, even if the original does not). The key command is Command+R.
![]() Split: The Split submenu offers three options, two of which are similar to those found in the main window Edit > Split submenu. The Split submenu commands are as follows:
Split: The Split submenu offers three options, two of which are similar to those found in the main window Edit > Split submenu. The Split submenu commands are as follows:
![]() Notes at Playhead: This command splits any selected notes at the current playhead position. The key command is Command+T.
Notes at Playhead: This command splits any selected notes at the current playhead position. The key command is Command+T.
![]() Notes at Rounded Playhead: This command splits any selected note at the bar nearest the playhead.
Notes at Rounded Playhead: This command splits any selected note at the bar nearest the playhead.
![]() Notes at Locators: This command creates a split in any selected notes at the current locator positions. The key command is Control+Command+T.
Notes at Locators: This command creates a split in any selected notes at the current locator positions. The key command is Control+Command+T.
![]() Join Notes: This command lets you join selected notes of the same pitch together to make one note. The key command for this is Command+J.
Join Notes: This command lets you join selected notes of the same pitch together to make one note. The key command for this is Command+J.
![]() Move: The Move submenu contains commands for moving selected notes, similar to the Edit > Move submenu in the main window, covered in Chapter 6, “The Logic Pro Main Window.” The Piano Roll Editor Edit > Move options are much fewer in number:
Move: The Move submenu contains commands for moving selected notes, similar to the Edit > Move submenu in the main window, covered in Chapter 6, “The Logic Pro Main Window.” The Piano Roll Editor Edit > Move options are much fewer in number:
![]() To Playhead: This command moves the beginning of the selected note to the current playhead position. If multiple notes are selected, they will be moved as well, while maintaining their position compared to the left-most note. The key command for this is; (semicolon).
To Playhead: This command moves the beginning of the selected note to the current playhead position. If multiple notes are selected, they will be moved as well, while maintaining their position compared to the left-most note. The key command for this is; (semicolon).
![]() Nudge Left: This command lets you nudge selected notes to the left per the Edit > Move > Set Nudge Value To setting. The key command for this is Option+left arrow.
Nudge Left: This command lets you nudge selected notes to the left per the Edit > Move > Set Nudge Value To setting. The key command for this is Option+left arrow.
![]() Nudge Right: This command lets you nudge selected notes to the right per the Edit > Move > Set Nudge Value To setting. The key command for this is Option+right arrow.
Nudge Right: This command lets you nudge selected notes to the right per the Edit > Move > Set Nudge Value To setting. The key command for this is Option+right arrow.
![]() Set Nudge Value To: This submenu, identical to the Edit > Move > Set Nudge Value To menu path in the main window (covered in Chapter 6), lets you set the nudge value for the Piano Roll editor.
Set Nudge Value To: This submenu, identical to the Edit > Move > Set Nudge Value To menu path in the main window (covered in Chapter 6), lets you set the nudge value for the Piano Roll editor.
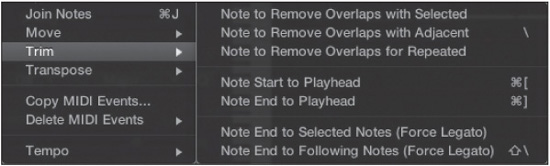
![]() Trim: The Trim submenu, shown in Figure 8.5, gives you the following options for trimming the length of notes in the Piano Roll editor:
Trim: The Trim submenu, shown in Figure 8.5, gives you the following options for trimming the length of notes in the Piano Roll editor:
![]() Note to Remove Overlap with Selected: This shortens any selected overlapping notes so they do not overlap. You must select both of the overlapping notes to correct a given pair of overlapping notes.
Note to Remove Overlap with Selected: This shortens any selected overlapping notes so they do not overlap. You must select both of the overlapping notes to correct a given pair of overlapping notes.
![]() Note to Remove Overlap with Adjacent: This shortens any selected overlapping notes so they do not overlap. It does not matter whether one or both of the overlapping notes is selected. The key command for this is (backslash).
Note to Remove Overlap with Adjacent: This shortens any selected overlapping notes so they do not overlap. It does not matter whether one or both of the overlapping notes is selected. The key command for this is (backslash).
![]() Note to Remove Overlap for Repeated: This shortens any selected repeated overlapping notes of the same pitch so they do not overlap. The first note in the overlap must be selected for this command to work.
Note to Remove Overlap for Repeated: This shortens any selected repeated overlapping notes of the same pitch so they do not overlap. The first note in the overlap must be selected for this command to work.
![]() Note Start to Playhead: This command trims the start of any selected notes to the current playhead position. The key command for this is Command+[ (left bracket).
Note Start to Playhead: This command trims the start of any selected notes to the current playhead position. The key command for this is Command+[ (left bracket).
![]() Note End to Playhead: This command trims the end of any selected notes to the current playhead position. The key command for this is Command+] (right bracket).
Note End to Playhead: This command trims the end of any selected notes to the current playhead position. The key command for this is Command+] (right bracket).
Figure 8.5 The Trim submenu of the Edit menu.
© Apple Inc.
![]() Note End to Selected Notes (Force Legato): This lengthens any note to extend to the beginning of any following notes. You must select both the initial notes to extend and the notes to which they will extend.
Note End to Selected Notes (Force Legato): This lengthens any note to extend to the beginning of any following notes. You must select both the initial notes to extend and the notes to which they will extend.
![]() Note End to Following Notes (Force Legato): This lengthens any note to extend to the beginning of any following notes. (This sort of smooth transition from one note to another without space in between is called legato.) The initial notes to be extended must be selected. The key command for this is Shift+ (backslash).
Note End to Following Notes (Force Legato): This lengthens any note to extend to the beginning of any following notes. (This sort of smooth transition from one note to another without space in between is called legato.) The initial notes to be extended must be selected. The key command for this is Shift+ (backslash).
![]() Transpose: The Transpose submenu offers the following commands for transposing selected notes.
Transpose: The Transpose submenu offers the following commands for transposing selected notes.
![]() +1 Semitone: This command lets you transpose selected notes up one semitone. The key command for this is Option +up arrow.
+1 Semitone: This command lets you transpose selected notes up one semitone. The key command for this is Option +up arrow.
![]() +1 Semitone: This command lets you transpose selected notes down one semitone. The key command for this is Option+down arrow.
+1 Semitone: This command lets you transpose selected notes down one semitone. The key command for this is Option+down arrow.
![]() +12 Semitones: This command lets you transpose selected notes up 12 semitones, or one full octave. The key command for this is Shift+Option+up arrow.
+12 Semitones: This command lets you transpose selected notes up 12 semitones, or one full octave. The key command for this is Shift+Option+up arrow.
![]() −12 Semitones: This command lets you transpose selected notes down 12 semitones, or one full octave. The key command for this is Shift+Option+down arrow.
−12 Semitones: This command lets you transpose selected notes down 12 semitones, or one full octave. The key command for this is Shift+Option+down arrow.
![]() Copy MIDI Events: You can copy all MIDI events with this command. You will be presented with a dialog box asking you the range of notes to copy and how you want them to be copied.
Copy MIDI Events: You can copy all MIDI events with this command. You will be presented with a dialog box asking you the range of notes to copy and how you want them to be copied.
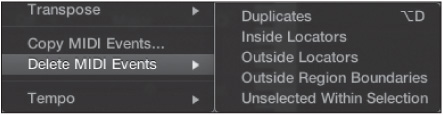
![]() Delete MIDI Events: The Delete MIDI Events submenu offers the commands shown in Figure 8.6.
Delete MIDI Events: The Delete MIDI Events submenu offers the commands shown in Figure 8.6.
Figure 8.6 The Delete MIDI Events submenu of the Edit menu.
© Apple Inc.
These commands offer different options for erasing groups of MIDI events in the Piano Roll editor. Here is a brief description of each:
![]() Duplicates: This erases the second instance of all MIDI events that are duplicated by other MIDI events (in other words, same pitch, time, controller number, and so on). The key command for this is Option+D.
Duplicates: This erases the second instance of all MIDI events that are duplicated by other MIDI events (in other words, same pitch, time, controller number, and so on). The key command for this is Option+D.
![]() Inside Locators: This command erases all MIDI events between the locators.
Inside Locators: This command erases all MIDI events between the locators.
![]() Outside Locators: This erases all MIDI events not between the locators.
Outside Locators: This erases all MIDI events not between the locators.
![]() Outside Region Borders: If you are editing more than one MIDI region in the Piano Roll editor, this command erases MIDI events inside the selected region that are outside the currently visible region boundaries. This is useful when a region has been resized. The other regions will not be affected.
Outside Region Borders: If you are editing more than one MIDI region in the Piano Roll editor, this command erases MIDI events inside the selected region that are outside the currently visible region boundaries. This is useful when a region has been resized. The other regions will not be affected.
![]() Unselected Within Selection: If one or more notes or events are unselected between the first and last selected notes, this command erases them.
Unselected Within Selection: If one or more notes or events are unselected between the first and last selected notes, this command erases them.
![]() Tempo: The Tempo submenu offers a number of options for operating on the tempo of your project. The Tempo submenu is covered in detail in Chapter 13, “Advanced Tempo Operations.”
Tempo: The Tempo submenu offers a number of options for operating on the tempo of your project. The Tempo submenu is covered in detail in Chapter 13, “Advanced Tempo Operations.”
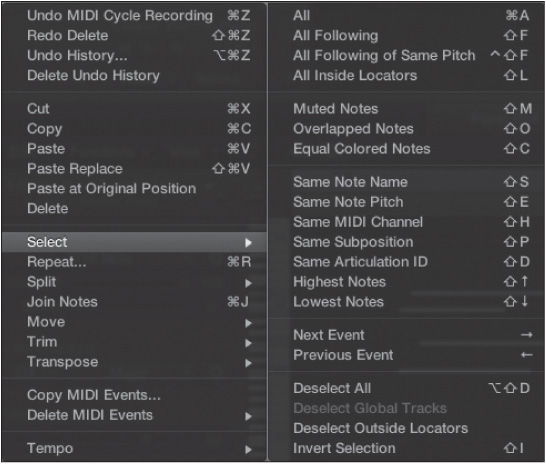
The Select submenu, shown in Figure 8.7, contains a host of commands for selecting MIDI data in the Piano Roll editor.
Figure 8.7 The Select submenu of the Edit menu.
© Apple Inc.
The Select submenu commands are as follows:
![]() All: This selects all the notes in the Piano Roll editor. The key command for this is Command+A.
All: This selects all the notes in the Piano Roll editor. The key command for this is Command+A.
![]() All Following: Use this command to select all the notes after the currently selected note. The key command for this is Shift+F.
All Following: Use this command to select all the notes after the currently selected note. The key command for this is Shift+F.
![]() All Following of Same Pitch: Use this command to select all the notes of the same pitch after the currently selected note. The key command for this is Control+Shift+F.
All Following of Same Pitch: Use this command to select all the notes of the same pitch after the currently selected note. The key command for this is Control+Shift+F.
![]() All Inside Locators: This command selects all the notes inside the two locators. The key command for this is Shift+L.
All Inside Locators: This command selects all the notes inside the two locators. The key command for this is Shift+L.
![]() Muted Notes: This command selects all notes that you have muted. The key command for this is Shift+M.
Muted Notes: This command selects all notes that you have muted. The key command for this is Shift+M.
![]() Overlapped Notes: You can use this command to select all notes that overlap each other in time, such as chords. The key command for this is Shift+O.
Overlapped Notes: You can use this command to select all notes that overlap each other in time, such as chords. The key command for this is Shift+O.
![]() Equal Colored Notes: This command selects all notes with the same color, based on the Colors mode enabled in the local View menu. The key command for this is Shift+C.
Equal Colored Notes: This command selects all notes with the same color, based on the Colors mode enabled in the local View menu. The key command for this is Shift+C.
![]() Same Note Name: This command selects all notes of the same name. For example, if you currently have a C selected, this command will select all C notes. The key command for this is Shift+S.
Same Note Name: This command selects all notes of the same name. For example, if you currently have a C selected, this command will select all C notes. The key command for this is Shift+S.
![]() Same Note Pitch: This selects all notes of the same pitch—for example, all D#4 notes. The key command for this is Shift+E. You can also select notes of the same pitch by clicking on that pitch in the keyboard at the left side of the Piano Roll editor.
Same Note Pitch: This selects all notes of the same pitch—for example, all D#4 notes. The key command for this is Shift+E. You can also select notes of the same pitch by clicking on that pitch in the keyboard at the left side of the Piano Roll editor.
![]() Same MIDI Channel: This selects all notes on the same MIDI channel. This is useful when viewing more than one MIDI track in the same Piano Roll editor. (See the section “Editing Multiple Regions in the Piano Roll Editor” later in this chapter for details on viewing options in the Piano Roll editor.) The key command for this is Shift+H.
Same MIDI Channel: This selects all notes on the same MIDI channel. This is useful when viewing more than one MIDI track in the same Piano Roll editor. (See the section “Editing Multiple Regions in the Piano Roll Editor” later in this chapter for details on viewing options in the Piano Roll editor.) The key command for this is Shift+H.
![]() Same Subposition: A powerful selection option, this command selects all MIDI notes that have the same relative position in the Bar ruler. That means if you select a note directly on the bar line, you select all notes that fall on a bar line as well. If you select a note between the third and fourth bar, for example, you also select all notes that fall on that relative position between the third and fourth bar, and so on. The key command for this is Shift+P.
Same Subposition: A powerful selection option, this command selects all MIDI notes that have the same relative position in the Bar ruler. That means if you select a note directly on the bar line, you select all notes that fall on a bar line as well. If you select a note between the third and fourth bar, for example, you also select all notes that fall on that relative position between the third and fourth bar, and so on. The key command for this is Shift+P.
![]() Same Articulation ID: Articulations are a means of getting different timbres out of an instrument. For example, a violin can have many different bowing techniques. In this example, articulations allow you to access different bowing techniques from one software instrument. This is much more elegant than having one software instrument for long bowing and another one for tremolo. Different articulations have different IDs—MIDI commands that tell the software instrument to use a particular articulation. The Select Same Articulation ID command lets you select all notes using a particular articulation ID. Instead of having to select each note individually when trying out a different articulation, you can use this command to select them all at one time. The key command for this is Shift+D.
Same Articulation ID: Articulations are a means of getting different timbres out of an instrument. For example, a violin can have many different bowing techniques. In this example, articulations allow you to access different bowing techniques from one software instrument. This is much more elegant than having one software instrument for long bowing and another one for tremolo. Different articulations have different IDs—MIDI commands that tell the software instrument to use a particular articulation. The Select Same Articulation ID command lets you select all notes using a particular articulation ID. Instead of having to select each note individually when trying out a different articulation, you can use this command to select them all at one time. The key command for this is Shift+D.
![]() Highest Notes: This command selects all the top-most notes across the length of your MIDI region. If your region contains a monophonic performance, such as a melody line, all the notes will be selected. The key command for this is Shift+up arrow.
Highest Notes: This command selects all the top-most notes across the length of your MIDI region. If your region contains a monophonic performance, such as a melody line, all the notes will be selected. The key command for this is Shift+up arrow.
![]() Lowest Notes: This command selects all the bottom-most notes across the length of your MIDI region. If your region contains a monophonic performance, such as a melody line, all the notes will be selected. The key command for this is Shift+down arrow.
Lowest Notes: This command selects all the bottom-most notes across the length of your MIDI region. If your region contains a monophonic performance, such as a melody line, all the notes will be selected. The key command for this is Shift+down arrow.
![]() Next Event: This command lets you change your selection from the selected event to the next event to the right of it. The key command for this is right arrow.
Next Event: This command lets you change your selection from the selected event to the next event to the right of it. The key command for this is right arrow.
![]() Previous Event: This command lets you change your selection from the selected event to the next event to the left of it. The key command for this is left arrow.
Previous Event: This command lets you change your selection from the selected event to the next event to the left of it. The key command for this is left arrow.
![]() Deselect All: This command deselects any selected events. The key command for this is Shift+Control+D.
Deselect All: This command deselects any selected events. The key command for this is Shift+Control+D.
![]() Deselect Global Tracks: This command deselects any selected global tracks.
Deselect Global Tracks: This command deselects any selected global tracks.
![]() Deselect Outside Locators: This command deselects any selected events outside the right and left locators.
Deselect Outside Locators: This command deselects any selected events outside the right and left locators.
![]() Invert Selection: This command inverts the selection status of all the notes in the Piano Roll editor. In other words, if you have a single note selected, this command toggles between that single note and every note except that selected note. If you had previously used the Select Inside Locators command, Invert Selection alternates between all notes inside the selected locators and those outside those locators. The key command for this is Shift+I.
Invert Selection: This command inverts the selection status of all the notes in the Piano Roll editor. In other words, if you have a single note selected, this command toggles between that single note and every note except that selected note. If you had previously used the Select Inside Locators command, Invert Selection alternates between all notes inside the selected locators and those outside those locators. The key command for this is Shift+I.
The Functions Menu
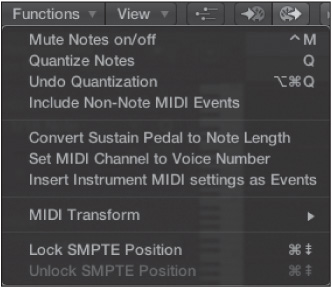
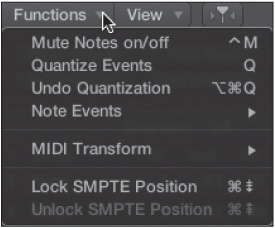
The Functions local menu contains commands that operate on other aspects of MIDI data in the Piano Roll editor. Figure 8.8 shows the Functions local menu.
Figure 8.8 The Functions menu of the Piano Roll editor.
© Apple Inc.
The functions included in this menu are as follows:
![]() Mute Notes On/Off: This command lets you mute and unmute the selected notes. The key command for this is Control+M.
Mute Notes On/Off: This command lets you mute and unmute the selected notes. The key command for this is Control+M.
![]() Quantize Notes: This command applies the current Time Quantize setting to the selected notes. The Time Quantize functions are covered in the section “The Piano Roll Editor Inspector” later in this chapter. The key command for this is Q.
Quantize Notes: This command applies the current Time Quantize setting to the selected notes. The Time Quantize functions are covered in the section “The Piano Roll Editor Inspector” later in this chapter. The key command for this is Q.
![]() Undo Quantization: This removes any quantization that has been applied and returns the selected notes to their original location. The key command for this is Control+Command+Q.
Undo Quantization: This removes any quantization that has been applied and returns the selected notes to their original location. The key command for this is Control+Command+Q.
![]() Include Non-Note MIDI Events: If you select this option, editing and moving notes also edits and moves any controller data acting on those notes.
Include Non-Note MIDI Events: If you select this option, editing and moving notes also edits and moves any controller data acting on those notes.
![]() Convert Sustain Pedal to Note Length: If you use this command, Logic uses any sustain pedal MIDI controller data to adjust the lengths of the MIDI notes that the messages were sustaining.
Convert Sustain Pedal to Note Length: If you use this command, Logic uses any sustain pedal MIDI controller data to adjust the lengths of the MIDI notes that the messages were sustaining.
![]() Set MIDI Channel to Voice Number: For selected notes, this places each voice (note of different pitch) on a separate MIDI channel.
Set MIDI Channel to Voice Number: For selected notes, this places each voice (note of different pitch) on a separate MIDI channel.
![]() Insert Instrument MIDI Settings as Events: When you select regions on an external MIDI track, choosing the Insert Instrument MIDI Settings as Events command creates MIDI events for program, volume, and pan if they are checked in the Track Inspector and places those events in the selected region.
Insert Instrument MIDI Settings as Events: When you select regions on an external MIDI track, choosing the Insert Instrument MIDI Settings as Events command creates MIDI events for program, volume, and pan if they are checked in the Track Inspector and places those events in the selected region.
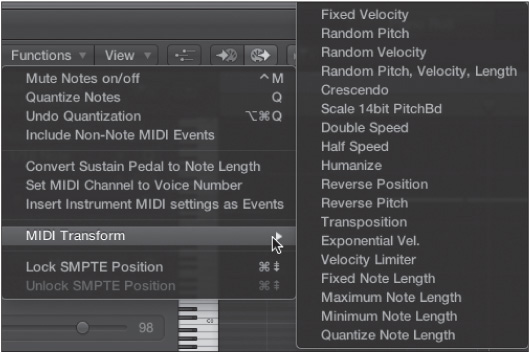
![]() MIDI Transform: One of Logic’s most powerful MIDI tools is its MIDI Transform feature, which lets you transform data in nearly unlimited ways. The MIDI Transform submenu offers a selection of Transform presets, as shown in Figure 8.9. If you select one of these presets, you launch the MIDI Transform window, which is configured to run the task you have chosen. The MIDI Transform window is one of the more complex aspects of Logic and is examined further in the section “The MIDI Transform Window” later in this chapter.
MIDI Transform: One of Logic’s most powerful MIDI tools is its MIDI Transform feature, which lets you transform data in nearly unlimited ways. The MIDI Transform submenu offers a selection of Transform presets, as shown in Figure 8.9. If you select one of these presets, you launch the MIDI Transform window, which is configured to run the task you have chosen. The MIDI Transform window is one of the more complex aspects of Logic and is examined further in the section “The MIDI Transform Window” later in this chapter.
Figure 8.9 The MIDI Transform submenu of the Functions menu.
© Apple Inc.
![]() Lock SMPTE Position: This command locks the MIDI events to their current SMPTE positions. The key command for this is Command+Page Down.
Lock SMPTE Position: This command locks the MIDI events to their current SMPTE positions. The key command for this is Command+Page Down.
![]() Unlock SMPTE Position: This releases the MIDI events from being tied to their current SMPTE positions. The key command for this is Command+Page Up.
Unlock SMPTE Position: This releases the MIDI events from being tied to their current SMPTE positions. The key command for this is Command+Page Up.
The View Menu
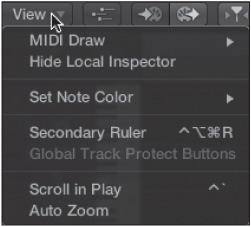
The View menu allows you to alter the appearance of the Piano Roll editor and gives you access to the MIDI Draw functions. Figure 8.10 shows the View menu of the Piano Roll editor.
Figure 8.10 The View menu of the Piano Roll editor.
© Apple Inc.
The View menu options are as follows:
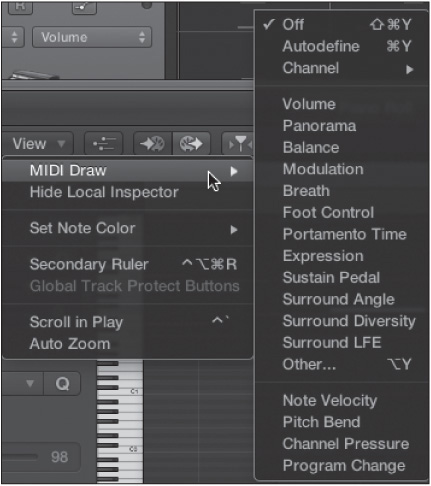
![]() MIDI Draw: As mentioned briefly in Chapter 6, MIDI Draw enables you to enter and edit MIDI controller data to automate a MIDI region. (MIDI Draw is also referred to as region-based automation, or RA.) Because the MIDI controller data is part of the region itself, when you are editing a region in the Piano Roll editor, you can edit the controller data as well.
MIDI Draw: As mentioned briefly in Chapter 6, MIDI Draw enables you to enter and edit MIDI controller data to automate a MIDI region. (MIDI Draw is also referred to as region-based automation, or RA.) Because the MIDI controller data is part of the region itself, when you are editing a region in the Piano Roll editor, you can edit the controller data as well.
This command displays a menu that offers a selection of possible MIDI controllers you may want to view alongside your note data, as shown in Figure 8.11. If you select one of these options, a controller data lane opens in the bottom half of the Piano Roll editor. This area is filled with any existing controller messages that you already have in the region, as shown in Figure 8.12.
Figure 8.11 The MIDI Draw submenu of the View menu.
© Apple Inc.
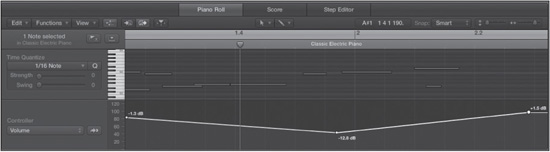
Figure 8.12 A Piano Roll editor showing the MIDI Draw window. Currently, the volume MIDI controller data is showing.
© Apple Inc.
TIP: You can adjust the height of the MIDI Draw area by dragging the bar between the MIDI Draw and Piano Roll areas up or down. You’ll learn more about MIDI Draw in Chapter 10, “Using Automation in Logic.”
![]() Show/Hide Local Inspector: This command shows or hides the Piano Roll editor Inspector, which contains the Time Quantize, Scale Quantize, and Velocity controls. The Piano Roll editor Inspector is covered later in this chapter.
Show/Hide Local Inspector: This command shows or hides the Piano Roll editor Inspector, which contains the Time Quantize, Scale Quantize, and Velocity controls. The Piano Roll editor Inspector is covered later in this chapter.
![]() Set Note Color: This submenu offers commands for setting the note colors based on the following parameters:
Set Note Color: This submenu offers commands for setting the note colors based on the following parameters:
![]() Region Color: This command displays the notes of each MIDI region with the same color from the Tracks area. This is most useful when more than one region is in the Piano Roll editor at the same time. (See the section “Editing Multiple Regions in the Piano Roll Editor” later in this chapter.)
Region Color: This command displays the notes of each MIDI region with the same color from the Tracks area. This is most useful when more than one region is in the Piano Roll editor at the same time. (See the section “Editing Multiple Regions in the Piano Roll Editor” later in this chapter.)
![]() Velocity: When Velocity is selected, the velocity of each note in the Piano Roll editor is displayed in color, ranging from bluish-green at the lowest velocities to reddish-purple at the loudest velocities. Editing velocity in the Piano Roll editor is easy using the Velocity tool, which is covered in the next section. Velocity is the default view in the Piano Roll editor.
Velocity: When Velocity is selected, the velocity of each note in the Piano Roll editor is displayed in color, ranging from bluish-green at the lowest velocities to reddish-purple at the loudest velocities. Editing velocity in the Piano Roll editor is easy using the Velocity tool, which is covered in the next section. Velocity is the default view in the Piano Roll editor.
![]() MIDI Channel: This command allows you to display notes of the same MIDI channel with the same color. For example, if you decide to use the Set MIDI Channel to Voice Number command on a region, and you want to see what notes are on which MIDI channels, selecting MIDI Channel Colors makes the changes readily apparent.
MIDI Channel: This command allows you to display notes of the same MIDI channel with the same color. For example, if you decide to use the Set MIDI Channel to Voice Number command on a region, and you want to see what notes are on which MIDI channels, selecting MIDI Channel Colors makes the changes readily apparent.
![]() Secondary Ruler: As in the main window, the Secondary Ruler command in this menu adds a second Bar ruler to the Piano Roll editor, showing bars if the primary ruler is showing time and time if the primary ruler is showing bars. The key command for this is Control+Option+Command+R.
Secondary Ruler: As in the main window, the Secondary Ruler command in this menu adds a second Bar ruler to the Piano Roll editor, showing bars if the primary ruler is showing time and time if the primary ruler is showing bars. The key command for this is Control+Option+Command+R.
![]() Global Track Protect Buttons: This command adds track protect buttons in the global track headers. Enabling a track protect button on a global track header prevents you from accidentally editing global events on that global track when working in the Piano Roll editor. If you’re displaying global tracks in the Piano Roll editor (using the Track > Global Tracks > Show Global Tracks command, the Global Tracks buttons, or the key command G), it’s a good idea to protect the tracks unless you need to edit one.
Global Track Protect Buttons: This command adds track protect buttons in the global track headers. Enabling a track protect button on a global track header prevents you from accidentally editing global events on that global track when working in the Piano Roll editor. If you’re displaying global tracks in the Piano Roll editor (using the Track > Global Tracks > Show Global Tracks command, the Global Tracks buttons, or the key command G), it’s a good idea to protect the tracks unless you need to edit one.
![]() Scroll in Play: If you select Scroll in Play, instead of the playhead scrolling across the Piano Roll editor window, the playhead remains stationary in the center of the window and the MIDI data scrolls horizontally past it, from right to left. The key command for this is Control+`.
Scroll in Play: If you select Scroll in Play, instead of the playhead scrolling across the Piano Roll editor window, the playhead remains stationary in the center of the window and the MIDI data scrolls horizontally past it, from right to left. The key command for this is Control+`.
![]() Auto Zoom: If you select Auto Zoom, when you open a region in the Piano Roll editor, the horizontal zoom level is automatically set to a point at which the entire length of the region can be displayed.
Auto Zoom: If you select Auto Zoom, when you open a region in the Piano Roll editor, the horizontal zoom level is automatically set to a point at which the entire length of the region can be displayed.
The Piano Roll Editor Tool Menu
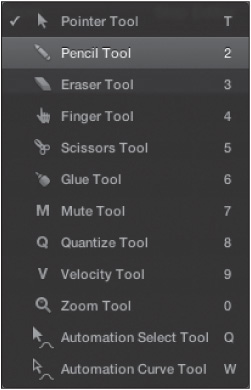
Because the Piano Roll editor is designed for graphic editing, it makes sense that the Piano Roll editor would have a rather extensive Tool menu of graphic editing tools. As in the main window, you can also assign secondary right-click tool in the Piano Roll editor and even a tertiary tool, per your Right Mouse Button preference setting. Figure 8.13 shows the Piano Roll editor Tool menu. You can also access the Piano Roll editor Tool menu by pressing T.
Figure 8.13 The Tool menu in the Piano Roll editor.
© Apple Inc.
Here is a description of the tools, in order from top to bottom.
![]() Pointer: This tool is the standard pointer for selecting and making “rubber band” selections of multiple notes. You can access this tool by pressing T.
Pointer: This tool is the standard pointer for selecting and making “rubber band” selections of multiple notes. You can access this tool by pressing T.
![]() Pencil: The Pencil tool allows you to draw new notes into the Piano Roll editor. You’ll learn how to use the Pencil tool later in this chapter, in the section “Inserting and Deleting Notes in the Piano Roll Editor.” You can access this tool by pressing T, then 2.
Pencil: The Pencil tool allows you to draw new notes into the Piano Roll editor. You’ll learn how to use the Pencil tool later in this chapter, in the section “Inserting and Deleting Notes in the Piano Roll Editor.” You can access this tool by pressing T, then 2.
![]() Eraser: This tool removes notes from the Piano Roll editor. You can access this tool by pressing T, then 3.
Eraser: This tool removes notes from the Piano Roll editor. You can access this tool by pressing T, then 3.
![]() Finger: This tool allows you to resize notes. You can access this tool by pressing T, then 4.
Finger: This tool allows you to resize notes. You can access this tool by pressing T, then 4.
![]() Scissors: The Scissors tool splits notes into multiple notes. You can access this tool by pressing T, then 5.
Scissors: The Scissors tool splits notes into multiple notes. You can access this tool by pressing T, then 5.
![]() Glue: This tool merges adjacent notes, forming one note from multiple notes. You can access this tool by pressing T, then 6.
Glue: This tool merges adjacent notes, forming one note from multiple notes. You can access this tool by pressing T, then 6.
![]() Mute: The Mute tool mutes or unmutes notes in the Piano Roll editor. You can access this tool by pressing T, then 7.
Mute: The Mute tool mutes or unmutes notes in the Piano Roll editor. You can access this tool by pressing T, then 7.
![]() Quantize: The Quantize tool allows you to quantize only selected notes, leaving the rest of the region unquantized. This is very useful if you have a great performance, but with only a portion in which the timing is slightly off. You can use this tool to quantize just those few notes and not alter the rest of the performance. You can access this tool by pressing T, then 8.
Quantize: The Quantize tool allows you to quantize only selected notes, leaving the rest of the region unquantized. This is very useful if you have a great performance, but with only a portion in which the timing is slightly off. You can use this tool to quantize just those few notes and not alter the rest of the performance. You can access this tool by pressing T, then 8.
![]() Velocity: The bar inside each note indicates the velocity of that note relative to the length of the note itself. In Velocity Colors mode, the bar for each note also displays its velocity using colors from purple through the rainbow to red. With the Velocity tool, you can raise or lower the velocity of one or more notes by selecting the note and then scrolling up or down with the mouse to shorten or lengthen the velocity bar inside the note or notes. When you adjust the velocity of all selected notes at once by clicking on any selected note and moving the mouse, every note retains its relative value compared to the other notes. (So if you raise the velocity of a loud note and a soft note, both will get louder, but the numeric difference between their velocities will remain the same.) You can also access this tool by pressing T, then 9.
Velocity: The bar inside each note indicates the velocity of that note relative to the length of the note itself. In Velocity Colors mode, the bar for each note also displays its velocity using colors from purple through the rainbow to red. With the Velocity tool, you can raise or lower the velocity of one or more notes by selecting the note and then scrolling up or down with the mouse to shorten or lengthen the velocity bar inside the note or notes. When you adjust the velocity of all selected notes at once by clicking on any selected note and moving the mouse, every note retains its relative value compared to the other notes. (So if you raise the velocity of a loud note and a soft note, both will get louder, but the numeric difference between their velocities will remain the same.) You can also access this tool by pressing T, then 9.
![]() Zoom: For zooming in on a particular group of notes, use the Zoom tool to “rubber band” them and zoom in to the maximum level. Click anywhere that has no notes to return to the original zoom level. You can access this tool by pressing T, then 0.
Zoom: For zooming in on a particular group of notes, use the Zoom tool to “rubber band” them and zoom in to the maximum level. Click anywhere that has no notes to return to the original zoom level. You can access this tool by pressing T, then 0.
![]() Automation Select: The Automation Select tool—represented by a bent arrow with a solid arrowhead, pointing upward and left—can select automation data in the Piano Roll editor MIDI Draw automation lane. Chapter 10, “Using Automation in Logic,” discusses automation and the Automation Select tool in depth. You can access this tool by pressing T, then Q.
Automation Select: The Automation Select tool—represented by a bent arrow with a solid arrowhead, pointing upward and left—can select automation data in the Piano Roll editor MIDI Draw automation lane. Chapter 10, “Using Automation in Logic,” discusses automation and the Automation Select tool in depth. You can access this tool by pressing T, then Q.
![]() Automation Curve: The Automation Curve tool—represented by a bent arrow with an open arrowhead, pointing upward and left—can create curves between two automation nodes in the Piano Roll editor MIDI Draw automation lane. Chapter 10 discusses automation and the Automation Curve tool in depth. You can access this tool by pressing T, then W.
Automation Curve: The Automation Curve tool—represented by a bent arrow with an open arrowhead, pointing upward and left—can create curves between two automation nodes in the Piano Roll editor MIDI Draw automation lane. Chapter 10 discusses automation and the Automation Curve tool in depth. You can access this tool by pressing T, then W.
Piano Roll Editor Buttons
At the upper-left corner of the Piano Roll editor are four Piano Roll editor buttons. Figure 8.14 shows those buttons.
Figure 8.14 The Piano Roll editor buttons.
© Apple Inc.
The functions of each of these buttons, going from left to right across the Piano Roll editor, are as follows:
![]() MIDI Draw: Clicking this button opens the MIDI Draw area of the Piano Roll editor.
MIDI Draw: Clicking this button opens the MIDI Draw area of the Piano Roll editor.
![]() MIDI IN: When this button is engaged, you can use your MIDI controller to directly input MIDI into the Piano Roll editor. This is very useful for step input, which is explained later in this chapter, in the section entitled “MIDI Step Input.”
MIDI IN: When this button is engaged, you can use your MIDI controller to directly input MIDI into the Piano Roll editor. This is very useful for step input, which is explained later in this chapter, in the section entitled “MIDI Step Input.”
![]() MIDI OUT: With this button engaged, you hear each note as you select and edit it. This is useful if you want to monitor what you are doing as you work in the editor.
MIDI OUT: With this button engaged, you hear each note as you select and edit it. This is useful if you want to monitor what you are doing as you work in the editor.
![]() Catch Playhead: The button containing the now-familiar playhead icon is the Catch Playhead button. With this button engaged, the visible window in the Piano Roll editor always follows the playhead. You will almost always want this button engaged.
Catch Playhead: The button containing the now-familiar playhead icon is the Catch Playhead button. With this button engaged, the visible window in the Piano Roll editor always follows the playhead. You will almost always want this button engaged.
The Piano Roll Editor Inspector
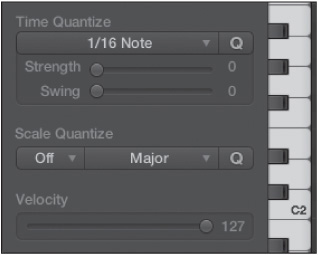
The Piano Roll editor has been upgraded in Logic Pro X to include a few handy controls in the new Piano Roll editor Inspector, shown in Figure 8.15. These controls are Time Quantize, Scale Quantize, and Velocity.
Figure 8.15 The Piano Roll editor Inspector gives you Time Quantize, Scale Quantize, and Velocity controls.
© Apple Inc.
Time Quantize
The Time Quantize functions are identical to the quantize parameters in the MIDI Region Inspector in the main window. To use Time Quantize in the Piano Roll editor, follow these steps:
1. Select the notes you wish to quantize.
2. Select the desired note value in the Time Quantize menu (directly under the words “Time Quantize,” as shown in Figure 8.15). It offers the same values found in the Quantize menu in the MIDI Region Inspector.
3. Next, adjust the Strength and Swing settings. Although this Inspector features sliders instead of the hybrid click-drag and text entry fields found in the MIDI Region Inspector, these sliders function identically to the Q-Strength and Q-Swing parameters in the MIDI Region Inspector.
4. Click the Time Quantize Q button, and the selected notes are quantized per your settings!
Scale Quantize
Scale Quantize is a great tool for fixing little mistakes—for example, when you have played a few wrong MIDI notes in an otherwise great performance—or perhaps for auditioning what a region would sound like in a minor key rather than a major one. It lets you select notes in the Piano Roll editor, set a root key and a scale or mode to use built off that key, and quantize the pitches of the selected notes to that scale.
To set up Scale Quantize, follow these steps:
1. Select notes you’d like to quantize to a scale.
2. Select a root key in the Key menu (under the words “Scale Quantize” in Figure 8.15). It has options for all 12 keys, plus an Off setting to turn Scale Quantize off.
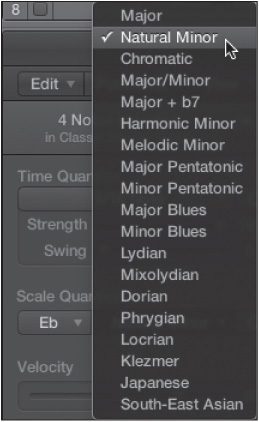
3. Select one of the scales offered in the Scale menu, as shown in Figure 8.16.
Figure 8.16 The Scale menu offers a wide array of scales for the Piano Roll editor’s Scale Quantize function.
© Apple Inc.
For those of you familiar with music theory, most if not all of these scales should be familiar. As of this writing, when you select a scale, the selected notes are automatically quantized to the selected scale in the selected key. The Scale Quantize Q button is (currently) unnecessary. If you change the Key or Scale settings, the scale quantization will happen immediately. If you set the Key setting to Off, the selected notes will return to their original pitches.
Velocity
The Velocity slider lets you quickly alter the velocity setting of any selected notes. It does not create an absolute velocity value for the selected notes; rather it scales them up or down as you increase or decrease the Velocity setting.
You will probably find it useful to remember some of the different note selection techniques detailed earlier in this chapter when using these different functions. For example, it’s pretty easy to see how selecting all notes of one pitch using the Edit > Select > Same Note Pitch command (Shift+E) would make it a breeze to change the velocity of all snare hits in a given MIDI performance, or how choosing Edit > Select > Same Note Name (Shift+S) would let you correct any stray Eb notes in a performance in C major. You could even time-quantize the performance of different parts of a drum kit using different Swing or Strength settings. The possibilities offered by the functions of the Piano Roll editor Inspector are endless!
Inserting and Deleting Notes in the Piano Roll Editor
You may already have a region filled with MIDI information from recording a MIDI performance. If, however, you want to enter MIDI data without recording and performing a MIDI part in its entirety, and if working with your music graphically appeals to you, the Piano Roll editor is the place to create MIDI performances in Logic. There are a couple ways to insert notes in the Piano Roll editor:
![]() You can use a MIDI controller, the computer keyboard, or onscreen keyboard to “step input” MIDI.
You can use a MIDI controller, the computer keyboard, or onscreen keyboard to “step input” MIDI.
![]() You can use the Pencil tool to draw your MIDI performance onscreen. To use one of these methods of inserting notes, first you must have an open MIDI region in the Piano Roll editor. This can be an empty region that you created in the Tracks area just so you could fill the region in the Piano Roll editor, or it could be a region that already contains MIDI data. In the following sections, you’ll learn how to use each method of inserting notes.
You can use the Pencil tool to draw your MIDI performance onscreen. To use one of these methods of inserting notes, first you must have an open MIDI region in the Piano Roll editor. This can be an empty region that you created in the Tracks area just so you could fill the region in the Piano Roll editor, or it could be a region that already contains MIDI data. In the following sections, you’ll learn how to use each method of inserting notes.
MIDI Step Input
The Piano Roll editor (and the Score and Event list editors) allow you to use your hardware MIDI controller to input MIDI in step input or step recording mode. In this mode, you enter your MIDI performance one step at a time. This is useful if you want to create a MIDI performance that is beyond your technical ability to play in real time or if you know precisely which notes you want to input and you want to insert them quickly, but not in real time. Step input in Logic is fast and intuitive once you understand the basics, and it is a powerful tool when you know how to use it.
To use step input:
1. Make sure you have the MIDI IN button engaged so that the Piano Roll editor can receive external MIDI.
2. Make sure your LCD is set to Custom.
3. Set the Division value in the Transport for the length of notes you’ll be playing. Click and hold on the Division display to access the Division menu, in which you select the Division value. The Division display in the Custom LCD is shown in Figure 8.17.
Figure 8.17 The Division display in the LCD in the Transport, Custom view. Click and hold on the Division display to access the Division menu, where you can select the Division value.

© Apple Inc.
4. Start playing your controller. Logic considers any notes you hold down at the same time to have been input at the same point, so you can play either single notes or chords. As soon as you release the key(s), the playhead advances by one division, and you will see the notes you performed (complete with the velocity with which you pressed the keys) onscreen. It’s as simple as that!
As you’d expect, Logic offers more control over step input than the basic procedure I just described. You can adjust the Division setting using the Division display or key commands throughout the step-input process. So you could, for example, step input a few 1/8 notes, then a passage of 1/16 notes, then two 1/4 notes, then back to 1/8 notes. You can lengthen notes you have just input by using the sustain pedal or the Sustain Inserted Notes key command. You can also insert a rest by depressing the sustain pedal without inputting notes or by using the Rest key command. You can also step forward and backward via key commands, or you can press the Delete key to erase what you have just input and thus move the playhead backward. When the Piano Roll editor is in focus, the spacebar works as a step forward key command. I’ve made references to some of the key command options for step input; in fact, you can use step input entirely by means of key commands. In the Key Commands window, look for the Step Input Keyboard section. You will find key commands for everything, from all the notes and divisions to different velocity settings. Also, be aware that if you have the Piano Roll editor MIDI IN engaged and the Piano Roll editor is in focus, your computer keyboard will react as if you have engaged the Musical Typing keyboard. To use the key commands that overlap input keys used by the Musical Typing keyboard, you must either disable the MIDI IN button or use the Tab key or your mouse to shift focus to another area of the main window.
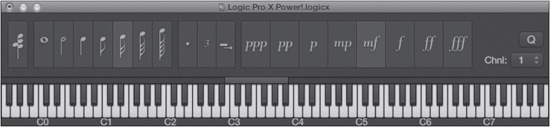
If you would rather use step input completely with the mouse, you can use Logic’s Musical Typing keyboard (described in Chapter 6) or the Step Input keyboard. You can launch the Step Input keyboard either by selecting Window > Step Input Keyboard or via the key command Option+Command+K. The Step Input keyboard is shown in Figure 8.18.
Figure 8.18 Use the Step Input keyboard to step input MIDI notes onscreen with the mouse.
© Apple Inc.
The Step Input keyboard includes buttons representing the various quantization settings, velocity ranges, a button for chord creation, and so on. As with MIDI hardware or keyboard input, you can adjust these features at any point while inputting, so you can create complex MIDI performances using the Step Input keyboard.
NOTE: As mentioned, you can use the Musical Typing or Step Input keyboard to step input MIDI notes. Because the Step Input keyboard has so many more options relating to MIDI step input, I highly recommend you use it for step recording instead of the Musical Typing keyboard. The Musical Typing keyboard is designed more for realtime input of performances in the main window.
All these step-input methods and key commands offer rich and creative tools to create and develop MIDI performances. Feel free to experiment with them, and be sure to check out the available key commands. Don’t think that step input is only for those who are not piano virtuosos. Even the best performers may just need to add a few notes to a MIDI region, and there’s nothing faster than using step-input key commands!
Entering MIDI Notes with the Pencil Tool
You can also “draw” your MIDI performance using the Pencil tool. If you know exactly what you want, this is a great way to create MIDI parts quickly. When you click the Pencil tool in the Piano Roll editor, it creates a note at that pitch and the nearest division. The created note will be the same length and velocity as the previously created note, so if you created an 1/8 note, then used the Finger tool to lengthen it to a whole note, the next note you created would be a whole note. If you select a note with the Pointer tool and then use the Pencil tool to create notes, all subsequent notes will have the length and velocity of the previously chosen note. If you click and drag with the Pencil tool, you can shorten or lengthen the note you are creating.
Entering Notes Using the Piano Roll Shortcut Menu
The Piano Roll editor shortcut menu, which you can open by right-clicking in the Piano Roll editor, offers a Create Note command. This places a note at the current pitch and position of the mouse pointer.
Deleting Notes in the Piano Roll Editor
You can delete notes in the Piano Roll editor by pressing the Delete key to delete any selected notes or by using the Eraser tool. If you want to restore notes you have deleted, you can undo the action.
Resizing and Moving Notes in the Piano Roll Editor
After creating notes, resizing and moving notes are two of the things you will use the Piano Roll editor for most often. Because the Piano Roll editor is designed for graphic editing, it’s no surprise that it includes tools to make these tasks as easy as possible. This section explores some of the methods for moving and resizing notes in the Piano Roll editor.
Resizing Notes
You can resize notes using a number of tools. To resize notes from the front, leaving the end point the same, you can grab a note from the lower-left corner (the cursor should change into a Resize cursor), hold down the mouse button, and drag right or left to move the beginning of the note forward or backward in the region. If you select multiple notes, when you click on the lower left of one note, you adjust the beginning point of all the selected notes.
The Finger tool is designed to allow you to adjust the length of one or more notes quickly. You can click on a single note to resize it, or you can select a group of notes and resize them all. As you hold down the mouse and drag right or left, the note becomes longer or shorter. You can resize a note to be as long as the entire MIDI region in the Piano Roll editor or as tiny as the smallest possible note division. Keep in mind that the smallest division to which you can graphically reduce a note depends on the zoom resolution of the Piano Roll editor. You can change the zoom level using the Zoom tool or the zoom sliders in the upper right of the Piano Roll editor, or via key commands.
If you hold down the Shift key while using the Finger tool to select multiple notes, every selected note will become the length of the last note selected. If you resize the notes while holding down the Shift key, the selected notes will all be the same length. If you hold down the Shift+Option key combination, all selected notes will end at the same point.
Moving Notes
You can move notes around the Piano Roll editor by selecting them with the Pointer tool and dragging them to a new location. When you hold the mouse button down with one or more notes selected, the mouse pointer turns into a hand to give you a visual cue that you can now move your notes around the Piano Roll editor. You can move at the highest resolution possible for the current zoom level by holding down the Control key as you move your notes (wait until the pointer turns into a hand before you press Control). To move at the single-tick level (the finest resolution possible in Logic) regardless of zoom level, hold down the Control+Shift keys.
Tip: To make and move a copy of one or more notes, hold down the Option key while dragging your notes.
Editing Multiple Regions in the Piano Roll Editor
The most common use of the Piano Roll editor is to open a single MIDI region for editing. However, sometimes you might want to view and/or edit more than one region in the Piano Roll editor simultaneously. You can accomplish this very easily.
To view multiple regions in the Piano Roll editor, simply select the regions you want to view in the Tracks area; the contents of all your selected MIDI regions will appear in the Piano Roll editor. Lines delineating the start and end points of MIDI regions in the Tracks area will appear as thick vertical lines in the editing window, reflecting the colors of their parent region. If you have Region Colors engaged, the notes of the various regions will have the same colors in the Piano Roll editor as their regions do in the main window.
When showing multiple regions, you can make selections, resize, and move notes from more than one region as if they were all in the same region.
The Event List
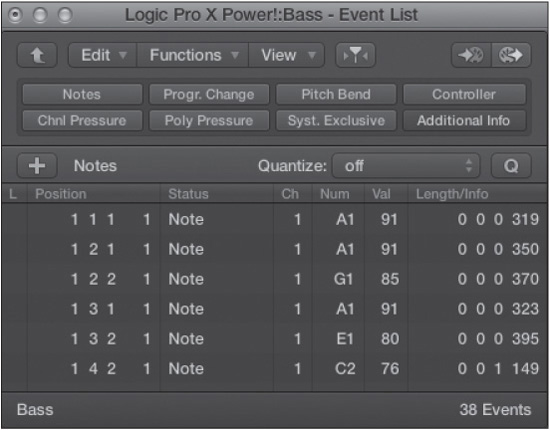
The Event list is the oldest method of recording, storing, and entering MIDI data, both in general and in Supertrack, Logic’s earliest predecessor. Given this long heritage, the Event list is extremely robust and feature-laden while admittedly looking a bit anachronistic. Put simply, the Event list features a scrolling text window containing MIDI information. You view, edit, and modify this information by changing the text in the list. Figure 8.19 shows the Event list window. You can also access the Event list in the List Editors area in the main window.
Figure 8.19 In the Event list, you can view and edit your MIDI data as text.
© Apple Inc.
The Event list displays the position of events, the specific type of event it is (which the list labels as “Status”), the MIDI channel of the event (Ch), any numerical values associated with that event, and the length or other relevant information about that MIDI event.
At first glance, it might seem as if editing music as text would be more tedious than creative. When you get used to the Event list, however, you’ll find this is far from the reality. Often, you’ll want to have a linked Event list even when using another editor or the main window, simply to view the detailed information available in the Event list. In some cases, some MIDI information, such as note release velocity, can be viewed and edited only in the Event list. And you might just find that when you know what you are doing, being able to quickly find and replace MIDI data as text is the most efficient method of editing available.
Let’s start looking at this vital and powerful tool by going through its local menus.
Event List Local Menus
Like the Piano Roll editor, the Event list has three local menus: Edit, Functions, and View. You can see those menus in the upper-left area of the Event list in Figure 8.19.
The similarities between the Piano Roll editor’s and the Event list’s local menus don’t end there. Because all MIDI editors are essentially working with the same data, many of the commands are also shared, as you will see in the following sections.
The Edit Menu
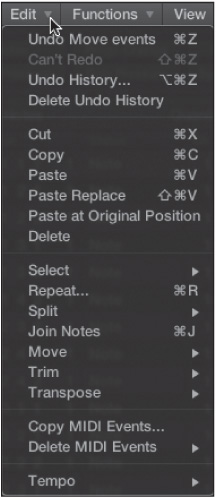
Figure 8.20 shows the Edit menu of the Event list. As you can see, this menu is exactly the same as the Edit menu in the Piano Roll editor. The submenus in the Edit menu also are identical in content. Refer to the descriptions of the commands in those sections of the chapter.
Figure 8.20 The Event list’s Edit menu is identical to the Piano Roll editor’s local Edit menu. (The Undo option displayed may be different, but that changes with each action.)
© Apple Inc.
The Functions Menu
Compare the Functions menu of the Event list in Figure 8.21 to the Functions menu in the Piano Roll editor. There are a couple of slight differences between them. First, the Event list editor Functions menu does not have the Include Non-Note MIDI Events command. That’s because by its very nature, the Event list is purpose-built for working on all manner of MIDI data. Second, the Event list Functions menu includes a submenu: Note Events. This submenu contains the Convert Sustain Pedal to Note Length command and the Set MIDI Channel to Voice Number command. The Note Events submenu also contains one more command: Assign MIDI Channels Based on Score Split. This command splits selected notes to different MIDI channels based on the Auto Split Notes in Polyphonic Staff Styles setting in the Score Preferences. When you choose this command, notes above get one channel and notes below get another. The key command for this is Control+Shift+C. For information about the other commands in the Functions menu, refer to the description of the commands in the section “The Functions Menu,” found in the section “The Piano Roll Editor” earlier in this chapter.
Figure 8.21 The Event list’s Functions local menu shares most of the same options as the Piano Roll editor’s Functions menu.
© Apple Inc.
The View Menu
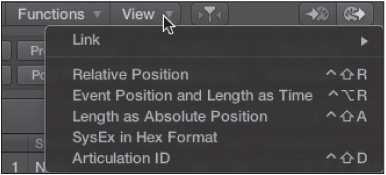
Unlike the other two local menus in the Event list, the View menu offers selections unique to it. Figure 8.22 shows the View menu of the Event list.
Figure 8.22 The View menu in the Event list.
© Apple Inc.
This menu offers a selection of commands that allow you to customize the display of events in the Event list:
![]() Link: The Link submenu contains Off, Same Level, and Content commands for linking the Event list to other areas and windows in Logic. The Link submenu functions were covered in Chapter 6.
Link: The Link submenu contains Off, Same Level, and Content commands for linking the Event list to other areas and windows in Logic. The Link submenu functions were covered in Chapter 6.
![]() Relative Position: With this engaged, the position of notes does not reflect their position in the song, but their relative position inside the MIDI region you are editing. The key command for this is Control+Shift+R.
Relative Position: With this engaged, the position of notes does not reflect their position in the song, but their relative position inside the MIDI region you are editing. The key command for this is Control+Shift+R.
![]() Event Position and Length as Time: With this engaged, the Position and Length columns in the Event list display SMPTE units instead of bar units. The key command for this is Control+Option+R.
Event Position and Length as Time: With this engaged, the Position and Length columns in the Event list display SMPTE units instead of bar units. The key command for this is Control+Option+R.
![]() Length as Absolute Position: If this is engaged, the Length display shows the absolute song position of the note-off message as opposed to the note length (which is the usual way of displaying length). The key command for this is Control+Shift+A.
Length as Absolute Position: If this is engaged, the Length display shows the absolute song position of the note-off message as opposed to the note length (which is the usual way of displaying length). The key command for this is Control+Shift+A.
![]() SysEx in Hex Format: If your Event list is displaying any system exclusive (SysEx) information for a hardware MIDI device, engaging this option displays the data in hexadecimal format. Consult your MIDI hardware unit’s instruction manual for details of its SysEx implementation.
SysEx in Hex Format: If your Event list is displaying any system exclusive (SysEx) information for a hardware MIDI device, engaging this option displays the data in hexadecimal format. Consult your MIDI hardware unit’s instruction manual for details of its SysEx implementation.
![]() Articulation ID: This command lets you add a column in the Event list for viewing and editing Articulation IDs. The key command for this is Control+Shift+D.
Articulation ID: This command lets you add a column in the Event list for viewing and editing Articulation IDs. The key command for this is Control+Shift+D.
Event List Buttons
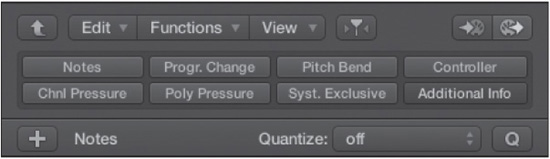
The Event list holds many more buttons than any window you have explored so far. Figure 8.23 shows the Event list buttons.
Figure 8.23 The Event list buttons allow you to select which data to show and which to filter out.
© Apple Inc.
Some of these buttons are familiar from other windows. Others are unique to the Event list and allow you to display only those specific types of MIDI messages with which you want to work. The familiar buttons located to the left of local menus include the following, from left to right:
![]() Hierarchy: Clicking this button when it is active will move you up a level in the Event list from a list of the events in a region to a list of the regions in the project.
Hierarchy: Clicking this button when it is active will move you up a level in the Event list from a list of the events in a region to a list of the regions in the project.
![]() Catch Playhead: With this button engaged, the visible window in the Event list always follows the playhead position. You will almost always want this button engaged.
Catch Playhead: With this button engaged, the visible window in the Event list always follows the playhead position. You will almost always want this button engaged.
![]() MIDI IN: When this button is engaged, you can use your MIDI controller to input MIDI directly into the Event list. This was described earlier in this chapter in the section “MIDI Step Input.”
MIDI IN: When this button is engaged, you can use your MIDI controller to input MIDI directly into the Event list. This was described earlier in this chapter in the section “MIDI Step Input.”
![]() MIDI OUT: With this engaged, you hear the currently selected MIDI note that you are editing.
MIDI OUT: With this engaged, you hear the currently selected MIDI note that you are editing.
In addition to these buttons, there is another major set of buttons available in the Event list. These buttons allow you to filter what MIDI data you see in the Event list.
![]() Notes: With this button engaged, you will see the MIDI notes in the MIDI region that you are editing.
Notes: With this button engaged, you will see the MIDI notes in the MIDI region that you are editing.
![]() Program Change: With this button engaged, you will see any program change messages in the MIDI region you are editing.
Program Change: With this button engaged, you will see any program change messages in the MIDI region you are editing.
![]() Pitch Bend: With this button engaged, you will see any pitch bend messages in the MIDI region you are editing. Keep in mind that if your region has pitch bend information, you may find literally hundreds of pitch bend messages representing every instant the pitch bend wheel was touched, so disengaging this button can be very handy!
Pitch Bend: With this button engaged, you will see any pitch bend messages in the MIDI region you are editing. Keep in mind that if your region has pitch bend information, you may find literally hundreds of pitch bend messages representing every instant the pitch bend wheel was touched, so disengaging this button can be very handy!
![]() Controller: With this button engaged, you will see any control change messages in the MIDI region you are editing. Like pitch bend data, continuous control change messages (modulation, for example) can overwhelm your Event list, making this another very useful filter.
Controller: With this button engaged, you will see any control change messages in the MIDI region you are editing. Like pitch bend data, continuous control change messages (modulation, for example) can overwhelm your Event list, making this another very useful filter.
![]() Channel Pressure: With this button engaged, you will see aftertouch messages in the MIDI region you are editing. Channel pressure is a continuous controller.
Channel Pressure: With this button engaged, you will see aftertouch messages in the MIDI region you are editing. Channel pressure is a continuous controller.
![]() Poly Pressure: With this button engaged, you will see any polyphonic key pressure messages in the MIDI region you are editing. Polyphonic aftertouch is also a continuous controller.
Poly Pressure: With this button engaged, you will see any polyphonic key pressure messages in the MIDI region you are editing. Polyphonic aftertouch is also a continuous controller.
![]() System Exclusive: With this button engaged, you will see any system exclusive messages in the MIDI region you are editing. SysEx is comparatively expert-level MIDI data. Most users can disengage this button, but for those who work with SysEx a lot, SysEx viewing and editing in the Event list is invaluable.
System Exclusive: With this button engaged, you will see any system exclusive messages in the MIDI region you are editing. SysEx is comparatively expert-level MIDI data. Most users can disengage this button, but for those who work with SysEx a lot, SysEx viewing and editing in the Event list is invaluable.
![]() Additional Info: If this button is engaged, you will see extra information (the “full message”) about the displayed MIDI messages. Again, this is relatively expert-level stuff.
Additional Info: If this button is engaged, you will see extra information (the “full message”) about the displayed MIDI messages. Again, this is relatively expert-level stuff.
Inserting and Deleting MIDI Messages in the Event List
As with the other MIDI editors, you can insert and delete MIDI information in the Event list. Because the Event list is a text editor, you do not have the visual cues that you do in the Piano Roll editor or the musical notation cues you have in the Score editor. Still, some people may find it convenient to add notes directly while using the Event list, and you can employ a number of methods.
First, you can use the same process described earlier in the section “MIDI Step Input” to input MIDI information into a MIDI performance one note at a time. The major difference is that you will not see a graphic representation of the note you have performed, but a line of text information instead.
You can also insert an event using the Create New Event button, marked with a plus symbol, in the bottom-left corner of the Event list (refer to Figure 8.23). You can create any kind of MIDI data listed previously for the Event list filter buttons. Simply select the type of data you’d like to create in the menu next to the Create New Event button, labeled “Notes” in Figure 8.23, and click the Create New Event button. The new event will be created at the current playhead position.
If you select an event and copy it (Command+C), the event is copied to the Clipboard. When you paste the event, a text entry box also appears, in which you can enter position values; this will be pasted in the new location.
You can delete MIDI events by selecting them and then pressing the Delete key. If you are not happy with any insertions or deletions you have made, you can always use the Undo command, or open the Undo History window if you have made a number of edits you dislike.
Moving and Adjusting the Values of MIDI Messages in the Event List
Even though you do not have the graphic bar to move, lengthen, or shorten for each note as you do in the Piano Roll editor, you can easily accomplish these things in the Event list, and with even more precision. The important thing to remember is that you are accomplishing everything through text entry, so you need to know the precise values of how much you want to resize a MIDI note or the exact position to which you want to move a MIDI event.
To move a single event, simply double-click its position data with the Pointer tool. A text entry box appears in which you type the new value. When you press Return, the event moves to the new location. If you select multiple MIDI messages, they all move relative to the event whose position you changed. So if you selected three MIDI notes that occurred on bar 1, bar 2, and bar 3, and you double-clicked on the note at bar 2 and changed its position to bar 3, the note at bar 1 would move to bar 2, and the note at bar 3 would move to bar 4.
The procedure for adjusting any other value, such as a MIDI event’s length or velocity, is basically the same: You simply double-click the desired data with the Pointer tool, enter a new value in the text box using spaces, commas, or periods to differentiate bars/beats/divisions/ticks, and press Return. If you select more than one MIDI event, they all maintain their values relative to each other, just as previously described; all selected events maintain their relative length.
You can also adjust values and move events without entering text, but by selecting one or more events and then using the mouse as a vertical slider to adjust values up or down.
When adjusting values for a group of MIDI events with the mouse, if any selected event reaches its maximum or minimum value (remember, MIDI values are between 0 and 127), no further adjustments in that direction will be possible for any event in that group, so that each event may maintain its relative value. If you want to continue to change the events from the selected group that have not reached their maximum or minimum, you can do so by holding the Option key down while dragging one of those events. If you want to set the same value for all selected events, hold down Shift+Option while dragging one of the events.
The Quantize function works as you would expect: Select the events you want to quantize, select the desired Quantize setting, and click the Q button.
Tip: You can easily use the Piano Roll editor and the Event list in tandem in the main window. When working in the Piano Roll editor, you can open the Event list in the main window by double-clicking a note in the Piano Roll editor. The Event list will open to the note you selected in the Piano Roll editor, ready for any editing you’d like to perform in the Event list!
The Step Editor
The Step editor, formerly called the Hyper editor, is another MIDI editor with a heritage that goes back to the early versions of Notator. It offers a unique way to build drum parts and to edit MIDI controller data graphically. It looks a bit like a cross between the Tracks area and the Piano Roll editor, with lanes for different notes or controller messages like tracks in the Tracks area, and vertical bars representing MIDI events. You can also view global tracks in the Step editor. Figure 8.24 shows a Step editor window.
Figure 8.24 You can use the Step editor as a MIDI drum or controller editor; here it is being used as a controller editor.
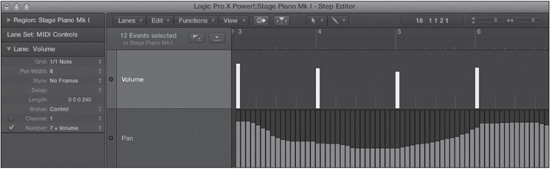
© Apple Inc.
The Step editor not only offers a step-entry graphic editor for drums and controller messages, it also allows you to save combinations of event definitions and drum note names as lane sets, which you’ll explore in the “Lane Sets” section later in this chapter. Due to the uniqueness of the Step editor, it is often overlooked. After reading this section, I hope you will feel comfortable enough to integrate it into your working method.
NOTE: What’s the difference between the Step editor and MIDI Draw? Although both can operate on MIDI control messages, they serve different purposes. MIDI Draw is an automation-like protocol in which you can enter MIDI control data in the main window or the Piano Roll editor for specific MIDI regions. The Step editor is a grid-based editor that does allow for the input and editing of MIDI control data, but its grid-based editing does not allow for the smoothness of changes that are possible with MIDI Draw. MIDI Draw is not suited for one-off and non-continuous MIDI control—MIDI Draw wants to connect control messages together. On the other hand, you’ll find the Step editor is far too tedious if you are trying to create automation-like effects—you’d be far better served using MIDI Draw or track-based automation. Additionally, the Step editor’s grid-based editing facility is uniquely suited for drum programming.
Step Editor Local Menus
Like the Event list, the Step editor shares the Edit, Functions, and View menu commands with the other MIDI editors. There is one wholly unique menu, however: the Lanes menu. Let’s look at the Step editor local menus.
The Lanes Menu
The local Lanes menu includes commands unique to the Step editor. Figure 8.25 shows the Lanes menu.
Figure 8.25 The Lanes menu of the Step editor.
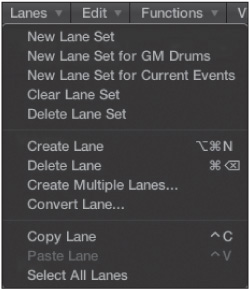
© Apple Inc.
This local menu contains commands related to using and creating lane sets. The “Lane Sets” section later in this chapter explains in detail how to use lane sets. Following are descriptions of these commands:
![]() New Lane Set: This creates a new lane set.
New Lane Set: This creates a new lane set.
![]() New Lane Set for GM Drums: This creates a new General MIDI drum lane set.
New Lane Set for GM Drums: This creates a new General MIDI drum lane set.
![]() New Lane Set for Current Events: This creates a lane set using the events currently selected in one of the MIDI editors. This is very useful if you have used MIDI Draw in other windows to add controller messages to MIDI regions, and you want to create a lane set with just those previously defined messages (events) represented.
New Lane Set for Current Events: This creates a lane set using the events currently selected in one of the MIDI editors. This is very useful if you have used MIDI Draw in other windows to add controller messages to MIDI regions, and you want to create a lane set with just those previously defined messages (events) represented.
![]() Clear Lane Set: This empties the current lane set.
Clear Lane Set: This empties the current lane set.
![]() Delete Lane Set: This deletes the current lane set.
Delete Lane Set: This deletes the current lane set.
![]() Create Lane: This creates a new lane based on the event definition of the selected lane in the Step editor. Event definitions determine which MIDI event a given lane of the Step editor will edit. You can change the event definition of a lane in the Lane Inspector, which is covered in the section “The Lane Inspector” later in this chapter. The key command for this is Option+Command+N.
Create Lane: This creates a new lane based on the event definition of the selected lane in the Step editor. Event definitions determine which MIDI event a given lane of the Step editor will edit. You can change the event definition of a lane in the Lane Inspector, which is covered in the section “The Lane Inspector” later in this chapter. The key command for this is Option+Command+N.
![]() Delete Lane: This deletes the selected lane(s) in the Step editor. The key command for this is Command+Delete.
Delete Lane: This deletes the selected lane(s) in the Step editor. The key command for this is Command+Delete.
![]() Create Multiple Lanes: You can automatically create lanes for all MIDI events or all selected events. When you choose this command, a dialog box appears, asking whether you want to create new lanes with definitions only for those events you have selected or for all events. Select the option you desire and press Return, and all those event definitions will appear in the Step editor.
Create Multiple Lanes: You can automatically create lanes for all MIDI events or all selected events. When you choose this command, a dialog box appears, asking whether you want to create new lanes with definitions only for those events you have selected or for all events. Select the option you desire and press Return, and all those event definitions will appear in the Step editor.
![]() Convert Lane: This redefines the selected event definition, as well as all the events in its lane. The events retain their values after conversion. A pane appears in the main window showing the current Lane Inspector settings to the left of an identical Lane Inspector, which you can edit.
Convert Lane: This redefines the selected event definition, as well as all the events in its lane. The events retain their values after conversion. A pane appears in the main window showing the current Lane Inspector settings to the left of an identical Lane Inspector, which you can edit.
![]() Copy Lane: This command copies an event definition into the Clipboard. The key command for this is Control+C.
Copy Lane: This command copies an event definition into the Clipboard. The key command for this is Control+C.
![]() Paste Lane: This pastes an event definition from the Clipboard. The key command for this is Control+V.
Paste Lane: This pastes an event definition from the Clipboard. The key command for this is Control+V.
![]() Select All Lanes: This command selects all the lanes in the current lane set.
Select All Lanes: This command selects all the lanes in the current lane set.
The Edit Menu
Figure 8.26 shows the Edit menu of the Step editor. As you can see, the Step editor shares its Edit menu with the Piano Roll editor and Event list. Refer to the previous section covering the Piano Roll editor’s Edit menu for descriptions of these commands.
Figure 8.26 The Edit menu of the Step editor is the same as the Edit menus of the Piano Roll editor and Event list.
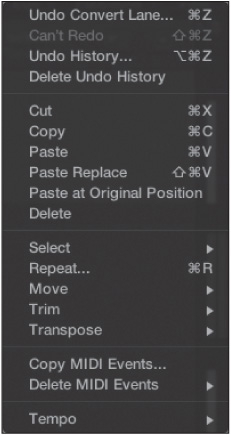
© Apple Inc.
The Functions Menu
Figure 8.27 shows the Functions menu of the Step editor. This menu has commands found in the Functions menu in the Piano Roll editor and the Event list. Refer to the previous sections covering the Functions menu for descriptions of these commands.
Figure 8.27 The Functions menu of the Step editor has commands found in the Piano Roll editor and the Event list.
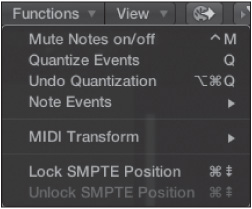
© Apple Inc.
The View Menu
The View menu for the Step editor, shown in Figure 8.28, has options found in the Piano Roll editor and Event list editor View menus. Refer to the previous View menu sections for descriptions of these commands.
Figure 8.28 The View menu of the Step editor.
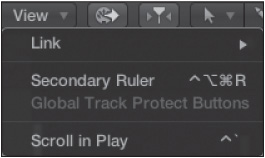
© Apple Inc.
The Step Editor Tool Menu
Figure 8.29 shows the Step editor Tool menu.
Figure 8.29 The Tool menu of the Step editor.
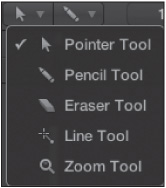
© Apple Inc.
The Line tool is unique to the Step editor, but the other four tools are standard. Descriptions of the five tools follow:
![]() Pointer: This is the standard Pointer tool for selecting and making “rubber band” selections of multiple notes.
Pointer: This is the standard Pointer tool for selecting and making “rubber band” selections of multiple notes.
![]() Pencil: The Pencil tool allows you to draw in new drum notes if you are using the Step editor as a drum editor or new controller information if you are using the editor to edit controller data. You’ll learn how to use the Pencil tool later in this chapter.
Pencil: The Pencil tool allows you to draw in new drum notes if you are using the Step editor as a drum editor or new controller information if you are using the editor to edit controller data. You’ll learn how to use the Pencil tool later in this chapter.
![]() Eraser: This tool removes notes and controller data from the Step editor.
Eraser: This tool removes notes and controller data from the Step editor.
![]() Line: This tool is valuable if you want to make linear changes in your data. To use this tool, click and hold on the note or controller message that you want to begin your line, drag the line until you reach your end point, then release the mouse button. The velocity or controller data in any event between the line’s end points will snap to the value at which the line bisected the event. In other words, if you want to fade up the velocity of drum hits slowly, you could click the crosshair on the first drum hit at the very bottom of the hit; then, at the end of the measure, click again, drawing a diagonal line up through your drum hits. The velocities of your drum hits now have the upward ramp formed by the Line tool, giving you an even, linear fade-in.
Line: This tool is valuable if you want to make linear changes in your data. To use this tool, click and hold on the note or controller message that you want to begin your line, drag the line until you reach your end point, then release the mouse button. The velocity or controller data in any event between the line’s end points will snap to the value at which the line bisected the event. In other words, if you want to fade up the velocity of drum hits slowly, you could click the crosshair on the first drum hit at the very bottom of the hit; then, at the end of the measure, click again, drawing a diagonal line up through your drum hits. The velocities of your drum hits now have the upward ramp formed by the Line tool, giving you an even, linear fade-in.
![]() Zoom: To zoom in on a particular area, use the Zoom tool to “rubber band” it. Then zoom in to the maximum zoom level. Click in any empty space in the editor to return to the original zoom level.
Zoom: To zoom in on a particular area, use the Zoom tool to “rubber band” it. Then zoom in to the maximum zoom level. Click in any empty space in the editor to return to the original zoom level.
The Step Editor Buttons
Because the Step editor is unique in its functions, it relies less on the standard Logic window components. The Step editor has two basic function buttons common to the other MIDI editors: Catch Playhead and MIDI OUT. When working in the Step editor, you’ll normally want these buttons on. For information on how these buttons work, refer to the section “The Piano Roll Editor Buttons” earlier in this chapter.
The Lane Inspector
Unlike the Piano Roll editor or the Event list, the Step editor has an Inspector. The Step editor’s Lane Inspector contains parameters to define the currently selected lane in the Step editor. Every event definition has its own Inspector. Figure 8.30 shows an Inspector for the Volume lane.
Figure 8.30 The Inspector for the volume events in the Step editor.
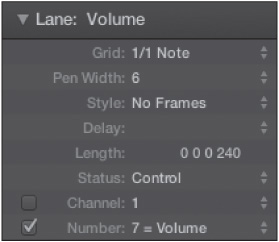
© Apple Inc.
The functions of these parameters are as follows:
![]() Grid: This determines the grid, or how many events will fit in one bar in the Step editor window. The size of the grid determines the resolution of the events.
Grid: This determines the grid, or how many events will fit in one bar in the Step editor window. The size of the grid determines the resolution of the events.
![]() Pen Width: With this parameter, you can adjust the width of the bars that appear in the Step editor window. You can adjust this parameter between 1 and 16. In general, you’ll want to find the value that almost completely fills the grid space but that still leaves a few pixels so you can differentiate the different bars. You need to determine the correct value based on your chosen grid resolution.
Pen Width: With this parameter, you can adjust the width of the bars that appear in the Step editor window. You can adjust this parameter between 1 and 16. In general, you’ll want to find the value that almost completely fills the grid space but that still leaves a few pixels so you can differentiate the different bars. You need to determine the correct value based on your chosen grid resolution.
![]() Style: This parameter gives you two options for how data is displayed in the Step editor. No Frames displays the event as a vertical line. Framed Values displays the event as a vertical line with a hollow frame that fills the remainder of the lane, allowing you to see the event as a proportion of its full range. You can see the framed values displayed in the pan lane in Figure 8.24.
Style: This parameter gives you two options for how data is displayed in the Step editor. No Frames displays the event as a vertical line. Framed Values displays the event as a vertical line with a hollow frame that fills the remainder of the lane, allowing you to see the event as a proportion of its full range. You can see the framed values displayed in the pan lane in Figure 8.24.
![]() Delay: With this parameter, you can offset all the events in a lane by a number of ticks. Simply double-click the left side of the Delay text box and enter a value. Positive values delay events; negative numbers advance events. If you click the right side of the Delay area by the up and down arrows, a menu appears in which you can select your note divisions.
Delay: With this parameter, you can offset all the events in a lane by a number of ticks. Simply double-click the left side of the Delay text box and enter a value. Positive values delay events; negative numbers advance events. If you click the right side of the Delay area by the up and down arrows, a menu appears in which you can select your note divisions.
![]() Length: The Length parameter determines how long added notes will be. The first number is the current division and the second is ticks. You will not normally need to set this unless you have some particularly long or short drum samples.
Length: The Length parameter determines how long added notes will be. The first number is the current division and the second is ticks. You will not normally need to set this unless you have some particularly long or short drum samples.
![]() Status: Here you can change the event definition from one type of message (note, volume, pitch bend, and so on) to another.
Status: Here you can change the event definition from one type of message (note, volume, pitch bend, and so on) to another.
![]() Channel: Normally, the Step editor displays all matching MIDI events in the region being edited. If you set the Channel parameter and select the accompanying checkbox, the Step editor shows only those events on the selected channel. If the checkbox is unchecked, the parameter is ignored.
Channel: Normally, the Step editor displays all matching MIDI events in the region being edited. If you set the Channel parameter and select the accompanying checkbox, the Step editor shows only those events on the selected channel. If the checkbox is unchecked, the parameter is ignored.
![]() Number or Pitch (First Byte): With this checkbox selected, this parameter determines what the initial byte (note pitch for notes, controller type for MIDI control messages) must be for the lane to display data. In other words, if this parameter is set for C#2, the editor displays only those notes that fall on C#2. Generally, for drum editing and specific MIDI control message events, you’ll want this checkbox selected. For more generic columns (such as the All Velocities option), you’ll want to leave this checkbox unchecked.
Number or Pitch (First Byte): With this checkbox selected, this parameter determines what the initial byte (note pitch for notes, controller type for MIDI control messages) must be for the lane to display data. In other words, if this parameter is set for C#2, the editor displays only those notes that fall on C#2. Generally, for drum editing and specific MIDI control message events, you’ll want this checkbox selected. For more generic columns (such as the All Velocities option), you’ll want to leave this checkbox unchecked.
NOTE: Suppose you’ve become very comfortable working with Logic’s editors in the main window. You’ve looked at the picture of the Step editor in Figure 8.24 and you’ve looked at the integrated Step editor in the main window, and you don’t see the Step editor window’s Inspector in the integrated Step editor. Instead of wasting what space you do have in the main window’s Step editor, Logic uses the main window’s own Inspector for controlling the currently selected lane!
Lane Sets
Lane sets are unique to the Step editor. They are basically stored lists of MIDI note or MIDI control message definitions, complete with parameters for each lane. Lane sets allow you to configure the editor for your specific needs. You can then save that configuration with all of your parameter settings, note names, and so on, and recall that configuration at will. If you like to use a few specific MIDI control events, you can create a lane set of only those event definitions. You can also have a lane set for your specific MIDI drum kit. Then, whenever you want to program drums, the exact setup that you need will be ready for you right in the Step editor.
Lane sets not only are powerful tools, but they are also very easy to use. You can access your available lane sets from the Lane Set menu in the Inspector. Simply click in the Lane Set field to open the menu and select the lane set you want to use. This menu also includes the commands for creating and clearing lane sets found in the Lanes menu. Figure 8.31 shows the Lane Set selection field.
Figure 8.31 All the lane sets you create are available in the Lane Set menu.
© Apple Inc.
Logic offers lane sets for MIDI controls and GM (General MIDI) drums, which you can use as they are or as templates for your own lane sets. Simply adjust each lane using the Lanes local menu and key commands, set the Lane Inspector for the event definitions in the Inspector to taste, use the Select All command, then choose New Lane Set for Current Events to create a lane set of your current configuration. (The section “Setting Up the Step Editor as a Drum Editor” later in this chapter describes this in more detail.) If you’d prefer to work from a blank slate, you can always start the process by using the New Lane Set command. You can name your lane set by selecting Rename Lane Set in the Lane Set menu, which presents you with a text box in which to enter a new name for the lane set. You need not worry about saving anything—Logic automatically saves each new lane set, so it’s available in all of your projects.
Editing MIDI Control Messages Using the Step Editor
The Step editor is ideal for editing situations in which you want to see your controller data in a grid or in vertical bars. You can also view many different MIDI messages in one lane set and get an overall view of how your various MIDI messages, such as volume and pan messages, are interacting with each other.
You can use the Pencil tool to place MIDI events directly on the grid where you want them. If you want to create many messages at once, simply hold the mouse button down and move across the grid. As you move the mouse up or down, you draw in higher or lower values for your data. The bar for each note is solidly colored to represent how high the value of the event is. A totally solid event means the event has a value of 127, the highest MIDI value. If the solid portion of the bar is only a third of the way up the bar, the value may be only 42. After creating your data with the Pencil tool, you can use the Line tool to make smooth, linear value adjustments across an entire lane.
If you are used to viewing messages as continuous data, viewing them in the shape of static bars instead might seem tricky at first, but what you might think is continuous is actually nothing but a series of individual messages, each assigning a given controller a value at a particular position. After using the Step editor to edit those individual messages and values, you might just fall in love with having that level of control over your data!
Editing MIDI Notes (Drums) Using the Step Editor
A MIDI note is actually just a type of MIDI message that tells a sound module or software instrument to play a sound at a given pitch. That means the Step editor can be configured to edit MIDI note messages just as easily as MIDI control messages. Because the Step editor allows you to place notes directly on a grid, using the Step editor as a drum editor is a natural fit. If you enjoy programming drums in the computer rather than via a performance on a MIDI keyboard, drum controller, or MIDI percussion set, the Step editor offers you the ability to draw notes on a grid quickly, exactly where you want them. Thanks to lane sets, you can even name each lane with the name of the drum instrument the lane triggers. See the next section, “Setting Up the Step Editor as a Drum Editor,” for specific details on using the Step editor with drums.
The procedure for using the Step editor to program drums is exactly the same as described previously for MIDI control messages: You draw in the event you want, in the lane you want, at the velocity you want. You’ll see a bar line representing your drum hit and the velocity you selected. You can hold the Pencil tool down and roll over many positions to create multiple notes, and you can use the Line tool to create fade-ins, fade-outs, steady velocity at a particular value, and so on. If you like programming drum parts directly into Logic, you’ll find the Step editor especially suited to your needs.
Tip: Clearly, the Step editor assumes that if you want to program notes in its grid, they will be for drum parts—as its inclusion of a GM drum lane set and commands to create them illustrates. That doesn’t mean you must use the Step editor for drum tracks. However, if you are programming heavily quantized MIDI parts and looking for that old-school “analog” step sequencer style of grid in which to place your arpeggiated synth pulses and techno hits, you just might find that the Step editor suits your needs as well.
Simply create a GM drum lane set, which will give you a lane set with all notes; then erase the drum name in the Lane Inspector and give each event its standard note name. You’ll end up with a lane set of notes without drum names. Rename the lane set, and you now have a MIDI step sequencer lane set, ready for you to program synths right to the grid!
Setting Up the Step Editor as a Drum Editor
If you happen to be using an external General MIDI drum module (or a synthesizer with GM drum assignments), then the Step editor is already set up for you. Just select the GM drums lane set, and you’re done! Everything is already configured for you. However, it’s possible that you are using a software instrument or a more advanced drum module that may not follow the GM convention for drums. In this case, you should start with the GM drum kit set, but you’ll want to customize it to your specific instrument.
If your software instrument or drum module matches some or all of the GM drum notes, customizing your lane set will be a breeze. Simply select those event definitions that you don’t need and choose Lanes > Delete Lane or use the default key command, Command+Delete (refer to Figure 8.25). You can delete more than one definition at a time by Shift-clicking multiple lanes.
Very often, your drum instrument may match its main drums with the names in the GM drum kit, but not all of them. For example, the kick, snares, and most cymbals may match up between your instrument and the GM drum kit lane set, but your instrument’s crash sound may be in the GM drum kit lane for RIDE 2. Thankfully, the Step editor lets you easily change the names of event definitions. To do this, in the Lane Inspector, simply click on the lane name and type in the new name. Figure 8.32 shows the name of the KICK 2 event definition being changed.
Figure 8.32 Click the lane name in the Lane Inspector to quickly change its name.
© Apple Inc.
If you find that your instrument doesn’t match any of the GM drum kit names, you can create a brand-new lane set specifically using the notes of your instrument. To do this, select a MIDI region of notes, open that region in the Step editor, and select New Lane Set for Current Events from the Lanes menu. As Figure 8.33 shows, this will leave you with a new lane set containing one lane for each MIDI note in your MIDI region. The event definitions will be named for their MIDI note by default. The lane set will have the same name as your MIDI region. You can rename both the lane set and event definition names in the Lane Inspector.
Figure 8.33 When you use the New Lane Set for Current Events command, a new lane set named after your MIDI region is created with one lane for each MIDI note.
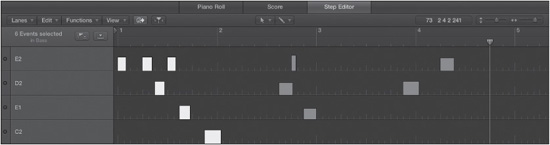
© Apple Inc.
Tip: Suppose you’re creating your own lane set from the New Lane Set for Current Events command, and you want to ensure that you have a lane for every single drum hit. In this case, create a MIDI region that contains one note for each drum hit. You can even play each drum hit in the order from first to last that you want the lanes to appear in your new lane set. Then select that MIDI region, open it in the Step editor, and select New Lane Set for Current Events. This creates a lane for every single hit, with the first note appearing in the top lane and the last note appearing in the bottom lane.
Tip: Even if you are using a software instrument such as Ultrabeat that already has a built-in step sequencer, you might want to use the Step editor. Most software instruments with step sequencers only allow a single-step division setting to be used at once; in other words, you can’t have a 1/4-note grid for your kick drum, a 1/16-note grid for your snare, a 1/32-note grid for your hi-hats, and so on. The Step editor gives you that level of flexibility. Give it a try!
The Score Editor
As cutting edge as Logic is, musicians who like working with notation are not left out in the cold. One of the most powerful editors in Logic is the Score editor, which offers traditional music notation recording, editing, and score printing. Even if you don’t feel at home using computers to manipulate MIDI performances, you will find the Score editor to be the “digital music notation paper” you always wanted, where you can perform, move, erase, redraw, and print out sheet music with the ease that only a computer can bring. Figure 8.34 shows the Score editor.

© Apple Inc.
If you do not read and write music notation, you might find this editor superfluous to your working method. However, if you do use—and sometimes even think in—music notation, you’ll find the Score editor to be one of Logic’s most important features, with advantages over other sequencers that do not offer the power and flexibility of Logic’s notation facilities.
NOTE: This section is not intended to teach music theory or the reading and writing of music notation. Instead, the purpose is to introduce those already familiar with these concepts to the way that Logic allows users to write and edit music in notation form—and I do mean introduce. The Score editor is perhaps the deepest editor in Logic, because music notation itself is truly an advanced symbolic language, with all the inherent complexity and flexibility that implies. If this chapter inspires you to explore music notation on your own, great! Music theory will always help your music productions, regardless of genre.
Score Editor Local Menus
Because of the comprehensive nature of music notation, the Score editor has a lot of commands relating to how to format, lay out, and enter musical information. To accommodate this, the Score editor has a unique Layout menu. The other local menus are shared with the other MIDI editors, but there are some Score editor–specific commands in these menus. The sections that follow describe the various options available in the local menus.
Layout Menu
The Layout menu contains options for how to format your score. Figure 8.35 shows the Layout menu.
Figure 8.35 The Layout menu of the Score editor.
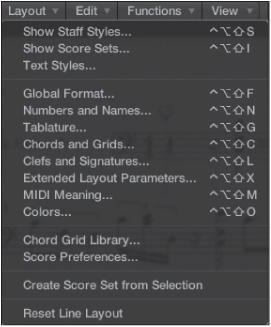
© Apple Inc.
The various options are as follows:
![]() Show Staff Styles: This command opens the Staff Styles window, which allows you to access Logic’s predesigned staff styles as well as create your own. The Staff Styles window is described in the section “Staff Styles” later in this chapter. The key command for this is Control+Option+Shift+S.
Show Staff Styles: This command opens the Staff Styles window, which allows you to access Logic’s predesigned staff styles as well as create your own. The Staff Styles window is described in the section “Staff Styles” later in this chapter. The key command for this is Control+Option+Shift+S.
![]() Show Score Sets: This command brings up the Score Sets window, which allows you to create score sets for grouping MIDI instruments from the Tracks area as you want them to appear in your score. The key command for this is Control+Option+Shift+I.
Show Score Sets: This command brings up the Score Sets window, which allows you to create score sets for grouping MIDI instruments from the Tracks area as you want them to appear in your score. The key command for this is Control+Option+Shift+I.
![]() Text Styles: This command opens the Text Styles window, which allows you full control of any text on your score. The Text Styles window is covered in the section “Text Styles” later in this chapter.
Text Styles: This command opens the Text Styles window, which allows you full control of any text on your score. The Text Styles window is covered in the section “Text Styles” later in this chapter.
![]() Global Format: This command opens the Score Project Settings window to the Global tab, which allows you to configure the page setup for printing, the spacing of your score, the chord symbols, and so on. (See Figure 8.36.) You can also access the Score Project Settings window by choosing File > Project Settings > Score. The key command for this is Control+Option+Shift+F.
Global Format: This command opens the Score Project Settings window to the Global tab, which allows you to configure the page setup for printing, the spacing of your score, the chord symbols, and so on. (See Figure 8.36.) You can also access the Score Project Settings window by choosing File > Project Settings > Score. The key command for this is Control+Option+Shift+F.
Figure 8.36 The Score Project Settings window open to the Global tab.
© Apple Inc.
![]() Numbers and Names: This command opens the Score Project Settings window to the Numbers & Names tab, in which you can configure page numbers, bar numbers, and instrument names for printing and so on. (See Figure 8.37.) The key command for this is Control+Option+Shift+N.
Numbers and Names: This command opens the Score Project Settings window to the Numbers & Names tab, in which you can configure page numbers, bar numbers, and instrument names for printing and so on. (See Figure 8.37.) The key command for this is Control+Option+Shift+N.
Figure 8.37 The Score Project Settings window open to the Numbers & Names tab.
© Apple Inc.
![]() Tablature: This command opens the Score Project Settings window to the Tablature tab, which allows you to configure how Logic will format guitar tablature and similar features. (See Figure 8.38.) The key command for this is Control+ Option+Shift+G.
Tablature: This command opens the Score Project Settings window to the Tablature tab, which allows you to configure how Logic will format guitar tablature and similar features. (See Figure 8.38.) The key command for this is Control+ Option+Shift+G.
Figure 8.38 The Score Project Settings window open to the Tablature tab.
© Apple Inc.
![]() Chords and Grids: This command opens the Score Project Settings window to the Chords & Grids tab, which allows you to configure the way Logic displays chord symbols and to define settings for the way tablature is displayed. (See Figure 8.39.) The key command for this is Control+Option+Shift+C.
Chords and Grids: This command opens the Score Project Settings window to the Chords & Grids tab, which allows you to configure the way Logic displays chord symbols and to define settings for the way tablature is displayed. (See Figure 8.39.) The key command for this is Control+Option+Shift+C.
Figure 8.39 The Score Project Settings window open to the Chords & Grids tab.
© Apple Inc.
![]() Clefs and Signatures: This command opens the Score Project Settings window to the Clefs & Signatures tab. This window offers parameters for how Logic displays clefs, key signatures, time signatures, and octave symbols. (See Figure 8.40.) The key command for this is Control+Option+Shift+L.
Clefs and Signatures: This command opens the Score Project Settings window to the Clefs & Signatures tab. This window offers parameters for how Logic displays clefs, key signatures, time signatures, and octave symbols. (See Figure 8.40.) The key command for this is Control+Option+Shift+L.
Figure 8.40 The Score Project Settings window open to the Clefs & Signatures tab.

© Apple Inc.
![]() Extended Layout Parameters: This command opens the Score Project Settings window to the Layout tab. This window offers extra parameters for more esoteric and aesthetic display options. (See Figure 8.41.) The key command for this is Control+Option+Shift+X.
Extended Layout Parameters: This command opens the Score Project Settings window to the Layout tab. This window offers extra parameters for more esoteric and aesthetic display options. (See Figure 8.41.) The key command for this is Control+Option+Shift+X.
Figure 8.41 The Score Project Settings window open to the Layout tab.
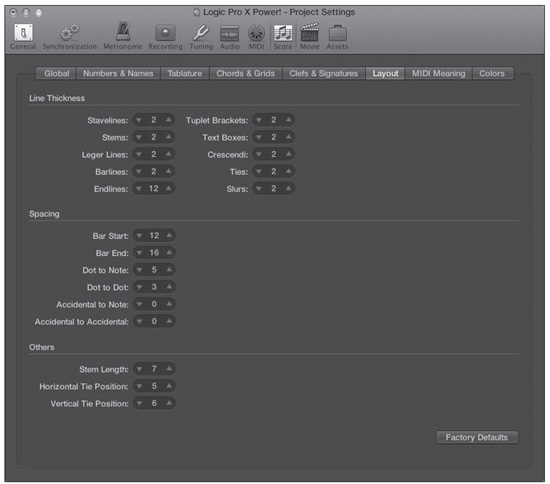
© Apple Inc.
![]() MIDI Meaning: This command opens the Score Project Settings window to the MIDI Meaning tab. This window lets you assign MIDI values to score symbols. (See Figure 8.42.) The key command for this is Control+Option+Shift+M.
MIDI Meaning: This command opens the Score Project Settings window to the MIDI Meaning tab. This window lets you assign MIDI values to score symbols. (See Figure 8.42.) The key command for this is Control+Option+Shift+M.
Figure 8.42 The Score Project Settings window open to the MIDI Meaning tab.
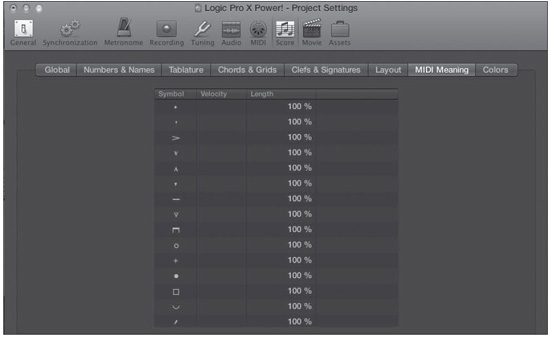
© Apple Inc.
![]() Colors: This command opens the Score Project Settings window to the Colors tab. This window lets you assign colors to pitch and velocity, as well as construct your own user palettes. (See Figure 8.43.) The key command for this is Control+Option+Shift+O.
Colors: This command opens the Score Project Settings window to the Colors tab. This window lets you assign colors to pitch and velocity, as well as construct your own user palettes. (See Figure 8.43.) The key command for this is Control+Option+Shift+O.
Figure 8.43 The Score Project Settings window open to the Colors tab.
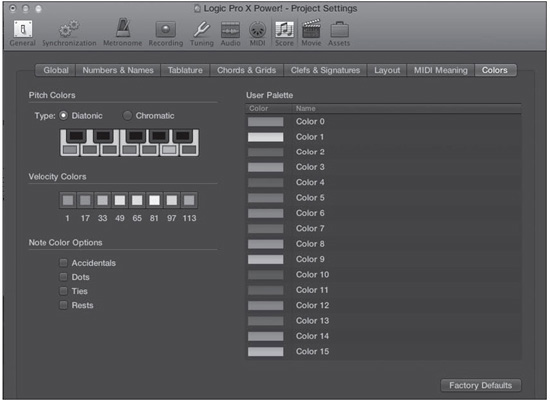
© Apple Inc.
![]() Chord Grid Library: Selecting Chord Grid Library opens the Chord Grid Library, a repository of thousands of guitar tablatures. The Chord Grid Library will be covered in detail in “The Chord Grid Library” section later in this chapter.
Chord Grid Library: Selecting Chord Grid Library opens the Chord Grid Library, a repository of thousands of guitar tablatures. The Chord Grid Library will be covered in detail in “The Chord Grid Library” section later in this chapter.
![]() Score Preferences: This command launches the global Score Preferences dialog box. You can also open this dialog box by choosing Logic Pro > Preferences > Score or by clicking on the Preferences menu in the Toolbar and selecting Score. The Score Preferences dialog box includes preferences for how you want the Score editor to operate. The specific settings that you want will depend completely on how you use the Score editor—for example, do you use it more for editing or just for printing? Many score preferences options are self-evident if you are familiar with music notation. Figure 8.44 shows the Score Preferences dialog box.
Score Preferences: This command launches the global Score Preferences dialog box. You can also open this dialog box by choosing Logic Pro > Preferences > Score or by clicking on the Preferences menu in the Toolbar and selecting Score. The Score Preferences dialog box includes preferences for how you want the Score editor to operate. The specific settings that you want will depend completely on how you use the Score editor—for example, do you use it more for editing or just for printing? Many score preferences options are self-evident if you are familiar with music notation. Figure 8.44 shows the Score Preferences dialog box.
Figure 8.44 The Score Preferences dialog box allows you to define how the Score editor will behave in all of your projects.
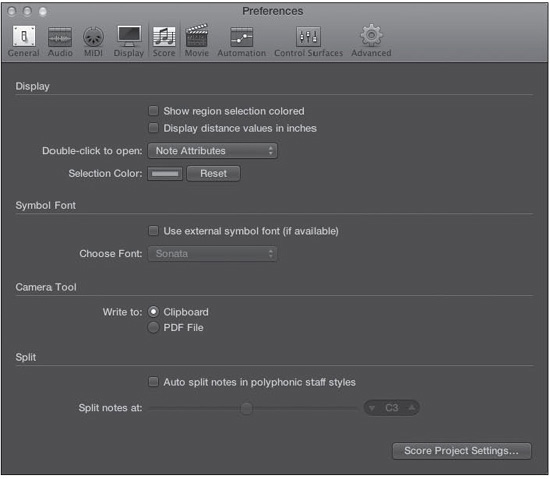
© Apple Inc.
![]() Create Score Set from Selection: This creates a new score set from all the instruments assigned to the MIDI regions you have selected.
Create Score Set from Selection: This creates a new score set from all the instruments assigned to the MIDI regions you have selected.
![]() Reset Line Layout: You can reset the layout of the notation lines with this command.
Reset Line Layout: You can reset the layout of the notation lines with this command.
Printing a Score That Includes Both a Transposed and a Non-Transposed Instrument: Noted film and television composer Jay Asher, author of Going Pro with Logic Pro 9 (Course Technology PTR, 2010), is a long-time Logic user who, as he puts it, “lives in the Score editor.” Asher shares with us a very helpful tip he learned for printing scores that begin on a non-transposing instrument and switch to a transposing instrument:
Let us say you need to print out a part that begins on a non-transposing (C) instrument—for example, the oboe—and then switches to a transposing instrument—for example, the English horn, which transposes up a 5th (+7). You could highlight all the notes in one of the editors and manually transpose them, but the result would be that the notes would sound different when played back. Here’s how you can do it without changing the sound:
1. Make sure that your Score editor is showing the default instrument set All Instruments.
2. If your oboe and English horn parts are already different MIDI regions on the same main window track, you can skip to step 4.
3. Cut the MIDI region into two MIDI regions and put them on the same main window track.
4. Make sure that both have the proper transposition—in our example, none for the oboe sequence, and +7 for the English horn.
5. Open the Score editor. Make sure that you are in Full Score mode in Page Edit view and select both MIDI regions by holding the Shift key while selecting.
6. In the Layout local menu, choose Create Score Set from Selection. This will create a new score set (which you can rename if you would like).
7. Then double-click anywhere in the white area around the MIDI regions.
8. Switch to Print view.
The result is [a single] score part with both MIDI regions properly transposed for a [professional musician] to read, and your MIDI parts will sound [as they did originally]. Remember, of course, to insert text to [inform] the player…when he is playing one instrument (oboe, in our example) and when he switches (to English horn, in our example).
The Edit Menu
As Figure 8.45 illustrates, the Edit menu in the Score editor is fundamentally the same as in the other MIDI editors. Although you can refer to the subsection covering the Piano Roll editor’s Edit menu to learn about the various functions of the Edit menu, there is one in particular that is unique to the Score editor that needs attention. At the bottom of the Score editor Edit menu is the Diatonic Insert command. When you are using the Pencil tool, engaging Diatonic Insert limits you to inserting only notes that are diatonically correct for the current key. You can alter the notes chromatically once they have been inserted, however. Note that this function does not work for MIDI input notes, only drawn notes.
Figure 8.45 The Edit menu in the Score editor is similar to the Edit menu in all the other MIDI editors in Logic.
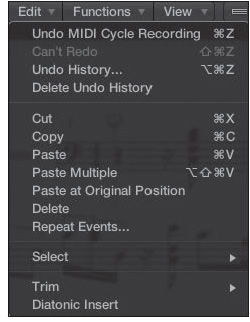
© Apple Inc.
The Functions Menu
The options of the Functions menu, shown in Figure 8.46, are also similar to the other MIDI editors with a few notable exceptions:
Figure 8.46 The Functions menu in the Score editor.
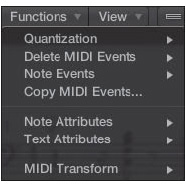
© Apple Inc.
![]() Quantization: Figure 8.47 shows the Quantization submenu. The Quantization submenu gives you options to control the quantization of events in the Score editor:
Quantization: Figure 8.47 shows the Quantization submenu. The Quantization submenu gives you options to control the quantization of events in the Score editor:
Figure 8.47 The Quantization submenu of the Functions menu in the Score editor.
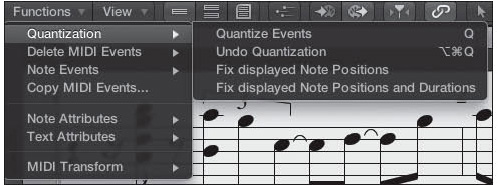
© Apple Inc.
![]() Quantize Events: This command applies the current quantization setting to the selected events. The key command for this is Q.
Quantize Events: This command applies the current quantization setting to the selected events. The key command for this is Q.
![]() Undo Quantization: This removes any quantization that may have been applied and returns the selected notes to their original location. The key command for this is Option+Command+Q.
Undo Quantization: This removes any quantization that may have been applied and returns the selected notes to their original location. The key command for this is Option+Command+Q.
![]() Fix Displayed Note Positions: This command fixes the display quantization of the notes in your project, allowing you to export it to another notation program, maintaining the display quantization settings.
Fix Displayed Note Positions: This command fixes the display quantization of the notes in your project, allowing you to export it to another notation program, maintaining the display quantization settings.
![]() Fix Displayed Note Positions and Durations: This command fixes the display quantization of the notes and their duration.
Fix Displayed Note Positions and Durations: This command fixes the display quantization of the notes and their duration.
![]() Delete MIDI Events: The Delete MIDI Events submenu, covered in the main window Edit menu section in Chapter 6, provides commands for deleting notes based on the following selection methods: Duplicates, Inside Locators, Outside Locators, Outside Region Boundaries, and Unselected Within Selection.
Delete MIDI Events: The Delete MIDI Events submenu, covered in the main window Edit menu section in Chapter 6, provides commands for deleting notes based on the following selection methods: Duplicates, Inside Locators, Outside Locators, Outside Region Boundaries, and Unselected Within Selection.
![]() Note Events: The Note Events submenu is identical to the Note Events submenu in the Event list editor. For details on these commands, refer to the Event list editor’s “Functions Menu” section earlier in this chapter.
Note Events: The Note Events submenu is identical to the Note Events submenu in the Event list editor. For details on these commands, refer to the Event list editor’s “Functions Menu” section earlier in this chapter.
![]() Copy MIDI Events: You can copy all MIDI events with this command. You will be presented with a dialog box asking you the range of notes to copy and how you want them to be copied.
Copy MIDI Events: You can copy all MIDI events with this command. You will be presented with a dialog box asking you the range of notes to copy and how you want them to be copied.
![]() Note Attributes: The Note Attributes submenu is filled with note and score symbol display parameters that you can set individually per note, regardless of your settings in other menus. It contains nine menus with more than 40 options for altering the attributes of the selected note or notes. To apply any of these options, select one or more notes and/or symbols in the editor display, then choose the desired option from this menu. For example, you can change the direction of the stem of a note, shift a sharp note to its enharmonic flat note, or change the display color of a note with commands from this menu. Figure 8.48 shows the Note Attributes submenu.
Note Attributes: The Note Attributes submenu is filled with note and score symbol display parameters that you can set individually per note, regardless of your settings in other menus. It contains nine menus with more than 40 options for altering the attributes of the selected note or notes. To apply any of these options, select one or more notes and/or symbols in the editor display, then choose the desired option from this menu. For example, you can change the direction of the stem of a note, shift a sharp note to its enharmonic flat note, or change the display color of a note with commands from this menu. Figure 8.48 shows the Note Attributes submenu.
Figure 8.48 The Note Attributes submenu. This Functions menu submenu contains different options to change the attributes of a selected note or symbol.
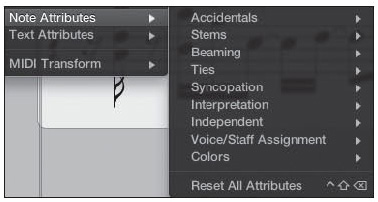
© Apple Inc.
NOTE: It’s beyond the scope of this book to cover all the possible note and symbol attribute alterations in this menu. If you write music notation and need to alter note attributes, you should find it easy to locate the desired attributes in this menu.
![]() Text Attributes: The Text Attributes submenu should look familiar to anyone used to word-processing and desktop-publishing applications. The Text Attributes submenu offers a standard selection of text-formatting options from which to choose any of your installed fonts, size, style, left/right alignment, and so on, for use with lyrics, notes on your score, and more. Figure 8.49 shows the Text Attributes submenu.
Text Attributes: The Text Attributes submenu should look familiar to anyone used to word-processing and desktop-publishing applications. The Text Attributes submenu offers a standard selection of text-formatting options from which to choose any of your installed fonts, size, style, left/right alignment, and so on, for use with lyrics, notes on your score, and more. Figure 8.49 shows the Text Attributes submenu.
Figure 8.49 The Text Attributes submenu offers you the use of your currently installed fonts and basic style options for score text.

© Apple Inc.
![]() MIDI Transform: This submenu gives you access to presets in the MIDI Transform window, which is covered later in this chapter.
MIDI Transform: This submenu gives you access to presets in the MIDI Transform window, which is covered later in this chapter.
The View Menu
The View menu contains options for configuring your view of the Score editor. Figure 8.50 shows the View menu.
Figure 8.50 The View menu of the Score editor.
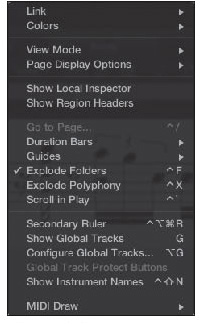
© Apple Inc.
The various options available in the View menu are as follows:
![]() Link: The Link submenu is identical to the ones found in the Event list and Step editor View menus. The Score editor also includes a Link button.
Link: The Link submenu is identical to the ones found in the Event list and Step editor View menus. The Score editor also includes a Link button.
![]() Colors: This submenu offers options to colorize notes by pitch, velocity, or voice assignment. You can also force a note to be black and white instead of colorized.
Colors: This submenu offers options to colorize notes by pitch, velocity, or voice assignment. You can also force a note to be black and white instead of colorized.
![]() View Mode: This submenu offers three view modes for the Score editor. Linear view shows your score part on a single line. Wrapped view appears more like a normal score layout. Page view is your actual printer-ready score layout. The key command for Page view is Control+P.
View Mode: This submenu offers three view modes for the Score editor. Linear view shows your score part on a single line. Wrapped view appears more like a normal score layout. Page view is your actual printer-ready score layout. The key command for Page view is Control+P.
![]() Page Display Options: This submenu offers additional page layout display options when Page view is selected, like the ability to adjust your margins.
Page Display Options: This submenu offers additional page layout display options when Page view is selected, like the ability to adjust your margins.
![]() Show Local Inspector: Engaging this option displays the Score window’s Inspector to the left of the edit area in the Score editor window. As of this writing, this command does not open or close the Inspectors shown in Figure 8.34, which can be shown or hidden using the key command I. Instead, it opens an Inspector containing the same Time Quantize, Scale Quantize, and Velocity controls found in the Piano Roll editor. Refer to the section “The Piano Roll Editor Inspector” for more information on these controls. This command is only available when the Score editor is in Linear view mode.
Show Local Inspector: Engaging this option displays the Score window’s Inspector to the left of the edit area in the Score editor window. As of this writing, this command does not open or close the Inspectors shown in Figure 8.34, which can be shown or hidden using the key command I. Instead, it opens an Inspector containing the same Time Quantize, Scale Quantize, and Velocity controls found in the Piano Roll editor. Refer to the section “The Piano Roll Editor Inspector” for more information on these controls. This command is only available when the Score editor is in Linear view mode.
![]() Show Region Headers: Selecting this option wraps each region in the Score editor with its own region header, complete with the name and correct coloring from the parent Tracks area regions. This can be very handy when working with multiple regions across multiple tracks, for example.
Show Region Headers: Selecting this option wraps each region in the Score editor with its own region header, complete with the name and correct coloring from the parent Tracks area regions. This can be very handy when working with multiple regions across multiple tracks, for example.
![]() Go to Page: When you are in Page view, selecting this option opens the Go to Page dialog box. There, you can enter a page number and click OK or press Return, and the selected page will be displayed. The key command for this is Control+/(forward slash).
Go to Page: When you are in Page view, selecting this option opens the Go to Page dialog box. There, you can enter a page number and click OK or press Return, and the selected page will be displayed. The key command for this is Control+/(forward slash).
![]() Duration Bars: Duration bars are similar to the bars for notes in the Piano Roll editor. They provide a visual, editable representation of the length of each note. You can choose to disable the display of duration bars, display them only for notes you have selected, or display them for all notes.
Duration Bars: Duration bars are similar to the bars for notes in the Piano Roll editor. They provide a visual, editable representation of the length of each note. You can choose to disable the display of duration bars, display them only for notes you have selected, or display them for all notes.
![]() Guides: This submenu gives you a variety of options for displaying vertical dotted-line guides, which can help you align objects in the score as you work on its layout. You can turn guides off or display them for dragged objects, selected objects, or all objects. If you want to clean up your score to look as professional as possible, guides are an invaluable aid.
Guides: This submenu gives you a variety of options for displaying vertical dotted-line guides, which can help you align objects in the score as you work on its layout. You can turn guides off or display them for dragged objects, selected objects, or all objects. If you want to clean up your score to look as professional as possible, guides are an invaluable aid.
![]() Explode Folders: This separates folder tracks into their component tracks. The key command for this is Control+F.
Explode Folders: This separates folder tracks into their component tracks. The key command for this is Control+F.
![]() Explode Polyphony: This separates into separate staves the various separate voices playing together. The key command for this is Control+X.
Explode Polyphony: This separates into separate staves the various separate voices playing together. The key command for this is Control+X.
![]() Scroll in Play: If this is engaged, instead of the playhead scrolling through the Score editor, the score scrolls past the stationary playhead.
Scroll in Play: If this is engaged, instead of the playhead scrolling through the Score editor, the score scrolls past the stationary playhead.
![]() Secondary Ruler: Like in the main window, the Secondary Ruler command adds a second bar ruler to the Score, with bars if the primary ruler is showing time and time if the primary ruler is showing bars. The key command for this is Control+Option+Command+R.
Secondary Ruler: Like in the main window, the Secondary Ruler command adds a second bar ruler to the Score, with bars if the primary ruler is showing time and time if the primary ruler is showing bars. The key command for this is Control+Option+Command+R.
![]() Show Global Tracks: You can toggle the global tracks on or off with this command when Page view is off. The key command for this is G.
Show Global Tracks: You can toggle the global tracks on or off with this command when Page view is off. The key command for this is G.
![]() Configure Global Tracks: This command opens a menu that lets you toggle on or off individual global tracks you wish to view. The key command for this is Option+G.
Configure Global Tracks: This command opens a menu that lets you toggle on or off individual global tracks you wish to view. The key command for this is Option+G.
![]() Global Track Protect Buttons: If this is selected, Track Protect buttons will appear on the global tracks.
Global Track Protect Buttons: If this is selected, Track Protect buttons will appear on the global tracks.
![]() Show Instrument Names: This determines whether the name of the instrument to which your MIDI region is assigned is displayed. The key command for this is Control+Shift+N.
Show Instrument Names: This determines whether the name of the instrument to which your MIDI region is assigned is displayed. The key command for this is Control+Shift+N.
![]() MIDI Draw: Just like the Piano Roll editor View menu option, this command creates a track lane beneath the Score editor where you can view, edit, and create MIDI Draw or MIDI control message information. Figure 8.51 shows a Score editor displaying the MIDI Draw lane.
MIDI Draw: Just like the Piano Roll editor View menu option, this command creates a track lane beneath the Score editor where you can view, edit, and create MIDI Draw or MIDI control message information. Figure 8.51 shows a Score editor displaying the MIDI Draw lane.
Figure 8.51 The MIDI Draw View option selected in the Score editor, displaying volume automation. Region headers are also enabled in this image.
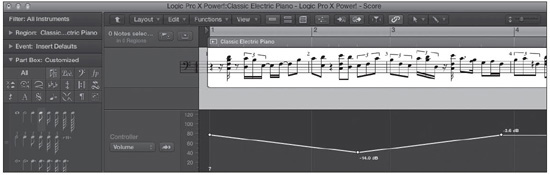
© Apple Inc.
The Score Editor Tool Menu
Because the Score editor is geared toward both graphic editing and printing, its Tool menu is the largest of all the MIDI editors, housing 17 tools. Figure 8.52 shows the Score editor Tool menu.
Figure 8.52 The Score editor Tool menu.
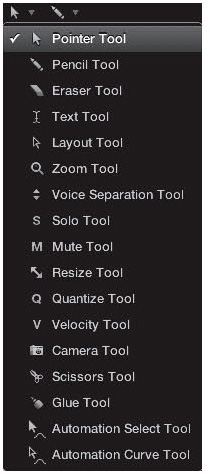
© Apple Inc.
Many of these tools are familiar, but a few are unique to the Score editor. Following are descriptions of these tools from top to bottom:
![]() Pointer: The standard Pointer tool is for selecting and making “rubber band” selections of multiple notes.
Pointer: The standard Pointer tool is for selecting and making “rubber band” selections of multiple notes.
![]() Pencil: The Pencil tool allows you to insert new notes into the Score editor and to create nodes in the MIDI Draw area.
Pencil: The Pencil tool allows you to insert new notes into the Score editor and to create nodes in the MIDI Draw area.
![]() Eraser: This tool removes notes from the Score editor.
Eraser: This tool removes notes from the Score editor.
![]() Text: With this tool, you can enter text into your score.
Text: With this tool, you can enter text into your score.
![]() Layout: Use this tool to move objects around in your score without actually affecting the timing of the parent MIDI event.
Layout: Use this tool to move objects around in your score without actually affecting the timing of the parent MIDI event.
![]() Zoom: If you want to zoom in on a particular group of notes, use the Zoom tool to “rubber band” them. You then zoom in to the maximum zoom level. Click anywhere there are no notes to return to the original zoom level.
Zoom: If you want to zoom in on a particular group of notes, use the Zoom tool to “rubber band” them. You then zoom in to the maximum zoom level. Click anywhere there are no notes to return to the original zoom level.
![]() Voice Separation: This tool allows you to separate polyphonic voices into different staves by drawing a dividing line. For this tool to be effective, you must be using a polyphonic staff style.
Voice Separation: This tool allows you to separate polyphonic voices into different staves by drawing a dividing line. For this tool to be effective, you must be using a polyphonic staff style.
![]() Solo: This tool solos or unsolos notes in the Score editor.
Solo: This tool solos or unsolos notes in the Score editor.
![]() Mute: The Mute tool mutes or unmutes notes in the Score editor.
Mute: The Mute tool mutes or unmutes notes in the Score editor.
![]() Resize: This tool can adjust the size of objects in the Score editor.
Resize: This tool can adjust the size of objects in the Score editor.
![]() Quantize: The Quantize tool allows you to quantize only selected notes, leaving the rest of the region unquantized. This is very useful if you have a great performance with only one portion in which the timing is slightly off. You can use this tool to quantize just those few notes to improve the readability of the score and leave the rest of the performance alone.
Quantize: The Quantize tool allows you to quantize only selected notes, leaving the rest of the region unquantized. This is very useful if you have a great performance with only one portion in which the timing is slightly off. You can use this tool to quantize just those few notes to improve the readability of the score and leave the rest of the performance alone.
![]() Velocity: With the Velocity tool, you can raise or lower the velocity of one or more notes graphically, by selecting the note and then scrolling up or down with the mouse to increase or decrease the velocity of the selected note. When you adjust the velocity of all selected notes at once by clicking on a single note and moving the mouse, every note retains its value relative to the other notes. (So, if you raise the velocity of a loud note and a soft note, both become louder, but the soft note becomes the same amount softer.) You can hold down Option+Shift to adjust all selected notes to the same velocity.
Velocity: With the Velocity tool, you can raise or lower the velocity of one or more notes graphically, by selecting the note and then scrolling up or down with the mouse to increase or decrease the velocity of the selected note. When you adjust the velocity of all selected notes at once by clicking on a single note and moving the mouse, every note retains its value relative to the other notes. (So, if you raise the velocity of a loud note and a soft note, both become louder, but the soft note becomes the same amount softer.) You can hold down Option+Shift to adjust all selected notes to the same velocity.
![]() Camera: Use the Camera tool to select sections of your score and export them into graphics files.
Camera: Use the Camera tool to select sections of your score and export them into graphics files.
![]() Scissors: The Scissors tool can be used to cut a score piece into multiple regions, and in the signature track for cutting bars into smaller divisions, creating time-signature changes in the process.
Scissors: The Scissors tool can be used to cut a score piece into multiple regions, and in the signature track for cutting bars into smaller divisions, creating time-signature changes in the process.
![]() Glue: This tool works in the signature track to merge measures, affecting the time signature of those measures in the process. You can also glue notes of the same pitch together to create notes of longer duration.
Glue: This tool works in the signature track to merge measures, affecting the time signature of those measures in the process. You can also glue notes of the same pitch together to create notes of longer duration.
![]() Automation Select: The Automation Select tool—represented by a bent arrow with a solid arrowhead, pointing upward and left—can select automation data in the Score editor MIDI Draw automation lane. Chapter 10 discusses automation and the Automation Select tool in depth.
Automation Select: The Automation Select tool—represented by a bent arrow with a solid arrowhead, pointing upward and left—can select automation data in the Score editor MIDI Draw automation lane. Chapter 10 discusses automation and the Automation Select tool in depth.
![]() Automation Curve: The Automation Curve tool—represented by a bent arrow with an open arrowhead, pointing upward and left—can create curves between two automation nodes in the Score editor MIDI Draw automation lane. Chapter 10 discusses automation and the Automation Curve tool in depth.
Automation Curve: The Automation Curve tool—represented by a bent arrow with an open arrowhead, pointing upward and left—can create curves between two automation nodes in the Score editor MIDI Draw automation lane. Chapter 10 discusses automation and the Automation Curve tool in depth.
The Score Editor Buttons
The Score editor offers nine buttons, five of which are common to the other editors in Logic. Figure 8.53 shows the Score editor buttons.
Figure 8.53 The Score editor buttons.
© Apple Inc.
Following are descriptions of the buttons, moving from left to right:
![]() Hierarchy: This button takes you from a view of the selected region(s) to a master Score view of all the project’s regions.
Hierarchy: This button takes you from a view of the selected region(s) to a master Score view of all the project’s regions.
![]() Linear View: This button lets you see your score in Linear view, where you will do the bulk of your editing.
Linear View: This button lets you see your score in Linear view, where you will do the bulk of your editing.
![]() Wrapped View: This button lets you see your score in Wrapped view.
Wrapped View: This button lets you see your score in Wrapped view.
![]() Page View: This button lets you see your score in Page view, a full-page overview of how your score will print out. Page view was not really designed for realtime input or editing operations, but for final finishing touches before printing.
Page View: This button lets you see your score in Page view, a full-page overview of how your score will print out. Page view was not really designed for realtime input or editing operations, but for final finishing touches before printing.
![]() MIDI Draw: This button opens the MIDI Draw area in the Score editor. The MIDI Draw button is available only in Linear view.
MIDI Draw: This button opens the MIDI Draw area in the Score editor. The MIDI Draw button is available only in Linear view.
![]() MIDI IN: The MIDI IN button engages step input mode, described earlier in this chapter in the section “The Piano Roll Editor.”
MIDI IN: The MIDI IN button engages step input mode, described earlier in this chapter in the section “The Piano Roll Editor.”
![]() MIDI OUT: With this engaged, you hear the currently selected MIDI note or event change (if you are working with pitch bend data, for example) while you are working.
MIDI OUT: With this engaged, you hear the currently selected MIDI note or event change (if you are working with pitch bend data, for example) while you are working.
![]() Playhead Catch: With this button engaged, the edit area in the Score editor will always follow the playhead position. You will almost always want this on.
Playhead Catch: With this button engaged, the edit area in the Score editor will always follow the playhead position. You will almost always want this on.
![]() Link: Engaging this button ensures that the editor always displays the same content as the top-most window. Double-clicking or Option-clicking the Link button while the Playhead Catch button is also engaged activates Contents Catch mode, in which the Score editor always shows the contents of the currently playing MIDI region as the song plays.
Link: Engaging this button ensures that the editor always displays the same content as the top-most window. Double-clicking or Option-clicking the Link button while the Playhead Catch button is also engaged activates Contents Catch mode, in which the Score editor always shows the contents of the currently playing MIDI region as the song plays.
The Score Editor Inspector
As you can see in Figure 8.54, the Score editor’s Inspector is loaded with options. Two of them are Inspectors for the region being edited in the Score editor. You can also see the Time Quantize, Scale Quantize, and Velocity controls found in the Piano Roll editor. Refer to the section “The Piano Roll Editor Inspector” earlier in this chapter for more information on those controls. The following sections describe the Score Inspector parameters.
Figure 8.54 The Score editor Inspector.
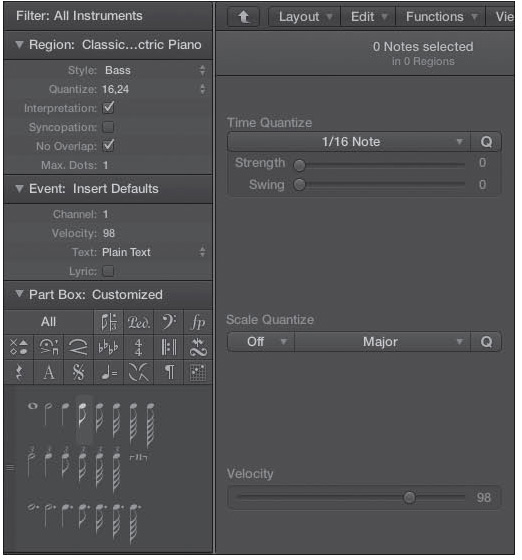
© Apple Inc.
The Filter Menu
The Filter menu lets you select what score set or instrument is displayed in the Edit area. You can also access the Show/Hide Score Sets Window command in this menu. To access this menu, click in the Filter field.
The Region Inspector
The Region Inspector, located directly underneath the Filter menu, contains parameters that configure the rhythmic display of the selected MIDI region. Figure 8.55 shows the Region Inspector.
Figure 8.55 The Region Inspector.
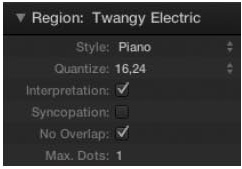
© Apple Inc.
Descriptions of the parameters follow:
![]() Style: This parameter indicates the staff style used for the score display of the selected MIDI region. Clicking to the right of the parameter name opens a menu of all available staff styles from which you can choose.
Style: This parameter indicates the staff style used for the score display of the selected MIDI region. Clicking to the right of the parameter name opens a menu of all available staff styles from which you can choose.
![]() Quantize: The Quantize parameter determines the shortest note value that the currently selected region can display. The value can be either a single number, called a binary quantization, or two numbers (a binary and a ternary value), called a hybrid quantization. As with the Style parameter, you choose your desired value from the menu that appears when you click to the right of the parameter name. This quantize parameter affects only the display of notes in the Score editor, not their quantize setting within their parent region.
Quantize: The Quantize parameter determines the shortest note value that the currently selected region can display. The value can be either a single number, called a binary quantization, or two numbers (a binary and a ternary value), called a hybrid quantization. As with the Style parameter, you choose your desired value from the menu that appears when you click to the right of the parameter name. This quantize parameter affects only the display of notes in the Score editor, not their quantize setting within their parent region.
![]() Interpretation: With Interpretation enabled, the Score editor displays notes with length values that fall on the beat to make the score easier to read. The display is far less precise than when Interpretation is disabled and the Score editor shows notes at their true length. At the same time, when Interpretation is disabled, your Score can be too accurate, showing every possible miniscule division of the beat that was played. You can also turn this feature on or off on a per-note basis by choosing the appropriate option in the Functions > Note Attributes menu or via a key command. Generally, you probably want to leave Interpretation on.
Interpretation: With Interpretation enabled, the Score editor displays notes with length values that fall on the beat to make the score easier to read. The display is far less precise than when Interpretation is disabled and the Score editor shows notes at their true length. At the same time, when Interpretation is disabled, your Score can be too accurate, showing every possible miniscule division of the beat that was played. You can also turn this feature on or off on a per-note basis by choosing the appropriate option in the Functions > Note Attributes menu or via a key command. Generally, you probably want to leave Interpretation on.
![]() Syncopation: If Syncopation is enabled, instead of displaying syncopated notes as several tied notes, the Score editor displays them as a single note. As with the Interpretation option, you can turn this feature on or off per note by choosing the appropriate option in the Functions > Note Attributes submenu or via the key command.
Syncopation: If Syncopation is enabled, instead of displaying syncopated notes as several tied notes, the Score editor displays them as a single note. As with the Interpretation option, you can turn this feature on or off per note by choosing the appropriate option in the Functions > Note Attributes submenu or via the key command.
![]() No Overlap: This prevents the overlapping of notes in the display. Unless you want to display visually repeated and overlapping notes, you will want to keep this option on.
No Overlap: This prevents the overlapping of notes in the display. Unless you want to display visually repeated and overlapping notes, you will want to keep this option on.
![]() Max. Dots: The Max. Dots option determines how many dots Logic allows a single note to display. You can change unwanted dotted notes by inserting user rests.
Max. Dots: The Max. Dots option determines how many dots Logic allows a single note to display. You can change unwanted dotted notes by inserting user rests.
The Event Inspector
Each event in the Score editor gets its own parameter set. The Event Inspector displays those parameters for each individual event (note, rest, time signature, and so on) in your score. Figure 8.56 shows the Event Inspector.
Figure 8.56 The Event Inspector.
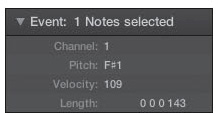
© Apple Inc.
Depending on whether you have selected a note or a non-note event, the Event Inspector displays different options. Following are all the possible parameters that can appear in this box:
![]() Channel: The selected event is on the MIDI channel set in this parameter. In general, your entire MIDI region should send all of its notes on the same channel, but you might want to send a few notes to other devices. An exception is if you are working on a drum score and you are sending different drum instruments on different MIDI channels.
Channel: The selected event is on the MIDI channel set in this parameter. In general, your entire MIDI region should send all of its notes on the same channel, but you might want to send a few notes to other devices. An exception is if you are working on a drum score and you are sending different drum instruments on different MIDI channels.
![]() Pitch: This sets the pitch of the selected note. This parameter appears only when notes are selected.
Pitch: This sets the pitch of the selected note. This parameter appears only when notes are selected.
![]() Velocity: This parameter is for setting the MIDI velocity (the volume of the event). If the event is a rest, even though the parameter contains a value, it is still sending silence.
Velocity: This parameter is for setting the MIDI velocity (the volume of the event). If the event is a rest, even though the parameter contains a value, it is still sending silence.
![]() Length: This parameter sets the length of the note. It appears only when notes are selected.
Length: This parameter sets the length of the note. It appears only when notes are selected.
![]() Text: Use this parameter to select a text style from the menu that appears when you click on it. You’ll learn about text styles in the “Text Styles” section later in this chapter. This parameter does not appear for note events.
Text: Use this parameter to select a text style from the menu that appears when you click on it. You’ll learn about text styles in the “Text Styles” section later in this chapter. This parameter does not appear for note events.
![]() Lyric: You should select this checkbox if you are writing lyrics above this event. If not, uncheck it. This parameter does not appear for note events.
Lyric: You should select this checkbox if you are writing lyrics above this event. If not, uncheck it. This parameter does not appear for note events.
The Part Box
The Score editor Inspector contains a unique notation toolset underneath the Event Inspector called the part box—so named because it contains various parts you might like to use in a score. Figure 8.57 shows the part box.
Figure 8.57 The Score editor part box.
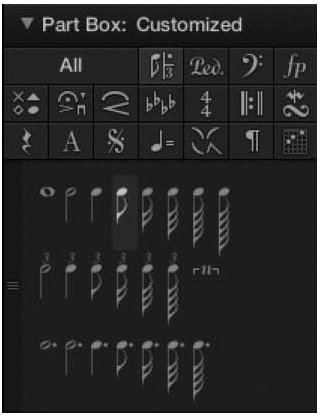
© Apple Inc.
The part box is so expansive that the entire box fits into the Score editor only at the highest resolutions of very large displays. Figure 8.57 shows only a portion of the part box. This isn’t a problem, however, because the top portion of the part box consists of 19 Group buttons. As you click different buttons, different sections of the part box move to the top of the box under the Group buttons, so the specific section of the part box you need is never more than one click away. You can also click in the Part Box field to access and create part box sets—combinations of groups that suit your workflow.
Inserting parts from the part box couldn’t be easier: Simply select the group(s) you need, click on a part you want to add to your score, and then drag it to the location in your score where you want to place the part. Alternatively, use the Pencil tool to insert a part. You can drag the left half of the Part Box field to open a floating part box, which can be freely resized. Additionally, you can use key commands to switch among the parts in the part box.
Staff Styles
You can think of staff styles as similar to style sheets in word-processor or desktop-publishing applications: They contain a set of formatting and layout preferences for you to apply when needed. You can access staff styles from the Layout local menu or via the key command Control+Option+Shift+S. Figure 8.58 shows the Staff Style window.
Figure 8.58 The Staff Style window.
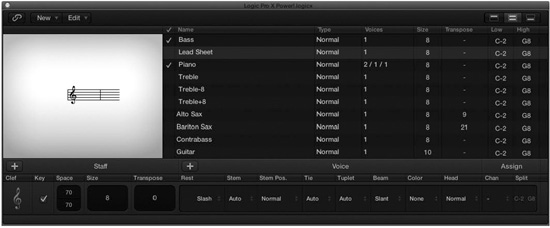
© Apple Inc.
The Staff Style window allows you to select one of the default staff styles or to create your own. These staff styles are then accessible through the Region Inspector in the Score editor or the instrument Inspector in the main window for every MIDI instrument.
You can create your own staff styles by selecting Duplicate or by choosing one of the varieties of new staff styles from the New local menu. After designing your style by typing new values and/or using the Pointer click-drag values, you can double-click the name of the style you have been creating to type your own name. That staff style then appears in every menu of staff styles.
Text Styles
Just as there is a Staff Style window to create format and layout templates for your score, there is also a Text Styles window for creating text-formatting templates. Figure 8.59 shows the Text Styles window, accessible from the Lanes menu.
Figure 8.59 The Text Styles window.
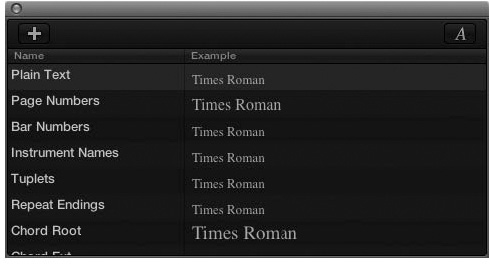
© Apple Inc.
Clicking on a text style in the Example column or clicking the A button opens a typical Fonts window, which lets you select a font, size, and formatting style. You can also access the Fonts window from the Functions > Text Attributes local menu command in the Score editor window. You can edit the selected text style in the Fonts window or create your own by clicking the plus (+) button in the Text Styles window and defining the new style’s attributes in the Fonts window. Your new text style will appear at the bottom of the Text Styles window and at the bottom of the Text Styles menu.
A Brief Primer on Working in the Score Editor
After reading all the information on the various menus and tools in the Score editor, it would be unfair to leave you without even the slightest knowledge of how to use any of those tools to create your own scores. Although it is well outside of the scope of this book to go into much more depth on this very powerful editor, I can at least give you a couple of basic building blocks, starting with the Chord Grid Library.
The Chord Grid Library
The Chord Grid Library contains thousands of preconfigured chords in tablature. It’s an easily searchable database, but it also offers you a great deal of latitude to create and edit chord grids of your own using tunings of your own creation. The Chord Grid Library window has three different tabs: Instrument Editor, Chord Grid Selector, and Chord Grid Editor. You can open the Chord Grid Library by selecting Chord Grid Library in the Layout menu. We’ll start by looking at the Instrument Editor tab.
THE INSTRUMENT EDITOR TAB
The Instrument Editor tab of the Chord Grid Library window lets you create, delete, import, and export different instruments for which you can create chord grids. Although it only has a standard six-string guitar instrument configuration in standard tuning to begin with, you can create an instrument with up to 16 strings tuned almost any way you can imagine. Figure 8.60 shows the Instrument Editor tab.
Figure 8.60 The Instrument Editor tab of the Chord Grid Library. You can create new instruments with up to 16 strings in any number of tunings in the Instrument Editor tab.
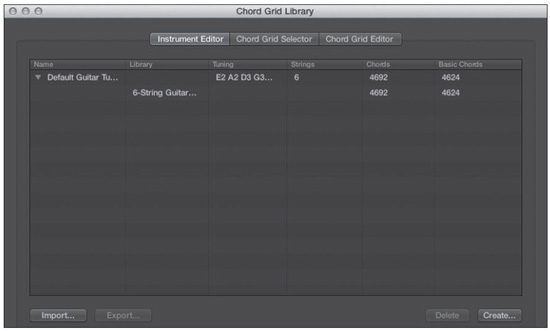
© Apple Inc.
To create a new instrument, click the Create button in the lower-right corner of the window. This opens the Create Library dialog box, shown in Figure 8.61.
Figure 8.61 The Create Library dialog box.
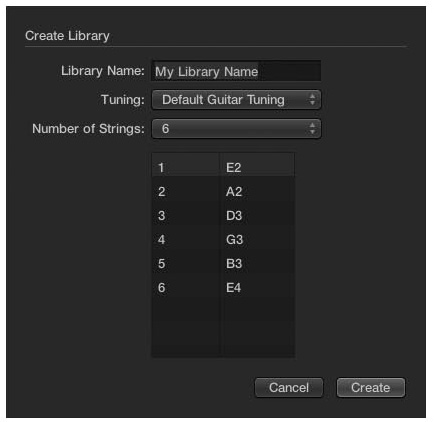
The Create Library dialog box offers the following options:
![]() Library Name: To name your library, select the text in the text box and type your new library name.
Library Name: To name your library, select the text in the text box and type your new library name.
![]() Tuning: The Tuning menu allows you to select a tuning to use as a starting point. At first, there is only the Default Guitar Tuning option, but as you add your own libraries, they will appear in this list. This menu may become unavailable depending on the settings in the Number of Strings menu.
Tuning: The Tuning menu allows you to select a tuning to use as a starting point. At first, there is only the Default Guitar Tuning option, but as you add your own libraries, they will appear in this list. This menu may become unavailable depending on the settings in the Number of Strings menu.
![]() Number of Strings: Use this menu to define the number of strings for your new instrument, from 1 to 16.
Number of Strings: Use this menu to define the number of strings for your new instrument, from 1 to 16.
![]() Tuning area: The Tuning area lets you define the tuning for each string of your new instrument. Simply double-click the pitch name for the string you wish to alter and enter the new pitch name manually. Be sure to enter the right octave number for the string, too! After you have finished defining the properties of your new instrument, click the Create button, and your new instrument will be added to the Instrument Editor tab. You can rename an instrument or library in the Instrument Editor tab by double-clicking the name you want to edit, entering the new name, and pressing Return.
Tuning area: The Tuning area lets you define the tuning for each string of your new instrument. Simply double-click the pitch name for the string you wish to alter and enter the new pitch name manually. Be sure to enter the right octave number for the string, too! After you have finished defining the properties of your new instrument, click the Create button, and your new instrument will be added to the Instrument Editor tab. You can rename an instrument or library in the Instrument Editor tab by double-clicking the name you want to edit, entering the new name, and pressing Return.
You can delete an instrument in the Instrument Editor tab by selecting it and clicking the Delete button in the lower-right corner. Clicking Import or Export opens a typical file browser dialog box in which you can search for an instrument file to import or choose a directory into which you will export, respectively.
THE CHORD GRID SELECTOR TAB
The Chord Grid Selector tab lets you browse for, view, and even hear any chord in the Chord Grid Library. Figure 8.62 shows the Chord Grid Selector tab.
Figure 8.62 The Chord Grid Selector tab.
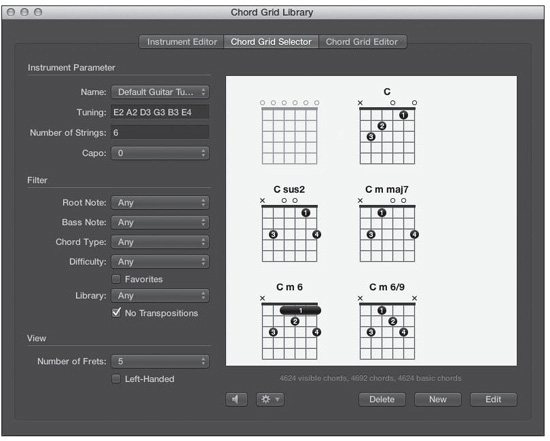
© Apple Inc.
The Chord Grid Selector tab has a bunch of different menus, enabling you to browse for a very general set of chord grids or extremely specific ones quickly and easily. The Chord Grid Selector tab’s options are as follows:
![]() Name: Select the instrument whose chord grids you wish to view in this menu.
Name: Select the instrument whose chord grids you wish to view in this menu.
![]() Tuning: This field displays the tuning for the selected instrument.
Tuning: This field displays the tuning for the selected instrument.
![]() Number of Strings: This field displays the number of strings for the selected instrument.
Number of Strings: This field displays the number of strings for the selected instrument.
![]() Capo: You can assign a capo setting for the selected instrument in this menu, anywhere from the first fret to the 12th.
Capo: You can assign a capo setting for the selected instrument in this menu, anywhere from the first fret to the 12th.
![]() Root Note: This menu allows you to assign a root note for the chord grids you are looking for, filtering out all chord grids with different root notes. You can also select Any, which displays all chord grids, or Undefined, which displays any undefined chord grids.
Root Note: This menu allows you to assign a root note for the chord grids you are looking for, filtering out all chord grids with different root notes. You can also select Any, which displays all chord grids, or Undefined, which displays any undefined chord grids.
![]() Bass Note: This menu allows you to assign a bass note for the chord grids you are looking for, filtering out all chord grids with different bass notes. You can also select Any, which displays all chord grids, or Undefined, which displays any undefined chord grids.
Bass Note: This menu allows you to assign a bass note for the chord grids you are looking for, filtering out all chord grids with different bass notes. You can also select Any, which displays all chord grids, or Undefined, which displays any undefined chord grids.
![]() Chord Type: This menu allows you to assign a chord quality—such as major, minor, or any other of a wide variety of chord types—for the chord grids you are looking for, filtering out all chord grids of different chord types. You can also select Any, which displays all chord grids, or Undefined, which displays any undefined chord grids.
Chord Type: This menu allows you to assign a chord quality—such as major, minor, or any other of a wide variety of chord types—for the chord grids you are looking for, filtering out all chord grids of different chord types. You can also select Any, which displays all chord grids, or Undefined, which displays any undefined chord grids.
![]() Difficulty: This menu allows you to filter the chord grids based on their difficulty: Easy, Medium, or Advanced. You can also select Any, which displays all chord grids, or Undefined, which displays any undefined chord grids.
Difficulty: This menu allows you to filter the chord grids based on their difficulty: Easy, Medium, or Advanced. You can also select Any, which displays all chord grids, or Undefined, which displays any undefined chord grids.
![]() Favorites: Selecting this checkbox allows you to display only those chord grids tagged as favorites.
Favorites: Selecting this checkbox allows you to display only those chord grids tagged as favorites.
![]() Library: This menu allows you to select whether to display the chord grids from any library for your selected instrument or from a specific library.
Library: This menu allows you to select whether to display the chord grids from any library for your selected instrument or from a specific library.
![]() No Transpositions: This checkbox allows you to exclude chord grids that have been transposed.
No Transpositions: This checkbox allows you to exclude chord grids that have been transposed.
![]() Number of Frets: This menu lets you define the number of frets shown for each chord grid—four, five, or six.
Number of Frets: This menu lets you define the number of frets shown for each chord grid—four, five, or six.
![]() Left-Handed: Selecting the Left-Handed checkbox reverses the chord grids so they appear as they would on a left-handed guitar.
Left-Handed: Selecting the Left-Handed checkbox reverses the chord grids so they appear as they would on a left-handed guitar.
You can select any chord grid simply by clicking on it. If you want to hear what that particular chord grid looks like, click the Playback button at the bottom of the Chord Grid Selector tab. You can even decide how chord grids will be played when you click the Playback button by using the self-explanatory options in the Playback Action menu immediately to the right of the Playback button. The Playback Action menu is shown in Figure 8.63.
Figure 8.63 The Playback Action menu lets you define how chord grids will be played when you click the Playback button.
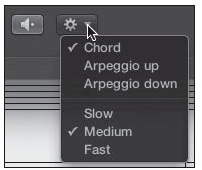
© Apple Inc.
To delete a chord grid, select the chord grid and click the Delete button. You can edit a chord grid by selecting it and clicking the Edit button, and you can create a new chord grid by clicking the New button. Either one of these actions opens the Chord Grid Editor tab.
THE CHORD GRID EDITOR TAB
The Chord Grid Editor tab allows you to create new chord grids, edit existing ones, and save them to the desired library. Figure 8.64 shows the Chord Grid Editor tab. As you can see, the parameters to the left of the window are almost identical to those in the Chord Grid Selector tab, but instead of using them to filter chord grids, you use them to classify the chord grid you are editing.
Figure 8.64 The Chord Grid Editor tab.
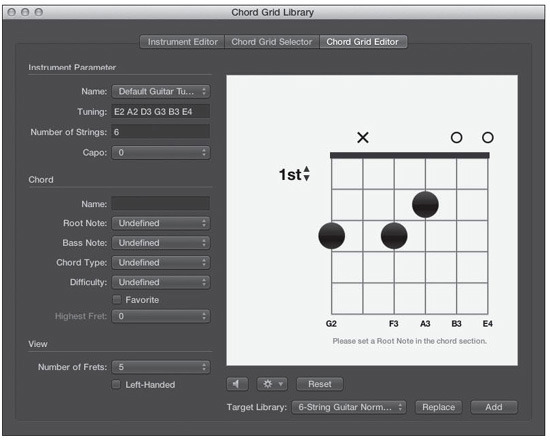
© Apple Inc.
To add a note to a chord grid, simply click on the desired string and fret. A dot will appear. You can move the dot by clicking and dragging it. You can assign the new note a fingering by right-clicking on the dot and selecting a finger number from the menu that opens. To create a barre, click and hold on one of the desired outer strings and drag the mouse across the chord grid to the desired end of the barre. If you click and drag vertically, a selection box will be drawn, allowing you to select multiple notes to edit. Above the chord grid in Figure 8.64, you’ll notice an X (meaning don’t play that string) and a couple Os (meaning let the open string ring). You can change from an X to an O by clicking on the X, and vice versa. Finally, you can assign the lowest fret for the chord grid by clicking on the number to the left of the chord grid—1st in Figure 8.64. This opens a menu from which you can select any fret number from 1 to 15.
The Clear button at the bottom of the window lets you clear the entire chord grid. If you have performed any edits, it becomes a Reset button, letting you return the chord grid to its original state. The Target Library menu lets you determine which library the chord grid will be added to when you’ve finished creating or editing it. The Replace button replaces the original chord grid with your edited chord grid. The Add button adds it to the selected chord grid library.
Inserting and Deleting Events in the Score Editor
Although the Score editor deals with MIDI information as traditional notation instead of as text or piano roll–like graphics, you can still use some of the same familiar event-entry methods that are available in the other MIDI editors.
As with the Piano Roll editor and the Event list, you can use the process described in the “MIDI Step Input” section to input MIDI information into the Score editor. Before you do, make sure you have disabled the Interpretation setting in the Display Inspector and that you have set the Quantize setting to the smallest note value you’ll be using. You can set the playhead by dragging it to the position you want.
To enter notes in the Score editor with a mouse, make sure you have the Notes button selected in the part box, as in Figure 8.57. You can then drag a note of the desired value directly onto the staff and place it at the appropriate location. As you drag the note across the staff, a help tag appears, showing you the MIDI channel, pitch, velocity, and position of the note. You can also use the Pencil tool to add events to the Score editor by selecting the note value you wish to use in the part box and clicking in the staff at the position and pitch you want the event to be. Be aware that the Quantize setting determines the smallest note value you can enter with the mouse, too.
What if you need to add a tempo marking or a slur to your score? You can add any of these other notation symbols to your score directly from the part box. Just drag the symbol to the location where you want it, and it’s added to the score just like a note.
If you insert a chord grid from the part box, a two-tab version of the Chord Grid Library will open, offering the Chord Grid Selector and Chord Grid Editor tabs. You can drag the desired chord grid from the Chord Grid Selector tab directly to the inserted chord.
Deleting events from the Score editor is just as easy as it is in the other editors. Simply select the notes you want to delete and either press Delete or click on the note with the Eraser tool.
Moving and Adjusting Events in the Score Editor
You’ve finished your score and you notice a few things you want to adjust. Perhaps there is a wrong note, or a note isn’t lining up where you’d like it. Maybe a note you entered via step input isn’t long enough. Making these adjustments in the Score editor is quick and easy.
CHANGING THE LENGTH OF EVENTS IN THE SCORE EDITOR
Entering events into the Score editor via step input creates notes that are the same length as the Quantize setting you selected earlier. To alter the length of a note you have entered, you simply select the note and change it to the desired length using the Length setting in the Event Inspector or via key commands. You can also enable duration bars in the View menu and edit the length of notes using the Resize cursor as you would in the Piano Roll editor. Figure 8.65 shows some notes in the Score editor with duration bars enabled. Notice the Resize cursor next to one of the very light gray duration bars.
Figure 8.65 You can edit the length of notes in the score using duration bars.
© Apple Inc.
CHANGING THE PITCH OF EVENTS IN THE SCORE EDITOR
Adjusting the pitch of a note in the Score editor couldn’t be easier. Simply select the note(s) you want to change and drag it vertically to the correct pitch. As you hold down the mouse button, a help tag will appear, telling you what pitch the note is currently on and how far you have transposed it. You can also use the Pitch parameter in the Event Inspector to alter a note’s pitch or do so via key commands.
ADJUSTING THE LAYOUT OF EVENTS IN THE SCORE EDITOR
Once you have all of your events at the correct time and pitch in the Score editor, the score itself might have a few places that aren’t as easily readable in Page view as you would like. Perhaps a couple of notes are a little too close together, or a bar is smaller than you would like it to be. This is where the Layout tool, seen in the Tool menu in Figure 8.52, comes in handy.
The Layout tool allows you to adjust the position of events in the Score editor graphically while maintaining their timing. Select the Layout tool from the Tool menu, grab the event(s) you want to adjust, and then drag them horizontally to their correct location. A help tag will appear, telling you how far you have moved the event. The entire bar that the event is in will adjust some as a result of the move. A little bit of experimentation with the Layout tool will make anticipating the effects of these adjustments much more intuitive. Also, don’t forget to enable guides to help you align elements of your score. Figure 8.66 shows an element of a score with guides enabled.
Figure 8.66 Notice the dotted vertical line below the sforzando marking. Enabling guides makes it easy to line up elements of your score with the note to which you intend them to relate.
© Apple Inc.
For Further Score Editor Information…
The Score editor is the deepest MIDI editor in Logic, and there is far more to delve into than space in this book allows. As you see, just the preceding explanation of the surface functionality of the Score editor has already taken more figures and pages of this book than any other MIDI editor has! Going into minute detail could easily fill half this book. Instead, let me point you to two resources for further information on the Score editor. The first, of course, is the Logic Pro X manual itself, which includes more than 100 pages on the Score editor. For a really excellent guide on how to use the Score editor, I recommend Johannes Prischl’s Logic Notation Guide, which has more than 200 pages of explanation, tutorials, valuable Logic Environments, and more to help you get the most out of the Score editor. The book is only available through the author’s website: http://prischl.net/LNG/. Prischl wrote this guide for an earlier version of Logic, so you’ll notice that the look of the Score editor is different. However, the fundamental workflow and functionality of the Score editor hasn’t changed much over the years. Although his examples will look different, the methodology and procedures are fundamentally the same, and his Environments still work (although they may need conversion through Logic 7 to a usable format). I cannot recommend his book highly enough for those who want a more complete Score editor reference.
The MIDI Transform Window
The MIDI Transform window is not exactly a MIDI editor, but it offers you the ability to alter (or transform) large amounts of MIDI data at once. You can consider it a MIDI event batch processor window if you want. If that sounds a bit complicated, that’s because its functionality can be incredibly far-reaching. You can use it for processes as straightforward as changing every instance of one note in a selected MIDI region into another note, or you could set up a very complex map, which would filter out only specific notes of a specific velocity and map them to selected new notes. Logic comes with a number of transform sets that are preconfigured for many popular transformations, and you can create your own transform sets. The MIDI Transform window is one of those features in Logic that you may use very rarely, but when you can use it, knowing how to will allow you to automate the transformation of your MIDI data in ways that would take forever manually.
Users often overlook the MIDI Transform window. For one thing, it’s not an editor, so it’s not absolutely necessary to the basic recording and editing of music. Another reason users frequently overlook the Transform window is that it initially appears to be very mathematical in nature and not very intuitive. Figure 8.67 shows a MIDI Transform window.
Figure 8.67 You can use the MIDI Transform window to make batch transformations of MIDI data.
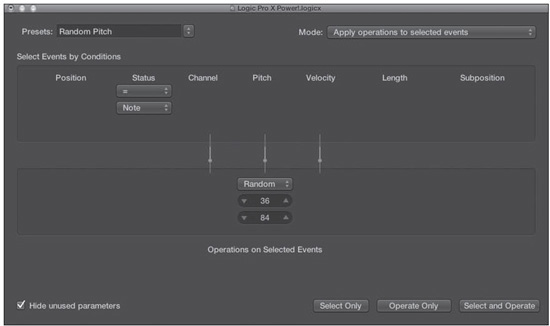
© Apple Inc.
Unless you already have a mathematical understanding of MIDI data and values, the MIDI Transform window doesn’t seem very inviting, does it? Despite its initial complexity, however, it is a very powerful weapon to have in your arsenal. The goal of this section is to demystify the MIDI Transform window for you!
How the MIDI Transform Window Works
The MIDI Transform window becomes easier to grasp when you have a general idea of how it works. Remember that at its root, MIDI represents musical ideas mathematically, and the MIDI Transform window uses the form and flow of a mathematical formula to operate on your data.
You’ll start by setting the operation mode from the Mode menu in the upper-right area of the window. The mode you choose determines how the transformation will affect the selected events. The different modes are described in the next section, “Setting the MIDI Transform Mode.”
Next, you set up the conditions for the transformation, defining which events to transform. You set up these conditions in the area labeled “Select Events by Conditions.” You’ll learn how to do this in the section titled “Setting Up Transform Conditions” later in this chapter. After you have set up your conditions, you define the operation that you want to execute. You can select the various parameters of your operation in the area labeled “Operations on Selected Events.” You’ll learn how to set these parameters later in this chapter, in the section “Setting Up Transform Operations.”
Finally, you perform your transformation by clicking on one of the buttons at the bottom of the window. The different buttons are described in the “Action Buttons of the MIDI Transform Window” section later in this chapter.
Setting the Transform Mode
In the upper-right area of the MIDI Transform window is the Mode menu. Apply Operations to Selected Events is the mode showing in Figure 8.67. The modes available in this menu are as follows:
![]() Apply Operations to Selected Events: In this mode, the operation that you set up in the Mode menu is applied to the events you select via the conditions you set. This is the default mode.
Apply Operations to Selected Events: In this mode, the operation that you set up in the Mode menu is applied to the events you select via the conditions you set. This is the default mode.
![]() Apply Operations and Delete Unselected Events: When the only events you want to remain after the transformation are those events that are operated on, choose this option. It operates on the selected events and deletes any other events in the region.
Apply Operations and Delete Unselected Events: When the only events you want to remain after the transformation are those events that are operated on, choose this option. It operates on the selected events and deletes any other events in the region.
![]() Delete Selected Events: In this mode, you can use the MIDI Transform window as a programmable delete function. You set up which events to select in the Select Events by Conditions area. When you apply the transformation, those events are deleted.
Delete Selected Events: In this mode, you can use the MIDI Transform window as a programmable delete function. You set up which events to select in the Select Events by Conditions area. When you apply the transformation, those events are deleted.
![]() Copy Selected Events, Then Apply Operations: If you don’t want to modify your original events but you do want to add transformed events to your region, you can do so in this mode. This mode copies your selected events and then operates on those events, so you retain the original events and add the transformed copies of those events.
Copy Selected Events, Then Apply Operations: If you don’t want to modify your original events but you do want to add transformed events to your region, you can do so in this mode. This mode copies your selected events and then operates on those events, so you retain the original events and add the transformed copies of those events.
Setting Up Transform Conditions
The Select Events by Conditions area of the MIDI Transform window gives you seven parameters with which to define those events you want to select. Figure 8.68 shows you the Select Events by Conditions area.
Figure 8.68 The Select Events by Conditions area in the MIDI Transform window allows you to focus precisely on the exact events you want to transform.

© Apple Inc.
Notice that all the parameters offer menus filled with options for that parameter. Sometimes, an option includes an additional menu in which you can enter a further value. This allows you to precisely configure the condition you want for selecting events. The various parameters and your options for setting them are as follows:
![]() Position: This option is for setting the time position in the song of your selection relative to the conditions you set. In other words, should Logic select only those notes that happen at an earlier or equal time to your conditions, or should it also select those that are unequal to the time position you are setting? Or should it select those events that are equal or those events inside a specific time range (map) of values? Figure 8.69 shows the menu of all your options.
Position: This option is for setting the time position in the song of your selection relative to the conditions you set. In other words, should Logic select only those notes that happen at an earlier or equal time to your conditions, or should it also select those that are unequal to the time position you are setting? Or should it select those events that are equal or those events inside a specific time range (map) of values? Figure 8.69 shows the menu of all your options.
Figure 8.69 The Position options. Use this menu to determine which notes to select relative to the value determined by your conditions.
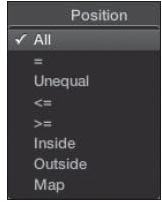
© Apple Inc.
NOTE: Remember that your MIDI data is mathematical at its base, so it’s easy to create mathematical relationships between the conditions you set up and to specify how you want those conditions to determine which notes to select.
![]() Status: First, the menu allows you to choose whether you want your selection conditions to be equal to a specific kind of MIDI event or to apply to all MIDI events. If you choose to limit your conditions to one type of MIDI event, another menu appears from which you can choose your event type. Figure 8.70 shows the list of event types.
Status: First, the menu allows you to choose whether you want your selection conditions to be equal to a specific kind of MIDI event or to apply to all MIDI events. If you choose to limit your conditions to one type of MIDI event, another menu appears from which you can choose your event type. Figure 8.70 shows the list of event types.
Figure 8.70 In this menu, you can choose the event type to which you want to limit your selection conditions.
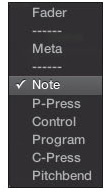
© Apple Inc.
NOTE: Note events are the most commonly chosen, but you can also choose fader (automation) events, meta events, MIDI program changes, and other common MIDI performance events.
![]() Channel: Here you can specify whether you want the conditions to apply to events on all MIDI channels, only channels equal to or less than the recorded MIDI channel of the event, and more. This menu has the exact same options as the Position menu.
Channel: Here you can specify whether you want the conditions to apply to events on all MIDI channels, only channels equal to or less than the recorded MIDI channel of the event, and more. This menu has the exact same options as the Position menu.
![]() Pitch: The menu under the title is the same menu as displayed for the Position and Channel parameters. This menu allows you to specify the range of pitches, controller number, and so on of the selected notes or controller numbers relative to the conditions you are setting. When you make a Pitch menu selection, one or two text entry boxes will open underneath this menu. You can define a single value or a range of values for selection using these text entry boxes. If the event you selected in the Status menu is a note, then you type the note you want in this box. If you selected a control message type in the Status menu, you input the controller number here.
Pitch: The menu under the title is the same menu as displayed for the Position and Channel parameters. This menu allows you to specify the range of pitches, controller number, and so on of the selected notes or controller numbers relative to the conditions you are setting. When you make a Pitch menu selection, one or two text entry boxes will open underneath this menu. You can define a single value or a range of values for selection using these text entry boxes. If the event you selected in the Status menu is a note, then you type the note you want in this box. If you selected a control message type in the Status menu, you input the controller number here.
![]() Velocity: The menu under the title is the same menu as displayed for the Position, Channel, and Pitch parameters. This menu allows you to specify the range of the velocity or controller value relative to the conditions you are setting. When you make a Velocity menu selection, one or two text entry boxes will open underneath this menu. You can define a single value or a range of values for selection using these text entry boxes. If the event you selected in the Status menu is a note, then in this box you type in the velocity you want for the note. If you selected a control message type in the Status menu, you input the controller value here.
Velocity: The menu under the title is the same menu as displayed for the Position, Channel, and Pitch parameters. This menu allows you to specify the range of the velocity or controller value relative to the conditions you are setting. When you make a Velocity menu selection, one or two text entry boxes will open underneath this menu. You can define a single value or a range of values for selection using these text entry boxes. If the event you selected in the Status menu is a note, then in this box you type in the velocity you want for the note. If you selected a control message type in the Status menu, you input the controller value here.
![]() Length: Here you can determine what the relative length of the events selected by your conditions should be, whether the events all need to be equal or unequal in length, and more. This option presents the same menu as displayed for the Position, Channel, Pitch, and Velocity parameters. This field is irrelevant except for with regard to note events.
Length: Here you can determine what the relative length of the events selected by your conditions should be, whether the events all need to be equal or unequal in length, and more. This option presents the same menu as displayed for the Position, Channel, Pitch, and Velocity parameters. This field is irrelevant except for with regard to note events.
![]() Subposition: This parameter determines whether events must have the same subposition inside a bar as other selected notes. Once again, this parameter features the same menu as the Position, Channel, Pitch, Velocity, and Length parameters.
Subposition: This parameter determines whether events must have the same subposition inside a bar as other selected notes. Once again, this parameter features the same menu as the Position, Channel, Pitch, Velocity, and Length parameters.
Setting Up Transform Operations
In the Operations on Selected Events area, shown in Figure 8.71, you can specify any changes that you want executed on those MIDI events that match all the conditions you set in the Select Events by Conditions area.
Figure 8.71 The Operations on Selected Events area is where you specify which transformations you want to perform on the events selected by the conditions you set.

© Apple Inc.
Notice the menus in the Operations on Selected Events area directly beneath each parameter in the Select Events by Conditions area. Each menu in the Operations on Selected Events area directly affects the parameter above it. (You can refer to Figure 8.67 for a view of the whole Transform window.) In other words, if you want your transformation to operate on the pitch of a note, you would use the menu under the Pitch condition. The default for each of the menus is Thru, which specifies that no operation is performed. Figure 8.72 shows the Operations menu and all of the possibilities for transformations it offers. This Operations menu is the same menu for every column in the Operations on Selected Events area except Status.
Figure 8.72 The Operations menu. Every column but Status uses this same menu.
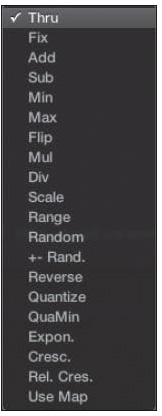
© Apple Inc.
Figure 8.72 shows all the ways in which you can operate on your data. As soon as you select an option, a text box appears below for you to type in the value that you want for the operation. A brief explanation of the options follows:
![]() Thru: This parameter passes the selected events through without altering them.
Thru: This parameter passes the selected events through without altering them.
![]() Fix: The parameter is fixed (changed) to the value you choose.
Fix: The parameter is fixed (changed) to the value you choose.
![]() Add: This option adds the value you choose to the event.
Add: This option adds the value you choose to the event.
![]() Sub: This subtracts the value you choose from the event.
Sub: This subtracts the value you choose from the event.
![]() Min: If any events that met your conditions have values in this column less than the number you set for this parameter, Logic changes the event values to the number you set here.
Min: If any events that met your conditions have values in this column less than the number you set for this parameter, Logic changes the event values to the number you set here.
![]() Max: If any events that met your conditions have values in this column that exceed the value you set, this value replaces those event values.
Max: If any events that met your conditions have values in this column that exceed the value you set, this value replaces those event values.
![]() Flip: You can flip, or reverse, data around a set point. If the value of the event in this column is above the flip value, Logic reduces the value below the flip point by the same amount it was originally over it. If the value in the selected event is below the flip point, Logic raises it above the flip point by as much as it originally had under it.
Flip: You can flip, or reverse, data around a set point. If the value of the event in this column is above the flip value, Logic reduces the value below the flip point by the same amount it was originally over it. If the value in the selected event is below the flip point, Logic raises it above the flip point by as much as it originally had under it.
![]() Mul: The event is multiplied by the value you choose.
Mul: The event is multiplied by the value you choose.
![]() Div: The event is divided by the value you choose.
Div: The event is divided by the value you choose.
![]() Scale: In this complex action, two text entry boxes appear below the Operations on Selected Events area, one above the other. Logic first multiplies the value of events that match your conditions by the top number and then adds the bottom number to the result.
Scale: In this complex action, two text entry boxes appear below the Operations on Selected Events area, one above the other. Logic first multiplies the value of events that match your conditions by the top number and then adds the bottom number to the result.
![]() Range: This limits the range of values to the lower and upper values entered in the text boxes.
Range: This limits the range of values to the lower and upper values entered in the text boxes.
![]() Random: This generates random values for the events that match the conditions, within limits that you set.
Random: This generates random values for the events that match the conditions, within limits that you set.
![]() +− Rand.: This adds to the event a random number between zero and a value you set. You can use either a positive or a negative number as a value.
+− Rand.: This adds to the event a random number between zero and a value you set. You can use either a positive or a negative number as a value.
![]() Reverse: This option reverses the value of the event within its parameter range (so a velocity of 13 becomes 115, for example).
Reverse: This option reverses the value of the event within its parameter range (so a velocity of 13 becomes 115, for example).
![]() Quantize: This quantizes the event to a multiple of the value you choose.
Quantize: This quantizes the event to a multiple of the value you choose.
![]() QuaMin: This is a combination of the Quantize and Min operations. The operation quantizes the event, but if the quantized value falls below the value you choose, Logic replaces the value with the minimum value you choose.
QuaMin: This is a combination of the Quantize and Min operations. The operation quantizes the event, but if the quantized value falls below the value you choose, Logic replaces the value with the minimum value you choose.
![]() Expon.: This scales the parameter value according to an exponential function. The value you choose shapes the curve of the exponential function. A positive value scales exponentially; a negative value scales logarithmically.
Expon.: This scales the parameter value according to an exponential function. The value you choose shapes the curve of the exponential function. A positive value scales exponentially; a negative value scales logarithmically.
![]() Cresc: If you have selected “inside” as your value for your condition above, this operation creates a smooth alteration between the set boundaries.
Cresc: If you have selected “inside” as your value for your condition above, this operation creates a smooth alteration between the set boundaries.
![]() Rel. Cres.: This has a similar effect as Cresc. does, except it takes the original values of your selected event into account to create a more natural crescendo and preserve the original feel of the MIDI event.
Rel. Cres.: This has a similar effect as Cresc. does, except it takes the original values of your selected event into account to create a more natural crescendo and preserve the original feel of the MIDI event.
![]() Use Map: When you select this option, the map at the bottom of the MIDI Transform window becomes interactive, and you can select, deselect, and map different values as you see fit. Figure 8.73 shows the Universal Map under a Velocity operation. You use this map by typing a value in each text box in the lower-left (such as 81 in the first box and 67 in the second box), by scrolling the numbers in the text boxes, or by clicking in the map itself. The vertical columns represent every permissible value, and the blue lines represent the location to which that value is currently mapped.
Use Map: When you select this option, the map at the bottom of the MIDI Transform window becomes interactive, and you can select, deselect, and map different values as you see fit. Figure 8.73 shows the Universal Map under a Velocity operation. You use this map by typing a value in each text box in the lower-left (such as 81 in the first box and 67 in the second box), by scrolling the numbers in the text boxes, or by clicking in the map itself. The vertical columns represent every permissible value, and the blue lines represent the location to which that value is currently mapped.
Figure 8.73 The MIDI Transform Universal Map can be used to map one parameter value to another, only operate on specific values within the map, and more.
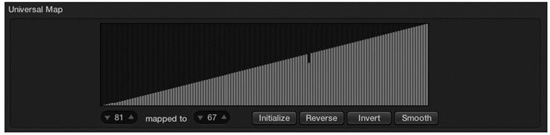
© Apple Inc.
Action Buttons of the MIDI Transform Window
The bottom of the MIDI Transform window contains a couple of general controls, the parameter to hide any menus you aren’t using in the Select Events by Conditions and Operations on Selected Events areas, and the action buttons. These three action buttons give you a number of different ways to use the Transform window. Figure 8.74 shows the three action buttons of the MIDI Transform window.
Figure 8.74 The action buttons of the MIDI Transform window.
© Apple Inc.
Once you have your conditions and operations defined, you must click one of these buttons to begin the transformation. These buttons are as follows:
![]() Select Only: This selects all the events that fulfill your conditions, but it will not operate on them. This is useful if you want to use the Transform as a programmable selection tool or if you want to verify that your conditions select the right events.
Select Only: This selects all the events that fulfill your conditions, but it will not operate on them. This is useful if you want to use the Transform as a programmable selection tool or if you want to verify that your conditions select the right events.
![]() Operate Only: This button processes any selected events according to the Operations on Selected Events area settings, regardless of the Select Events by Conditions area settings. This is useful if you have already manually selected all the events you want to be operated on.
Operate Only: This button processes any selected events according to the Operations on Selected Events area settings, regardless of the Select Events by Conditions area settings. This is useful if you have already manually selected all the events you want to be operated on.
![]() Select and Operate: This button selects events according to your Select Events by Conditions area settings and processes those events according to the Transform mode and your Operations on Selected Events area settings.
Select and Operate: This button selects events according to your Select Events by Conditions area settings and processes those events according to the Transform mode and your Operations on Selected Events area settings.
MIDI Transform Sets
As mentioned, in the top-left corner of the MIDI Transform window is the MIDI Transform Sets menu. These transform sets are already configured for many popular transformations to save you the trouble of having to set up each transformation from scratch. You can simply select the transform set and modify any specific parameters to suit your needs, and you’re ready to process your data. Figure 8.75 shows you the menu of available transform sets.
Figure 8.75 The menu of available transform sets. At the bottom of the menu is the option to create your own transform set.
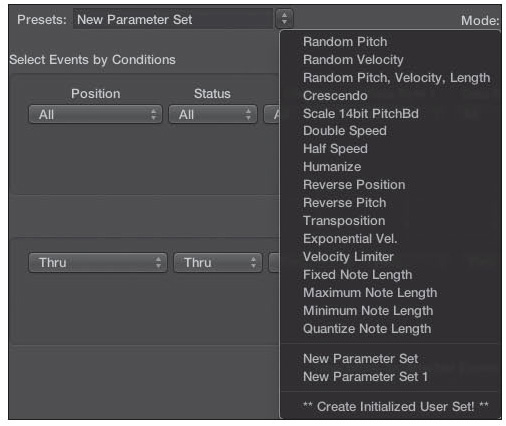
© Apple Inc.
You may also find that there are specific transformations that you like to do regularly. Logic allows you to save your own transformations as transform sets. Notice the last item on the Transform Sets menu is named **Create Initialized User Set!** If you select this option, a dialog box opens, asking whether you would like to create a new transform parameter set or rename the current set. If you choose to create a new set, you can configure your transformation any way you want, and Logic will automatically save your settings in this new transform set. You can rename it by clicking the name and changing it to anything you want.