
12 Working with and Sharing Files
AT THIS POINT, YOU SHOULD HAVE A PRETTY SOLID FOUNDATION IN HOW TO SET UP, COMPOSE, AND MIX A PROJECT IN LOGIC. You’re now ready to start learning about file management within Logic. Some general aspects of file management, such as creating new documents and opening and saving files, should already be familiar to you, although Logic Pro X offers a new way to save your project—as a wholly self-contained package. Other more specialized operations, such as exporting your project to a variety of standard formats, require a little more explanation. This chapter should hit on everything you need to know to manage your project’s files properly in Logic.
Creating New Projects
As explained in Chapter 3, “The Logic Project,” Logic can be configured to launch to your default template. You can also have Logic launch with an empty project or to the Templates dialog box, among other options. Normally, new songs are based on one of these starting points. Your template is your “virtual studio,” representing an ideal configuration for the way you like to work, but what if you have a number of ideal configurations based on the specific project? Luckily, Logic lets you create and save multiple templates for access at any time.
Templates
Chapter 3 discussed templates in some detail. A template is a powerful way to have a preferred Logic configuration ready to go whenever you need it, and having multiple templates allows you to have a number of different Logic configurations at your disposal. For example, you might want one virtual studio setup for compositions with lots of software instruments, one for recording lots of audio tracks simultaneously, one for different video setups if you do sound-to-picture, and so on. Or, you might have more than one Mac and want different templates based on the different monitor sizes and CPU power of each machine, or perhaps you use a laptop and require one template for when you’re on the go and another for when you have a second monitor connected.
Logic Pro X comes with a number of templates, which are installed in the/Library/Application Support/Logic/Project Templates directory. You will notice that there are different base configurations optimized for composing, recording, working in surround, and so on. You can also save any project you create as a template by opening the File menu and choosing Save As Template. After you name the project in the dialog box that appears, your project will be saved in the ~/Music/Audio Music Apps/Project Templates directory. You can create a subfolder structure in the Project Templates folder to organize multiple templates if you wish. Every time you create a new project template, the template you created will appear in the list of available templates in the New dialog box either on startup or when you use the New command.
Using the New Command to Create New Songs
Obviously, the easiest way to create a new project is to simply start working in your default template and then save it as a new project later. However, if you set the Startup Action Preference (discussed in the “Configuring Logic’s Startup Action” section later in this chapter) in the Project Handling tab of General screen of the Preferences window (which you access by opening the Logic Pro menu, choosing Preferences, and clicking General) to Automatically Open Most Recent Project, for example, you will not get your default template or an empty project on startup. Also, you may want to start a new song from one of your other templates or one of the templates included with Logic. In these situations, you’ll want to use the New command from the global File menu.
When you select the New command, the Project Chooser opens, as shown in Figure 12.1.
Figure 12.1 The Project Chooser.
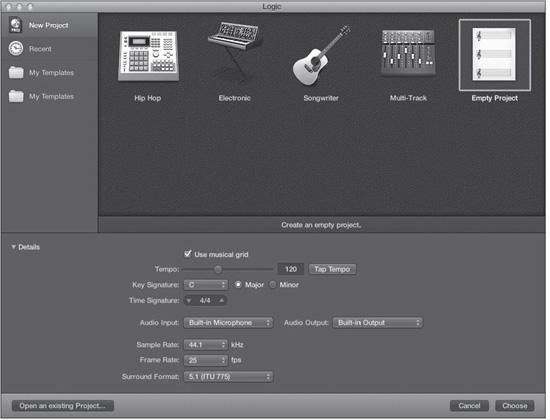
© Apple Inc.
From here, you can select the project template you want to use from the various menus of project templates. You can also open the Details area at the bottom of the dialog box and begin setting up different parameters such as Tempo, Key Signature, Time Signature, Audio Input, Audio Output, Sample Rate, Frame Rate (for video work), and Surround Format (if you’re working in surround; if you aren’t, don’t worry about this setting). There is also a button in the bottom-left corner, the Open an Existing Project button, that lets you browse for an existing project.
Saving Logic Projects
In versions of Logic before Logic 8, songs were saved independently of their various dependent files, or assets. To save a song with its assets, you had to specifically tell Logic to save the song as a project. Logic would then create a folder hierarchy containing all the assets you wanted saved in the project. Since Logic Pro 8, the project is the default format. Logic Pro X adds the option to save your project as a self-contained package. Let’s look at the different Save options.
The Save Dialog Box
To save your project in Logic, open the File menu and choose Save or press Command+S. The first time you save your Logic project, the Save dialog box, shown in Figure 12.2, will open.
Figure 12.2 The Save dialog box. In addition to determining the file path and name of your Logic project, you can choose which of its assets to save in the Project folder.
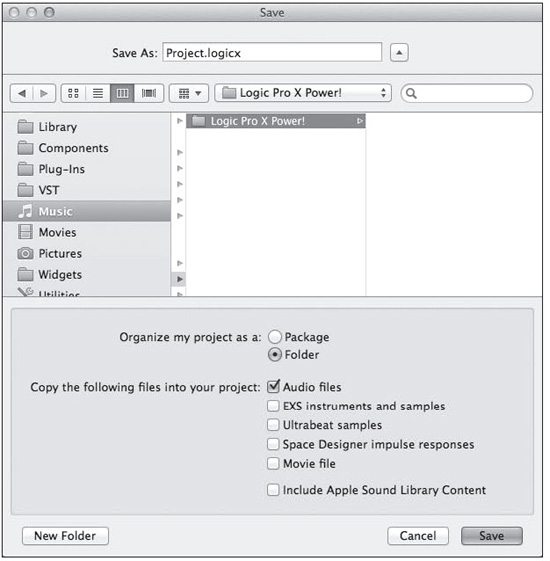
© Apple Inc.
The Save dialog box looks very similar to a typical Save dialog box you might see in any application—until you look at the area below the file browser. There are a number of different options for how you can organize and save the files in your project. These options are divided into two sections: Organize My Project As and Copy the Following Files into Your Project.
The Organize My Project As options are as follows:
![]() Package: When you select this option, Logic saves your project and any of the project assets you select as a package. A package differs from a folder in that it is entirely self contained, with the file structure hidden from view in the Finder, much like an application, a GarageBand project, or your iPhoto Library. These are packages that contain and hide their dependent files. Because the file structure is hidden when you save a project as a package, the file structure is also hidden from Spotlight. That means you can’t search for any of the included assets in the Finder using Spotlight. You can always right-click on a package and select Show Package Contents from the menu that opens to access the file structure of a package and search for files contained in the package manually.
Package: When you select this option, Logic saves your project and any of the project assets you select as a package. A package differs from a folder in that it is entirely self contained, with the file structure hidden from view in the Finder, much like an application, a GarageBand project, or your iPhoto Library. These are packages that contain and hide their dependent files. Because the file structure is hidden when you save a project as a package, the file structure is also hidden from Spotlight. That means you can’t search for any of the included assets in the Finder using Spotlight. You can always right-click on a package and select Show Package Contents from the menu that opens to access the file structure of a package and search for files contained in the package manually.
![]() Folder: Selecting this option saves your Logic project and any project assets you select in a folder, giving you full, quick, and easy access to any and all files saved with the project.
Folder: Selecting this option saves your Logic project and any project assets you select in a folder, giving you full, quick, and easy access to any and all files saved with the project.
The Copy the Following Files into Your Project options are as follows:
![]() Audio Files: When you select this option, Logic saves all the audio files used in your project in the project package or in the Audio Files subfolder of the Project folder.
Audio Files: When you select this option, Logic saves all the audio files used in your project in the project package or in the Audio Files subfolder of the Project folder.
![]() EXS Instruments and Samples: This option allows you to save any EXS instrument files (.exs) and their dependent samples used in your project in the project package or in the Sampler Instruments and Samples subfolder of the Project folder. Unless the Include Apple Sound Library Content option is selected, this will only save EXS samples not included in the Apple Sound Library.
EXS Instruments and Samples: This option allows you to save any EXS instrument files (.exs) and their dependent samples used in your project in the project package or in the Sampler Instruments and Samples subfolder of the Project folder. Unless the Include Apple Sound Library Content option is selected, this will only save EXS samples not included in the Apple Sound Library.
![]() Ultrabeat Samples: You can save any Ultrabeat samples used in your project in the project package or the Project folder by selecting this option. Ultrabeat samples are then added to the Samples subfolder of the Project folder. Unless the Include Apple Sound Library Content option is selected, this will only save Ultrabeat samples not included in the Apple Sound Library.
Ultrabeat Samples: You can save any Ultrabeat samples used in your project in the project package or the Project folder by selecting this option. Ultrabeat samples are then added to the Samples subfolder of the Project folder. Unless the Include Apple Sound Library Content option is selected, this will only save Ultrabeat samples not included in the Apple Sound Library.
![]() Space Designer Impulse Responses: This option saves any Space Designer impulse responses you use in the project in the project package or in the Impulse Responses folder in the Project folder.
Space Designer Impulse Responses: This option saves any Space Designer impulse responses you use in the project in the project package or in the Impulse Responses folder in the Project folder.
![]() Movie File: This option saves any QuickTime movies used in the project in the project package or in the Movie Files folder in the Project folder. If you select this option, Logic will open a dialog box asking whether you really want to store a copy of your movie in the Project folder.
Movie File: This option saves any QuickTime movies used in the project in the project package or in the Movie Files folder in the Project folder. If you select this option, Logic will open a dialog box asking whether you really want to store a copy of your movie in the Project folder.
![]() Include Apple Sound Library Content: This option lets you save all your user samples, plus any Apple sound library content in the project package or the Project folder. Selecting this option automatically selects the EXS, Ultrabeat, and Space Designer options.
Include Apple Sound Library Content: This option lets you save all your user samples, plus any Apple sound library content in the project package or the Project folder. Selecting this option automatically selects the EXS, Ultrabeat, and Space Designer options.
You may not want—or even need—to use all these options all the time. What these options do is allow you to create an easily portable version of your project encompassing all the files associated with it. This is perfect for backing up important projects, transferring projects between computers, and even transferring projects to other Logic users. You can therefore ensure that all necessary assets are not only included with your project but also are located in the directory structure in which Logic expects to find them.
Changing Your Project’s Included Assets
Suppose you’ve saved your project. Since then, you’ve decided you need to use an instance of Ultrabeat in your project. You’d like to save the Ultrabeat samples in the Project folder, but you didn’t allow for that the first time you saved your project. If you have already saved your project and you decide you need to reconfigure the assets that Logic is saving, simply open the File menu, choose Project Settings, and select Assets. Alternatively, select Assets from the Settings menu in the Toolbar. This opens the Assets tab of the Project Settings window, shown in Figure 12.3.
Figure 12.3 The Assets tab of the Project Settings window.
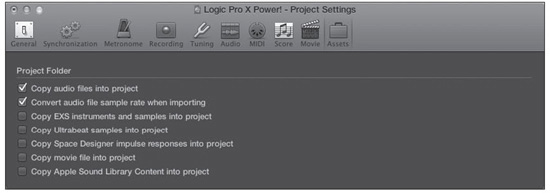
© Apple Inc.
The asset options in the Assets tab of the Project Settings window are identical to those in the Save dialog box, with one exception: Convert Audio File Sample Rate When Importing. This option is a good one to leave enabled. If you import audio into your project that is of a different sample rate than your project, it will not play correctly. Suppose your project sample rate is 44.1 kHz and you import a one-second audio file whose sample rate is 48 kHz. If you do not have Convert Audio File Sample Rate When Importing selected, Logic will read 41,000 samples of the 48,000 samples contained in the imported audio in one second, reading the remaining 7,000 samples in the first 7/48 of the next second. Your audio will play back too slow—and flat to boot. Unless you’re looking for that sort of effect (to each their own), having Logic handle the sample-rate conversion automatically will save you a lot of headaches.
Saving Backups of Your Project
Logic automatically creates a backup of your project file each time you save your project. Each backup of your project is numbered and automatically saved inside the project file itself. These backups are available in the File > Revert To menu path.
To save your Logic project with a new name or in a new directory, or even to switch it to a package or a folder, open the File menu and choose Save As or press Shift+Command+S. You can also save a copy of your project by opening the File menu and choosing Save a Copy As. In either case, a dialog box identical to the original Save dialog box will appear, in which you can type a new name for your file and select a directory in which to save your project. If you use the Save a Copy As option, the Organize My Project As options are not accessible.
These methods of backing up a project are similar to those used in other software applications. Although Logic does automatically create backups of your projects, it is still wise to manually back up projects (and even templates) as a normal part of your work routine.
Saving Alternatives of Your Project
It’s pretty common when working on music, either for yourself or for a client, to experiment with different mixes or arrangements. Sometimes—for example, in the case of commercials—it’s pretty much a requirement for the job. Project alternatives are an amazingly handy way to create alternative mixes and arrangements of your project without having to bother with extra file-management headaches.
Saving an alternative is as easy as opening the File menu, choosing Alternatives, and selecting New Alternative. When you do, a simple Save as New Alternative dialog box opens. The only option in the dialog box is to name your alternative. By default, it uses your project name and adds a number to the title, ascending from 1 as you add more alternatives. Although the numbers make it easy to quickly save an alternative, it’s a good idea to change the alternative name to something more meaningful, like “[Your Project] Mix No Voice” or “[Your Project] Extended Arrangement.” Alternatives share assets with the original project because they are in fact a part of the project.
When you add an alternative, it is added to the Alternatives submenu of the File menu, allowing you to quickly switch from one alternative to another. If you need to rename or delete an alternative, open the File menu, choose Alternatives, and select Edit Alternatives. This opens a dialog box that lets you accomplish those things easily.
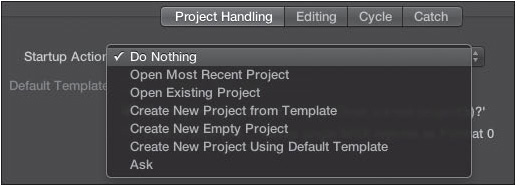
Configuring Logic’s Startup Action
Logic offers you a number of options as to what occurs when you launch the program. Opening the Project Handling tab of the General Preferences window allows you to access the Startup Action menu, shown in Figure 12.4.
Figure 12.4 The Startup Action menu in the Project Handling tab of the General Preferences window.
© Apple Inc.
The options in the Startup Action menu are as follows:
![]() Do Nothing: Selecting this option allows you to choose what you do each time you launch Logic. You can decide to create a new project, open a recent project, open a template from the Templates dialog box, and so on.
Do Nothing: Selecting this option allows you to choose what you do each time you launch Logic. You can decide to create a new project, open a recent project, open a template from the Templates dialog box, and so on.
![]() Open Most Recent Project: If you select this option, each time you launch Logic, it will open the project on which you last worked.
Open Most Recent Project: If you select this option, each time you launch Logic, it will open the project on which you last worked.
![]() Open Existing Project: If you select this option, Logic will display the Open dialog box to the most recent save location when launched.
Open Existing Project: If you select this option, Logic will display the Open dialog box to the most recent save location when launched.
![]() Create New Project from Template: If you select this option, Logic will display the Project Chooser when launched.
Create New Project from Template: If you select this option, Logic will display the Project Chooser when launched.
![]() Create New Empty Project: If you select this option, Logic will launch an empty project.
Create New Empty Project: If you select this option, Logic will launch an empty project.
![]() Create New Project Using Default Template: If you select this option and have assigned a default template, Logic will open your default template upon startup.
Create New Project Using Default Template: If you select this option and have assigned a default template, Logic will open your default template upon startup.
![]() Ask: If you select Ask, every time you open Logic, a dialog box containing the preceding options will appear. Select the option you prefer and click OK. If you select Cancel, Logic will remain open, and you can select a project using any method you prefer—the Open command, the New command, the Open Recent menu, and so on.
Ask: If you select Ask, every time you open Logic, a dialog box containing the preceding options will appear. Select the option you prefer and click OK. If you select Cancel, Logic will remain open, and you can select a project using any method you prefer—the Open command, the New command, the Open Recent menu, and so on.
Obviously, the best startup action for your workflow is a matter of personal preference, but often, a well-thought-out default template is the perfect starting point.
The Project Management Menu
You have a number of project-related options beyond simply saving Logic projects and their assets to Project folders or project packages and then opening the projects within them. Figure 12.5 shows the Project Management submenu of the File menu. The options in this submenu give you the ability to do a little housecleaning to your project if the need arises.
Figure 12.5 The Project Management submenu of the File menu.
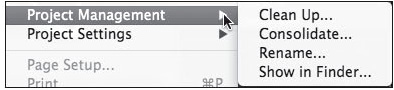
© Apple Inc.
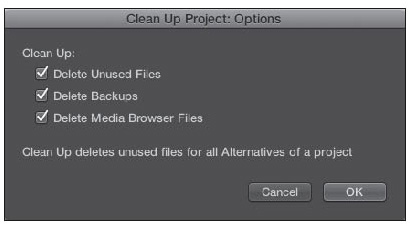
Clean Up
You can clean up Project folders by deleting unused files with the Clean Up command. If you select Clean Up from the Project Management submenu of the File menu, the Clean Up Project: Options dialog box opens, as shown in Figure 12.6.
Figure 12.6 The Clean Up Project: Options dialog box gives you options for what types of files will be deleted from your project when you use the Clean Up command.
© Apple Inc.
The Clean Up Project: Options choices are as follows:
![]() Delete Unused Files: Selecting this option will let you delete all unused files in all project alternatives. Delete Backups is automatically selected when you use this option.
Delete Unused Files: Selecting this option will let you delete all unused files in all project alternatives. Delete Backups is automatically selected when you use this option.
![]() Delete Backups: This option lets you delete all backups for all project alternatives.
Delete Backups: This option lets you delete all backups for all project alternatives.
![]() Delete Media Browser Files: This option lets you delete all files shared to the Media Browser.
Delete Media Browser Files: This option lets you delete all files shared to the Media Browser.
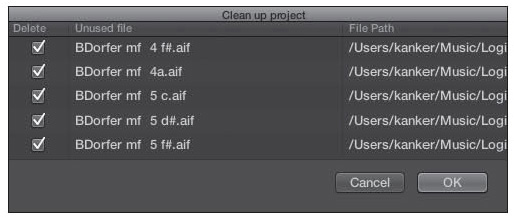
Clicking OK opens the Clean Up Project window, which lists any files in the Project folder or project package that are currently unused in your song, as shown in Figure 12.7.
Figure 12.7 The Clean Up Project window allows you to delete unused files from your Project folder or project package.
© Apple Inc.
Select which files to delete and which unused files you wish to keep; then click OK. Logic will clean up your project for you.
Consolidate
If you have been working with a project that has managed to link to files all over your hard drive or otherwise become disorganized, you can choose Consolidate from the Project Management submenu of the File menu to bring your Logic song and associated files together. After selecting this command, you will be presented with the Consolidate Project: Options dialog box, which offers the same asset-handling options as the Save As Project dialog box (see Figure 12.8).
Figure 12.8 The Consolidate Project: Options dialog box.

© Apple Inc.
After your project is consolidated, you can use all the other project-related functions (such as cleaning up and opening its settings) to further operate on the consolidated folder.
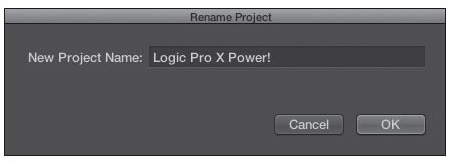
Rename
If you want to rename a project, choose the Rename command from the Project submenu of the File menu. This command is very useful if you save a project before you name your song and you want to rename it all in one go. Figure 12.9 shows the Rename Project dialog box.
Figure 12.9 The Rename Project dialog box.
© Apple Inc.
Show in Finder
The Show in Finder command in the Project Management submenu of the File menu is useful when you need to access your project’s folder or package in the Finder. For example, suppose you just finished work on your project and you want to back up the file to an external storage drive. If you execute the Show in Finder command, a Finder window will open to your project’s location!
The Project Settings Menu
The Project Settings menu can be found in the File menu. Most of the Project Settings are covered in depth in other chapters. These settings affect the current project only. You can configure these settings as you desire and save them to your template project to ensure that each time you start a new project, you are using your preferred settings. The Import Project settings command found in the Project Settings menu is discussed later in this chapter.
Opening or Importing Projects and Files
In Logic Pro, the Open dialog box not only opens Logic and GarageBand Projects, but also lets you import all the formats that Logic can import. When you open the File menu and choose Open or press Command+O, Logic displays a typical Open dialog box. Logic Pro X can open the following file types:
![]() Logic projects: This includes projects created in Logic 5 or later.
Logic projects: This includes projects created in Logic 5 or later.
![]() GarageBand projects: Any GarageBand projects can be opened in Logic.
GarageBand projects: Any GarageBand projects can be opened in Logic.
![]() MIDI files: Logic can open Standard MIDI File (SMF) files.
MIDI files: Logic can open Standard MIDI File (SMF) files.
![]() AAF files: Advanced Authoring Format (AAF) files are currently supported by high-end professional audio applications, such as Pro Tools HD.
AAF files: Advanced Authoring Format (AAF) files are currently supported by high-end professional audio applications, such as Pro Tools HD.
![]() XML (Final Cut Pro) files: Extensible Markup Language (XML) files allow you to integrate Logic Pro with Apple’s video-editing application, Final Cut Pro.
XML (Final Cut Pro) files: Extensible Markup Language (XML) files allow you to integrate Logic Pro with Apple’s video-editing application, Final Cut Pro.
If you are opening a song from an earlier version of Logic, a dialog box tells you that Logic is converting the file to the newer song format. Note that Logic Pro X can open Logic songs created only in Logic 5, Logic 6, Logic 7, Logic 8, Logic 9, or Logic X. If you need to open a song created in Logic 4 or earlier, the song must first be opened and saved in a version of Logic 5, Logic 6, or Logic 7. (Be aware that pre–Logic 5 projects do not open in Logic 8 or 9, either.) Once you save an older Logic project in Logic Pro X, you can only open the new project file in Logic Pro X.
If you open the File menu and choose Open Recent, Logic will display the submenu shown in Figure 12.10. This Open Recent submenu lists all Logic songs that you have opened; you can simply select your song from this submenu.
Figure 12.10 The Open Recent submenu in the global File menu.

© Apple Inc.
If your Open Recent submenu gets too long and unwieldy, you can choose the Clear Menu option at the bottom of the Open Recent submenu to reset the list.
Importing Files into Logic
Although the Open dialog box can both open and import files, Logic also contains an Import command, which you can access by opening the File menu and choosing Import. The Import menu lets you import any of the file types Logic can open. You can also import audio files using the Import menu. The main difference between opening and importing is that when you use the Open command, Logic Pro opens a new project, whereas with the Import command, Logic attempts to import the file into the currently open project. If it cannot add the imported material to the current song, it will open a new project, just like the Open command.
You can also import SMF files by dragging them onto the main window in Logic. When you open an SMF file this way, Logic will place it in your Tracks area. One track for each MIDI channel is created, and any data on that track appears in the track lane as a single MIDI region.
Logic also includes a specialized window called the All Files Browser, discussed next.
Using the All Files Browser
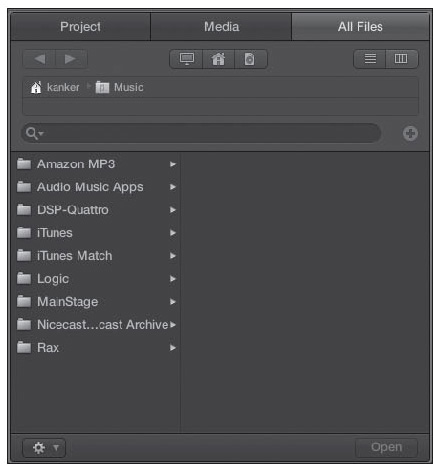
The All Files Browser is available in the Browsers area of the main window. The key command to open the Browsers area is F, and the All Files Browser is available in the All Files tab of the Browsers area. The All Files Browser is akin to having a Finder window incorporated into Logic—and in fact, the Browser is kept automatically in sync with your drives via Spotlight, the Finder’s built-in search technology. Figure 12.11 shows the All Files Browser. You can use the All Files Browser to search for and add any file type supported by Logic.
Figure 12.11 The All Files Browser in the Browsers area of the main window in Column view. The All Files Browser functions similarly to a Finder window.
© Apple Inc.
The All Files Browser has a very simple interface. Its main function allows you to quickly search for and add files to your Logic project. The All Files Browser has two view modes: List view and Column view. These two views are similar to List view and Column view in the Finder. You switch between these two views using the two buttons in the upper-right corner of the All Files Browser. Figure 12.11 shows the All Files Browser in Column view.
To the left of the View buttons are the Bookmark buttons. These buttons are, from left to right, the Computer button, the Home button, and the Project button. Selecting one of these buttons moves the All Files Browser to that particular level of your computer’s file hierarchy.
Beneath the View buttons in the All Files Browser is the Path field. The Path field displays the current file hierarchy. You can navigate up the levels of the file path of your project using the Path field. When you select a different level in the file hierarchy, the All Files Browser shows the files and folders contained in that level, similar to a Path menu in a Save dialog box.
In the upper-left corner are two buttons with arrows in them, the Back and Forward buttons. These buttons allow you to move backward and forward through your navigation history in the All Files Browser, independent of file path.
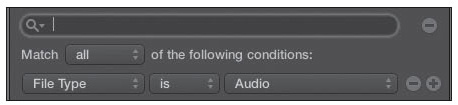
The All Files Browser also includes a Search field. Clicking the magnifying glass in the left end of the Search field opens a list of your recent All Files Browser searches. To the right of the Search field is a plus symbol (+) in a circle. Clicking the plus symbol opens a set of advanced search parameters, as shown in Figure 12.12.
Figure 12.12 Clicking the plus symbol next to the Search field opens a set of advanced search parameters.
© Apple Inc.
You can use these parameters to narrow and fine-tune your search to specify things such as the file type, sample rate, bit depth, format, and so on. You can add more search parameters by clicking the plus symbol next to the advanced search parameters, or you can remove search parameters by clicking the minus (−) symbol.
When you find the file(s) you are looking for, select the files and click the Add button to add the selected file(s) to the Tracks area. Audio files are also added to the Project Audio Browser. Selecting a movie opens the Open Movie dialog box, covered in Chapter 14, “Working with Video.”
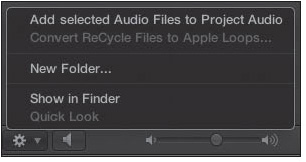
When you select an audio file, the bottom of the All Files Browser adds a couple familiar features: the Speaker button, which allows you to preview audio files in the All Files Browser, and a volume slider. There is also an Actions menu at the bottom of the All Files Browser, which was mentioned briefly in Chapter 7, “Working with Audio and Apple Loops.” Figure 12.13 shows the Actions menu of the All Files Browser.
Figure 12.13 The Actions menu of the All Files Browser.
© Apple Inc.
The Actions menu contains the following options:
![]() Add Selected Audio Files to Project Audio: Using this command will add the files selected to the Project Audio Browser.
Add Selected Audio Files to Project Audio: Using this command will add the files selected to the Project Audio Browser.
![]() Convert ReCycle Files to Apple Loops: This command, which was covered in detail in Chapter 7, allows you to convert the selected ReCycle audio files into Apple Loops.
Convert ReCycle Files to Apple Loops: This command, which was covered in detail in Chapter 7, allows you to convert the selected ReCycle audio files into Apple Loops.
![]() New Folder: Selecting New Folder opens a dialog box in which you can name your new folder. After you name the new folder, it is added to the currently displayed folder in the All Files Browser.
New Folder: Selecting New Folder opens a dialog box in which you can name your new folder. After you name the new folder, it is added to the currently displayed folder in the All Files Browser.
![]() Show in Finder: This command opens a Finder window with the selected file displayed.
Show in Finder: This command opens a Finder window with the selected file displayed.
![]() Quick Look: If you have selected a Logic project document, this option allows you to see a Quick Look of the project in its most recent saved state, just as you would see with Quick Look in the Finder.
Quick Look: If you have selected a Logic project document, this option allows you to see a Quick Look of the project in its most recent saved state, just as you would see with Quick Look in the Finder.
Importing Track Settings from Other Projects
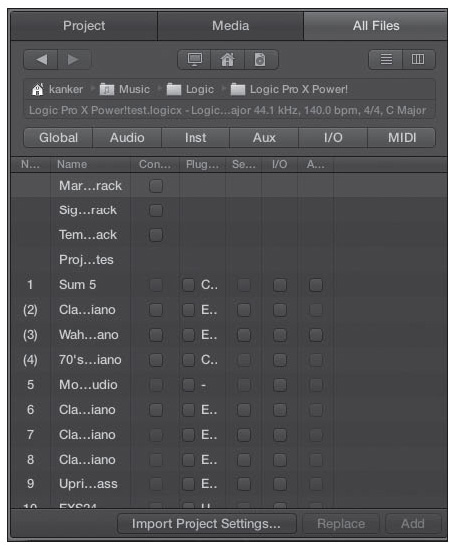
One of the really handy features in Logic is the ability to import different settings directly from other Logic projects. After selecting a Logic project in the All Files Browser or opening the File menu, choosing Import, and selecting Logic Projects, clicking the Import button opens a window that gives you access to any available project alternatives. Once you select a project alternative you wish to explore, the All Files Browser switches to Track Import view, shown in Figure 12.14.
Figure 12.14 The Track Import view in the All Files Browser, where you can import settings from individual tracks in other Logic projects directly into your current Logic project.
© Apple Inc.
The Track Import view shows all the tracks in the selected project, including the marker, signature, and tempo global tracks. You can select what type of settings will be imported from each individual track by selecting the appropriate checkboxes. You can also filter the types of tracks that are displayed using the Global, Audio, Inst, Aux, I/O, and MIDI filter buttons that appear at the top of the list of tracks, similar to the way you can filter tracks in the Mixer. The columns and options of the Track Import view are as follows:
![]() Num: The Num column displays track numbers in the selected project, where applicable.
Num: The Num column displays track numbers in the selected project, where applicable.
![]() Name: This column displays the name of each track in the selected project.
Name: This column displays the name of each track in the selected project.
![]() Content: If you select Content and click the Add button, the region data or global track data for the selected track(s) will be imported, and a new track will be created for each imported track. The channel strip settings for any track imported via the Content option will not be imported.
Content: If you select Content and click the Add button, the region data or global track data for the selected track(s) will be imported, and a new track will be created for each imported track. The channel strip settings for any track imported via the Content option will not be imported.
![]() Plug-ins: If you select Plug-ins and click Add, the region data (if applicable) and channel strip settings will be imported for each selected track to new tracks.
Plug-ins: If you select Plug-ins and click Add, the region data (if applicable) and channel strip settings will be imported for each selected track to new tracks.
![]() Sends: If you select Sends and click Add, you will be prompted to either add a new aux that matches the aux selected in the All Files Browser or select an aux in your current project to convert to the aux selected in the All Files Browser.
Sends: If you select Sends and click Add, you will be prompted to either add a new aux that matches the aux selected in the All Files Browser or select an aux in your current project to convert to the aux selected in the All Files Browser.
![]() I/O: If you select I/O and click Add, tracks that share an I/O configuration will be imported, creating new tracks in the Tracks area with empty channel strips.
I/O: If you select I/O and click Add, tracks that share an I/O configuration will be imported, creating new tracks in the Tracks area with empty channel strips.
![]() Auto: If you select Auto and click Add, the automation data for the selected track(s) will be imported into new tracks in the Tracks area with empty channel strips.
Auto: If you select Auto and click Add, the automation data for the selected track(s) will be imported into new tracks in the Tracks area with empty channel strips.
![]() Notes: The Notes option lets you import notes for the selected track.
Notes: The Notes option lets you import notes for the selected track.
You can select multiple options per track, and all the selected options for a track will be imported to a single track. You can click on one option for a track and press the right arrow key on your keyboard to select all options for the selected track. Pressing the left arrow key deselects all options on the selected track. Selecting any option for a track in a Track Stack automatically selects all options for all tracks in the Track Stack.
The Replace button at the bottom of the Track Import view transfers that data to the currently selected tracks in the main window, replacing all data of the selected types on the selected track. Otherwise, click the Add button to import everything you have selected into the current project.
The Import Project Settings Window
There may be times when you want to import different settings from other projects, such as screensets, staff styles, or lane sets. To browse for a Logic project in a typical file browser, open the File menu, choose Project Settings, and select Import Project Settings. To import a project, select it in this file browser and click Import. After you click Import, or after you click the Import Project Settings button at the bottom of the Track Import view, the Import Project Settings dialog box opens, as shown in Figure 12.15.
Figure 12.15 The Import Project Settings dialog box.
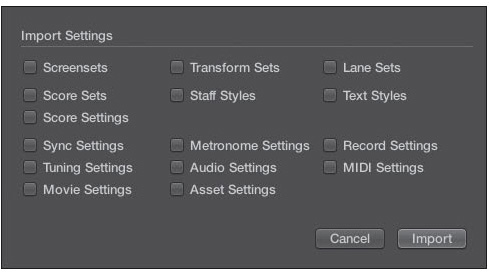
© Apple Inc.
The settings from which you can choose are as follows:
![]() Screensets
Screensets
![]() Transform Sets
Transform Sets
![]() Lane Sets
Lane Sets
![]() Score Sets
Score Sets
![]() Staff Styles
Staff Styles
![]() Text Styles
Text Styles
![]() Score Settings
Score Settings
![]() Sync Settings
Sync Settings
![]() Metronome Settings
Metronome Settings
![]() Record Settings
Record Settings
![]() Tuning Settings
Tuning Settings
![]() Audio Settings
Audio Settings
![]() MIDI Settings
MIDI Settings
![]() Movie Settings
Movie Settings
![]() Asset Settings
Asset Settings
Simply select the settings you wish to import and click Import. The chosen settings will be imported into the current project.
Exporting Files from Logic
If you want to export your Logic project in a different format for use in a different application (or an earlier version of Logic), Logic offers an Export submenu in the global File menu. Figure 12.16 shows this submenu.
Figure 12.16 The Export submenu in the global File menu features options for exporting files from Logic into different formats.
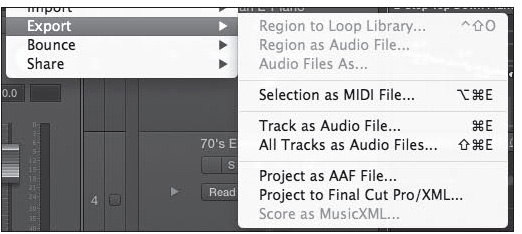
© Apple Inc.
The export options are as follows:
![]() Region to Loop Library. Selecting a region and using the Region to Loop Library command opens the Add Region to Apple Loops Library window. This command and the Add Region to Apple Loops Library window were covered in Chapter 7.
Region to Loop Library. Selecting a region and using the Region to Loop Library command opens the Add Region to Apple Loops Library window. This command and the Add Region to Apple Loops Library window were covered in Chapter 7.
![]() Region as Audio File: This command allows you to export the selected audio or software instrument region as an audio file. When selected, this command opens the Region as Audio File dialog box, shown in Figure 12.17. In addition to the normal Save As dialog box features, this dialog box gives you a number of different options regarding how Logic will bounce your regions. These options are as follows:
Region as Audio File: This command allows you to export the selected audio or software instrument region as an audio file. When selected, this command opens the Region as Audio File dialog box, shown in Figure 12.17. In addition to the normal Save As dialog box features, this dialog box gives you a number of different options regarding how Logic will bounce your regions. These options are as follows:
Figure 12.17 The Region as Audio File dialog box.
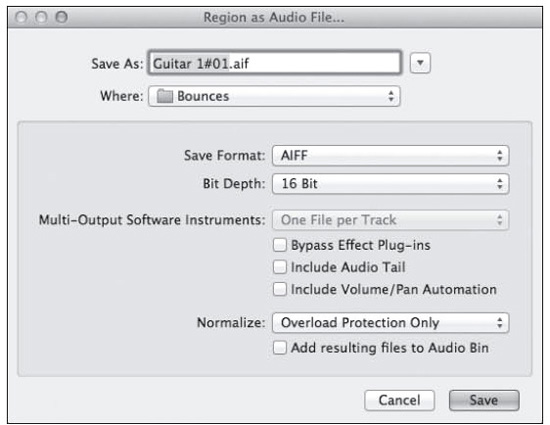
© Apple Inc.
![]() Save Format: Use this menu to select the save format for your exported audio file: AIFF, CAF, or Broadcast Wave.
Save Format: Use this menu to select the save format for your exported audio file: AIFF, CAF, or Broadcast Wave.
![]() Bit Depth: Select the bit depth (8-, 16-, or 24-bit, or 32-bit float) of your exported audio file in this menu.
Bit Depth: Select the bit depth (8-, 16-, or 24-bit, or 32-bit float) of your exported audio file in this menu.
![]() Multi-Output Software Instruments: This menu offers two options: One File per Track and One File per Channel Strip. The One File per Track option creates one bounce file for the selected multi-output software instrument track in the Tracks area. The One File per Channel Strip option creates one file for every channel strip a multi-output software instrument utilizes, including aux channel strips. Exporting a Multi-Output Software Instrument region to audio automatically selects the Include Volume/Pan Automation option.
Multi-Output Software Instruments: This menu offers two options: One File per Track and One File per Channel Strip. The One File per Track option creates one bounce file for the selected multi-output software instrument track in the Tracks area. The One File per Channel Strip option creates one file for every channel strip a multi-output software instrument utilizes, including aux channel strips. Exporting a Multi-Output Software Instrument region to audio automatically selects the Include Volume/Pan Automation option.
![]() Bypass Effect Plug-Ins: Selecting this option lets you bypass the effect plug-ins for the exported audio file.
Bypass Effect Plug-Ins: Selecting this option lets you bypass the effect plug-ins for the exported audio file.
![]() Include Audio Tail: When you select this option, the exported audio file is automatically lengthened to include any effects tails, similar to the Include Audio Tail option in the Bounce dialog box.
Include Audio Tail: When you select this option, the exported audio file is automatically lengthened to include any effects tails, similar to the Include Audio Tail option in the Bounce dialog box.
![]() Include Volume/Pan Automation: With this option selected, all volume and pan automation that occurs over the selected region will be performed during the export.
Include Volume/Pan Automation: With this option selected, all volume and pan automation that occurs over the selected region will be performed during the export.
![]() Normalize: The Normalize menu offers the same options for export as the Normalize menu in the Bounce dialog box: On, Off, and Overload Protection Only. With On selected, the exported file will be normalized. With Off selected, the exported file will not be normalized. With Overload Protection Only selected, the file will be scanned for peaks over 0 dBFS. Those peaks will be reduced to 0 dBFS, and the rest of the file will not be altered.
Normalize: The Normalize menu offers the same options for export as the Normalize menu in the Bounce dialog box: On, Off, and Overload Protection Only. With On selected, the exported file will be normalized. With Off selected, the exported file will not be normalized. With Overload Protection Only selected, the file will be scanned for peaks over 0 dBFS. Those peaks will be reduced to 0 dBFS, and the rest of the file will not be altered.
![]() Add Resulting Files to Audio Bin: Select Add Resulting Files to Audio Bin to have the exported audio added to the Project Audio Browser. (“Audio Bin” is what the Project Audio Browser was named in Logic 9; as of this writing, this detail has not been updated to current Logic Pro X terminology.)
Add Resulting Files to Audio Bin: Select Add Resulting Files to Audio Bin to have the exported audio added to the Project Audio Browser. (“Audio Bin” is what the Project Audio Browser was named in Logic 9; as of this writing, this detail has not been updated to current Logic Pro X terminology.)
When you click Save, Logic will perform an offline bounce of the selected region.
![]() Selection as MIDI File: To export MIDI data from Logic, first select one or more MIDI regions (across as many tracks as you’d like); then choose this option or press Option+Command+E. A dialog box will prompt you to choose a name and a directory for your exported file, and your MIDI selection will be exported with a .mid extension to denote that it is a Standard MIDI File (SMF) file. By default, Logic exports SMFs in Format 1, where the file can contain one or more MIDI tracks. In the Project Handling tab of the Global Preferences window, shown in Figure 12.4, there is an option to export single MIDI as Format 0. Format 0 SMFs consist of one multichannel track. To export a Format 0 SMF, you would first need to merge all your MIDI regions into one region on one track. First, select all your MIDI regions; then open the Edit menu, choose Join, and select Regions, or press Command+J. You can now export your MIDI file as a Format 0 SMF.
Selection as MIDI File: To export MIDI data from Logic, first select one or more MIDI regions (across as many tracks as you’d like); then choose this option or press Option+Command+E. A dialog box will prompt you to choose a name and a directory for your exported file, and your MIDI selection will be exported with a .mid extension to denote that it is a Standard MIDI File (SMF) file. By default, Logic exports SMFs in Format 1, where the file can contain one or more MIDI tracks. In the Project Handling tab of the Global Preferences window, shown in Figure 12.4, there is an option to export single MIDI as Format 0. Format 0 SMFs consist of one multichannel track. To export a Format 0 SMF, you would first need to merge all your MIDI regions into one region on one track. First, select all your MIDI regions; then open the Edit menu, choose Join, and select Regions, or press Command+J. You can now export your MIDI file as a Format 0 SMF.
![]() Track as Audio File: This command allows you to export the selected audio or software instrument track as an audio file. Selecting this command brings up a dialog box identical to the one shown in Figure 12.17. Logic Pro will do an offline bounce of the selected track that begins at the project’s beginning and ends at the project’s end. The key command for this is Command+E.
Track as Audio File: This command allows you to export the selected audio or software instrument track as an audio file. Selecting this command brings up a dialog box identical to the one shown in Figure 12.17. Logic Pro will do an offline bounce of the selected track that begins at the project’s beginning and ends at the project’s end. The key command for this is Command+E.
![]() All Tracks as Audio Files: This command allows you to export all of your audio and software instrument tracks as separate audio files. Selecting this command or pressing Shift+Command+E brings up a dialog box identical to the one shown in Figure 12.17. The export options you specify will be applied to every track you export. For example, you can’t choose different formats and/or bit depths for different tracks; they will all have the same format and bit depth. Logic Pro will do an offline bounce of each track that begins at the project’s beginning and ends at the project’s end.
All Tracks as Audio Files: This command allows you to export all of your audio and software instrument tracks as separate audio files. Selecting this command or pressing Shift+Command+E brings up a dialog box identical to the one shown in Figure 12.17. The export options you specify will be applied to every track you export. For example, you can’t choose different formats and/or bit depths for different tracks; they will all have the same format and bit depth. Logic Pro will do an offline bounce of each track that begins at the project’s beginning and ends at the project’s end.
![]() Project as AAF File: When you choose to export your song as a new, professional Advanced Authoring Format (AAF) file, you are presented with a specialized Save AAF File As dialog box, shown in Figure 12.18. In addition to the normal Save As dialog box options, this dialog box offers four Audio File Export Settings:
Project as AAF File: When you choose to export your song as a new, professional Advanced Authoring Format (AAF) file, you are presented with a specialized Save AAF File As dialog box, shown in Figure 12.18. In addition to the normal Save As dialog box options, this dialog box offers four Audio File Export Settings:
Figure 12.18 The Save AAF File As dialog box.
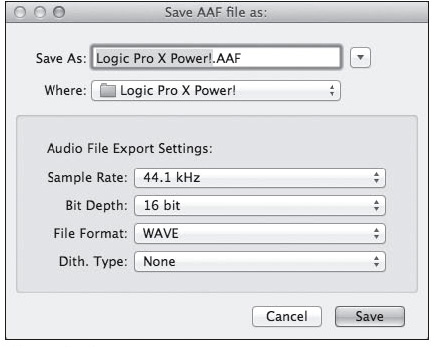
© Apple Inc.
In addition to the normal Save As window options, this dialog box offers four Audio File Export Settings:
![]() Sample Rate: You can select a sample rate from 44.1 kHz to 96 kHz.
Sample Rate: You can select a sample rate from 44.1 kHz to 96 kHz.
![]() Bit Depth: You can select a bit depth of either 16 or 24 bit.
Bit Depth: You can select a bit depth of either 16 or 24 bit.
![]() File Format: You can select either the WAVE or AIFF format for your audio files.
File Format: You can select either the WAVE or AIFF format for your audio files.
![]() Dither Type: If you have selected 16-bit audio files from 24-bit originals, you should select one of the available dither algorithms to dither your files.
Dither Type: If you have selected 16-bit audio files from 24-bit originals, you should select one of the available dither algorithms to dither your files.
When youare finished settingup the AAFaudio file export settings, click Save, and Logic will export your Logic song as an AAF.
![]() Project to Final Cut Pro/XML: This option will save your Logic song in Extensible Markup Language (XML) for use in Final Cut Pro. When you select this option, it will present you with a Save As dialog box that has two options: Include Video in Export and Export as Final Cut Compound Clip. Simply name your file, choose if you will include the video and export the project as a Final Cut compound clip, choose where to save your XML file, and press Return. Logic will save your song as an XML file that you can then import into Final Cut Pro.
Project to Final Cut Pro/XML: This option will save your Logic song in Extensible Markup Language (XML) for use in Final Cut Pro. When you select this option, it will present you with a Save As dialog box that has two options: Include Video in Export and Export as Final Cut Compound Clip. Simply name your file, choose if you will include the video and export the project as a Final Cut compound clip, choose where to save your XML file, and press Return. Logic will save your song as an XML file that you can then import into Final Cut Pro.
![]() Score as MusicXML: The Export Score as MusicXML command lets you export your project’s score in an industry-standard format that is compatible with many DAWs and scoring applications. When you select this option, a simple Save As dialog box opens.
Score as MusicXML: The Export Score as MusicXML command lets you export your project’s score in an industry-standard format that is compatible with many DAWs and scoring applications. When you select this option, a simple Save As dialog box opens.
Sharing Audio to iTunes, the Media Browser, and SoundCloud
As you are working on a project, and particularly when you are finished with it, you very likely will want to share your audio on the Internet or to other applications, like iTunes or Final Cut Pro. The Share submenu of the File menu, shown in Figure 12.19, helps you accomplish these things without having to bounce the file. Let’s check out the different sharing options.
Figure 12.19 The Share submenu of the File menu.

© Apple Inc.
Sharing to iTunes
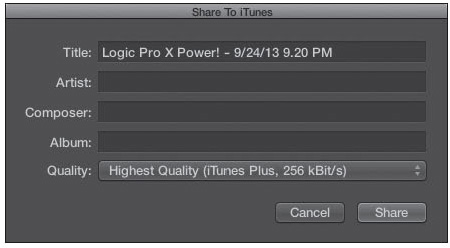
Perhaps the most common destination for bounced audio is iTunes. Listening to audio, putting it on an iOS device, and burning it to disc is what we do with iTunes. Logic Pro X lets you share audio directly to iTunes. When you open the File menu, choose Share, and select To iTunes, the Share to iTunes dialog box, shown in Figure 12.20, opens.
Figure 12.20 The Share to iTunes dialog box lets you add metadata to the audio being shared to iTunes and to select the audio quality.
© Apple Inc.
The Share to iTunes dialog box lets you add metadata to the audio you are sharing to iTunes, including the title, artist, composer, and album, making it easy to find and sort in iTunes. If you need to add additional metadata, you can accomplish that in iTunes using the Get Info command (right-click on the file in iTunes).
You can also select the quality of the audio that will be shared to iTunes. There are five Quality options in the Quality menu:
![]() Low Quality (64 kBit/s)
Low Quality (64 kBit/s)
![]() Medium Quality (128 kBit/s)
Medium Quality (128 kBit/s)
![]() High Quality (192 kBit/s)
High Quality (192 kBit/s)
![]() Highest Quality (256 kBit/s)
Highest Quality (256 kBit/s)
![]() Uncompressed (AIFF)
Uncompressed (AIFF)
The first four options share your audio in the compressed AAC format. What quality setting you choose is determined by your source audio and how critical the delivery format is. For example, a spoken-word audio file could be shared at 64 kBit/s with little if any audible degradation of the source audio, particularly for private consumption. If you’re looking to listen to a mix of a song with everything from bass to high guitar or keyboard parts, anything less than 192 kBit/s would degrade the audio too much, while 256 kBit/s and especially AIFF would be the preferred audio quality.
After you have filled in the metadata fields and chosen a quality setting, click Share. Logic will bounce your audio and share it to iTunes, and iTunes will open and play your shared file. Note that when you share a file with Cycle engaged, the Cycle region will be shared.
Sharing to the Media Browser
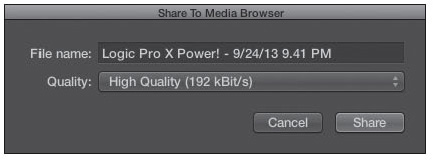
Sharing to the Media Browser makes it easy to make your bounced audio available to other Apple applications like iMovie. To share to the Media Browser, open the File menu, choose Share, and select the To Media Browser. This opens the Share to Media Browser dialog box, shown in Figure 12.21.
Figure 12.21 The Share To Media Browser window.
© Apple Inc.
The Share to Media Browser dialog box lets you name the file and select the file’s quality, with the same quality settings as in the Share to iTunes dialog box. When you’re finished choosing your settings, click Share; the project is bounced and shared to the Media Browser.
Sharing to SoundCloud
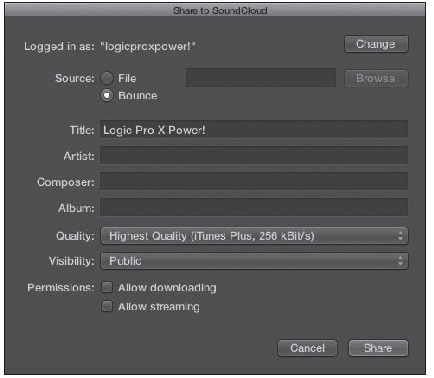
SoundCloud (www.soundcloud.com) is one of the most popular sites on the Internet for individuals and bands to share their music with the world. Logic Pro X lets you share your projects directly to SoundCloud. Don’t worry if you don’t have a SoundCloud account; the first time you open the File menu, choose Share, and select the To SoundCloud command, a dialog box opens that lets you either log in to your SoundCloud account or create a new one. After you log in or create a new account, the Share to SoundCloud dialog box, shown in Figure 12.22, will open.
Figure 12.22 The Share to SoundCloud dialog box lets you share your project audio directly to the Internet.
© Apple Inc.
The Title, Artist, Composer, Album, and Quality options are identical to those offered in the Share to iTunes window. There are some options unique to the Share to SoundCloud dialog box, however. Those options are as follows:
![]() Logged In As: The Logged In As area shows you the username of the SoundCloud account to which you currently have access.
Logged In As: The Logged In As area shows you the username of the SoundCloud account to which you currently have access.
![]() Change: Click the Change button if you need to log in to a different SoundCloud account to share the project audio.
Change: Click the Change button if you need to log in to a different SoundCloud account to share the project audio.
![]() Source: Source gives you two options: File and Bounce. If you select File, you can click the Browse button to open a file browser in which you can select an audio file to share to SoundCloud. If you select Bounce, you will share the audio from your project to SoundCloud when you click the Share button.
Source: Source gives you two options: File and Bounce. If you select File, you can click the Browse button to open a file browser in which you can select an audio file to share to SoundCloud. If you select Bounce, you will share the audio from your project to SoundCloud when you click the Share button.
![]() Visibility: The Visibility menu lets you select whether your shared audio will be public or private.
Visibility: The Visibility menu lets you select whether your shared audio will be public or private.
![]() Permissions: The permissions options let you determine whether your shared audio can be downloaded and/or streamed.
Permissions: The permissions options let you determine whether your shared audio can be downloaded and/or streamed.
Once you have configured all the Share to SoundCloud options, click Share. Assuming you are connected to the Internet, your project audio will be bounced and uploaded to SoundCloud!