
6 The Logic Pro Main Window
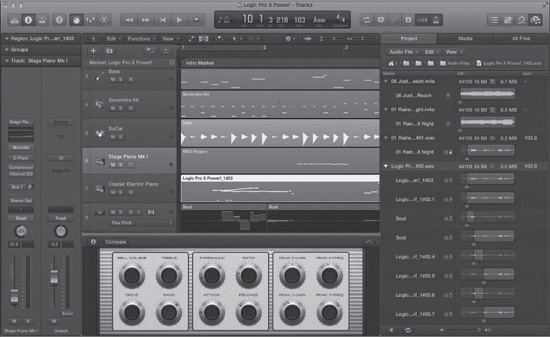
THE MAIN WINDOW IS THE CENTRAL WINDOW IN LOGIC. As mentioned in Chapter 2, “A Quick Tour of Logic Pro,” the main window has seen some significant changes since Logic Pro 9. The main window, formerly called the Arrange window, gives you integrated access to all the editors, browsers, and lists, as well as to Smart Controls and the Drummer editor. Here you create and manipulate all the various tracks of your project, along with those tracks’ adjustable parameters. You can record data onto tracks in the Tracks area, and that data is graphically represented in track lanes as one or more regions. These regions can then be arranged (that is, manipulated into new organizations that do not necessarily reflect the original data organization), processed, and automated. You can use the Tracks area in the main window to give you an overview of an entire project or a sample-accurate close-up of a few tracks. You can play your Logic project from beginning to end or set up project locators at any two points and just focus on your project from there. Figure 6.1 gives you a look at a Logic main window showing a selection of audio and MIDI tracks along with their regions, some automation, a global track (an expanded marker track), and the Project Audio Browser and Smart Controls for a track.
Figure 6.1 The main window in Logic Pro X. You will spend much of your time using this window, so getting comfortable with it will make your Logic experience a productive one.
© Apple Inc.
You will find that you spend much of your time using Logic in the main window, so you’ll need a solid understanding of what functions and features are available to you here.
An Overview of the Main Window
While every different area in the main window is covered in depth throughout this book, this chapter will touch on each area briefly before going into detail on the more “traditional” functions in the main window. With the exception of the Track list and the Tracks area, all other areas in the main window can be hidden if desired. The main window interface consists of the following different areas:
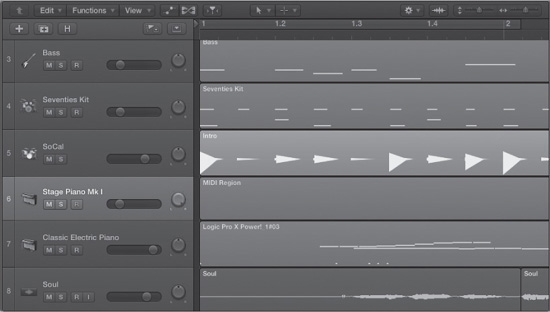
![]() Tracks area: The Tracks area is the central area of the main window. Here you find the Track list, global tracks, local menus, and track lanes. This is the area where you perform the bulk of your editing and arranging tasks. Figure 6.2 shows the Tracks area.
Tracks area: The Tracks area is the central area of the main window. Here you find the Track list, global tracks, local menus, and track lanes. This is the area where you perform the bulk of your editing and arranging tasks. Figure 6.2 shows the Tracks area.
Figure 6.2 The Tracks area is where you will perform most editing and arranging tasks.
© Apple Inc.
![]() Control bar: The control bar is a customizable area that sits across the top of the main window. In it, you can place mouse shortcuts for different commands and windows, and for the Lists and Browsers areas. It also contains the Transport controls and the LCD display, and you can access a Toolbar area underneath the control bar. The control bar is covered in the section “The Control Bar” later in this chapter.
Control bar: The control bar is a customizable area that sits across the top of the main window. In it, you can place mouse shortcuts for different commands and windows, and for the Lists and Browsers areas. It also contains the Transport controls and the LCD display, and you can access a Toolbar area underneath the control bar. The control bar is covered in the section “The Control Bar” later in this chapter.
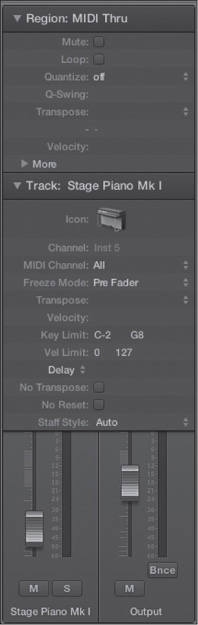
![]() Inspector pane: The Inspector pane is found on the left side of the main window. It consists, from top to bottom, of the Region Inspector, the Track Inspector, and the Inspector channel strips. You can toggle the Inspector pane by selecting View > Inspector, by clicking the Inspector icon in the control bar, or by pressing the key command I. Each component of the Inspector gives you some added control over individual tracks or regions in the Tracks area. The different components of the Inspector are covered in detail in the “Track Parameters” and “The Inspector Channel Strips” sections later in this chapter. Figure 6.3 shows the main window Inspector pane.
Inspector pane: The Inspector pane is found on the left side of the main window. It consists, from top to bottom, of the Region Inspector, the Track Inspector, and the Inspector channel strips. You can toggle the Inspector pane by selecting View > Inspector, by clicking the Inspector icon in the control bar, or by pressing the key command I. Each component of the Inspector gives you some added control over individual tracks or regions in the Tracks area. The different components of the Inspector are covered in detail in the “Track Parameters” and “The Inspector Channel Strips” sections later in this chapter. Figure 6.3 shows the main window Inspector pane.
Figure 6.3 The Inspector pane contains the Region Inspector, the Track Inspector, and the Inspector channel strips.
© Apple Inc.
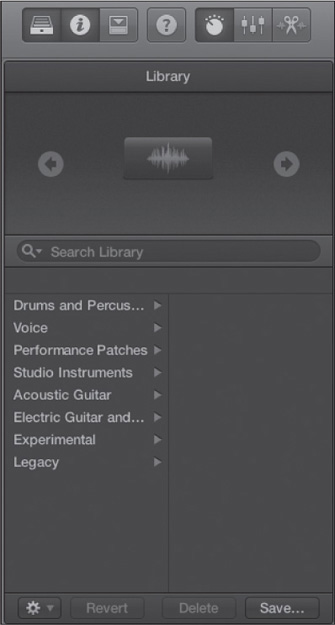
![]() Library: The Library is found on the left side of the main window when the Library button in the control bar is selected or when you select View > Library. The Library gives you access to patches and settings for the currently selected track, along with a Save command for patches, among other things. Patches are new to Logic Pro X, and are covered later in this chapter. Figure 6.4 shows the Library.
Library: The Library is found on the left side of the main window when the Library button in the control bar is selected or when you select View > Library. The Library gives you access to patches and settings for the currently selected track, along with a Save command for patches, among other things. Patches are new to Logic Pro X, and are covered later in this chapter. Figure 6.4 shows the Library.
Figure 6.4 The Library in the main window gives you access to patches and settings for the current track.
© Apple Inc.
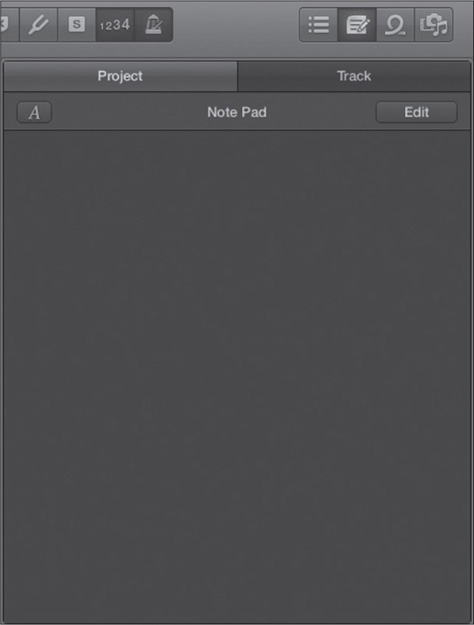
![]() Note Pad area: The Note Pad area is found on the right side of the main window. This area lets you create notes for individual tracks or for your project as a whole, making it very easy to create specific reminders for yourself or for your collaborators. Figure 6.5 shows the Note Pad area.
Note Pad area: The Note Pad area is found on the right side of the main window. This area lets you create notes for individual tracks or for your project as a whole, making it very easy to create specific reminders for yourself or for your collaborators. Figure 6.5 shows the Note Pad area.
Figure 6.5 The Note Pad area of the main window. You can create notes for individual tracks or for the project as a whole in this area.
© Apple Inc.
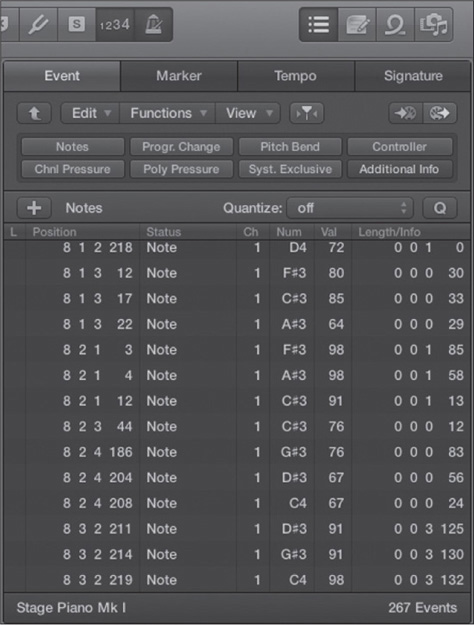
![]() Lists area: The Lists area occupies the same space as the Note Pad area. This area is used for editing different types of data in a text-based interface. It contains tabs for the Event, Marker, Tempo, and Signature lists, as shown in Figure 6.6.
Lists area: The Lists area occupies the same space as the Note Pad area. This area is used for editing different types of data in a text-based interface. It contains tabs for the Event, Marker, Tempo, and Signature lists, as shown in Figure 6.6.
Figure 6.6 The Lists area of the main window. Here you can access the Event, Marker, Tempo, and Signature lists directly in the main window.
© Apple Inc.
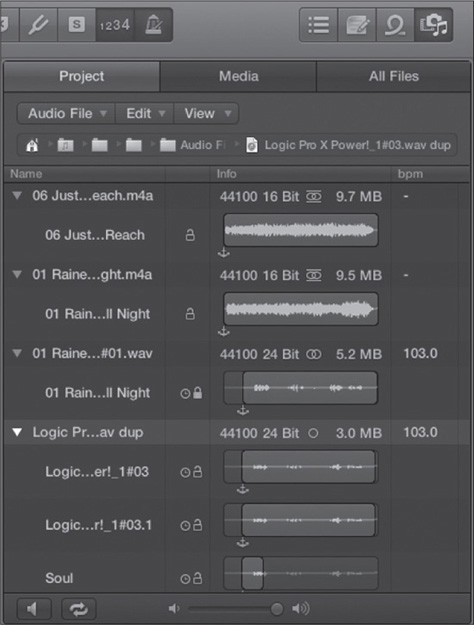
![]() Browsers area: The Browsers area occupies the same space as the Note Pad and Lists areas. Selecting a component of any of these areas while a component of the other area is showing automatically hides the first. For example, if you are working in the Event list in the Lists area and you open the Media tab of the Browsers area, the Event list will be hidden and the Media Browser will be shown. The Browsers area is a repository of browsers for different media files, such as audio files, video files, and effect presets. The Browsers area contains tabs for the Project Audio Browser, the Media Browser, and the All Files Browser, as shown in Figure 6.7.
Browsers area: The Browsers area occupies the same space as the Note Pad and Lists areas. Selecting a component of any of these areas while a component of the other area is showing automatically hides the first. For example, if you are working in the Event list in the Lists area and you open the Media tab of the Browsers area, the Event list will be hidden and the Media Browser will be shown. The Browsers area is a repository of browsers for different media files, such as audio files, video files, and effect presets. The Browsers area contains tabs for the Project Audio Browser, the Media Browser, and the All Files Browser, as shown in Figure 6.7.
Figure 6.7 The Browsers area of the main window. Here you can access the Project Audio Browser, the Media Browser, and the All Files Browser.
© Apple Inc.
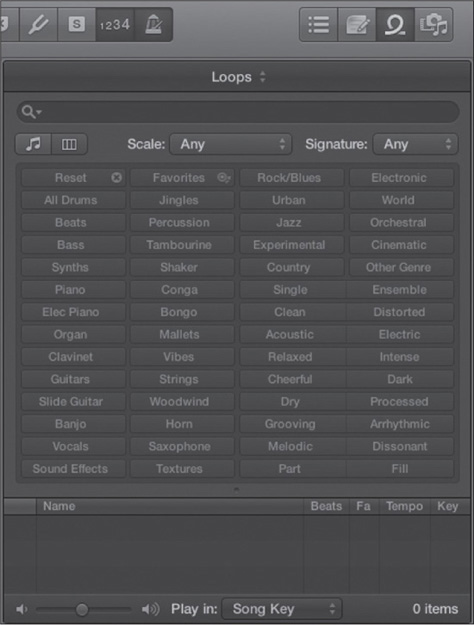
![]() Loops Browser: The Loops Browser gives you access to all your Apple Loops. Figure 6.8 shows the Loops Browser.
Loops Browser: The Loops Browser gives you access to all your Apple Loops. Figure 6.8 shows the Loops Browser.
Figure 6.8 The Loops Browser gives you access to all your Apple Loops.
© Apple Inc.
![]() Editor area: At the bottom of the Tracks area is the Editor area. You can access the different editors via varying control bar buttons, key commands, and Tracks area selections, as you’ll learn throughout this chapter. The Editor area can display the Mixer, Audio Track, and Audio File editors; the Piano Roll, Score, and Step editors; as well as Smart Controls and the Drummer editor. Figure 6.9 shows the Editor area.
Editor area: At the bottom of the Tracks area is the Editor area. You can access the different editors via varying control bar buttons, key commands, and Tracks area selections, as you’ll learn throughout this chapter. The Editor area can display the Mixer, Audio Track, and Audio File editors; the Piano Roll, Score, and Step editors; as well as Smart Controls and the Drummer editor. Figure 6.9 shows the Editor area.
Figure 6.9 The Editor area of the main window gives you access to the Mixer, Audio Track, and Audio File editors; the Piano Roll, Score, and Step editors; plus Smart Controls and the Drummer editor. In this figure, the Drummer editor is open in the Editor area.
© Apple Inc.
Local Menus
Every editor and window in Logic has its own local menus. These menus conveniently contain commands users need within that window and editor. (Keep in mind that some commands that can be used in a particular window will not be in local menus because they are already located in the global application menus or because the given function is only available using key commands.)
The following sections describe the local menus in the Tracks area of Logic and the commands that they contain.
The Edit Menu
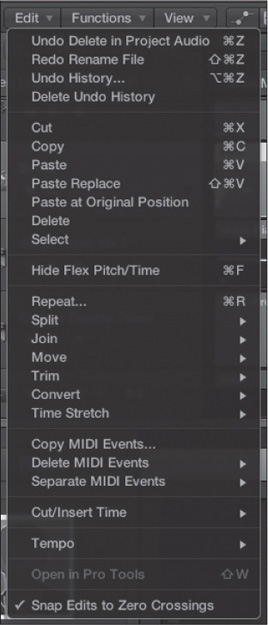
The Edit menu, shown in Figure 6.10, is the first local menu in the Logic Tracks area.
Figure 6.10 The Edit menu in the Tracks area.
© Apple Inc.
Following are descriptions of each command in the Edit menu. Whenever a key command is defined by default, it is listed at the end of the definition. Remember that even for menu commands that do not have default key commands assigned, you can assign one yourself in the Key Commands window.
![]() Undo: This command will undo the last action in Logic. Be careful about relying on Undo, however; not every action can be undone. If an action cannot be undone, this command will be grayed out and will change to Can’t Undo. The key command is Command+Z.
Undo: This command will undo the last action in Logic. Be careful about relying on Undo, however; not every action can be undone. If an action cannot be undone, this command will be grayed out and will change to Can’t Undo. The key command is Command+Z.
![]() Redo: This command will redo the action previously undone. Be careful about relying on Redo, however; you cannot redo every option that you can undo. If an action cannot be redone, this command will be grayed out and will change to Can’t Redo. The key command is Shift+Command+Z.
Redo: This command will redo the action previously undone. Be careful about relying on Redo, however; you cannot redo every option that you can undo. If an action cannot be redone, this command will be grayed out and will change to Can’t Redo. The key command is Shift+Command+Z.
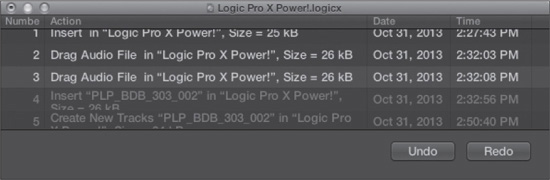
![]() Undo History: Logic offers multiple levels of undo. It maintains a list of actions that have been performed, and you can choose to undo any or all of them at any point. And this does mean at any point—your undo list is saved with your project, so the list of all your undoable actions is always available (unless you choose to delete it; see the description of the Delete Undo History command). You determine how many levels deep your Undo History will be via a preference in the Editing tab of the General Preferences window, which you can access by selecting Logic Pro X > Preferences > General. You can choose any number up to 200 steps. When you select this command, you are presented with the Undo History window shown in Figure 6.11.
Undo History: Logic offers multiple levels of undo. It maintains a list of actions that have been performed, and you can choose to undo any or all of them at any point. And this does mean at any point—your undo list is saved with your project, so the list of all your undoable actions is always available (unless you choose to delete it; see the description of the Delete Undo History command). You determine how many levels deep your Undo History will be via a preference in the Editing tab of the General Preferences window, which you can access by selecting Logic Pro X > Preferences > General. You can choose any number up to 200 steps. When you select this command, you are presented with the Undo History window shown in Figure 6.11.
Figure 6.11 The Undo History window. In this example, you can undo action 3 and below by clicking the Undo button. If you undo these actions, you can redo them by clicking the Redo button.
© Apple Inc.
The obvious features of the Undo History window are a list of your previous actions in Logic and two buttons in the bottom-left corner, labeled “Undo” and “Redo.” When you click on an option inside the window, that option is highlighted. You can change what step you have highlighted by either clicking on another step or pressing the up or down arrow key. The actions above the selection appear as normal, and those below the selection are grayed out. This indicates that if you were to click the Undo button, all the options below the line would be undone. If you want to redo those actions, clicking the Redo button will redo them. Clicking Undo or Redo moves the highlighted area up or down a step accordingly. Keep in mind that you can redo what you have just undone only if you have not already gone ahead and performed other actions. If you have, these new actions start where your Undo action left off, and you’ll no longer have Redo as an option. As with the single Undo and Redo commands, not every action will appear in your Undo History, as not every action can be undone or redone. The key command to open this window is Option+Command+Z.
![]() Delete Undo History: This option completely empties the Undo History window for the project. After this, no previous actions will be undoable. The Undo History window immediately starts recording all undoable actions after the Delete Undo History command, and those subsequent actions remain undoable until the next time you select Delete Undo History.
Delete Undo History: This option completely empties the Undo History window for the project. After this, no previous actions will be undoable. The Undo History window immediately starts recording all undoable actions after the Delete Undo History command, and those subsequent actions remain undoable until the next time you select Delete Undo History.
![]() Cut: The Cut command removes the contents of any selection you make in a text box or track lane of the Tracks area and places it onto the Clipboard. You can then use the Paste command to replace the cut selection. The key command for the Cut function is Command+X.
Cut: The Cut command removes the contents of any selection you make in a text box or track lane of the Tracks area and places it onto the Clipboard. You can then use the Paste command to replace the cut selection. The key command for the Cut function is Command+X.
![]() Copy: The Copy command copies the contents of any selection you make in a text box or track lane of the Tracks area and places it onto the Clipboard. The original data is not removed. You can then use the Paste command to insert a copy of the data on the Clipboard. The key command for the Copy function is Command+C.
Copy: The Copy command copies the contents of any selection you make in a text box or track lane of the Tracks area and places it onto the Clipboard. The original data is not removed. You can then use the Paste command to insert a copy of the data on the Clipboard. The key command for the Copy function is Command+C.
![]() Paste: Paste inserts the data from the Clipboard at the current playhead location. Keep in mind that if you have text on the Clipboard, you have to paste it into a text window, and if you have a region from a track lane on the Clipboard, you cannot paste that into a text box. The key command is Command+V.
Paste: Paste inserts the data from the Clipboard at the current playhead location. Keep in mind that if you have text on the Clipboard, you have to paste it into a text window, and if you have a region from a track lane on the Clipboard, you cannot paste that into a text box. The key command is Command+V.
![]() Paste Replace: Instead of inserting the regions from the Clipboard at a given location, Paste Replace overwrites any regions that occur at the same point in the timeline with regions from the Clipboard. The key command is Shift+Command+V.
Paste Replace: Instead of inserting the regions from the Clipboard at a given location, Paste Replace overwrites any regions that occur at the same point in the timeline with regions from the Clipboard. The key command is Shift+Command+V.
![]() Paste at Original Position: If you select Paste at Original Position, the regions on the Clipboard will be pasted to the exact position they were cut or copied from instead of at the current project location.
Paste at Original Position: If you select Paste at Original Position, the regions on the Clipboard will be pasted to the exact position they were cut or copied from instead of at the current project location.
![]() Delete: Delete erases any currently selected regions. The key command is, obviously, Delete.
Delete: Delete erases any currently selected regions. The key command is, obviously, Delete.
![]() Select: The Select submenu is covered later in this chapter in “The Select Submenu” section.
Select: The Select submenu is covered later in this chapter in “The Select Submenu” section.
![]() Hide/Show Flex Pitch/Time: This command toggles the Enable Flex buttons on audio track headers. The key command for this is Command+F.
Hide/Show Flex Pitch/Time: This command toggles the Enable Flex buttons on audio track headers. The key command for this is Command+F.
![]() Repeat: This command repeats the selected region. Selecting it opens a small dialog box for you to specify the number of repetitions, whether you want real or alias copies, and whether you want to quantize the copies (in other words, force the repeats to end on an exact bar line, even if the original does not). The key command is Command+R.
Repeat: This command repeats the selected region. Selecting it opens a small dialog box for you to specify the number of repetitions, whether you want real or alias copies, and whether you want to quantize the copies (in other words, force the repeats to end on an exact bar line, even if the original does not). The key command is Command+R.
![]() Split: This submenu includes two commands that divide regions in different ways:
Split: This submenu includes two commands that divide regions in different ways:
![]() Split Regions at Playhead: This command splits any selected regions at the current playhead position. The key command is Command+T.
Split Regions at Playhead: This command splits any selected regions at the current playhead position. The key command is Command+T.
![]() Split Regions at Locators: This command creates a split in any selected regions at the current locator positions. The key command is Control+Command+T.
Split Regions at Locators: This command creates a split in any selected regions at the current locator positions. The key command is Control+Command+T.
![]() Join: This submenu offers a couple of options for joining regions:
Join: This submenu offers a couple of options for joining regions:
![]() Regions: This command joins the data from any selected regions into a single region. The new object will be given the same name and will be on the same track as the track of the first selected object. If you have MIDI regions on different tracks, the merged data will retain its position in time but not its MIDI channel. The MIDI channel on which the newly created MIDI region will transmit its data will be the MIDI channel that the instrument on the selected track is using. If you use this command on noncontiguous audio regions, Logic will create a new audio file containing the joined regions, just as if you had used the Glue tool (described in the section “The Tracks Area Tool Menu” later in this chapter). The key command is Command+J.
Regions: This command joins the data from any selected regions into a single region. The new object will be given the same name and will be on the same track as the track of the first selected object. If you have MIDI regions on different tracks, the merged data will retain its position in time but not its MIDI channel. The MIDI channel on which the newly created MIDI region will transmit its data will be the MIDI channel that the instrument on the selected track is using. If you use this command on noncontiguous audio regions, Logic will create a new audio file containing the joined regions, just as if you had used the Glue tool (described in the section “The Tracks Area Tool Menu” later in this chapter). The key command is Command+J.
![]() Regions Per Tracks: This is the same as the preceding option, except that if the selected objects are on different tracks, rather than a single region being created on the track of the first region, Logic will create regions on each track on which there are selected regions. That means merged MIDI regions will transmit their data on their original MIDI channel because they are not changing MIDI instruments. New audio files will be created for merged audio regions on their respective tracks. The key command is J.
Regions Per Tracks: This is the same as the preceding option, except that if the selected objects are on different tracks, rather than a single region being created on the track of the first region, Logic will create regions on each track on which there are selected regions. That means merged MIDI regions will transmit their data on their original MIDI channel because they are not changing MIDI instruments. New audio files will be created for merged audio regions on their respective tracks. The key command is J.
![]() Move: See the section “The Move Submenu” later in this chapter.
Move: See the section “The Move Submenu” later in this chapter.
![]() Trim: See the section “The Trim Submenu” later in this chapter.
Trim: See the section “The Trim Submenu” later in this chapter.
![]() Convert: The Convert submenu offers the following options for converting regions:
Convert: The Convert submenu offers the following options for converting regions:
![]() Loops to Regions: This command turns any loops of the selected region into an actual copy of the selected region. The key command is Control+L.
Loops to Regions: This command turns any loops of the selected region into an actual copy of the selected region. The key command is Control+L.
![]() MIDI Loops to Aliases: This command turns any loops of the selected MIDI region into aliases of the selected MIDI region.
MIDI Loops to Aliases: This command turns any loops of the selected MIDI region into aliases of the selected MIDI region.
![]() Audio Regions to New Regions: This command makes independent audio regions in the Project Audio Browser for regions previously considered subregions of a “parent” audio region (meaning audio regions carved from what was one initial audio region). The key command is Option+Command+R.
Audio Regions to New Regions: This command makes independent audio regions in the Project Audio Browser for regions previously considered subregions of a “parent” audio region (meaning audio regions carved from what was one initial audio region). The key command is Option+Command+R.
![]() Audio Regions to New Audio Files: This command saves all the audio regions you select as separate audio files on your hard disk. This command is incredibly useful if you want to export specific regions to other audio applications. You may also need to use this command if you want to make an Apple Loop of a specific region that is a part of a longer audio file. The key command is Option+Command+F.
Audio Regions to New Audio Files: This command saves all the audio regions you select as separate audio files on your hard disk. This command is incredibly useful if you want to export specific regions to other audio applications. You may also need to use this command if you want to make an Apple Loop of a specific region that is a part of a longer audio file. The key command is Option+Command+F.
![]() Time Stretch: The Time Stretch submenu includes the following options:
Time Stretch: The Time Stretch submenu includes the following options:
![]() Time Stretch Region to Locators: When you select an audio region and choose this command, Logic will time stretch or compress your audio to the length of the locators. Note that no audio region can be stretched more than 400% or compressed to less than 25% of its original length. The key command is Option+Command+L.
Time Stretch Region to Locators: When you select an audio region and choose this command, Logic will time stretch or compress your audio to the length of the locators. Note that no audio region can be stretched more than 400% or compressed to less than 25% of its original length. The key command is Option+Command+L.
![]() Time Stretch Region to Nearest Bar: This command results in Logic using time stretching or compressing to adjust the length of a selected audio region to the nearest bar. Note that no audio region can be stretched more than 400% or compressed to less than 25% of its original length. The key command is Option+Command+B.
Time Stretch Region to Nearest Bar: This command results in Logic using time stretching or compressing to adjust the length of a selected audio region to the nearest bar. Note that no audio region can be stretched more than 400% or compressed to less than 25% of its original length. The key command is Option+Command+B.
![]() Time Stretching Algorithm: When Logic time stretches or compresses an audio region, it uses unique and high-quality algorithms created for its Time Machine in the Audio File editor, which is explored in the next chapter. The Time Stretching Algorithm submenu is explained in the section “The Time Stretching Algorithm Submenu” later in this chapter.
Time Stretching Algorithm: When Logic time stretches or compresses an audio region, it uses unique and high-quality algorithms created for its Time Machine in the Audio File editor, which is explored in the next chapter. The Time Stretching Algorithm submenu is explained in the section “The Time Stretching Algorithm Submenu” later in this chapter.
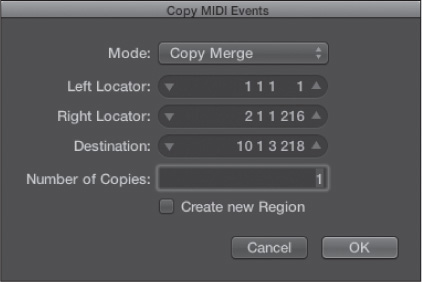
![]() Copy MIDI Events: This command opens the dialog box shown in Figure 6.12. From this dialog box, you can select exactly where your data to copy is, if you want to copy it to the Clipboard or to another location in the Tracks area, what type of copy mode (merge, replace, and so on) you wish for your MIDI data, and how many copies you want to make. This command is a very powerful way to move large amounts of MIDI data around your project. If you work with MIDI a lot, assigning this command to a key command is a must.
Copy MIDI Events: This command opens the dialog box shown in Figure 6.12. From this dialog box, you can select exactly where your data to copy is, if you want to copy it to the Clipboard or to another location in the Tracks area, what type of copy mode (merge, replace, and so on) you wish for your MIDI data, and how many copies you want to make. This command is a very powerful way to move large amounts of MIDI data around your project. If you work with MIDI a lot, assigning this command to a key command is a must.
Figure 6.12 The Copy MIDI Events dialog box. Use this to copy or move large amounts of MIDI data around your project.
© Apple Inc.
![]() Delete MIDI Events: This submenu contains the following options for deleting MIDI events in a track:
Delete MIDI Events: This submenu contains the following options for deleting MIDI events in a track:
![]() Duplicates: This command erases all duplicate MIDI events (meaning, similar events at the same time position in your project) in selected regions. The key command for this is D.
Duplicates: This command erases all duplicate MIDI events (meaning, similar events at the same time position in your project) in selected regions. The key command for this is D.
![]() Inside Locators: This command erases all MIDI events in selected regions inside the left and right locators.
Inside Locators: This command erases all MIDI events in selected regions inside the left and right locators.
![]() Outside Locators: This command erases all MIDI events outside of the left and right locators in selected regions.
Outside Locators: This command erases all MIDI events outside of the left and right locators in selected regions.
![]() Outside Region Borders: Use this command to erase all of the MIDI events outside the borders of a selected region.
Outside Region Borders: Use this command to erase all of the MIDI events outside the borders of a selected region.
![]() Unselected Within Selection: This command erases all the unselected MIDI information inside an area you have selected.
Unselected Within Selection: This command erases all the unselected MIDI information inside an area you have selected.
![]() Separate MIDI Events: The Separate MIDI Events submenu contains the following commands:
Separate MIDI Events: The Separate MIDI Events submenu contains the following commands:
![]() By Event Channel: If you have a MIDI region selected, this command creates a new track for each MIDI channel used by events in the parent region. Each new track will contain the events from the original region that were on that MIDI channel. This command is useful for recording many different MIDI parts on different MIDI channels at once and then moving each part to its own track afterward. Remember that if you select a track header, all the regions on that track are selected, allowing you to separate an entire track with one command.
By Event Channel: If you have a MIDI region selected, this command creates a new track for each MIDI channel used by events in the parent region. Each new track will contain the events from the original region that were on that MIDI channel. This command is useful for recording many different MIDI parts on different MIDI channels at once and then moving each part to its own track afterward. Remember that if you select a track header, all the regions on that track are selected, allowing you to separate an entire track with one command.
![]() By Note Pitch: If you have a MIDI region selected, this command creates a new track for every MIDI note in the parent region. This command is especially useful for recording a MIDI drum performance, in which each note is a separate drum, and then placing each drum note on its own separate track afterward.
By Note Pitch: If you have a MIDI region selected, this command creates a new track for every MIDI note in the parent region. This command is especially useful for recording a MIDI drum performance, in which each note is a separate drum, and then placing each drum note on its own separate track afterward.
![]() By Articulation ID: Articulations are a means of getting different timbres out of an instrument. For example, a violin can be played using many different bowing techniques. In this example, articulations allow you to access different bowing techniques from one software instrument. This is much more elegant than having to have one software instrument for long bowing and another one for tremolo. Different articulations have different IDs—MIDI commands that tell the software instrument to use a particular articulation. The By Articulation ID command lets you separate all MIDI data to tracks based on articulation ID.
By Articulation ID: Articulations are a means of getting different timbres out of an instrument. For example, a violin can be played using many different bowing techniques. In this example, articulations allow you to access different bowing techniques from one software instrument. This is much more elegant than having to have one software instrument for long bowing and another one for tremolo. Different articulations have different IDs—MIDI commands that tell the software instrument to use a particular articulation. The By Articulation ID command lets you separate all MIDI data to tracks based on articulation ID.
![]() Cut/Insert Time: This submenu includes these commands that add or remove time from the project:
Cut/Insert Time: This submenu includes these commands that add or remove time from the project:
![]() Cut Section Between Locators: This command removes an amount of time determined by the project locators. Regions after the right locator move to the left locator, and all information between the locators is removed from the project to the Clipboard. The key command for this is Control+Command+X.
Cut Section Between Locators: This command removes an amount of time determined by the project locators. Regions after the right locator move to the left locator, and all information between the locators is removed from the project to the Clipboard. The key command for this is Control+Command+X.
![]() Insert Section at Playhead: This command inserts all the information cut by the Cut Section Between Locators command back into the project at the current playhead position. All regions to the right of the inserted objects are moved to the right in the Tracks area so they begin at the end of the inserted regions. The key command for this is Control+Command+V.
Insert Section at Playhead: This command inserts all the information cut by the Cut Section Between Locators command back into the project at the current playhead position. All regions to the right of the inserted objects are moved to the right in the Tracks area so they begin at the end of the inserted regions. The key command for this is Control+Command+V.
![]() Insert Silence Between Locators: This command creates a gap of empty space between the two locators. Any regions between the locators move to the right of the right locator. The key command for this is Control+Command+Z.
Insert Silence Between Locators: This command creates a gap of empty space between the two locators. Any regions between the locators move to the right of the right locator. The key command for this is Control+Command+Z.
![]() Repeat Section Between Locators: This command takes all selected regions inside the locators and any sections of any selected regions inside the locators and copies them to the right of the right locator. The key command for this is Control+Command+R.
Repeat Section Between Locators: This command takes all selected regions inside the locators and any sections of any selected regions inside the locators and copies them to the right of the right locator. The key command for this is Control+Command+R.
![]() Tempo: The Tempo submenu contains a number of commands for performing tempo-related operations. It is covered in detail in Chapter 13, “Advanced Tempo Operations.”
Tempo: The Tempo submenu contains a number of commands for performing tempo-related operations. It is covered in detail in Chapter 13, “Advanced Tempo Operations.”
![]() Open In: If you have configured Logic to use an external sample editor, this command lets you open audio regions in that editor from Logic. Configuring Logic to use an external sample editor is covered in the next chapter.
Open In: If you have configured Logic to use an external sample editor, this command lets you open audio regions in that editor from Logic. Configuring Logic to use an external sample editor is covered in the next chapter.
![]() Snap Edits to Zero Crossings: This command sets a preference to search selected audio regions for points at which the amplitude of the audio wave crosses the zero line. Any subsequent attempts to edit the length of an audio region will be restricted to zero crossings. This is useful in matching up audio edits.
Snap Edits to Zero Crossings: This command sets a preference to search selected audio regions for points at which the amplitude of the audio wave crosses the zero line. Any subsequent attempts to edit the length of an audio region will be restricted to zero crossings. This is useful in matching up audio edits.
The Select Submenu
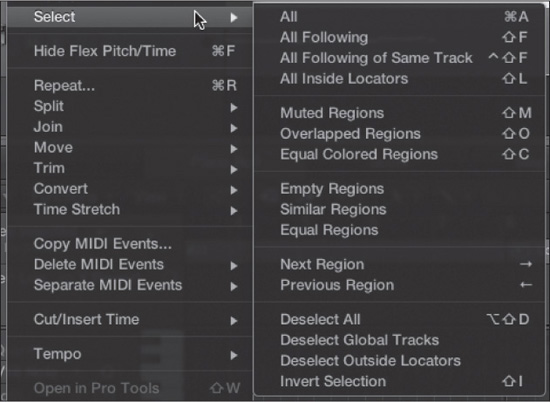
The Select submenu, shown in Figure 6.13, contains numerous commands for selecting regions and events in the Tracks area.
Figure 6.13 The Select submenu.
© Apple Inc.
The Select submenu commands are as follows:
![]() All: This command selects all regions on every track lane. The key command is Command+A.
All: This command selects all regions on every track lane. The key command is Command+A.
![]() All Following: If you select a region in the Tracks area, this command selects all other regions on every track lane beyond the selected region. This command does not select any region whose starting point comes before your originally selected region, even if the end of the region extends to (or past) the selected region. The key command is Shift+F.
All Following: If you select a region in the Tracks area, this command selects all other regions on every track lane beyond the selected region. This command does not select any region whose starting point comes before your originally selected region, even if the end of the region extends to (or past) the selected region. The key command is Shift+F.
![]() All Following of Same Track: If you select a region in the Tracks area, this command selects all other regions beyond the selected region on the same track lane. This command does not select any region whose starting point comes before your originally selected region, even if the end of those regions extends to (or past) the selected region. The key command is Option+Shift+F.
All Following of Same Track: If you select a region in the Tracks area, this command selects all other regions beyond the selected region on the same track lane. This command does not select any region whose starting point comes before your originally selected region, even if the end of those regions extends to (or past) the selected region. The key command is Option+Shift+F.
![]() All Inside Locators: This command selects all regions that are between the left and right locators. The key command is Shift+L.
All Inside Locators: This command selects all regions that are between the left and right locators. The key command is Shift+L.
![]() Muted Regions: You can use this command to select all the regions that you have previously muted in the Tracks area. The key command is Shift+M.
Muted Regions: You can use this command to select all the regions that you have previously muted in the Tracks area. The key command is Shift+M.
![]() Overlapped Regions: This command selects every region that is overlapping (or overlapped by) another region.
Overlapped Regions: This command selects every region that is overlapping (or overlapped by) another region.
![]() Equal Colored Regions: If you are using color to organize your tracks in the Tracks area, this command will select all the regions that have the same color. The key command is Shift+C.
Equal Colored Regions: If you are using color to organize your tracks in the Tracks area, this command will select all the regions that have the same color. The key command is Shift+C.
![]() Empty Regions: If you have regions that do not contain any data, this command selects them. Because empty regions typically don’t serve much purpose, this command is often used in tandem with Delete (or the Delete key) to remove unnecessary regions from the main window.
Empty Regions: If you have regions that do not contain any data, this command selects them. Because empty regions typically don’t serve much purpose, this command is often used in tandem with Delete (or the Delete key) to remove unnecessary regions from the main window.
![]() Similar Regions: If you select a region, this command selects regions that process the same type of MIDI data as the one you have selected.
Similar Regions: If you select a region, this command selects regions that process the same type of MIDI data as the one you have selected.
![]() Equal Regions: If you select a region, this command selects regions identical to the region you have selected. For example, if you have copied and pasted a region a number of times, this will select each of the copied regions.
Equal Regions: If you select a region, this command selects regions identical to the region you have selected. For example, if you have copied and pasted a region a number of times, this will select each of the copied regions.
![]() Next Region: This command selects the region to the right of the selected region on the selected track. The key command for this is right arrow.
Next Region: This command selects the region to the right of the selected region on the selected track. The key command for this is right arrow.
![]() Previous Region: This command selects the region to the left of the selected region on the selected track. The key command for this is left arrow.
Previous Region: This command selects the region to the left of the selected region on the selected track. The key command for this is left arrow.
![]() Deselect All: Any selected regions will be deselected with this command. The key command is Option+Shift+D.
Deselect All: Any selected regions will be deselected with this command. The key command is Option+Shift+D.
![]() Deselect Global Tracks: This command will deselect any global tracks and/or global events on global tracks that have been selected.
Deselect Global Tracks: This command will deselect any global tracks and/or global events on global tracks that have been selected.
![]() Deselect Outside Locators: When you select this command, any regions you’ve previously selected outside the left and right locators will be deselected. Regions between the two locators will be unaffected.
Deselect Outside Locators: When you select this command, any regions you’ve previously selected outside the left and right locators will be deselected. Regions between the two locators will be unaffected.
![]() Invert Selection: This powerful command toggles the selection status of regions in the Tracks area. In other words, if you currently have four regions selected, this command deselects those four regions and selects every other region in the Tracks area. The key command is Shift+I.
Invert Selection: This powerful command toggles the selection status of regions in the Tracks area. In other words, if you currently have four regions selected, this command deselects those four regions and selects every other region in the Tracks area. The key command is Shift+I.
The Move Submenu
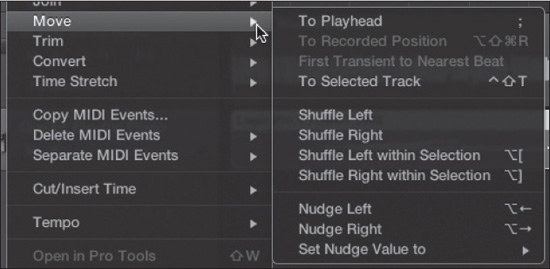
The Move submenu offers a number of commands for moving regions in the Tracks area. Figure 6.14 shows the Move submenu.
© Apple Inc.
The Move submenu commands are as follows:
![]() To Playhead: This command moves the selected regions to the current playhead position. The region(s) farthest to the left will be placed at the location of the playhead, and any regions beginning after the left-most regions will be placed at their same relative positions. The key command for this is; (semicolon).
To Playhead: This command moves the selected regions to the current playhead position. The region(s) farthest to the left will be placed at the location of the playhead, and any regions beginning after the left-most regions will be placed at their same relative positions. The key command for this is; (semicolon).
![]() To Recorded Position: This command returns a region that has been moved to the position in the Bar ruler where it was originally recorded. The key command for this is Option+Shift+Command+R.
To Recorded Position: This command returns a region that has been moved to the position in the Bar ruler where it was originally recorded. The key command for this is Option+Shift+Command+R.
![]() First Transient to Nearest Beat: This command moves the first transient of the selected region to the nearest beat.
First Transient to Nearest Beat: This command moves the first transient of the selected region to the nearest beat.
![]() To Selected Track: This command moves any selected regions to the selected track. The key command for this is Control+Shift+T.
To Selected Track: This command moves any selected regions to the selected track. The key command for this is Control+Shift+T.
![]() Shuffle Left: This command moves the selected regions left to close any gaps between them and the regions to their right.
Shuffle Left: This command moves the selected regions left to close any gaps between them and the regions to their right.
![]() Shuffle Right: This command moves the selected regions right to close any gaps between them and the regions to their left.
Shuffle Right: This command moves the selected regions right to close any gaps between them and the regions to their left.
![]() Shuffle Left Within Selection: This command moves the selected regions left to close any gaps between them and the regions to their right. The key command for this is Option+[ (left bracket).
Shuffle Left Within Selection: This command moves the selected regions left to close any gaps between them and the regions to their right. The key command for this is Option+[ (left bracket).
![]() Shuffle Right Within Selection: This command moves the selected regions right to close any gaps between them and the regions to their left. The key command for this is Option+] (right bracket).
Shuffle Right Within Selection: This command moves the selected regions right to close any gaps between them and the regions to their left. The key command for this is Option+] (right bracket).
![]() Nudge Left: The Nudge Left command moves selected regions left by the amount defined in the Set Nudge Value To submenu, covered after the Nudge Right command. The key command for Nudge Left is Option+left arrow. Note that this is also a system-wide key command; as of this writing (which covers Logic 10.0.4), you will need to either deactivate the key command in the Keyboard Shortcuts tab in the Keyboard pane of the System Preferences window or reassign the key command in the Key Commands window. Hopefully this gets fixed in a future Logic update.
Nudge Left: The Nudge Left command moves selected regions left by the amount defined in the Set Nudge Value To submenu, covered after the Nudge Right command. The key command for Nudge Left is Option+left arrow. Note that this is also a system-wide key command; as of this writing (which covers Logic 10.0.4), you will need to either deactivate the key command in the Keyboard Shortcuts tab in the Keyboard pane of the System Preferences window or reassign the key command in the Key Commands window. Hopefully this gets fixed in a future Logic update.
![]() Nudge Right: The Nudge Right command moves selected regions right by the amount defined in the Set Nudge Value To submenu. The key command for this is Option+right arrow. Note that, like Nudge Left, this is also a system-wide key command, so as of this writing (which covers Logic 10.0.4), you will need to either deactivate the key command in the System Preferences window or reassign the key command in the Key Commands window. Hopefully this gets fixed in a future Logic update.
Nudge Right: The Nudge Right command moves selected regions right by the amount defined in the Set Nudge Value To submenu. The key command for this is Option+right arrow. Note that, like Nudge Left, this is also a system-wide key command, so as of this writing (which covers Logic 10.0.4), you will need to either deactivate the key command in the System Preferences window or reassign the key command in the Key Commands window. Hopefully this gets fixed in a future Logic update.
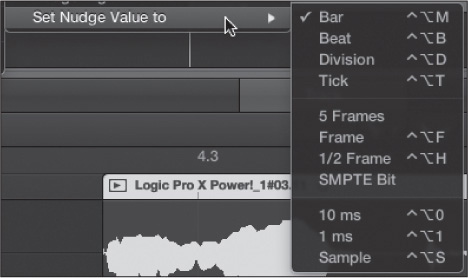
![]() Set Nudge Value To: This submenu lets you define the nudge value used by the Nudge Left and Nudge Right commands. You can use this submenu to set the nudge value by bar (Control+Option+M), beat (Control+Option+B), division (as defined in the Division field of the Custom LCD display) (Control+Option+D), tick (Control+Option+T), five frames (a SMPTE nudge value), one frame (Control+Option+F), a half frame (Control+Option+H), SMPTE bit, 10 ms (Control+Option+0), 1 ms (Control+T), or sample (Control+Option+S). Figure 6.15 shows the Set Nudge Value To submenu.
Set Nudge Value To: This submenu lets you define the nudge value used by the Nudge Left and Nudge Right commands. You can use this submenu to set the nudge value by bar (Control+Option+M), beat (Control+Option+B), division (as defined in the Division field of the Custom LCD display) (Control+Option+D), tick (Control+Option+T), five frames (a SMPTE nudge value), one frame (Control+Option+F), a half frame (Control+Option+H), SMPTE bit, 10 ms (Control+Option+0), 1 ms (Control+T), or sample (Control+Option+S). Figure 6.15 shows the Set Nudge Value To submenu.
Figure 6.15 The Set Nudge Value To submenu of the Move submenu.
© Apple Inc.
The Trim Submenu
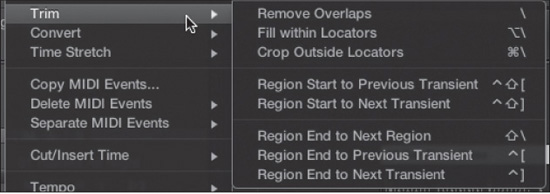
The Trim submenu, shown in Figure 6.16, includes a number of commands for trimming the size of regions.
© Apple Inc.
The Trim submenu commands are as follows:
![]() Remove Overlaps: If you have overlapping regions selected, this command shortens the length of the earlier region to stop at the beginning of the later region. The key command is (backslash).
Remove Overlaps: If you have overlapping regions selected, this command shortens the length of the earlier region to stop at the beginning of the later region. The key command is (backslash).
![]() Fill Within Locators: This command elongates all regions between the locators on the same track so there are no gaps between them. The key command is Option+ (backslash). When applied to regions on separate tracks, the regions will simply be extended to the locators.
Fill Within Locators: This command elongates all regions between the locators on the same track so there are no gaps between them. The key command is Option+ (backslash). When applied to regions on separate tracks, the regions will simply be extended to the locators.
![]() Crop Outside Locators: This command crops any part of a selected region that is outside the locators. The key command for this is Command+ (backslash).
Crop Outside Locators: This command crops any part of a selected region that is outside the locators. The key command for this is Command+ (backslash).
![]() Region Start to Previous Transient: This command extends the beginning of an audio region with analyzed or created transients to the previous transient within that region. This command will not extend an audio region beyond its beginning. The key command for this is Control+Shift+[ (left bracket).
Region Start to Previous Transient: This command extends the beginning of an audio region with analyzed or created transients to the previous transient within that region. This command will not extend an audio region beyond its beginning. The key command for this is Control+Shift+[ (left bracket).
![]() Region Start to Next Transient: This command shortens the beginning of an audio region with analyzed or created transients to the next transient within that region. The key command for this is Control+Shift+] (right bracket).
Region Start to Next Transient: This command shortens the beginning of an audio region with analyzed or created transients to the next transient within that region. The key command for this is Control+Shift+] (right bracket).
![]() Region End to Next Region: This command extends all selected regions so that they end at exactly the beginning of the subsequent region on the track. For audio regions, this works only if the audio file is long enough for the region to extend to the beginning of the subsequent region. The key command is Shift+ (backslash).
Region End to Next Region: This command extends all selected regions so that they end at exactly the beginning of the subsequent region on the track. For audio regions, this works only if the audio file is long enough for the region to extend to the beginning of the subsequent region. The key command is Shift+ (backslash).
![]() Region End to Previous Transient: This command shortens the end of an audio region with analyzed or created transients to the previous transient within that region. The key command for this is Control+[ (left bracket).
Region End to Previous Transient: This command shortens the end of an audio region with analyzed or created transients to the previous transient within that region. The key command for this is Control+[ (left bracket).
![]() Region End to Next Transient: This command lengthens the end of an audio region with analyzed or created transients to the next transient within that region. This command will not extend an audio region beyond its end. The key command for this is Control+] (right bracket).
Region End to Next Transient: This command lengthens the end of an audio region with analyzed or created transients to the next transient within that region. This command will not extend an audio region beyond its end. The key command for this is Control+] (right bracket).
The Time Stretching Algorithm Submenu
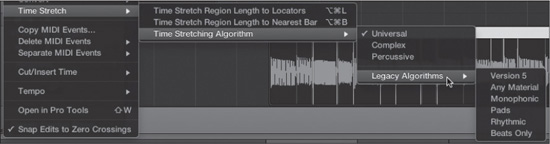
You can choose from several time stretching algorithms, each of which is optimized differently. Figure 6.17 shows the options available from the Time Stretching Algorithm submenu.
Figure 6.17 The Edit > Time Stretch > Time Stretching Algorithm submenu.
© Apple Inc.
You can select from the following algorithms:
![]() Universal: This algorithm is designed to supplant the Any Material algorithm. Most of your time stretching and compressing needs can be addressed with this setting.
Universal: This algorithm is designed to supplant the Any Material algorithm. Most of your time stretching and compressing needs can be addressed with this setting.
![]() Complex: This algorithm is designed to time stretch or compress particularly dense and complex material.
Complex: This algorithm is designed to time stretch or compress particularly dense and complex material.
![]() Percussive: This algorithm is designed to maintain the rhythmic integrity of your more percussive audio material when time stretching or compressing. Don’t let the name fool you; this algorithm works beautifully on percussive material played on harmony instruments as well as drums and other percussion instruments.
Percussive: This algorithm is designed to maintain the rhythmic integrity of your more percussive audio material when time stretching or compressing. Don’t let the name fool you; this algorithm works beautifully on percussive material played on harmony instruments as well as drums and other percussion instruments.
![]() Legacy Algorithms: The algorithms in this submenu come from earlier versions of Logic. The Legacy algorithms are as follows:
Legacy Algorithms: The algorithms in this submenu come from earlier versions of Logic. The Legacy algorithms are as follows:
![]() Version 5: This is the time stretching algorithm from Logic 5.
Version 5: This is the time stretching algorithm from Logic 5.
![]() Any Material: This algorithm gives high-quality results when stretching and compressing audio regions containing any variety of material.
Any Material: This algorithm gives high-quality results when stretching and compressing audio regions containing any variety of material.
![]() Monophonic: This algorithm is optimized for material that uses only a single voice (such as a single singer, wind instrument, mono synthesizer, and so on).
Monophonic: This algorithm is optimized for material that uses only a single voice (such as a single singer, wind instrument, mono synthesizer, and so on).
![]() Pads: This algorithm is optimized for polyphonic material, such as pads, choirs, and so on.
Pads: This algorithm is optimized for polyphonic material, such as pads, choirs, and so on.
![]() Rhythmic: This algorithm is optimized for instruments with dramatic rhythmic peaks, such as percussion, steel drums, pulsing rhythmic synths, and so on.
Rhythmic: This algorithm is optimized for instruments with dramatic rhythmic peaks, such as percussion, steel drums, pulsing rhythmic synths, and so on.
![]() Beats Only: This algorithm is for non-pitched material with strong rhythmic peaks, such as drums. You can use this algorithm to adjust the spaces between peaks, which produces excellent results on drums and such. However, the algorithm is often ineffective or unusable on melodic audio parts.
Beats Only: This algorithm is for non-pitched material with strong rhythmic peaks, such as drums. You can use this algorithm to adjust the spaces between peaks, which produces excellent results on drums and such. However, the algorithm is often ineffective or unusable on melodic audio parts.
One of the advantages of the way Logic implements its Time Machine is that third parties can release their own extremely high-quality time stretching algorithms that you can use within Logic. If you have any third-party algorithms installed, such as the iZotope Radius AU or Serato Pitch ’n Time LE AU, you will see their available algorithms in this menu, and you can use these algorithms seamlessly in the Time Machine. They will also be available to you in the Time and Pitch Machine in the Audio File editor.
At this time, there are other high-quality algorithms being developed by other companies as well, so be sure to do some research as to the current state of the art if you are looking for some professional time stretching algorithms. Finally, make sure that whatever third-party AU you purchase offers 64-bit compatibility.
The Functions Menu
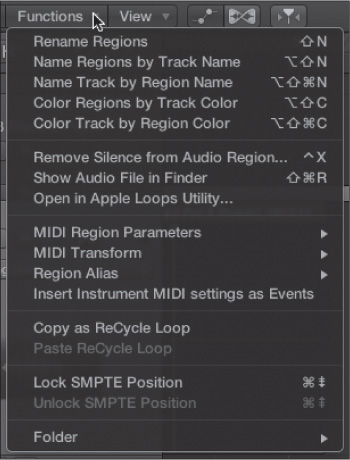
The Functions menu options primarily deal with different ways of handling properties of regions, such as region names, colors, and the contents of the regions. Figure 6.18 shows the Functions menu.
Figure 6.18 The Tracks area Functions menu.
© Apple Inc.
The Functions menu options are as follows:
![]() Rename Regions: This command opens a text box in the selected region’s header, allowing you to rename the selected region. The key command for this is Shift+N.
Rename Regions: This command opens a text box in the selected region’s header, allowing you to rename the selected region. The key command for this is Shift+N.
![]() Name Regions by Track Name: When you select a track and then use this command, all of the regions on that track will be given the name of the track. The key command is Option+Shift+N.
Name Regions by Track Name: When you select a track and then use this command, all of the regions on that track will be given the name of the track. The key command is Option+Shift+N.
![]() Name Track by Region Name: When you select a region and then use this command, the track will be given the name of the selected region. The key command is Option+Shift+Command+N.
Name Track by Region Name: When you select a region and then use this command, the track will be given the name of the selected region. The key command is Option+Shift+Command+N.
![]() Color Regions by Track Color: When you select a track and then use this command, all of the regions on that track will be given the same color as the track. The key command is Option+Shift+C.
Color Regions by Track Color: When you select a track and then use this command, all of the regions on that track will be given the same color as the track. The key command is Option+Shift+C.
![]() Color Track by Region Color: When you select a region and then use this command, the track will be given the same color as the selected region. The key command is Option+Shift+Command+C.
Color Track by Region Color: When you select a region and then use this command, the track will be given the same color as the selected region. The key command is Option+Shift+Command+C.
![]() Remove Silence from Audio Region: When you select an audio region, you can choose this command, also known as Strip Silence, to scan the audio region for points in which the audio material is below a threshold you define, and then create a number of new audio regions out of those regions above the threshold. This command is extremely useful for removing any pauses in a recording. This command is covered in more detail in Chapter 7, “Working with Audio and Apple Loops.” The key command is Control+X.
Remove Silence from Audio Region: When you select an audio region, you can choose this command, also known as Strip Silence, to scan the audio region for points in which the audio material is below a threshold you define, and then create a number of new audio regions out of those regions above the threshold. This command is extremely useful for removing any pauses in a recording. This command is covered in more detail in Chapter 7, “Working with Audio and Apple Loops.” The key command is Control+X.
![]() Show Audio File in Finder: This command opens a Finder window showing you the actual file on your hard drive referenced by the selected audio region. The key command is Shift+Command+R.
Show Audio File in Finder: This command opens a Finder window showing you the actual file on your hard drive referenced by the selected audio region. The key command is Shift+Command+R.
![]() Open in Apple Loops Utility: This command opens the Open Audio File in Apple Loops Utility dialog box, which lets you define the length in bars of the selected audio region before opening the Apple Loops Utility. This command is covered in detail in Chapter 7.
Open in Apple Loops Utility: This command opens the Open Audio File in Apple Loops Utility dialog box, which lets you define the length in bars of the selected audio region before opening the Apple Loops Utility. This command is covered in detail in Chapter 7.
![]() MIDI Region Parameters: This submenu contains a number of commands that relate to the parameters specific to MIDI regions. The following are descriptions of the MIDI Region Parameters submenu’s options:
MIDI Region Parameters: This submenu contains a number of commands that relate to the parameters specific to MIDI regions. The following are descriptions of the MIDI Region Parameters submenu’s options:
![]() Apply Quantization Permanently: This command permanently applies the playback quantize value assigned to the MIDI region in its Inspector. The key command is Control+Q.
Apply Quantization Permanently: This command permanently applies the playback quantize value assigned to the MIDI region in its Inspector. The key command is Control+Q.
![]() Apply All Parameters Permanently: This command permanently adjusts the values in the Inspector of a MIDI region. The key command is Control+N.
Apply All Parameters Permanently: This command permanently adjusts the values in the Inspector of a MIDI region. The key command is Control+N.
![]() Apply All Except Channel: This command permanently adjusts the values in the Inspector of a MIDI region except the MIDI channel value setting.
Apply All Except Channel: This command permanently adjusts the values in the Inspector of a MIDI region except the MIDI channel value setting.
![]() Apply All Except Channel and Delay: This command permanently adjusts the values in the Inspector of a MIDI region except the MIDI channel or the MIDI delay settings.
Apply All Except Channel and Delay: This command permanently adjusts the values in the Inspector of a MIDI region except the MIDI channel or the MIDI delay settings.
![]() MIDI Transform: The MIDI Transform submenu offers shortcuts to the functions in the MIDI Transform window. Selecting one of the options in the MIDI Transform submenu opens the MIDI Transform window, with the selected MIDI Transform process ready to be used. The MIDI Transform window is covered in Chapter 8, “Working with MIDI.”
MIDI Transform: The MIDI Transform submenu offers shortcuts to the functions in the MIDI Transform window. Selecting one of the options in the MIDI Transform submenu opens the MIDI Transform window, with the selected MIDI Transform process ready to be used. The MIDI Transform window is covered in Chapter 8, “Working with MIDI.”
![]() Region Alias: The Region Alias submenu is covered in the next section.
Region Alias: The Region Alias submenu is covered in the next section.
![]() Insert Instrument MIDI Settings as Events: When you select a MIDI track, choosing the Insert Instrument MIDI Settings as Events command creates MIDI events for program, volume, and pan if they are selected in the Track Inspector and places those events in the track.
Insert Instrument MIDI Settings as Events: When you select a MIDI track, choosing the Insert Instrument MIDI Settings as Events command creates MIDI events for program, volume, and pan if they are selected in the Track Inspector and places those events in the track.
![]() Copy as ReCycle Loop: If you want to copy audio in your Tracks area for use in Propellerhead’s ReCycle, you can select the audio files and copy them to the Clipboard using this command.
Copy as ReCycle Loop: If you want to copy audio in your Tracks area for use in Propellerhead’s ReCycle, you can select the audio files and copy them to the Clipboard using this command.
![]() Paste ReCycle Loop: If you have copied a REX or REX2 loop to the Clipboard, you can paste it at the current playhead position using this command.
Paste ReCycle Loop: If you have copied a REX or REX2 loop to the Clipboard, you can paste it at the current playhead position using this command.
![]() Lock SMPTE Position: This command locks any selected region to its SMPTE position. That way, any changes in bar length, tempo, meter, and so on will not affect those regions’ time positions, even as their bar location changes. The key command is Command+Page Down.
Lock SMPTE Position: This command locks any selected region to its SMPTE position. That way, any changes in bar length, tempo, meter, and so on will not affect those regions’ time positions, even as their bar location changes. The key command is Command+Page Down.
![]() Unlock SMPTE Position: This command unlocks the selected regions from their SMPTE position. At this point, these regions are tied to their bar position, like every other region. The key command is Command+Page Up.
Unlock SMPTE Position: This command unlocks the selected regions from their SMPTE position. At this point, these regions are tied to their bar position, like every other region. The key command is Command+Page Up.
![]() Folder: The Folder submenu is covered in the upcoming section “The Folder Submenu.”
Folder: The Folder submenu is covered in the upcoming section “The Folder Submenu.”
The Region Alias Submenu
Aliases are regions that do not themselves contain data, but are pointers to other regions that contain data. This submenu offers a selection of commands relating to the creation and selection of aliases. Figure 6.19 shows this submenu.
Figure 6.19 The Region Alias submenu of the Functions menu.

© Apple Inc.
An explanation of the commands in the Alias submenu follows:
![]() Make Alias: This command makes an alias of the selected region.
Make Alias: This command makes an alias of the selected region.
![]() Re-Assign Alias: If you select an alias and the desired region to which you wish to reassign that alias, choosing this command will reassign the selected alias to point to the selected region instead of the initial region to which the alias pointed.
Re-Assign Alias: If you select an alias and the desired region to which you wish to reassign that alias, choosing this command will reassign the selected alias to point to the selected region instead of the initial region to which the alias pointed.
![]() Convert Alias to a Copy: This command turns an alias into a real copy of the original region. In other words, it will now contain data identical to that of the original region and not simply a pointer to the original region. The benefit of this command is that you can then edit events in the new region copy or the region as a whole. The key command is Control+A.
Convert Alias to a Copy: This command turns an alias into a real copy of the original region. In other words, it will now contain data identical to that of the original region and not simply a pointer to the original region. The benefit of this command is that you can then edit events in the new region copy or the region as a whole. The key command is Control+A.
![]() Select Original Region: If you select an alias and then choose this command, the original region to which the alias is pointing will be selected as well.
Select Original Region: If you select an alias and then choose this command, the original region to which the alias is pointing will be selected as well.
![]() Select Aliases of Region: If you select a region and choose this command, all the aliases of the original region will be selected as well. The key command is Shift+A.
Select Aliases of Region: If you select a region and choose this command, all the aliases of the original region will be selected as well. The key command is Shift+A.
![]() Select Orphan Aliases: If you have unassigned aliases in your Tracks area because you deleted the original region to which they pointed, this command selects those aliases. The key command is Option+Shift+A.
Select Orphan Aliases: If you have unassigned aliases in your Tracks area because you deleted the original region to which they pointed, this command selects those aliases. The key command is Option+Shift+A.
![]() Delete Orphan Aliases: This command deletes all aliases that point to deleted regions.
Delete Orphan Aliases: This command deletes all aliases that point to deleted regions.
The Folder Submenu
Logic Pro uses two different kinds of folders. Folder tracks are tracks that use folders as containers for the data of one or more other tracks. They allow you to organize tracks into their own little Tracks area groups and move and edit the entire group on a single track. For example, you could keep your “main” Tracks area organized by creating folder tracks for all your drum loops, synth lines, backup vocals, and so on. I will explain folder tracks in more depth later in this chapter.
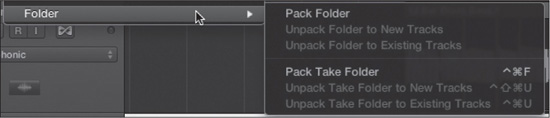
Folders are also used for recording takes. Takes are multiple recordings of the same section of a project on the same track. Take recording and take folders were covered in Chapter 5, “Transport Controls and Recording.” The Folder submenu, shown in Figure 6.20, contains commands that operate on folder tracks and take folders.
Figure 6.20 The Folder submenu of the Functions local menu.
© Apple Inc.
The commands in the Folder submenu are as follows:
![]() Pack Folder: This command combines all the selected tracks into a single folder track.
Pack Folder: This command combines all the selected tracks into a single folder track.
![]() Unpack Folder to New Tracks: When you select a folder track, this command removes each track from the folder and creates a new track in your Track list for each track in the folder.
Unpack Folder to New Tracks: When you select a folder track, this command removes each track from the folder and creates a new track in your Track list for each track in the folder.
![]() Unpack Folder to Existing Tracks: This command also removes each track from the selected folder. If you do not have any existing tracks in your Tracks area that match the folder track, it creates new tracks. If empty tracks already exist that match the name of the folder track, it places the contents of each track on the matching empty track.
Unpack Folder to Existing Tracks: This command also removes each track from the selected folder. If you do not have any existing tracks in your Tracks area that match the folder track, it creates new tracks. If empty tracks already exist that match the name of the folder track, it places the contents of each track on the matching empty track.
![]() Pack Take Folder: This command places all selected regions in a new take folder. Take folders were covered in more detail in Chapter 5. The key command for this is Control+Command+F.
Pack Take Folder: This command places all selected regions in a new take folder. Take folders were covered in more detail in Chapter 5. The key command for this is Control+Command+F.
![]() Unpack Take Folder to New Tracks: This command unpacks a take folder to new tracks, all with their own channel strips but with the original track’s channel strip setting. The key command for this is Control+Shift+Command+U.
Unpack Take Folder to New Tracks: This command unpacks a take folder to new tracks, all with their own channel strips but with the original track’s channel strip setting. The key command for this is Control+Shift+Command+U.
![]() Unpack Take Folder to Existing Tracks: This command also removes each take from the selected take folder. The takes will be placed on new tracks assigned to the parent track’s channel strip. The key command for this is Control+Command+U.
Unpack Take Folder to Existing Tracks: This command also removes each take from the selected take folder. The takes will be placed on new tracks assigned to the parent track’s channel strip. The key command for this is Control+Command+U.
The View Menu
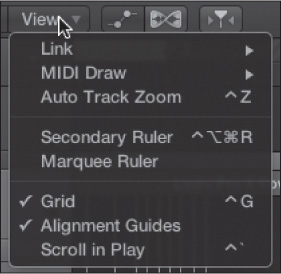
The View menu is loaded with options you can use to specify what you will see in your Tracks area. Most of these options simply allow you to select or deselect various items to determine whether they will appear in your Tracks area. Figure 6.21 shows all the various items that you can choose to view or not to view in the Tracks area.
Figure 6.21 Use the main window’s View menu to select which items you will view in your Tracks area.
© Apple Inc.
Because these items are simply selected or deselected and are described individually later in this chapter and in other chapters, this menu doesn’t call for a definition of options here. The main thing to remember about the View menu is that when you need to toggle the view of any feature of the Tracks area, you use this local menu.
The Tracks Area Tool Menu
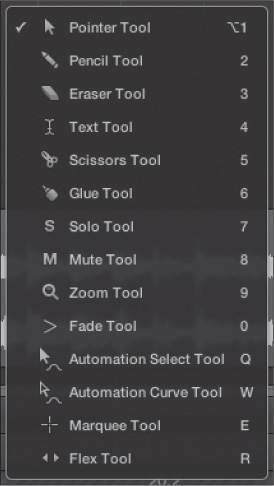
The Tracks area Tool menu contains a collection of tools for use in the Tracks area. Each of these tools has a different function when graphically manipulating and editing regions. In addition to the Tool menu in the local menu bar, you can press T to create a floating Tool menu at the current cursor position. Alternatively, you can right-click with your mouse if you have set right-click to open the Tool menu in the Editing tab of the General Preferences window, which you open by choosing Logic Pro > Preferences > General. When you open the Tool menu, you can access any of the tools either with the mouse or with the key command listed next to each tool. These key commands are listed here. Note that they work only when the Tool menu is open. Note that selecting a tool via key command or with the cursor closes the Tool menu. Figure 6.22 shows the Tool menu.
Figure 6.22 The Tool menu in the Tracks area. Each window and editor contains its own set of tools.
© Apple Inc.
Brief descriptions of each tool follow, from top to bottom:
![]() Pointer: This tool looks like an arrow pointing up and to the left. The Pointer tool should be familiar from most other computer applications and is the default tool in Logic. You can use it to select regions by clicking on one or more regions or dragging over a group of regions to create a “rubber band” or “lasso” that will select them all. The key command is T.
Pointer: This tool looks like an arrow pointing up and to the left. The Pointer tool should be familiar from most other computer applications and is the default tool in Logic. You can use it to select regions by clicking on one or more regions or dragging over a group of regions to create a “rubber band” or “lasso” that will select them all. The key command is T.
![]() Pencil: The icon for this tool resembles a pencil. This tool is used to add or alter the length of regions. The key command is T, then 2.
Pencil: The icon for this tool resembles a pencil. This tool is used to add or alter the length of regions. The key command is T, then 2.
![]() Eraser: This tool looks like an eraser. It is used to remove (erase) any regions you have selected from the Tracks area. The key command is T, then 3.
Eraser: This tool looks like an eraser. It is used to remove (erase) any regions you have selected from the Tracks area. The key command is T, then 3.
![]() Text: This tool looks like a text-entry cursor. It is used to name regions. The key command is T, then 4.
Text: This tool looks like a text-entry cursor. It is used to name regions. The key command is T, then 4.
![]() Scissors: The Scissors tool conveniently looks like a pair of scissors. It is used to split regions. You can hold the Option key down while splitting regions to divide the entire region into multiple equally spaced regions the same length as your initial split. The key command is T, then 5.
Scissors: The Scissors tool conveniently looks like a pair of scissors. It is used to split regions. You can hold the Option key down while splitting regions to divide the entire region into multiple equally spaced regions the same length as your initial split. The key command is T, then 5.
![]() Glue: This tool looks like a tube of glue. It is used to join selected regions into one single region, which is given the name and track position of the initial region. When the Glue tool is used to glue audio regions that were not originally next to each other, Logic will need to create a new audio file. The key command is T, then 6.
Glue: This tool looks like a tube of glue. It is used to join selected regions into one single region, which is given the name and track position of the initial region. When the Glue tool is used to glue audio regions that were not originally next to each other, Logic will need to create a new audio file. The key command is T, then 6.
![]() Solo: The Solo tool is represented by the letter S. This tool solos any selected regions. The key command is T, then 7.
Solo: The Solo tool is represented by the letter S. This tool solos any selected regions. The key command is T, then 7.
![]() Mute: The Mute tool is represented by the letter M. This tool mutes any selected regions. The key command is 8.
Mute: The Mute tool is represented by the letter M. This tool mutes any selected regions. The key command is 8.
![]() Zoom: This tool resembles a magnifying glass. When you use this tool to select an area containing regions, Logic zooms in on that area. The key command is 9.
Zoom: This tool resembles a magnifying glass. When you use this tool to select an area containing regions, Logic zooms in on that area. The key command is 9.
![]() Fade: This tool looks like a greater-than symbol (>). This tool, when dragged over two adjacent audio regions, creates a crossfade between them. It can also create fade-ins and fade-outs. See the next chapter for an explanation of crossfades. The key command is 0.
Fade: This tool looks like a greater-than symbol (>). This tool, when dragged over two adjacent audio regions, creates a crossfade between them. It can also create fade-ins and fade-outs. See the next chapter for an explanation of crossfades. The key command is 0.
![]() Automation Select: The Automation Select tool resembles a bent arrow with a solid arrowhead, pointing up and to the left. The Automation Select tool can select automation data in the automation lane. Chapter 10, “Using Automation in Logic,” discusses automation and the Automation Select tool in depth. The key command is Q.
Automation Select: The Automation Select tool resembles a bent arrow with a solid arrowhead, pointing up and to the left. The Automation Select tool can select automation data in the automation lane. Chapter 10, “Using Automation in Logic,” discusses automation and the Automation Select tool in depth. The key command is Q.
![]() Automation Curve: The Automation Curve tool resembles a bent arrow with an open arrowhead, pointing up and to the left. The Automation Curve tool can create curves between two automation nodes. Chapter 10 discusses automation and the Automation Curve tool in depth. The key command is W.
Automation Curve: The Automation Curve tool resembles a bent arrow with an open arrowhead, pointing up and to the left. The Automation Curve tool can create curves between two automation nodes. Chapter 10 discusses automation and the Automation Curve tool in depth. The key command is W.
![]() Marquee: This tool looks like a crosshair. The Marquee tool is a unique and powerful tool, as you’ll see later in this chapter. Briefly, the Marquee tool is not limited to selecting entire regions, but can make selections within regions for subsequent editing. (The name marquee was adopted from graphics applications, in which some selection boxes featured moving, broken selection lines that often resembled an old theater marquee with rotating lights.) The key command is E.
Marquee: This tool looks like a crosshair. The Marquee tool is a unique and powerful tool, as you’ll see later in this chapter. Briefly, the Marquee tool is not limited to selecting entire regions, but can make selections within regions for subsequent editing. (The name marquee was adopted from graphics applications, in which some selection boxes featured moving, broken selection lines that often resembled an old theater marquee with rotating lights.) The key command is E.
![]() Flex: The Flex tool allows you to perform some Flex Time edits when Logic is not in Flex view. The Flex tool is covered in the section “Using the Flex Tool” later in this chapter. The key command is R.
Flex: The Flex tool allows you to perform some Flex Time edits when Logic is not in Flex view. The Flex tool is covered in the section “Using the Flex Tool” later in this chapter. The key command is R.
Tip: Different windows and editors in Logic offer different selections of tools. That means the key commands you can use once a Tool menu is open change throughout Logic. Logic offers key commands to accomplish the function of many of these tools and offers key commands that enable you to select tools without having to use the Tool menu. For example, the Scissors tool is used in numerous editors. If you use the Scissors tool frequently, assigning a key command to directly access the Scissors tool can speed up your workflow. If you want to be as fast with Logic as possible, be sure to assign and use those direct key commands!
Global Menu Commands for the Main Window
In earlier versions of Logic, there were many more commands tucked in more local menus in the Arrange window. With Logic Pro X and the reorganization and renaming of so many different elements, including the Arrange window becoming the main window, more commands useful in the main window were moved up to new global menus. The global Track, Navigate, and View menus contain several commands for working with the main window and Tracks area. First, the Track menu.
The Track Menu
The Track menu contains commands for creating, sorting, and working with tracks. Figure 6.23 shows the Track menu.

© Apple Inc.
Several of these commands have been covered previously in other chapters. The remaining Track menu commands are as follows:
![]() Other: The Other submenu has a couple commands not previously covered:
Other: The Other submenu has a couple commands not previously covered:
![]() New Track for Overlapped Regions: If you select a number of regions on a track lane that overlap, this command creates one new track for each region.
New Track for Overlapped Regions: If you select a number of regions on a track lane that overlap, this command creates one new track for each region.
![]() New Track for Selected Regions: Similar to the New Track for Overlapped Regions command, this command creates a new track for each region you have selected. This command does not require regions to be overlapping.
New Track for Selected Regions: Similar to the New Track for Overlapped Regions command, this command creates a new track for each region you have selected. This command does not require regions to be overlapping.
![]() Rename Track: This command opens a text box in the selected track’s track header, allowing you to rename the track. The key command is Shift+Return.
Rename Track: This command opens a text box in the selected track’s track header, allowing you to rename the track. The key command is Shift+Return.
![]() Delete Track: This command deletes the selected track. The key command is Command+Delete. If nothing else is selected, you can also just press Delete.
Delete Track: This command deletes the selected track. The key command is Command+Delete. If nothing else is selected, you can also just press Delete.
![]() Delete Unused Tracks: This command deletes any tracks with no regions. The key command is Shift+Command+Delete.
Delete Unused Tracks: This command deletes any tracks with no regions. The key command is Shift+Command+Delete.
![]() Create Track Stack: This command lets you create a Track Stack. A Track Stack is a combination of different tracks under the authority of a single main track that can be used for basic volume, mute, and solo control over a group of tracks, or as a collection of tracks all routed through the same Summing Track. Track Stacks are covered in detail later in this chapter in the section “Track Stacks.” The key command for this is Shift+Command+D.
Create Track Stack: This command lets you create a Track Stack. A Track Stack is a combination of different tracks under the authority of a single main track that can be used for basic volume, mute, and solo control over a group of tracks, or as a collection of tracks all routed through the same Summing Track. Track Stacks are covered in detail later in this chapter in the section “Track Stacks.” The key command for this is Shift+Command+D.
![]() Flatten Track Stack: Knowing about flattening take folders makes this command easier to understand without knowing much about Track Stacks. This is the command you use to “un-stack” a Track Stack, or free all the tracks in the selected Track Stack from their main track. This command also deletes the Track Stack’s main track. The key command is Shift+Command+U.
Flatten Track Stack: Knowing about flattening take folders makes this command easier to understand without knowing much about Track Stacks. This is the command you use to “un-stack” a Track Stack, or free all the tracks in the selected Track Stack from their main track. This command also deletes the Track Stack’s main track. The key command is Shift+Command+U.
![]() Show Master Track: This command shows the master track at the bottom of your track list. The master track contains no regions. It can be used to automate the main output channel strip in a mono or stereo project, or the master channel strip in a surround project. The key command for this is Shift+Command+M.
Show Master Track: This command shows the master track at the bottom of your track list. The master track contains no regions. It can be used to automate the main output channel strip in a mono or stereo project, or the master channel strip in a surround project. The key command for this is Shift+Command+M.
![]() Replace or Double Drum Track: This command lets you easily replace or double a drum track with sampled drum sounds. The Replace or Double Drum Track command is covered in the section “Replacing and Doubling Drum Tracks” section later in this chapter. The key command is Control+D.
Replace or Double Drum Track: This command lets you easily replace or double a drum track with sampled drum sounds. The Replace or Double Drum Track command is covered in the section “Replacing and Doubling Drum Tracks” section later in this chapter. The key command is Control+D.
![]() Convert Regions to New Sampler Track: This command lets you convert the selected region(s) to zones in an EXS24 instrument. The new EXS instrument will be loaded on a new software instrument track, which will contain a region with notes automatically placed to play back the converted regions at their original positions. This command is covered in more detail in the section “Converting Regions to Sampler Tracks” later in this chapter. The key command is Control+E.
Convert Regions to New Sampler Track: This command lets you convert the selected region(s) to zones in an EXS24 instrument. The new EXS instrument will be loaded on a new software instrument track, which will contain a region with notes automatically placed to play back the converted regions at their original positions. This command is covered in more detail in the section “Converting Regions to Sampler Tracks” later in this chapter. The key command is Control+E.
![]() Hide Track: This command engages the Hide button (H) in the selected track header. The key command is Control+H. Hidden tracks are covered in the section “Hide Tracks” later in this chapter.
Hide Track: This command engages the Hide button (H) in the selected track header. The key command is Control+H. Hidden tracks are covered in the section “Hide Tracks” later in this chapter.
![]() Unhide All Tracks: This command disengages the Hide button for all tracks.
Unhide All Tracks: This command disengages the Hide button for all tracks.
![]() Show Hidden Tracks: This command toggles tracks with their Hide buttons engaged show/hide status. The key command for this is H.
Show Hidden Tracks: This command toggles tracks with their Hide buttons engaged show/hide status. The key command for this is H.
![]() Sort Tracks By: This is a submenu of track-sorting options. The Sort Tracks By options are as follows:
Sort Tracks By: This is a submenu of track-sorting options. The Sort Tracks By options are as follows:
![]() MIDI Channel: If you choose this option, Logic sorts all the external MIDI and software instrument tracks in your Track list in order of their MIDI channel. Any aux channels in your Track list will also be sorted in order of the MIDI channel in their Track Inspector.
MIDI Channel: If you choose this option, Logic sorts all the external MIDI and software instrument tracks in your Track list in order of their MIDI channel. Any aux channels in your Track list will also be sorted in order of the MIDI channel in their Track Inspector.
![]() Audio Channel: This option sorts audio tracks by their audio channel. MIDI channels, which don’t have an audio channel, will be sorted to the top of your Track list.
Audio Channel: This option sorts audio tracks by their audio channel. MIDI channels, which don’t have an audio channel, will be sorted to the top of your Track list.
![]() Output Channel: This option sorts audio tracks by their output channel. Tracks assigned to the same output will be sorted alphabetically. MIDI channels, which don’t have an audio channel, will be sorted to the bottom of your Track list.
Output Channel: This option sorts audio tracks by their output channel. Tracks assigned to the same output will be sorted alphabetically. MIDI channels, which don’t have an audio channel, will be sorted to the bottom of your Track list.
![]() Instrument Name: This option sorts tracks alphabetically by instrument name.
Instrument Name: This option sorts tracks alphabetically by instrument name.
![]() Track Name: This option sorts tracks alphabetically by track name.
Track Name: This option sorts tracks alphabetically by track name.
![]() Used, Unused: This option sorts tracks into groups that have regions and that do not have regions.
Used, Unused: This option sorts tracks into groups that have regions and that do not have regions.
![]() Assign Track Color: This command opens the Color palette. Click a color to assign that color to the selected track.
Assign Track Color: This command opens the Color palette. Click a color to assign that color to the selected track.
![]() Configure Track Header: This command opens the Track Header Configuration window, which is covered in the section “Configuring the Track Header” later in this chapter.
Configure Track Header: This command opens the Track Header Configuration window, which is covered in the section “Configuring the Track Header” later in this chapter.
The Navigate Menu
You already saw some of the powerful commands offered by the Navigate menu in Chapter 4, “Global Elements of Logic,” and Chapter 5, “Transport Controls and Recording.” In addition to these, there are a few more to explore at this time. Figure 6.24 shows the Navigate menu.
Figure 6.24 The Navigate menu.
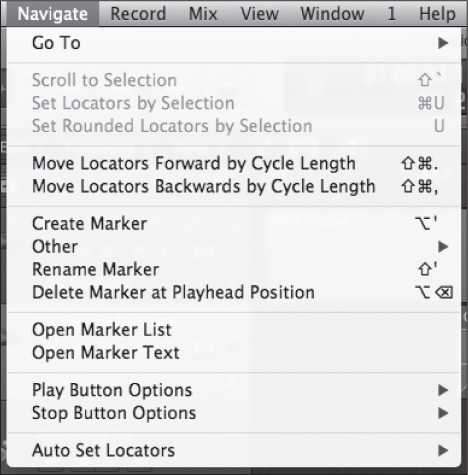
© Apple Inc.
The remaining Navigate menu commands are as follows:
![]() Go To: The Go To submenu is covered after this bulleted list.
Go To: The Go To submenu is covered after this bulleted list.
![]() Scroll to Selection: If you have selected a region that isn’t currently displayed in your Tracks area because you are at a different location in your project, this command will take you back to the location of the selected region. The key command is Shift+`.
Scroll to Selection: If you have selected a region that isn’t currently displayed in your Tracks area because you are at a different location in your project, this command will take you back to the location of the selected region. The key command is Shift+`.
![]() Set Locators by Selection: This command will set the locators by the beginning and end of the selected region(s). The key command for this is Command+U.
Set Locators by Selection: This command will set the locators by the beginning and end of the selected region(s). The key command for this is Command+U.
![]() Set Rounded Locators by Selection: This command sets each locator to the nearest bar before and after the selected region(s). The key command is U.
Set Rounded Locators by Selection: This command sets each locator to the nearest bar before and after the selected region(s). The key command is U.
![]() Move Locators Forward by Cycle Length: This command moves the locators forward across the Bar ruler by the current cycle length, with the new cycle region beginning at the end of the previous cycle region. The key command is Shift+Command+. (period).
Move Locators Forward by Cycle Length: This command moves the locators forward across the Bar ruler by the current cycle length, with the new cycle region beginning at the end of the previous cycle region. The key command is Shift+Command+. (period).
![]() Move Locators Backwards by Cycle Length: This command moves the locators backward across the Bar ruler by the current cycle length, with the new cycle region ending at the beginning of the previous cycle region. The key command is Shift+Command+, (comma).
Move Locators Backwards by Cycle Length: This command moves the locators backward across the Bar ruler by the current cycle length, with the new cycle region ending at the beginning of the previous cycle region. The key command is Shift+Command+, (comma).
![]() Auto Set Locators: The Auto Set Locators submenu offers a few methods for automatically setting the locators. If you want to automatically set locators, select the Enable Auto Set Locators option. Then select which of the three methods will be used to set the locators: By Marquee, By Region, and By Note Selection. As you can see in Figure 6.25, you can have all three selected at once. The most recent selection takes precedence. In other words, if you select a MIDI region, the locators will be set at the beginning and end of that region. If the region is open in a MIDI editor, like the Piano Roll editor, and you select some notes in the Piano Roll editor in the selected region, the rounded extent of those notes will become the current locators setting. If you then make a Marquee selection in the Tracks area of another region, the Marquee selection will define the locators. Note that By Notes is the only option that rounds the locators to the nearest bar before and after the notes selection.
Auto Set Locators: The Auto Set Locators submenu offers a few methods for automatically setting the locators. If you want to automatically set locators, select the Enable Auto Set Locators option. Then select which of the three methods will be used to set the locators: By Marquee, By Region, and By Note Selection. As you can see in Figure 6.25, you can have all three selected at once. The most recent selection takes precedence. In other words, if you select a MIDI region, the locators will be set at the beginning and end of that region. If the region is open in a MIDI editor, like the Piano Roll editor, and you select some notes in the Piano Roll editor in the selected region, the rounded extent of those notes will become the current locators setting. If you then make a Marquee selection in the Tracks area of another region, the Marquee selection will define the locators. Note that By Notes is the only option that rounds the locators to the nearest bar before and after the notes selection.
Figure 6.25 The Auto Set Locators submenu of the Navigate menu.

© Apple Inc.
The Go To submenu, partially covered in Chapter 4, gives you some commands for navigating your project to a direct location, via locators, selection boundaries, and, of course, markers. Figure 6.26 shows the Go To submenu.
Figure 6.26 The Go To submenu of the Navigate menu.
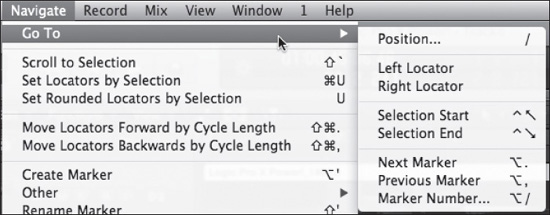
© Apple Inc.
The commands are pretty straightforward. The Left Locator command moves your position in the Tracks area to the left locator; the Right Locator command to the right locator. Selection Start (Function+Control+left arrow) takes you to the beginning of the current selection, Selection End (Function+Control+right arrow) takes you to the end of the current selection. The marker commands were covered in Chapter 4. That leaves the Position command. Selecting the Position command or pressing the key command / (forward slash) opens the Go To Position dialog box, shown in Figure 6.27.
Figure 6.27 The Go To Position dialog box lets you navigate your project by manually entering a location.
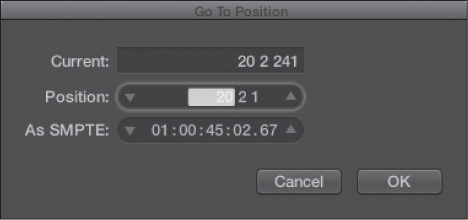
© Apple Inc.
The Go To Position dialog box displays your current position and offers a Position field in which you can enter a new position in bars|beats|divisions|ticks by using the up and down arrows at either end of the Position field, by dragging the values in the Position field, or by double-clicking in the field and entering a value manually. When entering a value manually, place a space, a period, or a comma between the bar, beat, division, and ticks numbers. The SMPTE field lets you enter a new position using SMPTE timecode in the same manners as the Position field.
The View Menu
The global View menu, shown in Figure 6.28, gives you control over what elements are displayed in the main window.
Figure 6.28 The global View menu.
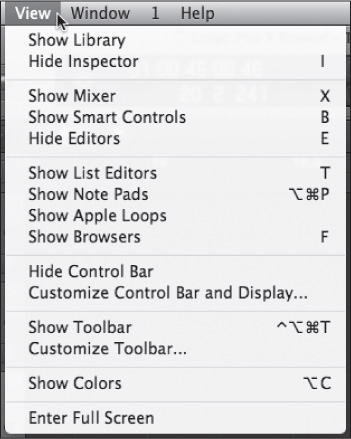
© Apple Inc.
The global View menu options are as follows:
![]() Show/Hide Library: This command toggles the display of the Library at the left side of the main window.
Show/Hide Library: This command toggles the display of the Library at the left side of the main window.
![]() Show/Hide Inspector: This command toggles the display of the Inspector pane at the left side of the main window. The key command is I.
Show/Hide Inspector: This command toggles the display of the Inspector pane at the left side of the main window. The key command is I.
![]() Show/Hide Mixer: This command toggles the display of the Mixer at the bottom of the main window.
Show/Hide Mixer: This command toggles the display of the Mixer at the bottom of the main window.
![]() Show/Hide Smart Controls: This command toggles the display of Smart Controls at the bottom of the main window. Smart Controls are covered in the section “Smart Controls” later in this chapter. The key command is B.
Show/Hide Smart Controls: This command toggles the display of Smart Controls at the bottom of the main window. Smart Controls are covered in the section “Smart Controls” later in this chapter. The key command is B.
![]() Show/Hide Editors: This command toggles the display of the editors at the bottom of the main window. If a MIDI region is selected, this command allows access to the Piano Roll, Score, and Step editors. If an audio region is selected, this command allows access to the Audio Track and Audio File editors. If a Drummer region is selected, this command allows access to the Drummer editor, covered later in this chapter. The key command is E.
Show/Hide Editors: This command toggles the display of the editors at the bottom of the main window. If a MIDI region is selected, this command allows access to the Piano Roll, Score, and Step editors. If an audio region is selected, this command allows access to the Audio Track and Audio File editors. If a Drummer region is selected, this command allows access to the Drummer editor, covered later in this chapter. The key command is E.
![]() Show/Hide List Editors: This command toggles the display of the List Editors area at the right side of the main window. The key command is T.
Show/Hide List Editors: This command toggles the display of the List Editors area at the right side of the main window. The key command is T.
![]() Show/Hide Note Pads: This command toggles the display of the Note Pads at the right side of the main window. The key command is Option+Command+P.
Show/Hide Note Pads: This command toggles the display of the Note Pads at the right side of the main window. The key command is Option+Command+P.
![]() Show/Hide Apple Loops: This command toggles the display of the Loops Browser at the right side of the main window.
Show/Hide Apple Loops: This command toggles the display of the Loops Browser at the right side of the main window.
![]() Show/Hide Browsers: This command toggles the display of the browsers at the right side of the main window. The key command is F.
Show/Hide Browsers: This command toggles the display of the browsers at the right side of the main window. The key command is F.
![]() Show/Hide Control Bar: This command toggles the display of the control bar at the top of the main window.
Show/Hide Control Bar: This command toggles the display of the control bar at the top of the main window.
![]() Customize Control Bar and Display: This command lets you customize the elements in the control bar and LCD display, as you learned in Chapter 5. Customizing the other elements in the control bar is covered later in this chapter.
Customize Control Bar and Display: This command lets you customize the elements in the control bar and LCD display, as you learned in Chapter 5. Customizing the other elements in the control bar is covered later in this chapter.
![]() Show/Hide Toolbar: This command toggles the display of the Toolbar under the control bar at the top of the main window. The Toolbar is fundamentally an element of the control bar, meaning you have to show the control bar to show the Toolbar. The key command is Control+Option+Command+T.
Show/Hide Toolbar: This command toggles the display of the Toolbar under the control bar at the top of the main window. The Toolbar is fundamentally an element of the control bar, meaning you have to show the control bar to show the Toolbar. The key command is Control+Option+Command+T.
![]() Show/Hide Colors: This command opens Logic’s Color palette, useful for coloring tracks and regions. The key command is Option+C.
Show/Hide Colors: This command opens Logic’s Color palette, useful for coloring tracks and regions. The key command is Option+C.
![]() Enter Full Screen: This command puts Logic in full-screen mode. You can also achieve this by clicking the arrows at the upper-right corner of the main window. In full-screen mode, you can access the global menus by moving your cursor to the top of your screen; they simply scroll down into view. To exit full-screen mode, press the Esc key.
Enter Full Screen: This command puts Logic in full-screen mode. You can also achieve this by clicking the arrows at the upper-right corner of the main window. In full-screen mode, you can access the global menus by moving your cursor to the top of your screen; they simply scroll down into view. To exit full-screen mode, press the Esc key.
Track Classes
By now you realize that all tracks are not created equal. Logic provides several different track classes. Each track contains different sorts of data and has a different purpose. Let’s briefly go over them:
![]() External MIDI tracks: An external MIDI track is assigned to an external MIDI instrument or a MIDI channel of a multitimbral MIDI instrument and contains MIDI data. You can only record and play back MIDI information from an external MIDI track.
External MIDI tracks: An external MIDI track is assigned to an external MIDI instrument or a MIDI channel of a multitimbral MIDI instrument and contains MIDI data. You can only record and play back MIDI information from an external MIDI track.
![]() Audio tracks: An audio track is a track assigned to an audio channel. It may contain, record, and play back audio information. An audio track doesn’t have to contain audio data, however; you can create audio tracks to represent audio, bus, auxiliary, output, input, and other tracks that do not actually contain regions but are assigned to an audio channel. Reasons for creating these sorts of tracks are to access their channel strips in the main window Inspector pane, to include the multiple outputs of a software synthesizer with its software instrument track, to automate them using track automation, and so on.
Audio tracks: An audio track is a track assigned to an audio channel. It may contain, record, and play back audio information. An audio track doesn’t have to contain audio data, however; you can create audio tracks to represent audio, bus, auxiliary, output, input, and other tracks that do not actually contain regions but are assigned to an audio channel. Reasons for creating these sorts of tracks are to access their channel strips in the main window Inspector pane, to include the multiple outputs of a software synthesizer with its software instrument track, to automate them using track automation, and so on.
![]() Software instrument tracks: These are also audio tracks, but of a special kind. A software instrument outputs audio produced by the instrument through Logic’s audio engine. So a software instrument track uses an audio channel and has a channel strip similar to the channel strips of the other audio channel strips. However, because software instrument tracks contain instruments, the track itself contains only MIDI data in its regions that trigger the instrument. As such, the parameters and channel strip of a software instrument track look like an audio track, but the regions on a software instrument track look like that of a MIDI track.
Software instrument tracks: These are also audio tracks, but of a special kind. A software instrument outputs audio produced by the instrument through Logic’s audio engine. So a software instrument track uses an audio channel and has a channel strip similar to the channel strips of the other audio channel strips. However, because software instrument tracks contain instruments, the track itself contains only MIDI data in its regions that trigger the instrument. As such, the parameters and channel strip of a software instrument track look like an audio track, but the regions on a software instrument track look like that of a MIDI track.
![]() Drummer tracks: Drummer tracks are almost a hybrid of an audio track and a software instrument track. They are simultaneously less than and more than both track types. The Drummer track uses the Drum Kit Designer software instrument as a source for the audio it outputs, but it only uses its unique, self-generated Drummer regions. In other words, you cannot record to a Drummer track—it has no Record button. The regions the Drummer track creates in the Tracks area can only be edited in an extremely limited fashion, yet Drummer tracks have their own dedicated editor for working on their regions. A Drummer track’s channel strip looks like a software instrument channel strip, as does its Track Inspector, but the Region Inspector is virtually devoid of options. Regardless, Drummer tracks are incredibly powerful tools that can help you quickly build an arrangement. They are covered in depth later in this chapter.
Drummer tracks: Drummer tracks are almost a hybrid of an audio track and a software instrument track. They are simultaneously less than and more than both track types. The Drummer track uses the Drum Kit Designer software instrument as a source for the audio it outputs, but it only uses its unique, self-generated Drummer regions. In other words, you cannot record to a Drummer track—it has no Record button. The regions the Drummer track creates in the Tracks area can only be edited in an extremely limited fashion, yet Drummer tracks have their own dedicated editor for working on their regions. A Drummer track’s channel strip looks like a software instrument channel strip, as does its Track Inspector, but the Region Inspector is virtually devoid of options. Regardless, Drummer tracks are incredibly powerful tools that can help you quickly build an arrangement. They are covered in depth later in this chapter.
![]() Folder tracks: As explained, folder tracks use folders as containers for other classes of tracks. Tracks packed in folders can be arranged and edited as a single track. An advantage of this capability is that if you have a group of tracks that you want to keep together—for example, a full choir—you can put them all in a folder. Then, when you move, split, or otherwise change that folder track, all of your choir tracks will be moved and edited together; you need not operate on each individual track. Folders are also great organizational tracks in that packing tracks into folders can help keep your main window from becoming cluttered. There are commands in the Functions > Folder submenu to both pack folders (load a folder with tracks) and unpack folders (unload all the tracks in a folder onto the Tracks area). See the section “The Folder Submenu” earlier in this chapter for a description of those commands.
Folder tracks: As explained, folder tracks use folders as containers for other classes of tracks. Tracks packed in folders can be arranged and edited as a single track. An advantage of this capability is that if you have a group of tracks that you want to keep together—for example, a full choir—you can put them all in a folder. Then, when you move, split, or otherwise change that folder track, all of your choir tracks will be moved and edited together; you need not operate on each individual track. Folders are also great organizational tracks in that packing tracks into folders can help keep your main window from becoming cluttered. There are commands in the Functions > Folder submenu to both pack folders (load a folder with tracks) and unpack folders (unload all the tracks in a folder onto the Tracks area). See the section “The Folder Submenu” earlier in this chapter for a description of those commands.
![]() Master track: The master track, when shown using the Track > Show Master Track command (Shift+Command+M), can be found at the bottom of the Track list. It contains no regions. Then what is it good for, you may ask? You can use the master track to automate the volume of your entire project. If your project is stereo, the master track affects the stereo outputs. If your project is in surround, it automates the master channel strip. You can also control the volume of your project using the Volume fader in the master track header. Additionally, the master track is a Track Stack, automatically adding any auxes assigned to the output of master fader to the master Track Stack. Track Stacks are covered in depth in the section “Track Stacks” later in this chapter.
Master track: The master track, when shown using the Track > Show Master Track command (Shift+Command+M), can be found at the bottom of the Track list. It contains no regions. Then what is it good for, you may ask? You can use the master track to automate the volume of your entire project. If your project is stereo, the master track affects the stereo outputs. If your project is in surround, it automates the master channel strip. You can also control the volume of your project using the Volume fader in the master track header. Additionally, the master track is a Track Stack, automatically adding any auxes assigned to the output of master fader to the master Track Stack. Track Stacks are covered in depth in the section “Track Stacks” later in this chapter.
Uses for Folder Tracks: Len Sasso, author of Emagic Logic Tips and Tricks (Course Technology PTR, 2003), offers a few expert uses for folder tracks:
Create a screenset with two main windows, one primary, and one secondary. Select your secondary main window’s local View > Link > Content option. Any folder you select in the primary main window will now have its contents shown automatically in the secondary main window.
Sasso also explains how to unpack only part of a folder:
When you want to unpack only some of the regions in a folder, select the regions you don’t want unpacked and pack them into a subfolder of their own. Then unpack the original folder and you will have the desired regions unpacked and the rest in their own folder. That’s easier than trying to find and re-pack the desired regions in the full main window.
![]() Metronome track: This is the track reserved for the metronome in Logic, called click by default. You can use this track to adjust the parameters of your click to best assist your live performance. You will only want a single metronome track per project. Keep in mind that you don’t actually need to have a metronome track in your Tracks area to use the metronome.
Metronome track: This is the track reserved for the metronome in Logic, called click by default. You can use this track to adjust the parameters of your click to best assist your live performance. You will only want a single metronome track per project. Keep in mind that you don’t actually need to have a metronome track in your Tracks area to use the metronome.
![]() No Output track: This special track, as its name implies, does not output any MIDI data to MIDI devices or audio data to audio outputs. Rather, this option is mostly used for storing synth SysEx data you don’t want to send or as a temporary assignment for tracks you want to turn off momentarily.
No Output track: This special track, as its name implies, does not output any MIDI data to MIDI devices or audio data to audio outputs. Rather, this option is mostly used for storing synth SysEx data you don’t want to send or as a temporary assignment for tracks you want to turn off momentarily.
You can change the class of a track and/or instrument of a track by right-clicking a track in the Track list. Place the cursor over the Reassign Track option and a menu will appear, containing all the previously discussed track classes and all your instrument and audio options divided into submenus based on the Environment layer in which they appear. Generally, you will use the Mixer submenu in the Reassign Track menu to change the class of a track. Figure 6.29 shows this menu of track classes. To change the track, simply select a new track class or instrument.
Figure 6.29 When you right-click on a track header, a menu will appear of all available track classes and instruments on the various Environment layers.
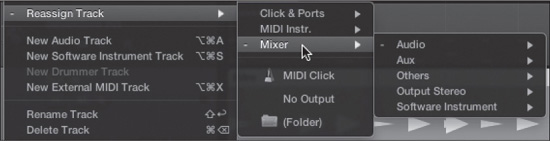
© Apple Inc.
Folders on Nonfolder Tracks: There is an exception to the preceding tip, as aforementioned author Sasso points out:
Normally folders are placed on special Folder Tracks, which are not assigned to particular channel strips, unlike other tracks. That’s what Logic does automatically when you create a folder, but you can reassign the track to its own channel strip using the Reassign Track menu, and you can also move the folder to another track. When a folder is on a normal track, all of its output is routed to the channel strip assigned to that track. That holds for the No Output track as well.
The Control Bar
The control bar is a handy repository of buttons for opening different main window elements like the browsers and Smart Controls, for accessing the Quick Help field in the Inspector pane (which provides descriptions of elements in Logic when you place the cursor over them, a very useful feature when exploring Logic), and for accessing an extended Toolbar of commands. It also contains the Transport controls, as you learned in Chapter 5. In keeping with the overall customizable nature of Logic, you can configure the control bar to contain the buttons you find most useful, or you can hide the control bar entirely. Figure 6.30 shows the default control bar configuration. To hide the control bar, use the Hide Control Bar command in the global View menu.
Figure 6.30 The default control bar configuration, including the default Transport. The control bar can be configured to display buttons for different functions and commands or can be hidden from view.
© Apple Inc.
To configure the control bar, right-click any open space in the control bar and select Customize Control Bar and Display. This opens the Customize Control Bar and Display window shown in Figure 6.31.
Figure 6.31 Right-clicking in the control bar and choosing Customize Control Bar and Display opens the Customize Control Bar and Display window.

© Apple Inc.
This is the same window used to customize the Transport. The Views column controls the control bar items. Simply select the items you wish to show in your Controls bar as you did with the Transport and click OK. You can also create your own default control bar and Transport by selecting all the items you want to access at the top of the main window and clicking Save As Default. If you have more items in your control bar than you have space on the screen at the top of your main window, some elements will be moved to a menu at the right end of the control bar. Click the area marked >> to access your other control bar items. The custom control bar options are self-explanatory, but there is one control bar feature that needs further attention: the Toolbar.
Accessing and Customizing the Toolbar
The Toolbar is a feature of the control bar that can be shown, hidden, and customized as needed. It contains buttons for executing commands in the main window, and a Nudge Value menu to give you quick access to nudge value settings. To access the Toolbar, shown in Figure 6.32, click the Toolbar button in the control bar or select View > Show Toolbar (Control+Option+Command+T).
Figure 6.32 The default Toolbar.
© Apple Inc.
The Toolbar opens directly beneath the control bar. As you can see in Figure 6.32, the default configuration offers a number handy commands, each one just a mouse click away. You can also customize the Toolbar to your liking. First, right-click in the Toolbar and select Customize Toolbar or select View > Customize Toolbar. This opens the Customize Toolbar dialog box, shown in Figure 6.33.
Figure 6.33 The Customize Toolbar dialog box. You can add buttons controlling a wide variety of commands to your Toolbar with this dialog box.
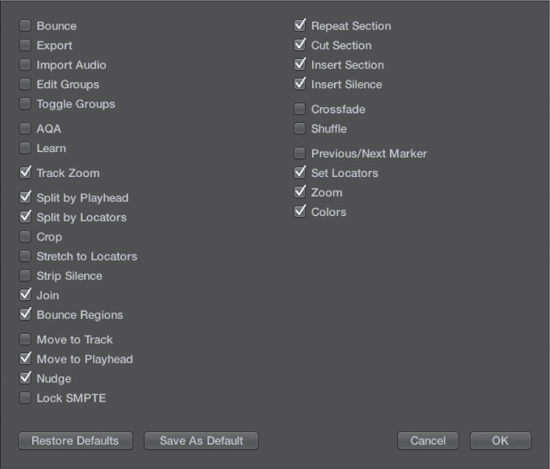
© Apple Inc.
As in the Customize Control Bar and Display window, you simply select the checkboxes of the commands you want in your Toolbar and click OK. You can use the Save As Default option to create your own default Toolbar. If you have more items in your Toolbar than you have space on the screen at the top of your main window, some commands will be moved to a menu at the right end of the Toolbar. Click the area marked >> to access your other Toolbar commands. Most of the commands available in the Toolbar are self-explanatory. The only one that really stands out as needing clarification is AQA. This is an abbreviation for Automation Quick Access, which is covered in Chapter 10.
Adding Tracks to the Main Window Track List
We already discussed how to add tracks to the main window Track list in Chapter 3, “The Logic Project.” You can also use the Append Track to Track List command. If you want to append a new track to the very bottom of your Track list, you can do so by double-clicking in the empty space below the final track in your Track list. This creates a new track that is identical to whichever track you have selected in the Track list. You can also define a key command for this function in the Key Commands window.
The Main Window Inspector
We’ve already seen and discussed the different Track Inspector parameters in Chapter 3, but it bears repeating that every single track has two Inspectors. The main window Inspector also includes the Inspector channel strips, which display the signal flow channel strips for the selected track in the track list. Figure 6.34 shows both Inspectors and, because of the size of the Inspectors when open, the bottom of the Inspector channel strips.
Figure 6.34 The Region Inspector, the Track Inspector, and the Inspector channel strips of a Drummer track. The Track Inspector should be familiar from Chapter 3. The Region Inspector contains playback parameters for MIDI regions. The Inspector channel strips show the signal flow of the selected track in the Track list.
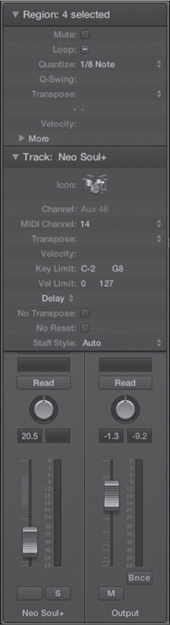
© Apple Inc.
The upper area in the Inspector pane is the Region Inspector. It acts as the MIDI THRU Inspector if no region is selected. If any regions are selected, it acts on the region playback parameters for the selected regions. The second area is the familiar Track Inspector. Chapter 3 explained the track parameters, and the next section describes the region parameters.
Region Playback Parameters
Figure 6.34 shows the region playback parameters that you will find for a region on an external MIDI or software instrument track, and to auxes assigned to multi-timbral or multi-output instruments. They are called playback parameters because they do not affect recording. In addition, they are not written to the region itself, but only affect the way Logic plays back the track (unless you apply the Normalize Region Parameters command).
Descriptions of the parameters follow:
![]() Mute: Selecting this checkbox mutes the selected region(s) but not the parent track.
Mute: Selecting this checkbox mutes the selected region(s) but not the parent track.
![]() Loop: Selecting this checkbox turns on “old-style” looping for that region. When activating old-style looping, the looped region will continually repeat for the length of the project or until another region on the same track interrupts the looping. When old-style looping is activated for a region, a number of regions with faded events representing the repeats of the looped region extend until the end of the project or until looping is interrupted by another region. You can also engage looping by pressing L. Looping is explained in more detail later in this chapter, in the “Looping Regions in the Tracks Area” section.
Loop: Selecting this checkbox turns on “old-style” looping for that region. When activating old-style looping, the looped region will continually repeat for the length of the project or until another region on the same track interrupts the looping. When old-style looping is activated for a region, a number of regions with faded events representing the repeats of the looped region extend until the end of the project or until looping is interrupted by another region. You can also engage looping by pressing L. Looping is explained in more detail later in this chapter, in the “Looping Regions in the Tracks Area” section.
![]() Quantize: This is the quantize setting. To quantize MIDI data means to lock its playback to a beat count so that regardless of the timing of the data when it was created, it will be played back with the exact timing selected in the Quantize parameter. If you click to the right of the parameter, a menu will appear that offers you myriad beat and note options from which to choose. Quantizing is explored in more depth in Chapter 8.
Quantize: This is the quantize setting. To quantize MIDI data means to lock its playback to a beat count so that regardless of the timing of the data when it was created, it will be played back with the exact timing selected in the Quantize parameter. If you click to the right of the parameter, a menu will appear that offers you myriad beat and note options from which to choose. Quantizing is explored in more depth in Chapter 8.
![]() Q-Swing: This controls how tightly the quantization feature locks every second beat to its quantization grid to give the MIDI part a more pushed or laid-back feel. You can adjust this parameter from 1% to 99%, with values under 50% resulting in an early beat and values over 50% resulting in a delayed beat.
Q-Swing: This controls how tightly the quantization feature locks every second beat to its quantization grid to give the MIDI part a more pushed or laid-back feel. You can adjust this parameter from 1% to 99%, with values under 50% resulting in an early beat and values over 50% resulting in a delayed beat.
![]() Transpose: This parameter allows you to transpose the pitch of playback higher or lower by up to 96 semitones.
Transpose: This parameter allows you to transpose the pitch of playback higher or lower by up to 96 semitones.
![]() Velocity: You can also offset the velocity of a MIDI track or region up or down. The range of velocity is the standard MIDI parameter range of 0–127. You can add or subtract up to 96 to or from that value, up to the maximum value of 127.
Velocity: You can also offset the velocity of a MIDI track or region up or down. The range of velocity is the standard MIDI parameter range of 0–127. You can add or subtract up to 96 to or from that value, up to the maximum value of 127.
Advanced Region Parameters
If you click the disclosure triangle, labeled “More,” at the bottom of the Region Inspector, the Region Inspector will expand to display the advanced region parameters, which offer more options than the standard region playback parameters. The advanced region parameters are shown in Figure 6.35. As you may have guessed from the name “advanced region parameters,” these parameters offer control over some less typical functions.
Figure 6.35 The advanced region parameters for the track in Figure 6.34.
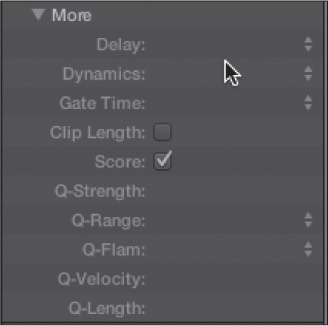
© Apple Inc.
The advanced region parameters are as follows:
![]() Delay: This parameter offsets when a region plays back. The range of this parameter is –999 to 9,999 ticks. (A tick is the smallest time resolution in the sequencer, 1/3840 of a 1/4 note.) Double-click in the Delay field to access a text box for entering a Delay setting manually. Alternatively, click the arrows at the right end of the Delay field to open a menu that offers Delay settings in musically meaningful subdivisions, with the resulting delay in milliseconds listed as well. This parameter is useful if you are trying to align audio and MIDI data, and your MIDI seems to play back a tiny bit ahead of or behind the audio.
Delay: This parameter offsets when a region plays back. The range of this parameter is –999 to 9,999 ticks. (A tick is the smallest time resolution in the sequencer, 1/3840 of a 1/4 note.) Double-click in the Delay field to access a text box for entering a Delay setting manually. Alternatively, click the arrows at the right end of the Delay field to open a menu that offers Delay settings in musically meaningful subdivisions, with the resulting delay in milliseconds listed as well. This parameter is useful if you are trying to align audio and MIDI data, and your MIDI seems to play back a tiny bit ahead of or behind the audio.
![]() Dynamics: Adjusting the Dynamics parameter affects the velocity, except that instead of offsetting the maximum value, Dynamics offsets the distance between the loudest and softest velocities in the region. This can compress or expand the difference in volume between the notes, affecting the perceived volume. Double-click in the Dynamics field to access a text box for entering a Dynamics setting manually. If you click the arrows at the right end of the Dynamics field, a menu will open that offers adjustment steps from 25% to 400%, with values below 100% decreasing the dynamics and values above 100% increasing the dynamics. The Fixed option plays back all the notes at the same velocity.
Dynamics: Adjusting the Dynamics parameter affects the velocity, except that instead of offsetting the maximum value, Dynamics offsets the distance between the loudest and softest velocities in the region. This can compress or expand the difference in volume between the notes, affecting the perceived volume. Double-click in the Dynamics field to access a text box for entering a Dynamics setting manually. If you click the arrows at the right end of the Dynamics field, a menu will open that offers adjustment steps from 25% to 400%, with values below 100% decreasing the dynamics and values above 100% increasing the dynamics. The Fixed option plays back all the notes at the same velocity.
![]() Gate Time: This scales the note duration, forcing playback to be staccato (shorter) or legato (longer). This parameter offers a menu of adjustment steps from 25% to 400%, with values below 100% reducing note duration and values above 100% increasing note duration. The Fixed option will create an abrupt staccato effect, while Legato will remove all space between all notes in the selected region. Double-click in the Gate Time field to access a text box for entering a Gate Time setting manually.
Gate Time: This scales the note duration, forcing playback to be staccato (shorter) or legato (longer). This parameter offers a menu of adjustment steps from 25% to 400%, with values below 100% reducing note duration and values above 100% increasing note duration. The Fixed option will create an abrupt staccato effect, while Legato will remove all space between all notes in the selected region. Double-click in the Gate Time field to access a text box for entering a Gate Time setting manually.
![]() Clip Length: When the end of a MIDI region is reached, this parameter determines whether any notes that sustain past the end of the region will be played back to their completion or cut off. If the checkbox is selected, any sustaining notes are stopped. If the checkbox is deselected, the notes continue playing normally.
Clip Length: When the end of a MIDI region is reached, this parameter determines whether any notes that sustain past the end of the region will be played back to their completion or cut off. If the checkbox is selected, any sustaining notes are stopped. If the checkbox is deselected, the notes continue playing normally.
![]() Score: This parameter determines whether the MIDI region is available in the Score editor. Select this checkbox to make the region available in the Score editor. This parameter is of use when a MIDI region contains only nonmusical MIDI information, such as controller messages, and you don’t need to display the region in the Score editor.
Score: This parameter determines whether the MIDI region is available in the Score editor. Select this checkbox to make the region available in the Score editor. This parameter is of use when a MIDI region contains only nonmusical MIDI information, such as controller messages, and you don’t need to display the region in the Score editor.
![]() Q-Strength: This parameter determines how close to move each note to the nearest quantization grid position. You can adjust the value from 0% to 100%, with 0% resulting in no movement of the note at all and 100% moving the note completely to the grid.
Q-Strength: This parameter determines how close to move each note to the nearest quantization grid position. You can adjust the value from 0% to 100%, with 0% resulting in no movement of the note at all and 100% moving the note completely to the grid.
![]() Q-Range: If you set this parameter, notes that are farther away than the number of ticks you set are not quantized. The range can be from –3,840 to 3,840 ticks. There are some exceptions to this, however. A negative setting means that only those notes farther away are quantized; this is useful to quantize only those notes farther away from the grid than you would like. Also, a value of 0 basically turns off the Q-Range function, in which case all notes are quantized.
Q-Range: If you set this parameter, notes that are farther away than the number of ticks you set are not quantized. The range can be from –3,840 to 3,840 ticks. There are some exceptions to this, however. A negative setting means that only those notes farther away are quantized; this is useful to quantize only those notes farther away from the grid than you would like. Also, a value of 0 basically turns off the Q-Range function, in which case all notes are quantized.
![]() Q-Flam: This parameter spreads out notes that fall on the same point; in other words, it rolls the chords. A positive value creates an upward roll; a negative value creates a downward roll. You can set the range from –3,840 to 3,840 ticks.
Q-Flam: This parameter spreads out notes that fall on the same point; in other words, it rolls the chords. A positive value creates an upward roll; a negative value creates a downward roll. You can set the range from –3,840 to 3,840 ticks.
![]() Q-Velocity: This parameter sets how much the velocity values of a template MIDI region will affect the velocity of the notes. You can adjust this parameter from –99% to 127%, with negative numbers and numbers over 100% creating the greatest velocity deviation from the template MIDI region, 0% leaving the notes unaffected by the note velocities of the template MIDI region, and 100% meaning the notes adopt the note velocities of the template MIDI region completely.
Q-Velocity: This parameter sets how much the velocity values of a template MIDI region will affect the velocity of the notes. You can adjust this parameter from –99% to 127%, with negative numbers and numbers over 100% creating the greatest velocity deviation from the template MIDI region, 0% leaving the notes unaffected by the note velocities of the template MIDI region, and 100% meaning the notes adopt the note velocities of the template MIDI region completely.
![]() Q-Length: This parameter determines how the note lengths of a template MIDI region affect the note length of your MIDI region in the Tracks area. You can adjust this parameter from –99% to 127%, with negative numbers and numbers over 100% creating the greatest note length deviation from the template MIDI region, 0% leaving the notes unaffected by the note lengths of the template MIDI region, and 100% meaning the notes adopt the note lengths of the template MIDI region completely.
Q-Length: This parameter determines how the note lengths of a template MIDI region affect the note length of your MIDI region in the Tracks area. You can adjust this parameter from –99% to 127%, with negative numbers and numbers over 100% creating the greatest note length deviation from the template MIDI region, 0% leaving the notes unaffected by the note lengths of the template MIDI region, and 100% meaning the notes adopt the note lengths of the template MIDI region completely.
The Audio Region Inspector
If you select an audio region, a different Region Inspector will appear that contains parameters specific to audio regions. The Audio Region Inspector also includes advanced region parameters, which you access by clicking the disclosure triangle at the bottom of the Audio Region Inspector. Figure 6.36 shows the Audio Region Inspector with its advanced region parameters.
Figure 6.36 The Inspector of an audio region.
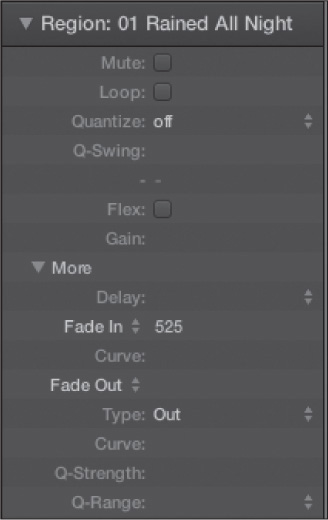
© Apple Inc.
Some parameters in this Inspector are the same as those you’ve already seen. The remaining parameters are as follows:
![]() Mute: Select this checkbox to mute the selected audio regions.
Mute: Select this checkbox to mute the selected audio regions.
![]() Quantize: You can use the Quantize parameter to quantize audio regions based on Flex markers, similar to the Quantize setting described for the region playback parameters.
Quantize: You can use the Quantize parameter to quantize audio regions based on Flex markers, similar to the Quantize setting described for the region playback parameters.
![]() Flex: This checkbox enables or disables Flex Time or Flex Pitch for the selected regions. It also can be used to “turn off” any Flex Time or Flex Pitch edits you have performed on the selected regions. Flex Time and Flex Pitch are covered later in this chapter.
Flex: This checkbox enables or disables Flex Time or Flex Pitch for the selected regions. It also can be used to “turn off” any Flex Time or Flex Pitch edits you have performed on the selected regions. Flex Time and Flex Pitch are covered later in this chapter.
![]() Gain: The Gain parameter lets you adjust the volume of the selected audio region, +/–30 dB.
Gain: The Gain parameter lets you adjust the volume of the selected audio region, +/–30 dB.
![]() Fade In: You can adjust this parameter to determine the length in milliseconds of a fade-in at the beginning of an audio region.
Fade In: You can adjust this parameter to determine the length in milliseconds of a fade-in at the beginning of an audio region.
![]() Speed Up: If you click on the Fade In parameter name, a menu will open in which you can select between the Fade In parameter and the Speed Up parameter. The Speed Up parameter creates an effect that sounds like tape speeding up to its proper playback speed, per the length in milliseconds you define, at the beginning of an audio region.
Speed Up: If you click on the Fade In parameter name, a menu will open in which you can select between the Fade In parameter and the Speed Up parameter. The Speed Up parameter creates an effect that sounds like tape speeding up to its proper playback speed, per the length in milliseconds you define, at the beginning of an audio region.
![]() Curve: This setting determines the strength and shape of the curve of the fade-in or speed up, if any.
Curve: This setting determines the strength and shape of the curve of the fade-in or speed up, if any.
![]() Fade Out: This parameter determines which kind of fade there will be at the end of your audio region.
Fade Out: This parameter determines which kind of fade there will be at the end of your audio region.
![]() Type: The Type options are Out (for fade-out), X (for crossfade), EqP (for equal-power crossfade), or X S (for equal-strength crossfade).
Type: The Type options are Out (for fade-out), X (for crossfade), EqP (for equal-power crossfade), or X S (for equal-strength crossfade).
![]() Slow Down: If you click on the Fade Out parameter name, a menu will open in which you can select between the Fade Out parameter and the Slow Down parameter. The Slow Down parameter creates an effect that sounds like tape slowing down from its proper playback speed, per the length in milliseconds you define, at the end of an audio region. The Slow Down setting only works with the fade type set to Out.
Slow Down: If you click on the Fade Out parameter name, a menu will open in which you can select between the Fade Out parameter and the Slow Down parameter. The Slow Down parameter creates an effect that sounds like tape slowing down from its proper playback speed, per the length in milliseconds you define, at the end of an audio region. The Slow Down setting only works with the fade type set to Out.
![]() Curve: This setting determines the strength and shape of the curve of the final fade or slow down, if any.
Curve: This setting determines the strength and shape of the curve of the final fade or slow down, if any.
NOTE: Don’t worry if you are completely unfamiliar with the concept of audio fades right now; you’ll learn more about this in Chapter 7.
The Inspector Channel Strips
To make mixing and accessing mixing parameters more convenient, Logic displays the channel strip for the selected track below the parameters in the Inspector along with a second channel strip. The second channel strip is the signal flow channel strip. It can display any channel strip to which your primary channel strip is routed. In other words, you can have the second channel strip display the primary channel strip’s output channel strip by simply clicking on the Output field of the primary channel strip, or to an aux channel strip by clicking on the Bus field on the primary channel strip for the desired aux. You need to have the Inspector turned on in the View menu (View > Inspector, or key command I) to see the Inspector channel strip. Figure 6.37 shows the Inspector channel strips of a software instrument track.
Figure 6.37 The Inspector channel strips of a software instrument track. This track is routed through a number of buses, but the aux channel strip for bus 1 is displayed to the right. You can select any output on the primary channel strip, and it will display in the second channel strip. As you can see, you’ll need to close the Region or Track Inspector to fit the entire strip on the page on many monitors.
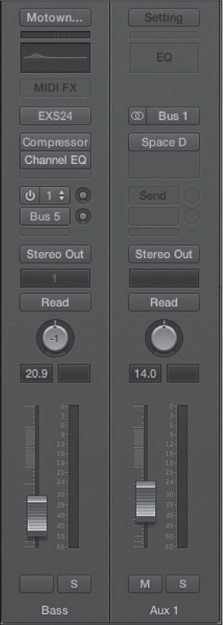
© Apple Inc.
The Inspector channel strips take up a lot of vertical space, so depending on how large your main window is and how many items you are viewing in the Inspector, the channel strips may not fit in the window and may appear cut off at the top of its frame. To fit both channel strips in the window, you might need to close other items in the Inspector by clicking on their disclosure triangles in the top-left of each box. A monitor with more vertical resolution would allow you to display all the items in the Inspector.
Configuring the Track Header
At the left side of each track lane is the track header, which contains a variety of track information and controls. As with so many other aspects of Logic, the track header is customizable. Perhaps you are using multiple control surfaces and need a quick visual reference for which tracks are tied to which control surface, or maybe you want to enable Volume and Pan controls on the track header. While some of the most fundamental tools are displayed in the track header by default, configuring the track header allows you to put tools you need at your fingertips. Figure 6.38 shows an audio track with the default track header.
Figure 6.38 An audio track with the default track header configuration.

© Apple Inc.
To configure your track headers, select Track > Configure Track Header or right-click on a track header and select Configure Track Header. Alternatively, press Option+T. This opens the Track Header Configuration dialog box, shown in Figure 6.39.
Figure 6.39 The Track Header Configuration dialog box. You can customize your track headers in this dialog box.

©Apple Inc.
Many of these options are explained in detail elsewhere in the book. For now, here is a quick description of the functions that each option represents:
![]() Control Surface Bars: Selecting this option displays the track control bars that show the tracks that are controlled by any connected control surfaces.
Control Surface Bars: Selecting this option displays the track control bars that show the tracks that are controlled by any connected control surfaces.
![]() Track Numbers: Selecting this option displays the track number for each track.
Track Numbers: Selecting this option displays the track number for each track.
![]() Color Bars: If you have Track Numbers enabled, you can select this option to display the color bars for your tracks. You can assign colors to tracks using the Color palette, accessed via the global View > Show Colors command or by pressing Option+C.
Color Bars: If you have Track Numbers enabled, you can select this option to display the color bars for your tracks. You can assign colors to tracks using the Color palette, accessed via the global View > Show Colors command or by pressing Option+C.
![]() Groove Track: Enabling this option lets you click the track number area of a track to make that track the Groove Track, which is denoted by a yellow star in place of the track number. Once you select a track to be the Groove Track, checkboxes appear to the right of the other track numbers. These checkboxes let you select which tracks’ timing follows that of the Groove Track. Tracks that follow the Groove Track cannot be quantized using the Region Inspector.
Groove Track: Enabling this option lets you click the track number area of a track to make that track the Groove Track, which is denoted by a yellow star in place of the track number. Once you select a track to be the Groove Track, checkboxes appear to the right of the other track numbers. These checkboxes let you select which tracks’ timing follows that of the Groove Track. Tracks that follow the Groove Track cannot be quantized using the Region Inspector.
![]() Track Icons: If you select this option, track icons will be displayed in the track header. Track icons are covered in greater detail in the next section.
Track Icons: If you select this option, track icons will be displayed in the track header. Track icons are covered in greater detail in the next section.
![]() Additional Name Column: This section provides another option for naming your tracks. The menu contains a list of options regarding the nature of the name(s) displayed for your tracks. The Additional Name Column section of the Track Header Configuration dialog box was covered in Chapter 3.
Additional Name Column: This section provides another option for naming your tracks. The menu contains a list of options regarding the nature of the name(s) displayed for your tracks. The Additional Name Column section of the Track Header Configuration dialog box was covered in Chapter 3.
![]() On/Off: This button turns the track on and off, effectively muting it in the process. Turning a track off can be useful for managing system performance, freeing up CPU power for other purposes.
On/Off: This button turns the track on and off, effectively muting it in the process. Turning a track off can be useful for managing system performance, freeing up CPU power for other purposes.
![]() Mute: This button mutes the track’s parent channel strip. When you click this button, the track and any dependent tracks of the parent channel strip are muted, the regions’ colors become grayer, and the button glows turquoise. Clicking it again unmutes the parent channel strip and any dependent tracks.
Mute: This button mutes the track’s parent channel strip. When you click this button, the track and any dependent tracks of the parent channel strip are muted, the regions’ colors become grayer, and the button glows turquoise. Clicking it again unmutes the parent channel strip and any dependent tracks.
![]() Solo: This button will solo all the regions on the selected track. When you engage the Solo button, only other tracks with their Solo buttons engaged, or regions that have been soloed, will play back, and the Solo button will glow yellow. With Solo engaged, the LCD will become yellow, and a yellow outline will surround all the regions in the soloed track.
Solo: This button will solo all the regions on the selected track. When you engage the Solo button, only other tracks with their Solo buttons engaged, or regions that have been soloed, will play back, and the Solo button will glow yellow. With Solo engaged, the LCD will become yellow, and a yellow outline will surround all the regions in the soloed track.
![]() Protect: This is the Track Protect switch. When clicked, this button locks the regions on the track in time and disallows recording on that track. (The R button vanishes.) When selected, the button glows green, and the icon changes to an image of a closed lock. When you click the button again, the track is no longer protected, and the icon returns to the image of an open lock.
Protect: This is the Track Protect switch. When clicked, this button locks the regions on the track in time and disallows recording on that track. (The R button vanishes.) When selected, the button glows green, and the icon changes to an image of a closed lock. When you click the button again, the track is no longer protected, and the icon returns to the image of an open lock.
![]() Freeze: The button with a snowflake icon is the Freeze switch (audio tracks, software instrument tracks, and Drummer tracks only). Clicking this button freezes the selected tracks. (See the “Freezing Tracks” section later in this chapter.) The button glows green when the Freeze switch is active for that track. If you click the button again, the track will unfreeze.
Freeze: The button with a snowflake icon is the Freeze switch (audio tracks, software instrument tracks, and Drummer tracks only). Clicking this button freezes the selected tracks. (See the “Freezing Tracks” section later in this chapter.) The button glows green when the Freeze switch is active for that track. If you click the button again, the track will unfreeze.
![]() Record Enable: This button allows the track to receive audio as soon as you begin recording. When you click the button, the track is record enabled, and the button glows red. Clicking it again disables record enable.
Record Enable: This button allows the track to receive audio as soon as you begin recording. When you click the button, the track is record enabled, and the button glows red. Clicking it again disables record enable.
![]() Input Monitoring: Selecting the Input Monitoring button allows you to monitor audio signals through Logic when an audio track is not record enabled. When selected, the Input Monitoring button glows orange. The Input Monitoring button is displayed in the track header of audio tracks by default.
Input Monitoring: Selecting the Input Monitoring button allows you to monitor audio signals through Logic when an audio track is not record enabled. When selected, the Input Monitoring button glows orange. The Input Monitoring button is displayed in the track header of audio tracks by default.
![]() Volume: Selecting Volume adds a volume slider to the track header, which also doubles as a level meter when in playback or recording.
Volume: Selecting Volume adds a volume slider to the track header, which also doubles as a level meter when in playback or recording.
![]() Pan: This option adds a Pan control to the track header, which can also be configured to act as a send control for any of the eight possible sends for the track using the Pan menu next to the Pan checkbox.
Pan: This option adds a Pan control to the track header, which can also be configured to act as a send control for any of the eight possible sends for the track using the Pan menu next to the Pan checkbox.
You can also enable and disable different options through the contextual menu available in the track header. Figure 6.40 shows the track header contextual menu.
Figure 6.40 The track header contextual menu lets you enable and disable different track header options quickly and easily.
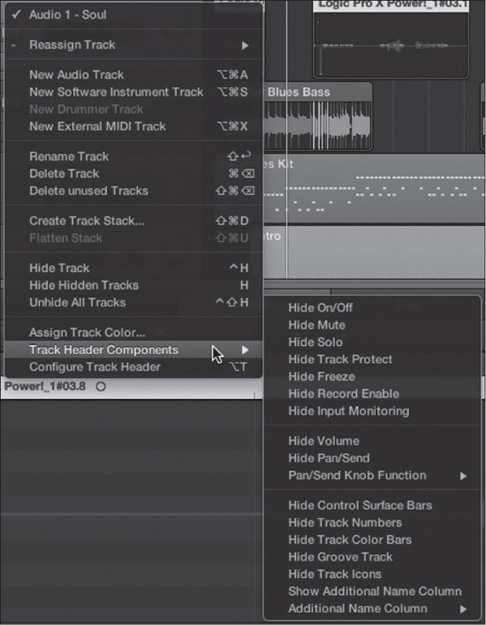
© Apple Inc.
As you can see in Figure 6.40, there are a number of additional commands available in the track header contextual menu, some that have already been covered, others that will be covered later in this chapter.
Unless you have a particularly large display, you will probably want to be fairly selective with the options you enable for your track headers. Figure 6.41 shows a track lane with every possible track header configuration option activated.
Figure 6.41 A track header with all options visible. As you can see, this takes up quite a lot of screen space.

© Apple Inc.
You can place the mouse pointer at the right edge of the Track list and use the Resize cursor that appears to expand or shrink the track header if you have all the track header components enabled. The Volume slider and Pan knob will disappear when you decrease the length of the track header, but all the buttons and the track icon will remain.
Tip: If you want to toggle on or off multiple buttons of the same type, navigating to each track one by one to click its relevant track button will become quite time-consuming. Luckily, you can click and hold a button and then mouse up or down over the other similar track buttons to activate or deactivate multiple buttons at the same time. For example, suppose you want to mute 10 tracks. Rather than selecting each track individually and clicking each individual Mute button, you could click and hold the first Mute button, then slide your mouse over the other nine tracks to mute the rest of the tracks. Note that you can use this feature only on the same type of button. In other words, you can’t click and hold on the Mute button of one track and then slide over the Solo button of another. Nonetheless, you’ll find this feature to be a massive timesaver!
Track Icons
Every track can have an icon associated with it if you turn on Track Icons in the Track Configuration menu. This track icon represents the channel strip and/or Environment object to which that track is linked. Logic features excellent, high-resolution icons, as you can see in Figure 6.42.
Figure 6.42 Here you can see the icon in the Drummer Track Inspector and a larger icon in a zoomed-out track lane.
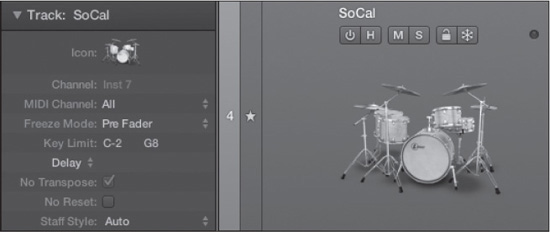
© Apple Inc.
To assign an icon to a track, simply click and hold on the icon in the Track Inspector. A window with icons categorized by type will open, in which you can select the icon for your track.
Hide Tracks
Suppose you have tracks in the Track list that have project-related MIDI data, such as SysEx data, that you do not need to see in the Tracks area. Or perhaps you created a number of tracks for audio channel strips that you wanted to appear in the Mixer, but that you do not need to display in the Track list. Or maybe you just want to focus on a particular set of tracks and you wish to group the other tracks for quick hiding and unhiding. For situations where you have tracks in the Track list that you do not need or want to have visible, Logic offers the Hide Track feature.
There is a global Hide View button at the top of the Tracks area. It appears to the right of the New Tracks buttons and features an H, as you can see in Figure 6.43. When you click on the Hide View button, it glows green, and Hide buttons in the individual track headers become available. You can then activate the individual Hide buttons on the desired tracks, which will also glow green when activated. When you deactivate the global Hide View button, all those tracks with Hide activated will no longer be visible, and the Hide View button will glow orange to let you know that the Track list includes hidden tracks. The Hide button will also disappear from the remaining track headers. When you want to see the hidden tracks again or to have access to Hide buttons for your remaining tracks, simply reactivate the Hide View button.
Figure 6.43 The global Hide View button. It is currently green, indicating you can click on the Hide button on individual tracks to hide them.

© Apple Inc.
Several key commands relate to the Hide Track feature. Even when the global Hide View button is deactivated, you can still hide an individual track by using the Hide Current Arrange Track and Select Next Track key command, Control+H. You can toggle the state of the Hide View button using the key command H. Finally, there is a key command to unhide all tracks that resets the Hide buttons of each track, making them all visible, Shift+Control+H. You can also hide tracks assigned to groups that have Hide enabled in their Group Settings using the Toggle Hide Group key command, Control+Shift+Group Number (press the group number, 1 through 9). Groups are covered in Chapter 11, “Mixing in Logic.” Keep in mind that hiding a track does not affect its playback in any way.
CAUTION: Suppose you want to add or remove some measures from your entire project. An easy way to do this would be to select all your tracks in the Tracks area and then use the Snip/Insert Time commands from the local Region menu. Unfortunately, this way of adding or removing time skips over any hidden tracks. Be sure that if you have hidden tracks, you have clicked the Hide button so it is green when you use either of these commands.
Freezing Tracks
Freeze is one of the most powerful features in Logic. Most applications have some form of freeze function, but Logic was the first major sequencer to add Freeze. Freeze can extend the power of your computer if you find your CPU beginning to strain under the processing load of your project. You can also freeze your software instrument tracks on one computer, take your Logic project to a computer without those software instruments installed, and then play the project, including the missing instruments. If you use audio or software instruments, you may find yourself wanting to use Logic’s Freeze function.
What Is Freeze?
When you start using audio effects and software instruments, particularly at high sample rates and bit depths, you’ll quickly realize that realtime effects and synth processing can take up a large amount of CPU power. Each effect and synth takes up a different amount of CPU power, of course, but the more you use, the higher the load on your CPU. What happens when you reach the limit of your Mac’s CPU capability? You get a System Overload error message, your project stops playing, and you need to turn off some of the synths or effects you have turned on.
This is where Freeze comes in. With a simple click of the Freeze button, Logic will make a temporary 32-bit floating-point audio file of your audio or software instrument track, including all effects and effects automation, and then link that track to the temporary audio file, bypassing all the effects (and the software instrument, if the track is a software instrument track). That means instead of your CPU having the heavy load of realtime synths and effects, it has only the lighter duty of playing back the referenced audio file. All the processing power required by the synth and the effects used by that track are now released.
You may want to use Freeze if you want to use effects and/or softsynths after you’ve run out of CPU power. Another very handy way to use Freeze is if you are trying to play back a Logic project created on a computer with greater power; you can use Freeze until the CPU load is reduced to the point that the project will play back. Keep in mind that if your project’s realtime processing demands are not causing any processing problems, you do not need to freeze any tracks.
How to Freeze Tracks
Freezing tracks is incredibly easy. First, make sure that the Freeze button, which features a snowflake, is visible on your track. If it isn’t, you can display it by selecting Track > Configure Track Header, pressing Option+T, or right-clicking on the track header and selecting Configure Track Header, and then checking the Freeze checkbox.
Once the button is visible, simply click on it. The button will glow green, as shown in Figure 6.44. Repeat this procedure for all the tracks in your project that you want to freeze. If you want to freeze many tracks at once, you can use the procedure described in the tip found in the “Configuring the Track Header” section earlier in this chapter to engage multiple Freeze buttons. The next time you issue the Play command (via the Transport, a key command, or a software controller), instead of beginning playback of your project, Logic will freeze all of the tracks that you have selected. If the region or regions on the tracks you are freezing don’t extend to the length of your project, you can press Command+. (period) to stop the freeze process. Your tracks will be frozen, but you won’t have to wait until Logic reaches the end of your project to get back to work. That’s it!
Figure 6.44 An audio track with Freeze turned on. This button tells you that the plug-ins on this track will not be played back in real time, but instead the track is playing an audio file that is an exact duplicate of the track.

© Apple Inc.
There is a parameter to note in the Track Inspector: Freeze mode. There are two modes:
![]() Source Only: This freezes the software instrument or source audio file (including Flex Time and Flex Pitch adjustments), but not any of the plug-ins on the track. This is very useful if you have a very CPU-heavy software instrument and want to freeze the instrument, but you want to keep the plug-ins “live” so you can adjust them. Source Only also can be used if you have an audio track that is very heavily Flexed, as Flex takes up CPU resources when used in real time. In this mode, the Freeze button will turn blue.
Source Only: This freezes the software instrument or source audio file (including Flex Time and Flex Pitch adjustments), but not any of the plug-ins on the track. This is very useful if you have a very CPU-heavy software instrument and want to freeze the instrument, but you want to keep the plug-ins “live” so you can adjust them. Source Only also can be used if you have an audio track that is very heavily Flexed, as Flex takes up CPU resources when used in real time. In this mode, the Freeze button will turn blue.
![]() Pre Fader: This is the traditional Logic Freeze mode. The source audio or software instrument and all plug-ins (in other words, everything before the fader) will be frozen. This saves the most CPU and turns the Freeze button green.
Pre Fader: This is the traditional Logic Freeze mode. The source audio or software instrument and all plug-ins (in other words, everything before the fader) will be frozen. This saves the most CPU and turns the Freeze button green.
When you freeze a track, you can no longer edit the track or adjust the automation of your effect or software instrument parameters. This is because the track is no longer playing back the regions in the track lane in real time, but is instead linking to the recorded file. If you selected Source Only mode for freezing, you can still adjust and add/remove plug-ins, but in Pre Fader mode you cannot. If you attempt to edit any of these parameters, Logic will display the error message, “Current track is frozen. Do you wish to unfreeze it?” As this message informs you, if you want to make further changes or edits to the regions, effects, or effects automation, just click the Unfreeze button in the message or click the Freeze button again to unfreeze the track. When you are finished editing your track, simply reactivate the Freeze button; the next time you activate Play, the track will refreeze with your changes. If you make an edit after unfreezing a track, the Undo command will undo the edit but will not refreeze your track, so be sure to freeze your track again even if your edits are undone.
Not every function of the track is frozen, however. You can still adjust the effect send level and destination, the pan and surround parameters, and the volume, and toggle the channel strip’s mute and solo status (as well as automation for these features).
Keep in mind that because Freeze operates by printing files faster than real time, in order for Freeze to work, the audio engine and processors you are using must be capable of working faster than real time. Also, if you are using the I/O plug-in to access external hardware in real time, you cannot use Freeze.
Cycle Mode
Chapter 5 touched on Cycle mode, but now I’ll go into it in detail. As you recall, Cycle mode allows you to loop a predefined section of your project continually. You might want to do this to listen critically to a specific section of your project, to practice performing a specific part of your project, to edit events only in a given section, and so on.
You can turn on Cycle mode in a number of ways:
![]() Click the Cycle button on the Transport.
Click the Cycle button on the Transport.
![]() Press the Cycle key command C.
Press the Cycle key command C.
![]() Click the top of the Bar ruler.
Click the top of the Bar ruler.
![]() Define the cycle region.
Define the cycle region.
When Logic is in Cycle mode, the playhead plays back the project only within the cycle region. When the playhead reaches the end of the cycle, it immediately returns to the beginning of the cycle, interrupting playback of whatever sounds are at the end of the cycle.
Combining Cycle Mode and Recording
One of the most powerful combinations of features in Logic is to use Cycle mode with recording. This can greatly facilitate creativity and frees you to improvise parts over a section of your project without worrying about creation and organization of tracks and so on. It can also be beneficial when recording takes, as you saw in Chapter 5. The Recording tab of the Project Settings window offers a number of preferences as to how cycle recording will operate within a given project. You can access these parameters by selecting File > Project Settings > Recording or by clicking and holding the Record button in the Transport and selecting Recording Settings from the menu that appears.
You already saw the Recording tab of the Project Settings window in Figure 5.38 of Chapter 5. Please refer to Chapter 5 if you would like more information on the Recording tab as a whole. Following are short explanations of each parameter that relates to Cycle mode MIDI recording (and MIDI recording only):
![]() Create Take Folders: This option tells Logic to automatically create a take folder when a second cycle has passed the first bar of the cycle region. Take folders and take recording were covered in detail in Chapter 5.
Create Take Folders: This option tells Logic to automatically create a take folder when a second cycle has passed the first bar of the cycle region. Take folders and take recording were covered in detail in Chapter 5.
![]() Join with Selected Regions: This parameter merges the data from each recording pass into a single region on the track to which you are recording. If you do not select this option, Logic will create a new region for each recording pass.
Join with Selected Regions: This parameter merges the data from each recording pass into a single region on the track to which you are recording. If you do not select this option, Logic will create a new region for each recording pass.
![]() Join When Cycling: This setting allows you to record the first pass as a unique region. Then Logic merges all subsequent recording passes into another region. If you do not select this, Logic will create a new region for each recording pass.
Join When Cycling: This setting allows you to record the first pass as a unique region. Then Logic merges all subsequent recording passes into another region. If you do not select this, Logic will create a new region for each recording pass.
![]() Create Tracks When Cycling: This option not only creates a new region for each recording pass, but creates a new track as well. The newly created tracks appear sequentially beneath the original track to which you began recording. Obviously, this function deactivates the merge options.
Create Tracks When Cycling: This option not only creates a new region for each recording pass, but creates a new track as well. The newly created tracks appear sequentially beneath the original track to which you began recording. Obviously, this function deactivates the merge options.
![]() Create Tracks and Mute When Cycling: If you select this option, each pass will be muted as soon as it is finished recording, so you will not have to listen to it when recording subsequent passes.
Create Tracks and Mute When Cycling: If you select this option, each pass will be muted as soon as it is finished recording, so you will not have to listen to it when recording subsequent passes.
Defining the Cycle Region
There are a number of different ways to set the cycle region in Logic. The most straightforward method is to click in the top half of the Bar ruler and then drag your mouse to the point at which you want the cycle to end. As you drag the mouse, a gold bar will travel behind your mouse to the point at which you stop. This gold bar represents the cycle region. Figure 6.45 shows a defined cycle region.
Figure 6.45 The gold bar between measure 2 and measure 6 represents the defined cycle region.
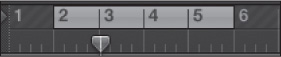
© Apple Inc.
You can grab one of the edges of the cycle region to redefine it, even during playback! You can also click in the middle of the cycle region to move it. If you want to reset one of the cycle region boundaries to a specific point near that boundary, you can click on that point while holding down the Shift key. You can also drag a marker from the marker track or arrangement track into the upper portion of the Bar ruler to set the cycle region.
In addition to setting the cycle region graphically, you can set it by directly inputting the measure numbers into the position display of the Transport. You might also define several key commands to set the cycle region. If you do a key command search for locator, you will find a host of key commands that can set the cycle regions by objects, markers, and so on. Very few of these key commands are defined by default; it’s up to you to decide which ones you want to use and then to define them. Also, don’t forget about the commands regarding locators that are available in the Navigate menu, covered earlier in this chapter, including Auto Set Locators capabilities.
Using Skip Cycle
Skip Cycle is a variation of Cycle mode. Skip Cycle mode allows you to define a region that will be skipped over rather than used during playback. You can create a Skip Cycle region by using the Swap Left and Right Locators key command, =, or by right-clicking in the Bar ruler and selecting Swap Left and Right Locators in the contextual menu that opens. A Skip Cycle region is indicated by a gold striped black bar at the top of the Bar ruler, as shown in Figure 6.46.
Figure 6.46 Here a Skip Cycle region is defined between measures 2 and 6.
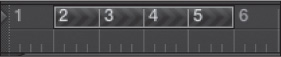
© Apple Inc.
When a Skip Cycle region is defined, Logic simply ignores that section of the project during playback or editing. The playhead jumps instantly from the beginning of the Skip Cycle region to the end and continues as if the section did not exist. When Skip Cycle mode is turned off, by turning on Cycle mode or by swapping the locators again, the region plays back as normal.
Looping Regions in the Tracks Area
We’ve already touched on the Loop parameter in the Region Inspector, and you’ve seen some of the commands related to looping in the Tracks area local menus. If you loop a region, Logic repeats that region again as soon as it ends. You will be able to see this visually on the track lane as well; boxes with grayed-out audio overviews or MIDI events the identical length of your original region will emanate from the end of your original region. This is illustrated in Figure 6.47.
Figure 6.47 The boxes with grayed-out audio overviews attached to the take folder region offer visual feedback on the track lane that the region is looped.

© Apple Inc.
Looping Regions with the Loop Tool
The traditional method or old style of looping in Logic consists of selecting the Loop checkbox in the Region Inspector. You can also use the Toggle Loop command (default key command: L) to turn the Loop parameter on and off for a selected region. Once looping is engaged, boxes representing loops—repeats of your region—will extend from the selected region until they reach either the end of the project or another region in the same track lane. If you don’t want the loop to extend to the end of the project, the old-style method of controlling how many measures a region will loop is to use the Pencil tool to create an empty region at some point in the track after a region that you want to loop, or create a new region with different events or audio at the desired location if that suits your arrangement. Then, when you turn on looping for the original region, it loops until it reaches that next region, and then the looping ends. As you move that new region around, you can extend or reduce the number of loops for that original region. You will also notice that as you extend or reduce the length of your project, those loops that extend to the end of your project will be extended or reduced along with the project length. You could also cut loops using the Marquee tool (covered in the section “Splitting and Resizing Regions Using the Marquee Tool” later in this chapter).
You can also loop regions directly in the Tracks area, which for distinction’s sake I will call “new-style” looping. Users of GarageBand or other ACID-loop–style applications will be familiar with this method of looping. For users unfamiliar with this kind of looping, you are in for a treat because it couldn’t be easier. Here’s how it works:
1. Move the cursor to the upper-right edge of a region. The pointer becomes the Loop tool, as shown in Figure 6.48.
Figure 6.48 When you move the cursor to the upper-right edge of a region, it becomes the Loop tool.
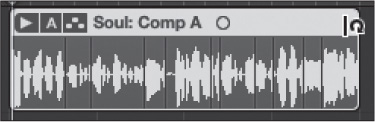
© Apple Inc.
2. Drag the loop out as many measures as you wish (see Figure 6.49). The cursor info tag will indicate which region you are looping, where you are in your project, and how many times the region has been repeated. Note that the resolution to which you can drag a loop is determined by the Snap value, which is covered in the section “The Snap and Drag Menus” later in this chapter.
Figure 6.49 To loop your region, simply drag the region as far to the right as you would like your region to loop.

© Apple Inc.
That’s it! Looping in Logic couldn’t be simpler. If you want a loop to continue for an entire project or for so many measures that manually dragging the loop would be tedious, that’s where the old style of looping comes in.
You can also use the Loop tool to edit any loop—old-style loops, new-style loops, and Apple Loops. If you simply move the mouse pointer to the upper third of a loop, it will turn into the Loop tool, as shown in Figure 6.50. You can then click on the loop to stop looping at that point. You can also drag the new end point exactly as you would a new-style loop. You can cut loops with the Loop tool regardless of whether they were looped using old- or new-style looping.
Figure 6.50 Moving the cursor to the upper third of any loop will turn the mouse pointer into the Loop tool. You can then split and drag the loop.

© Apple Inc.
If you want to operate on a loop that resides on a track in which the automation lane is showing, you must Option-drag the loop. This is because when the automation lane is in view, there is a very small area that must be shared by both looping and resizing functions. You will read more about resizing and track automation later in this chapter.
NOTE: One more time, just to be clear: There is no actual distinction made by the application between what I call “old-style” and “new-style” looping. I simply refer to these methods as such for the sake of upgraders who are familiar with traditional looping in Logic but unfamiliar with the updates to looping since Logic Pro 7.
Clicking on a loop selects the looped region and all its loops. Clicking and holding on a loop turns the cursor into a Hand tool, allowing you to grab and move the looped region. Clicking and holding on a loop’s track turns the cursor to a rubber band, like normal. The Marquee tool is capable of making “rubber band” selections of portions of a loop.
The local Edit > Convert > Loops to Regions command, key command Control+L, changes all the loops from a selected region into new regions that are identical to the original region. The Edit > Convert > MIDI Loops to Aliases command changes all the loops from a selected region into new regions that contain no data but point to the original region.
Tip: Len Sasso, author of Emagic Logic Tips and Tricks, offered some tips on using folder tracks earlier in the chapter. He also has some tips specifically regarding using folder tracks for looping: “When you want to create a composite loop incorporating several regions,” he explains, “pack the regions into a folder and loop the folder.” In fact, if you use Propellerhead’s ReCycle (REX) files, you will see that they use this same concept: REX files in Logic are folders packed with individual audio slices.
Creating Regions
At first, your tracks will not have regions on their track lanes. There are basically three ways for you to create regions in the Tracks area:
![]() You can record audio or MIDI onto your various tracks. (Refer to Chapter 5 for more information on recording.) Logic will create audio regions and MIDI regions consisting of what you record.
You can record audio or MIDI onto your various tracks. (Refer to Chapter 5 for more information on recording.) Logic will create audio regions and MIDI regions consisting of what you record.
![]() You can use the Pencil tool to create regions. If you click with the Pencil tool in a MIDI track lane, an empty region one bar long will be created. If you click with the Pencil tool in an audio track, you will be presented with the Open File dialog box for you to choose an audio file to add to the Tracks area at the current cursor location. The created audio region will be the length of the audio file you select.
You can use the Pencil tool to create regions. If you click with the Pencil tool in a MIDI track lane, an empty region one bar long will be created. If you click with the Pencil tool in an audio track, you will be presented with the Open File dialog box for you to choose an audio file to add to the Tracks area at the current cursor location. The created audio region will be the length of the audio file you select.
![]() You can create regions in the Tracks area by adding audio or MIDI files to your project by dragging them into the main window. You can drag MIDI files from the Finder directly into Logic or from the All Files Browser (discussed in Chapter 12, “Working with and Sharing Files”), and you can drag audio files from the Finder or the Project Audio Browser (discussed in Chapter 7). You can also use the Add to Tracks command in the Project Audio Browser.
You can create regions in the Tracks area by adding audio or MIDI files to your project by dragging them into the main window. You can drag MIDI files from the Finder directly into Logic or from the All Files Browser (discussed in Chapter 12, “Working with and Sharing Files”), and you can drag audio files from the Finder or the Project Audio Browser (discussed in Chapter 7). You can also use the Add to Tracks command in the Project Audio Browser.
Editing in the Tracks Area
After you create your Track list and you’ve got some regions in the Tracks area, you most likely will want to edit and rearrange them. As you would imagine, the Tracks area is ideal for rearranging regions. Every region displayed in the track lanes of the Tracks area is ready and waiting for you to manipulate using Logic Pro’s powerful tools and features.
Making Selections
The first step in editing your project is to select one or more regions or portions of regions that you want to edit further. Selected regions will have lighter outlines and title bars. Figure 6.51 shows a number of selected regions in the Tracks area.
Figure 6.51 The Tracks area with several regions selected. The lighter color and title bar indicate which regions are selected.
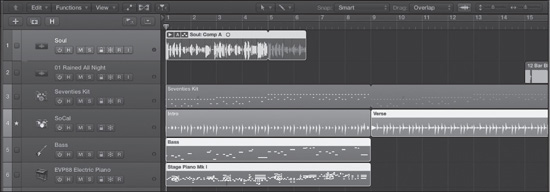
© Apple Inc.
Logic offers a number of methods for selecting regions.
Selecting Regions Using Commands
You can use many different commands to select regions, such as the Select submenu commands. These commands were previously covered with the local Edit menu earlier in this chapter. If you do a search in the Key Commands window, you will also find many selection commands, some of which are unassigned.
The two most common key commands for selecting regions are the Select Next Region and Select Previous Region commands. The key commands move you to the following or previous region, using the right or left arrow, respectively. These commands select one region at a time. If you want to use the arrow keys to select more than one region, hold down the Shift key while navigating to the various regions with the arrow keys.
Selecting Regions Using the Pointer Tool
Clicking on any region in the Tracks area with the Pointer tool will select that region. Remember that if you have Track Automation view enabled, you will need to click on the top solid bar of any region you wish to select. Otherwise, you will inadvertently edit your automation. To select multiple regions, even on different tracks, Shift-click them. Clicking a track header selects all the regions on that track. Selecting multiple track headers by Shift-clicking them selects all the regions on the selected tracks. You can, however, disable this region selection behavior by deselecting the Select Regions on Track Selection checkbox in the Editing tab of the General Preferences window.
Another method of selecting regions is by using the Pointer tool to “rubber band” a group of regions. To do this, simply click the Pointer tool on an empty spot in the Tracks area near the objects you want to select and then drag a selection square over all the regions you want to select.
Making Selections with the Marquee Tool
The Marquee tool is unique in that instead of selecting a number of entire regions, it can select a portion of regions, as shown in Figure 6.52.
Figure 6.52 A marquee selection spanning a number of regions and tracks. The area in which the colors of the tracks are highlighted is the marquee selection.
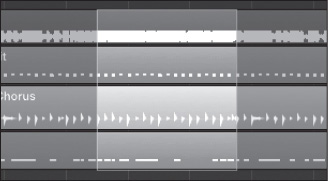
© Apple Inc.
To use the Marquee tool, select the tool and then drag it over a portion of one or more regions. When you release the mouse button, the colors inside your selection area will be lightened; this is the selected area. You can press Control+Shift while selecting a marquee area to snap to either ticks or samples depending on your zoom level. Pressing Control while selecting a marquee area will snap to the current Division setting. By pressing Shift, you can adjust the borders of the current marquee selection from either the left or the right side (not up or down). Also, remember you can set the locators by your Marquee selection. When you have made a marquee selection and you click Play, playback of only the marquee selection occurs. If you click Record, the marquee area becomes an auto-punch region, and a red autopunch bar will be displayed under the Cycle area of the Bar ruler.
You also have the option to display the Marquee ruler, which sits below the Bar ruler and displays a gray-dotted bar over the area selected with the Marquee tool. To enable the Marquee ruler, select the local View > Marquee Ruler option.
Figure 6.53 shows the Marquee ruler and an area of a region selected with the Marquee tool.
Figure 6.53 The Marquee ruler displays a gray-dotted bar over the area selected with the Marquee tool. Note the auto-punch region beneath the Cycle area of the Bar ruler. Clicking Record when you have a marquee selection creates auto-punch locators.
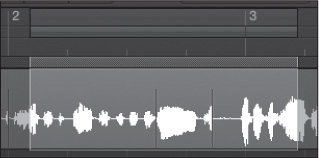
© Apple Inc.
You can use the marquee stripe for a quick visual reference for the length of a selection you have made with the Marquee tool or for precise manipulation of the edges of the marquee selection. If you create a marquee selection by clicking and dragging on the Marquee ruler, all tracks are highlighted by the marquee selection. To adjust the borders of a marquee area with the Marquee ruler, drag the cursor to the edge you wish to alter. The cursor will become the Resize tool. The resolution you can achieve with the Resize tool depends on the Snap setting, which is covered in the section “The Snap and Drag Menus” later in this chapter. You can also move the marquee stripe across the Marquee ruler. Just place the cursor over the marquee stripe, and the cursor will change to a Hand tool. You can then drag the marquee stripe.
Almost every editing function that is available when you select entire regions is available when you select portions of regions with the Marquee tool. If you find yourself regularly working with the Marquee tool, consider selecting the Marquee Tool Click Zones checkbox in the Pointer Tool in Tracks Provides area of the Editing tab in the General Preferences window, shown in Figure 6.54. When you have Marquee Tool Click Zones enabled, the Pointer tool automatically becomes a Marquee tool in the bottom half of a region.
Figure 6.54 Selecting the Marquee Tool Click Zones checkbox in the Editing tab of the General Preferences window converts your Pointer tool to a Marquee tool automatically when you hover the cursor over the lower half of a region.

© Apple Inc.
The More Tools, the Merrier: If you’re comfortable with having a wide variety of contextual tools available when using the Pointer tool in the Tracks area, you should select both the Marquee Tool Click Zones checkbox and the Fade Tool Click Zones checkbox, which are found in the Pointer Tool in Tracks Provides section of the General Preferences Editing tab. This gives you the flexibility to have up to six tools at your immediate disposal in the Tracks area:
![]() Pointer tool: The Pointer tool, or whichever tool you have assigned using the left-most Tool menu in the Tracks area, is your default tool.
Pointer tool: The Pointer tool, or whichever tool you have assigned using the left-most Tool menu in the Tracks area, is your default tool.
![]() Command-click secondary tool: The always available Command-click tool offers a secondary tool option.
Command-click secondary tool: The always available Command-click tool offers a secondary tool option.
![]() Right mouse button: When the Right Mouse Button menu in the Editing tab of the General Preferences window is set to Is Assignable to a Tool, you gain access to a third Tool menu. Assign your right-click tool using this third Tool menu.
Right mouse button: When the Right Mouse Button menu in the Editing tab of the General Preferences window is set to Is Assignable to a Tool, you gain access to a third Tool menu. Assign your right-click tool using this third Tool menu.
![]() Fade tool: The Pointer tool becomes a Fade tool at the upper corner of audio region boundaries when the Fade Tool Click Zones checkbox is selected.
Fade tool: The Pointer tool becomes a Fade tool at the upper corner of audio region boundaries when the Fade Tool Click Zones checkbox is selected.
![]() Marquee tool: The Pointer tool becomes a Marquee tool in the bottom half of regions when the Marquee Tool Click Zones checkbox is selected.
Marquee tool: The Pointer tool becomes a Marquee tool in the bottom half of regions when the Marquee Tool Click Zones checkbox is selected.
![]() Option-drag Zoom tool: If you click-drag in an empty part of the Tracks area while pressing the Option key, the cursor becomes the Zoom tool. You can then lasso an area, and the Tracks area will zoom in to the lassoed area.
Option-drag Zoom tool: If you click-drag in an empty part of the Tracks area while pressing the Option key, the cursor becomes the Zoom tool. You can then lasso an area, and the Tracks area will zoom in to the lassoed area.
That doesn’t even include the different Pointer modes like the Resize, Loop, and Hand tools! Even if you have your right-click preference set to open contextual menus, you can have five varied tools at your immediate disposal, plus the Tool menu a quick right-click away. As much as I encourage you to learn and use key commands, I also recommend using these different Pointer Tool in Tracks options along with a secondary tool setting and the Option-drag to Zoom facilities. The quicker you can work in Logic, the less time you spend not being creative!
Adjusting the Marquee Borders by Transient
One extremely powerful feature of the Marquee tool is that it can help you arrange and edit regions by transient. As mentioned during the discussion of the beat-mapping track in Chapter 4, transients are musically relevant peaks in audio material. You may want your marquee selection to fall not on the measure line but on the beat, or the upstroke of an acoustic guitar strum, or the accented stroke of a violin bow, and so on.
Previously, if you wanted to do this, you had no choice but to try to visually find the transients by looking at the zoomed-in audio region and then painstakingly set the marquee start and end on those transients. If you then realized that you set your marquee too long and you wanted your selection to be one transient shorter, or your marquee selection needed to be a couple transients longer, you had to grab the start or end of the marquee and try to visually reset it again. As you can imagine, this took a long time and wasn’t always accurate. Fortunately, Logic Pro includes these four key commands:
![]() Move Marquee End to Previous Transient: This sets the end of the current marquee selection to the transient before the current marquee end. The key command is left arrow.
Move Marquee End to Previous Transient: This sets the end of the current marquee selection to the transient before the current marquee end. The key command is left arrow.
![]() Move Marquee End to Next Transient: This sets the end of the current marquee selection to the transient after the current marquee end. The key command is right arrow.
Move Marquee End to Next Transient: This sets the end of the current marquee selection to the transient after the current marquee end. The key command is right arrow.
![]() Move Marquee Start to Previous Transient: This sets the start of the current marquee selection to the transient before the current marquee start. The key command is Shift+left arrow.
Move Marquee Start to Previous Transient: This sets the start of the current marquee selection to the transient before the current marquee start. The key command is Shift+left arrow.
![]() Move Marquee Start to Next Transient: This sets the start of the current marquee selection to the transient after the current marquee start. The key command is Shift+right arrow.
Move Marquee Start to Next Transient: This sets the start of the current marquee selection to the transient after the current marquee start. The key command is Shift+right arrow.
These commands allow you to quickly shift the start and end points of the marquee selection to the transients you wish. Combined with the editing commands, these make the Marquee an even more precise editing tool.
The Tracks Area Grid
Most of what you’ll be doing in the Tracks area will be editing and moving regions. For many users, the playhead and the Bar ruler offer enough of a guide. If you want more obvious guidelines, you’re in luck. If you select View > Grid (or press Control+G), you will activate the Tracks area grid. This grid puts guidelines at every bar of your project. The resolution of the grid depends on your current zoom level and the numerator of the time signature of your project. Figure 6.55 shows a project with the grid turned on.
Figure 6.55 Here is a section of a Tracks area that has the grid activated. Due to the zoom level and the 4/4 time signature, you can see a grid line every 1/4 note.
© Apple Inc.
The grid is a purely visual tool. It does not affect region movement or editing at all, but it can assist you in moving regions and performing edits on specific grid positions. If the grid makes working in the Tracks area easier for you, turn it on whenever you need it.
Zooming in the Tracks Area
As you begin moving and editing regions, you’ll find that you sometimes want an overview of a portion of the project, while other times you want to focus in on a very small area. To do this, you’ll want to zoom in and out. Chapter 3 discussed using the zoom sliders in the upper-right of the Tracks area to adjust the size of the track lanes. Using the horizontal zoom increases or decreases the number of bars that are visible onscreen at a time. When your project is fully zoomed out, you can easily fit the entire length of the project on your monitor at once for arranging regions, and if you zoom in all the way, you’ll be able to view each individual sample of your audio to enable very precise editing.
By now, it should be no surprise that Logic offers a full complement of key commands to facilitate zooming in addition to the zoom sliders. By default, pressing Command+arrow zooms in or out, horizontally or vertically, depending on the arrow key. There are also key commands to zoom in and out for individual tracks, to change instantly to user-definable zoom settings, to zoom to fit selection, and more. Be sure to do a search for zoom in the Key Commands window; you’ll find a lot of fantastic timesaving key commands just waiting to be assigned.
Finally, you can select Auto Track Zoom either via the key command Control+Z or by choosing View > Auto Track Zoom. This automatically increases the vertical zoom of the selected track for as long as that track is selected. This command is useful if you want to keep your tracks vertically short to fit more tracks on the screen, but you want the specific track you are working on to be larger for more precise moves and edits.
Splitting and Resizing Regions
Two operations that go hand in hand with zooming are splitting and resizing regions. You can zoom out or in to get the optimal view of a section of project and then edit that section to suit your taste. This is one of the most important uses for sequencers, and Logic’s main window offers users powerful and intuitive tools and commands for this purpose. This section describes some of the most popular commands, functions, and tips for splitting and resizing regions.
Splitting Regions
Logic offers a number of different functions and methods to split one region into two or more regions. Perhaps the most graphically intuitive way to split a region into two parts is to select the Scissors tool from the Tool menu and then click on a portion of a region. Logic then splits that region into two regions at the point at which you clicked. Figure 6.56 shows a region being split in two by the Scissors tool.
Figure 6.56 Splitting a region with the Scissors tool. Left: the Scissors tool over a Drummer region in the Tracks area. Right: the resulting two Drummer regions.
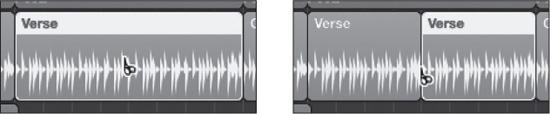
© Apple Inc.
If you try to split a MIDI region that has a note that overlaps the split by more than 1/16 note, Logic will display a dialog box asking whether you want to keep, shorten, or split those notes. Select the option you prefer in the dialog box.
![]() Choosing Keep leaves the note lengths unaltered; you will simply have notes in the first region that play past the end of the region. (If you select the Clip Length option in the track’s Region Inspector, however, the note will still be cut off.)
Choosing Keep leaves the note lengths unaltered; you will simply have notes in the first region that play past the end of the region. (If you select the Clip Length option in the track’s Region Inspector, however, the note will still be cut off.)
![]() If you select Shorten, the overlapping notes are truncated at the end of the first region.
If you select Shorten, the overlapping notes are truncated at the end of the first region.
![]() Selecting Split creates two notes to represent the original overlapping note: one note in the first region that is truncated at the end of the first region, and a new note at the beginning of the second region that consists of the remainder of the original note.
Selecting Split creates two notes to represent the original overlapping note: one note in the first region that is truncated at the end of the first region, and a new note at the beginning of the second region that consists of the remainder of the original note.
Logic also enables you to split a region into multiple regions using the Scissors tool. If you hold down the Option key while splitting your region, the Scissors tool will appear with a plus sign (+) above the teeth of the scissors, and it will split the region into multiple regions of equal size. Figure 6.57 illustrates this.
Figure 6.57 Using the Scissors tool to split a region into multiple regions. Left: the Scissors tool over a bar into a Drummer region. Right: the results of clicking with the Scissors tool while pressing the Option key.
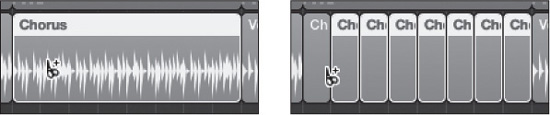
© Apple Inc.
You can also use a number of commands to split regions. As explained, the Edit > Split submenu offers the commands Split Region by Locators and Split Region by Playhead, also available in the Toolbar. These commands split a selected region by using the locators in the Bar ruler or by using the playhead, respectively. You can also use the key commands for these commands, as well as the key command for Split Region by Rounded Playhead Position, which splits the region at the bar line nearest to the playhead.
NOTE: In the Editing tab of the General Preferences window is a SmartLoop Handling of Scissors and “Split by Playhead” checkbox. If you have this checkbox selected and you split a region that has been looped, the loop immediately following the split region will be turned into a copy of the original region and the original region will be split. This is a special feature in Logic called SmartLoop. Logic does not assume that just because you want to split a looped region you necessarily intend to split every single loop that comes after it. By creating a copy, Logic automatically keeps the loop identical to how it was before you split the looped region, giving you a “new” original for the following loops. This procedure of creating a copy, looping the copy, and then splitting the original used to require a number of steps and a fair amount of time. Now, Logic takes care of it automatically for you!
Resizing Regions
Splitting isn’t the only way you can alter a region in the Tracks area; you can also resize it. Logic offers a few simple ways to resize regions. The most straightforward way is simply to move the pointer to the lower half of the edge of a region. The Pointer tool will become the Resize tool; you can then drag to the right or left to expand or shorten the region. The info tag beneath the cursor will display your action and position. Figure 6.58 shows a region being resized in this manner.
Figure 6.58 When you move the Pointer tool to the lower half of the right or left edge of a region, it turns into the Resize tool. You can drag right or left to lengthen or shorten selected regions. The info tag displays what you are doing.
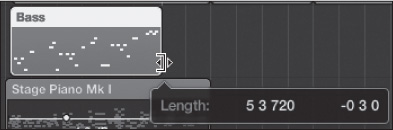
© Apple Inc.
You can also resize multiple regions this way: Simply select a group of regions and then click and drag the lower-right corner of one of the selected regions to resize it. Logic will lengthen or shorten all the regions by the amount you adjusted the region that you clicked. If you want to adjust multiple regions to the same absolute length (meaning the same number of bars), even if they were originally of varying length, press the Option+Shift keys while resizing.
There are some limitations to your ability to resize regions, however. You cannot shorten a region out of existence—Logic will always retain at least a sliver of the region. Also, if you are expanding an audio region, you cannot lengthen it past the end of the audio file itself, because there is no audio after that point. However, you can expand a MIDI region past existing MIDI data.
If you shorten a boundary of a region that includes data, Logic will no longer consider that data part of that region. The data will not be deleted or modified in any way, however, and if you later lengthen the region, the original data will still be there, exactly as it was before you shortened the region.
Sometimes, however, when you adjust the length of a region, you may want to compress or expand the data inside to fit the new region boundary. If you have selected a region, you can do this by pressing the Option key while dragging the right region boundary.
You can also use two different commands to resize an audio region and compress or stretch its contents to fit: Time Stretch Region Length to Locators and Time Stretch Region Length to Nearest Bar, both available from the Edit local menu. These commands invoke the chosen time stretching algorithm to adjust the length of your audio region. Obviously, the Time Stretch Region Length to Locators command would require having Auto Set Locators by Region disabled. Compressing or stretching audio using any of these approaches is different from using Flex Time on an audio region. Flex Time editing is covered in detail in the section “Using Flex Time and Pitch” later in this chapter.
Other local menu functions, such as Remove Overlaps and Crop Outside Locators, are also useful for resizing regions. Review the subsections in the section “The Edit Menu” earlier in this chapter to learn about these commands. There are also unassigned key commands that will allow you to nudge the length of regions shorter or longer by varying degrees. If you find any of them useful, remember to assign key commands to them.
Splitting and Resizing Regions Using the Marquee Tool
The Marquee tool is a special tool—perhaps one of the most powerful editing tools available in Logic Pro—and thus gets its own section here. As described earlier in the section “Making Selections with the Marquee Tool,” you can use the Marquee tool to select portions of regions, not just entire regions. Once you have made a selection with the Marquee tool, you can perform most region-based edit options, such as the following:
![]() Erase: Press Delete or click with the Eraser tool.
Erase: Press Delete or click with the Eraser tool.
![]() Move and Copy (with the Pointer tool): To move a selection, drag it with the Pointer tool. To copy it, press the Option key while dragging the selection using the Pointer tool. (See the upcoming section “Moving and Copying Regions” for more information.)
Move and Copy (with the Pointer tool): To move a selection, drag it with the Pointer tool. To copy it, press the Option key while dragging the selection using the Pointer tool. (See the upcoming section “Moving and Copying Regions” for more information.)
![]() Cut and Copy (with key commands): Press Command+X for cut and Command+C to copy.
Cut and Copy (with key commands): Press Command+X for cut and Command+C to copy.
![]() Paste: To paste the region at the playhead, press Command+V.
Paste: To paste the region at the playhead, press Command+V.
![]() Cut (at the selection border): Click inside the selection with the Scissors tool.
Cut (at the selection border): Click inside the selection with the Scissors tool.
![]() Mute: This can be done via a key command or the Mute tool. Both approaches result in a cut at the selection borders with the regions inside the selection borders muted.
Mute: This can be done via a key command or the Mute tool. Both approaches result in a cut at the selection borders with the regions inside the selection borders muted.
![]() Solo: This can be done via a key command or the Solo tool. Both approaches result in a cut at the selection borders with the regions inside the selection being soloed.
Solo: This can be done via a key command or the Solo tool. Both approaches result in a cut at the selection borders with the regions inside the selection being soloed.
Moving and Copying Regions
Now that you’ve split and resized some regions in the Tracks area, you probably want to arrange them! Moving regions around is certainly one of the central functions of the Tracks area, and it couldn’t be simpler. Just select a region or regions, hold down the mouse button, drag your selection anywhere you want, and then drop the region or regions in the new location. Done!
Of course, Logic gives you many more options for moving regions. If you want to restrict the movement to either the horizontal or vertical axis (depending upon whether you initially move the region horizontally or vertically), there is a Limit Dragging to One Direction in Tracks checkbox in the Editing tab of the General Preferences window, which you access by choosing Logic Pro > Preferences > General. You can also toggle this feature on and off by pressing the Shift key while dragging. (In other words, if you’ve checked the preference, pressing Shift will allow normal movement, and if the preference is unchecked, you can press Shift to limit region movement to one axis.)
If you press Control while dragging a region, you can move the region in one-division increments. If you press Control+Shift while dragging a region, you can move the region in increments of one tick or one sample, depending on your zoom setting. Don’t forget the various local Edit > Move commands covered earlier in this chapter. There are also unassigned key commands that you can use to nudge a region forward or backward by varying amounts. Search for nudge in the Key Commands window to find them. If you find any of them useful, be sure to assign keys to them.
Sometimes you may want to duplicate the data in a given region or regions in another location. Logic allows you to copy regions very easily. To move a copy of your selected region(s) instead of the original region(s), press the Option key while moving the region, leaving the original regions in their original positions. If you want the copied regions to be aliases (see upcoming tip) that point to the original regions instead of actual copies, press Option+Shift when moving the regions. You can also make multiple duplicates that will follow your selected region or regions by using the Repeat command either by pressing Command+R or by choosing the local Edit > Repeat option. This command presents you with a dialog box in which you may select the number of copies you want and specify whether you want them to be aliases or copies.
Moving and copying operations snap automatically to the Snap menu setting, discussed in “The Snap and Drag Menus” section later in this chapter. Also, remember that you can use the arrangement track to move and copy regions. Refer back to Chapter 4 for more information on using the arrangement track.
Tip: Copying a region creates a completely new region with its own MIDI notes or audio data. It is a duplicate of the original region, but you can edit the original region without affecting the copy, and vice versa. An alias, however, looks like a copy of the original region, but it doesn’t contain any data of its own. Instead, it is just a reference to the original region. That means any editing you do to the original will be reflected in the alias. Aliases are perfect for when you want to ensure that each instance of your copied region exactly reflects the original region, because any edits and changes to the original affect all the aliases as well. If you want to edit an alias without affecting the original, you can always turn your alias into a real copy.
Editing Multiple Regions
There will probably be times when you will want to perform the same edits on multiple tracks. For example, you may want to remove a couple of bars from a multitrack drum performance and a guitar part and then drag the resulting regions one bar closer to each other. This kind of editing could take a bit of time, particularly if the tracks aren’t all in order in the Track list. Fortunately, Logic allows you to group channel strips for just this kind of work.
To assign channel strips to a group, do the following:
1. Click the Group slot on a channel strip you wish to assign to a group. The Group slot is the empty dark-gray box between the Output and Automation Mode boxes on each channel strip.
2. Select an available group or create a new one in the menu that appears, which is shown in Figure 6.59. When you select a group for the first time, the Group Settings window shown in Figure 6.60 will open.
Figure 6.59 The Groups menu. You can assign channel strips to groups in this list.
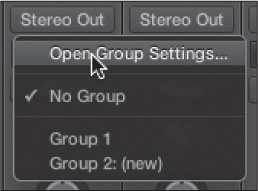
© Apple Inc.
Figure 6.60 The Group Settings window.
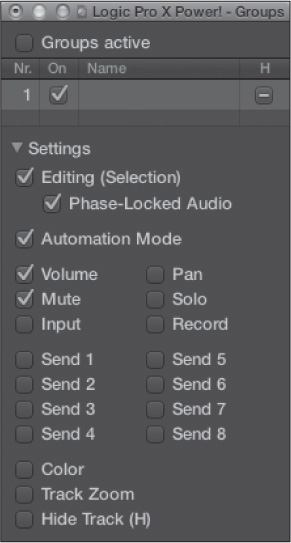
© Apple Inc.
3. Select the Editing (Selection) option and close the Group Settings window. You can now assign other channel strips to that same group.
When you perform an edit on any single track assigned to a channel strip in the group, the same edit is performed on all tracks in the group. If you select an area of any region on a group track with the Marquee tool, the same area will be selected on all group tracks. If you select a whole region on a group track, all regions on group tracks that overlap the selected region anywhere along its length will be selected. You can then move or delete these regions collectively.
Groups can be used for many other functions, as you can see in Figure 6.60. Groups, the Group Settings window, and the Group box in the Inspector are covered in greater detail in Chapter 11.
Comping in Logic
Comping, or compiling pieces of different performances of the same material into one cohesive performance, used to involve a lot of work—keeping track of different performances on different tracks, selecting which parts to keep, editing sections into new regions, keeping the new edited bits organized, and so forth. Logic Pro gives you an incredibly powerful set of features that not only simplify the management of different takes, as explored in Chapter 5, but that also make creating audio comps from those takes a breeze thanks to Quick Swipe Comping.
Creating and Editing Comps
To begin, open an audio take folder by clicking its disclosure triangle at the upper-left corner. Next, enable Quick Swipe Comping by clicking the Quick Swipe Comping button at the upper-left corner of your audio region, by selecting Quick Swipe Comping in the Take Folder menu, or by using the key command Option+Q. Now you can use the Pointer tool to select sections from different takes. As you select a comp area from one take, that same area in every other take is deselected. Also, when you select different pieces of your takes to create your comp, the waveform in the top-most track in the audio take folder is updated to reflect those selections. Figure 6.61 shows an open audio take folder that has takes that have been comped. Note the cursor under the Take 4 heading—that’s the cursor you use to create and edit comps.
Figure 6.61 An open audio take folder containing takes that have been comped. Selecting an area of one take deselects that same area on all other takes, and the waveform in the top-most track updates to reflect the selection.
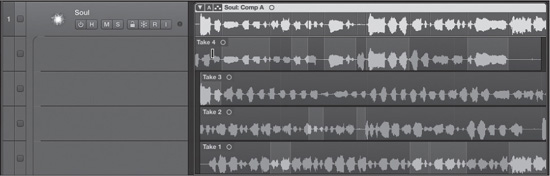
© Apple Inc.
You can also create a take folder using the Functions > Folder > Pack Take Folder command (key command Control+Command+F). When you use this command on selected regions on different tracks, they are packed into a take folder using the channel strip of the top-most track. You can then create comps in your new take folder, but if you use this command on regions that are on the same track lane, then a comp is automatically created.
You can change the length of a comp section by dragging its border. If there are any comp sections that share that border with the section you are editing, they will automatically be resized. If you press Shift while shortening a comp section, adjacent comp sections will not be lengthened. You can also move a comp section. If you drag a comp section, you can move the entire section left or right. Any adjacent comp sections will be automatically resized.
When you create a comp, the various sections that make up the comp are automatically crossfaded per the settings in the Crossfades for Merge and Take Comping section of the General tab of the Audio Preferences window. You can access the Crossfades for Merge and Take Comping preferences by selecting Logic Pro X > Preferences > Audio. Figure 6.62 shows the Crossfades for Merge and Take Comping section of the General tab of the Audio Preferences window.
Figure 6.62 The Crossfades for Merge and Take Comping section of the General tab of the Audio Preferences window. You can determine how Logic crossfades the sections of any comps you create with the parameters in this section.

© Apple Inc.
The Crossfade Time parameter determines how long in milliseconds each crossfade will take. The Crossfade Curve parameter allows you to control the kind of curve Logic will use to crossfade your comps. A setting of 0 will give you linear crossfades, while positive or negative values will give you symmetrical, exponential fades.
After you have selected the various sections of your different takes that will make up your comp, you can quickly replace an individual section of your comp with the same section of a different take by clicking in the desired area of the desired take. If the take folder is closed, you can do this by right-clicking on the section in the take folder. A menu like the one shown in Figure 6.63 will appear, in which you can select the alternate take for use in that section.
Figure 6.63 If you want to replace the take used for a particular section of your comp in a closed take folder with the audio from another take, simply right-click on that section in the take folder. You can select a different take from the menu that appears.
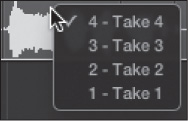
© Apple Inc.
To remove a comp section, simply Shift-click on that section on its parent take. If you Shift-click on a take’s header, it will remove all comp sections from that take.
Treating Takes as Regions
Suppose you have found the exact comp you want from a set of takes, but there’s one comp section that’s just a little late. You can easily slice a take into sections via either of two commands found in a right-click contextual menu specific to audio takes folders—Slice at Comp Selection Borders and Trim to Active Comp Sections. Both of these commands fundamentally create new regions from the selected take that reside in the takes folder. The Slice at Comp Selection Borders command slices the take into separate regions defined by the borders of any comp selections for the particular take. Trim to Active Comp Sections slices the take into separate regions too, but it removes any regions that are not used as comps. You can see the effect of both of these commands in Figure 6.64.
Figure 6.64 The top take in this takes folder, take 4, after using the Slice at Comp Selection Borders command has been divided into 11 regions. Five are derived from the comp sections from the take and six are from the remaining sections of the take. The next take has been reduced to one region derived from its comp section from the take using the Trim to Active Comp Sections command.
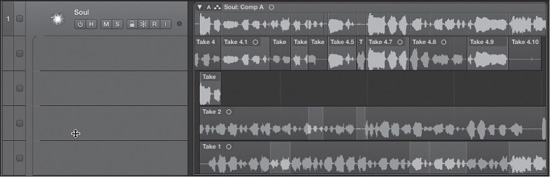
© Apple Inc.
You can now move these regions freely within the take folder using the mouse or any nudge commands. Note that you must turn off Quick Swipe Comping mode to move any of these take regions.
Saving Comps
You can store multiple comps created with the same take folder. Once you are satisfied with your comp, click on the triangle in the upper-right corner of the take folder to open the Take Folder menu and select New Comp. A new, freely editable comp will be created, and your previous comp will be saved. If you wish to rename a saved comp, open the Take Folder menu and select the desired comp. Then open the Take Folder menu again and select the Rename Comp command. This opens the Rename Comp dialog box, discussed with the Rename Take dialog box in Chapter 5.
Flattening and Merging Comps
After you have comped your takes and you have decided that you have a comp you want to use, you have the option to either flatten or flatten and merge your comp. Both of these commands are found in the Take Folder menu and are assignable to key commands. The Flatten command replaces your take folder with individual regions that encompass each take selection. Figure 6.65 shows regions that have been created by the Flatten command.
Figure 6.65 Regions created by the Flatten command in the Take Folder menu.

© Apple Inc.
The Flatten and Merge command takes the Flatten command one step further by merging the individual take selections into one region and creating a new audio file for that region. Figure 6.66 shows the effect of the Flatten and Merge command on the same comp used in Figure 6.65. What makes these commands so powerful is that the new regions created by these commands are fully editable and movable, just like any other region.
Figure 6.66 This region, created with the Flatten and Merge command, is from the same comp used in Figure 6.65.

© Apple Inc.
Exporting and Unpacking Takes and Comps
There are a few more commands for manipulating takes and comps that you may find useful: Export to New Track, Unpack, and Unpack to New Tracks. All three commands can be found in the Take Folder menu, and the two Unpack commands can also be found in the Functions > Folder submenu. Both Unpack commands place the contents of the take folder on individual tracks, getting rid of the parent take folder in the process. Takes are unpacked to individual tracks as whole regions, and comps are unpacked to individual tracks as regions representing each take selection. The Unpack command (Control+Command+U) places all takes and comps on their own track lanes, and they all use the parent take folder track’s channel strip. The take or comp that was active when the folder was unpacked remains active, and all other takes and comps are muted. The Unpack to New Tracks command (Shift+Control+Command+U) functions like the Unpack command, except each new track is given its own channel strip with the configuration of the original take folder’s channel strip. Figure 6.67 shows an unpacked take folder.
Figure 6.67 Unpacking a take folder sends all takes and comps to individual tracks.
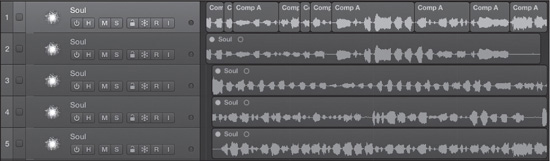
© Apple Inc.
The Export to New Tracks command allows you to export an individual take or comp from the take folder to a new track with its own channel strip, but using the same settings as the channel strip of the parent track, while maintaining the existence of the parent take folder. You just need to select a take or comp and then select the Export to New Tracks command (or assign a key command), and the selected take or comp will be exported to a new track directly below the parent take folder in the Track list. If you export a comp, the take selections will be exported as individual regions.
The Snap and Drag Menus
To the left of the Tracks area Tool menu are two very important menus: Snap and Drag (see Figure 6.68). Both of these menus affect the way you can move regions around the Tracks area in Logic Pro. The following sections explain each menu in more detail.
Figure 6.68 The Snap and Drag menus of the main window.
© Apple Inc.
The Snap Menu
The Snap menu affects precisely where a region you move will “snap,” or be affixed, in the Tracks area. You have a number of options for snap resolutions in this menu, designed to give you the ultimate say on where you want Logic to place your region. Your Snap menu options are as follows:
![]() Smart: Smart snap determines the snap resolution based on the zoom level of the Tracks area. For example, if you are zoomed out to see all 200 bars of your project, if you move a region, Smart snap will snap to even bars. However, if you are zoomed in so you can accurately see 1/32 notes, Smart snap will snap to 1/32 notes. The limit is the sample level.
Smart: Smart snap determines the snap resolution based on the zoom level of the Tracks area. For example, if you are zoomed out to see all 200 bars of your project, if you move a region, Smart snap will snap to even bars. However, if you are zoomed in so you can accurately see 1/32 notes, Smart snap will snap to 1/32 notes. The limit is the sample level.
![]() Bar: This option will always snap every region you move in one-bar increments relative to the region’s start position, regardless of zoom level. If your region’s position is 1 1 2 67, dragging your region one bar to the right will result in a position of 2 1 2 67.
Bar: This option will always snap every region you move in one-bar increments relative to the region’s start position, regardless of zoom level. If your region’s position is 1 1 2 67, dragging your region one bar to the right will result in a position of 2 1 2 67.
![]() Beat: This option will snap to the denominator of your time signature (which determines the beat) relative to the region’s start position, regardless of the zoom level. For example, if your project is in 4/4 time, Beat snap will snap your regions to 1/4-note increments; if your project is in 6/8 time, Beat snap will snap to 1/8-note increments. If you have time changes in your signature track, Beat snap will follow those signature changes and snap to the correct beat increment. As with the Bar snap setting, the Beat setting moves your regions by beats relative to the region’s starting position.
Beat: This option will snap to the denominator of your time signature (which determines the beat) relative to the region’s start position, regardless of the zoom level. For example, if your project is in 4/4 time, Beat snap will snap your regions to 1/4-note increments; if your project is in 6/8 time, Beat snap will snap to 1/8-note increments. If you have time changes in your signature track, Beat snap will follow those signature changes and snap to the correct beat increment. As with the Bar snap setting, the Beat setting moves your regions by beats relative to the region’s starting position.
![]() Division: This option snaps to the note value increments displayed in the Division display of the Transport window (1/16 notes, 1/8 notes, and so on) relative to the region’s start position, regardless of the zoom level.
Division: This option snaps to the note value increments displayed in the Division display of the Transport window (1/16 notes, 1/8 notes, and so on) relative to the region’s start position, regardless of the zoom level.
![]() Ticks: This option will always snap to ticks, regardless of the zoom level.
Ticks: This option will always snap to ticks, regardless of the zoom level.
![]() Frames: Frames snap to SMPTE frames regardless of the zoom level. The exact snap will depend on which frame rate you have set in your synchronization options.
Frames: Frames snap to SMPTE frames regardless of the zoom level. The exact snap will depend on which frame rate you have set in your synchronization options.
![]() QF: This option will always snap to quarter frames (one quarter the length of a full SMPTE frame) regardless of the zoom level.
QF: This option will always snap to quarter frames (one quarter the length of a full SMPTE frame) regardless of the zoom level.
![]() Samples: This option snaps at the sample level for extremely precise editing. You must be at extremely high zoom levels to use this snap resolution.
Samples: This option snaps at the sample level for extremely precise editing. You must be at extremely high zoom levels to use this snap resolution.
![]() Snap Regions to Absolute Value: Selecting this option snaps any move to the nearest absolute position described by the Snap value. In other words, if your region begins at 1 1 2 67, and your Snap value is set to Bar, any drag will move the region by an even bar. Moving the region to the immediate right would result in a position of 2 1 1 1.
Snap Regions to Absolute Value: Selecting this option snaps any move to the nearest absolute position described by the Snap value. In other words, if your region begins at 1 1 2 67, and your Snap value is set to Bar, any drag will move the region by an even bar. Moving the region to the immediate right would result in a position of 2 1 1 1.
![]() Snap Regions to Relative Value: Selecting this option snaps any move to the nearest relative position described by the Snap value. In other words, if your region begins at 1 1 2 67, and your Snap value is set to Bar, any drag will move the region by an even bar. Moving the region to the immediate right would result in a position of 2 1 2 67.
Snap Regions to Relative Value: Selecting this option snaps any move to the nearest relative position described by the Snap value. In other words, if your region begins at 1 1 2 67, and your Snap value is set to Bar, any drag will move the region by an even bar. Moving the region to the immediate right would result in a position of 2 1 2 67.
![]() Snap Quick Swipe Comping to Absolute Value: With this option enabled, all Quick Swipe Comping comps will be snapped to absolute values as defined by the Snap setting.
Snap Quick Swipe Comping to Absolute Value: With this option enabled, all Quick Swipe Comping comps will be snapped to absolute values as defined by the Snap setting.
![]() Snap Automation to Absolute Value: With this option enabled, all automation, track-based or region-based, will snap to the absolute Snap value.
Snap Automation to Absolute Value: With this option enabled, all automation, track-based or region-based, will snap to the absolute Snap value.
![]() Automation Snap Offset: Selecting this option enables Automation Snap Offset, which allows you to offset automation to compensate for any latency you may incur because of hardware, plug-in processing needs, or any other source of latency. Automation Snap Offset is covered in more detail in Chapter 10.
Automation Snap Offset: Selecting this option enables Automation Snap Offset, which allows you to offset automation to compensate for any latency you may incur because of hardware, plug-in processing needs, or any other source of latency. Automation Snap Offset is covered in more detail in Chapter 10.
The Drag Menu
The majority of the Drag menu options determine how regions will react when two regions are moved into the same space, called overlapping (as the regions will then overlap each other). The exceptions are the Shuffle modes, which determine how regions respond when dragged or cut. The Drag menu options are as follows:
![]() Overlap: In this mode, two regions can overlap, with the region you are dragging covering the region being overlapped. Be careful not to lose one region behind another in this mode! You can always move regions to expose a region hidden due to overlapping.
Overlap: In this mode, two regions can overlap, with the region you are dragging covering the region being overlapped. Be careful not to lose one region behind another in this mode! You can always move regions to expose a region hidden due to overlapping.
![]() No Overlap: In this mode, two regions are not allowed to overlap. If you move a region into a position in which it would overlap another, the region that would be overlapped is simply resized. Remember, you can always resize regions back to their original state, so don’t be afraid to use No Overlap mode.
No Overlap: In this mode, two regions are not allowed to overlap. If you move a region into a position in which it would overlap another, the region that would be overlapped is simply resized. Remember, you can always resize regions back to their original state, so don’t be afraid to use No Overlap mode.
![]() X-Fade (Crossfade): This mode acts like Overlap mode for MIDI regions. However, if you overlap two audio regions, Logic Pro will automatically generate a crossfade between the two regions, as shown in Figure 6.69. See Chapter 7 for more information on audio crossfades. You can see the crossfade graphically represented over the overlapping regions.
X-Fade (Crossfade): This mode acts like Overlap mode for MIDI regions. However, if you overlap two audio regions, Logic Pro will automatically generate a crossfade between the two regions, as shown in Figure 6.69. See Chapter 7 for more information on audio crossfades. You can see the crossfade graphically represented over the overlapping regions.
Figure 6.69 Logic will automatically create crossfades for overlapping audio regions with the Drag mode set to X-Fade.
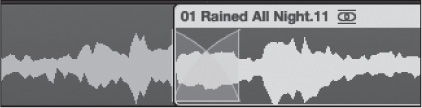
© Apple Inc.
![]() Shuffle R: With Shuffle R mode enabled, if you move a region any distance to the right, it will automatically snap to the region to its immediate right, as shown in Figure 6.70. Obviously, if there is no other region to the right of the region you are moving, this will not happen.
Shuffle R: With Shuffle R mode enabled, if you move a region any distance to the right, it will automatically snap to the region to its immediate right, as shown in Figure 6.70. Obviously, if there is no other region to the right of the region you are moving, this will not happen.
Figure 6.70 As you can see from the two figures, in Shuffle R mode (left), if you move a region even a slight distance to the right, it will snap to the nearest region to its right. Shuffle L (right) mode is identical, but for regions you move left.
© Apple Inc.
![]() Shuffle L: Shuffle L mode operates identically to Shuffle R mode, except that if you move any region to the left, it will snap to the region to its immediate left. Shuffle L operates the same as the Pro Tools Shuffle mode. (Pro Tools does not have two shuffle modes—only one, which operates like Logic Pro’s Shuffle L.)
Shuffle L: Shuffle L mode operates identically to Shuffle R mode, except that if you move any region to the left, it will snap to the region to its immediate left. Shuffle L operates the same as the Pro Tools Shuffle mode. (Pro Tools does not have two shuffle modes—only one, which operates like Logic Pro’s Shuffle L.)
Using Flex Time and Pitch
When you work with MIDI, moving around individual notes or groups of notes to improve their timing or pitch, tailoring them to exactly what you want, is easy. Indeed, there are many different tools you can use to accomplish this. Logic’s many robust MIDI editors give you complete control over every detail of a MIDI performance, and time and pitch quantization let you easily align notes to a grid and a scale. Speeding up or slowing down a MIDI performance alters nothing about the pitch or timing of the performance.
Traditionally, audio has been much more difficult to deal with in these regards. Sampled sound is completely time reliant; making it “elastic” while maintaining an audio file’s sound quality is challenging at best. Logic used to handle this solely through use of the Time and Pitch Machine, which is covered in Chapter 7. Basically, you needed to work very deliberately with your audio to get the desired effect without drastically altering the character of your recording. Then you had the issue of lining up parts of audio performances—in other words, quantizing the audio. Previously, to handle this kind of work, a lot of precision cutting and arranging of audio regions was necessary. For a single timing or pitch issue, this is no big deal, and this is still an easy and effective way to correct such a simple issue, but when you’re dealing with entire sections that have “gotten off the grid,” you’re talking about a significant amount of tedious work.
Flex Time and Flex Pitch editing help make it much easier to manipulate the timing and pitch of your audio files and even give you the ability to actually quantize your audio to the same grid your MIDI performances use. Flex Time offers a number of different modes, which allow you to tailor its effect to each individual track you wish to flex, and it does this all nondestructively. Flex Pitch, on the other hand, is currently useful only on monophonic material.
Enabling Flex View
To work with Flex Time and Pitch, you need to enable Flex view. Flex view is a main window state that adds a Flex menu and Flex button to each audio track header, and therefore hides any automation lanes that may have been visible along with the automation controls in the track header. To enable Flex view, select Edit > Show Flex Pitch/Time, click the Flex button in the local Tracks area menus and buttons area, or use the key command Command+F. Figure 6.71 shows a track header with Flex view enabled.
Figure 6.71 Enabling Flex view gives you access to a Flex button and the Flex menu in each audio track header.
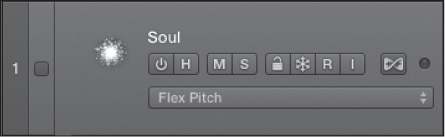
© Apple Inc.
The default Flex state for each audio track is off. You can enable Flex editing for a track by clicking its Flex button or by selecting a Flex mode. Clicking on the Flex menu reveals the different Flex modes available, which are assignable on a per-track basis (see Figure 6.72). When you select a Flex mode or enable the Flex button on a track for the first time, Logic will analyze the audio and create Flex markers—markers that generally denote meaningful points in your audio, such as higher amplitude transients, from which you can stretch or compress your audio. It will also analyze the pitch of your audio and create Flex Pitch bars for Flex Pitch editing. Transient markers are discussed in greater detail in Chapter 7; for now, the important thing to remember is that initially, Flex will use these Flex markers as the “pivot points” around which it will stretch or compress your audio. Flex Pitch bars are discussed later in this chapter.
Figure 6.72 The Flex button, highlighted in the upper-right corner of this image, lets you enable and disable Flex editing for the track. The Flex menu lets you choose the Flex mode you will use for the selected track.

© Apple Inc.
To perform Flex Pitch editing on your monophonic audio, select Flex Pitch in the Flex menu. The Flex Time modes are optimized for working on different types of material. Knowing which Flex Time mode to use with a particular kind of source will greatly improve the results you can achieve with Flex Time. I’ll cover all the different Flex Time modes in more detail in the following sections; for now, here are brief descriptions of the different Flex Time modes:
![]() Automatic: This mode takes Logic’s analysis of the material and automatically selects what it deems to be the appropriate Flex Time mode for the audio.
Automatic: This mode takes Logic’s analysis of the material and automatically selects what it deems to be the appropriate Flex Time mode for the audio.
![]() Monophonic: Monophonic mode is great for flexing single vocal parts and other single-note passages.
Monophonic: Monophonic mode is great for flexing single vocal parts and other single-note passages.
![]() Slicing: Slicing mode allows you to flex your audio without applying any time compression or stretching. It works best with percussive sounds.
Slicing: Slicing mode allows you to flex your audio without applying any time compression or stretching. It works best with percussive sounds.
![]() Rhythmic: Rhythmic mode is great for flexing chordal rhythm parts.
Rhythmic: Rhythmic mode is great for flexing chordal rhythm parts.
![]() Polyphonic: Polyphonic mode is best used on chordal material, particularly less rhythmic material you want to flex.
Polyphonic: Polyphonic mode is best used on chordal material, particularly less rhythmic material you want to flex.
![]() Speed (FX): Speed mode simply affects the playback speed of the source material. Your audio’s pitch will be affected in Speed mode.
Speed (FX): Speed mode simply affects the playback speed of the source material. Your audio’s pitch will be affected in Speed mode.
![]() Tempophone (FX): Tempophone mode provides an effect similar to a tape-based time-stretching device called the Tempophone.
Tempophone (FX): Tempophone mode provides an effect similar to a tape-based time-stretching device called the Tempophone.
You can also set the Flex mode in the Track Inspector of the selected track. There are added Flex parameters available in the Track Inspector for most Flex modes. In addition, remember that the only way to completely disable Flex mode for a track is to turn Flex mode off in the Track Inspector. You can disable Flex mode for individual regions by deselecting the Flex checkboxes in their Region Inspectors. Let’s deal with the basics of Flex Time, such as creating and moving Flex markers, which are generally derived from transient markers. Then we’ll look at each Flex Time mode’s parameters in more detail. After that, we’ll get into Flex Pitch editing.
Flex Time Editing Basics
The basics of Flex Time stretching or compressing are incredibly simple. You can stretch or compress an entire region if you wish, or you can just alter the timing of a small section of a region. Figure 6.73 shows a region with Flex view engaged. Note the white vertical lines—these are the transient markers.
Figure 6.73 When Flex view is on, regions on tracks that have Flex Time enabled show vertical transient markers. Transient markers are points in your audio from which you can stretch or compress your audio.

© Apple Inc.
To stretch or compress an audio region on a Flex Time–enabled track, simply move your cursor to the beginning or end of the region and drag the region. Figure 6.74 shows the region in Figure 6.73 stretched to the next barline.
Figure 6.74 To stretch or compress an entire audio region, simply drag either end of the region.

© Apple Inc.
Stretching or compressing a section of your audio within a region is just as simple. First, drag the cursor into the top half of your Flex Time–enabled audio region. You’ll notice the cursor changes to a vertical line. I’ll discuss the function of that cursor mode in the next section. What you need to do now is drag the cursor near a transient marker. This changes the cursor from a simple vertical line to a line with a triangle at the top. When you see this cursor, shown on the left side of Figure 6.75, click your mouse, and a Flex marker will be created at the location of the selected transient marker, as shown on the right side of Figure 6.75.
Figure 6.75 Moving the cursor near a transient marker in a Flex Time–enabled audio region changes the cursor to a Flex marker tool. The Flex marker tool lets you change a transient marker to a Flex marker with a simple click of the mouse.
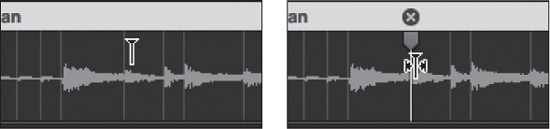
© Apple Inc.
Now you can drag the selected Flex marker left or right. Again, when you move the cursor over the Flex marker, the cursor mode changes to a tool that adds what look like miniature audio waveforms emanating from either side of the Flex marker tool, as shown in the right side of Figure 6.75. When the cursor changes to this mode, you can drag the selected Flex marker.
If you move your newly selected Flex marker, you’ll notice something that could be problematic: The entire region is affected, not just the audio in the immediate area of the Flex marker. If this is all you could accomplish with Flex Time editing, it would make Flex Time editing less than “flexible.” To affect the timing of a particular section of your audio region, you need to create Flex markers to either side of the Flex marker you wish to move. Obviously, that means if you are moving the beginning or end of a region, you only need to create one Flex marker to the right or the left, respectively.
In the middle of a region, you would need to create three Flex markers to flex a particular bit of audio—the Flex marker you wish to move and markers to create boundaries to either side. You can, of course, create these individually, and there may be times when that would be advantageous—for example, when flexing an area that encompasses multiple transient markers—but you can also use another cursor mode to accomplish this. Move the cursor to the bottom half of your Flex Time–enabled audio region. The Flex marker tool now has three vertical lines, as you can see in Figure 6.76.
Figure 6.76 When you move the cursor to the lower half of a Flex Time–enabled region, the Flex marker tool has three vertical lines.
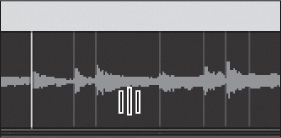
© Apple Inc.
As with the Flex marker tool in the upper half of an audio region, moving the tool next to a transient marker adds triangles to the top of each vertical line. Clicking your mouse will then create Flex markers for the selected transient marker and the transient markers immediately to the right and left of the selected transient marker, as shown in Figure 6.77.
Figure 6.77 Clicking on the selected transient marker changes it and the transient markers to its immediate right and left into Flex markers.
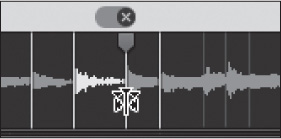
© Apple Inc.
You can now move the middle Flex marker, which will affect only the audio between the outer Flex markers, which you can see in Figure 6.78.
Figure 6.78 With three Flex markers now created, you can freely move the middle Flex marker and affect only the audio within the outer Flex markers.

© Apple Inc.
If you don’t like your edits, you can always undo them. If you find that you want to reset all your edits to their original state, you can right-click on the region and select Reset All Flex Edits from the menu that appears.
Flex Markers Versus Transient Markers: If you think that Flex and transient markers are the same things, or you’re confused about the difference, don’t be alarmed—they are similar, and this can be quite confusing! Thankfully, once explained, it becomes obvious. You’ll never forget again, and it will make all of Logic’s Flex Time features make more sense.
As written, transients refer to the characteristics of the audio file—generally moments of peak amplitude that are rhythmically and musically important. Therefore, transient markers are part of the audio file, as they relate to the recorded material itself. These markers inform the time stretching algorithms how to work their magic.
Flex markers, however, relate to the Flex Time stretching and compression feature of Logic. So it is the Flex markers (and the Flex markers alone) that you use to stretch and compress your audio in the Tracks area. In other words, with few exceptions, if you are working with Flex Time in the Tracks area and Audio Track editor, you’ll be working with Flex markers, and if you’re working with audio transient markers, you’ll be working in the Audio File editor. (More on transient markers in Chapter 7.)
You’ll see in a moment that there are a few exceptions, such as creating Flex markers from another audio file’s transient markers or using Flex with regions that don’t have tempo information, but the preceding is true in all other cases. If you’re “flexing” audio in the Tracks area, just worry about Flex markers.
Flexing your audio’s time is just that simple, but there’s a lot more depth in Flex Time editing than these simple elements. What if the transient markers don’t line up with the points in your audio you want to flex? Let’s find out.
Creating New Flex Markers
Creating your own Flex markers, independent of the transient markers Logic has created, is every bit as easy as it was to convert a transient marker into a Flex marker. Remember that when the Flex marker tool is in the upper half of a Flex Time–enabled audio region and is not near a transient marker, it is a single vertical line? To create a single Flex marker at a location you determine, simply move the Flex marker tool to the point in your audio where you would like to create a Flex marker and click your mouse. Figure 6.79 shows the same section of audio that we have been using since Figure 6.76, but notice the Flex marker created in a location where there was no transient marker.
Figure 6.79 To create a new Flex marker, click your mouse in the upper half of your Flex Time–enabled region at the point you want to flex.
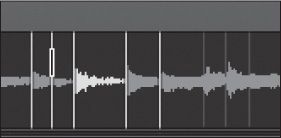
© Apple Inc.
Similarly, when you click the mouse in the lower half of your audio region away from a transient marker, a Flex marker will be created at that point and at the transient markers to the immediate right and left of that point, which you can see in Figure 6.80.
Figure 6.80 Clicking in the lower half of a Flex Time–enabled audio region away from a transient marker creates Flex markers at the point you click and at the transient markers to the immediate right and left.
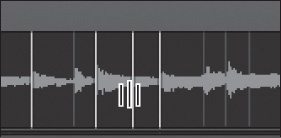
© Apple Inc.
Creating Flex Markers with the Marquee Tool
You can also use the Marquee tool to create Flex markers. Here’s how:
1. Select an area of your Flex Time–enabled audio region with the Marquee tool.
2. Switch to the Pointer tool.
3. Drag the cursor over the upper half of the audio region in the marquee area. The cursor becomes a Hand tool.
4. Click on the marquee area with the Hand tool. Flex markers will be created at the edges of the marquee area and at the transient markers to the immediate right and left, as shown in Figure 6.81.
Figure 6.81 When you click with the Hand tool on the upper half of a marquee selection in your Flex Time– enabled audio region, Flex markers are created at the edges of the marquee area and at the transient markers to the immediate right and left of the marquee region.
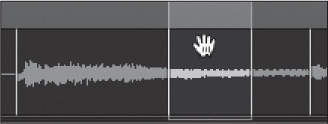
© Apple Inc.
When you click in the lower half of your marquee selection, Flex markers are created at the edges of the marquee area and at the point your clicked.
Creating Flex Markers from Another Audio Region’s Transients
There may come a time when you’re working on a project and you want to line up a Flex marker in one audio region with a transient marker in another audio region. Here’s how:
1. Make sure the regions are on adjoining tracks.
2. Click on the region in which you would like to create the new Flex marker.
3. While pressing the mouse button, drag the cursor to the adjacent track, find the transient marker from which you’d like to create your new Flex marker, and release the mouse button.
When you drag the cursor over the second region, a Flex marker line will extend through both regions, allowing you to clearly see what you’re doing, and the line will snap to the transient markers of the second region as you move the cursor. You can see this process in action in Figure 6.82. The left image in Figure 6.82 shows two Flex Time–enabled regions. The lower region has few transient markers in the selected area, and we’d like to create a new Flex marker from a transient in the upper region. Therefore, the left image shows the two regions before we do anything. The middle image shows the two regions as we drag the cursor from the lower region into the upper region. The right image shows the resulting Flex marker.
Figure 6.82 Left: The lower region has few transient markers, and we’d like to create a Flex marker at the exact location of a transient marker in the upper region. Middle: Clicking on the lower region and dragging the cursor to the upper region lets you snap the Flex marker tool to the transients in the upper region. Right: The Flex marker in the lower region is at the exact location of its parent transient marker in the region above.

© Apple Inc.
If you click on the lower half of the destination region and drag to the second region, three Flex markers will be created—two at the transient markers to the right and left of where you clicked and one in line with the parent transient marker in the second region. Note that regardless of where you click in the destination region, moving the cursor left or right as you select a parent transient will affect the audio in the destination region, so you want to begin by clicking in an area very close to the location of the parent transient to avoid any unnecessary impact on your audio.
Flexing Audio with an Unknown or Inconsistent Tempo: Flexing audio when Logic doesn’t know the tempo of the audio material—either because the file has no tempo information, because it wasn’t played to a click, or because it otherwise changes tempo—can lead to some pretty awful results. Luckily, with the Detect Tempo command and beat-mapping track, you can make Flex work wonders even in these difficult situations. Chapter 5 talked about the beat-mapping track, which lets you create a tempo map for an audio file that doesn’t keep a consistent tempo. You can use this to generate tempo information and then embed that tempo information to the audio file.
First, refer to Chapter 5 on how to create a beat-mapping global track and use that to create a tempo map of your audio file. If your audio file is consistent in tempo, the Edit > Tempo > Detect Tempo of Selected Region command might be enough.
Once Logic has generated tempo information for the audio file, use the command Edit > Tempo > Export Tempo Information to Audio File. After you export the tempo information to the audio file, that tempo information will then be used to create transient markers when Logic subsequently detects transients in Flex mode. Now you should be able to flex your audio with good results!
Moving and Deleting Flex Markers
There will probably be times when you create a Flex marker, but you’re not entirely happy with its exact location. You could always undo the action and create another Flex marker, or you could just move the one you have. To move a Flex marker, Option-drag the marker to the desired location, as in Figure 6.83. You can see the parent transient marker to the right of the moved Flex marker.
Figure 6.83 To move an existing Flex marker to a new location, Option-drag the marker.
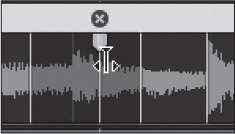
© Apple Inc.
To delete a Flex marker, you can double-click it, click the circle with an × in it at the top of the Flex marker (refer to Figure 6.83), right-click on it and select Delete Flex Marker in the menu that appears, or click it with the Eraser tool. You can delete multiple Flex markers by dragging the Eraser tool across them. You can also delete Flex markers you have created in a region by right-clicking on the region and selecting Reset Manual Flex Edits from the contextual menu that opens.
Flex Pitch Editing Basics
Flex Pitch editing in the Tracks area is fairly basic compared to Flex Time editing. For one thing, you can really only work with monophonic material—at least that’s the current limitation. There are other pitch-correction programs out there such as Melodyne editor that can work on polyphonic material, so if you need to work on polyphonic material, you’re going to have to use other options for now. I’m pretty sure that when you see how easy it is to use Flex Pitch in the Tracks area, and then see how powerful the Flex Pitch editing tools are in the Audio Track editor (Chapter 7), that you’ll be clamoring for Apple to introduce polyphonic Flex Pitch editing like I am.
To begin Flex Pitch editing, select Flex Pitch in the Flex menu in the track header for the track containing your monophonic audio. With the Flex button enabled, the Flex Pitch bars will be visible in the audio region, as shown in Figure 6.84.
Figure 6.84 Flex Pitch bars appear in Flex Pitch editing–enabled audio regions, letting you drag notes to pitch.

© Apple Inc.
The Flex Pitch bars show how far away from pitch each analyzed note is, +/–50 cents, or up to a half a semitone sharp or flat. Flex Pitch editing in the Tracks area couldn’t be simpler. Notes that are sharp extend above the center line, notes that are flat extend below. The center line denotes perfect pitch. To change the fine tuning of a note, simply drag its Flex bar with the cursor, which changes to a Resize cursor (see Figure 6.85). When you drag or click and hold a note, the audio at that location in your note plays, looping the current formant (formants are covered in the section “Flex Pitch Mode” later in this chapter). The pitch of the audio changes as you drag the Flex bar. The closer to the center line you drag the note, the more in tune it will be. A help tag will open telling you the pitch of the note and the fine-tuning adjustments you are making. Figure 6.85 shows the same audio from Figure 6.84 with Flex Pitch adjustments. Note the help tag with position, pitch, and fine-tuning info.
There are limitations to the pitch correction, though. Characteristics of a note like vibrato and pitch drift aren’t forced in tune. Therefore, when you move a note toward absolute pitch, the note in its entirety is moved relative to itself, with the bits that are sharp or flat remaining just as sharp or flat as they were earlier relative to the new pitch setting. This may seem like cause for concern; you might have thought that Flex Pitch would completely correct your tuning issues. Rest assured, there’s no need for alarm. Logic would rather preserve the intent of the performance first and give you the tools to edit further if need be. You’ll find out just how extensively you can Flex Pitch edit audio in Chapter 7.
Figure 6.85 The same audio from Figure 6.84, but with some Flex Pitch edits, plus one in progress. Note the help tag offering position, pitch, and fine-tuning info.

© Apple Inc.
There are only a few other things to know about Flex Pitch editing in the Tracks area. First, if you keep dragging the fine tuning of a note up or down beyond the half semitone variance around the analyzed pitch, you can change the tuning of the note to the next pitch higher or lower, respectively. You can quickly tune a note by clicking it with the Resize cursor (the note will be highlighted like the note being edited in Figure 6.85), then right-clicking and selecting Set to Perfect Pitch from the menu that appears. This will adjust the note to the exact analyzed pitch, with the vibrato and pitch drift intact. You can select a region, right-click, and select Set All to Perfect Pitch to tune the entire region. You can undo Flex Pitch edits for a note by selecting the note and choosing Set to Original Pitch in the right-click menu, or select the region and choose Set All to Original Pitch in the right-click menu. You can select multiple notes to edit using any of the aforementioned methods using the same techniques you would for selecting multiple regions with the cursor: Shift-clicking, Command-clicking, and lassoing. Edits made to multiple selected notes are relative to the note you choose to drag. When you drag the selected note to perfect pitch, it is no longer editable, but if you continue to drag, the other notes will continue to be edited until they reach perfect pitch. Again, there are much more extensive editing facilities available in the Audio Track editor—some you may find very surprising.
Flex Mode Parameters
Each Flex mode, with the exception of Speed, has at least one parameter available in the Track Inspector. In addition, you can change the Flex mode of the selected track in the Track Inspector. Figure 6.86 shows the Track Inspector of a track in Slicing mode. Let’s look at the parameters of the different Flex modes.
Figure 6.86 The Track Inspector for a track in Slicing mode.
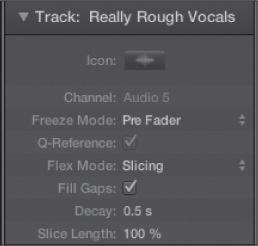
© Apple Inc.
Slicing Mode
Slicing mode basically slices the audio and flexes it without stretching or compressing the audio. When a track is in Slicing mode, its Track Inspector offers the following parameters:
![]() Fill Gaps: Selecting Fill Gaps ensures that any gaps between slices are filled per the Decay parameter.
Fill Gaps: Selecting Fill Gaps ensures that any gaps between slices are filled per the Decay parameter.
![]() Decay: The Decay parameter lets you set a decay time for the Fill Gaps parameter.
Decay: The Decay parameter lets you set a decay time for the Fill Gaps parameter.
![]() Slice Length: This parameter lets you control the length of each slice as a percentage. When you set this parameter below 100%, you are effectively shortening each slice, so the Fill Gaps and Decay parameters are not available.
Slice Length: This parameter lets you control the length of each slice as a percentage. When you set this parameter below 100%, you are effectively shortening each slice, so the Fill Gaps and Decay parameters are not available.
Rhythmic Mode
Rhythmic mode is good for rhythmic chordal parts. As such, flexing the audio can create some unwanted artifacts that the Rhythmic mode parameters help to mitigate. The Rhythmic mode parameters are as follows:
![]() Loop Length: This parameter lets you define the length as a percentage of the end of a time-stretched section of your audio that will be looped. This is similar to the looping that one might perform in the decay phase of a sampled instrument to help ensure a more natural decay phase.
Loop Length: This parameter lets you define the length as a percentage of the end of a time-stretched section of your audio that will be looped. This is similar to the looping that one might perform in the decay phase of a sampled instrument to help ensure a more natural decay phase.
![]() Decay: This parameter lets you define the decay time of any looping that will occur.
Decay: This parameter lets you define the decay time of any looping that will occur.
![]() Loop Offset: This parameter lets you move the start point of the looped section up to 100 ms earlier.
Loop Offset: This parameter lets you move the start point of the looped section up to 100 ms earlier.
Monophonic Mode
Monophonic mode works best on monophonic sources. There is only one parameter for Monophonic mode: the Percussive checkbox. Select the Percussive checkbox if your source audio is more percussive, or staccato. Otherwise, leave this option deselected.
Polyphonic Mode
Polyphonic mode works best on more legato polyphonic material and is a very processor-hungry Flex mode. As with Monophonic mode, Polyphonic mode offers only a single parameter, Complex. Selecting Complex allows for more internal transients in your audio.
Tempophone Mode
Tempophone mode is not the mode you would want to use for natural-sounding flexing, as it produces a more grainy effect. Tempophone mode offers two parameters:
![]() Grain Size: This parameter defines the size of each grain of audio in milliseconds, from 0.10 ms to 500 ms.
Grain Size: This parameter defines the size of each grain of audio in milliseconds, from 0.10 ms to 500 ms.
![]() Crossfade: This parameter controls the amount of crossfade from one grain to the next. The lower the setting, the less crossfading you will hear.
Crossfade: This parameter controls the amount of crossfade from one grain to the next. The lower the setting, the less crossfading you will hear.
Flex Pitch Mode
Flex Pitch mode offers two parameters:
![]() Formant Track: Formants are aspects of vocal sounds that, basically, allow us to distinguish vowels, the most resonant part of speech and singing. When shifting the pitch of audio, the formants are affected. The Formant Track setting lets you increase the frequency at which Logic looks for formants in your audio. The higher the Formant Track setting, the more frequently Logic looks for formants.
Formant Track: Formants are aspects of vocal sounds that, basically, allow us to distinguish vowels, the most resonant part of speech and singing. When shifting the pitch of audio, the formants are affected. The Formant Track setting lets you increase the frequency at which Logic looks for formants in your audio. The higher the Formant Track setting, the more frequently Logic looks for formants.
![]() Formant Shift: This parameter lets you tune the formants up or down, relative to the pitch of the audio. This can be useful for correcting artifacts created by Flex Pitch editing and making the audio sound more natural, particularly when changing the pitch drastically.
Formant Shift: This parameter lets you tune the formants up or down, relative to the pitch of the audio. This can be useful for correcting artifacts created by Flex Pitch editing and making the audio sound more natural, particularly when changing the pitch drastically.
Using the Flex Tool
The Flex tool is useful for quick Flex edits of audio when you are not in Flex view—that is, when Flex view is disabled via the master Flex view commands, Command+F, or the Flex Edit button at the top of the Tracks area. It can use the transients detected in your audio as guides, much like you would see when creating three Flex markers with the Flex marker tool and moving the middle Flex marker. Figure 6.87 shows the Flex marker tool being used to flex a bit of audio.
Figure 6.87 The Flex tool lets you flex your audio when you’re not in Flex view.
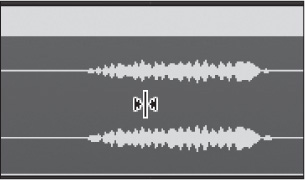
© Apple Inc.
When the Flex tool nears a transient, its appearance changes, and you can then flex your audio at that transient. Figure 6.88 shows the Flex tool near a transient.
Figure 6.88 You can flex your audio at transients with the Flex tool, too.
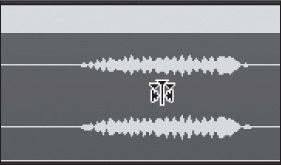
© Apple Inc.
You can use the Marquee tool in conjunction with the Flex tool. Select an area of your audio region with the Marquee tool, switch to the Flex tool, and you can flex the selected area as you would when you click the upper half of a marquee selection in Flex view.
In addition, you can move Flex markers with the Flex tool in the same way you can when in Flex mode. Drag the Flex tool to a transient, as in Figure 6.88, and Option-drag the marker to the desired location.
Adding Files to the Tracks Area
As noted, recording audio and MIDI is not the only way to create regions. You can also add preexisting files into the main window in Logic. There are a number of ways to add files:
![]() As explained, if you click the Pencil tool in an audio track, Logic will present you with the Add File dialog box to select an audio file to add at the clicked position.
As explained, if you click the Pencil tool in an audio track, Logic will present you with the Add File dialog box to select an audio file to add at the clicked position.
![]() By choosing File > Import > MIDI File or > Audio File (Shift+Command+I), you can import audio or MIDI files into Logic. The file will be placed at the nearest rounded playhead position.
By choosing File > Import > MIDI File or > Audio File (Shift+Command+I), you can import audio or MIDI files into Logic. The file will be placed at the nearest rounded playhead position.
![]() You can drag audio or MIDI files from your computer’s desktop (or any file directory) onto your Tracks area. This method drops the dragged audio or MIDI file directly onto a track on the Tracks area. If it is an audio file, this method also adds the file to the Project Audio Browser.
You can drag audio or MIDI files from your computer’s desktop (or any file directory) onto your Tracks area. This method drops the dragged audio or MIDI file directly onto a track on the Tracks area. If it is an audio file, this method also adds the file to the Project Audio Browser.
![]() You can drag audio or MIDI files from the All Files Browser to the Tracks area. The All Files Browser is explained in detail in Chapter 12.
You can drag audio or MIDI files from the All Files Browser to the Tracks area. The All Files Browser is explained in detail in Chapter 12.
![]() If you are working with an audio file, you can add it to the Project Audio Browser using the Add Audio File command and then drag that file from the Project Audio Browser into the Tracks area or use the Add to Tracks command. These methods are explained in more detail in the next chapter.
If you are working with an audio file, you can add it to the Project Audio Browser using the Add Audio File command and then drag that file from the Project Audio Browser into the Tracks area or use the Add to Tracks command. These methods are explained in more detail in the next chapter.
Using Folders When Importing Standard MIDI Files: Sasso has another great tip for how folder tracks can assist when importing Standard MIDI Files into Logic:
If a Standard MIDI File (SMF) has multiple tracks, dragging it to the [Tracks area] will create a separate region for each track. To keep them together and well organized, first create an empty folder, then open it and drag the SMF into the main window displaying the folder’s contents. If some of the resulting regions contain multiple channels, use Demix by MIDI Channel to further separate them.
Bouncing in Place
Bouncing tracks and regions in place, like freezing tracks and turning tracks off, is another great way to conserve system resources. A track or region that is bounced in place is given some of the same options that you see when you bounce your project, with added control over things such as volume and pan automation and whether new tracks are created for the bounced files. It allows you to bounce tracks directly into your project that you are “finished” with without the extra burden of deleting regions on your selected track or adding tracks to your project and dragging the bounced file into the new track and lining it up properly. It also allows you the flexibility to use external gear via the External Instrument or I/O plug-in.
Bouncing Tracks in Place
The Bounce Track in Place command lets you bounce an entire track and have the resulting bounce file automatically added back into the Tracks area. To use the Bounce Track in Place command, select the track you wish to bounce in place and then select File > Bounce > Track in Place or use the key command Command+Control+B. The Bounce Track in Place dialog box, shown in Figure 6.89, will open, giving you some options for how Logic will handle the bounce in place.
Figure 6.89 The Bounce Track in Place dialog box gives you a number of different options for controlling how Logic performs the bounce in place.

© Apple Inc.
The options in the Bounce Track in Place dialog box are as follows:
![]() Name: The Name field is automatically populated based on the track name, but you can rename the bounced file if you wish.
Name: The Name field is automatically populated based on the track name, but you can rename the bounced file if you wish.
![]() New Track: If you select New Track as the destination for your bounced file, Logic will create a new track below the selected track, and the bounced file will be added to the new track.
New Track: If you select New Track as the destination for your bounced file, Logic will create a new track below the selected track, and the bounced file will be added to the new track.
![]() Replace Track: If you select Replace Track as the destination for your bounced file, Logic will bounce the selected track and place it on a new track that replaces the original track.
Replace Track: If you select Replace Track as the destination for your bounced file, Logic will bounce the selected track and place it on a new track that replaces the original track.
![]() Include Instrument Multi-Outputs: If you are bouncing a multi-output software instrument in place, selecting this command will also bounce the output of any dependent aux channels into your bounce file.
Include Instrument Multi-Outputs: If you are bouncing a multi-output software instrument in place, selecting this command will also bounce the output of any dependent aux channels into your bounce file.
![]() As Additional Tracks: This option lets you create a separate bounce file for each multi-instrument aux output.
As Additional Tracks: This option lets you create a separate bounce file for each multi-instrument aux output.
![]() Bypass Effect Plug-Ins: When you select this option, any effects plug-ins on the track will be bypassed for the bounce.
Bypass Effect Plug-Ins: When you select this option, any effects plug-ins on the track will be bypassed for the bounce.
![]() Include Volume/Pan Automation: When you select this option, any volume or pan automation on the selected track will be performed during the bounce-in-place process.
Include Volume/Pan Automation: When you select this option, any volume or pan automation on the selected track will be performed during the bounce-in-place process.
![]() Normalize: The Normalize menu gives you options for normalizing the signal in the bounce, or finding the peak transient and increasing it to 0dBFs, and increasing the level of the rest of the file by the same amount. For more on the Normalize menu and its functions, see the section “Bouncing Your Mix” in Chapter 11.
Normalize: The Normalize menu gives you options for normalizing the signal in the bounce, or finding the peak transient and increasing it to 0dBFs, and increasing the level of the rest of the file by the same amount. For more on the Normalize menu and its functions, see the section “Bouncing Your Mix” in Chapter 11.
Click OK, and the track will be bounced, with the resulting file(s) added back to the Tracks area per your instructions. Figure 6.90 shows a track before and after a bounce in place.
Figure 6.90 A track before and after using the Bounce Track in Place command.

© Apple Inc.
Bouncing Regions in Place
Bouncing regions in place is very similar to bouncing a track in place. This command allows you to selectively bounce the regions on a track either alone or in combination with other regions. To use the Bounce Regions in Place command, select the regions you wish to bounce in place and then select File > Bounce > Regions in Place or use the key command Control+B. The Bounce Regions in Place dialog box, shown in Figure 6.91, will open, giving you some options for how Logic will handle the bounce in place.
Figure 6.91 The Bounce Regions in Place dialog box.

© Apple Inc.
As you can see, some of the options in the Bounce Regions in Place dialog box are identical to those in the Bounce Track in Place dialog box shown in Figure 6.90. There are a few differences, though. The unique options in the Bounce Regions in Place dialog box are as follows:
![]() Selected Track: If you select Selected Track as the destination for your bounced file, Logic will bounce the selected regions and place them on the selected track.
Selected Track: If you select Selected Track as the destination for your bounced file, Logic will bounce the selected regions and place them on the selected track.
![]() Leave: Selecting Leave keeps the parent regions intact and active after the bounce.
Leave: Selecting Leave keeps the parent regions intact and active after the bounce.
![]() Mute: Selecting Mute mutes the parent regions after the bounce.
Mute: Selecting Mute mutes the parent regions after the bounce.
![]() Delete: Selecting Delete deletes the parent regions from the main window after the bounce.
Delete: Selecting Delete deletes the parent regions from the main window after the bounce.
![]() Include Audio Tail in File: Selecting this option ensures that the bounce will continue until the very end of the region’s audio tail, although the resulting region will match the length of the original region.
Include Audio Tail in File: Selecting this option ensures that the bounce will continue until the very end of the region’s audio tail, although the resulting region will match the length of the original region.
![]() Include Audio Tail in Region: This option ensures that the full extent of the audio tail will be included in the resulting bounce region.
Include Audio Tail in Region: This option ensures that the full extent of the audio tail will be included in the resulting bounce region.
Click OK, and the selected regions will be bounced and added back to the Tracks area per your instructions in the Bounce Regions in Place dialog box. Figure 6.92 shows two regions selected on one track and the bounce file that is produced when those regions are bounced in place.
Figure 6.92 Two regions on the top track are selected and bounced in place, resulting in the new lower track and the new region on it.

© Apple Inc.
Bouncing All Tracks in Place
In addition to these track and region bounce-in-place functions, you can also bounce your entire project in place. Select File > Bounce > And Replace All Tracks. First you will be greeted with a warning dialog box inviting you to save your project. Since you’re a smart Logic user, you’ll select Yes because even though you save your projects regularly, it never hurts to save it one more time before performing a huge operation. After you select your save option, the Bounce Replace All Tracks dialog box, shown in Figure 6.93, will appear.
Figure 6.93 The Bounce Replace All Tracks dialog box.
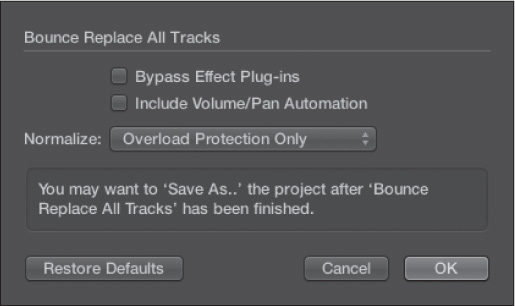
© Apple Inc.
There are two options and one menu in the Bounce Replace All Tracks dialog box, which are identical in function to the same commands in the Bounce Track in Place dialog box. Click OK, and your entire project will be bounced in place!
Other Transient-Related Functions in the Main Window
The use of transient markers in Logic Pro is extensive, and the more you get used to working with them and their related processes, the more mileage you’ll get out of Logic. There are a few more processes in the main window that use transient markers to perform their functions, and we’ll explore those processes now.
Replacing and Doubling Drum Tracks
One very handy function in the main window that makes use of transient markers is the Drum Replacement/Doubling command found in the Track menu or accessed via the key command Control+D. When you run this command on a track, the regions on the track are analyzed for transients, a software instrument track with EXS24 loaded is created, and trigger notes in the correct places are created immediately below the selected track, as shown in Figure 6.94. In addition, the Drum Replacement/Doubling dialog box, shown in Figure 6.95, opens. The Library tab is also opened, allowing you to select a different replacement drum sound.
Figure 6.94 When you run the Drum Replacement/Doubling command, the regions on the selected track are analyzed for transients. A software instrument track is added directly below the selected track. A region with trigger notes in line with the transients derived from the audio track is created, and an EXS24 instance with the appropriate triggered drum sound is instantiated.
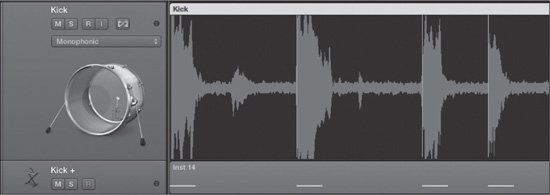
© Apple Inc.
Figure 6.95 The Drum Replacement/Doubling dialog box.
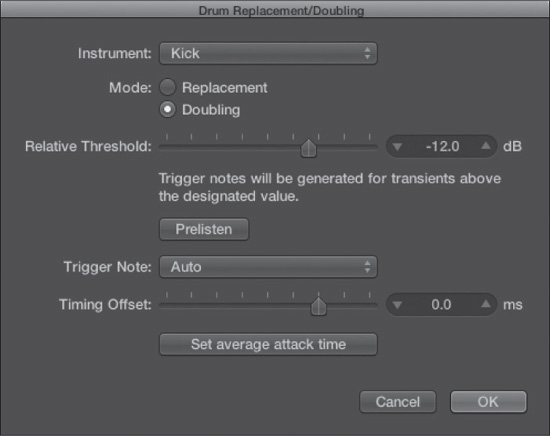
© Apple Inc.
The Drum Replacement/Doubling dialog box gives you a variety of options for defining how your drums are doubled or replaced:
![]() Instrument: The Instrument menu lets you define what kind of drum will be processed. The type of drum you define here will be loaded in the EXS24 instance on the related software instrument track. The Instrument menu options are Kick, Snare, Tom, and Other. You could therefore, for example, analyze a kick drum pattern but replace it with a snare drum if you wanted.
Instrument: The Instrument menu lets you define what kind of drum will be processed. The type of drum you define here will be loaded in the EXS24 instance on the related software instrument track. The Instrument menu options are Kick, Snare, Tom, and Other. You could therefore, for example, analyze a kick drum pattern but replace it with a snare drum if you wanted.
![]() Replacement: If you select Replacement, the original track will be muted, and the new software instrument track sound will replace the original sound.
Replacement: If you select Replacement, the original track will be muted, and the new software instrument track sound will replace the original sound.
![]() Doubling: If you select Doubling, the new software instrument sound will double the original audio track.
Doubling: If you select Doubling, the new software instrument sound will double the original audio track.
![]() Relative Threshold: The Relative Threshold control lets you define the threshold below which transients will be ignored. The lower the setting, the more transients will be doubled or replaced; the higher the setting, the fewer will be doubled or replaced.
Relative Threshold: The Relative Threshold control lets you define the threshold below which transients will be ignored. The lower the setting, the more transients will be doubled or replaced; the higher the setting, the fewer will be doubled or replaced.
![]() Prelisten: Clicking Prelisten lets you hear the results you will achieve with the current Drum Replacement/Doubling dialog box settings.
Prelisten: Clicking Prelisten lets you hear the results you will achieve with the current Drum Replacement/Doubling dialog box settings.
![]() Trigger Note: The Trigger Note menu lets you define what note will be triggered. This is particularly handy if you are going to use a custom drum kit for replacement or doubling or a drum at a non-standard note in Ultrabeat, for example. Auto sets the note based on the Instrument setting to the appropriate General MIDI note.
Trigger Note: The Trigger Note menu lets you define what note will be triggered. This is particularly handy if you are going to use a custom drum kit for replacement or doubling or a drum at a non-standard note in Ultrabeat, for example. Auto sets the note based on the Instrument setting to the appropriate General MIDI note.
![]() Timing Offset: The Timing Offset setting lets you alter the placement of the replaced or doubled drums forward or backward in milliseconds.
Timing Offset: The Timing Offset setting lets you alter the placement of the replaced or doubled drums forward or backward in milliseconds.
![]() Set Average Attack Time: Clicking this button sets an offset for the slicing position for all regions on the parent audio track.
Set Average Attack Time: Clicking this button sets an offset for the slicing position for all regions on the parent audio track.
When you’re finished tweaking the settings to achieve the desired result, click OK, and you’re done!
Converting Regions to Sampler Tracks
You can also turn regions into EXS24 sampler instrument settings by executing the Convert Regions to New Sampler Track command in the Track menu, also accessible via the key command Control+E. When you select an audio region or regions and execute the Convert Regions to New Sampler Track command, the Convert Regions to New Sampler Track dialog box, shown in Figure 6.96, will open.
Figure 6.96 The Convert Regions to New Sampler Track dialog box.
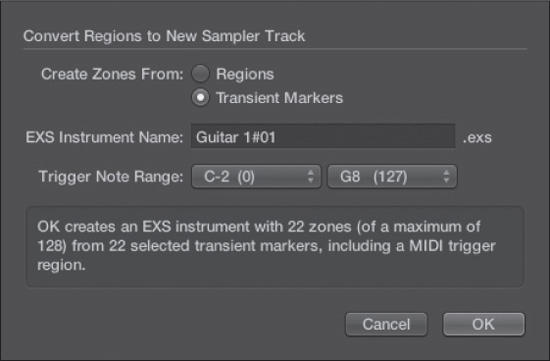
© Apple Inc.
The options in the Convert Regions to New Sampler Track dialog box are as follows:
![]() Regions: When you select the Convert Zones from Regions option button, a new EXS24 zone will be created for each selected region.
Regions: When you select the Convert Zones from Regions option button, a new EXS24 zone will be created for each selected region.
![]() Transient Markers: When you select the Convert Zones from Transient Markers option button, the zones in the new EXS24 instrument will be created using the transient markers in the selected audio regions. The result is similar to what you would find in a ReCycle file, where the audio is sliced into “playable” bits.
Transient Markers: When you select the Convert Zones from Transient Markers option button, the zones in the new EXS24 instrument will be created using the transient markers in the selected audio regions. The result is similar to what you would find in a ReCycle file, where the audio is sliced into “playable” bits.
![]() EXS Instrument Name: You can name your new EXS24 instrument here.
EXS Instrument Name: You can name your new EXS24 instrument here.
![]() Trigger Note Range: The Trigger Note Range menus let you define the upper and lower extent to which the newly created zones will be mapped in EXS24, from C-2 to G8.
Trigger Note Range: The Trigger Note Range menus let you define the upper and lower extent to which the newly created zones will be mapped in EXS24, from C-2 to G8.
When you click OK, the audio is processed per your instructions, a new software instrument track is created directly below the parent track with an instance of EXS24 loaded with your new sampler instrument, and a region is created on the new track with trigger notes created to play back your new instrument exactly like the parent audio region(s). You can see this in Figure 6.97.
Figure 6.97 When you execute the Convert Regions to New Sampler Track command, a new software instrument track is created under the parent track, with your new sampler instrument loaded into EXS24. A region featuring the appropriate trigger notes for playing back your sampler instrument exactly like the parent audio region is also created.

© Apple Inc.
NOTE: There isn’t nearly enough room in this book to explore the EXS24 mkII and all the other professional, world-class software instruments that come with Logic Pro. However, if you are interested in more information on Logic Pro’s instruments, Using Logic Pro Synthesizers by Kevin Anker (Cengage Learning, 2012) is the perfect companion to Logic Pro X Power!
Slicing Audio Regions at Transient Markers
There is one more command you can employ in the Tracks area that uses transient markers. To use it, right-click on a region and select the Slice at Transient Markers command. The selected region will be split into new regions at its transient markers, as shown in Figure 6.98. Note that the maximum initial length an audio region can be if you invoke this command is 32 bars.
Figure 6.98 An audio region before and after executing the Slice at Transient Markers command. You can see that the new regions all line up with the transient markers.
© Apple Inc.
There are many powerful things you can accomplish with transient markers. Now that you’ve seen some of them, you’re probably thinking that all this is great, but what’s the point if you can’t customize your transient markers? No worries—Logic has this covered too in the Audio File editor, as you’ll learn in the next chapter.
Track Stacks
Track Stacks are a new and very cool way of organizing tracks for automation and processing. There are two kinds of Track Stacks:
![]() Folder Stacks: A Folder Stack offers basic control of automation for volume, solo, and mute for its dependent tracks.
Folder Stacks: A Folder Stack offers basic control of automation for volume, solo, and mute for its dependent tracks.
![]() Summing Stacks: A Summing Stack buses the output of all dependent tracks to an aux, which can be used for processing, automation, and layering multiple software instruments together.
Summing Stacks: A Summing Stack buses the output of all dependent tracks to an aux, which can be used for processing, automation, and layering multiple software instruments together.
You can combine audio, software instrument, external MIDI, and Drummer tracks in a Folder Stack. To use your external MIDI gear with a Summing Stack, you need to use the External Instrument plug-in on a software instrument track. You can create a Track Stack as a permanent fixture in your project, or you can create them and get rid of them as needed while working on your project. Once you create a Track Stack, their power and potential will become more apparent.
Creating Track Stacks
Creating a Track Stack is easy. First, select the tracks you want in a Track Stack in the Track list. Again, you can combine different types of tracks in a Track Stack. For instance, you could combine a kick drum on an audio track with a synth bass sound on a software instrument track because you want to process them and automate them identically, or a number of background vocal audio tracks with a software instrument string section and an external MIDI xylophone part that you will be soloing together and muting and soloing individually to analyze places you hear them conflicting. Part of the power of the Track Stack is that it takes all the tracks you select and organizes them in one location, so using them as a temporary way to group tracks together for editing is one of many effective ways to use Track Stacks. You can select as many or as few tracks as you’d like in your Track Stack.
After you select the tracks you want to stack, select Track > Create Track Stack or press Shift+Command+D. This opens the Track Stack dialog box, shown in Figure 6.99.
Figure 6.99 The Track Stack dialog box.
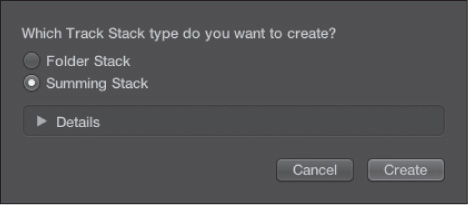
© Apple Inc.
As you can see, there are only two options in the Track Stack dialog box: Folder Stack and Summing Stack. Just in case you forget what the difference between the two types of Track Stacks is, you can click the Details disclosure triangle, and a description of the selected Track Stack type will be shown. If you want only basic automation control over the selected tracks, choose Folder Stack. If you want to route the outputs of all selected tracks to a single aux, select Summing Stack. Click Create, and the selected type of Track Stack will be created, as in Figure 6.100.
Figure 6.100 When you click Create in the Track Stack dialog box, a new Track Stack is created from the selected tracks. This figure shows a newly created Folder Stack.

© Apple Inc.
After you click Create, a new stack master track is created, which you can see in Figure 6.100. This is the container track—the one that you would use to solo or mute the entire stack and to automate the Track Stack. If you create a Folder Stack, the stack is named Sub. Summing Stacks are named Sum. You can rename a Track Stack by double-clicking on the name to open a text box and then typing the new name. To see the tracks contained in the Track Stack, click the disclosure triangle next to the icon in the Track Stack track header. Figure 6.101 shows the Track Stack from Figure 6.100 with its dependent tracks displayed.
Figure 6.101 To see the dependent tracks of a Track Stack, click the disclosure triangle in the icon field of the Track Stack track header.
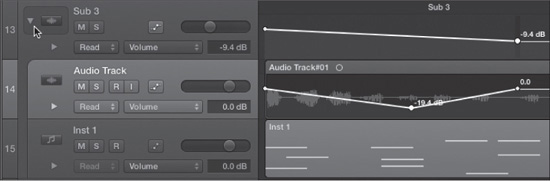
© Apple Inc.
There are a few things to note about Figure 6.101. First, this Track Stack contains an audio track and a software instrument track, and you can see their regions. There are no regions on the Folder Stack track. There is, however, volume automation on the Folder Stack track. There is also volume automation on the audio track. Although the Folder Stack track can be used to automate the volume, solo, and mute of its dependent tracks, you can still use automation on the Track Stack’s other tracks as well. Because a Summing Stack routes the outputs of its dependent tracks to a single aux, you can automate any automatable parameter of any effects inserted on the aux, as well as volume, pan, solo, mute, and insert bypass for the aux on the stack master track. You can see that both of the track headers of the dependent tracks have a little gap on their left side that leads up to the stack master. This allows you to easily see what tracks are in a stack compared to the rest of the tracks in your Track list.
When you select a stack master track, as with any other track, its Inspector channel strips will be available in the Inspector. When you select a track in a stack, you will be able to access that track’s channel strip and routing. The Folder Stack channel strip offers basic control, giving you access to automation settings, groups, volume, solo, and mute. No actual audio goes through the folder track fader; rather, it simply acts as a controller. The Summing Stack channel strip is a full-featured aux. The only options in the Track Inspector for a Track Stack are the Icon and MIDI Channel settings.
Flattening Track Stacks
Track Stacks are a great organizational tool. Sure, you can use them as a permanent fixture in your project, but as I mentioned, you can also use them as a temporary way of quickly organizing tracks for any number of purposes. Perhaps you want to briefly organize a bunch of disparate tracks in one place for editing purposes. Or maybe you want to audition some effects automation for a few tracks. Whatever the reason, once they’ve served their purpose, Track Stacks are easier to “delete” than they are to create.
When you’re finished with a Track Stack, you can “flatten” it. Flattening a Track Stack is more similar to unpacking a folder than it is to flattening a comp. When you flatten a Track Stack, the stack master track is eliminated, and the tracks are flattened to their previous location in the Track list. To flatten a Track Stack, select Track > Flatten Stack or press Shift+Command+U. That’s all there is to it! Figure 6.102 shows the Track Stack from Figure 6.101 after being flattened.
Figure 6.102 The tracks from the Track Stack in Figure 6.101 after the Track > Flatten Stack command is executed.
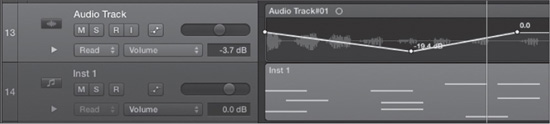
© Apple Inc.
Track Stacks allow for lots of flexibility and creativity in how you handle parts of your project. You may be envisioning different configurations of Track Stacks that you would love to be able to access across multiple projects. Fortunately, Logic Pro X allows for this via another great new feature: patches.
Working with Patches
So you’ve created some Track Stacks that are tailor made for your workflow across several types of projects on which you work regularly. For example, suppose you regularly record one particular drummer, and you have figured out the perfect Track Stack for mixing his kit and added it to your template. This Track Stack includes audio channels for all the mics you use, tailored audio FX for each channel, plus effects on the Sum aux of the stack and routings to your standard auxes to boot. Now all you want is to be able to quickly switch to your mix settings without having to load a whole bunch of settings on each channel strip. Alternatively, suppose you have a single software channel strip with an instance of Sculpture and Bass Amp Pro with some customized Smart Controls (covered later in this chapter), and you have sends set up to your usual auxes. The problem is, a channel strip setting doesn’t save all of this information, just some of it. This (and more) is what patches can help you accomplish. With patches, you can have more complex collections of highly customized settings available to you, a click away in the Library!
Creating and Saving Patches
The process for creating and saving patches is simple, with the obvious caveat that setting up your Track Stacks and/or channel strips and customizing any effects, software instruments, routings, Track Stacks, and Smart Controls can be time consuming. Thankfully, because patches recall all that information, you only have to do this once per patch!
Once you have set up your track’s channel strip or your Track Stack’s channel strips, make sure the track or the stack master track you want to save as a patch is selected. Then open the Library by clicking the Library button in the control bar or by selecting the global View > Show Library option. Figure 6.103 shows the Library.
Figure 6.103 The Library is used for loading and saving patches.
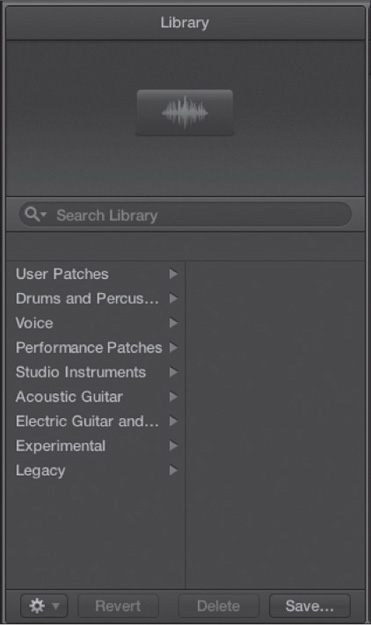
© Apple Inc.
To save a patch, simply click the Save button in the bottom-right corner of the Library. A typical Save dialog box will open in which you can name your patch. The patch will be saved to the file path ~/Library/Application Support/Logic/Patches/channel strip type, or ~/Music/Audio Music Apps/Patches/channel strip type where channel strip type will be one of these directories: Audio, Aux, Instrument, or Output (depending on the kind of channel strip assigned to the track). Therefore, Track Stack patches are saved to the aux folder.
Loading Patches
Not only is the Library used for saving patches, it’s also where you can search for, navigate to, and load patches. When you select a track in the Track list, all the channel strip settings and patches available for that track type are available in the submenus in the Library. Any patches and channel strip settings that you have made that are available for the selected track type will be available in the User Patches and User Channel Strip Settings submenus in the Library. Figure 6.104 shows the User Patches submenu for an audio track.
Figure 6.104 Browse and search for patches to load in the Library. The User Patches submenu is where you can find your custom patches.
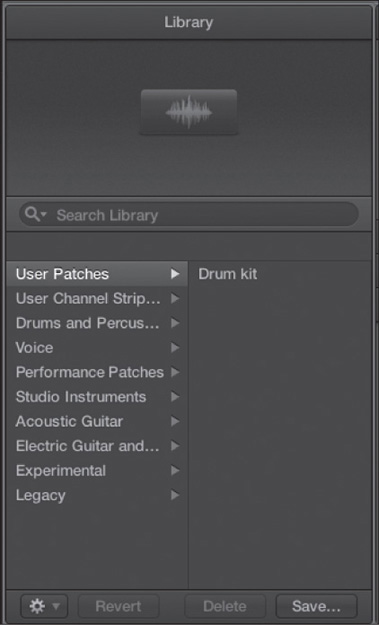
© Apple Inc.
The user patch in Figure 6.104 reveals one other handy feature of patch loading. In the introduction to patches, I mentioned the notion of a Track Stack customized for mixing drums, and saving that Track Stack as a patch. Because that Track Stack contained nothing but audio tracks, when I select an audio track in the Track list, my drum kit mixing patch is available in the Library. If the drum kit patch is selected, the audio track is instantly converted into the drum kit Track Stack. That means you can quickly configure a new project with your custom Track Stack patches by loading audio Track Stacks directly to audio tracks, software instrument Track Stacks directly to software instrument tracks, aux Track Stacks directly to aux tracks you’ve added to the Tracks area, and output Track Stacks directly to output tracks you’ve added to the Tracks area. While this doesn’t beat the convenience of a well-made template, it can let you quickly add new functionality to your template or help you reconfigure a project on the fly.
Merging Patches
So you came up with an incredibly happening audio effects signal path for guitar, complete with sends, that you saved as a patch, but you really want to hear how it would sound with your favorite Vintage Clav patch that you’ve tweaked with some MIDI effects (covered in Chapter 9, “Working with Software Instruments”). Sure, you could go through the trouble of loading all the settings for each audio and MIDI effect and for the Vintage Clav, or you could simply merge the patches. Patch merging offers loads of creative possibilities, letting you selectively apply aspects of one track to another track. Like every other aspect of patches, merging them is quickly and easily accomplished. First, select the track to which you want to transfer settings. Then click the Action menu in the lower-left corner of the Library and select Enable Patch Merging, as shown in Figure 6.105.
Figure 6.105 Select Enable Patch Merging in the Action menu in the Library to begin the patch-merging process.
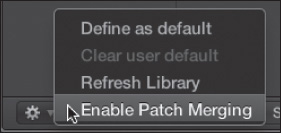
© Apple Inc.
After you select Enable Patch Merging, the Patch Merging area, shown in Figure 6.106, opens at the bottom of the Library. There are four buttons available in the Patch Merging area: MIDI Effects, Audio Effects, Instruments, and Sends. Enable the aspects of a patch or a setting you’d like to transfer, and disable the things you don’t want to be replaced. Finally, browse for and select the patch or setting in the Library from which you want to transfer settings, and the selected settings will be transferred to the selected track.
Figure 6.106 The Patch Merging area open in the Library.
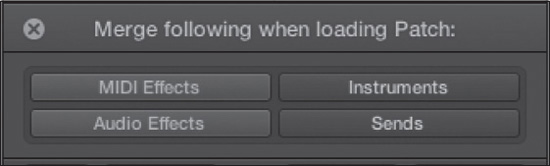
© Apple Inc.
Figure 6.107 shows two channel strips before and after Patch merging. The channel strip to the left is selected, and audio effects settings from the channel strip right are merged to the selected channel strip. To disable patch merging, simply click the × in the upper-left corner of the Patch Merging area.
Figure 6.107 Note the channel strip on the left, before and after merging the audio effects of the channel strip to the right.
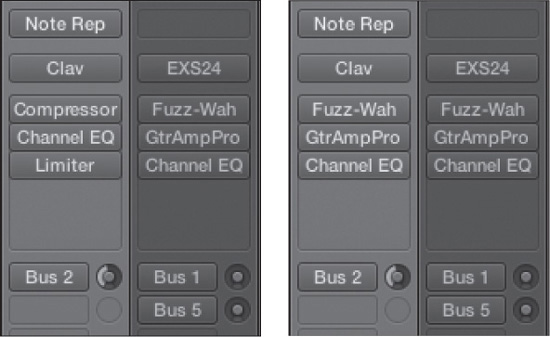
© Apple Inc.
Reverting and Deleting Patches
There are two other buttons at the bottom of the Library that can be useful: the Revert button and the Delete button. If you are editing any aspect of a patch or setting and you are unsatisfied with the results, you can revert to the original patch or setting by clicking the Revert button. To delete a patch or setting, browse or search in the Library for the patch or setting you want to delete, select it, and click the Delete button.
Smart Controls
Smart Controls are a new main window feature in Logic Pro X. They give you quick access to the some of the most important effects and software instrument parameters for the selected track. They are configured automatically for each channel strip, or you can create your own custom Smart Controls. To access Smart Controls, select the global View > Show Smart Controls option or press B. Figure 6.108 shows automatically generated Smart Controls for the software instrument and effects for the channel strip seen in a Mixer window to the left of the Smart Controls area in the main window.
Figure 6.108 Automatically generated smart controls for the software instrument and effects seen in the channel strip in the Mixer window to the left of the Smart Controls area in the main window.
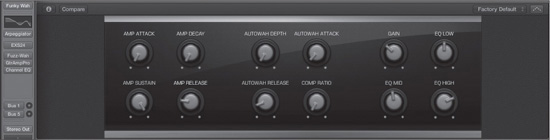
© Apple Inc.
You can see in Figure 6.108 that the four controls to the left control the amplifier attack, decay, sustain, and release for the amp envelope of the EXS24 instrument; the autowah depth, attack, release, and compression ratio settings for the Fuzz-Wah effect; and the gain, EQ low, mid, and high parameters for the Guitar Amp Pro effect. To change the setting of a parameter, drag it. To change a setting with finer control, Shift-drag it. Although the selection of parameters may seem limited, they generally offer the most essential parameters you would expect to need to quickly access and edit. At the same time, you don’t have to live with whatever Smart Controls Logic presents; you can edit which parameters a Smart Control affects.
Editing Smart Controls
Editing Smart Controls, like so many other things in Logic, is as easy as it is powerful. One reason to edit a track’s Smart Controls is that you have a different idea of what controls would be the most essential to access. Another reason is that, because Smart Controls can be automated either through mouse input or via a hardware controller, you very well may want to totally remap the controls to parameters you want to automate. To edit Smart Controls, click the I button in the Smart Controls area to open the Smart Controls Inspector, shown in Figure 6.109.
Figure 6.109 Use the Inspector in the Smart Controls area to edit Smart Controls.
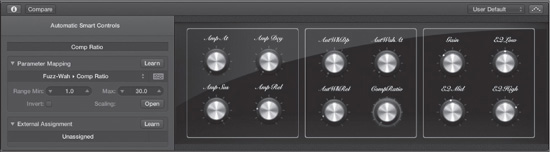
© Apple Inc.
The options in the Smart Controls Inspector are as follows:
![]() Layout: If you click on the Layout menu—the area that reads “Automatic Smart Controls” in Figure 6.109—you’ll see myriad Smart Controls layouts, suitable for particular instruments, effects types, and even amplifiers. If you compare Figure 6.108 and Figure 6.109, you’ll see that they offer the exact same parameters. (It may be a little hard to tell because the font used for the Smart Controls in Figure 6.109 aren’t the easiest to read at a smaller size.) To make the text for each Smart Control in Figure 6.108 more legible, I switched the layout setting to Modern Synth 12 using the Layout menu. You can change the layout as much as you’d like until you find the one that works best for your needs. The naming of the Layout menu options will give you a pretty good idea of what you can expect from each layout.
Layout: If you click on the Layout menu—the area that reads “Automatic Smart Controls” in Figure 6.109—you’ll see myriad Smart Controls layouts, suitable for particular instruments, effects types, and even amplifiers. If you compare Figure 6.108 and Figure 6.109, you’ll see that they offer the exact same parameters. (It may be a little hard to tell because the font used for the Smart Controls in Figure 6.109 aren’t the easiest to read at a smaller size.) To make the text for each Smart Control in Figure 6.108 more legible, I switched the layout setting to Modern Synth 12 using the Layout menu. You can change the layout as much as you’d like until you find the one that works best for your needs. The naming of the Layout menu options will give you a pretty good idea of what you can expect from each layout.
![]() Name: Click in the Name field (containing the text “Comp Ratio” in Figure 6.109) and type a new name to rename the Smart Control.
Name: Click in the Name field (containing the text “Comp Ratio” in Figure 6.109) and type a new name to rename the Smart Control.
![]() Parameter Mapping: If you click in the field under the “Parameter Mapping” label, the Parameter Mapping menu, shown in Figure 6.110, opens. This menu offers options for mapping controls in custom layouts; options for adding, deleting, and copying mappings; and submenus for selecting which track, effect, or software instrument parameter will be mapped to the currently selected Smart Control. Parameters that cannot be automated can be found in the Non-Automatable submenu.
Parameter Mapping: If you click in the field under the “Parameter Mapping” label, the Parameter Mapping menu, shown in Figure 6.110, opens. This menu offers options for mapping controls in custom layouts; options for adding, deleting, and copying mappings; and submenus for selecting which track, effect, or software instrument parameter will be mapped to the currently selected Smart Control. Parameters that cannot be automated can be found in the Non-Automatable submenu.
Figure 6.110 The Parameter Mapping menu.
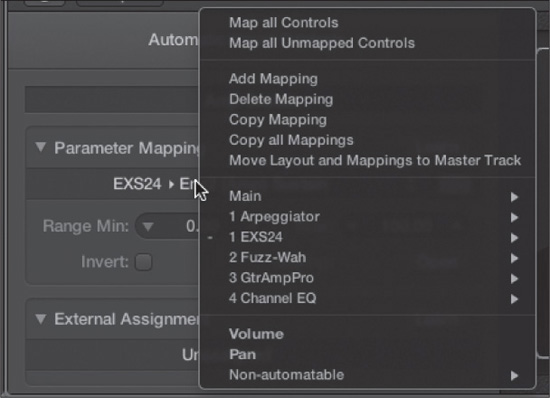
© Apple Inc.
![]() Range Min, Range Max, and Invert: These parameters will change in purpose depending on your selection in the Parameter Mapping menu. For example, if you map a Smart Control to Pan, the range parameters allow you to control the minimum and maximum settings across the stereo field the control can access, with maximum and minimum values of +/–64 offered. Switch the control to a synth filter, and the values offered may be 0–100.
Range Min, Range Max, and Invert: These parameters will change in purpose depending on your selection in the Parameter Mapping menu. For example, if you map a Smart Control to Pan, the range parameters allow you to control the minimum and maximum settings across the stereo field the control can access, with maximum and minimum values of +/–64 offered. Switch the control to a synth filter, and the values offered may be 0–100.
Tip: You can add more parameters to a Smart Control by selecting the Add Mapping control in the Parameter Mapping menu, allowing one Smart Control to affect multiple parameters.
![]() Editor Window: At the right end of the Parameter Mapping menu is the Editor Window button. If you click this button, the plug-in editor window for the currently selected parameter will open. This is useful in combination with the Learn button, discussed next.
Editor Window: At the right end of the Parameter Mapping menu is the Editor Window button. If you click this button, the plug-in editor window for the currently selected parameter will open. This is useful in combination with the Learn button, discussed next.
Tip: You can also right-click on a Smart Controls interface element to open the plug-in with which it is associated.
![]() Parameter Mapping Learn: If you click the Editor Window button and then click the Parameter Mapping Learn button, the Parameter Mapping Learn button and the selected Smart Control glow orange. Click on any control in the plug-in editor window, and that parameter is automatically mapped to the selected Smart Control. You can select other Smart Controls and plug-in parameters and map as many or as few as you wish. Click the Parameter Mapping Learn button again to disengage Learn mode.
Parameter Mapping Learn: If you click the Editor Window button and then click the Parameter Mapping Learn button, the Parameter Mapping Learn button and the selected Smart Control glow orange. Click on any control in the plug-in editor window, and that parameter is automatically mapped to the selected Smart Control. You can select other Smart Controls and plug-in parameters and map as many or as few as you wish. Click the Parameter Mapping Learn button again to disengage Learn mode.
![]() Scaling: Click the Open button to open the Scaling window, shown in Figure 6.111. Here you can control how the selected Smart Control’s values scale across its range. In the upper-left corner of the Scaling window are six preset scaling curves. Click a button to select that curve. The Range Min and Range Max parameters let you set the minimum and maximum values the selected Smart Control can access, like in the Inspector. The Invert button lets you invert the scaling. In other words, if the scaling of the curve in Figure 6.111 is inverted, the Smart Control produces its maximum value for the selected parameter with the Smart Control at its minimum setting, and the minimum value at its maximum setting. The Reset button lets you reset any edits you’ve made to the scaling curve. The Copy and Paste buttons let you copy and paste scaling curves, allowing you to copy the curve for one parameter to the curve of another parameter.
Scaling: Click the Open button to open the Scaling window, shown in Figure 6.111. Here you can control how the selected Smart Control’s values scale across its range. In the upper-left corner of the Scaling window are six preset scaling curves. Click a button to select that curve. The Range Min and Range Max parameters let you set the minimum and maximum values the selected Smart Control can access, like in the Inspector. The Invert button lets you invert the scaling. In other words, if the scaling of the curve in Figure 6.111 is inverted, the Smart Control produces its maximum value for the selected parameter with the Smart Control at its minimum setting, and the minimum value at its maximum setting. The Reset button lets you reset any edits you’ve made to the scaling curve. The Copy and Paste buttons let you copy and paste scaling curves, allowing you to copy the curve for one parameter to the curve of another parameter.
Figure 6.111 The Scaling window lets you dictate how a Smart Control’s values scale across its range.
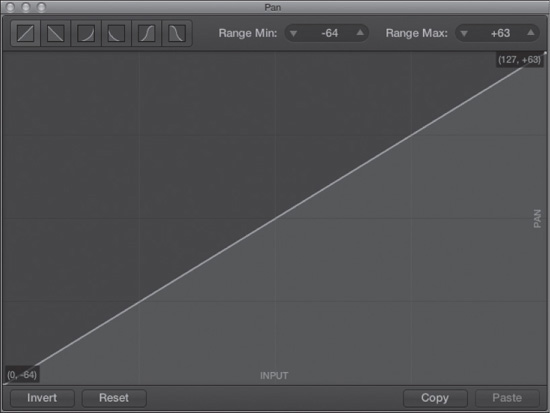
© Apple Inc.
Tip: You can use your mouse to edit the scaling curve. Drag at either end of the curve to change the Range settings of the curve. Click in the scaling curve area to move the scaling curve through that point. A help tag will follow the cursor throughout your movements in the scaling curve area, detailing the Smart Control Input value and the value that will be sent to the selected parameter at that Smart Control Input value, helping you to click in a meaningful location. A node on the curve, which can be moved by dragging, will be created at the location you clicked. The scaling curve will connect through that node using straight lines. Option-click on the line, either initially or after you have created nodes along the line, to be able to add curvature to the scaling curve. The selected part of the line will become dotted, and dragging it will add curvature to the line. You can see nodes and curves on the scaling curve in Figure 6.112.
Figure 6.112 A pretty impractical scaling curve. It demonstrates the degree to which you can scale the control that a Smart Control has over a parameter. Note the help tag offering useful information next to the mouse pointer.
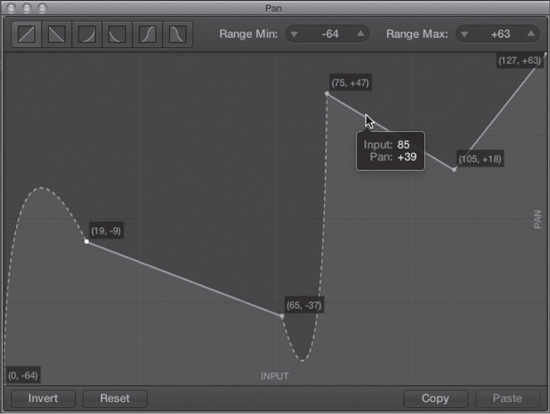
© Apple Inc.
![]() External Assignment Learn: If you want to map the currently selected Smart Control to a fader, knob, etc. on your hardware controller, click the External Assignment Learn button. The External Assignment Learn button and the selected Smart Control will glow orange. Move the desired element on your hardware controller to assign it to the selected parameter. Click the External Assignment Learn button again to get out of Learn mode. If you double-click in the External Assignment field, you will open the Controller Assignments window, covered in Chapter 3.
External Assignment Learn: If you want to map the currently selected Smart Control to a fader, knob, etc. on your hardware controller, click the External Assignment Learn button. The External Assignment Learn button and the selected Smart Control will glow orange. Move the desired element on your hardware controller to assign it to the selected parameter. Click the External Assignment Learn button again to get out of Learn mode. If you double-click in the External Assignment field, you will open the Controller Assignments window, covered in Chapter 3.
You can compare your edits with the original Smart Controls mapping by clicking the Compare button. To save Smart Controls you have edited, either save your channel strip as a channel strip setting in the Setting menu at the top of your channel strip or save your channel strip or patch as a patch.
You can also access the MIDI FX Arpeggiator in the Smart Controls area. To activate the Arpeggiator, click the Arpeggiator button at the upper-right corner of the Smart Controls area. You can select an Arpeggiator setting in the menu to the left of the Arpeggiator button. MIDI FX and the Arpeggiator are discussed in Chapter 9.
Drummer
The new Drummer track in Logic Pro X is one of those things that could have fit into a couple of chapters. When you create a Drummer track, a Drummer track, its parent channel strip, and two yellow eight-bar regions on the Drummer track are created, ready to be played. The Drummer channel strip includes the Drum Kit Designer software instrument, which provides reason to include this section in Chapter 9. What convinced me to include it in this chapter is the fact that not only are regions created on the Drummer track when you create a Drummer track, but the Drummer editor, which is the real key to its power, is integrated in the main window. You can see all this in Figure 6.113.
Figure 6.113 A newly created Drummer track, including the two regions that are automatically created, the Drummer editor at the bottom of the main window, and the Drummer channel strip in the main window Inspector.
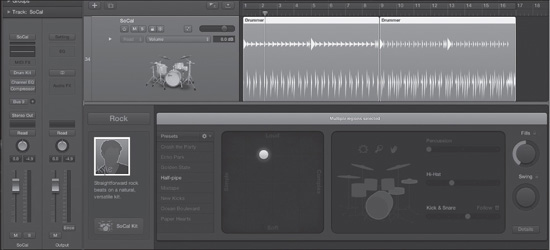
© Apple Inc.
Drummer has a lot of unique characteristics. From its dedicated editor featuring a number of different “drummers” playing different styles, to its specialized software instrument, to its regions, Drummer tracks are just different enough that they need separate explanation.
Creating Drummer Regions
Drummer regions look unique—because they are unique. They don’t really contain audio, although it appears as if they do. Rather, they contain MIDI data that triggers samples in the Drum Kit Designer plug-in in the Drummer channel strip.
You may notice in the Drummer track header that there is no Record button. Drummer tracks may be a hybrid audio and software instrument track, but you cannot record to a Drummer track via MIDI (although you can accomplish this by using Drum Kit Designer in a software instrument track). This begs the question, how the heck are you supposed to use the Drummer track if you can’t record to it? The answer is that there are several methods for creating new Drummer regions.
The first method should be the most obvious: Click in the Drummer track with the Pencil tool. A new eight-bar Drummer region will be created at the spot you click. You can also copy and paste Drummer regions, with the new copied regions being pasted at the current playhead position just like other regions. You can also right-click at an empty spot in the Drummer track and select the Create Drummer Region command. A new eight-bar Drummer region will be created at the barline to the left closest to where you right-clicked. All three of these methods work just fine, but there are a few other methods for creating Drummer regions that are a little more powerful.
If creating eight-bar Drummer region after eight-bar Drummer region sounds a little tedious for a track that’s 120 bars long, rest assured there are better methods. The simplest method is to right-click on an empty place in the Drummer track and select Populate with Drummer Regions in the menu that opens. The Drummer track will be filled with eight-bar Drummer regions from the end of the second initial Drummer region until the end of the project.
If creating nothing but eight-bar Drummer regions sounds a little limiting, there are a couple other methods of creating Drummer regions. The most flexible method involves the arrangement track. If you have a project whose arrangement has been decided, create arrangement track markers that follow your project’s arrangement. If you create the arrangement markers before you create a Drummer track, the Drummer track will be created with regions that follow each arrangement marker in your project. If you already have a Drummer track created when you craft your arrangement markers, use the Populate with Drummer Regions command in the Drummer track right-click menu. Regions that match your arrangement will be created through the length of your arrangement, and they will be named per your arrangement markers. Figure 6.114 shows a Drummer track created by following the arrangement track.
Figure 6.114 Drummer track regions created based on existing arrangement track markers.

© Apple Inc.
One final method for creating a Drummer region: If you drag a MIDI region or alias onto a Drummer track (or better yet, Option-drag to move a copy of the region or alias), right-click on the region, and select Convert to Drummer Region from the menu that appears, a Drummer region the length of the MIDI region will be created. None of the MIDI data in the region will be used. Drummer regions generate their own data. This is of particular use if you haven’t created an arrangement track but you have created MIDI regions that are more or less than eight-bars long that need Drummer accompaniment.
Resizing, Looping, Splitting, and Joining Drummer Regions
Although you can’t directly edit the contents of a Drummer region like you can a MIDI region or an audio region, you can resize, loop, split, join, and otherwise edit the size of Drummer regions exactly as you would any other region. Refer to the sections dealing with editing regions earlier in this chapter for reminders of how to edit regions in this way.
The Drummer Editor
The content of a Drummer region cannot be directly edited, it can only be influenced. To influence the content of your Drummer regions, you need to use the Drummer editor. For a track with regions that you can’t directly edit, the Drummer editor gives you fairly broad control over the content and vibe of your Drummer regions. To open the Drummer editor, double-click a Drummer region with the Pointer tool or select a region, regions, or the track header on a Drummer track and click the Editors button in the control bar (or press E). Figure 6.115 shows the Drummer editor.
Figure 6.115 The Drummer editor.
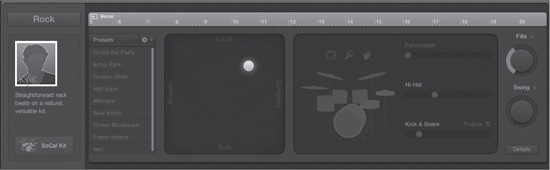
© Apple Inc.
The Drummer editor works on the currently selected region or regions. If you have a single Drummer region selected, the Bar ruler at the top of the Drummer editor displays what region is selected and where it lies on the Bar ruler. You can click the Play button at the left end of the Bar ruler to play the selected Drummer region. If you create a Cycle region for the selected region (Auto Set Locators By Region Length comes in handy here), the Drummer region will Cycle when you click Play in the Drummer editor. This makes it easy to hear your Drummer edits, even though it takes a few seconds or even a few bars for your changes to audibly update.
Selecting a Drummer
As of this writing, Drummer includes 15 different virtual drummers over four different styles. First, select from one of the four available styles by clicking the Genre menu, which reads “Rock” in Figure 6.115. The currently available genres are Rock, Alternative, Songwriter, and R&B. When you select a genre, the available drummers for that genre are displayed, as in Figure 6.116.
Figure 6.116 When you select a style, the available drummers for that style are displayed under the Genres menu.
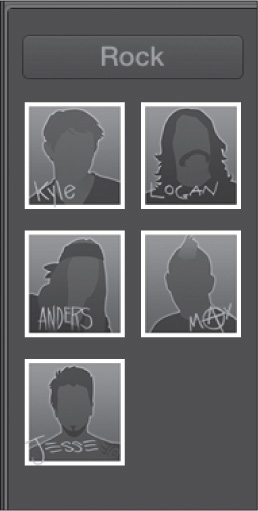
© Apple Inc.
Select a drummer by clicking on its picture. That loads the selected drummer for your Drummer track, and changes the content of your Drummer regions and the current Drum Kit Designer kit to match your selected drummer’s style within their genre. When you select a drummer, information about him and his style is displayed under his picture (see Figure 6.115). It should be mentioned that the default installation of Logic Pro X includes a very limited selection of drum kits. If you select a drummer whose kit hasn’t been downloaded, you will be prompted to download his kit. I highly recommend taking the time to download all the Drummer kits (along with their Producer Kits, mentioned later in this chapter).
Once you select a drummer, you can edit his kit by clicking the Editor Window button beneath the picture of your drummer. You can swap out drums, change entire kits, retune and dampen individual drums, and change individual drums’ overall volume setting.
Drummer Presets
Each drummer has his own set of eight preset Editor configurations. These are available at the left end of the Drummer editor, as shown in Figure 6.117. Simply click on a preset to switch to that preset. Your Drummer regions will be updated to reflect this change. You can save custom presets using the Action menu at the top of the Presets list. After I cover how to edit your Drummer regions, I’ll get into the Action menu.
Figure 6.117 Select a preset for the current drummer in the Presets area of the Drummer editor.
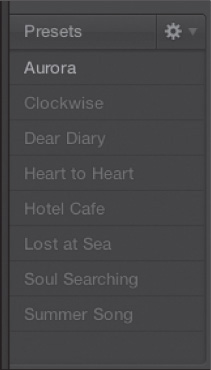
© Apple Inc.
Editing Drummer Regions
Because you can edit individual regions or multiple regions, you may find it helpful to create a general vibe for your project by selecting the track header and using the Drummer editor parameters to edit the state of all the Drummer regions. Then, after listening, you can make further edits to specific regions. The Drummer editor may not let you specify exactly what you want in each drummer region (that’s something you can do using Drum Kit Designer on a software instrument track), but what it can do is give you very musical, and very natural-sounding, drum performances that suit your project. The Drummer editor is pretty straightforward, and our discussion of it starts with the Drummer XY pad.
USING THE DRUMMER XY PAD
The Drummer XY pad, found to the right of the Presets list and shown in Figure 6.118, gives you broad control over the content in the selected Drummer region(s). An XY pad gives you control over the relationship among four different parameters on a two-dimensional plane. You can see in Figure 6.118 that the left side of the XY pad is labeled “Simple,” the right side is labeled “Complex,” the top is labeled “Loud,” and the bottom is labeled “Soft.” As you move the yellow ball from left to right, the content of the selected Drummer region(s) becomes more complex. As you drag it from top to bottom, the drums are played softer. The upper-right corner provides the loudest and most complex drumming, and the lower-left corner provides the softest and simplest drumming for the selected region(s). The XY pad influences the vibe of your regions greatly, which is part of the reason I recommend clicking the track header to select all regions and establish an XY setting that fits the vibe of your song as a whole before getting into more specific tweaks, including XY pad setting, for individual regions.
Figure 6.118 The XY pad in the Drummer editor.
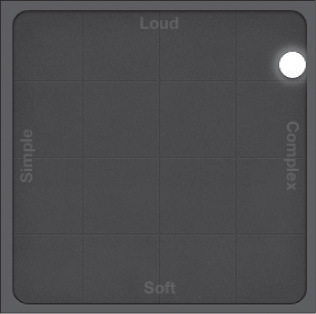
© Apple Inc.
USING THE PATTERN VARIATION CONTROLS
The Pattern Variation controls in the Drummer editor give you control over the various parts of the drum kit for the selected region(s), as well as the fills played and the swing feel of the drum performances. Figure 6.119 shows the Pattern Variation controls.
Figure 6.119 The Pattern Variation controls in the Drummer editor.
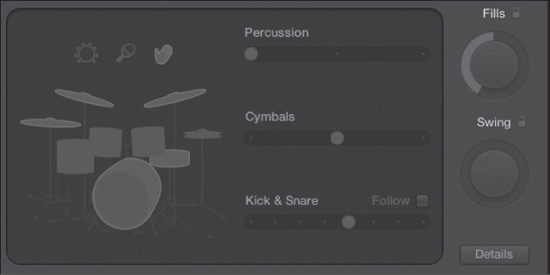
© Apple Inc.
The Pattern Variation controls are, on the whole, a reasonably simple set of controls. Any part of the drum kit that is highlighted is active for the selected region(s). To activate a part of the kit or a percussion instrument, click on it. Kick and snare are always available, and they can be activated and deactivated independently. You can have only one of these kit groups—Hi-Hat, Toms, and Cymbals—active at a time. You also have access to only one percussion instrument at a time. The sliders to the right of the kit offer pattern variations for the different drum kit elements. The Kick & Snare offers the most options, including six variations that produce beats typical for your time signature and tempo, plus a half-speed and a double-speed option, as you can see in Figure 6.120.
Figure 6.120 The Kick & Snare slider offers eight options.
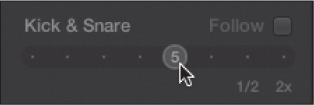
© Apple Inc.
The slider above Kick & Snare will change based on your selection of Hi-Hat, Toms, or Cymbals as an element of the selected Drummer region(s). If you select Hi-Hats or Cymbals, there will be four pattern variations available. If you select Toms, there will be three pattern variations available. Each of the three percussion options offers three pattern variations.
You can also make your Kick & Snare follow the rhythm of another track in your project. If you click the Follow checkbox above the right end of the Kick & Snare slider, the slider disappears, and the Kick & Snare field becomes a menu. Click on the Kick & Snare field to select a track for the Kick & Snare in the selected Drummer region(s) to follow, as in Figure 6.121.
Figure 6.121 When you select the Follow option for the Kick & Snare in the current Drummer region, you can make the Kick & Snare follow the rhythm of another track in your project by selecting that track in this menu.

© Apple Inc.
If you look at the right end of the Pattern Variation controls in Figure 6.119, you can see two knobs, Fills and Swing. The Fills knob controls how prominent or frequent drum fills will be in the selected region. The lower the Fills setting, the fewer fills you’ll get; the higher the setting, the more fills you’ll get. The Swing knob controls the extent to which your region has a swing feel. At its lowest setting, the Drummer region plays very strict, straight time. As you increase the Swing setting, the swing feel increases. Once you find Fills and Swing settings you like for your Drummer region, you can click the lock icon next to the Fills and Swing knob names to prevent those parameters from being edited further. Click the lock icon again to unlock the knob for further editing.
You access the final Pattern Variation controls by clicking the Details button in the lower-right corner of the Drummer editor. Figure 6.122 shows the three Details parameters.
Figure 6.122 The Details parameters in the Pattern Variation controls area.
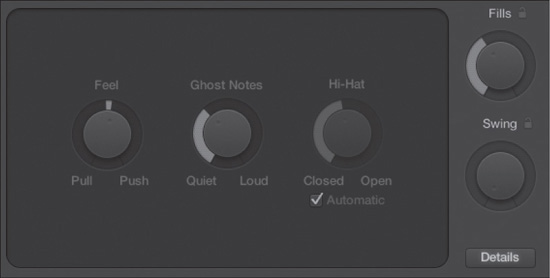
© Apple Inc.
![]() Feel: The Feel knob controls how behind the beat, on the beat, or ahead of the beat your Drummer region will feel. When the knob is centered, the feel is right on the beat. The closer the knob is set to Pull, the more the region will be behind the beat. The closer the knob is set to Push, the more the region will be ahead of the beat.
Feel: The Feel knob controls how behind the beat, on the beat, or ahead of the beat your Drummer region will feel. When the knob is centered, the feel is right on the beat. The closer the knob is set to Pull, the more the region will be behind the beat. The closer the knob is set to Push, the more the region will be ahead of the beat.
![]() Ghost Notes: The Ghost Notes knob controls the volume of any ghost notes in your Drummer region. The lower the setting, the quieter any ghost notes in the region will be.
Ghost Notes: The Ghost Notes knob controls the volume of any ghost notes in your Drummer region. The lower the setting, the quieter any ghost notes in the region will be.
![]() Hi-Hat: The Hi-Hat knob is editable only if you deselect the Automatic checkbox. If Automatic is selected, Drummer automatically decides how open or closed the Hi-Hat will be in your Drummer region (if the Hi-Hat is activated in the drum kit, of course). If you deselect Automatic, you can use the knob to make the Hi-Hat more opened or closed in your Drummer region.
Hi-Hat: The Hi-Hat knob is editable only if you deselect the Automatic checkbox. If Automatic is selected, Drummer automatically decides how open or closed the Hi-Hat will be in your Drummer region (if the Hi-Hat is activated in the drum kit, of course). If you deselect Automatic, you can use the knob to make the Hi-Hat more opened or closed in your Drummer region.
As you edit many of the parameters in the Pattern Variation controls and the XY pad, the Drummer region(s) you are editing will visually change their content to reflect your changes to their actual musical content. Once you get a Drummer region to a state that you really like, you can save the Drummer editor settings as a preset.
Saving Drummer Presets and the Drummer Editor Action Menu
To save a Drummer preset, simply click the Action menu in the Drummer editor, shown in Figure 6.123, and select the Save Preset option.
Figure 6.123 The Drummer editor Action menu.
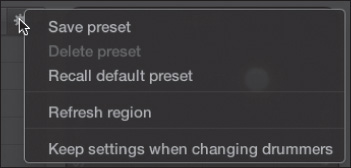
© Apple Inc.
When you select Save Preset, a text field will open at the bottom of the Presets list. Enter a name for your preset, press Return, and your new preset will always be available for the currently selected Drummer. To delete a preset, select it in the Presets list and choose Delete Preset in the Action menu.
The Recall Default Preset command returns Drummer to the current drummer’s default preset. The Refresh Region command lets you explore some alternate Drummer region performances based on your current Drummer editor settings.
Finally, enabling the Keep Setting When Changing Drummers option lets you audition your Drummer editor settings with other drummers. When this option is not enabled, switching drummers changes the Drummer editor settings to the new drummer’s default preset.
Tip: If you really want to get the most out of Drummer, do yourself a favor and download all the Producer Kits available for Drummer. Although the amount of space they’ll eat up on your storage drive is significant, the benefits are huge. When you load a Drummer Producer Kit, available in the Library after you download them, the Drummer track becomes a Drummer Track Stack. Instead of a single stereo Drummer track, opening the Drummer Track Stack reveals a host of tracks for each mic used in the original Drummer sampling session. This gives you full mixing, automation, and effects control over every element in the Drummer performance.
For added flexibility, load a Drum Kit Producer Kit on a software instrument track. The software instrument track will become a Drum Kit Track Stack, but without Drummer active. That means you can play and record MIDI performances to create your own drum track using Drum Kit Designer, but in a format that provides total control over the mixing possibilities of your performance—as you would get recording a real drummer!
Automation
Automation is one of Logic’s more extensive features, and Chapter 10 examines it in depth. However, since most automation functions are in the main window, a brief explanation of automation follows.
Track-Based Automation
Track-based automation (TA) is the most powerful, accurate, and modern automation in Logic. With TA, your automation is not connected to the regions on a particular track lane, but to the actual track lane itself. This is how automation would function with an actual hardware mixer, in which you automate a mixer channel, not the material that is playing through the channel. It is possible, however, to tie TA to the regions on a track, which is explained in Chapter 10.
When you turn on track-based automation by choosing View > Track Automation or by pressing A, the track lane expands, and you will see the various automation options. Figure 6.124 shows a track with track-based automation visible.
Figure 6.124 This track has track-based automation turned on, and you can see volume automation data in the track lane.

© Apple Inc.
NOTE: Because the automation lane takes up the majority of the track lane, when you want to edit, move, or resize regions, you’ll need to be careful to click only in the top label portion of the region above the automation data. Otherwise, Logic assumes that you are trying to edit your automation data, not the region.
Region-Based Automation (MIDI Draw)
Before Logic introduced TA, the only method of automation was called Hyper Draw, now called MIDI Draw. MIDI Draw uses standard MIDI messages to automate MIDI data. These MIDI messages are directly tied to the region for which they were created; hence, MIDI Draw is also known as region-based automation (RA). Figure 6.125 shows a track with RA information visible.
Figure 6.125 This track has volume MIDI Draw (region-based automation) data displayed. Notice that the Track list does not show as much information for the RA data as for the TA data in Figure 6.124. Notice also that the RA information is included as an actual part of the region itself, unlike TA information, which is connected to the track.

© Apple Inc.
One of the main advantages to RA is that as you move regions around, RA automatically moves with them. In general, however, RA does not have the high resolution or show as much information on the Track list as TA does. You can turn RA data into TA data, as you will explore in Chapter 10.
Musical Typing
Finally, although this isn’t technically a part of the main window, I’ll mention Musical Typing (a truly dreadful name change from the former Caps Lock Keyboard) here because you may want to use it to record software instrument performances. Pressing Command+K or selecting Window > Show Musical Typing will bring up the onscreen keyboard shown in Figure 6.126.
Figure 6.126 The Musical Typing keyboard.
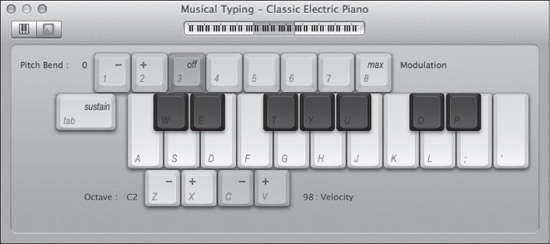
© Apple Inc.
The Musical Typing keyboard is a realtime MIDI keyboard with a maximum of six notes of polyphony. You can use it to audition software instruments without having to reach for your MIDI controller. You can even use the Musical Typing keyboard to record a MIDI performance in real time! The numeric keys give you control over pitch bend and modulation, you can use the Tab key as a sustain pedal, and you can assign its octave and velocity with the four Z-row keys shown in Figure 6.126!
The Musical Typing keyboard clearly doesn’t replace a full MIDI keyboard controller, but if you are on a plane, train, or automobile with no access to a real keyboard, Logic’s Musical Typing keyboard is very convenient. If you want to record a MIDI performance using it, just select your software instrument track in the Tracks area, open the Musical Typing keyboard, start recording, and play!
The main window is perhaps the most complex window in Logic. There’s a lot of information to digest here, but when you’re comfortable with the main window, you’ll be far along the path to being comfortable with Logic as a whole. The next chapter explores using audio and Apple Loops in Logic.