

9-15 shows the net laid flat, and Figure 9-16 shows it folded up into the prism.
To try this out, 3D print a prism with a square base using the
pyramid_prism_net.scad model. Based on the values of r and h you
input, estimate the surface area. Then try measuring the produced model
and seeing how close you got. Remember that the radius of the base (r)
parameter isn’t a side of the base. The radius is the distance from a vertex of
the base to the center. If we have a square base, the radius is the hypotenuse
of a right triangle s/2 on each side. The Pythagorean theorem tells us that
r
2
=(s/2)
2
+ (s/2)
2
which we can simplify to
r
2
=2s
2
/4
or further simplify to
r = s/ √
2
Thus, to get the side of the square to calculate area, you’ll need to multiply
the side by √
2
. If you want to explore other than square prisms, you can break
the base polygon into triangles the same way we do with Platonic solids
(although there we were working with the apothem, not the radius). Check
yourself against what the model calculates when you run it.
PYRAMID
The surfaces of a pyramid are made up of triangles and the base is a
polygon. The height of each triangle is equal to the slant height, and the base
is the length of each side of the polygon making up the base. Let’s assume
that the base is a regular polygon (all sides the same) and that the vertex
at the top of the pyramid is right over the center of the base, so we aren’t
dealing with any skewed sides.
FIGURE 915: Pentagonal prism net, open FIGURE 916: Pentagonal prism net, folded into the prism
Make: Geometry 187
186 Chapter 9: Surface Area and Nets
Geometry_Chapter10_v15.indd 186Geometry_Chapter10_v15.indd 186 6/23/2021 9:10:30 AM6/23/2021 9:10:30 AM

As we saw when we calculated the inscribed polygon in Chapter 7, if there
are n sides to our base polygon that are each of length s, we can break
our base up into 2n triangles and calculate the base area that way. As the
number of sides gets very big, the base starts to approximate a circle, and
the pyramid approaches a cone. The model pyramid_prism_net.scad also
prints nets for pyramids, with the parameter “pyramid” set to true.
Each of the 2n triangles has a base of s/2 and a height equal to the apothem
of the polygon:
Apothem = s/(2 * tan(180/n))
The area of the n-sided base with sides of length s is:
Base area = n /(4 * tan(180/n))
Then we have to add in the area of n triangles on the sides of the pyramid.
Each one has a base of length s, and a height equal to the slant height, which
is the hypotenuse of a right triangle made by the height of the pyramid and
the apothem.
Slant height =√
apothem + h
The area of each of these triangles is
Area = slant height * s/2
So the area of a pyramid with n sides is:
Surface area = n * s * slant height/2 + base area.
Let’s see what this is if we have a pyramid with a square base. In that case,
the number of sides is 4, and tan(180/4) = tan(45) = 1. Figure 9-17 shows the
net for this case laid flat, and Figure 9-18 shows it folded up into the pyramid.
Base area = 4s/4 = s
Apothem = s/2
Slant height = √
s ⁄4+h
Surface area = s+ 2s
√
s⁄4+h
Make: Geometry 187
Geometry_Chapter10_v15.indd 187Geometry_Chapter10_v15.indd 187 6/23/2021 9:10:30 AM6/23/2021 9:10:30 AM

Print out a pyramid with a square base using the pyramid_prism_net.scad
model. Based on the values of r and h you input, estimate the surface area.
Then try measuring the produced model and seeing how close you got.
Remember that the radius of the base (r) parameter isn’t a side of the base.
The radius is the distance from a vertex of the base to the center. (For an
accurate measurement, measure all the way across the base and divide by
2.) If we have a square base, the radius is the hypotenuse of a right triangle
s/2 on each side. The Pythagorean theorem tells us that
r= (s/2) + (s/2)
r= 2s /4
r = s/ √
2
So to get the side of the square to calculate area, you’ll need to multiply the
radius by √
2
. If you want to explore other than square prisms, you can break
the base polygon into triangles the same way we do with Platonic solids
(although there we were working with the apothem, not the radius). Check
yourself against what the model calculates when you run it.
CONE
Technically a cone can be thought of as a pyramid with infinitely many sides.
That’s not easy to calculate until you move on to calculus, which has tools
for such things. Instead, let’s think about what it would look like to unroll
the surface of a cone. In this case, because part of the net needs to curve
around, we have to use a paper model of a cone’s net.
FIGURE 917: Square base pyramid net open
FIGURE 918: Square base pyramid net folded into a pyramid
Make: Geometry 189
188 Chapter 9: Surface Area and Nets
Geometry_Chapter10_v15.indd 188Geometry_Chapter10_v15.indd 188 6/23/2021 9:10:31 AM6/23/2021 9:10:31 AM
Use the model cone_cylinder.scad to create a
paper model. File > Export > .svg creates a
file that can be printed on a regular paper print).
Drag the .svg file into an empty page on a web
browser, and print it from there. The model has
these parameters and defaults:
• r = 20;
• Radius of the base, mm
• h = 20;
• Height of the base, mm
• cone = true;
• Set to true to get a cone, false to
get a cylinder.
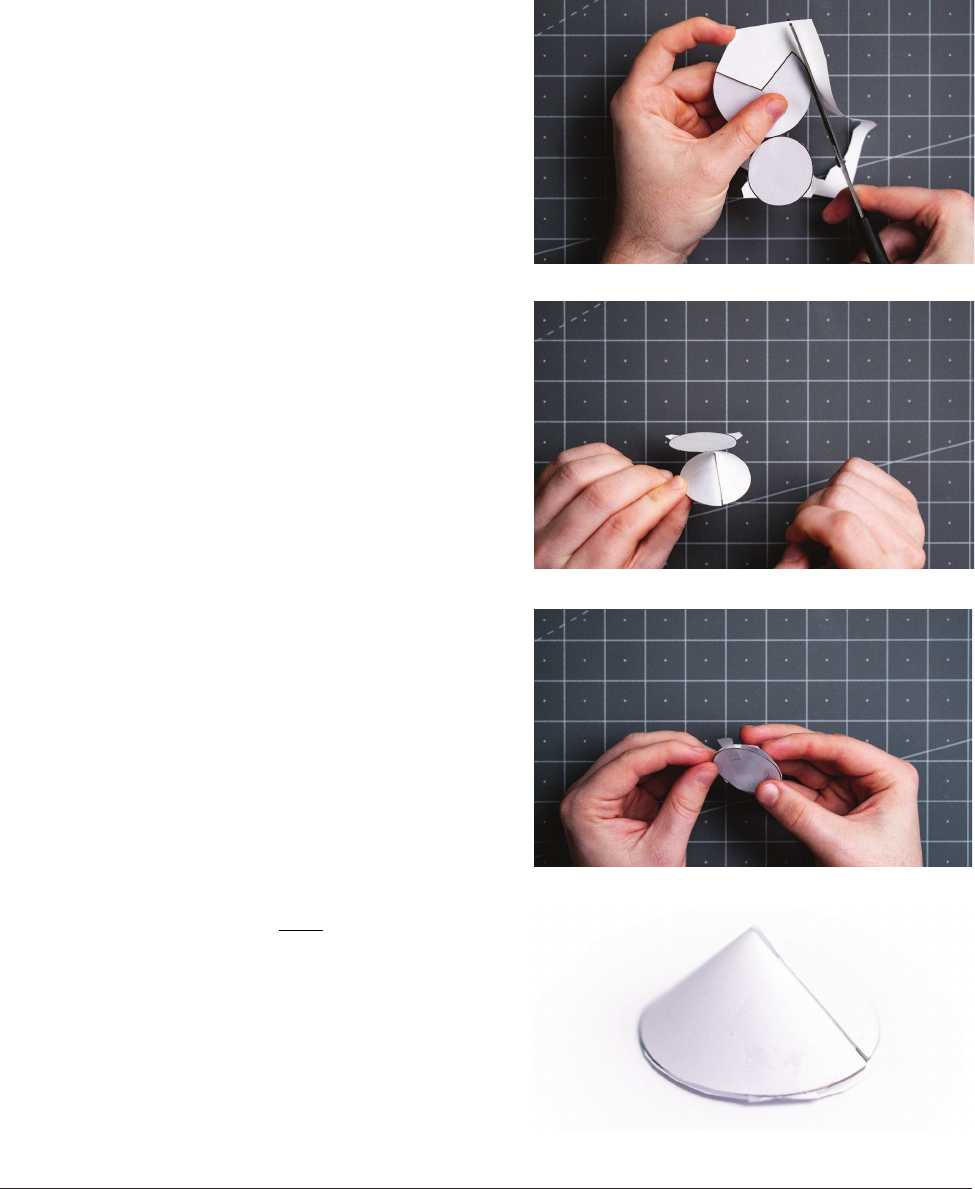
It consists of two parts: the base (which is just
a circle) and the curved part. We know what to
do with the base; its area is just πs. The upper
part, though, is a segment of a circle. Print out
the cone net, and cut the shape out of the paper.
Be careful to leave the two halves connected,
though. Since we did not allow any extra space for
overlapping, you might want to leave a few strate-
gic tabs to use as anchors for tape or glue (Figure
9-19). To assemble, first bend around the partial
circle to make the top of the cone (Figure 9-20).
Then bend over the base and tape (Figure 9-21).
Finally you will have the completed cone (Figure
9-22).
The slant height of the cone is the hypotenuse of
a triangle one side of which is the height of the
cone,and the other is the radius.
Slant height = √
r+h
We can tell what wedge of a circle the upper part
of the cone is equivalent to by thinking about the
fact that if we had a full circle, the radius would
be the slant height. However, the radius of the
base of the cone is 2πr. Thus the fraction of the
circle we have is
FIGURE 919: Cutting out the cone, leaving some tabs
FIGURE 920: Make curved part of the cone
FIGURE 921: Tape the base in place
FIGURE 922: Completed cone
Make: Geometry 189
Geometry_Chapter10_v15.indd 189Geometry_Chapter10_v15.indd 189 6/23/2021 9:10:34 AM6/23/2021 9:10:34 AM

Fraction of a full circle = r/√
r+h
Area of the full circle would be π ( √
r+h
)
Area of the segment = area of the full
circle * fraction of the full circle
= π ( √
r+h
) r/ √
r+h
= π r√
r+h
Surface area of a cone = area of the
segment + area of the base = π r √
r+h
+π r
Try to think this through by printing (on paper) a
cone net. Figure out, using the equations above,
what its surface area should be. If you doubled the
radius, what would that do to the surface area?
Check yourself against what the model calculates
when you run it, or check the “Answers” section at
the end of the chapter.
CYLINDER
The surface area of a cylinder is easy to figure
out if you think about the area of the label on a
soup can. If you peeled the label off and flattened
it out, it would be a rectangle 2πr by h, where r is
the radius of the can and h is the height. The area
of the base and top would be 2πr each. Thus the
surface area of the cylinder is:
Surface area = side + 2 * base
= 2πrh+ 2 * 2πr
= 2πr(h+ 2r)
You can print (on paper) a cone net using the
model cone_cylinder.scad as we just described
for the cone. Set cone = false to get a cylinder.
Cut the border of the shape out of the sheet of
paper (being careful not to detach the two circles
from the long strip. As with the cone, leave some
tabs to help with assembly (Figure 9-23). Tape
together the long strip to make the sides (Figure
9-24). Finally, tape on the top and bottom lids of
FIGURE 923: Cutting out the cylinder net
FIGURE 924: Taping the sides
FIGURE 925: Finishing off the cone.
Make: Geometry 191
190 Chapter 9: Surface Area and Nets
Geometry_Chapter10_v15.indd 190Geometry_Chapter10_v15.indd 190 6/23/2021 9:10:36 AM6/23/2021 9:10:36 AM
..................Content has been hidden....................
You can't read the all page of ebook, please click here login for view all page.