

4
CHAPTER 4
CONSTRUCTIONS
62 Chapter 4: Constructions Make: Geometry 63
Geometry_Chapter10_v15.indd 62Geometry_Chapter10_v15.indd 62 6/23/2021 9:08:48 AM6/23/2021 9:08:48 AM

In the last two chapters, we learned how to use OpenSCAD to simulate various geometrical shapes and
transformations. We also saw how those abstract models could become a 3D print. In this chapter, we’ll
learn a very old and more concrete way of simulating and creating geometrical shapes, the use of a tool
to draw straight lines (like a ruler), and the use of a drawing compass.
We’ll get into more detail on the properties of what we are constructing—angles, perpendicular lines,
triangles—in future chapters. In this chapter, we want to get across the power of these simple tools, and
how elegantly you can use them to construct accurate drawings.
CONSTRUCTIONS
We’ve mentioned the ancient Greek mathematicians a lot, since they developed the basics of geometry.
Some of it was done as an intellectual exercise. However, much of the development of geometry was
an early attempt to solve practical problems like navigation, specifically finding latitude (see Chapter
7). One of the best-known mathematicians of the group was Euclid. He lived about 2400 years ago, and
his geometry book Elements has more or less been continuously in print ever since. If you search for
“Euclid Elements” you can find various free versions and translations, or you can buy more modern
versions.
Obviously, the ancient Greeks were very limited in the tools they had at hand. They worked with a ruler (more
formally called a “straightedge”), a compass, and some way to mark a surface. We have the advantage of
pencil and paper, but otherwise we can try to get
some of their insights the same way they did.
We will give you a few examples, and we hope you
play around with them and find other relationships.
If you really enjoy this but would prefer something
more like a video game, you can try playing the
game Euclidea. It is available on the web
(https://www.euclidea.xyz) and as a phone app. It
simulates the use of a compass and straightedge,
and combines some of these tools so you can skip
some of the steps. However, you will probably enjoy
the game more if you learn a little geometry first,
since Euclidea doesn’t give many hints!
Now, we will walk through the steps of doing
three classic constructions. We’ll show one
particular type of compass because it is a little
easier to see what is going on with this type, and
it is a bit easier to swing around as you will see.
We’ll refer to the needle point of the compass as
3D Printable Models Used in
this Chapter
See Chapter 2 for directions on where and how to
download these models.
reuleaux-n-gon.scad
Creates objects called Reuleaux polygons (ex-
plained in this chapter)
Other supplies for this chapter
• Compass (the kind that draws circles)
• Ruler (straightedge)
• Pencil and paper
• Alternatively, string
Make: Geometry 63
Geometry_Chapter10_v15.indd 63Geometry_Chapter10_v15.indd 63 6/23/2021 9:08:48 AM6/23/2021 9:08:48 AM
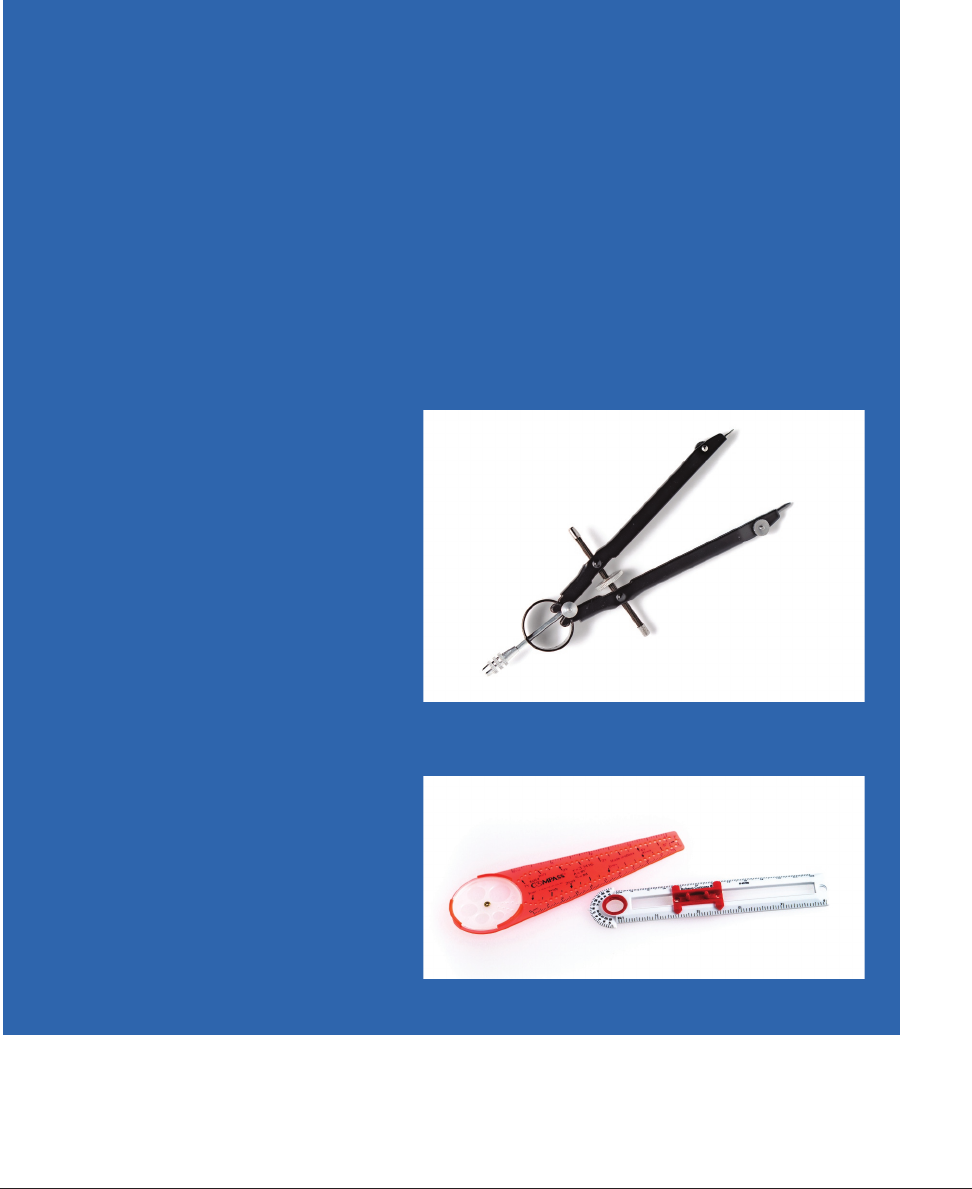
How to Use a Compass
A compass is an instrument for making circles, but it can also be used to do constructions, which
is what mathematicians call it when you draw something precisely, often to prove that a particular
statement is true.
There are several compass designs, but most hold a pencil in a way that makes it easy for you to
make a circle. We will show you three types of compass you might encounter.
The most common kind somehow attaches or incorporates a pencil on one side. You hold the
handle on top, and pivot the pencil around the center. This type (Fig. 4-1) is the easiest to use pre-
cisely, and it is simpler to be able to pivot
from one circle to another. It is also the
easiest to see what you are doing, so we
will use this type in future illustrations.
More recently, there are plastic “safety
compasses” of varying design (Fig 4-2).
We show two of them here. You hold down
the center of a flat piece of plastic, letting
the arm turn freely. Smaller circles can be
made by using the cutouts in the middle of
the arm.
In a pinch, you can use a piece of string
with a loop in it: put the pencil against the
loop, hold down the other end of the loop as
the center of the circle, and draw. However,
we are going to try to do some things that
require a bit of precision, and it will be a lot
easier if you can get an actual compass.
FIGURE 41: A standard compass
FIGURE 42: Safety compasses
64 Chapter 4: Constructions Make: Geometry 65
Geometry_Chapter10_v15.indd 64Geometry_Chapter10_v15.indd 64 6/23/2021 9:08:49 AM6/23/2021 9:08:49 AM

FIGURE 43: First, start by drawing two
lines with the straightedge to create an
angle
FIGURE 44: Now, take your compass
and put the needle point on the vertex of
the angle.
FIGURE 45: Swing the pencil point
around the needle point to draw an arc
centered on the vertex
FIGURE 46: After you have drawn your
arc, move your compass so that the
needle point is on the intersection of the
arc and one side of the angle
FIGURE 47: Now draw another arc
farther from the vertex.
FIGURE 48: Figure 4-8: Repeat this
move from the other side of the angle.
FIGURE 49: Now draw a line with a
ruler from the vertex of the angle to the
intersection of the two arcs you just
drew. That line will cut the angle in half.
the point that does not have a pencil on it, and the pencil point as the
one that does. For the compass with a rotating central part, obvi-
ously the middle of that is the equivalent of the needle point. We’ll
use a protractor (normally used to measure angles, as we will see in
Chapter 5) as a ruler here since it is easy to see through it. However,
any ruler will do.
BISECTING AN ANGLE
This construction cuts an angle in half, also known as bisecting an
angle. We will talk more about angles and measuring them with a
protractor in Chapter 5, but now just focus on how we can pretty
accurately cut one in half.
Be sure to keep the two points of the compass the same distance apart
for the whole drawing. The compass in our picture has a locking mech-
anism, but if yours does not you might just need to be careful not to
spread it out or compress it. Figures 4-3 through 4-9 detail the process.
Make: Geometry 65
Geometry_Chapter10_v15.indd 65Geometry_Chapter10_v15.indd 65 6/23/2021 9:08:57 AM6/23/2021 9:08:57 AM
The radius of the arc doesn’t matter, although you should have it intersect the sides of the angle fairly
close to the vertex so you have room for the later steps.
Why this works: Circles are used in constructions a lot because, since a circle’s radius is constant (as
we will explore in depth in Chapter 7), they are a handy way of measuring that two distances are the
same. When you drew the first arc, you marked points the same distance from the vertex on both sides
of the angle. The vertex is an equal distance from each of the two points where the arc crosses the
sides of the angle.
Because the bisecting line runs down the middle, every point on it is also equidistant from those
two points. By drawing two equal-radius arcs, one centered on each of those two points, we can find
another point on the bisecting line where they cross. Connecting this crossing point to the vertex gives
us the bisecting line.
PERPENDICULAR BISECTOR
Here, we are finding a line that cuts a given line in half, at a right angle to it. Figures 4-10 through 4-13
walk through the details of the process.
Why this works: As in the previous example, a circle’s radius is constant, and every point on the bisect-
ing line is an equal distance from the two endpoints. Since a slanted line would have to pass closer to
one endpoint than the other, this bisecting line has to be perpendicular. When you draw equal-radius
arcs from either end of the line, the places where they cross have to be equidistant from those points.
When you connect the two points where the arcs cross, you get a perpendicular line of points that are
all equidistant from those two centers.
66 Chapter 4: Constructions Make: Geometry 67
Geometry_Chapter10_v15.indd 66Geometry_Chapter10_v15.indd 66 6/23/2021 9:08:57 AM6/23/2021 9:08:57 AM
..................Content has been hidden....................
You can't read the all page of ebook, please click here login for view all page.