the cylinder (Figure 9-25).
Print (on paper) a cylinder net. Figure out, using
the equations above, what its surface area should
be. If you doubled the height, what would that do to
the surface area? Check yourself against what the
model calculates when you run it, and look at the
Answers section at the end of the chapter.
SPHERE
That the surface area of a sphere is 4πr is chal-
lenging to prove without calculus. However, some
complicated proofs survive from Archimedes and
others, which involve projecting the sphere onto
a cylinder of equal radius. There is not a simple
net for a sphere that conserves its surface area
exactly, although you can imagine approximations
if you think about ways to peel an orange and cut
the peel into smaller and smaller pieces until it is
as flat as you want.
GLUING OR PRINTING
A NET ONTO FABRIC
GLUING NETS ONTO FABRIC
The nets platonic_net.scad or pyramid_prism.
scad are designed so that you can print out the
separate pieces (without the hinge) and glue them
onto fabric instead. You will need to be careful in the placement, though, so
that the piece folds up correctly. For this method, set hinge = 0 and base-
layer = 0, so that you won’t be pulling on the fabric when you try to fold the
pieces together. (If you want a slight gap instead to allow room for heavier
fabric, set hinge = -1 for a 1mm gap, hinge = -2 for a 2mm gap, and so
on.)
We will describe how to use a hot glue gun to do this. You might experi-
ment with other methods. First, we took a baking sheet and some clay, and
arranged the model points-down in the clay so they wouldn’t move around.
This gives us a flat surface to glue on. Next, we taped down the fabric to the
baking sheet (Figure 9-26).
Finally, we applied hot glue through the fabric. (We used colored hot glue to
FIGURE 926: Setup for hot-gluing onto fabric.
FIGURE 927: Hot gluing
Make: Geometry 191
Geometry_Chapter10_v15.indd 191Geometry_Chapter10_v15.indd 191 6/23/2021 9:10:37 AM6/23/2021 9:10:37 AM

make it easier to see here, but regular hot glue will be less obtrusive.)
Obviously, this only works if the fabric is loose weave or netting (Figure
9-27). As always, be careful with hot glue and don’t burn your fingers!
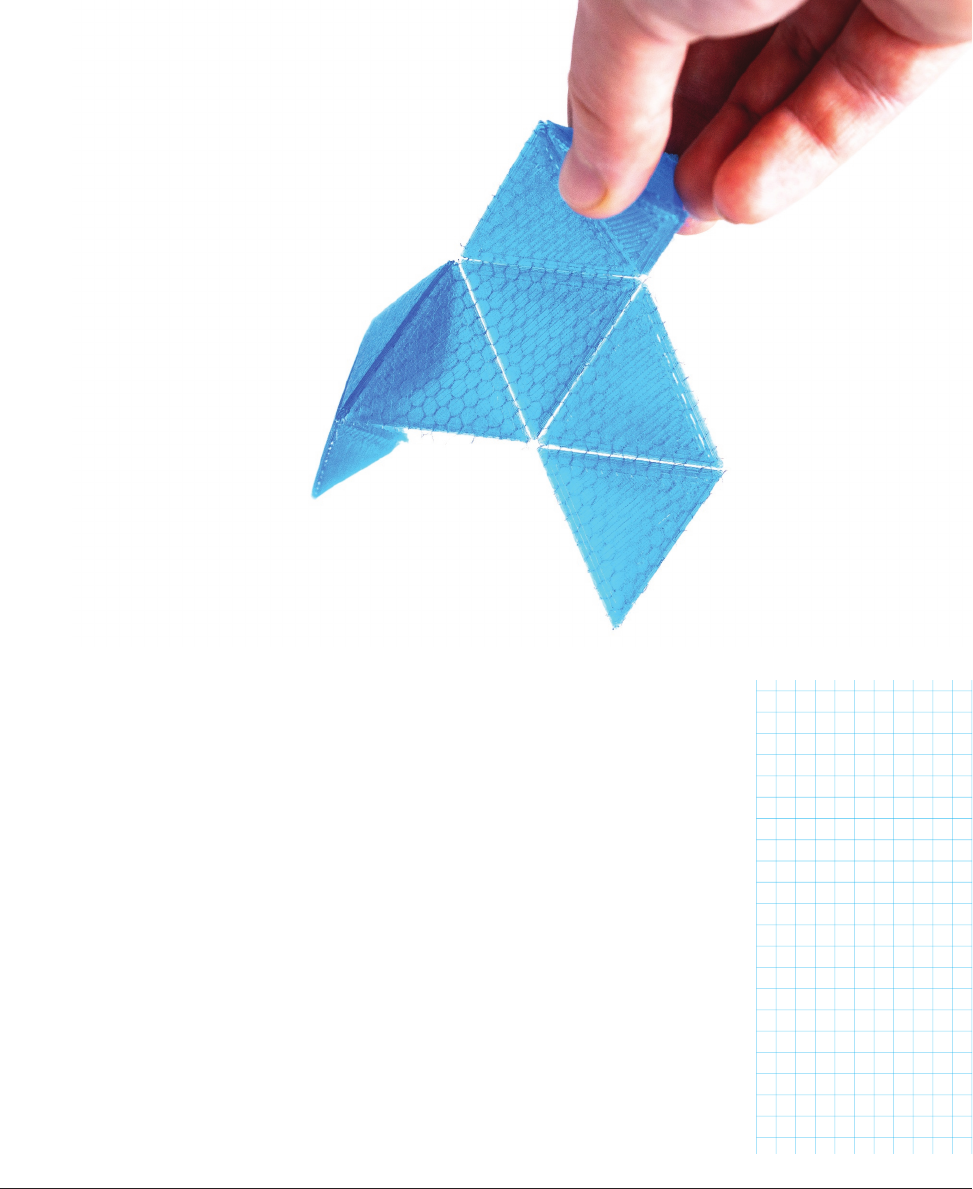
Take off the tape, and peel the net off the clay (Figure 9-28). Then cut off
the excess fabric, and it will fold as shown (Figure 9-29).
FABRIC PRINTING PROCESS
It is possible, although tricky, to stop a 3D print part way up and insert
fabric between desired layers of a print. People have been doing this to
make costumes and other wearables; see, for instance, the work of David
Shorey (www.shoreydesigns.com) or Billie Ruben (www.billieruben.info).
You can visit either of their sites for ideas and techniques. In particular
check out Billie’s guide to 3D printing on fabric on her site, which has
many detailed photos of the process.
Note that this is an advanced procedure, and you shouldn’t attempt it
unless you are very comfortable with your 3D printer hardware and soft-
ware. The details are very printer-dependent, and we would recommend
searching around a bit to find people who have done this with hardware
like yours. We will, however, go over the general process and issues that
arise so you will know how to set up the models.
You can use models from platonic_net.scad or pyramid_prism.scad for
this process. First, set the parameter hinge to a negative number. Start
with hinge = -1 which will leave a gap where the hinge would be, and
the fabric will be taking the place of the living hinge. A value of -1 will give
FIGURE 928: Finished with gluing
FIGURE 929: Finished net
Make: Geometry 193
192 Chapter 9: Surface Area and Nets
Geometry_Chapter10_v15.indd 192Geometry_Chapter10_v15.indd 192 6/23/2021 9:10:38 AM6/23/2021 9:10:38 AM

a one-millimeter gap, -2 a two-millimeter gap, etc. One millimeter should be
a large enough gap for thin, flexible fabrics like tulle, but thicker, stiffer ones
may require a larger gap.
There are several ways to 3D print on fabric with a filament printer. One way
is to attach fabric to the bed of your printer, either with small clips or tape,
before you start printing. This has the advantage of being simple. However, it
might confuse any automatic calibration your printer does at the beginning of
a run. The plastic also might not stick to the fabric all that well, or the print
may shift and fail if the fabric wrinkles or stretches.
What most people do instead is to print a few layers, pause the printer, clip
or tape down the fabric, and then resume the print. If the fabric is netting or
otherwise porous, the idea is that the plastic permeates through the fabric
from above and bonds to the plastic below. It then solidifies around the
threads of the fabric for better adhesion, so that the print doesn’t just peel off.
It is often recommended to print 3 to 5 layers before pausing to add the
fabric, but it’s possible to do more. Pausing after you have finished the solid
layers at the bottom of a print may result in a slightly weaker bond, but will
avoid a lot of potential issues caused by trying to force too much plastic into
the space already taken up by fabric. However you decide to print your base,
you should ensure that the baselayer value is set to the height at which your
pause will occur, so that your fabric hinge will end up in the right place.
PAUSING A 3D PRINT
Most popular slicers like Ultimaker Cura and PrusaSlicer can insert a pause
between layers, either after a certain number of layers have been printed
or once the printer has reached a certain height. This feature may be made
available via a plug-in, extension, or post-processing script. They usually
include options like moving the print head out of the way, displaying a custom
message on the printer’s control panel, and extruding a bit of material to
prime the nozzle before resuming.
Alternatively, if your printer has a control screen and a “pause” (or “change
filament”) feature, you can use that to pause the print after you have seen the
appropriate number of layers go by. If you have to resort to “change filament”
you might have to fake out the printer by removing and replacing the same
material, or perhaps take advantage of that to have the outer parts of the
nets one color and the inner parts another.
Make: Geometry 193
Geometry_Chapter10_v15.indd 193Geometry_Chapter10_v15.indd 193 6/23/2021 9:10:38 AM6/23/2021 9:10:38 AM

If you run your printer via Octoprint or a printer-specific wireless interface,
your manufacturer might have created a pause and restart functionality that
way. Check your documentation to see how that might work.
For this method to work, you’ll need some way of interacting with your
printer while it’s running, at least to tell it to resume after you’ve inserted the
fabric. The appropriate pause codes and resume procedures will depend
both on what printer you’re using and what software you’re using to control
it. If there aren’t obvious options for this in your software, you may want to go
with the technique of putting down the fabric before the first layer is printed
instead.
FABRIC TO USE
Use a thin fabric, and one that won’t melt at the touch of the nozzle. Tulle
works well, or other netting that will allow the plastic to attach itself through
the fabric. Anything too thick will distort the print or make the nozzle get
stuck, because there is no allowance for the fabric in the models. Always
closely monitor a print on fabric to make sure the fabric isn’t getting over-
heated or caught in the nozzle.
ATTACHING FABRIC TO THE PLATFORM
You will need to somehow pin down your fabric to the print bed, either at the
beginning or part way through the print. Depending on the geometry of your
printer, you may want to use binder clips to attach it to the edges of the print
bed, or some people have had good luck with using blue tape to attach it to
the platform (using a cold print bed). During this process:
• Keep your hands away from the hot nozzle.
• If using clips, be sure that they won’t be hit by the nozzle
when it is moving (you’ll need to bear that in mind when
positioning the print on the bed during slicing).
• The fabric should be taut, with no wrinkles or inconsistent
stretching. If the fabric is a little stretchy, you’ll want to pull it
pretty tightly over the platform.
• If you are taping the fabric down, the piece should be
smaller than the platform. If you are clipping it, it will need
to be a little bigger.
• Be sure that any excess fabric that hangs over the sides
doesn’t get close to any moving parts of the printer that it
might get tangled in or wrapped around.
Make: Geometry 195
194 Chapter 9: Surface Area and Nets
Geometry_Chapter10_v15.indd 194Geometry_Chapter10_v15.indd 194 6/23/2021 9:10:38 AM6/23/2021 9:10:38 AM

KEEPING A WARY EYE
Once you’ve stretched the fabric and started (or re-started) your print, hover
over it for at least the first few layers and expect to have to start over a few
times. It’s easy for the fabric to pull up, get wrapped around the nozzle, or for
the next layer not to print. It’s always a good idea to stay near a print in prog-
ress, but we wouldn’t leave a print on fabric alone until it completes. If things
go badly, be careful unraveling the detritus, sigh, and try again (or perhaps
hot glue will look better at that point). However, if it works, the results can be
impressive (Figure 9-30).
SUMMARY AND LEARNING MORE
In this chapter we learned about surface area, and how to use nets to visual-
ize them. We explored models to create nets for Platonic solids, pyramids and
prisms, and cones and cylinders. These can be created on paper, with 3D prints,
or in a mix of 3D prints and fabric. There are good discussions about surface
area on Wikipedia, and several videos through the Khan Academy.
FIGURE 930: Octahedron on fabric
Make: Geometry 195
Geometry_Chapter10_v15.indd 195Geometry_Chapter10_v15.indd 195 6/23/2021 9:10:39 AM6/23/2021 9:10:39 AM
..................Content has been hidden....................
You can't read the all page of ebook, please click here login for view all page.
