
Maker
Photography by Mister Jalopy
THE WORLD’S BIGGEST MP3 PLAYER
Play and digitize your LP collection with this retromodern wonder machine.
By Mister Jalopy
After years of garage sales, I have amassed a treasure trove of scratchy 78 RPM records on obscure regional labels by even more obscure artists. Most will never make it to a commercial CD, as the market is restricted to a few like-minded kooks that don’t like to leave the house. And the old-timey stuff that has made it onto CD has been scrubbed and optimized to remove the pops, skips, scratches, and other auditory foibles.
But what if you like those defects? Aren’t those pops and scratches part of the fun of listening to an original pressing of Duke Ellington’s “Mood Indigo”? And Soft Cell’s “Non-Stop Erotic Cabaret” or AC/DC’s “For Those About to Rock” sounds exactly as you remembered when you hear it in the correct order with the scratchy pauses between tracks. A whole 99 cents for a single iTunes track? Forget it!
A well-spent garage sale quarter will buy an entire album of Dinah Washington, Three Dog Night, or Devo.
Of course, there are significant downsides to vinyl records. The endless flipping of the album, the steady sound degradation with every play, and the space required for record collections are all legendary. So, with the ever-present bar napkin, I started designing my dream machine. It had to be able to digitize any input — mono or stereo. It should have a radio, preferably with time-shift recording like a TiVo, should sync to my iPod, have a decent turntable, and a big hard drive. And it shouldn’t be embarrassingly ugly.
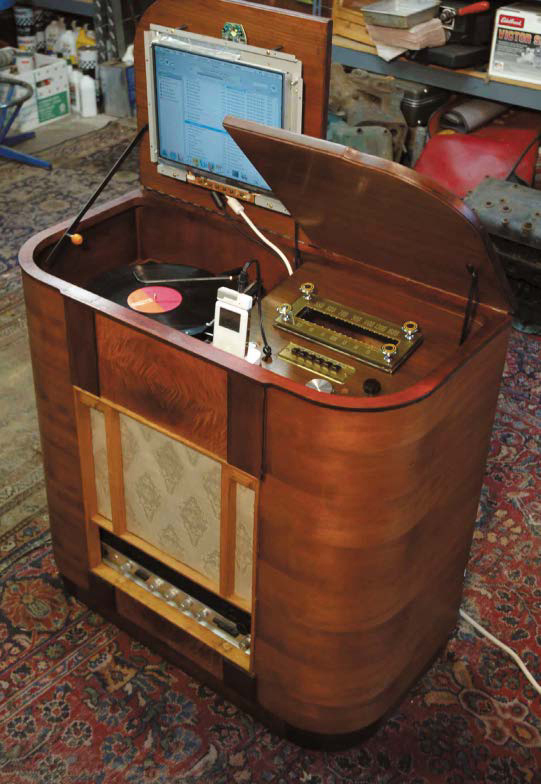
You can rest assured that you won’t get mugged carrying this behemoth on a subway — build the world’s biggest MP3 player!
LIBERATE COMPONENTS
It almost always makes sense to break individual components from their original housings. Everything just gets so much smaller.
1 Install the Turntable

Make a cardboard template and use a coping saw to trim the turntable wood top to fit.
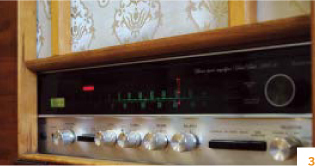
2 Install the Tuner

The tuner should be handy, so I decided front and center would be perfect. I removed the wood speaker grill and trimmed the verticals to clear the tuner. Then, I added a new horizontal wood crossbar.
3 Replace the Speaker Grill
The original 12" speaker was long gone, and replacement multirange 12" speakers are no longer available. A $5 Sony bookshelf speaker is sitting on top of the tuner behind that fabric.
4Use the Chassis

After removing endless capacitors and tubes, the original chassis is the perfect platform for your new modded machine. All the connecting hardware is there, everything lines up, and it is constructed to last until the next ice age. The Mac mini is held in with hardware store Velcro earthquake straps.
5 Liberate the Screen

Like the turntable, the LCD panel is considerably more svelte when you free it from its plastic case. Don’t tell anyone, but to reuse the RF shielding, I just smeared some silicone adhesive to secure it.
6 Mount the LCD

The monitor is screwed right to the turntable lid. To find the correct spacer, measure the depth of the monitor and find something just a shade longer at the hardware store.
RETROFIT
7 iMac

The original amplifier/tuner chassis is reinstalled but now with the Mac mini in its place. Those buttons were radio presets, but now they will control the iPod.
8 Study What’s There

Momentary switch: a switch that returns to its normal position when force is removed.
A project like this is so much more satisfying if you are able to reuse the existing controls. Under the gold-tone radio preset faceplate, we find the original radio tuner preset button assembly, and to get this switch to work, we need to convert it to a momentary switch. An iPod’s remote buttons press and then release. By examining the radio preset assembly, I determined a single spring needed to be removed to convert the old “press and hold” buttons to iPod-compatible momentary switches.
9 Connect Wires to AirClick
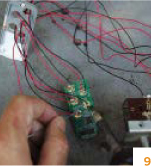
The AirClick is the magic bridge to control the iPod. Inside the AirClick, there are gold circuit board switch contacts that are triggered by magnetic pads on the backs of rubber buttons. Very carefully, drill tiny holes through the circuit board switch contacts to connect the new wire. Thread the wires for each contact set through the AirClick case holes, as it will be tidier when we reassemble. For each button function, solder a black wire to one switch contact, a red wire to the other.
10 Connect the Old Switch

Solder the other end of each red/black wire pair to the contacts on the old radio preset switch. It should be a one-to-one relationship when connecting the wires from AirClick to the old switch.
11 Connect Griffin Wheel and iPod Dock

To feed through the USB/FireWire connectors, the old knob holes needed to be expanded. Despite the creepy name, the rat-tail file is a fantastic tool to make a round hole oblong. Use the base of the file by the handle for a big, wide cut.

REASSEMBLE
The new AirClick-empowered switch assembly is back in, and now that row of brown buttons controls the iPod. The PowerMate controls iTunes on the Mac mini. The brown bakelite knob does absolutely nothing. Yet. Since the Mac mini is mounted vertically on the old radio chassis, just lift the old tuner window to put in a CD.

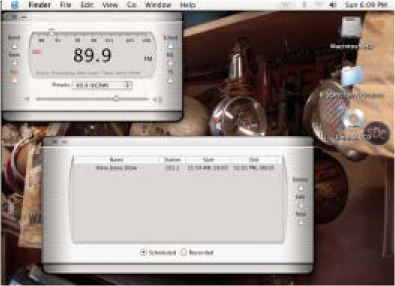
LISTEN TO RADIO
Tuning the radio with RadioShark couldn’t be easier, and the addition of pause and record buttons is pretty exciting. Mercifully, the RadioShark has a ⅛" mini jack for an external antenna, and plugging in a headphone extension cord helped pull in weaker stations.
DIGITIZE
Since I used the tuner output, the levels were high enough not to use the turntable 40dB signal boost. Since I don’t mind the pops and scratches, the free Final Vinyl software that comes with the iMic was just dandy for my purposes.
The real test will be if I get rid of my records. After holding on to that Haysai Fantayzee 12" for all these years, will I end up selling it for a quarter at my garage sale? Just the idea of people pawing through my records gives me an upset stomach, so I am probably doomed to keep them forever. But I’m sure I’ll listen to it more now that it is digitized!