
D.I.Y.
ROBOTICS

Photography by Dave Prochnow
Take me apart: The Robosapien is a robot with a purpose — to be hacked.
HACK A ROBOSAPIEN
This maker-friendly bot begs to be opened up.
By Dave Prochnow
One-and-a-half million Robosapiens were sold last year. Appealing to both adults and kids, Robosapien has probably gone further toward inspiring future roboticists than the most ambitious educational product.
But that’s only half the story. Robosapien is one of those few toys that you absolutely must take apart, for three reasons. First, as you disassemble Robosapien, you will be truly amazed at the simple beauty of its design. Counterbalancing springs, integrated plastic strain reliefs, and intricately geared servo motors will delight even the most jaded toy buyer. This robot ain’t no bucket of bolts.
The second reason for opening up Robosapien is learning the basics of robot and toy design. Yes, the insides of this robot are well documented, ensuring a good, competent education in robotics — that is, if you’re willing to pick up a screwdriver and open it up.
Finally, you’ve got to open up Robosapien if you want to become one with this robot’s greatest inner strength — it wants to be hacked. I should know: with the blessings of WowWee Ltd. and Robosapien’s inventor, Mark W. Tilden, I wrote The Official Robosapien Hacker’s Guide (TAB Electronics, 2005), which details over a dozen modifications, construction projects, and hacks that can be performed on this remarkable robot. Regrettably, there were two hacks I couldn’t thoroughly discuss in this book. Here they are.
What’s the Frequency, Robosapien?
By far, the easier of these two Robosapien hacks is the replacement of the main processor crystal. Labeled “Y1” on the Robosapien main circuit board, this crystal is actually a monolithic capacitor. As such, it doesn’t require a big leap of imagination to think that switching this capacitor crystal’s value could result in a different Robosapien “personality.”
And that’s exactly what will happen: the frequency of the robot’s operation can be slowed down or sped up by almost 50% just by using different-sized capacitors. Plus, the Robosapien IR remote control will still work. This hack allows you to vary the speed of motor actions for either fast and lightweight or slow and powerful designs.
Open, Sesame
The first step (and one of the hardest in this hack) is to get inside Robosapien to the main circuit board. All you will need for this portion of the hack is a No. 0 Phillips screwdriver.
Before you begin any hacking surgery, make sure you remove the four D-cell batteries from the Robosapien’s feet. With your patient now suitably anesthetized, there are four screws that hold the back plate to the Robosapien body — one in each shoulder and two in the waist.
Once you remove these screws, the back plate will lift off. Be careful, however; the power switch wiring harness (this also holds the speaker wiring) is attached to the main circuit board. Just pull the main circuit board plug for the power switch harness, and the back plate can be removed. Set both the front and back plates aside.
Gain Some Capacitance
The main circuit board is located on the back of the Robosapien. Take a moment to study all of the lovingly applied labeling that WowWee Ltd. added to the main circuit board — all of this done to help you, the hacker.
Locate the crystal capacitor. It is to the left of the IC U3 and labeled “Y1.” Although this crystal looks like a capacitor, it is actually a ceramic resonator. Take a pair of diagonal cutters, snip the Y1 capacitor off, and remove it from the circuit board. You will now solder either a new ceramic resonator or a capacitor in its place. I began with a .22µF monolithic capacitor. Alternatively, you can add an inexpensive ceramic resonator (digikey.com). Your beginning frequency for the resonator would be around 4MHz. Just solder this replacement capacitor or resonator crystal to the decapitated leads from the old crystal.
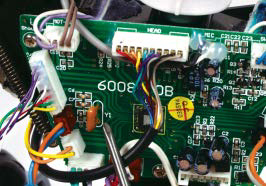
The Robosapien main circuit board is located on the robot’s back. The crystal capacitor is labeled Y1.
Plug-n-Go
If you really want to experiment with a wide variety of capacitor crystals, you might wish to solder two header pins to the Y1 crystal passthrough pads. Then you can just temporarily attach your capacitors or resonators to these header pins, until you find the perfect hack.
Typically, resonators with higher frequencies (6MHz to 12MHz, for example) will result in a “faster” Robosapien. (NOTE: The IR remote control might not function properly at frequencies higher than 6MHz.) Lower frequency resonators (2MHz to 3.58MHz) will make the robot behave more slowly.
This same principle holds true for the replacement capacitors, as well. For example, try a 2.2µF capacitor to increase the speed of Robosapien. Just remember to hold onto the original Y1 crystal, so that you can return your robot to its factory state of mind.
The Soccersapien
How about hacking Robosapien into a powerful, fast-moving, soccer-playing robot? Yes, it can be done and it’s easier than you think. Be forewarned, however, that this is a much more elaborate hack. If the complexity of the previous hack left your head reeling, then you might want to hold off on this one until you get some more circuit-building experience.
This hack will make it possible to triple the walking speed of Robosapien by using NiCad rechargeable batteries, two H-bridge post buffers, and two Radio-Control (RC) grade, high-torque, high-RPM motors in the hip gearboxes. One of the most common places to find these motors is inside an RC car. With motors in hand, you will need to build two H-bridge circuits and attach these directly to the motors.
In order to gain access to those hip gearbox motors inside Robosapien, you will have to remove the front and back plates as described earlier, as well as dropping the robot’s trousers. Removing these “trousers” can be a tricky proposition because two screws are hidden under black plastic plugs on the backside bottom plate.
After disassembling countless Robosapiens, I have seen these plugs both slipped in and glued in place. While the slipped-in plugs can be easily pulled out with a small knife blade, the glued-in plugs must be drilled out. I use a hand drill equipped with a small bit. Don’t opt for a power drill for this step — too much speed will melt the plastic. Just a simple hand twist or two and you’ll have an easy-access hole through each plug. Now increase the diameter of your drill bit to accommodate the size of your screwdriver shaft, and slowly ream out the hole to its final dimension.
If you happen to scratch or mar the black plastic, don’t fret. This plastic is actually painted black and can be quickly re-covered with some gentle sanding and a little dab of black gloss paint.
I’ve included a sample H-bridge schematic diagram to help you build this circuit. Wiring each H-bridge to the Robosapien main circuit board is deceptively easy. Each drive input for the H-bridge circuit is connected to the motor lines that are currently in Robosapien (i.e., “LEG-L” and “LEG-R”). Therefore, just snip the leads from the two motors in each Robosapien hip gearbox. Remove the old motors and insert your new high-torque motors. Just make sure that these motors have a static resistance greater than 4 ohms, are approximately ¾-⅞ inch in diameter, no greater than 2 inches in length, and have a pinion gear attached to the shaft (e.g., ideally any Mabuchi FA-130 series motor). Alternatively, you can use the existing motors and couple the H-bridge circuits to them, but the performance improvement isn’t nearly as dramatic as with the higher-torque motors.
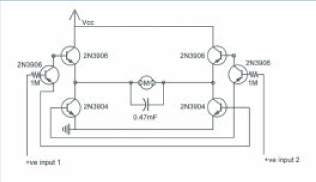
Schematic diagram of an H-bridge circuit. (Schematic redrawn from original design by Mark W. Tilden ©1997)
Greasy Bot Stuff
Now that your new motors are ready to go, you must find some power to drive the H-bridge circuits. Both Vcc and ground can be found on the two outside connectors located along the lower edge of the Robosapien main circuit board (“L-SW-GND-C” and “SPK-VDD-Fr-VCC”). Just remember that a big bypass capacitor (e.g., 330µF 16V electrolytic capacitor) must be attached to Vcc to avoid frying the Robosapien brain.
Now Fire ’em Up
It’s off to the races. Before you send Robosapien forth fleet footed, make sure you test this new high-speed “mover” on a slick surface. Alternatively, you can coat the footpads on the bottom of each battery compartment with something slippery. Insert your NiCad batteries and get ready to be impressed — all over again. The second “running” forward mode will now give the robot more than enough speed for robot soccer applications.
Dave Prochnow is author of The Official Robosapien Hacker’s Guide (TAB Electronics, 2005). You can learn more about this book and other projects at pco2go.com.