
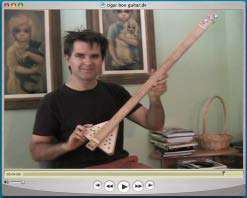
CIGAR BOX GUITAR
By Ed Vogel
Sweet-sounding, three-stringed mini guitar revives an American musical tradition.
Set up: p.79 Make it: p.80 Use it: p.86

ROCK ‘N’ ROLL-YOUR-OWN
As a volunteer music teacher, I sometimes meet kids who can’t afford instruments. So I decided to design one that they could inexpensively build themselves, based on the traditional cigar box guitar.
Before the 1950s, when factory guitars became less expensive, many folk musicians built their own stringed instruments. Wooden cigar boxes, which were solidly constructed connoisseur objects, became a popular choice for the instruments’ bodies. Thus, an American tradition was born, and today, the cigar box guitar is enjoying a folk revival.
My guitar is a simple, three-stringed design that uses only one power tool and common hardware. Despite its low cost, this guitar plays real music and will hold its tuning for a couple of days. A kid can build it (and play it), and so can you.
Photography by Sarah Whiting
![]() Hear the cigar box guitar at makezine.com/04/cigarbox.
Hear the cigar box guitar at makezine.com/04/cigarbox.
Ed Vogel lives in Minneapolis and believes that nothing may just be the next big thing.
MAKING STRINGS SING
A string vibrating by itself makes very little sound. The cigar box guitar, like other stringed instruments, uses flat, lightweight surfaces to push more air around, making the sound louder. A piezoelectric pickup converts the vibrations to voltage, letting you plug in and wake the entire neighborhood.
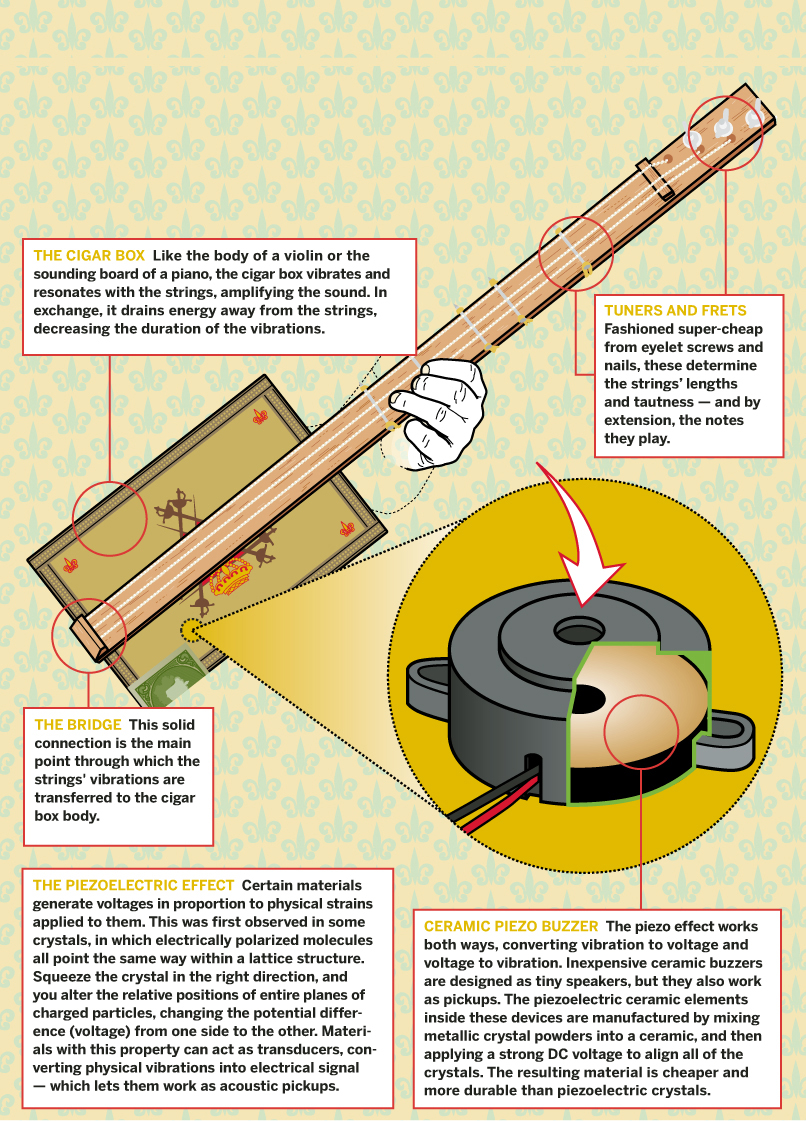
Illustration by Dustin Amery Hostetler / UPSO.org
SET UP.

MATERIALS
[A] Pen, pencil, or markers (not shown)
[B] Scissors (not shown)
[C] Cigar box Many tobacconists will give cigar boxes away free. I usually end up paying a dollar for them at a place near my house. If you can’t find a cigar box, an intact pizza box will also work.
[D] Mason twine, #15 and #18 Available at hardware stores, this is used by bricklayers and cement workers to mark lines.
[E] ¼"x3" eyebolts and nuts (3)
[F] #12x⅝" wood screws (3)
[G] Drill and drill bits
[H] 3’ length of 1x2 red oak This will be the guitar’s neck. The lumber’s actual measurements are ¾" by 1½", but 1x2 is how it’s named.
[I] ¼" square hardwood stock, at least 1½" long This will be the nut, at the top of the neck.
[J] ½" square hardwood stock, at least 1½" long This will be the bridge.
[K] Super glue
[L] 90-second epoxy (or 5-minute epoxy, for a little more positioning time)
[M] ¼" washers (6)
[N] ¼" wing nuts (3)
[O] 2" common nails (at least 3)
[P] Phillips screwdriver
[Q] 3½" x 1" (size 33) rubber bands
[R] Hacksaw blade or hacksaw
OPTIONAL
1500-3000Hz piezoelectric element, a.k.a. piezo buzzer For amplifier pickup.
¼" phono jack
Soldering iron, solder, and wire
MAKE IT.

BUILD YOUR CIGAR BOX GUITAR
START |
Time: An Afternoon Complexity: Low |
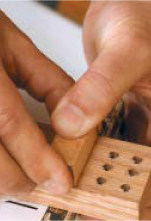
1. ASSEMBLE THE NECK AND BODY
1a. Using the diagram at right, drill holes at each end of the 1x2. You’ll drill six holes in two rows at the tail, to anchor the strings below the bridge, and six more in two diagonal rows where the tuning pegs will be.


1b. If you want to add an electric pickup to your guitar, skip ahead to step 4. Otherwise, super-glue the cigar box shut.
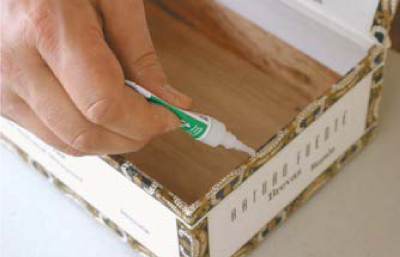
1c. Set the neck squarely on the box so that its six holes are just clear of one of the box’s ends. Mark the box along both sides of the neck, so you know where to put the glue.

1d. Mix up some epoxy. I recommend using half a tube, since there may be some gaps to fill.
1e. Apply a generous amount of epoxy to the cigar box, position the neck on top, and weigh it down with a phone book or other weight. With 90-second epoxy, I wait 5 minutes to get a decent cure.

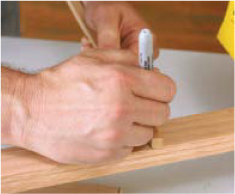
1f. Use the pen to mark the width of the neck (1½") on the ½" square stock. This will be the bridge.
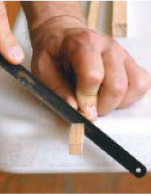
1g. Use the hacksaw blade to cut the bridge.
1h. Put down three dots of super glue for the bridge about ½" up from the six holes at the tail end of the neck.
1i. Set the bridge down on the glue and hold it long enough to sing “Twinkle, Twinkle, Little Star” twice. This song will help you tune later on.
1j. Repeat steps 1f through 1i, using the ¼" stock. Glue the nut six inches from the opposite end of the neck.

2. STRING THE GUITAR
2a. Take an eyebolt, spin a nut down the threads, add a washer, and then insert it up into a tuner hole at the end of the neck. Put another washer on top and spin on a wing nut.
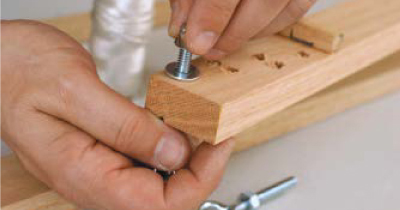
2b. Repeat with the other two bolts, and tighten all three to light-finger tight. Are you still humming “Twinkle, Twinkle”? It can become a real earworm. This will work in your favor later, for tuning and playing.


2c. Cut a piece of #18 mason twine about 5 feet long. You won’t need all of it, but ends get frayed and we need some slack for pulling on. Thread the string through the empty tuner hole closest to the nut, and tie the end to the adjacent eyebolt in back. Make sure the knot is on the side where the “eye” starts its bend, so that it won’t slip out when we tighten the string.


2d. Spin the eyebolt clockwise three times to get some string wrapped on. Tighten the wing nut to firm-finger tightness. Pull the string over the nut.
2e. Pull the string over the bridge and thread the other end down the corresponding hole just below.

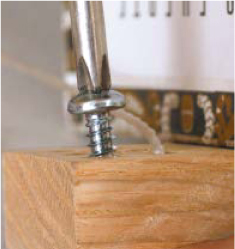
2f. Get a screw started in the hole on the other side, but leave some of the threaded part showing so it’s easy to wrap the string around it.
2g. Here is where some slack is handy. Make a loose loop of string around the screw, and then wrap the slack around your hand so you can pull the string tight while you tighten the screw to secure the string.

2h. Congratulations! You’ve just installed your bass string. Repeat steps 2c through 2g, using the #15 mason twine, for the tenor and alto strings.
People have been building playable musical instruments from LEGO for some time. Henry Lim’s LEGO Harpsichord (see Made on Earth, page 23) and Brad’s LEGO Guitar have been written about many times, but they’re only the start.
Telerobotic Glockenspiel Player: XILO is a slightly frightening-looking device that uses the LEGO camera to watch the player and translate his or her movements into real-time Glockenspiel playing. Eight metal tubes lifted from a toy xylophone surround a two-motor whacker in the middle. One motor rotates a mallet into position, and the other brings it down onto one of the tubes to play the corresponding note.
LEGO Dulcimer: What is it with medieval instruments and LEGO? Mountain dulcimer enthusiast Peter Always built himself a bright yellow dulcimer, with properly spaced frets made of little grey tiles.
Robotic Ukulele Players: Brown University students Bryant Choung and Amelia Wong built a ukulele-playing robot out of LEGO in 2003, and more recently, Middlebury College students Mike Rimoin and Jarvis Lagmans built a smaller one that plays three-chord, such as “Stir It Up” and “Rivers of Babylon.”
Singing LEGO Blocks: The LEGO Mindstorms RCX block (the brain of the system) has a built-in speaker, and Ralph Hempel has written a webpage that explains in eye-watering detail how to make music with it. Remarkably, there doesn’t seem to be a MIDI interface for the RCX; at least not yet…
![]() Get links to all these LEGO musical instrument websites at makezine.com/04/lego.
Get links to all these LEGO musical instrument websites at makezine.com/04/lego.

LEGO MIDI Guitar: The “Lifelong Kindergarten” group at MIT developed this LEGO-based system. The idea was that children could use special LEGO components to build their own experimental instruments, which would work as MIDI controllers.
—Tom Whitwell
Tom Whitwell is the founder of www.musicthing.co.uk. Reprinted with permission from Whitwell’s weekly column on engadget.com.
3. ADD THE FRETS
You can usually just find the proper fret locations by singing the major scale. This picture shows approximately where they will go, but it’ll take some tweaking to get it right. On my guitar, the five frets went from Re at 2½ inches down from the nut, to La at 11¾ inches down. Try plucking the string and listening for a tone, then marking a dot at the spot with a pencil.

3a. To attach a fret, first take a rubber band and double-loop it.
3b. Fit the looped rubber band to a nail near the head.


3c. Place the nail at a fret position, and pull the rubber band up from underneath the neck. Stretch and loop it around the pointed end of the nail. Notice how the nail point is pointing up. This is a good thing.

3d. Repeat steps 3a through 3c above to attach frets for Re, Mi, Fa, Sol, and La. Sing those notes a few times to get that going in your head because it is going to help you tune your guitar. You can add frets farther up, if you want, and the reason my guitar only has frets up to La, instead of up the full scale to Do, is almost maniacal: those are the notes you need to play “Twinkle, Twinkle, Little Star.” And nothing else matters.

4. ELECTRIFY! (OPTIONAL)
You can testify; now you must electrify! Here’s how to add a quick-and-dirty (and I do mean dirty) pickup, so you can play your cigar box guitar through an amp. If you already know you’ll want to play electric, it’s easier to perform these steps first, before you build the rest of the guitar.
4a. Drill a ⅜" hole in the tail end of the box and mount the ¼" phono jack. (If you’ve already glued the box shut, you’ll have to jimmy it back open with a hobby knife.)

4b. Glue the piezo element inside the box as shown, and solder two wires to connect the piezo pickup to the phono jack terminals. Then glue the box shut. If you haven’t already built the rest of your guitar, jump back to step 1c, and continue from there.

4c. Plug in and rock out! If you find that the pickup is picking up sounds other than the guitar, try covering the sound hole of the piezo element with a couple of pieces of duct tape.
USE IT.
TUNE, AND PLAY A TUNE
TUNING
Tuning any musical instrument can be tricky, so I am going to offer two methods: you can tune by ear, using “Twinkle, Twinkle,” or you can use a guitar tuner. If both methods still leave you unsatisfied, take your guitar to a music store and have them do it. I have never done this myself, but it might freak them out, which would be well worth the trip.
If trying to tune is making you crazy, put the guitar down for an hour, or even a day. Practice singing the scale and “Twinkle, Twinkle, Little Star.” You are not tone deaf. If you were, you would not be able to tell the difference between someone asking you a question and giving you a command. Give in to the earworm and be patient.
After coming back to your guitar, just monkey around with it. You built it; it’s yours, and you can do whatever you want! Try over-tightening the strings, and see what the notes sound like until they break. How loose can a string be and still play a recognizable musical sound?
Plan A: To tune by ear
a. Look at the picture you used to position the frets for step 3. To tweak in the frets, you’ll play the lowest string, the bass string, which is the one nearest the heads of the nails.
b. Turn the bass eyebolt and play the string until you start to hear a relatively clear tone.
c. Tighten the bass wing nut.
d. Use a screwdriver to get some leverage and tighten it a little more. Notice how the tone gets a little higher in pitch as you tighten?
e. Pluck the bass string a few times and sing the first two notes of “Twinkle, Twinkle, Little Star” (which is, of course, the two-syllable word “twinkle”).

f. Now tighten the middle string with the screwdriver the same way you tightened the bass string, until it sounds like the third and fourth notes of “Twinkle, Twinkle, Little Star,” the second “twinkle.” You may find yourself singing “Twinkle, Twinkle” along with the bass and middle strings 10 or 20 times. If you are truly going nuts at this point, proceed to Plan B: Using a guitar tuner.
g. The last string is a little trickier, because it requires that the first fret (“Re”) is properly set. Additionally, you are going to sing in a different key. Use the middle string to play the first two notes of “Twinkle, Twinkle.” Then, while fretting the third string up one fret, tighten it to play the second “twinkle.” Your left hand holds the third string down behind the first fret, as your right hand alternates between plucking the string and turning the peg. Again, repetition will make it work.
h. If you feel like you’ve got it (and even if you don’t), strum all three strings. It should sound nice. Another thing that should sound nice is fretting the third string on any fret while strumming all three strings. This little bit of magic lets you play melody and harmony easily, while only fretting one string. This is how the dulcimer works.
Plan B: Using a guitar tuner
a. Get a guitar tuner at a music store, or borrow one.
b. Tighten the bass string until it starts to sound clear.
c. Place the tuner on the cigar box and strum the bass. You should still be below A.
d. Tighten the bass string until you get an A.
e. Repeat steps b through d for the middle string until you get an E.
f. Repeat steps b through d for the top string until you get an A again. It will be an octave higher.
Now that the strings are tuned, you can use the tuner to set the frets:
g. Fret the third string to the first fret.
h. Strum and look at the tuner. If it shows a tone lower than B, move the fret down the neck toward the cigar box. If it shows a tone higher than B, move it up the neck toward the tuners.
i. Repeat steps g and h, moving down the frets, tuning to C#, D, E, F, and so on.
![]() Watch MAKE Editor-In-Chief Mark Frauenfelder demonstrate his variant on the cigar box guitar at makezine.com/04/cigarbox.
Watch MAKE Editor-In-Chief Mark Frauenfelder demonstrate his variant on the cigar box guitar at makezine.com/04/cigarbox.
PLAY A TUNE
Can you guess which one? I’ll bet you can! Yes, it is “Twinkle, Twinkle, Little Star.” You can do it all on your guitar’s bottom string. All you have to do is play the notes that appear above the words notated below:
Do |
Do |
Sol |
Sol |
La |
La |
Sol |
Twin - |
kle |
twin - |
kle |
lit - |
tle |
star, |
Fa |
Fa |
Mi |
Mi |
Re |
Re |
Do |
How |
I |
won - |
der |
what |
you |
are. |
La |
La |
Fa |
Fa |
Mi |
Mi |
Re |
Up |
a - |
bove |
the |
world, |
so |
high, |
La |
La |
Fa |
Fa |
Mi |
Mi |
Re |
Like |
a |
dia - |
mond |
in |
the |
sky. |
(And so on.)
If you have a hard time remembering which fret is Do, Re, Mi, and so on, then just pencil them in on the neck. It’s your guitar, and you can do what you want! To get a more bluegrass sound, you can strum all three strings down and up, double time, for each note.
TAKE IT ON THE ROAD
All-Cigar Box Guitar music festivals have been held recently in Carrolton, Ky.; Huntsville, Ala.; and Red Lion, Penn., and more are being planned for 2006. Check the cigarboxguitars Yahoo! Group for details and updates.
RESOURCES
CBG sites: cigarboxguitars.com, geocities.com/cigarboxguitar
CBG Yahoo! Group: groups.yahoo.com/groups/cigarboxguitars
CBG-building tutorial: cigarboxguitars.com
Musical Instrument Design by Bart Hopkin
Cardboard Folk Instruments to Make and Play by Dennis Waring
![]() Sound clip of author Ed Vogel playing “Twinkle, Twinkle”: www.geocities.com/ed_vogel/cbg1.WMA
Sound clip of author Ed Vogel playing “Twinkle, Twinkle”: www.geocities.com/ed_vogel/cbg1.WMA