D.I.Y.
COFFEE

Photograph by Will O’Brien
By removing the bottom of your espresso maker’s filter holder, you get more prized “crema.”
THE BOTTOMLESS PORTAFILTER
Mod your espresso maker’s filter holder for a tastier cup. By Will O’Brien
In my office at home, one end of the room is devoted to computers, electronics, and my assorted projects. The other is the home of the holy grail of caffeine: my espresso bar. That’s where I measure, grind, and tamp my way to produce some beautiful espresso. I’ve been tuning and tweaking my setup for the last six months or so, and there’s no end in sight. My most recent modification involved some power tools and my portafilter.
The portafilter is the chrome-plated coffee filter holder that most people only notice as the spent grounds are being beaten from its shiny grasp. In this case, I drilled, cut, and ground out the bottom of it to get what’s known as a “bottomless” or “naked” portafilter.
No stock machine comes with a bottomless portafilter. The modification can sometimes result in espresso going in strange directions — like the wall on the other side of the room. The only side affect I’ve observed is a tiny amount of spatter on the top of my espresso cup. So why go bottomless? For some, it’s simply so they can fit a triple basket in the stock portafilter. The espresso industry refers to the bottomless portafilter as a “training tool.”
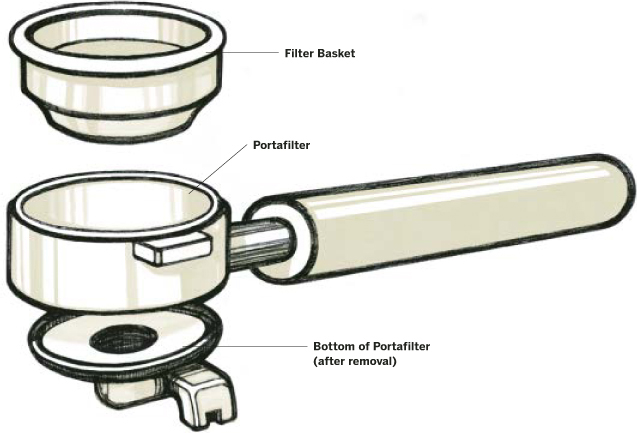
Illustration by Damien Scogin
You can even buy your own from espressoparts. com. As a training tool, the bottomless portafilter is excellent for checking your tamping technique. As an espresso machine modification, I’ve found that my espresso has increased crema, better mouthfeel, and it’s just tastier.
Just about every good quality portafilter is made of chromed marine brass. Inside is a tensioning spring collar that grips the basket, which contains the coffee grounds.
The basket should be removed by pulling or gently prying loose. You can probably leave the spring intact while you perform the modification.
Some people have had good success using a hole saw, but due to the uneven design of the portafilter on my Gaggia coffeemaker (probably the worst product name ever), I chose a different route. After removing the basket, I took the portafilter to my drill press and drilled a circle of holes just inside the walls of the portafilter. Once I’d drilled the 25 or so holes, I took up my Dremel tool and cut the remaining material in between the holes. Finally, I knocked out the center of the filter. After that, some time with the Dremel tool or grinder of your choice will flatten out the edges. When you’re satisfied with the finish of your mod, wash it thoroughly to remove any remaining brass dust.
Once the modification was complete, I pulled a fresh shot of espresso. The flow of the dark amber liquid was enchanting to watch. You may now partake of the art of Espronography: reading the espresso as it flows from the bottom of your new bottomless portafilter. Several weeks later, I still can’t resist watching each shot flow from the filter. As a bonus, I can now easily clean all of the coffee residue from the bottom of the basket.
Will O’Brien pulls espresso and modifies innocent kitchen appliances somewhere in middle Missouri.

Photography by Johnathan Nightingale
After a set amount of time, the toaster tea popper lifts the bag from the cup.
TOASTER TEA POPPER
Perfect brew by the clock. By Johnathan Nightingale
I didn’t used to care about tea timing. In general, I have found that I can prepare tea of adequate quality by simply leaving the teabag in for “a while.” Recently, though, I was persuaded to begin timing and have been convinced that doing so yields a better and more consistent brew. Conventional tea timers have a common failing though, be they hourglass, mechanical, or, in my case, Palm: they require user intervention. At work, I inevitably became distracted by a conversation or got called away to fix something only to return to a patiently beeping timer and some very overdone tea. What I needed was a timer that could remove the teabag on its own.
I found my salvation in a toaster. A toaster is, after all, an easily obtainable and very cheap device that has, at its core, a variable timer controlling a mechanical lifting arm. Most modern toasters use a simple electronic circuit: when the lever is depressed, current flows to the heating elements and to an electromagnet. The electromagnet holds the lever down against the tension of a spring in the handle. While the toast is toasting, a trickle of current flows into a capacitor at a rate controlled by the “darkness” dial, which is nothing more than a variable resistor or “rheostat.” When the capacitor is filled, the electromagnet disconnects, the lever pops back up, and current is cut to the heating coils. With all this work already done for us, a basic ability to solder and some simple parts should be all that’s needed for this project.
To begin, take the toaster apart. As you remove the front panel, you will see the various components described above: the arm, including a metal tab that the electromagnet grabs; a switch that the arm depresses allowing current to flow; and a circuit board with the electromagnet and rheostat (connected to the toaster’s darkness dial). The toaster’s frame and the heating coils can be discarded, but this is easier said than done: my toaster was built like a tank. A Dremel cutting wheel, tin snips, or some other metal cutting tool will help here.

Only one style of toaster will work for this project. Here’s a simple thrift-store test: push the handle down with the toaster unplugged. If it stays down, you have the wrong kind of toaster — an electromagnetic toaster (the kind you want) will pop back up immediately if no power is flowing to the magnet.
Of course, we don’t want to have to plug this into the wall. The vast majority of a toaster’s energy consumption goes into generating heat in the toasting coils. We don’t want that and neither does the circuit board; it’s counting on having most of the voltage dropped by the heaters. Your circuit board will likely be stamped with something like “10V”; regardless of the appliance voltage, the circuit wants to receive no more than 10V. Since most people like tea to steep a little longer than they like toast to toast, a 9V battery will work well here — the lower voltage will slow the rate at which the capacitor charges, and that’s just fine. The problem of how to convert the toaster from alternating current (wall socket) to direct current (battery) is also solved: the toaster circuit contains a bridge rectifier (a simple circuit for converting AC to DC.) Our DC battery will pass straight through, unaltered.
Putting it all together is easier if you can find a suitable container; I used an unfinished wood box from a local craft store. Cut most of the original power cord, attached to the lever switch, and solder the ends to a 9V battery holder. Solder the other lines from the lever switch to the power leads on the circuit board — thanks to the bridge rectifier, polarity doesn’t matter. Now arrange the pieces in your box as they were in the toaster. For the arm, I used a wooden dowel with a brass hook. To make a cup of tea, tie the teabag onto the hook, push the lever down to immerse the tea bag, and place your trust in the machine.
As the battery runs down, the timer will slow even more, but not to worry. By the time the battery gets that low, the voltage will have dropped low enough that the electromagnet no longer holds. I estimate that a regular 600mAh battery should be good for at least 8 hours runtime, about 80-100 cups for a 5-minute steeper.
Johnathan Nightingale is an IBM coder by day, reality hacker by night, and habitual over-thinker.

Photography by John F. Murphy
HOT ON THE SPOT
Get consistent shots by adding precise temperature control to your espresso maker. By John F. Murphy
The art of espresso making is fraught with many variables — coffee bean origin and blend, degree of roast, fineness and consistency of grind, tamping force and technique, and on and on and on. The temperature of the water used to brew the shot is one of the most important variables. In most espresso machines, the brew temperature is controlled by a wildly inaccurate thermostat.
However, control over the brew temperature is key to espresso quality. Different blends of espresso beans and different degrees of roast develop different flavors when brewed at different temperatures. Malabar Gold may taste sweet at a temperature that makes DSB taste sour. Control over the brew temp allows the skilled barista to coax the best flavor from each blend and each roast. In a stock Silvia espresso maker, relative brew temperature is roughly guestimated by “time surfing,” or pulling the shot a certain number of seconds after the stock thermostat turns on the heating element. Surfing does work, but it requires careful attention and lacks accuracy.
A better way is to use a PID controller. It’s easy to use (just set the desired temp and let the PID do its thing) and highly accurate, meaning the brew temperature of the next shot can be very nearly the same — if not exactly the same — as the last shot. And consistency from one shot of espresso to the next is the holy grail of espresso fanatics.

The Rancilio Silvia outfitted with temperature control.
PID BASICS
In simple terms (which is about all I can understand), a PID controller is a precise, computer-controlled thermostat. PID is an acronym for “Proportional, Derivative, Integral,” which has something to do with how the controller holds the boiler (in this application) at a precise temperature.
Here’s an analogy that explains how the PID works and why it is a good thing. Imagine you are driving your car down the street at 60mph. Ahead is an intersection controlled by a stop sign. If you continue to travel at 60mph until you reach the intersection and then slam on the brakes, your car is going to shoot past the stop sign before coming to rest. If, on the other hand, you gradually apply the brakes well in advance of the stop sign, you can come to a controlled stop right at the intersection. (This analogy is paraphrased from an explanation in the Fuji PXV3 manual.)
The stock brew thermostat in the Silvia is like the driver who slams on the brakes at the stop sign. The stock thermostat supplies full power to the boiler’s heating element until it reaches a certain temperature, and then cuts the power off completely. When the power is cut, the heating element continues to heat the boiler water for some seconds until the heating element cools off; this is like the car skidding through the intersection. On my Silvia, the stock thermostat turns off the heating element at around 220° F, but the water continues to heat up until it reaches about 238° F. This is called “overshoot.”
The PID controller is like the driver who gradually applies the brakes and slows down as he approaches the intersection. The PID controller turns the heating element on and off at one-second intervals. As the boiler approaches the desired temperature, the PID turns the heating element on for shorter intervals — like a driver braking harder the closer he gets to the stop sign (this is where the proportional, integral, and derivative calculations come in). Thus, the PID is able to hold the boiler at the desired temperature with very little overshoot. I usually see a 1° F or less overshoot with my PID’d Silvia. Compare that to the 18-degree overshoot with the stock thermostat.
Once the boiler is at the desired temperature, the PID cycles the heating element on and off at intervals calculated to maintain the boiler very close to that temperature. Mine fluctuates by about 1° F. The stock thermostat, by contrast, has a fluctuation of at least 40° F!
THE RANCILIO SILVIA
If you’re going to be finicky enough about your coffee that a few degrees variation in brew temperature is a big deal, you’d better start off with a decent espresso machine. The internet is replete with raves about Rancilio’s Silvia, so I’ll just touch on one key feature: temperature stability. Silvia contains a lot of heavy brass in the boiler, the grouphead, and the portafilter. Once all that brass gets up to operating temperature, it tends to stay there.
When you pull a two-ounce double, the hot brass of the grouphead and portafilter keep the brew water from cooling off before it hits the coffee grounds. Likewise, the brass boiler stays hot even as cool water from the reservoir replaces the water used to make the shot. Without good temperature stability during a shot, accurate temperature control is useless, if not downright impossible.
I also used the following tools and supplies that I had on hand: wire stripper/crimper (RadioShack sells them for under $8), soldering iron, solder, heat-shrink tubing, coping saw, and various small screwdrivers. (The last three items were all used solely for installing the optional switch.)
INSTALLATION
Note: I did not actually follow these steps in the order presented. I did a lot of trial fitting, testing, etc., before I arrived at the final assembly. But if I had it to do all over again, this is the way I would do it.
1. Prepare the enclosure. Fitting the PID into the project box was a bit tricky for someone of my limited craftsmanship. The screw towers and circuit board holders in the enclosure interfered with the placement of the PID. I ended up cutting a slot through one end of the enclosure with a hand miter saw and a coping saw. The distance between the circuit board holders molded into the enclosure is very close to the height of the PID, so I simply cut down along the circuit board holders, broke out the piece of plastic between the cuts with a pair of pliers, and reamed out the opening with a power drill until the PID fit.
I also drilled a ¼" hole in the back of the enclosure to run wires to the PID and a ¾" hole in the top towards the back to mount the (entirely superfluous) lighted rocker switch. Actually mounting the PID in the enclosure is simple enough once the opening is prepared: slip the white mounting collar over the PID, slide the PID into the enclosure, then cinch the mounting collar up tight against the inside of the enclosure. This is easier to do than it is to describe.
2. Open Silvia. (Unplug it first!) Silvia is a breeze to open — especially compared to my first machine, a DeLonghi, which was held together by hidden tamperproof screws.
2a. Remove the water reservoir. Shake the excess water out of the two water hoses into a towel or sink.
2b. Remove the four screws that hold on Silvia’s top. Set the top aside.
2c. Remove the two screws that hold on the front splash panel. Set the splash panel aside.
3. Install the thermocouple. Now that Silvia’s innards are exposed, you can see the bronze-colored boiler with many wires and two blue cylinders attached to it. The blue cylinders are the thermostats. The thermostats are attached to the boiler by three screws. Remove one of the screws, slip the washer end of the thermocouple under the “ear” of the thermostat, and then replace the screw through the thermostat and the thermocouple washer (see Fig. 1). I test-mounted the thermocouple under the leftmost screw, but later moved it over to the rightmost screw, which is closer to where the cold water enters the boiler. I’m not sure it makes any difference in operation.

Fig. 1 Thermocouple washer installed under screw of steam thermostat.
4. Remove wires from brew thermostat. The brew thermostat is the blue cylinder on the left. Unplug both connectors from the thermostat (see Fig. 2).

Fig. 2 Removing brew thermostat connectors.
5. Attach heater circuit wires to the solid-state relay (SSR).
5a. Cut two pieces of wire about 12" long. Strip the ends of both wires.
5b. Crimp a connector onto one end of each wire.
5c. Plug the connectors into the wires detached from the thermostat in step 4 (see Fig. 3).
5d. Run the other ends of the wires through Silvia’s chassis so that they protrude down behind the splashguard.
5e. Attach the bare wire ends to the SSR. There are four terminals on the SSR; on mine, they were labeled L1, T1, A2(+), and A2(-). Attach the wires to L1 and T1. It does not matter which wire goes to L1 or which to T1. My SSR has screw/clamp terminals; simply slide the wire into the terminal and tighten the screw to hold it in place. If necessary, trim the wires before attaching to the SSR so there is not an excess of wire behind the splashguard (see Fig. 3).

Fig. 3 Boiler detail with thermocouple and SSR wires installed.
6. Attach the PID control wires to the SSR.
6a. Cut two more pieces of wire, about 36" each. They need to be this long because I decided to run the wires out to the PID. Strip the ends.
6b. Since all of the wire I used was the same color, I marked both ends of one piece with tape so I could identify it later.
6c. Run one end of each wire from the boiler compartment down to the SSR.
6d. Attach the wire marked with tape to the ‘+’ terminal on the SSR. Attach the other wire to the ‘-’ terminal (see Fig. 4).

7. Run control wires and thermocouple wire out to the PID. I did not want to cut a hole for the wires in Silvia, so I decided to run them out of an existing gap in the bottom left corner at the back of Silvia.
7a. Remove the panel that fits between the water reservoir and the boiler compartment. It is held on with two small machine screws and lock washers on the water reservoir side. The panel is angled and may need a bit of fiddling to get it to slide out (see Fig. 5).

7b. Run the cycle time (TC) and control wires (the ones attached to the + and - terminals of the SSR) out of the boiler compartment, along the bottom of the water reservoir compartment, and out the opening in the bottom corner of the water reservoir compartment (see Fig. 6).
7c. Reinstall the panel removed in step 7a.
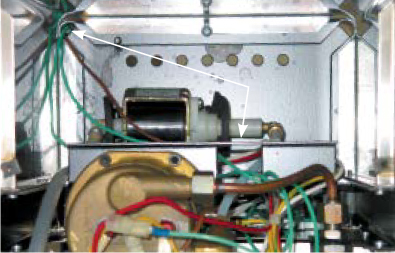
Fig. 6 Wire path out of Silvia.
8. Wire the PID.
8a. Cut the receptacle end (not the end that plugs into the wall) off of the extension cord and strip the ends of the wires about ¼".
8b. Run the extension cord, TC wire, and SSR control wires through the hole drilled in the back of the enclosure.
8c. Slide the white mounting collar over the back of the PID (it must go on before the wires are attached, for obvious reasons).
8d. Attach the wires to the PID as follows (see Fig. 7). The PID has simple screw clamp terminals, so just slide the wire into the appropriate terminal and tighten the screw.
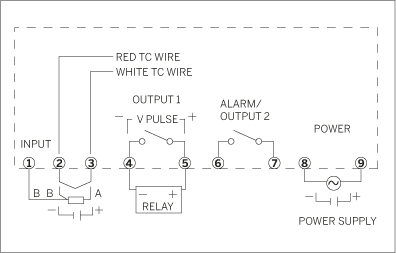
8e. The ends of the thermocouple wire go to terminals 2 (red wire) and 3 (white wire). The first time I wired up my PID, I had the leads reversed. When the PID turned on the heating element, the temperature readout started to drop instead of rise.
8f. The ends of the SSR control wires go into terminals 4 and 5. Be sure to match the + wire from the SSR to the + terminal on the PID, and the - wire to the - terminal. That’s why I marked the wire with tape in step 6b.
8g. The ends of your power cord go into terminals 8 and 9. (Note: The lighted rocker switch, if used, gets wired between the power source and the PID. I left that step out because the switch is totally superfluous.)
8h. Terminals 1, 6, and 7 are unused.
9. Mount the PID in the enclosure. Slide the PID into the enclosure. Cinch the mounting collar snug against the inside of the enclosure. Screw the cover onto the enclosure. I attached the enclosure to Silvia with double-sided foam tape. Not the most elegant solution, I guess, but it is cheap, fast, simple, and reversible.
10. Secure the SSR, and reinstall the splash panel. Behind Silvia’s front splash panel is a bolt that can be used to secure the SSR. I did not have a 4mm washer and nut (available at your local hardware store) to use for this purpose, so I simply hung the SSR on the screw, and then put the splash panel back in place.
11. Reinstall Silvia’s top and water reservoir. Put the top back on, tighten up the four screws that hold it down, and reinstall and refill the water reservoir.
12. Fire up! Plug Silvia in, plug the PID in, and turn Silvia on. The PID should display the boiler temperature after a second or two. Press the SEL button on the PID to see the setpoint temperature; use the up and down arrow buttons to adjust the setpoint to 230° F.
TUNING
In order for the PID to work its magic, various parameters must be set on the controller itself. Fortunately, the PID controller takes care of the hard parts through a process called “autotuning”; through trial and error, the PID determines its own optimum settings necessary to hold the boiler at the desired setpoint. There are a few parameters, however, which need to be set by hand.
Manual Settings
Make the following settings by hand. There are about 50 parameters that can be set manually; I only changed 5.
1. Primary Menu: Press and hold SEL key for 3 seconds. The only item of interest on the primary menu is autotune, which is discussed in the autotuning section below.
2. Secondary Menu: Press and hold SEL key for 7 seconds.
TC (cycle time): I have mine set to 1.
P-n2 (input type): Make sure this is set to 2 for type J thermocouple or 3 for type K.
P-dP (decimal point resolution): Set this to 1 to display temps in one-tenth degree increments.
3. Factory Presets Menu: Press and hold SEL for 9 seconds.
P-dF (input filter constant): This setting filters out quick changes in thermocouple readings and slows down PID responses, which is a bad thing for our application. I have mine set to 0.
FUZY (fuzzy logic): Helps eliminate overshoot. Set to On.
Autotuning
Autotuning is the process where the PID controller determines how output to the heating element affects boiler temperature. After autotuning, the PID sets its own proportional, integral, and derivative parameters so you don’t have to worry about it.
To activate autotuning:
1. Turn on Silvia and the PID and let her warm up for, say, an hour.
2. Run some water through the portafilter or steam wand to lower the boiler temp.
3. Press the SEL key for 3 seconds, and then the down arrow key until AT (looks like A7) appears on the PID display.
4. Press the SEL key once to select autotuning.
5. Press the UP key once. The PID should display 1. The autotune LED on the PID will start to blink.
6. Wait a while (about 7 minutes in my experience). When autotuning is complete, the PID will return to the current temperature display.
That’s all there is to it. Silvia is ready to go.
NOTE: The modifications described on these pages reflect the author’s own experience and are not intended to serve as a guide or instructions for others. These modifications involve tampering with high-wattage electrical circuits in a wet environment, which could result in electric shock, burns, other serious personal injury, or death, as well as fire, explosion, and other property damage. The author is not an electrician and the fact that his modifications were successful was purely a matter of luck. The author and/or MAKE is not responsible for injury or damage to or caused by anyone foolish enough to follow his example. Before you tinker with an espresso machine or any home appliance, make sure you know what you are doing or get help from someone who does. Modifying Silvia voids any warranty provided by the manufacturer and/or retailer.
John F. Murphy is a government lawyer in Fort Worth, Texas, who relies on espresso to fuel him through the work-a-day drudgery.

Add some Perl code to your morning brew and discover the difference it makes.
Illustration by Damien Scogin
AUTOMATE YOUR COFFEE POT USING X10
What good is a coffee pot if it can’t be controlled from the internet? By Dave Mabe
If you’re anything like most geeks I’ve met, you probably have a coffee pot that gets a lot of use catering to your caffeine addiction. I decided to play around with X10 technology and an open source software program called MisterHouse to automate my coffee pot and make it more user friendly.
I wanted to wake up to freshly brewed coffee, and I’m too lazy to remember to turn off the pot after a period of time to prevent burning. Sure, you could buy a fancy coffee pot that has some of the features I wanted built in, but even the most expensive coffee pot can’t touch the flexibilities you can create with a little Perl code.
MisterHouse (misterhouse.net) runs on Windows, Mac, and Linux, and lets you write simple Perl code to control a variety of hardware. To control your coffee pot, you’ll need to buy an X10 PC interface and an appliance module (less than $50 new — even less on eBay). You’ll plug the appliance module into the electrical outlet and the coffee pot into the appliance module. You’ll need a coffee pot with a mechanical switch — it needs to be able to be turned on and off simply by controlling the power supplied to it. The PC interface connects to a computer’s serial port and plugs into any electrical outlet.
Once the hardware is connected, configuring MisterHouse is a breeze. There are detailed instructions in the misterhouse.ini file included with the software on the website.
Rather than schedule the time to start brewing, I wanted to schedule the time my coffee pot completed the brew so I could know the instant my coffee was ready. First, I timed how long my pot takes to brew our standard amount of coffee (8 minutes until the last drip). I created a file called coffeepot.pl in MisterHouse’s code directory on my PC with the following code in it (MisterHouse creates an event loop and executes your code a few times every second):
# C2 is the code I set on the appliance module
my $coffee_pot = new X10_Appliance("C2");
my $morning_coffee_time = "5:15 AM";
my $brew_duration = 8;
my $start_brew_at = time_add("$morning_coffee_time
- 00:$brew_duration:00");
my $coffee_timer = new Timer;
my $coffee_brew_timer = new Timer;
my $coffee_pot_on_duration = 40;
if (time_now($start_brew_at)) {
set $coffee_pot ON;
set $coffee_timer ($coffee_pot_on_duration * 60);
set $coffee_brew_timer ($brew_duration * 60);
}
if (expired $coffee_brew_timer) {
# do some optional notification here
}
if (expired $coffee_timer) {
set $coffee_pot OFF;
}
This way, MisterHouse knows to start brewing at 5:07 a.m. if I want to have coffee at 5:15 a.m. A timer is started for the brew time ($coffee_brew_ timer) and for the automatic shutoff ($coffee_timer). Once the coffee timer expires, the coffee pot is automatically turned off (Smokey the Bear would be proud).
I drink coffee twice a day — one cup in the morning and one in the afternoon, so I added code for the afternoon brew with some notification features as well. I’ve placed some motion detectors ($25 each) throughout my home and external home office. Depending on which room there has recently been motion in, MisterHouse turns a light on and off when the coffee’s ready. For the early morning brew when there’s no motion in the house, I turn on a light near my bedroom that acts as a gentle alarm clock. If the house is motionless at any other time of the day and the brew completes, I send an email to my BlackBerry with a “Turn Off Now” link, in case it’s been turned on in error.
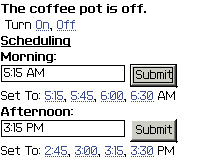
MisterHouse comes with its own built-in web server that allows most any object to be accessed and modified using a browser. Along with a fairly comprehensive default web interface, there is full documentation on how to easily roll your own. I wanted to be able to schedule my coffee pot as well as turn it on and off from my BlackBerry, so I created a custom site that looks decent on a mobile browser.
I’ve also added some vacation logic. My morning brew is automatic — after I schedule it once, it happens daily. However, if there hasn’t been motion in the house during the previous evening, MisterHouse knows I’m probably on vacation, so the morning brew doesn’t kick off.
Well, there go the lights — it’s nectar time!
Learn more about Misterhouse and how it can help you do more than brew a great cup of joe by visiting the wiki at misterhouse.sourceforge.net.
Dave Mabe is the author of the upcoming BlackBerry Hacks from O’Reilly and lives in Chapel Hill, N.C.