4
Scaffolding a New Helm Chart
In the previous chapter, you learned how to use Helm from an end user perspective, leveraging it as a package manager to install applications to Kubernetes. Leveraging Helm in this fashion required you to understand how to use the Helm life cycle commands (install, upgrade, rollback, and uninstall), but it did not require you to understand how the Helm chart itself was built. While an understanding of the Helm CLI commands is necessary to install and manage applications installed by Helm, that level of knowledge alone will not allow you to package your own applications into Helm charts.
In the second part of this book, starting with this chapter, we will switch gears away from being a Helm chart end user and transition into becoming a Helm chart developer. We will accomplish this by building a Helm chart from scratch over the next few chapters that deploys an instance of the Guestbook application, a commonly used sample application within the Kubernetes community. By the end of the second part, you will have an understanding of the concepts and experience required to write robust Helm charts.
In this chapter, we will begin to explore Helm chart development by discussing the following topics:
- Understanding the Guestbook application
- Understanding the YAML format
- Using helm create to scaffold a new Helm chart
- Deploying the scaffolded Guestbook chart
- Exploring the Chart.yaml file
- Updating the Chart.yaml file
Technical requirements
This section requires the minikube and helm binaries to be installed on your local machine. The installation and configuration of these tools are covered in Chapter 2, Preparing a Kubernetes and Helm Environment.
Understanding the Guestbook application
Since the second part of this book will be centered around developing a Helm chart to deploy the Guestbook application, let’s first understand what this application does and what its architecture looks like.
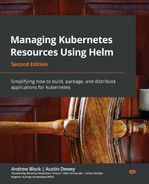
The Guestbook application is a simple PHP: Hypertext Preprocessor (PHP) frontend designed to persist messages to a Redis backend. The frontend consists of a dialog box and a Submit button, as illustrated in the following screenshot:
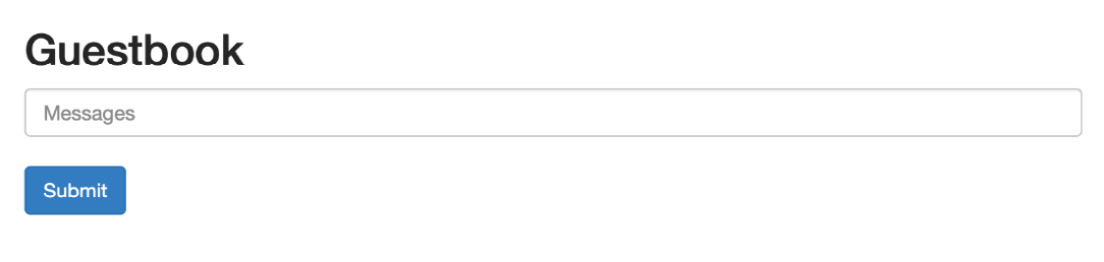
Figure 4.1 – The Guestbook PHP frontend
To interact with this application, users can follow these steps:
- Type a message in the Messages dialog box.
- Click the Submit button.
- When the Submit button is clicked, the message will be saved to the Redis database and displayed at the bottom of the page, as shown in the following screenshot:

Figure 4.2 – The Guestbook frontend after a new message has been submitted
Redis is an in-memory, key-value data store that, for our Helm chart, will be clustered to provide data replication. The cluster will consist of one leader node that the Guestbook frontend writes to. Once data is persisted, the leader will replicate across each of the follower nodes, from which Guestbook replicas will read, to retrieve and display the list of previously submitted messages.
The following diagram describes how the frontend interacts with Redis:

Figure 4.3 – Guestbook frontend and Redis interaction
With an understanding of how this application works, let’s focus on starting our Guestbook Helm chart. We’ll begin with a primer on the YAML format, since this format is ubiquitous among the files you will interact with as a Helm chart developer.
Understanding the YAML format
YAML Ain’t Markup Language (YAML) is a file format used to create human-readable configuration. It is the file format most used to configure Kubernetes resources and is also the format used for many of the files in Helm charts.
YAML files follow a key-value format to declare configuration. Let’s explore the YAML key-value construct.
Defining key-value pairs
One of the most basic examples of a YAML key-value pair is shown here:
name: LearnHelm
In the preceding example, the name key is given a LearnHelm value. In YAML, keys and values are separated by a colon (:). Characters written to the left of the colon represent the key, while characters written to the right of the colon represent the value.
Spacing matters in YAML format. The following line does not constitute a valid key-value pair:
name:LearnHelm
Note that a space is missing between the colon and the LearnHelm string. This would result in a parsing error. A space must exist between the colon and the value.
While the preceding example represents a simple key-value pair, YAML allows users to configure more complex pairings with nested elements, called maps. An example is shown here:
resources:
  limits:
    cpu: 100m
    memory: 512Mi
The preceding example demonstrates a resources object containing a map of two key-value pairs:
|
Key |
Value |
|
resources.limits.cpu |
100m |
|
resources.limits.memory |
512Mi |
Keys are determined by following the indentation under a YAML block. Each indentation adds a dot (.) separator to the name of the key. The value of the key has been reached when there are no longer any indentations remaining in the YAML block. By common practice, indentations in YAML should use two spaces, but users can provide as many spaces as they desire as long as the spacing is consistent throughout the document.
Important Note
Tabs are not supported by YAML, and their use will result in a parsing error.
With an understanding of YAML key-value pairs, let’s now explore some of the common types that values can be defined as.
Value types
Values in a YAML file can be of different types. The most common type is a string, which is a text value. Strings can be declared by wrapping a value in quotation marks, but this is not always required. If a value contains at least one alphabetical letter or special character, the value is considered a string, with or without quotation marks. Multiline strings can be set by using the pipe (|) symbol, as shown:
configuration: |
  server.port=8443
  logging.file.path=/var/log
Values can also be integers. A value is an integer when it is a numeric character that is not wrapped in quotations. The following YAML declares an integer value:
replicas: 1
Compare this to the following YAML, which assigns replicas to a string value:
replicas: "1"
Boolean values are often used as well, which can be declared with either true or false:
ingress:
  enable: true
This YAML sets ingress.enable to the true Boolean value. Other acceptable Boolean values are yes, no, on, off, y, n, Y, and N.
Values can also be set to more complex types, such as lists. Items in a list in YAML are identified by the dash (-) symbol.
The following demonstrates a YAML list:
servicePorts:
  - 8080
  - 8443
This YAML sets servicePorts to a list of integers (such as 8080 and 8443). This syntax can also be used to describe a list of objects:
deployment:
  env:
    - name: MY_VAR
      value: MY_VALUE
    - name: SERVICE_NAME
      value: MY_SERVICE
In this case, env is set to a list of objects containing the name and value fields. Lists are often used in both Kubernetes and Helm configuration, and understanding them is valuable to using Helm to its fullest potential.
While YAML is more commonly used in the worlds of Kubernetes and Helm for its ease of readability, the JavaScript Object Notation (JSON) format can be used as well. Let’s briefly describe this format.
The JSON format
YAML is a superset of another widely used format—JSON. This is a string of key-value pairs, similar to YAML. The key difference is that while YAML relies on spacing and indentation to properly configure key-value pairs, JSON relies on braces and brackets.
The following example converts the previous YAML example into the JSON format:
{
  "deployment": {
    "env": [
      {
        "name": "MY_VAR",
        "value": "MY_VALUE"
      },
      {
        "name": "SERVICE_NAME",
        "value": "MY_SERVICE"
      }
    ]
  }
All the keys in JSON are wrapped in quotation marks and positioned before a colon:
- Curly braces ({) denote a block in a similar way to how indentations denote a block in YAML.
- Square brackets ([) denote a list in a similar way to how dashes denote a list in YAML.
There are many more constructs to the YAML and JSON formats, but this introduction provides more than enough information to understand how they can be used in Helm charts.
In the next section, we will begin to develop our Guestbook Helm chart by first learning how to scaffold Helm charts.
Scaffolding the Guestbook Helm chart
When developing a new Helm chart from scratch, it is often useful to start by running the helm create command, which has the following syntax:
helm create NAME [flags]
The helm create command provides a new project folder for your Helm chart. Inside, the folder contains a basic Helm chart scaffolding that you can use to begin developing your chart.
Let’s run the helm create command to scaffold our Guestbook Helm chart:
- In your terminal, within a directory where you would like to store Helm charts, run the helm create command:
$ helm create guestbook
Creating guestbook
- Review the list of files that have been created:
$ ls –al guestbook
.
..
charts/
Chart.yaml
.helmignore
templates/
values.yaml
$ ls –l guestbook/templates/
deployment.yaml
_helpers.tpl
hpa.yaml
ingress.yaml
NOTES.txt
serviceaccount.yaml
service.yaml
tests/
As you can see, the helm create command generated a new folder for you called guestbook, which represents the name of the Helm chart. It is not necessarily required to call this folder guestbook, but since this is the name of the Helm chart we are creating, it is a good idea to make sure the folder name matches.
Under the guestbook folder, there are several different files and folders that make up your Helm chart. This may appear overwhelming at first, but we will dive deeper into each component as we develop the Guestbook chart over the next few chapters. By the end of the second part, each of these files will become clearer, and you will be able to jump into your next Helm chart with ease!
For now, let’s take a high-level look at each of the files that helm create generated for us. As you’ll see in the following table, some of the files are not strictly required for a new Helm chart, but helm create provided them for us as a best practice:
|
File/Directory |
Definition |
Required? |
|
charts/ |
A directory that contains dependencies or Helm charts that the parent chart depends on. |
No |
|
Chart.yaml |
A file that contains metadata about the Helm chart. |
Yes |
|
.helmignore |
A file that contains a list of files and directories that should be omitted from the Helm chart’s packaging. |
No |
|
templates/ |
A directory that contains Golang templates, which are primarily used for generating Kubernetes resources. |
Yes, unless the chart contains dependencies |
|
templates/*.yaml |
A template file used to generate a Kubernetes resource. |
Yes, unless the chart contains dependencies |
|
templates/_*.tpl |
A file that contains boilerplate helper templates. |
No |
|
templates/NOTES.txt |
A template file that is used to generate usage instructions after chart installation. |
No |
|
templates/tests/ (or more generically, templates/*/) |
A folder used for grouping different templates. This is strictly for aesthetics and has no effect on how the Helm chart operates – for example, templates/tests is used to group templates that are used for testing. |
No |
|
values.yaml |
A file that contains the chart’s default values. |
No, but every chart should contain this file as a best practice |
Table 4.2 – Files created with the “helm create” command
In addition to the files listed in the preceding table, there are a few other files that a Helm chart can contain that helm create did not include for us. Let’s take a high-level look at these files in the following table:
|
File/Directory |
Definition |
Required? |
|
Chart.lock |
A file used to save, or lock in, the previously applied dependency versions. |
No |
|
crds/ |
A directory that contains Custom Resource Definition (CRD) YAML resources. These CRD resources will be installed before those under templates/. |
No |
|
README.md |
A file that contains installation and usage information about the Helm chart. |
No, but every Helm chart should contain this file as a best practice |
|
LICENSE |
A file that contains the chart’s license, which provides information about usage and redistribution rights. |
No |
|
values.schema.json |
A file that contains the chart’s values schema in the JSON format. Used to provide input validation. |
No |
Table 4.3– Additional Helm chart files
Again, we will explore each of these files in greater detail when they become relevant to the topics we will discuss later in this chapter and over the next few chapters.
For now, let’s focus on the content in the guestbook directory that helm create generated for us. You may be surprised to know that, upon running helm create, you already have a fully functional Helm chart contained within your guestbook folder! Let’s install the Guestbook chart in its current state to see what gets deployed.
Deploying the scaffolded Guestbook chart
Before we install the chart, let’s set up your Kubernetes environment by following these steps:
- Start Minikube by running the minikube start command:
$ minikube start
- Create a new namespace called chapter4:
$ kubectl create namespace chapter4
Now, let’s proceed by installing your scaffolded chart and reviewing the deployed resources. In Chapter 3, Installing Your First App With Helm, we installed a Helm chart from a remote repository by providing the name bitnami/wordpress, which references the name of the remote repository and the chart contained within this repository. Alternatively, you can also install a chart by providing the local path to a valid Helm chart project folder. This makes it easy to test your Helm charts and see your progress without needing to publish the chart to a repository first.
- Let’s install your chart by running the following command, where ./guestbook represents the folder generated by helm create:
$ helm install guestbook ./guestbook -n chapter4
NAME: guestbook
LAST DEPLOYED: Sun Sep 19 10:39:40 2021
NAMESPACE: default
STATUS: deployed
REVISION: 1
NOTES:
1. Get the application URL by running these commands:
export POD_NAME=$(kubectl get pods --namespace default -l "app.kubernetes.io/name=guestbook,app.kubernetes.io/instance=guestbook" -o jsonpath="{.items[0].metadata.name}")
export CONTAINER_PORT=$(kubectl get pod --namespace default $POD_NAME -o jsonpath="{.spec.containers[0].ports[0].containerPort}")
echo "Visit http://127.0.0.1:8080 to use your application"
kubectl --namespace default port-forward $POD_NAME 8080:$CONTAINER_PORT
- Run helm get manifest to review the resources that were deployed:
$ helm get manifest guestbook –n chapter4
As denoted in the output, your scaffolded Guestbook chart (with the default values applied) contains one service account, one service, and one deployment. If you look carefully at the deployment, you’ll find something interesting about the image that was deployed:
image: "nginx:1.16.0"
Sure enough, a new Helm chart that was scaffolded using helm create begins as a basic NGINX chart. NGINX is a popular open source web server and reverse proxy. Because its installation requires many of the same resources as many other Kubernetes applications, it serves as a great starting point when writing new Helm charts.
Let’s continue by accessing the NGINX application to verify it was installed properly.
- Since the Helm chart created a ClusterIP service, let’s run kubectl port-forward so that we can access the NGINX pod. Keep in mind that, although our Guestbook chart has installed NGINX, the deployed resources are still called guestbook, since that is the name of our chart:
$ kubectl -n chapter4 port-forward svc/guestbook 8080:80
- In a new terminal window (since the current one will block while the kubectl port-forward command is active), use the curl command to reach NGINX:
$ curl localhost:8080
<!DOCTYPE html>
<html>
<head>
<title>Welcome to nginx!</title>
<style>
body {
width: 35em;
margin: 0 auto;
font-family: Tahoma, Verdana, Arial, sans-serif;
}
</style>
</head>
<body>
<h1>Welcome to nginx!</h1>
As you can see, we are able to reach NGINX successfully. Now, let’s continue by cleaning up this Helm release.
- Press Ctrl + c in the terminal window running the kubectl port-forward command. Alternatively, you can close the window.
- Uninstall the guestbook Helm release:
$ helm uninstall guestbook –n chapter4
release "guestbook" uninstalled
- Next, you can delete the chapter4 namespace, since we won’t need it for the remainder of the chapter:
$ kubectl delete namespace chapter4
namespace "chapter4" deleted
- Finally, you can shut down your minikube cluster:
$ minikube stop
You may realize after this exercise that our Guestbook chart doesn’t resemble the architecture we presented at the beginning of this chapter very much. However, by providing a scaffold that we will use as a starting point, we have already made great progress toward creating a Helm chart for deploying the desired architecture. We will continue making progress on our Guestbook chart in the next chapter when we learn about dependencies. At that time, we will declare a dependency to install Redis and the backend of our Guestbook architecture.
In the next section, we’ll take a deeper dive into one of the most important Helm chart files, Chart.yaml. Then, at the end of the chapter, we will update this file to provide new settings that align with our Guestbook chart.
Understanding the Chart.yaml file
The Chart.yaml file, also referred to as the chart definition, is used for storing different pieces of metadata about a Helm chart. This file is required, and if it is not included within a chart, you’ll receive the following error:
Error: Chart.yaml file is missing
A Chart.yaml file was created for you earlier when you ran helm create. Let’s review this file by running the following command:
$ cat guestbook/Chart.yaml
An output like the following will be displayed:
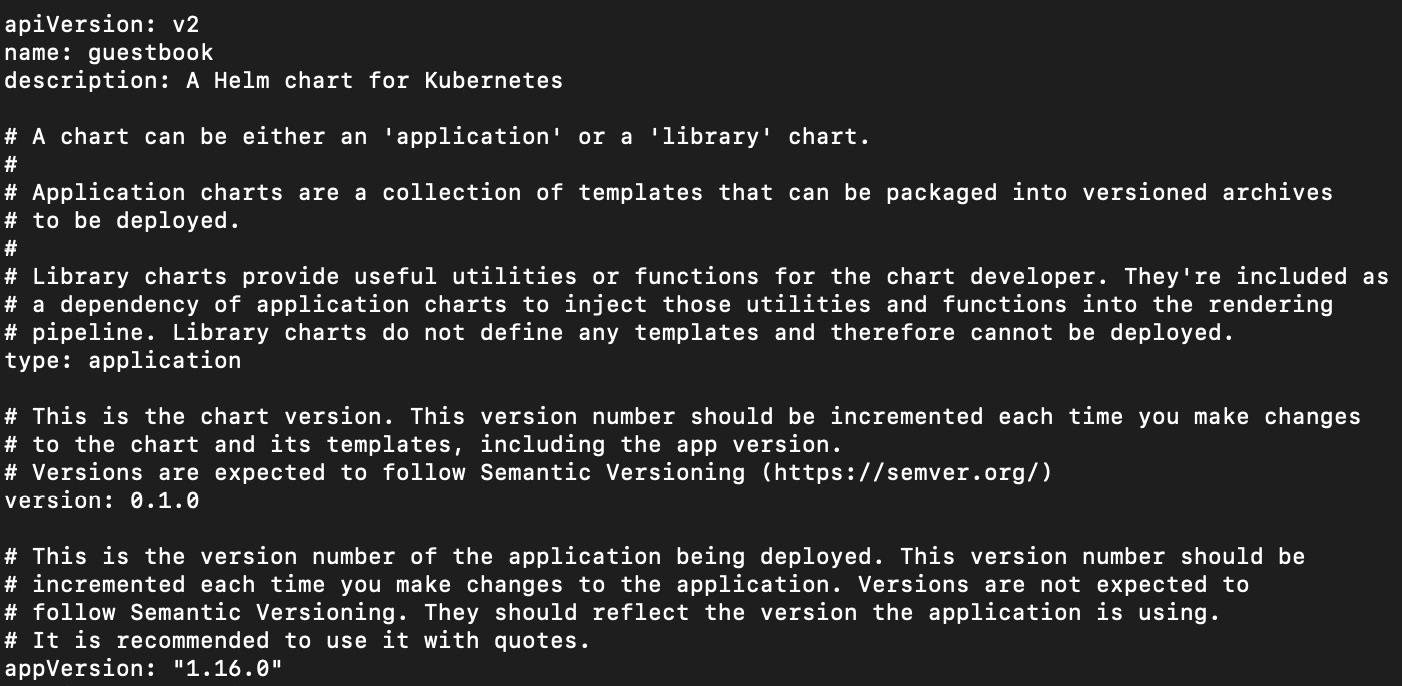
Figure 4.4 – The Guestbook Chart.yaml file
A Chart.yaml file can contain many different fields, some of which are required, while most other fields are optional. Let’s take a closer look at each of the fields provided in our Guestbook chart’s Chart.yaml file.
|
Field |
Description |
Required? |
|
apiVersion |
The chart API version |
Yes |
|
name |
The name of the Helm chart |
Yes |
|
description |
A brief description of the Helm chart |
No |
|
type |
The type of Helm chart (either Application or Library) |
No |
|
version |
The version of the Helm chart, in SemVer format. |
Yes |
|
appVersion |
The version of the application that the Helm chart deploys. This does not need to be in the SemVer format. |
No |
Table 4.4 – Fields from the generated Chart.yaml file
As you can see from Guestbook’s chart definition, the apiVersion value for our chart is set to v2. Charts with an apiVersion value of v2 are only compatible with Helm 3. The other possible apiVersion value is v1, but this is a legacy version that was geared towards Helm 2. Charts with an apiVersion value of v1 handled dependencies differently and did not support library charts (topics that we will discuss in greater detail later in this book). Helm 3 is in fact backward-compatible with apiVersion v1, but in order to leverage Helm’s latest features and to avoid deprecations, new Helm charts should be created using apiVersion v2.
The type of Helm chart we have scaffolded, according to the Chart.yaml file, is an application chart. A Helm chart can be either an application chart or a library chart. An application chart is used to deploy an application to Kubernetes, while a library chart is used to provide reusable helper templates. We will discuss library charts in greater detail in Chapter 6, Understanding Helm Templates . The type field in the Chart.yaml file is optional and defaults to application.
The other fields in our chart definition, name, description, version, and appVersion, are used to provide metadata that identifies our chart. As an example, think back to Chapter 3, Installing Your First App with Helm, when we searched Artifact Hub from the command line for WordPress charts. We ran the helm search hub wordpress command and saw an output like the following:

Figure 4.5 – An example of name, version, appVersion, and description
These fields are acquired from their corresponding fields in Chart.yaml. Note that you can also see this information on any chart’s Artifact Hub page.
In addition to the fields included in our scaffolded Chart.yaml file, there are many other fields used to describe your chart, as shown in the following table:
|
Field |
Description |
Required? |
|
kubeVersion |
A range of compatible Kubernetes versions in the SemVer format. |
No |
|
keywords |
A list of keywords used to describe the Helm chart. Keywords are also used to provide search terms for the helm search command. |
No |
|
home |
The URL to the Helm chart’s home page. |
No |
|
sources |
A list of URLs that link to source code used by the Helm chart. |
No |
|
dependencies |
A list of charts that your Helm chart is reliant on. |
No |
|
maintainers |
A list of Helm chart maintainers. |
No |
|
icon |
An icon in SVG or PNG format used to represent the Helm chart. Displayed on the chart’s Artifact Hub page. |
No |
|
deprecated |
Indicates whether the Helm chart has been deprecated. |
No |
|
annotations |
A list of annotations used to provide custom metadata. |
No |
Table 4.5 – Additional Chart.yaml fields
The kubeVersion field is used to provide validation against the target Kubernetes cluster version. This is useful if your Helm chart uses resources that are only compatible with certain versions of Kubernetes. You could set kubeVersion to a string such as >= 1.18.0 < 1.20.0, and Helm will ensure that the chart is installed only if Kubernetes is greater than or equal to version 1.18.0 and less than (exclusive) 1.20.0. You can also use the OR (||) operator, as in >= 1.15.0 <= 1.17.0 || >= 1.18.0 < 1.20.0.
The dependencies field is the most functional of these optional fields. Charts added under the dependencies field will be installed alongside your Helm chart’s resources. We will explore dependencies more in the next chapter.
As shown earlier with the name, version, appVersion, and description fields, each of the other Chart.yaml properties also have an impact on how a Helm chart is displayed in Artifact Hub. Look at the following screenshot, taken from Bitnami’s WordPress page in Artifact Hub:
Figure 4.6 – Chart.yaml metadata displayed on Artifact Hub
Let’s compare this to WordPress’s Chart.yaml file, retrieved by running helm show values bitnami/wordpress:

Figure 4.7 – The Bitnami/WordPress Chart.yaml file
Note how home, sources, maintainers, dependencies, and keywords from Chart.yaml are also displayed in Artifact Hub.
It is not required to provide all the Chart.yaml fields in full, but it is a good thing to do if you are publishing your charts to Artifact Hub or another repository that can display chart metadata. Otherwise, feel free to use your discretion and provide the fields that you find relevant and necessary. Besides apiVersion, name, and version, we recommend providing at least appVersion and description, since these fields provide a good high-level glance at the application your Helm chart is packaging. If you are writing a Helm chart for public use, you should consider also adding maintainers, home, and sources, and if you are publishing to Artifact Hub, you should also include keywords so that the chart can be easily discovered.
With an understanding of the Chart.yaml fields, let’s finish this chapter by updating our scaffolded chart definition to better suit our Guestbook application.
Updating the Guestbook Chart.yaml file
The scaffolded Chart.yaml file that helm create generated is catered around NGINX and not Guestbook as we would desire. Let’s make a couple of quick changes to improve the content:
- First, let’s update the chart description to better describe the application our chart will deploy. Update the description field of Chart.yaml to the following (or feel free to provide your own):
description: An application used for keeping a running record of guests
- Next, let’s provide a more appropriate appVersion setting that better suits the version of Guestbook that our chart will deploy. The latest version of Guestbook is v5, so let’s use this as our appVersion:
appVersion: v5
Our Chart.yaml file should now look like this (with the comments removed):

Figure 4.8 – The updated Chart.yaml file for Guestbook
Feel free to add any of the other Chart.yaml fields as well, but these changes, at a minimum, will put us in a good state where the Chart.yaml metadata accurately reflects the application that we will deploy.
We will revisit the Chart.yaml field in the next chapter when we add a chart dependency for deploying Redis.
Summary
In this chapter, we began to peek into the world of Helm chart development by introducing the Helm chart and chart definition structure. A Helm chart consists of a chart definition (a Chart.yaml file) and template files used for generating Kubernetes resources. A chart definition is used to provide an identity around the chart, including metadata such as the chart name, version, description, and the application version that the chart deploys.
We also introduced an application called Guestbook, and we began writing a Helm chart that will be used to deploy this application. We ran the helm create command to scaffold a new Helm chart, and we updated the Chart.yaml file to better reflect the application that our chart will deploy. In the next chapter, we will return to the Chart.yaml file when we add a dependency for installing Redis, the backend service that our Guestbook frontend relies on.
Further reading
To learn more about Helm chart structure and Chart.yaml files, visit the Helm documentation at https://helm.sh/docs/topics/charts/. For more information on the Guestbook application, visit https://kubernetes.io/docs/tutorials/stateless-application/guestbook/.
Questions
- What is the file format most used in Kubernetes and Helm?
- What is the command used to scaffold a new Helm chart?
- Where is the Helm chart name and version defined?
- What are the three required fields in the Chart.yaml file?
- Helm charts can be made up of many different files. Which files are required?
- Which folder of a Helm chart is used to contain Kubernetes resource templates?
- Which Chart.yaml field is used to describe the application version that a Helm chart deploys?