9
Testing Helm Charts
Testing is a common task that engineers must perform during software development. Testing is performed to validate the functionality of a product, as well as to prevent regressions as a product evolves. Well-tested software is easier to maintain and allows developers to confidently provide new releases to end users.
A Helm chart should be tested properly to ensure that it delivers its features to the level of quality expected. In this chapter, we will discuss the ways that testing can be applied to Helm charts to verify the expected capabilities.
In this chapter, we will cover the following topics:
- Setting up your environment
- Verifying Helm templating
- Testing in a live cluster
- Improving chart tests with the Chart Testing tool
- Cleaning up
Technical requirements
For this chapter, you will need the following:
- minikube
- kubectl
- helm
- git
- yamllint
- yamale
- ct (chart-testing)
Additionally, you should clone the Packt GitHub repository locally: $ git clone https://github.com/PacktPublishing/Managing-Kubernetes-Resources-using-Helm.git.
In this chapter, we will use our minikube environment extensively throughout the scenarios. In the next section, you will set up the environment.
Setting up your environment
Run the following steps to set up your minikube environment:
- Start minikube by running the minikube start command:
$ minikube start
- Then, create a new namespace called chapter9:
$ kubectl create namespace chapter9
With your minikube environment ready, let’s begin by discussing how Helm charts can be tested. We will begin the discussion by outlining the methods you can use to verify your Helm templates.
Verifying Helm templating
One of the primary purposes of Helm is to create Kubernetes resources. As a result, when developing and testing a Helm chart, you should ensure that your resources are being generated properly. This can be accomplished using a variety of methods. We will discuss these in the next section.
Validating template generation locally with helm template
The first way to validate the templating of your chart is to use the helm template command. We first introduced this command in Chapter 6, Understanding Helm Templates. In this chapter, we will describe using the helm template command to render a chart’s templates locally.
The helm template command has the following syntax:
$ helm template [NAME] [CHART] [flags]
You can see this command in action by demonstrating it against the Helm chart located in chapter9/guestbook in the Packt repository:
$ helm template my-guestbook guestbook
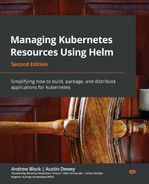
The result of this command will display each of the Kubernetes resources that would be created if they were applied to the cluster, as shown here:
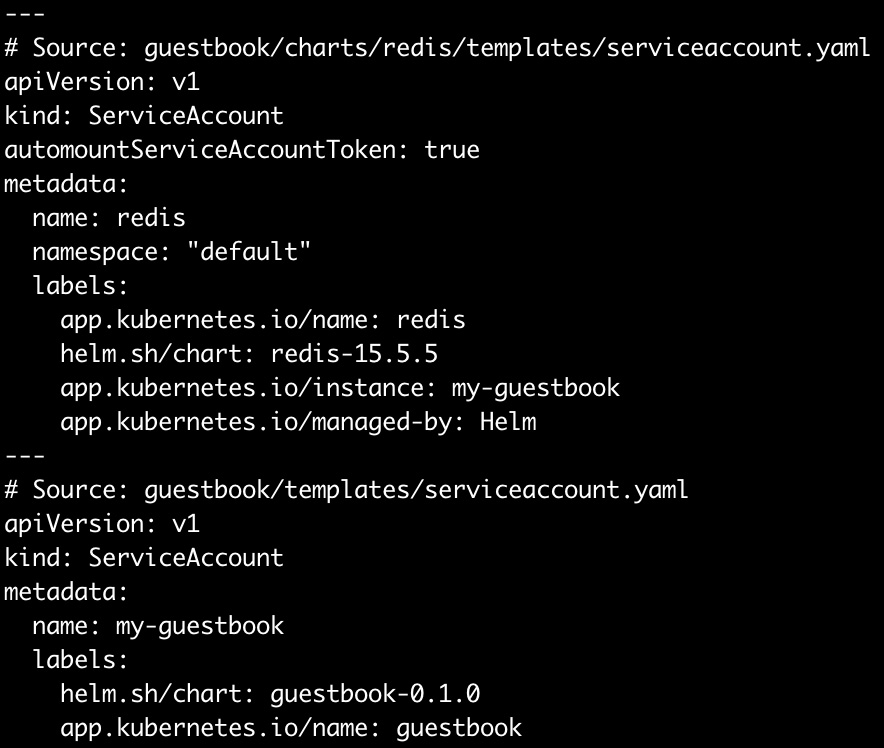
Figure 9.1 – The helm template output
The preceding output displays the beginning portion of the helm template output. As you can see, a fully rendered ServiceAccount is shown, along with the beginning of another ServiceAccount that would be created with a release. Rendering these resources allows you to understand how the resources would be created if the release was installed against a Kubernetes cluster.
During chart development, you may want to use the helm template command regularly to validate that your Kubernetes resources are being generated properly.
Some common aspects of chart development that you may want to validate throughout are as follows:
- Parameterized fields are successfully replaced by default or overridden values
- Control structures such as if, range, and with successfully generate YAML based on the provided values.
- Resources contain proper spacing and indentation.
- Functions and pipelines are used correctly to properly format and manipulate YAML.
- Input validation mechanisms such as the required and fail functions or the values.schema.json file properly validate values based on user input.
- Dependencies have been declared properly and their resource definitions appear in the helm template output.
In the next section, we will discuss how server-side validation can be enabled when rendering your resources with helm template.
Adding server-side validation to chart rendering
While the helm template command is important to the chart development process and should be used frequently to verify your chart rendering, it does have a key limitation. The main purpose of the helm template command is to provide client-side rendering, meaning it does not communicate with the Kubernetes API server to provide resource validation. If you would like to ensure that your resources are valid after they have been generated, you can use the --validate flag to instruct helm template to communicate with the Kubernetes API server:
$ helm template my-release <chart_name> --validate
With the --validate flag specified, any generated template that does not produce a valid Kubernetes resource emits an error message. Imagine, for example, a deployment template was used with the incorrect apiVersion. What may appear to be valid locally would be incorrect when applying the --validate flag. Here’s an example error message that Kubernetes could throw with invalid content that was triggered through the use of the --validate flag:
Error: unable to build kubernetes objects from release manifest: unable to recognize "": no matches for kind "Deployment" in version "v1"
While helm template does provide server-side validation capabilities with the --validate flag, it is not the only way to determine if your chart is generating valid Kubernetes resources. As an alternative approach, you can apply the --dry-run flag against the install, upgrade, rollback, and uninstall commands. Here is an example of using this flag with the install command:
$ helm install my-chart <chart_name> --dry-run
The --dry-run flag is primarily used by end users to perform a sanity check before running an installation. This helps ensure that values have been provided properly and that the installation will produce the desired results. It is a good last line of defense that can be used to verify that errors will not be thrown before you execute the associated command.
While it is necessary to verify that templates are generated the way you intend, it is also important to perform linting to ensure that Helm charts and generated resources follow best formatting practices. There are a couple of ways to accomplish this goal. Let’s take a look.
Linting Helm charts and templates
Linting a Helm chart involves two high-level steps:
- Ensuring that a Helm chart is valid
- Ensuring that a Helm chart follows consistent formatting practices
To ensure that a Helm chart is valid, we can use the helm lint command, which has the following syntax:
$ helm lint <chart-name> [flags]
The helm lint command is used to validate the Chart.yaml file and ensure that the Helm chart does not contain any breaking issues. Note that this command does not validate rendered resources or perform YAML style linting.
You can run the helm lint command against the guestbook chart located in the Packt repository, as shown here:
$ helm lint chapter9/guestbook
==> Linting chapter9/guestbook
[INFO] Chart.yaml: icon is recommended
1 chart(s) linted, 0 chart(s) failed
The preceding output shows that the chart is valid, noted by the 0 chart(s) failed message. The [INFO] message reported that the icon field in the Chart.yaml file is recommended, but not required. Other types of messages include [WARNING], which indicates that the chart breaks conventions, and [ERROR], which indicates that the chart will fail at installation.
Let’s run through several examples to illustrate each potential outcome. Consider the chart in chapter9/no-chart-yaml, which contains the following file structure:
no-chart-yaml/
  templates/
  Values.yaml
As you can probably guess from the name, this chart is missing a Chart.yaml definition file. When we run helm lint over this chart, we get an error:
$ helm lint chapter9/no-chart-yaml
==> Linting chapter9/no-chart-yaml
Error unable to check Chart.yaml file in chart: stat chapter9/no-chart-yaml/Chart.yaml: no such file or directory
Error: 1 chart(s) linted, 1 chart(s) failed
This error indicates that Helm cannot find the Chart.yaml file, resulting in an invalid chart.
We can see different errors if we add an empty Chart.yaml file. Let’s run helm lint on the chapter9/empty-chart-yaml chart:
$ helm lint chapter9/empty-chart-yaml
==> Linting chapter9/empty-chart-yaml
[ERROR] Chart.yaml: name is required
[ERROR] Chart.yaml: apiVersion is required. The value must be either "v1" or "v2"
[ERROR] Chart.yaml: version is required
[INFO] Chart.yaml: icon is recommended
[ERROR] templates/: validation: chart.metadata.name is required
[ERROR] : unable to load chart
validation: chart.metadata.name is required
Error: 1 chart(s) linted, 1 chart(s) failed
The output lists each of the required fields that are missing from the Chart.yaml file.
The linter will also check for the existence of other files, such as the values.yaml file and the templates directory. It also ensures that files under the templates directory have valid .yaml, .yml, .tpl, or .txt file extensions.
The helm lint command is great for checking whether your chart contains the appropriate contents, but it does not carry out exhaustive linting of your chart’s YAML style. To perform this type of linting, you can use another tool called yamllint, which can be found at https://github.com/adrienverge/yamllint. This tool can be installed using the pip3 (or pip) package manager across a range of operating systems by using the following command:
$ pip3 install yamllint –user
It can also be installed with your system’s package manager, as described in the yamllint quick-start instructions at https://yamllint.readthedocs.io/en/stable/quickstart.html.
To use yamllint on your chart’s resources, you must use it in combination with the helm template command to feed the output of the rendered templates as input to yamllint. Let’s run yamllint against the chapter9/guestbook Helm chart:
$ helm template my-guestbook chapter9/guestbook | yamllint -
A snippet of the result is shown here:
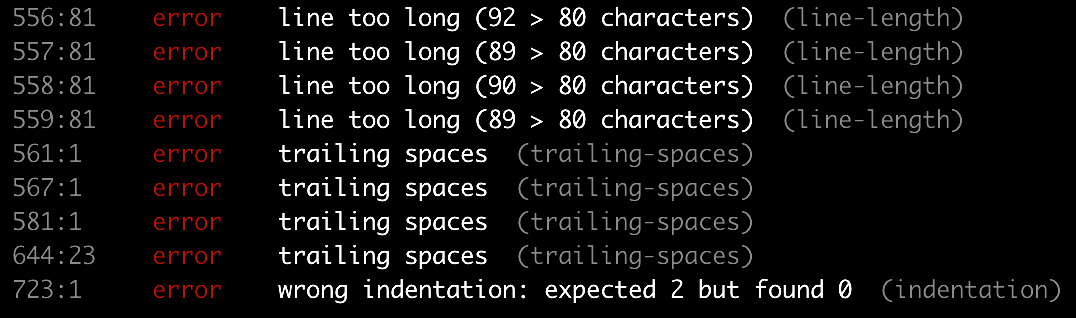
Figure 9.2 – yamllint output
The line numbers provided to the left reflect the entirety of the helm template output, which can make it difficult to determine which line from the yamllint output corresponds with which line from your template files. You can simplify this by redirecting the helm template output to determine its line numbers:
$ cat -n <(helm template my-guestbook chapter9/guestbook)
The yamllint tool performs linting against many different rules, including the following:
- Indentation
- Line length
- Trailing spaces
- Empty lines
- Comment format
You can define your own rules by authoring them in one of the following files:
- .yamllint, .yamllint.yaml, or .yamllint.yml in the current working directory
- $XDG_CONFIG_HOME/yamllint/config
- ~/.config/yamllint/config
An example .yamllint.yaml file can be found in chapter9/yamllint-override. Here, we have defined the following contents:
rules:
  indentation:
    indent-sequences: whatever
This sample creates one rule that instructs yamllint not to enforce any particular method of indentation.
A deep dive into configuring yamllint rules is beyond the scope of this chapter, but you can refer to the yamllint documentation on the topic of rules to learn more: https://yamllint.readthedocs.io/en/stable/rules.html.
In this section, we discussed how you can validate the local rendering of your Helm charts by using the helm template, helm lint, and yamllint commands. This, however, does not verify your chart’s functionality or the application’s ability to run properly. In the next section, we will address this topic by learning how to create tests in a live Kubernetes cluster.
Testing in a live cluster
Understanding how to perform tests in a live Kubernetes cluster is an essential part of developing and maintaining a Helm chart. Live testing helps ensure your chart is functioning as intended and can be used to help prevent regressions as new additions are introduced to your chart over time.
Testing can involve, but is not limited to, the following two different constructs:
- Readiness probes and the helm install --wait command
- Test hooks and the helm test command
A readiness probe is a type of health check in Kubernetes that, upon success, marks a pod as Ready and makes the pod eligible to receive ingress traffic. An example of a readiness probe is located at chapter9/guestbook/templates/deployment.yaml:
readinessProbe:
  httpGet:
    path: /
    port: http
This readiness probe will mark the pod as Ready when an HTTP GET request succeeds against the / path.
Readiness probes can be used alongside the –wait flag, which forces Helm to return successfully only when the probe passes. If the readiness probe times out, Helm will return exit code 1, indicating that the installation was not successful. A timeout occurs 5 minutes after the installation begins, by default. This can be configured with the --timeout flag.
The following is an example of invoking helm install with the --wait flag:
$ helm install my-guestbook chapter9/guestbook --wait
Other commands that also support the --wait flag include upgrade, rollback, and uninstall. However, when used with uninstall, Helm waits for each resource to be deleted instead.
Besides readiness probes, testing in Helm can also be performed by using test hooks and the helm test command. Test hooks are pods that perform custom tests after the Helm chart is installed to confirm they execute successfully. They are defined under the templates directory and contain the helm.sh/hook: test annotation. When the helm test command is run, templates with the test annotation are created and execute their defined functions.
We can see an example test in chapter9/guestbook/templates/tests/test-connection.yaml:
apiVersion: v1
kind: Pod
metadata:
  name: "{{ include "guestbook.fullname" . }}-test-connection"
  labels:
    {{- include "guestbook.labels" . | nindent 4 }}
  annotations:
    "helm.sh/hook": test
spec:
  containers:
    - name: wget
      image: busybox
      command: ['wget']
      args: ['{{ include "guestbook.fullname" . }}:{{ .Values.service.port }}']
  restartPolicy: Never
As we can see, this test attempts to make a call to the guestbook frontend.
Let’s work on running this Helm test in our minikube environment.
Running the chart test
To run a chart’s tests, the chart must be installed in a Kubernetes environment using the helm install command. Because the guestbook chart contains readiness probes for the frontend and Redis instances (provided by the Redis dependency), we can add the --wait flag to our helm command to block until all pods are ready. Run the following command to install the guestbook chart:
$ helm install guestbook chapter9/guestbook -n chapter9 –wait
Once the chart has been installed, you can use the helm test command to execute the test life cycle hook. The syntax for the helm test command is as follows:
helm test [RELEASE] [flags]
Run the helm test command against the guestbook release:
$ helm test guestbook –n chapter9
If your test is successful, you will see the following results in the output:
NAME: guestbook
LAST DEPLOYED: Sun Mar 13 17:18:51 2022
NAMESPACE: chapter9
STATUS: deployed
REVISION: 1
TEST SUITE:     guestbook-test-connection
Last Started:   Sun Mar 13 17:26:00 2022
Last Completed: Sun Mar 13 17:26:03 2022
Phase:          Succeeded
When running your tests, you can also use the --logs flag to display the logs from your test pods. Let’s run the test again and inspect the logs by including the --logs flag:
$ helm test guestbook --logs –n chapter9
<skipped>
POD LOGS: guestbook-test-connection
Connecting to guestbook:80 (10.98.198.86:80)
saving to 'index.html'
index.html 100% |********************************| 920 0:00:00 ETA
'index.html' saved
As evidenced by the logs from our test pod, our application is up and running! As a final step, you can delete your release with helm uninstall:
$ helm uninstall guestbook –n chapter9
In this section, we ran a test hook that served as a smoke test for our chart installation. In the next section, we will discuss how the testing process can be improved by leveraging a tool called ct.
Improving chart tests with the Chart Testing tool
The testing methods described in the previous section are sufficient enough to determine whether a Helm chart can be successfully installed. However, some key limitations are inherent to the standard Helm testing process and need to be discussed.
The first limitation to consider is the difficulty of testing different permutations that can occur within a chart’s values. Because the helm test command does not provide the ability to modify a release’s values beyond those set at the time of an installation or upgrade, the following workflow must be followed when running helm test against different values:
- Install your chart with an initial set of values.
- Run helm test against your release.
- Delete your release.
- Install the chart with a different set of values.
- Repeat Step 2 through Step 4 until a significant amount of value possibilities have been tested.
Each of these manual steps poses the risk of errors.
In addition to testing different value permutations, you should also make sure regressions do not occur when making modifications to your charts. The best way to prevent regressions is to include the usage of helm upgrade in your testing workflow:
- Install the previous chart version.
- Upgrade your release to the newer chart version.
- Delete the release.
- Install the newer chart version.
This workflow should be repeated against each set of values to ensure that there are no regressions or unintended breaking changes.
These processes sound tedious but imagine the additional strain chart developers face when maintaining Helm chart monorepos, where multiple charts need to be tested and maintained at the same time. A repository is considered a monorepo when multiple different artifacts or modules are contained in the same repository. A monorepo design is the most common way for a chart developer or an organization to develop and maintain its charts.
A Helm chart monorepo could have the following file structure:
helm-charts/
  guestbook/
    Chart.yaml
    templates/
    README.md
    values.yaml
 redis/         # Contains the same file structure as 'guestbook'
 wordpress/     # Contains the same file structure as 'guestbook'
Helm charts in a well-maintained monorepo should adhere to proper SemVer versioning to denote the types of changes made between releases. SemVer versions follow a MAJOR.MINOR.PATCH version format. Use the following list as a guideline on how to increase a SemVer version:
- Increment the MAJOR version if you are making a breaking change to your chart. A breaking change is a change that is not backward compatible with the previous chart version.
- Increment the MINOR version if you are adding a feature but you are not making a breaking change. You should increment this version if the change you are making is backward compatible with the previous chart version.
- Increment the PATCH version if you are making a bug fix or addressing a security vulnerability that will not result in a breaking change. This version should be incremented if the change is backward-compatible with the previous chart version.
With the responsibilities of chart testing and versioning, it can become increasingly difficult for a Helm chart maintainer to ensure that charts are properly tested, and their versions are incremented, especially if maintaining a monorepo with multiple Helm charts. This challenge prompted the Helm community to create a tool called ct to provide structure and automation around the testing and maintenance of Helm charts. We will discuss this tool next.
Introducing the Chart Testing project
The Chart Testing project, which can be found at https://github.com/helm/chart-testing, is designed to be used against charts in a Git monorepo to perform automated linting, validation, and testing. This automated testing is achieved by using Git to detect when charts have changed against a specified branch. Charts that have changed should undergo testing, while charts that were unchanged do not need to be tested.
The project’s Command-Line Interface (CLI), ct, provides four primary commands:
- lint: Lints and validates charts that have been modified
- install: Installs the chart in a running Kubernetes cluster and runs test hooks against charts that have been modified
- lint-and-install: Combines the lint and install commands
- list-changed: Lists charts that have been modified
The lint-and-install command is the primary function of ct. It performs linting, installs charts in your Kubernetes cluster, and runs any test hooks that are present. It also checks whether you have increased the charts’ version fields in Chart.yaml for any chart that has been modified. This validation helps maintainers enforce proper versioning of their Helm charts.
The ct tool also lets you test Helm charts against multiple different values files. During the invocation of the lint, install, and lint-and-install commands, ct loops through each test values file and performs linting and testing based on the different permutations of values provided. Test values files for use by ct are written under a folder called ci/ and end with the values.yaml format. The following is an example Helm chart structure that includes the ci folder:
guestbook/
  Chart.yaml
  ci/
    nodeport-service-values.yaml
    ingress-values.yaml
  templates/
  values.yaml
Each values file under ci/ should be named appropriately to determine the function that the values are testing. For example, nodeport-service-values.yaml might be used to ensure that NodePort services are configured properly, and ingress-values.yaml would test Ingress.
The most common ct command you are likely to use is the lint-and-install command. When this command is running, a series of steps are executed:
- Detect the charts that have been modified within the Git monorepo. Ensure that the charts’ versions have been incremented.
- For each chart that has been modified, lint the chart and each values file under the ci/ folder.
- For each chart that has been modified, install the chart in the Kubernetes cluster and wait for the readiness probes to pass. Once the probes have passed, run test hooks, if present. Repeat Step 3 for each values file in the ci/ folder.
- Uninstall the Helm release.
As you can see, this command performs a variety of steps to ensure your charts are properly linted and tested. However, by default, the lint-and-install command does not check for backward compatibility. This feature can be enabled by adding the --upgrade flag.
When the --upgrade flag is provided, ct checks if the MAJOR version number of the chart’s version has been incremented. If a breaking change is not expected, then ct deploys the previous chart version first and then upgrades to the new version. This helps ensure that regressions have not occurred. Then, ct installs the new version directly using a standard release. We recommend adding the --upgrade flag when using the lint-and-install command.
Let’s continue by installing ct and its dependencies locally. Then, we will look at an example of how ct can be used.
Installing the Chart Testing tools
To use ct, you must have the following tools installed on your local machine:
- helm
- git (version 2.17.0 or later)
- yamllint
- yamale
- kubectl
Instructions for installing helm and kubectl were provided in Chapter 2, Preparing a Kubernetes and Helm Environment, while yamllint was installed earlier in this chapter. Now, we’ll install yamale, which is a tool for validating YAML schemas. It is used by ct to validate the Chart.yaml file.
yamale can be installed with the pip3 package manager, as shown here:
$ pip3 install yamale –user
You can also install Yamale manually by downloading an archive from https://github.com/23andMe/Yamale/archive/master.zip. Once downloaded, unzip the archive and run the setup.py script:
$ python3 setup.py install
Once you have the prerequisite tooling installed, you should download ct from the project’s GitHub releases page at https://github.com/helm/chart-testing/releases. Each release contains an Assets section with a list of archives associated with each release.
Download the archive that corresponds with the platform type of your local machine. Version v3.5.1 was the version that was used for this publication:
Figure 9.3 – The Helm releases page on GitHub
Unarchive the release once you have downloaded the appropriate archive from the GitHub releases page. Once unarchived, you will see the following contents:
LICENSE
README.md
etc/chart_schema.yaml
etc/lintconf.yaml
ct
The LICENSE and README.md files can be removed as they are not needed.
The etc/chart_schema.yaml and etc/lintconf.yaml files can be moved to either the $HOME/.ct/ or /etc/ct/ location on your local machine. These files provide yamllint and yamale rules for linting and schema validation. When moved to the suggested locations, they provide default rules for any invocation of ct, regardless of their location on the filesystem.
You should also move ct to a location that is included in your system’s PATH variable. Moving ct as well as the files located under etc can be done with the following commands:
$ mkdir $HOME/.ct
$ mv $HOME/Downloads/etc/* $HOME/.ct/
$ mv $HOME/Downloads/ct /usr/local/bin/
Now that all of the required tools have been installed, let’s clone the Packt repository – that is, if you did not clone it previously. We will interact with this repository to demonstrate the use of ct:
$ git clone https://github.com/PacktPublishing/Managing-Kubernetes-Resources-using-Helm.git
Once cloned, you will notice that this repository contains several ct-related files:
- lintconf.yaml: This is a copy of the same file that was included in the ct archive. When added to a repository, ct uses this local reference instead of the default file located at $HOME/.ct/.
- chart_schema.yaml: This is also a copy of the same file that was included in the ct archive. When added to a repository, ct uses this local reference instead of the default file located at $HOME/.ct/.
- ct.yaml: This file contains the configuration for ct.
The following are a couple of the configurations that are included in the ct.yaml file:
chart-dirs:
  - helm-charts/charts
chart-repos:
  - bitnami=https://raw.githubusercontent.com/bitnami/charts/archive-full-index/bitnami
The chart-dirs field indicates that the helm-charts/charts directory relative to ct.yaml is the root of the Helm chart monorepo. The chart-repos field provides a list of repositories that ct should add to download dependencies. A variety of other configurations can be added to this file to customize the execution of ct. The full list of available options can be reviewed in the Chart Testing documentation at https://github.com/helm/chart-testing.
Now, let’s see ct in action by running the lint-and-install command.
Running the lint-and-install command
In the helm-charts/charts folder, which is the location of our Helm charts monorepo, we have two charts:
- guestbook: This is the guestbook chart that we wrote in Part 2 of this book.
- nginx: This is a basic Helm chart that was created with helm create and is used to deploy an nginx reverse proxy.
The guestbook and nginx Helm charts are the charts that will be tested with ct. First, let’s navigate to the top level of the Git repository:
$ cd Managing-Kubernetes-Resources-using-Helm
$ ls
LICENSE chapter4 chapter6 chapter8 chart_schema.yaml helm-charts
README.md chapter5 chapter7 chapter9 ct.yaml lintconf.yaml
Since ct should run in the same folder as the ct.yaml file, we can simply run ct lint-and-install from the top level of the repository:
$ ct lint-and-install
After running this command, you should see the following message:
Linting and installing charts...
--------------------------------------------
No chart changes detected.
--------------------------------------------
All charts linted and installed successfully
Since none of the charts were modified, ct did not perform any testing on your charts. We should modify at least one chart in the helm-charts/charts directory to allow for testing to take place. Since normal development would likely involve feature branches, let’s create a new Git branch where we will make modifications. Create a new branch called chart-testing-example by running the following command:
$ git checkout –b chart-testing-example
The modifications can be of any size and type, so for this example, we will simply modify the nginx chart’s Chart.yaml file. Modify the description fields of the helm-charts/charts/nginx/Chart.yaml file so that they read as follows:
description: Deploys an NGINX instance to Kubernetes
Previously, this value was A Helm chart for Kubernetes. Verify that the nginx chart has been modified by running the git status command:
$ git status
You should see an output similar to the following:

Figure 9.4 – Git status, displaying a change in Chart.yaml
Now, try to run the lint-and-install command again:
$ ct lint-and-install
This time, ct displays the charts from the monorepo that have changed:
Linting and installing charts...
----------------------------------------------------------------
Charts to be processed:
----------------------------------------------------------------
nginx => (version: "1.0.0", path: "helm-charts/charts/nginx")
----------------------------------------------------------------
The process, however, fails later on because the nginx chart version was not modified:

Figure 9.5 – ct output when chart versions are not updated
This can be fixed by incrementing the version of the nginx chart. Since this change does not introduce new features, we will increment the PATCH version. Modify the nginx chart version to 1.0.1 in the Chart.yaml file:
version: 1.0.1
Once the version is updated, run the lint-and-install command again:
$ ct lint-and-install
Now that the chart version has been incremented, the lint-and-install command will follow the full testing workflow. You will see that the nginx chart has been linted and deployed to an automatically created namespace (though a specific namespace can be targeted by using the --namespace flag). Once the deployed pods are reported as ready, ct will automatically run the test hooks denoted by resources with the helm.sh/hook test annotation. ct will also print the logs of each test pod, as well as the namespace events.
You may notice that the nginx chart was deployed multiple times. This is because the nginx chart contains a ci/ folder, located within the helm-charts/charts/nginx/ci directory. This folder contains two different values files, so the nginx Helm chart was installed two different times to test both sets of values. This can be observed throughout the output of lint-and-install:
Linting chart with values file 'nginx/ci/nodeport-values.yaml'...
Linting chart with values file 'nginx/ci/ingress-values.yaml'...
Installing chart with values file 'nginx/ci/nodeport-values.yaml'...
Installing chart with values file 'nginx/ci/ingress-values.yaml'...
While this process was useful for testing the functionality of updated charts, it did not validate whether upgrades to the newer version will be successful. To do this, we need to provide the --upgrade flag. Run lint-and-install again, but this time, let’s add the --upgrade flag:
$ ct lint-and-install --upgrade
This time, an in-place upgrade will occur for each values file under the ci/ directory. This can be seen in the following output:
Testing upgrades of chart 'nginx => (version: "1.0.1", path: "nginx")' relative to previous revision 'nginx => (version: "1.0.0", path: "ct_previous_revision216728160/nginx")'...
Recall that an in-place upgrade will only be tested if the MAJOR version between versions is the same. If the --upgrade flag was specified and the MAJOR version was changed, you would see a message similar to the following:
Skipping upgrade test of 'nginx => (version: "2.0.0", path: "helm-charts/charts/nginx")' because: 1 error occurred:
* 2.0.0 does not have same major version as 1.0.0
Now that you have an understanding of how to test your Helm charts robustly, we will conclude by cleaning up the minikube environment.
Cleaning up
If you have finished with the examples in this chapter, you can remove the chapter9 namespace from your minikube cluster:
$ kubectl delete ns chapter9
Finally, shut down your minikube cluster by running minikube stop.
Summary
In this chapter, you learned about different methods you can apply to test your Helm charts. The most basic way to test a chart is to run the helm template command against a local chart directory and determine whether its resources were generated. You can also use the helm lint command to ensure that your chart follows the correct formatting for Helm resources, and you can use the yamllint command to lint the YAML style that’s used in your chart.
Apart from local templating and linting, you can also perform live tests on a Kubernetes environment with the helm test command and the ct tool. In addition to performing basic chart testing capabilities, ct also provides features that make it easier to maintain Helm charts in a monorepo.
In the next chapter, you will learn how Helm can be used within a continuous delivery (CD) and GitOps setting.
Further reading
For additional information on the helm template and helm lint commands, please refer to the following resources:
- helm template: https://helm.sh/docs/helm/helm_template/
- helm lint: https://helm.sh/docs/helm/helm_lint/
The following pages from the Helm documentation discuss chart tests and the helm test command:
- Chart tests: https://helm.sh/docs/topics/chart_tests/
- The helm test command: https://helm.sh/docs/helm/helm_test/
Finally, see the Chart Testing GitHub repository for more information about the ct CLI: https://github.com/helm/chart-testing.
Questions
Answer the following questions to test your knowledge of this chapter:
- What is the purpose of the helm template command? How does it differ from the helm lint command?
- What tool can be leveraged to lint the YAML style of rendered Helm templates?
- How is a chart test created? How is a chart test executed?
- What is the difference between helm test and ct lint-and-install?
- What is the purpose of the ci/ folder when used with the ct tool?
- How does the --upgrade flag change the behavior of the ct lint-and-install command?