12
Helm Security Considerations
As you have likely come to realize throughout this book, Helm is a powerful tool that makes deploying applications on Kubernetes simple and efficient. With that said, we need to ensure that we do not lose sight of security best practices when leveraging Helm. Luckily, Helm provides several ways to incorporate good security practices into everyday usage in ways that are simple to achieve, from the moment the Helm CLI is downloaded to the moment a Helm chart is installed into a Kubernetes cluster.
In this chapter, we will cover the following topics:
- Data provenance and integrity
- Developing secure and stable Helm charts
- Configuring RBAC rules
Technical requirements
This chapter will make use of the following technologies:
- minikube
- kubectl
- helm
- gpg (GNU Privacy Guard)
You learned how to install and configure the minikube, kubectl, and helm command-line interfaces (CLIs) in Chapter 2, Preparing a Kubernetes and Helm Environment.
We will also leverage the guestbook chart from the Packt repository located at https://github.com/PacktPublishing/Managing-Kubernetes-Resources-using-Helm for an exercise later in this chapter. If you have not already cloned the repository, you can do so with the following command:
$ git clone https://github.com/PacktPublishing/Managing-Kubernetes-Resources-using-Helm.git
Let’s begin by discussing data provenance and integrity.
Data provenance and integrity
When working with any kind of data, two often-overlooked questions should be considered:
- Does the data come from a reliable source?
- Does the data contain all of the contents that you expected it to?
The first question relates to the topic of data provenance. Data provenance is about determining the origin of data and determining where the data originated from.
The second question refers to the topic of data integrity. Data integrity is about determining whether the contents you received from a remote location represents what you expected to receive. It helps determine whether data was tampered with as it was sent across the wire.
Both data provenance and data integrity can be verified using a concept called digital signatures. An author can create a unique signature based on cryptography to sign data, and the consumer of that data can use cryptographic tools to verify the authenticity of that signature. If the authenticity is verified, then the consumer is assured that the data originates from the expected source and was not tampered with as it was transferred.
Authors can create a digital signature using a variety of tools. One such method is by using Pretty Good Privacy (PGP). PGP, in this context, refers to OpenPGP, which is a set of standards based on encryption. PGP focuses on establishing asymmetric encryption, which is based on the use of two different keys – private and public.
Private keys are meant to be kept secret, while public keys are designed to be shared. In PGP, the private key is used to encrypt data, while the public key is used by consumers to decrypt that data. The PGP key pair is often created using a tool called GPG, which is an open source tool that implements the OpenPGP standard.
To begin working with PGP, the first step is to create the key pair, which will generate a set of public and private keys. Once the PGP key pair has been created, the author can use GPG to sign the data. When data has been signed, GPG performs the following steps in the background:
- A hash is calculated based on the contents of the data. The output is a fixed-length string called the message digest.
- The message digest is encrypted using the author’s private key. The output is the digital signature.
To verify the signature, consumers must use the author’s public key to decrypt it. This verification can also be performed using GPG.
Digital signatures play a role in Helm in two ways:
- First, each Helm binary has an accompanying digital signature that’s owned by one of the Helm maintainers. This signature can be used to verify the origin of the download, as well as its integrity.
- Second, Helm charts can also be digitally signed so that they benefit from the same form of verifications. Authors of Helm charts can sign the chart during packaging, and the chart users can verify the chart’s authenticity by using the author’s public key.
Now that you understand how data provenance and integrity come into play concerning digital signatures, in the next section, you will create a GPG key pair on your local machine that will be used to elaborate on the previously described concepts.
Creating a GPG key pair
To create a key pair, you must have GPG installed on your local machine. Use the following instructions as a guide to installing GPG on your respective machine. Note that this chapter is based on gpg version 2.3.6:
- For Windows, you can use the Chocolatey package manager:
> choco install gnupg
You can also download the installer for Windows from https://gpg4win.org/download.html.
- For macOS, you can use the Homebrew package manager by using the following command:
$ brew install gpg
You can also download the macOS-based installer from https://sourceforge.net/p/gpgosx/docu/Download/.
- For Debian-based Linux distributions, you can use the apt package manager:
$ sudo apt install gnupg
- For RPM-based Linux distributions, you can use the dnf package manager:
$ sudo dnf install gnupg
Once you have installed GPG, you can create your own GPG key pair, which we will use throughout our discussion on data provenance and integrity.
Follow these steps to configure your key pair:
- First, we need to begin the generation process by running the gpg --full-generate-key command:
$ gpg --full-generate-key
- For the Please select what kind of key you want prompt, select (1) RSA and RSA:
Please select what kind of key you want:
(1) RSA and RSA
(2) DSA and Elgamal
(3) DSA (sign only)
(4) RSA (sign only)
(9) ECC (sign and encrypt) *default*
(10) ECC (sign only)
(14) Existing key from card
Your selection? 1
The reason we are using RSA instead of the default option (ECC) is that ECC is not supported by the crypto library used in Helm’s source code.
- Next, you will be prompted to enter the key size. For this example, we can simply select the default, so continue by pressing the Enter key:
RSA keys may be between 1024 and 4096 bits long.
What keysize do you want? (3072) <enter>
Requested keysize is 3072 bits
- After you enter your key size, you will be asked how long the key should be valid. Since this key will be used solely to run through the examples, we recommend setting a short expiration, such as 1 week (1w):
Please specify how long the key should be valid.
0 = key does not expire
<n> = key expires in n days
<n>w = key expires in n weeks
<n>m = key expires in n months
<n>y = key expires in n years
Key is valid for? (0) 1w
Key expires at Sun May 22 12:26:09 2022 EDT
Is this correct? (y/N) y
- Now, you will be prompted for your name and email address. These will be used to identify you as the owner of the key pair and will be the name and email address displayed by those who receive your public key. You will also be prompted to provide a comment, which you can simply leave blank:
GnuPG needs to construct a user ID to identify your key.
Real name: John Doe
Email address: [email protected]
Comment: <enter>
You selected this USER-ID:
"John Doe <[email protected]>"
- Press the O key to continue.
- Finally, you will be prompted to enter your private key passphrase. Providing a strong passphrase is essential for protecting your identity in the event your private key is stolen. This is because it must be provided each time you attempt to access your key.
To keep our example simple, we will create an empty string passphrase to avoid passphrase prompts. While this is acceptable in this demonstration, you should protect any private key you intend to use in a real-world situation with a strong passphrase.
To continue, simply press Enter to submit an empty passphrase. When prompted, select <Yes, protection is not needed>.
Once your GPG key pair has been created, you will see an output similar to the following:
pub   rsa3072 2022-05-15 [SC] [expires: 2022-05-22]
      D2557B1EDD57BBC41A5D4DA7161DADB1C5AC21B5
uid                      John Doe <[email protected]>
sub   rsa3072 2022-05-15 [E] [expires: 2022-05-22]
The preceding output displays information about the public (pub) and private (sub) keys, as well as the fingerprint of the public key (the second line of the output). The fingerprint is a unique identifier that’s used to identify you as the owner of that key. The third line, beginning with uid, displays the name and email address that you entered when generating the GPG key pair.
With your key pair now created, let’s continue to the next section to learn how a Helm binary can be verified.
Verifying Helm downloads
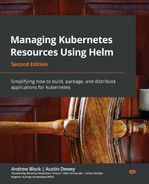
As discussed in Chapter 2, Preparing a Kubernetes and Helm Environment, one of the ways Helm can be installed is by downloading an archive from GitHub. These archives can be installed from Helm’s GitHub releases page (https://github.com/helm/helm/releases) by selecting one of the links shown in the following screenshot:
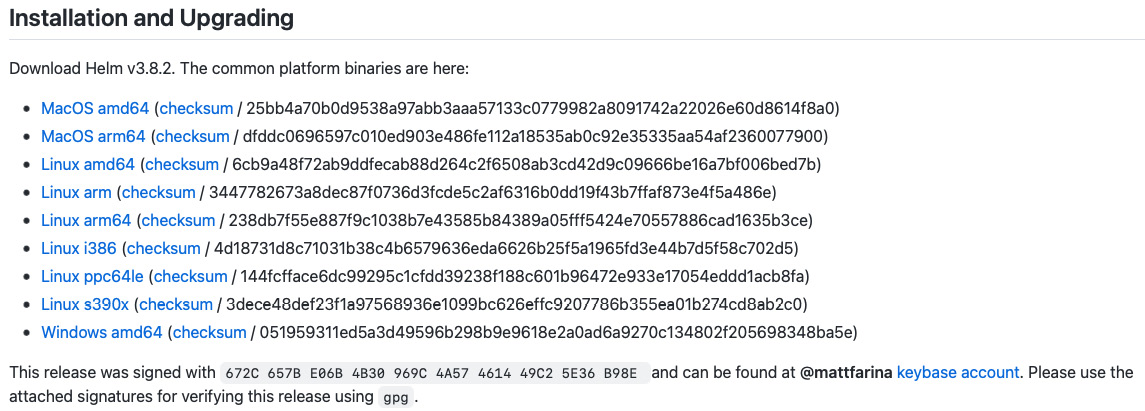
Figure 12.1 – The Installation and Upgrading section of Helm’s GitHub releases page
At the bottom of the preceding screenshot, you will notice a paragraph explaining that the release was signed. Each Helm release is signed by a Helm maintainer and can be verified against the digital signature that corresponds to the downloaded release. Each of the signatures is located under the Assets section, as shown here:

Figure 12.2 – The Assets section of Helm’s GitHub releases page
To verify the provenance and integrity of a Helm download, in addition to the binary itself, you should also download the corresponding .asc file. Note that sha256 files are used to verify the integrity only. In this example, we will download the .tar.gz.asc file, which verifies both provenance and integrity.
Let’s demonstrate how a Helm release can be verified. First, we should download a Helm archive, along with its corresponding .asc file:
- Download a Helm archive that corresponds with your operating system. For this example, we will use version 3.8.2. If you are running an AMD64-based Linux system, the version for this distribution can be downloaded from the GitHub release page or by using the following curl command:
$ curl -LO https://get.helm.sh/helm-v3.8.2-linux-amd64.tar.gz
- Next, download the.asc file that corresponds with your operating system. When running an AMD64-based Linux system, helm-v3.8.2-linux-amd64.tar.gz.asc would be the resulting file that would be downloaded. You can download this file from the GitHub release page or by using the following curl command:
$ curl -LO https://github.com/helm/helm/releases/download/v3.8.2/helm-v3.8.2-linux-amd64.tar.gz.asc
Once both files have been downloaded, you should see the two files located within the same directory on the command line:
$ ls –l
helm-v3.8.2-linux-amd64.tar.gz
helm-v3.8.2-linux-amd64.tar.gz.asc
The next step involves importing the Helm maintainer’s public key to your local GPG keyring. This allows you to decrypt the digital signature contained in the .asc file to verify the provenance and integrity of your downloaded binary. GPG public keys are saved in public key servers such as keyserver.ubuntu.com and pgp.mit.edu. As such, we can use the gpg --recv-key command to download the maintainer’s key from a public key server.
Let’s import the maintainer’s public key and continue with the verification process:
- First, recall the maintainer’s public key fingerprint from Figure 12.1:
672C657BE06B4B30969C4A57461449C25E36B98E
- Use the gpg --recv-key command to download and import the key into your local keychain:
$ gpg --recv-key 672C657BE06B4B30969C4A57461449C25E36B98E
gpg: key 461449C25E36B98E: public key "Matthew Farina <[email protected]>" imported
gpg: Total number processed: 1
gpg: imported: 1
- Now that the public key has been imported, you can verify the Helm release by using the --verify subcommand of GPG. This command has the gpg --verify <signature> <data> syntax:
$ gpg --verify helm-v3.8.2-linux-amd64.tar.gz.asc helm-v3.8.2-linux-amd64.tar.gz
This command decrypts the digital signature contained in the .asc file. If it is successful, it means that the Helm download (the file ending in .tar.gz) was signed by the person you expected (Matt Farina for this release) and that the download was not modified or altered in any way. A successful output looks similar to the following:
gpg: Signature made Wed Apr 13 14:00:32 2022 EDT
gpg: using RSA key 711F28D510E1E0BCBD5F6BFE9436E80BFBA46909
gpg: Good signature from "Matthew Farina <[email protected]>" [unknown]
gpg: WARNING: This key is not certified with a trusted signature!
gpg: There is no indication that the signature belongs to the owner.
Primary key fingerprint: 672C 657B E06B 4B30 969C 4A57 4614 49C2 5E36 B98E
Subkey fingerprint: 711F 28D5 10E1 E0BC BD5F 6BFE 9436 E80B FBA4 6909
Upon further inspection of this output, you may notice the WARNING message, indicating that the key was not certified, which may lead you to question whether or not the verification was successful. In this case, the verification was indeed successful, but you have not certified the maintainer’s key yet, so GPG returns this warning.
The This key is not certified message is normally not an issue, but if you would like to ensure this warning does not appear in the future, you can follow these steps to certify the maintainer’s public key:
- Check that the public key’s fingerprint (also referred to as the primary key from the gpg –verify output) matches the fingerprint displayed on the Helm releases page. As you will recall from Figure 12.1, the fingerprint was displayed, as shown here:
This release was signed with 672C 657B E06B 4B30 969C 4A57 4614 49C2 5E36 B98E and can be found at @mattfarina keybase account.
- Because the key we imported matches the fingerprint displayed on GitHub, we know that we can trust this key. Trust can be associated with this key by using the gpg --sign-key subcommand:
$ gpg --sign-key 672C657BE06B4B30969C4A57461449C25E36B98E
In the Really sign? prompt, enter y.
Now that you have signed the maintainer’s public key, the key has been certified. The next time you perform a verification with this key, you should no longer see the warning message:
$ gpg --verify helm-v3.8.2-linux-amd64.tar.gz.asc helm-v3.8.2-linux-amd64.tar.gz
gpg: assuming signed data in 'helm-v3.8.2-linux-amd64.tar.gz'
gpg: Signature made Wed Apr 13 14:00:32 2022 EDT
gpg: using RSA key 711F28D510E1E0BCBD5F6BFE9436E80BFBA46909
gpg: Good signature from "Matthew Farina <[email protected]>" [full]
Digital signatures also play a role in signing and verifying Helm charts. We will explore this topic in the next section.
Signing and verifying Helm charts
Similar to how the Helm maintainers sign releases, you can sign your Helm charts so that users can verify its origin as well as confirm it contains the expected content. To sign a chart, you must have a GPG key pair present on your local workstation (we created a GPG key pair earlier in the Creating a GPG key pair section).
There is one important caveat to note before we start signing charts. If you are using GPG version 2 or greater, you must export your public and secret keyrings to a legacy format. Early versions of GPG stored keyrings in the .gpg file format, which is the format that Helm expects your keyring to be in (at the time of writing). Newer versions of GPG store keyrings in the .kbx file format, which is not compatible at the time of writing.
Luckily, we can export our keys in the .gpg format by following these steps:
- First, find your GPG version by running the following command:
$ gpg --version
gpg (GnuPG) 2.3.6
libgcrypt 1.10.1
Copyright (C) 2021 Free Software Foundation, Inc.
- If your GPG version is 2 or greater, export your public and secret keyrings using the gpg --export and gpg --export-secret-keys commands:
$ gpg --export > ~/.gnupg/pubring.gpg
$ gpg --export-secret-keys > ~/.gnupg/secring.gpg
Once your keyrings have been exported, you will be able to sign your charts using the helm package command. The helm package command provides three key flags that allow you to sign and package charts:
- --sign: This allows you to sign a chart using a PGP private key.
- --key: The name of the key to use when signing.
- --keyring: The location of the keyring containing the PGP private key.
Let’s run the helm package command to sign the guestbook Helm chart from the Packt repository:
$ helm package --sign --key <key_name> --keyring ~/.gnupg/secring.gpg helm-charts/charts/guestbook
The <key_name> placeholder refers to either the email, name, or fingerprint associated with the desired key. These details can be found by using the gpg --list-keys command.
If the helm package command is successful, you will see the following files displayed in the current directory:
guestbook-0.1.0.tgz
guestbook-0.1.0.tgz.prov
The guestbook-0.1.0.tgz file is the archive that contains the Helm chart. This file is always created by helm package, whether you are signing the chart or not.
The guestbook-0.1.0.tgz.prov file is called a provenance file. The provenance file contains a provenance record, which contains the following:
- The chart metadata from the file
- The sha256 hash of the guestbook-0.1.0.tgz file
- The PGP digital signature
Helm chart consumers leverage provenance files to verify the data provenance and integrity of the chart that they have downloaded. So, chart developers should be sure to publish both the .tgz archive as well as the .tgz.prov provenance file to their Helm chart repository.
While you have successfully signed the guestbook chart and have created the .tgz.prov file, it is not quite enough for users to verify the chart, as they still need to access your public key to decrypt your signature. You can make this key available for users by publishing it to the PGP key servers with the gpg --send-key command:
$ gpg --send-key <key_name>
End users can then download and import this key by using the gpg --recv-key command:
$ gpg --recv-key <key_name>
Once a user has imported your public key (and exported it to the ~/.gnupg/pubring.gpg keyring, as shown earlier in this section), they can verify your Helm chart by using the helm verify command, provided both the .tgz chart archive and .tgz.prov provenance file have been downloaded to the same directory:
$ helm verify --keyring ~/.gnupg/pubring.gpg guestbook-0.1.0.tgz
Signed by: John Doe <[email protected]>
Using Key With Fingerprint: D2557B1EDD57BBC41A5D4DA7161DADB1C5AC21B5
Chart Hash Verified: sha256:c8089c7748bb0c8102894a8d70e641010b90abe9bb45962a 53468eacfbaf6731
If verification is successful, you will see that the signer, the signer’s public key, and the chart have been verified. Otherwise, an error will be returned. The verification could fail for a variety of reasons, including the following:
- The .tgz and .tgz.prov files are not in the same directory.
- The .tgz or .tgz.prov files are corrupt.
- The file hashes do not match, indicating a loss of integrity.
- The public key used to decrypt the signature does not match the private key originally used to encrypt it.
The helm verify command is designed to be run on locally downloaded charts, so users may find it better to leverage the helm install --verify command instead, which performs the verification and installation in a single command, assuming that the .tgz and .tgz.prov files can both be downloaded from a chart repository.
The following command describes how the helm install --verify command can be used:
$ helm install guestbook <chart_repo>/guestbook --verify --keyring ~/.gnupg/pubring.gpg
By using the methodologies described in this section, chart developers and consumers can be assured that the content is sourced from a trusted origin and has been unaltered.
With an understanding of how data provenance and integrity play a role in Helm, let’s continue discussing Helm security considerations by moving on to our next topic – security concerning Helm charts and Helm chart development.
Developing secure and stable Helm charts
While provenance and integrity play a major role in the security of Helm, they are not the only concerns you need to consider. During the development process, chart developers should ensure that they are adhering to best practices around security to prevent vulnerabilities from being introduced when a user installs their chart into a Kubernetes cluster. In this section, we will discuss many of the concerns surrounding security as it relates to Helm chart development and what you, as a developer, can do to write Helm charts with security as a priority.
We will begin by discussing the security around any container images that your Helm chart may reference.
Using secure images
Since the goal of Helm (and Kubernetes) is to deploy container images, the image itself presents several areas of consideration concerning security. To start, chart developers should be aware of the differences between image tags and image digests.
A tag is a human-readable reference to a given image and provides both developers and consumers with an easy way to reference an image. However, tags can present a security concern as there are no guarantees that the contents of a given tag will always remain the same. The image owner may choose to push an updated image using the same tag, which would result in a different underlying image being executed at runtime (even though the tag is the same). Performing these actions against the same tag introduces the possibility of regressions, which can cause unexpected adverse effects for end users. Instead of referencing an image by tag, images can also be referenced by digest. An image digest is a computed SHA-256 value of an image that not only provides an immutable identifier to an exact image but also allows for the container runtime to verify the integrity of the image that is retrieved from a remote registry. This removes the risk of deploying an image that contains an accidental regression against a given tag and can also remove the risks of a man-in-the-middle attack, where the tag’s contents are modified with malicious intent.
As an example, an image referenced as quay.io/bitnami/redis:5.0.9 in a chart template can be referenced by a digest as quay.io/bitnami/redis@sha256:70b816f2127afb5d4af7ec9d6e8636b2f0f973a3cd8dda7032f9dcffa38ba11f. Notice that instead of specifying the name of a tag after the name of the image, the SHA-256 digest is explicitly specified. This assures that the image content will not change over time, even if the tag changes, thus strengthening your security posture.
As time progresses, a tag or a digest may become unsafe for deployment, as vulnerabilities may eventually be found in the underlying packages or base components. There are many different ways to determine whether there are any vulnerabilities associated with a given image. One way is to leverage the native capabilities of the registry that the image belongs to. Many different image registry solutions contain capabilities around image vulnerability scanning that can help provide insight as to when an image is vulnerable.
The Quay container registry, for example, can automatically scan images at specified intervals to determine vulnerabilities that may be present within a given image. The Nexus and Artifactory container registries are also examples of container registries that have similar capabilities. Outside of native scanning capabilities provided by container registries, other tools can be leveraged, such as Vuls and OpenSCAP. When your image registry or standalone scanning tool reports that an image is vulnerable, you should immediately update your chart’s image to a newer version, if available, to prevent vulnerabilities from being introduced to your users’ Kubernetes clusters.
To help simplify the process of updating the container image, you can develop a regular cadence where image updates are checked. This helps prevent you from getting to a point where your target image contains vulnerabilities that make it unfit for deployment. Many teams and organizations also restrict the source of images to trusted registries to reduce the potential of running images that do contain vulnerabilities. This setting can be configured at the container runtime level or within policies applied to a Kubernetes cluster. The specific location and configurations vary based on the specific implementation(s).
Apart from image vulnerability scanning and content sourcing, you should also avoid deploying images that run as root or privileged. Running containers as the root user (UID 0) is dangerous, as the process would also have root access to the underlying host if it can break out of the container. Your application likely does not need the level of permission that root provides, so you should run the container as a non-root user instead to limit its available permissions.
While running a container as root is dangerous, due to the process isolation that containers provide, it does not quite grant all available Linux capabilities by default. As a result, some users, often mistakenly, will further escalate permissions by running containers as privileged. Running a container as privileged grants all capabilities to the container, allowing it to interact with the underlying host from within the container. If your application does require additional capabilities, rather than running the container as privileged, you can instead select the exact list of capabilities in securityContext of a pod that is desired. A list of capabilities can be found in the CAPABILITIES(7) page of the Linux manual pages (http://man7.org/linux/man-pages/man7/capabilities.7.html).
In addition to the container image that has been deployed, chart developers should focus on the resources that have been granted to an application to ensure the integrity of the Kubernetes cluster. We will dive into this topic in the next section.
Setting resource requests and limits
Pods consume resources from the host (node) that it is running within. Resources are defined in terms of requests (the minimum amount of resources to allocate) and limits (the maximum amount of resources the pod is allowed to use). Pods that do not define requests run the risk of being scheduled on nodes that cannot support their minimum resource requirements. Pods that do not define limits run the risk of exhausting a node’s resources, resulting in pod eviction and resource contention with other workloads. Because of the issues that can occur when resource requests and limits are not set, chart developers should ensure that their charts define these resource constraints while allowing users to override them with Helm values as needed.
For example, as a chart developer, you may write your chart so that it includes the following default values for configuring resources:
resources:
  limits:
    cpu: "1"
    memory: 4Gi
  requests:
    cpu: 500m
    memory: 2Gi
Then, if the chart is installed without explicitly setting the application’s resource requirements, the defaults would be applied to avoid under- or over-utilizing cluster resources.
Apart from resource requests and limits, a Kubernetes administrator can also create LimitRange and ResourceQuota objects to restrict the number of resources requested and consumed by applications within namespaces. The LimitRange and ResourceQuota objects are applied separately from Helm, usually as part of a namespace provisioning process.
LimitRanges are used to restrict the number of resources a container or pod is allowed to consume within a given namespace. They are also used to set the default resources for containers that don’t already have resource limits defined. The following is an example of a LimitRange definition:
apiVersion: v1
kind: LimitRange
metadata:
  name: limits-per-container
spec:
  limits:
    - max:
        cpu: 4
        memory: 16Gi
      default:
        cpu: 500m
        memory: 2Gi
      defaultRequest:
        cpu: 50m
        memory: 128Mi
      type: Container
In the example, LimitRange sets the maximum amount of allowed container resources to 4 CPU cores and 16 Gi of memory. For containers whose resource limits are undefined, a limit of 500 millicores of CPU and 2 Gi of memory will automatically be applied. For containers whose resource requests are undefined, a request of 50 millicores of CPU and 128 Mi of memory will automatically be applied. LimitRanges can also be applied at the pod level by setting the type field to Pod. This setting ensures that the sum of resource utilization of all containers in the pod satisfies the specified limits.
In addition to setting limits against CPU and memory utilization, you can configure LimitRange to restrict storage consumption by setting the type field to PersistentVolumeClaim. The following is a LimitRange example used to restrict storage claims to 8 Gi or fewer:
apiVersion: v1
kind: LimitRange
metadata:
  name: limits-per-pvc
spec:
  - max:
      storage: 8Gi
    type: PersistentVolumeClaim
While LimitRange objects are used to restrict resources at the Container, Pod, or PersistentVolumeClaim level, ResourceQuotas are used by cluster administrators to restrict resource utilization at the namespace level. They are used to define the maximum number of resources a namespace can utilize in addition to limiting the amount of Kubernetes objects that can be created, such as Secrets and ConfigMaps. The following is an example ResourceQuota definition:
apiVersion: v1
kind: ResourceQuota
metadata:
  name: pod-and-pvc-quota
spec:
  hard:
    limits.cpu: "32"
    limits.memory: 64Gi
    requests.cpu: "24"
    requests.memory: 48Gi
    requests.storage: 20Gi
This ResourceQuota would ensure that the sum of all CPU and memory requests and limits remain under the defined amounts. It also sets a limit on the storage for PersistentVolumeClaims that can be requested within the namespace.
By setting reasonable defaults for resource constraints in your Helm charts, along with the usage of LimitRange and ResourceQuotas, you can ensure that users of your Helm charts do not exhaust cluster resources. You can also help ensure that applications request the minimum amount of resources necessary for a proper operation.
With an understanding of resource requests and limits, let’s move on to the next topic – handling secrets in Helm charts.
Handling secrets in Helm charts
Handling secrets is a common concern when working with Helm charts. Consider the WordPress application from Chapter 3, Installing Your First App with Helm, where you were required to provide a password to configure an admin user. This password was not provided by default in the values.yaml file because this would have left the application vulnerable if you forgot to override the password value. Chart developers should be in the habit of not providing defaults for secret values, such as passwords, and should instead require users to provide an explicit value. This can easily be accomplished by leveraging the required function. Helm can also generate random strings using the randAlphaNum function.
Note
Note that the randAlphaNum function generates a new random string each time the chart is upgraded. For that reason, developers should design charts with the expectation that users will provide their own password or another secret key, with the required function serving as a gate to ensure that a value is provided.
When using native Kubernetes resources to store secret information, chart developers should ensure that these sensitive assets are saved in a Kubernetes Secret, not a ConfigMap. Secrets and ConfigMaps are similar, but Secrets are reserved for sensitive data. Because secret and non-secret data is stored in separate objects, cluster administrators can set RBAC policies accordingly to restrict access to secret data while allowing permission to data that is non-secret (RBAC will be described further later in the Configuring RBAC rules section).
Chart users should ensure that secret values such as credentials are provided securely. Values are most commonly provided using the --values flag, in which properties are configured within values files. This is an appropriate method when working with non-secret values, but you should use caution when using this approach with secrets. Users should be sure that values files that contain secrets are not checked into a Git repository or an otherwise public location where those secrets could be exposed. One way that users can avoid exposing secrets is by leveraging the --set flag to pass secrets inline from the command line. This reduces the risk of credentials being exposed, but users should be aware that this could reveal the credentials in the bash history.
Another way that users can avoid exposing secrets is by leveraging an encryption tool to encrypt values files that contain secrets. This approach would continue to allow users to apply the --values flag, along with enabling the values file to be stored in a remote location, such as a Git repository. Then, the values file can only be decrypted by users that have the appropriate decryption key and would remain encrypted for all other users, only allowing trusted entities to access the data. Users can simply leverage GPG to encrypt the values files, or they can leverage a purpose-built tool such as Secrets OPerationS (SOPS). SOPS (https://github.com/mozilla/sops) is a tool designed to encrypt the values of YAML or JSON files, but leave the keys unencrypted. The following code depicts a secret key/value pair from a SOPS-encrypted file:
password: ENC[AES256_GCM,data:xhdUx7DVUG8bitGnqjGvPMygpw==,iv:3LR9KcttchCvZNpRKqE5L cXRyWD1I00v2kEAIl1ttco=,tag:9HEwxhT9s1pxo9lg19wyNg==,type:str]
Notice how the password key is unencrypted but the value is encrypted. This allows you to easily see the types of values contained within the file without exposing their sensitive values.
There are other tools capable of encrypting values files that contain secrets. Some examples include git-crypt (https://github.com/AGWA/git-crypt) and blackbox (https://github.com/StackExchange/blackbox). Additionally, purpose-built secret management utilities, such as HashiCorp Vault or CyberArk Conjur, can be used to encrypt secrets in the form of key/value stores. Secrets can then be retrieved by authenticating against the secret management system and then be utilized within Helm by specifying their values with the --set flag.
Now that you understand how security plays a role in Helm chart development, let’s discuss how Role-Based Access Control (RBAC) can be applied in Kubernetes to provide greater security to your users.
Configuring RBAC rules
The ability of an authenticated user in Kubernetes to perform actions is governed by a set of RBAC policies. As introduced in Chapter 2, Preparing a Kubernetes and Helm Environment, policies, known as roles, can be associated with users or service accounts, and Kubernetes includes several roles with any installation. RBAC has been enabled by default in Kubernetes since version 1.6. When thinking about Kubernetes RBAC in the context of Helm usage, you need to consider two factors:
- The user installing the Helm chart
- The service account associated with the pod running the workload
In most cases, the individual responsible for installing a Helm chart is associated with a Kubernetes user. However, Helm charts can be installed through other means, such as by a Kubernetes operator with an associated service account.
By default, users and service accounts have minimal permissions in a Kubernetes cluster. Additional permissions are granted through the use of roles, which have been scoped to an individual namespace, or cluster roles, which grant access at a cluster level. These roles are then associated with a user or service account using either a role binding or a cluster role binding, depending on the type of policy being targeted. While Kubernetes has several included roles, the Principle of Least Privilege should be used wherever possible. The Principle of Least Privilege is a security concept that emphasizes that a user or application is granted only the minimum set of permissions that is needed to function. For example, imagine we wanted to add functionality to our application that allows for pod metadata to be queried. While Kubernetes contains a built-in role called view that provides the necessary permissions for reading pod manifests in a given namespace, it also grants access to other resources, such as ConfigMaps and Deployments. To minimize the level of access that is provided to an application, a custom policy, in the form of Role or ClusterRole, can be created that provides only the necessary permissions that the application needs. Since most typical users of a Kubernetes cluster do not have access to create resources at a cluster level, let’s create a role that is applied to the namespace that the Helm chart is deployed in.
The kubectl create role command can be used to create a Kubernetes Role. Alternatively, the Role and RoleBinding resources could have been created using YAML definitions. A basic role contains two key elements:
- The type of action (verb) made against the Kubernetes API
- The list of Kubernetes resources to target
As an example, to demonstrate how RBAC can be configured in Kubernetes, let’s configure a set of RBAC rules to allow an authenticated user to view Pods within a namespace:
- First, be sure to start your minikube cluster and create a new namespace for this exercise:
$ minikube start
$ kubectl create namespace chapter12
- Next, use the kubectl CLI to create a new role called pod-viewer:
$ kubectl create role pod-viewer --resource=pods --verb=get,list –n chapter12
With this new role created, it needs to be associated with a user or service account. Since we want to associate the role with an application running in Kubernetes, we will apply the role to a service account. To abide by the Principle of Least Privilege, it is recommended to create a unique service account for the application (otherwise, the default service account would be used). This is to ensure that no other workloads are deployed in the same namespace that would accidentally inherit the same permissions.
- Create a new service account called example by running the following command:
$ kubectl create sa example –n chapter12
- Finally, create RoleBinding called pod-viewers and associate it with the example service account:
$ kubectl create rolebinding pod-viewers --role=pod-viewer --serviceaccount=chapter12:example –n chapter12
With the role and role binding created, the example service account has the appropriate permissions to list and get pods. To verify this assumption, we can use the kubectl auth can-i command:
$ kubectl auth can-i list pods --as=system:serviceaccount:chapter12:example –n chapter12
yes
The --as flag makes use of the user impersonation feature in Kubernetes to allow you to debug authorization policies.
To confirm that the service account cannot access a resource it should not be able to, such as listing Deployments, you can run the following command:
$ kubectl auth can-i list deployments --as=system:serviceaccount:chapter12:example –n chapter12
no
As you can see from the output of no for listing Deployments and yes for listing pods, the expected policies are in place. This service account can now be referenced by a Helm chart. Alternatively, a Helm chart could be written to create the ServiceAccount, Role, and RoleBinding resources natively, assuming that a user installing the chart has the appropriate privileges required.
When used effectively, Kubernetes RBAC aids in providing Helm chart developers with the tools needed to enforce least-privilege access, protecting users and applications from potential errant or malicious actions.
To clean up from this exercise, you can delete your namespace with kubectl delete ns chapter12 and stop your minikube cluster with minikube stop.
Next, let’s discuss how to access secure Helm chart repositories.
Accessing secure chart repositories
Chart repositories allow you to discover Helm charts and install them on your Kubernetes cluster. Repositories were explored in Chapter 8, Publishing to a Helm Chart Repository. There, you learned how to serve charts using an HTTP server (demonstrated using GitHub Pages) and an OCI registry (demonstrated using GitHub’s container registry, ghcr.io).
Most chart repositories are readily available and open for those who are interested. However, chart repositories and hosting services do provide additional security measures for interacting with content stored within a repository, including the following:
- Authentication
- Transport Layer Security (TLS)
HTTP(S)-based chart repositories support basic and certificate-based authentication. For basic authentication, a username and password can be provided when adding a repository using the helm repo add command through the use of the --username and --password flags. For example, if you wanted to access a repository that is protected via basic authentication, adding the repository would take the following form:
$ helm repo add <repo_name> <repo_url> --username <username> --password <password>
Under certain circumstances, you may also need to use the --pass-credentials flag in addition to --username and --password. Recall that an index.yaml file contains indexing of all Helm charts within the chart repository. Within the index.yaml file is a property field named urls that refers to the location of the associated Helm chart. Typically, the urls field contains relative paths within the chart repository, but in some cases, a location at an entirely different domain can be specified. Without the --pass-credentials flag, Helm will not forward your username and password along to these domains, which is a security feature implemented in Helm 3.6.1 to prevent your information from being exposed. However, if you do need to pass your credentials to another domain to authenticate against those endpoints, you can provide the --pass-credentials flag when using the helm repo add command.
OCI registries also support basic authentication using the helm registry login command. The username is provided using the --username flag, but there are two ways to specify the password:
- --password: Provides the password as an argument. This could reveal the password in plaintext in the bash history.
- --password-stdin: Provides the password from stdin. This allows you to keep the password hidden from the bash history by redirecting it from stdin.
It is recommended to use the --password-stdin flag to keep the password concealed from the bash history. As such, you can perform basic authentication against an OCI registry using the following command:
$ cat <password_file> | helm registry login <registry_host> --username <username> --password-stdin
While basic authentication is most commonly used, certificate-based authentication is another way of verifying a client’s identity. Helm, at the time of writing, does not provide flags for OCI certificate-based authentication, but for traditional Helm repositories, the Helm repo add command provides the --cert-file and --key-file flags, which are used to specify your client certificate and key, respectively.
Enabling basic authentication and certificate authentication on the chart repository itself depends on the repository implementation that is used. For example, ChartMuseum, a popular chart repository solution, provides the --basic-auth-user and --basic-auth-pass flags, which can be used on startup to configure the basic auth username and password. It also provides the --tls-ca-cert flag to configure the certificate authority (CA) certificate for certificate authentication. Other chart repository implementations may provide similar or additional capabilities.
Even with authentication in place, the packets sent between your Helm client and your chart repository must be transmitted securely using TLS-based encryption. While this is a given for certificate-based authentication, which leverages TLS natively, repositories that use basic authentication can still benefit from encrypting network traffic. Configuring TLS on the chart repository depends on the repository implementation being used, but for ChartMuseum, the --tls-cert and --tls-key flags can be used to provide the certificate chain and key files. More general web servers, such as NGINX, typically require a configuration file that provides the location of the certificate and key files on the server. Offerings such as GitHub Pages already have TLS configured.
Each of the Helm repositories that we have used so far has used certificates signed by publicly available CAs that are stored in your web browser and underlying operating system. As a result, we did not need to go out of our way to trust their certificates. Many large organizations, however, have their own CAs that are used to produce the certificate for the chart repository. Since this certificate is likely not from a publicly available CA, the Helm CLI may not trust the certificate, resulting in the following error:
Error: looks like "<repo_url>" is not a valid chart repository or cannot be reached: Get <repo_url>/index.yaml: x509: certificate signed by unknown authority
To allow the Helm CLI to trust the chart repository’s certificate, the CA certificate, or CA bundle containing the certificate chain, can be added to the operating system’s trust store. Alternatively, for HTTPS chart repositories, the --ca-file flag can be added to the helm repo add command.
Finally, depending on how the chart repository is configured, additional metrics can be obtained to perform request-level auditing and logging to determine who has attempted to access the repository.
Through the use of authentication and TLS, additional capabilities can be realized for enhancing the security footprint of Helm repositories.
Summary
In this chapter, you learned about different topics around security that pertain to Helm usage. First, you learned how to prove the data provenance and integrity of Helm releases and Helm charts. Next, you learned about Helm chart security and how a chart developer can leverage security best practices to write a stable and secure Helm chart. Then, we focused on using RBAC to create an environment based on the Principle of Least Privilege, and we finished by talking about how chart repositories can be secured using authentication and TLS. Now, by employing each of these concepts, you are well equipped to create a secure Helm architecture and working environment.
Thank you for reading Managing Kubernetes Resources Using Helm! We hope that this book helps you be confident and efficient as you use Helm to work within the Kubernetes ecosystem.
Further reading
To learn more about the topics that were covered in this chapter, take a look at the following resources:
- To learn more about data provenance and integrity in the context of Helm charts, go to https://helm.sh/docs/topics/provenance/.
- To learn more about Kubernetes RBAC, check out the Using RBAC Authorization section from the Kubernetes documentation at https://kubernetes.io/docs/reference/access-authn-authz/rbac/.
- Check out the chart repository guide from the Helm documentation to learn more about chart repositories: https://helm.sh/docs/topics/chart_repository/.
- Finally, visit the Registries page from the Helm documentation to learn more about OCI support: https://helm.sh/docs/topics/registries/.
Questions
Answer the following questions to test your knowledge of this chapter:
- What are data provenance and integrity? How are data provenance and data integrity different?
- What commands can a user run to verify the data provenance and integrity of a Helm chart? Which files are required to make this process possible?
- What considerations need to be taken into account to use and maintain secure container images?
- Why is it important to leverage resource requests and limits in your Helm chart? What other Kubernetes resources can be used to configure requests and limits?
- What is the Principle of Least Privilege? Which Kubernetes resources allow you to configure authorization and achieve the least privilege?
- Which flags can you use to authenticate to an HTTP(S) repository?
- Which flags can you use to authenticate to an OCI registry?