11
Using Helm with the Operator Framework
One of the advantages of using Helm is the ability to declaratively define an application’s desired state. With Helm, the desired state is managed with templates and Helm values, which, when provided using the install or upgrade commands, apply the values to synchronize the live state in a Kubernetes cluster. In previous chapters, this was performed by invoking those commands manually. Most recently, in Chapter 10, Automating Helm with CD and GitOps, we used Argo CD as a method of state synchronization.
Another way changes can be synchronized to a Kubernetes cluster is to use a controller that checks periodically that the desired state matches the current configuration in the environment. If the state does not match, the application can automatically modify the environment to match the desired state. This controller is the foundation of applications and is referred to as a Kubernetes operator.
In this chapter, we will create a Helm-based operator that helps ensure that the desired state always matches the live state of the cluster. If it does not, the operator will execute the appropriate Helm commands to reconcile the state of the environment.
In this chapter, we will cover the following topics:
- Understanding Kubernetes operators
- Understanding the Guestbook operator control loop
- Using Helm to manage operators, Custom Resource Definitions (CRDs), and Custom Resources (CRs)
- Cleaning up
Technical requirements
For this chapter, you will need to have the following technologies installed on your local machine:
- minikube
- Helm
- kubectl
In addition to these tools, you should find the Packt repository containing resources associated with the examples on GitHub at https://github.com/PacktPublishing/Managing-Kubernetes-Resources-using-Helm. This repository will be referenced throughout this chapter.
Understanding Kubernetes operators
One of the fundamental principles of Kubernetes is that the current state of resources within the cluster matches the desired state, a process known as the control loop. The control loop is an ongoing, non-terminating pattern of monitoring the state of the cluster through the use of controllers. Kubernetes includes numerous controllers that are native to the platform, with examples ranging from admission controllers that intercept requests made to the API server to replication controllers that ensure the configuration of pod replicas.
As interest in Kubernetes began to grow, the combination of providing users with the ability to extend the capabilities of the platform, as well as a way to provide more intelligence around managing the life cycle of applications, led to the creation of a couple of important features to support Kubernetes development. First, the introduction of CRDs enabled users the ability to extend the default Kubernetes API in order to create and register new types of resources. Registering a new CRD creates a new resource path on the Kubernetes API server. For example, registering a new CRD for an object type called Guestbook provides the capabilities to interact with the Guestbook resource through the Kubernetes API server. When using the Kubernetes CLI, kubectl get Guestbook can now be used to view all Guestbook objects that are currently available. With this new capability realized, developers could now create controllers of their own to monitor these types of CRs and manage the lifecycle of applications through the use of CRDs.
Another major feature that helped to shape the developer experience in Kubernetes included advances in the types of applications deployed to Kubernetes. Instead of small and simple applications, more complex and stateful applications were being deployed more frequently. Typically, these types of advanced applications require a higher level of management and maintenance, such as day 2 activities including backups, restorations, and upgrades. These tasks extend beyond the typical types of controllers that are found natively in Kubernetes, as deep knowledge related to the application being managed must be embedded within. This pattern of using a CR to manage applications and their components is known as the Operator pattern. First coined by the software company CoreOS in 2016, operators aim to capture the knowledge that a human operator would have for managing the lifecycle of an application. Operators are packaged as normal containerized applications, deployed within pods, that react on changes to the API against CRs.
Operators are commonly written using a framework called kubebuilder, which contains features that simplify the creation of CRs and the interaction with a Kubernetes environment. Several additional frameworks have since been created to further extend the capabilities to support operator development. One such popular toolkit is the Operator Framework, which provides end users with the ability to create operators using one of the following three technologies:
- Go
- Ansible
- Helm
Go-based operators leverage the Go programming language to implement control loop logic. Ansible-based operators leverage the Ansible CLI tool and Ansible playbooks to manage the state of resources. Ansible is a popular open source configuration management tool.
In this chapter, we will focus on Helm-based operators. Helm operators base their control loop logic on Helm charts and a subset of features provided by the Helm CLI. As a result, they represent an easy way for Helm users to implement their own operators.
With an understanding of operators, let’s continue by creating our own operator using Helm.
Understanding the Guestbook operator control loop
In this chapter, we will write a Helm-based operator that will be used to install the Guestbook Helm chart. This chart can be found in the Packt repository at https://github.com/PacktPublishing/Managing-Kubernetes-Resources-using-Helm/tree/main/helm-charts/charts/guestbook.
The following diagram demonstrates how the Guestbook operator will function once it has been deployed:

Figure 11.1 – The Guestbook operator control loop
The Guestbook operator constantly watches for the creation, deletion, or modification of Guestbook CRs. When a Guestbook CR is created, the operator will install the Guestbook Helm chart, and when the CR is modified, it upgrades the release accordingly so that the state of the cluster matches the desired intent as defined by the CR. Similarly, when the CR is deleted, the operator uninstalls the release.
With an understanding of how the operator’s control loop will function, let’s set up an environment where the operator can be built and deployed.
Preparing a local development environment
In order to create a Helm operator, you will need the following CLI tools at a minimum:
- operator-sdk
- A container management tool, such as docker, podman, or buildah
The operator-sdk CLI is a toolkit used to help develop Kubernetes operators. It contains inherent logic to simplify the operator development process. Under the hood, operator-sdk requires a container management tool that it can use to build the operator image. The supported container management tools are docker, podman, and buildah.
Installing the operator-sdk CLI is easy, as you can simply download a release from GitHub at https://github.com/operator-framework/operator-sdk/releases. However, the process used to install docker, podman, or buildah varies greatly depending on your operating system; not to mention, Windows users will not be able to use the operator-sdk toolkit natively.
Fortunately, the minikube Virtual Machine (VM) can be leveraged as a working environment for developers regardless of the host operating system since minikube is a Linux VM that also contains the Docker CLI. In this section, we will install the operator-sdk toolkit onto minikube and use the minikube VM as an environment to create the operator.
First, start the minikube VM:
$ minikube start
Once the VM has started, proceed by following these steps:
- Access the VM by running the minikube ssh command:
$ minikube ssh
- Once inside the VM, you need to download the operator-sdk CLI. This can be accomplished using the curl command. Note that the operator-sdk version used during writing was version v1.20.0.
To download this version of the operator-sdk CLI, run the following command:
$ curl –o operator-sdk –L https://github.com/operator-framework/operator-sdk/releases/download/v1.20.0/operator-sdk_linux_amd64
- Once downloaded, you will need to change the permission of the operator-sdk binary to be user-executable. Run the chmod command to make this modification:
$ chmod u+x operator-sdk
- Next, move the operator-sdk binary to a location managed by the PATH variable, such as /usr/local/bin. Because this operation requires root privileges, you will need to run the mv command using sudo:
$ sudo mv operator-sdk /usr/local/bin
- Finally, verify your operator-sdk installation by running the operator-sdk version command:
$ operator-sdk version
operator-sdk version: "v1.20.0", commit: "deb3531ae20a5805b7ee30b71f13792b80bd49b1", kubernetes version: "1.23", go version: "go1.17.9", GOOS: "linux", GOARCH: "amd64"
- As an additional step, you should also clone the Packt repository in your minikube VM since we will need it later to build our Helm operator. Run the following commands to install git and clone the repository in your VM (notice that we will also install make, which is necessary for building our operator image later):
$ sudo apt update
$ sudo apt install git make
$ git clone https://github.com/PacktPublishing/Managing-Kubernetes-Resources-using-Helm.git
Now that you have a local development environment created in the minikube VM, let’s begin writing the Guestbook operator. Note that an example of the operator code is located in the Packt repository at https://github.com/PacktPublishing/Managing-Kubernetes-Resources-using-Helm/tree/main/chapter11/guestbook-operator.
Scaffolding the operator file structure
Similar to Helm charts themselves, Helm operators built by the operator-sdk binary have a specific file structure that must be adhered to. The file structure is explained in the following table:
|
File/folder |
Definition |
|
Dockerfile |
Used to build the operator image |
|
Makefile |
Provides a convenient set of targets for building the operator image and deploying it to Kubernetes |
|
PROJECT |
Provides operator-sdk metadata |
|
config/ |
Contains Kubernetes resource manifests for CRDs, CRs, and the operator instance |
|
helm-charts/ |
Contains the Helm charts that the operator is in charge of installing |
|
watches.yaml |
Defines the CRs that the operator is in charge of monitoring |
Table 11.1 – The operator-sdk file structure
This file structure can be easily created using the operator-sdk init and operator-sdk create api commands. Let’s walk through this process to create a Guestbook kind of a custom API version, demo.example.com/v1alpha1:
- First, create a new folder for the operator and cd inside the newly created directory:
$ mkdir guestbook-operator
$ cd guestbook-operator
- Next, use the operator-sdk init command to initialize the project:
$ operator-sdk init --plugins helm --domain example.com
Notice the usage of the --plugins helm parameter. This specifies that our project is a Helm operator and provides the necessary project scaffolding. The –domain example.com parameter specifies the Kubernetes API group that will be used for the CR. However, the command has not yet created the Guestbook CRD and control loop logic. This will be handled in the next step.
- Run the operator-sdk create api command to create the Guestbook CRD and associated manifests:
$ operator-sdk create api --group demo --version v1alpha1 --kind Guestbook --helm-chart ../Managing-Kubernetes-Resources-using-Helm/helm-charts/charts/guestbook
You might see a warning about RBAC rules, but this can safely be ignored for this example. In practice, you should always ensure that the RBAC rules follow the principle of least privilege.
With the Guestbook operator successfully scaffolded, let’s build the operator and push it to a container registry, where we will later pull the image for deployment.
Building the operator image
One of the files generated by operator-sdk was Makefile, which contains targets for building your operator image and pushing it to a container registry. However, before we can build our image, we need to have access to a container registry.
In Chapter 8, Publishing to a Helm Chart Repository, we used the GitHub container registry located at ghcr.io to publish images. We will use the same registry for publishing our Guestbook operator.
In order to publish to ghcr.io, you need to have first created a Personal Access Token (PAT). If you have already created one in Chapter 8, Publishing to a Helm Chart Repository, you do not need to create a new one (unless it has expired or you have misplaced the token).
However, if you do need to create a PAT, you can follow these steps:
- Log into GitHub. Once you are logged in, from the upper-right corner of the page, select your profile picture and click on Settings from the drop-down menu.
- Click on Developer Settings and select Personal Account Token.
- Click on the Generate New Token button to initiate the token creation process.
- Enter a unique name for the token, such as Learn Helm.
- Select the date the token will expire. It is a recommended practice to specify an expiration date as it follows security best practices.
- Select the scopes (permissions) granted to the token. The following scopes are required for managing content within the container registry:
- read:packages
- write:packages
- delete:packages
- Click on the Generate Token button to create the token.
Be sure to copy the token before navigating away from the page. If you navigate away from the page before noting the content of the token, it can be regenerated at any time. However, the previously specified value will no longer be valid.
Once you have created your PAT and copied the access token, you can log into the ghcr.io registry from within your minikube VM by using the docker login command. For the Username prompt, provide your GitHub username, and for Password, paste the PAT token:
$ docker login ghcr.io
Username: <user>
Password: <Paste your PAT token here>
Once you have logged into the registry, you can continue by building and deploying your operator image. To do this, we can use the make utility to run different Makefile targets:
- First, we need to define the image name. The Makefile defaults the image name to controller:latest. We can give a more descriptive name by setting the IMG environment variable:
$ export IMG=ghcr.io/<GITHUB_USERNAME>/guestbook-operator:1.0.0
Be sure to substitute your GitHub username when setting the IMG variable.
- Next, we can begin the image build using the docker-build Makefile target:
$ make docker-build
If the build is successful, you will see the Successfully tagged message followed by the container image name and tag. Additionally, you can use the docker images command to verify the image was created:
$ docker images
REPOSITORY TAG
Ghcr.io/<GITHUB_USERNAME>/guestbook-operator 1.0.0
- Finally, we can push our image using the docker-push target:
$ make docker-push
. . .
1.0.0: digest: sha256:1f73c8f37afea7c7f4eabaa741d5505880b 5f1bda4de4fad15862acd7d16fb23 size: 1779
By default, your image will be private after you successfully push to ghcr.io. To avoid requiring the need for specifying a Kubernetes pull secret to access the image, we can update the image settings to make the image publicly available.
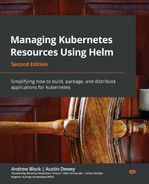
First, in GitHub, select your profile picture from the upper-right corner of the page, and choose Your Profile. On the next screen, select the Packages tab at the top of the page. After selecting the Packages tab, you should be able to see the guestbook-operator image (the guestbook image from Chapter 8, Publishing to a Helm Chart Repository, is visible in the screenshot, too):
Figure 11.2 – The GitHub Packages page
Next, select the guestbook-operator package. On the far right of the screen, select Package Settings, then update the Change Visibility setting to Public.
If you were able to update your image’s visibility to Public, then you have successfully pushed your image and can now access it without requiring credentials. Let’s continue by deploying your operator to Kubernetes.
Deploying the Guestbook operator
Similar to building the operator, the deployment of our Guestbook operator can be performed using a set of Makefile targets. The Makefile generated by operator-sdk contains four targets related to the installation or removal of the operator:
- install: This installs CRDs onto the Kubernetes cluster. This target adds the Guestbook API to the cluster.
- uninstall: This uninstalls CRDs from the Kubernetes cluster. This target removes the Guestbook API from the cluster.
- deploy: This installs CRDs and deploys the Guestbook operator to the Kubernetes cluster. We’ll use this target later for the deployment.
- undeploy: This undeploys (or removes) the CRDs and Guestbook operator instance from the Kubernetes cluster.
Under the hood, each target uses kubectl and a configuration management tool called kustomize to generate and apply manifests located under the config folder. Kustomize is a tool that, at a high level, uses kustomization.yaml files that specify the Kubernetes manifests that will be applied. Also, it adds patches and common configurations to each manifest, such as the target namespace and resource names.
The contents of the config folder contents are shown in the following table:
|
Folder |
Definition |
|
config/crd/ |
Contains the CRDs for extending the Kubernetes API. For our Guestbook operator, there is only one CRD. |
|
config/default/ |
Contains a parent kustomization.yaml file for applying CRD, RBAC, and operator (also referred to as manager) resources. |
|
config/manager/ |
Contains a deployment resource for creating the operator (or manager) instance. |
|
config/manifests/ |
A superset of the config/default/ folder. Here, config/manifests applies CRD, RBAC, and operator resources, but it also applies an example Guestbook CR and a scorecard, which is used for testing the operator. |
|
config/prometheus/ |
Contains a Prometheus ServiceMonitor resource for tracking metrics. This is disabled by default but can be enabled in the kustomization.yaml file located under config/default/. |
|
config/rbac/ |
Contains Role, RoleBinding, and ServiceAccount resources. These grant the operator permission to manage Guestbook resources. They also create Guestbook editor and viewer roles for users throughout the Kubernetes cluster. |
|
config/samples/ |
Contains an example Guestbook manifest. |
|
config/scorecard/ |
Contains manifests for testing the operator. They are unused by default. |
Figure 11.4 – The contents of the config folder
When we run the make deploy command, Kustomize targets the kustomization.yaml file from config/default/ to apply resources from the config/crd/, config/manager/, and config/rbac/ directories. Then, when the operator is installed, we will apply the Guestbook CR, which is located at config/samples/demo_v1alpha1_guestbook.yaml. Let’s take a look at a snippet from the demo_v1alpha1_guestbook.yaml file:
apiVersion: demo.example.com/v1alpha1
kind: Guestbook
metadata:
  name: guestbook-sample
spec:
  # Default values copied from <project_dir>/helm-charts/guestbook/values.yaml
  affinity: {}
  autoscaling:
    enabled: false
    maxReplicas: 100
    minReplicas: 1
    targetCPUUtilizationPercentage: 80
  env:
  - name: GET_HOSTS_FROM
    value: env
  - name: REDIS_LEADER_SERVICE_HOST
    value: redis-master
  - name: REDIS_FOLLOWER_SERVICE_HOST
    value: redis-replicas
  fullnameOverride: ""
  image:
    pullPolicy: IfNotPresent
    repository: gcr.io/google_samples/gb-frontend
    tag: ""
Does the preceding YAML look familiar? Each of the entries under the spec stanza reference default values from the Guestbook chart’s values.yaml file. This is how values are provided when using a Helm operator. Rather than providing a values.yaml file, users write values in the Guestbook CR. Then, when the resource is applied, the operator consumes the values and deploys the application accordingly.
With a basic understanding of the operator’s config/ folder and Makefile targets, let’s deploy the Guestbook operator by following these steps:
- In order to deploy the Guestbook operator, we need to be authenticated to the Kubernetes cluster. Because the minikube VM does not have kubectl installed, nor kubeconfig, which we can use for authentication, it will be simpler to deploy the operator from your host machine.
Exit the minikube VM by running the following command:
$ exit
- The resources we created in the minikube VM are also located in the Packt repository under the chapter11/guestbook-operator/ folder. You can clone this repository and navigate to the guestbook-operator folder by running the following commands:
$ git clone https://github.com/PacktPublishing/Managing-Kubernetes-Resources-using-Helm.git
$ cd Managing-Kubernetes-Resources-using-Helm/chapter11/guestbook-operator
The files from the Packt repository are the same as the ones you created in the minikube VM with one exception. As you might recall from previous chapters, the Guestbook Helm chart contains hooks for backing up and restoring the Redis database. These hooks require the operator to have permission to manage the Job and PersistentVolumeClaim resources. Because the role generated by operator-sdk does not include these resources, we added them at the end of the role definition located at chapter11/guestbook-operator/config/rbac/role.yaml. Here are the permissions that we added:
- apiGroups:
- ""
resources:
- persistentvolumeclaims
verbs:
- create
- delete
- get
- list
- patch
- update
- watch
- apiGroups:
- batch
resources:
- jobs
verbs:
- create
- delete
- get
- list
- patch
- update
- watch
- Next, we will use the make command to deploy the Guestbook CRD and operator to the Kubernetes cluster. Note that Windows users might need to install make first, which can be done by using the Chocolatey package manager:
$ choco install make
Proceed with the operator deployment by setting the IMG environment variable and running the following make command:
$ export IMG=ghcr.io/<GITHUB_USERNAME>/guestbook-operator:1.0.0
$ make deploy
- The operator was installed in a namespace called guestbook-operator-system. Verify that the pod was deployed successfully in this namespace:
$ kubectl get pods –n guestbook-operator-system
NAME READY STATUS
guestbook-operator-controller-manager... 2/2 Running
Now that the operator has been deployed, let’s use it to install the Guestbook Helm chart.
Deploying the Guestbook application
When using Helm normally as a standalone CLI tool, you would install a Helm chart by running the helm install command. With a Helm operator, you can install a Helm chart by creating a CR.
First, create a new namespace for our deployment:
$ kubectl create namespace chapter11
Then, using the CR located in the Packt repository at chapter11/guestbook-operator/config/samples/demo_v1alpha1_guestbook.yaml, install the Guestbook Helm chart:
$ kubectl apply –f chapter11/guestbook-operator/config/samples/demo_v1alpha1_guestbook.yaml -n chapter11
Once the installation is complete, you’ll see each pod in the ready state:
$ kubectl get pods –n chapter11
NAME READY STATUS
guestbook-sample-76d48ccddb-dfrkr 1/1 Running
redis-master-0 1/1 Running
redis-replicas-0 1/1 Running
redis-replicas-1 1/1 Running
redis-replicas-2 1/1 Running
When you created the CR, the operator executed the helm install command against the Guestbook Helm chart. You can confirm the release was created by running helm list:
$ helm list –n chapter11
NAME NAMESPACE REVISION
guestbook-sample chapter11 1
Upgrades are performed by reapplying the CR with a different set of values. A modified CR is located in the Packt repository at chapter11/guestbook-operator/config/samples/upgrade-example.yaml. In this file, the replicaCount value has been changed to 2, as opposed to 1 in the original CR.
Apply the updated CR by running the following command:
$ kubectl apply –f chapter11/guestbook-operator/config/samples/upgrade-example.yaml -n chapter11
This modification of the Guestbook CR causes the operator to trigger helm upgrade against the guestbook-sample release. As you might recall from Chapter 7, Helm Lifecycle Hooks, the Guestbook chart contains an upgrade hook that initiates a Redis backup. If you watch the pods in the chapter11 namespace after modifying the CR, you will see the backup job begin, and then you will shortly see two Guestbook pods appear. You will also notice that the revision number of the release increased to 2:
$ helm list –n chapter11
NAME NAMESPACE REVISION
guestbook-sample chapter11 2
Although the revision number increased to 2, as of writing, one limitation of Helm operators is that you cannot initiate a rollback to a previous version as you can do when using the CLI. If you attempt to run helm history against the guestbook-sample release, you will notice that only the current revision is available in the release history:
$ helm history guestbook-sample –n chapter11
REVISION UPDATED STATUS CHART
2 Sun May 8 22:44:41 2022 deployed guestbook-0.1.0
This is an important difference between using Helm regularly with the CLI and using Helm as an operator. Because the release history is not retained, Helm operators do not allow you to perform explicit rollbacks. However, helm rollback will be run implicitly in situations where upgrades fail. This would also trigger any rollback hooks that might be defined in the chart.
Although Helm operators do not retain the release history, one area where they excel is in synchronizing the desired and live states of an application. This is because the operator constantly watches the state of the Kubernetes environment and ensures that the application is always configured to match the CR. In other words, if one of the Guestbook application’s resources has been modified, the operator will immediately revert the change to synchronize it with the configuration defined within the CR. You can see this in action by modifying one of the live resources. As an example, we will change the Guestbook deployment’s replica count from 2 to 3 and watch the operator revert this change back to 2 immediately to resync the state to match the CR. Run the following kubectl patch command to change the replica count on the deployment from 2 to 3:
$ kubectl patch deployment guestbook-sample –p '{"spec":{"replicas":3}}' -n chapter11
Normally, this would create an additional Guestbook pod replica. However, because the Guestbook CR currently defines only 2 replicas, the operator quickly changes the replica count back to 2 and terminates the additional pod that was created. If you actually wanted to increase the replica count to 3, you would need to update the replicaCount value on the CR. This process provides the advantage of ensuring the desired state matches the live state at all times.
Uninstalling releases created by the Helm operator is as simple as removing the CR. Delete the guestbook-sample CR to uninstall the release:
$ kubectl delete –f chapter11/guestbook-operator/config/samples/demo_v1alpha1_guestbook.yaml -n chapter11
You can also remove the Guestbook operator and its resources since we will not need them in the next section. You can do this by running another make command:
$ make undeploy
In general, you should always make sure that you delete the CR first before deleting the operator. If you delete the operator before the CR, then the operator will not be able to automatically run helm uninstall, and you would have to run it manually from the command line.
Over the course of this chapter, you created a Helm operator and learned how to install a Helm chart using an operator-based approach. In the next section, we will continue our discussion on operators by investigating how they can be managed using Helm.
Using Helm to manage operators, CRDs, and CRs
In this chapter, we installed the Guestbook operator and CRD by using the Makefile instance generated by operator-sdk. Then, we installed a Guestbook CR using kubectl apply. While this is an acceptable way of creating these resources, we could also install the operator, CRD, and CR by using Helm charts to provide a more repeatable solution for installing and managing an operator.
Helm allows you to create CRDs by adding them to a directory called crds/ in your Helm chart. Helm creates CRDs before any of the other resources defined under the templates/ folder, making it simpler to install applications such as operators that depend on CRDs.
The following file structure depicts a Helm chart that could be used to install the Guestbook operator:
guestbook-operator/
  Chart.yaml
  crds/
    guestbooks_crd.yaml
  templates/
    deployment.yaml
    role_binding.yaml
    role.yaml
    service_account.yaml
  values.yaml
Upon installation, this Helm chart will first install the Guestbook CRD. If the CRD is already present in the cluster, it will skip the CRD creation and go straight into installing the templates. Note that while CRDs can be convenient to include in a Helm chart, there are a couple of limitations to be aware of. First, Helm does not allow CRDs to contain any Go templating, so CRDs do not benefit from parameterization as opposed to typical resources. Also, CRDs cannot be upgraded, rolled back, or deleted. Finally, including CRDs in your chart would require the user to have elevated cluster-level privileges within the Kubernetes cluster. Often, it is administrators who perform operator installations, so this is likely to be an acceptable approach.
The Helm chart that we described earlier could be used to install the Guestbook operator, but this is only half of the equation, as end users must still be able to create CRs that deploy the Guestbook application. To address this limitation, you could create a separate Helm chart that is used for templating a Guestbook CR. An example layout for this type of Helm chart is shown in the following file structure:
guestbook/
  Chart.yaml
  templates/
    Guestbook.yaml
  values.yaml
Unlike CRDs, CRs underneath the templates/ folder benefit from Go templating and lifecycle management, as do all other resources. This methodology provides the most value when the CR contains complex fields or when other resources must be installed alongside the CR. You would also be able to manage the lifecycle of your CR with this method, and you would also be able to maintain a history of revisions.
However, users would need to be given permission to install Guestbook CRs, since this permission would not be included in Kubernetes by default. These permissions can be easily added by applying the guestbook_editor_role.yaml file under the operator’s config/rbac/ folder. Then, you can create a RoleBinding resource to assign the editor role to the appropriate users or groups.
Now that you have an understanding of how operators, CRDs, and CRs can be managed with Helm, let’s close out the chapter by cleaning up the Kubernetes environment.
Cleaning up
First, delete the chapter11 namespace:
$ kubectl delete namespace chapter11
Finally, run the minikube stop command to stop your minikube VM.
Summary
Operators are important for ensuring that the desired state always matches the live state. Such a feat allows users to more easily maintain a source of truth for resource configuration. Users can leverage a Helm operator to provide this type of resource reconciliation, and it is easy to get started because it uses Helm charts as its deployment mechanism. When a CR is created, the Helm operator installs the associated Helm chart to create a new release. Subsequent upgrades are performed when the CR is modified, and the release is uninstalled when the CR has been deleted.
To manage the operator, cluster administrators can create a separate Helm chart for creating the operator’s resources and CRDs. Also, end users can create a separate Helm chart for creating CRs and other related resources.
In the next chapter, we will discuss best practices and topics around security within the Helm ecosystem.
Further reading
- To learn more about operators and their origins, check out the Kubernetes documentation at https://kubernetes.io/docs/concepts/extend-kubernetes/operator/.
- To discover other operators that have been developed throughout the community, check out OperatorHub at https://operatorhub.io or the Operators section of ArtifactHub at https://artifacthub.io.
Questions
- What is an operator? How does an operator work at a high level?
- What is the difference between installing a Helm chart with the Helm CLI versus a Helm operator?
- What toolkit can you use to create Helm operators?
- How does the install, upgrade, rollback, and uninstall hooks function with a Helm operator?
- What is the purpose of the crds/ folder in a Helm chart?