8
Publishing to a Helm Chart Repository
Helm could not be regarded as the package manager for Kubernetes without the concept of a Helm chart repository. Repositories are used to publish Helm charts to the community. In this chapter, we will understand different methods of creating a Helm chart repository. Later, we will get hands-on practice with different repository implementations by publishing our Guestbook Helm chart to an HTTP-based repository and an OCI registry.
In this chapter, we will cover the following topics:
- Understanding Helm chart repositories
- Publishing to an HTTP repository
- Publishing to an OCI registry
Technical requirements
For this chapter, you will need a GitHub account. If you already have a GitHub account, you can log in at https://github.com/login. Otherwise, you can create a new account at https://github.com/join.
You should also clone the Packt Git repository locally:
$ git clone https://github.com/PacktPublishing/Managing-Kubernetes-Resources-using-Helm.git
To begin, let’s understand the basics of a Helm chart repository.
Understanding Helm chart repositories
Helm chart repositories are used for publishing Helm charts and making them available to a wide community of Helm users. This is conceptually similar to the repositories that are used in Linux package management, such as RPM or Debian repositories, in which packages are installed using tools such as dnf or apt-get. Public Helm chart repositories can be found at Artifact Hub (https://artifacthub.io).
A Helm chart repository is created using one of two high-level implementations:
- An HTTP server
- An OCI registry
Using an HTTP server is the most common implementation for publishing charts since it has been in supported the longest. To create a Helm chart repository using an HTTP server, you can use tools such as Apache httpd, NGINX, Amazon S3, and GitHub Pages. ChartMuseum (https://github.com/helm/chartmuseum) is another popular option as it provides an API for more advanced operations. In the Publishing to an HTTP repository section, we will use GitHub Pages to create our repository.
A repository that’s been created using an HTTP server must consist of the following components:
- Helm charts, packaged as .tgz archives
- An index.yaml file, containing metadata about the charts contained in the repository
Basic chart repositories require maintainers to generate index.yaml files using the helm repo index command, which we will explore later, but more advanced solutions such as ChartMuseum can automatically generate the index.yaml file when new charts are uploaded to the repository.
Besides HTTP, the other type of repository a Helm chart maintainer can distribute charts to is an Open Container Initiative (OCI) registry. OCI is an open governance structure for creating open standards for container runtimes and formats. Artifacts is an OCI initiative that allows you to store and serve additional content, such as Helm charts, within container registries aside from container images. Since images and their registries are already a fundamental construct in both Kubernetes and Helm, the ability to leverage the same registry to store both container images and Helm charts reduces the amount of effort needed by Helm maintainers to publish charts. We will explore publishing Helm charts using OCI registries in greater detail in the Publishing to an OCI registry section.
In the next section, we’ll publish our Guestbook Helm chart to GitHub Pages. Here, you will get an understanding of how a basic Helm chart repository is created and interacted with.
Publishing to an HTTP repository
GitHub Pages is a feature within GitHub that allows you to serve static content from a repository. In this section, we’ll create a new GitHub repository with Pages enabled to publish our Guestbook Helm chart.
To follow the example in this section, you must have a GitHub account. Directions for creating a GitHub account or logging into an existing one were provided in the Technical requirements section.
Once you are logged into GitHub, continue to the next section to create your repository.
Creating a GitHub Pages repository
Follow these steps to create a GitHub Pages repository:
- Go to https://github.com/new and access the Create a new repository page.
- Provide a name for your chart repository. We suggest Chart-Repository-Example.
- Select the checkbox next to Initialize this repository with a README. This is required because GitHub does not allow you to create a static site if it does not contain any content. You can leave the rest of the settings at their default values. Note that to leverage GitHub Pages, you must leave the privacy setting set to Public unless you have a paid GitHub Pro account.
Your Create a new repository page should now look as follows:

Figure 8.1 – Creating a new GitHub repository
- Click the Create repository button to create your repository.
Although your repository has been created, it is not ready to serve Helm charts until GitHub Pages is enabled.
- Click the Settings tab within your repository to access your repository settings. From there, select the Pages tab from the left-hand column. Then, under Source, select the main option from the drop-down list. Finally, click the Save button. This will instruct GitHub to create a static site that serves the contents of your main branch.
At this point, your screen should look similar to the following:

Figure 8.2 – Finding GitHub Pages settings
Now that you have configured your GitHub repository, you should clone it to your local machine so that you can add the Guestbook Helm chart to it later. Follow these steps to clone your repository:
- Navigate to the root of your repository by selecting the Code tab at the top of the page.
- Select the green Clone or download button. This will reveal the URI to your GitHub repository (note that this is not the same as the URL for the static site). You can use the following screenshot as a reference to find your repository URI:
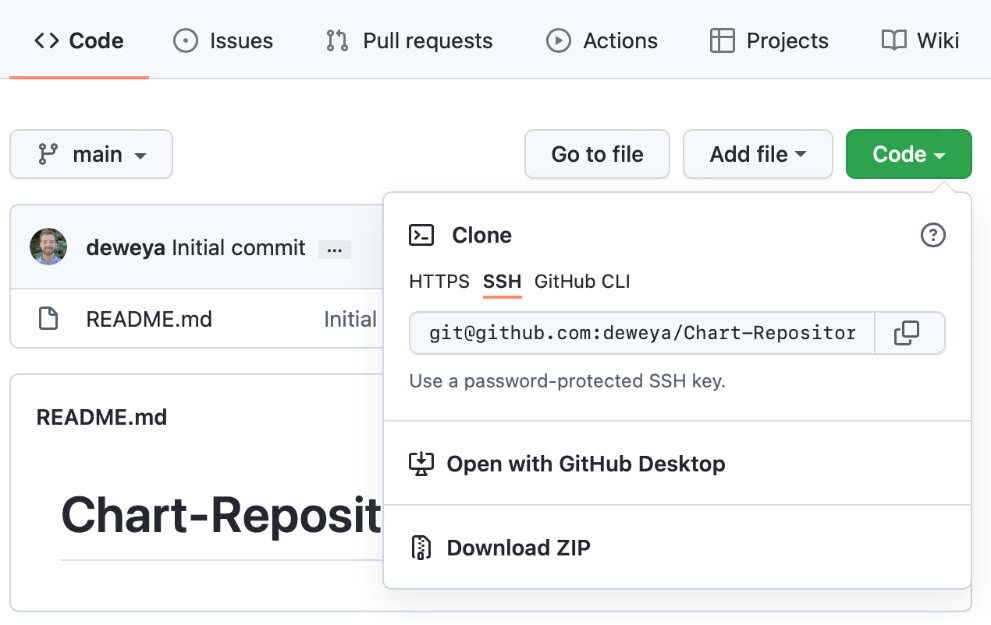
Figure 8.3 – Locating the git URI
- Once you have acquired your repository’s URI, clone the repository to your local machine. You may want to ensure you are in your home directory first before you clone to ensure you do not accidentally clone to an existing git repo:
$ cd ~
$ git clone <repository URI>
Now that you have cloned the repository, you can publish your Guestbook chart.
Publishing the Guestbook chart
Publishing a Helm chart to an HTTP repository consists of a three-step process:
- Packaging the Helm chart as a .tgz archive
- Generating an index.yaml file
- Uploading the .tgz archive and the index.yaml file to the server
Helm provides several different commands to make the publishing process a simple task. We’ll walk through these commands in this section.
First, you can use the helm package command to package your chart into a .tgz archive. We’ll use the Guestbook chart located in the Packt Git repository at chapter8/guestbook as part of this example:
$ helm dependency update chapter8/guestbook
$ helm package guestbook chapter8/guestbook
If these commands execute successfully, a file called guestbook-0.1.0.tgz will be created.
Note that we executed the helm dependency update command before running helm package. This is because the Guestbook chart must have the dependencies downloaded first to be included in the archive. To simplify this, we could have combined the previous two commands into a single step by providing an additional flag to the helm package command:
$ helm package chapter8/guestbook --dependency-update
This would ensure that the dependencies are included in the final package.
Once your chart has been packaged, the resulting .tgz file should be copied to your local GitHub Pages repository clone. This can be done by using the cp command:
$ cp guestbook-0.1.0.tgz <GitHub Pages repository clone>
When this file is copied, you can use the helm repo index command to generate the index.yaml file. This command takes the location of your chart repository clone as an argument. Run the following command to generate your index.yaml file:
$ helm repo index <GitHub Pages repository clone>
The command will succeed quietly, but you will see the new index.yaml file inside your GitHub Pages clone. The contents of this file provide the Guestbook chart metadata and will look as follows:
apiVersion: v1
entries:
  guestbook:
  - apiVersion: v2
    appVersion: v5
    created: "2022-02-20T04:13:36.052015-05:00"
    dependencies:
    - condition: redis.enabled
      name: redis
      repository:  https://raw.githubusercontent.com/bitnami/charts/archive-full-index/bitnami
      version: 15.5.x
    description: An application used for keeping a running record of guests
    digest: 983dee22d05be37fb73cf6a06fa5a2b2c320c1678ad6a8 df3d198a403f467343
    name: guestbook
    type: application
    urls:
    - guestbook-0.1.0.tgz
    version: 0.1.0
generated: "2022-02-20T04:13:36.045492-05:00"
If additional charts were added to this repository, their metadata would be listed in this file as well.
Your Helm chart repository should now contain the .tgz archive and the index.yaml file, with the contents listed similar to the output from the following command:
$ ls <GitHub Pages repository clone>
README.md guestbook-0.1.0.tgz index.yaml
To finish the publishing process, you should commit and push these files to GitHub using the following commands:
$ cd <GitHub Pages repository clone>
$ git add --all
$ git commit –m "publishing the guestbook helm chart"
$ git push origin main
Once you have pushed to the remote repository, your Guestbook Helm chart will be served from the GitHub Pages static site. We can verify this is working properly by adding our repository and performing a search.
First, find your GitHub Pages site URL. This URL was displayed in the Settings tab and takes the form of https://<github username>.github.io/Chart-Repository-Example/. Once you have identified the URL, use it to add the chart repository:
$ helm repo add example <GitHub Pages Site URL>
This command will allow Helm to interact with your repository. You can verify that your chart was published successfully by searching for the Guestbook chart against your locally configured repos. This can be done by running the following command:
$ helm search repo guestbook
You should find the example Guestbook chart that was returned in the search output.
Congratulations! You have published the Guestbook chart to your Helm chart repository. Note that while we have published our chart to an unauthenticated repository in this chapter, we will explore authentication and security in detail in Chapter 12, Helm Security Considerations.
In the next section, we will explore OCI registry support and publish our Guestbook chart to a container registry.
Publishing to an OCI registry
Publishing a Helm chart to an OCI registry follows a similar workflow to the one you would follow when working with a standard container image. Commands such as docker login, docker pull, and docker push have analogous commands in Helm. These commands and their descriptions can be seen in the following table:
|
Command |
Description |
|
helm registry login |
Log in to a registry |
|
helm registry logout |
Log out of a registry |
|
helm push |
Push a packaged chart to a registry |
|
helm pull |
Pull a chart from a registry |
Table 8.1 – Helm commands for OCI management
Note that full support for OCI-based charts became available in version 3.8.0. Before this version, it was included as an experimental feature and required an environment variable to be present to activate the feature. If you are using a version older than 3.8.0, the HELM_EXPERIMENTAL_OCI=1 environment variable must be set, as shown here:
$ export HELM_EXPERIMENTAL_OCI=1
The helm pull command is just one example where OCI-based charts can be used interchangeably with charts sourced from different locations (such as an HTTP repository or a local filesystem). Other Helm commands that can be used in this manner include the following:
- helm show
- helm template
- helm install
- helm upgrade
OCI-based charts can be differentiated from other sources by specifying the OCI protocol (oci://) as part of a chart’s location. For example, a chart sourced from a registry at localhost:5000/helm-charts/mychart is referenced in Helm as oci://localhost:5000/helm-charts/mychart.
It is also important to note that while OCI artifacts can be served within the same registry alongside container images, not every registry fully supports the OCI artifact specification, so it cannot store OCI-based helm charts. Consult the documentation of the registry distribution beforehand.
To demonstrate how to interact with OCI-based helm charts, we can use the Guestbook chart and store it in an OCI registry. First, we must determine the registry where the chart should be stored. Since we are not only using GitHub to store the raw source code for our charts as it also acts as our Helm repository, the Container Registry provided as part of the GitHub packages offering can act as an OCI registry for helm charts. OCI artifacts are fully supported by the container registry, which is one less concern that we need to worry about.
To publish content to the container registry, a Personal Account Token (PAT) must be created. Follow these steps to create a PAT with the necessary permissions to push and pull images:
- Once logged into GitHub, at the top right corner of the page, select your profile picture and click Settings from the dropdown.
- Click Developer Settings and select Personal Account Token.
- Click the Generate New Token button to initiate the token creation process.
- Enter a unique name for the token, such as Learn Helm.
- Select the date the token will expire.
- Select the scopes (permissions) that will be granted to the token. The following scopes are required for managing content within the container registry:
- read:packages
- write:packages
- delete:packages
- Click the Generate Token button to create the token.
Be sure to copy the generated token as it cannot be retrieved once you’ve navigated away from the page.
Before interacting with the container registry, it is important to note how content is organized within the registry. While these details are specific to the GitHub service, these concepts can be applied to any container registry. Content is stored in the ghcr.io/<OWNER>/<ARTIFACT> format. OWNER, in this situation, represents the name of a user account or GitHub organization.
The primary reason why these details are so important is that Helm imposes a strict naming convention that is applied to OCI-based charts. Unlike publishing other artifacts to a container registry, where the repository name and tag can be specified, the repository name and tag are determined automatically based on the chart’s name and semantic version, as defined in the Chart.yaml file. For example, a chart named mychart with version 0.1.0 would be stored in the GitHub container registry for a user named jdoe at ghcr.io/jdoe/mychart:0.1.0.
Now that we understand how charts are organized within OCI registries, let’s push the chart we created previously to the GitHub registry. The first step is to log in to the registry using the PAT that we created previously using the helm registry login command.
The helm registry login command takes the following form:
$ helm registry login <registry>
To log in to the GitHub registry, execute the following command:
$ helm registry login ghcr.io
Enter your GitHub username and the PAT as the password when prompted. A Login Succeeded response will be returned upon successful authentication. –-username, along with either the --password or --password-stdin flag, can be used to perform non-interactive authentication.
Now that we are logged in to the remote registry, we can push the previously created Helm chart to the remote registry using the helm push command. helm push requires a location of an already packaged chart to be provided, along with the destination registry, as shown here:
$ helm push <location_of_tgz_helm_package> <registry/reference>
Signed charts are also supported, so long as the provenance (.prov) file is located in the same directory as the packaged chart. No additional configuration or flags to the helm push command are needed. Provenance and chart signing will be discussed in greater detail in Chapter 12, Helm Security Considerations.
Push the packaged Guestbook chart to GitHub’s container registry:
$ helm push guestbook-0.1.0.tgz oci://ghcr.io/<OWNER>
Pushed: ghcr.io/<OWNER>/guestbook:<version>
Digest: sha256:<SHA>
Once the chart has been pushed, it can be viewed within GitHub via the Packages tab of your user profile. From any page within GitHub, select your profile picture at the top-right corner of the page and select Your Profile. The Packages tab can be found at the top of the page.
After clicking on the Packages tab, the chart that you pushed previously should be visible, as shown in the following screenshot:
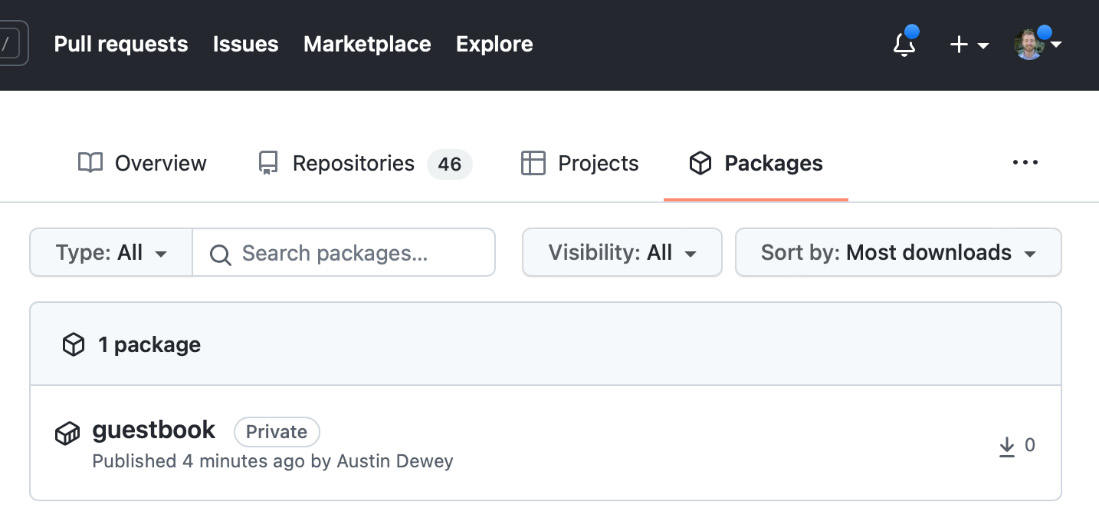
Figure 8.4 – The Packages tab in GitHub
By default, newly created packages are private and cannot be accessed by others. This configuration can be changed by selecting the package and, from the Details page, selecting Package Settings on the far right. Select Change Visibility in the Danger Zone section and select Public.
Alternatively, individual users or teams can be specified instead of changing the visibility if you wish to restrict access to the helm chart.
Pulling the OCI Guestbook chart
Pulling Helm charts from OCI registries is just as easy as publishing them and the helm pull command can be used to do this. The options found in the helm pull command are the same for OCI charts as they are for charts either located within chart repositories or located on the filesystem. Of the various options available, the --version flag allows the user to specify the chart to be received. Otherwise, the most recent version per SemVer convention is selected.
Pull the previously published chart from the GitHub container registry, as shown here:
$ helm pull oci://ghcr.io/<OWNER>/guestbook --version 0.1.0
The most recent version of the chart will be retrieved from the registry and the packaged chart (.tgz) will be stored locally.
Summary
After doing some hard work on developing a Helm chart, nothing beats the feeling of finally publishing your Helm chart to a repository for the world to see! In this chapter, we learned about HTTP and OCI Helm chart repositories. HTTP repositories allow you to publish your charts to simple web servers, while OCI registries allow you to publish your Helm charts alongside your container images. To practice, we published the Guestbook Helm chart to GitHub Pages (an HTTP server) and GitHub’s container registry (an OCI registry).
In the next chapter, we will learn about the tooling and strategies behind testing Helm charts.
Further reading
To learn more about Helm chart repositories, visit the Chart Repository Guide section of the Helm documentation: https://helm.sh/docs/topics/chart_repository/#helm.
To learn more about OCI support, visit the documentation’s Registries section: https://helm.sh/docs/topics/registries/.
Questions
Answer the following questions to test your knowledge of this chapter:
- What are three different tools you can use to create an HTTP repository?
- What command can you run to ensure that dependencies are always included in the .tgz archive?
- What files are required when publishing to an HTTP server?
- How is the process of publishing to an HTTP repository different from publishing to an OCI registry?
- What Helm command is used to publish to an OCI registry?
- What Helm command is used to download a Helm chart from an OCI registry?