7
Helm Lifecycle Hooks
A Helm release undergoes several different phases during its lifetime. The first phase, install, occurs when the Helm chart is first installed. The second phase, upgrade, occurs when the Helm release is updated by either updating values or the Helm chart itself. At a later point, a Helm user may need to execute the rollback phase, which reverts the Helm release to an earlier state. Finally, if a user needs to delete the Helm release and its associated resources from the Kubernetes cluster, users must execute the uninstall phase.
Each phase is powerful on its own, but to provide additional capabilities around the release lifecycle, Helm features a hooks mechanism that allows custom actions to be undertaken at different points within a release cycle. For example, you may use hooks to do the following:
- Perform operations on a database, such as back up after upgrading or restoring a chart from a previous snapshot during a rollback.
- Fetch secrets from a secrets management engine after installing a chart.
- Clean up external assets after uninstalling a chart.
In this chapter, we will explore Helm hooks and understand how they can be used to enhance the capabilities of a Helm chart. Then, we will implement hooks in our Guestbook Helm chart to back up and restore the Redis database when the Helm release is upgraded and rolled back.
In this chapter, we will cover the following topics:
- The basics of a Helm hook
- Hook life cycle
- Hook cleanup
- Writing hooks in the Guestbook Helm chart
- Cleaning up
Technical requirements
For this chapter, you will need the following tools:
- minikube
- kubectl
- Helm
- Git
We will use minikube to explore several examples throughout this chapter, so feel free to start your minikube environment using the following command:
$ minikube start
Once minikube has started, create a new namespace for this chapter:
$ kubectl create namespace chapter7
If you have not already cloned the example git repository in previous chapters, clone the repository by running the following command:
$ git clone https://github.com/PacktPublishing/Managing-Kubernetes-Resources-using-Helm.git
Next, let’s understand the basics of a Helm hook and explore an example of running one.
The basics of a Helm hook
A hook executes as a one-time action at a designated point in time during the life span of a release. A hook is implemented as a Kubernetes resource and, more specifically, within a container. While the majority of workloads within Kubernetes are designed to be long-living processes, such as an application serving API requests, hooks are made up of a single task or set of tasks that return 0 to indicate success or non-0 to indicate a failure.
The options that are typically used in a Kubernetes environment for creating short-lived tasks are a bare pod or a job. A bare pod is a pod that runs until completion and then terminates but will not be rescheduled if the underlying node fails. A bare pod differentiates from a standard pod by toggling the restartPolicy property. By default, this field is configured as Always, meaning that the pod will be restarted if it completes (either due to success or failure). Even though there are use cases for running bare pods, it is preferred to run lifecycle hooks as jobs, which has advantages over bare pods, including that you can reschedule the hook if the node fails or becomes unavailable.
Since hooks are simply defined as Kubernetes resources, they are created like other Helm templates and are placed in the templates/ folder. However, hooks are different in that they are always annotated with the helm.sh/hook annotation. Hooks use this annotation to ensure that they are not rendered in the same fashion as the rest of the resources during standard processing. Instead, they are rendered and applied based on the value specified within the helm.sh/hook annotation, which determines when it should be executed within Kubernetes as part of the Helm release lifecycle.
The following is an example of a hook. This example can also be found in this book’s GitHub repository at chapter7/examples/hook-example/templates/hooks/job.yaml:
apiVersion: batch/v1
kind: Job
metadata:
  name: {{ .Release.Name }}-hook
  annotations:
    "helm.sh/hook": post-install
spec:
  template:
    metadata:
      name: {{ .Release.Name }}-hook
    spec:
      restartPolicy: Never
      containers:
      - name: {{ .Release.Name }}-hook
        command: ["/bin/sh", "-c"]
        args:
          - echo "Hook executed at $(date)"
        image: alpine
This trivial example prints out the current date and time after the chart is installed. A use case for this type of hook is to integrate with an auditing system that tracks when applications are installed in a Kubernetes environment. Note that although the hook is saved under the template/hooks/ folder, it could have also been saved directly under templates/. The additional hooks/ subdirectory was created only to separate application-specific templates from hook templates.
To demonstrate the behavior of Helm hooks, let’s see this hook in action by installing the Helm chart located within chapter7/examples/hook-example:
- First, install the hook-example Helm chart:
$ helm install my-app chapter7/examples/hook-example –n chapter7
Note that this command may hang for longer than the Helm commands that have been invoked in the past. This is because Helm is waiting for the hook to be created and completed before returning.
Next, view the pods in the namespace. You will see two pods. The first is the application, while the second is the hook:
$ kubectl get pods –n chapter7
NAME READY STATUS
my-app-hook-example-6747bfbb6-dd9xz 1/1 Running
my-app-hook-p8rrd 0/1 Completed
- The pod with a status of Completed is the hook. Let’s check the pod logs to view the output produced by the hook:
$ kubectl logs jobs/my-app-hook –n chapter7
Hook executed at Mon Jan 17 21:40:38 UTC 2022
As you can see, the hook logged the time just after the Helm chart was installed.
- Uninstall the release and check the remaining pods. You will see that the hook remains in the namespace:
$ helm uninstall my-app –n chapter7
$ kubectl get pods –n chapter7
NAME READY STATUS
my-app-hook-p8rrd 0/1 Completed
Once hooks have been created and executed, they become unmanaged. (This happens unless the helm.sh/hook-delete-policy annotation is applied. We will cover this later in this chapter in the Advanced hook concepts section.) As a result, we are responsible for cleaning up the hook ourselves. Let’s do this now by deleting the job:
$ kubectl delete job my-app-hook –n chapter7
At this point, all the resources associated with the installation of the chart have been cleaned up.
Since hooks may contain long-running tasks, the release may time out. By default, Helm sets a timeout value of 5 minutes to complete all the steps related to a release. The timeout related to a release can also be controlled using the --timeout flag when performing a helm install or helm upgrade when an alternate value is desired. Modifying this value may be needed if a hook is long-running and may extend past the default timeout value.
Now that we have a basic understanding of Helm hooks, let’s take a look at the different hook life cycle options.
Helm hook life cycle
As you saw regarding the job hook in the previous section, the point at which the job was executed was based on the value of the helm.sh/hook annotation. Since post-install was specified, the job was executed once all the associated resources were created as part of the release. The post-install option represents one of the points during the life span of a Helm chart where a hook can be executed.
The following table describes the available options for the helm.sh/hook annotation. A description of each hook can be found in the official Helm documentation, which can be found at https://helm.sh/docs/topics/charts_hooks/#the-available-hooks:
|
Annotation Value |
Description |
|
pre-install |
Executes after templates are rendered but before any resources are created in Kubernetes. |
|
post-install |
Executes after all resources are created in Kubernetes. |
|
pre-delete |
Executes due to a deletion request before any resources are deleted from Kubernetes. |
|
post-delete |
Executes due to a deletion request after all the release’s resources have been deleted. |
|
pre-upgrade |
Executes due to an upgrade request after templates are rendered but before any resources are updated. |
|
post-upgrade |
Executes due to an upgrade after all the resources have been upgraded. |
|
pre-rollback |
Executes due to a rollback request after templates are rendered but before any resources are rolled back. |
|
post-rollback |
Executes due to a rollback request after all resources have been modified. |
|
test |
Executes when the helm test subcommand is invoked. This will be discussed in more detail in Chapter 9, Testing Helm Charts. |
Sometimes, you may have multiple resources with the same helm.sh/hook setting. For example, you may have a ConfigMap resource and a job resource both marked as hooks to run in the same phase, such as pre-upgrade. In this case, you can define the order in which these resources are created by using the helm.sh/weight annotation. This annotation is used to assign weighted values to each of the hook resources that are marked to execute in the same phase. Weights are sorted in ascending order, so the resource marked with the lowest weight is executed first. If weights are not applied but the Helm chart contains multiple hooks that execute in the same phase, then Helm infers the order by sorting the templates by resource kind and name in alphabetical order.
The following example illustrates setting the annotation value for a hook’s weight to 0:
annotations:
  "helm.sh/hook": pre-upgrade
  "helm.sh/weight": "0"
This hook will be executed during the chart upgrade process and after the necessary resources have been rendered, but before them being applied to the Kubernetes cluster.
Apart from being able to position hooks in a single lifecycle phase, we can use the helm.sh/hook annotation to specify multiple phases. This can be done by specifying a comma-separated list of lifecycle phases. The following example defines a hook that should be installed both before and after a chart has been installed:
annotations:
  "helm.sh/hook": pre-install,post-install
In this example, where both the pre-install and post-install options are selected, the helm install command would be executed as follows:
- The user initiates the installation of a Helm chart (by running, for example, helm install wordpress bitnami/wordpress).
- Any CRDs in the crds/ folder, if present, are installed in the Kubernetes environment.
- The chart templates are verified and the resources are rendered.
- The pre-install hooks are ordered by weight, then rendered and applied to the Kubernetes environment.
- Helm waits until the hook resources have been created and, for pods and jobs, are reported to have been Completed or in an Error state.
- The template resources are rendered and applied to the Kubernetes environment.
- The post-install hooks are ordered by weight and then executed.
- Helm waits until the post-install hooks have finished running.
- The results of the helm install command are returned.
In this section, we reviewed the options for running hooks within different lifecycle phases. Next, we will discuss the cleanup process for hook-related resources.
Helm hook cleanup
In the Helm hook basics section, we noted that Helm hooks, by default, are not removed with the rest of the chart’s resources when the helm uninstall command is invoked. Instead, we must clean up the resources manually. Luckily, several strategies can be employed to automatically remove hooks during a release’s life cycle. These options include configuring a deletion policy and setting a time to live (TTL) on a job.
The helm.sh/hook-delete-policy annotation is used to set a deletion policy on hook resources. This annotation determines when Helm should remove the resources from Kubernetes. The following table highlights the available options. You can find descriptions for these in the Helm documentation at https://helm.sh/docs/topics/charts_hooks/#hook-deletion-policies:
|
Annotation Value |
Description |
|
before-hook-creation |
Deletes the previous resources before the hook is launched (this is the default) |
|
hook-succeeded |
Deletes the resources after the hook is successfully executed |
|
hook-failed |
Deletes the resources if the hook failed during execution |
If the helm.sh/hook-delete-policy annotation is not provided, then the before-hook-creation policy is applied by default. This means that if any existing hook resources are deleted (if they are present), they are recreated when the hook is executed. This is useful, especially for jobs, as conflicts can occur if jobs are recreated with the same name. By making use of the before-hook-create annotation, we can avoid this situation.
There are also situations where the other types of hook cleanup policies could be used. For example, you may want to apply the hook-succeeded value, which cleans up the hook if it is successfully executed, to avoid retaining excess resources. However, if an error does occur during the execution of the hook, the resources will remain to help with any troubleshooting to determine the cause of the error. The hook-failed cleanup type, as you can probably guess, removes the associated hook resources from the hook upon failure. This can be a useful option if you don’t wish to retain the assets associated with a hook, regardless of whether it completes successfully or fails. Similar to the helm.sh/hook annotation, multiple deletion policies can be applied by setting the helm.sh/hook-delete-policy annotation with a comma-separated string:
annotations:
  "helm.sh/hook-delete-policy": before-hook-creation,hook-succeeded
The Helm delete policy represents the most encompassing way to clean up after hooks, but you can also leverage a job’s ttlSecondsAfterFinished configuration to define a TTL in which jobs should be retained before they are automatically deleted. This will limit the amount of time that the job is retained in the namespace after it is completed. The following code shows an example of using the ttlSecondsAfterFinished job setting:
apiVersion: batch/v1
kind: Job
metadata:
  name: {{ .Release.Name }}-hook
  annotations:
    "helm.sh/hook": post-install
spec:
  ttlSecondsAfterFinished: 60
  <omitted>
In this example, the job will be removed 60 seconds after it completes or fails.
In this section, we discussed ways to automatically clean up resources and how regular chart resources (that is, resources that are not associated with hooks) are automatically removed when helm uninstall is invoked. There may be some situations, however, when you want specific chart resources to follow the behavior of hooks and remain installed in the cluster, even when the helm uninstall command is invoked. A common use case for this is when your chart has created persistent storage via a standalone PersistentVolumeClaim resource (as opposed to a PersistentVolumeClaim resource managed by a StatefulSet object). You may want this storage to be retained beyond the release’s normal life cycle. You can enable this behavior by applying the helm.sh/resource-policy annotation to the resource, as shown in the following snippet:
annotations:
  "helm.sh/resource-policy": keep
Note that when using this annotation on non-hook resources, naming conflicts may occur if the chart is reinstalled.
So far, we have covered Helm hooks and the various options that are associated with them. Now, let’s look at the power that hooks bring by writing a hook in our Guestbook Helm chart.
Writing hooks in the Guestbook Helm chart
As you may recall, the Guestbook Helm chart uses a Redis database to persist messages created by the user. Using Helm hooks, we can create a process that performs simple backup and restore processes of the Redis database at various points of the chart’s life cycle. Let’s take a look at the two hooks that we will create in this section:
- The first hook will occur in the pre-upgrade lifecycle phase. This phase takes place immediately after the helm-upgrade command is run, but before any Kubernetes resources have been modified. This hook will be used to take a data snapshot of the Redis database before the upgrade is performed, ensuring that the database is backed up in case any errors occur during the upgrade.
- The second hook will occur in the pre-rollback lifecycle phase. This phase takes place immediately after the helm-rollback command is run, but before any Kubernetes resources are reverted. This hook will restore the Redis database to a previously taken snapshot and ensure that the Kubernetes resources are reverted so that they match the configuration at the point in time when the snapshot was taken.
By the end of this section, you will be more familiar with lifecycle hooks and some of the powerful capabilities that can be performed with them. Be sure to keep in mind that the hooks that will be created in this section are simple and are designed for demonstration purposes only. It is not advised to use these hooks as-is in applications that may use Redis.
Let’s begin by creating the pre-upgrade hook.
Creating the pre-upgrade hook to take a data snapshot
In Redis, data snapshots are contained inside a file called dump.rdb. We can back this file up by creating a hook that creates a new PVC in the Kubernetes namespace to store database backup contents. The hook can then create a Job resource that copies the dump.rdb file to the newly created PersistentVolumeClaim.
While the helm create command generates some powerful resource templates that allow the initial guestbook chart to be created quickly, it does not scaffold out any hooks that can be used for this task. As a result, you can create the pre-upgrade hook from scratch by following these steps:
- First, you should create a new folder that will contain the hook templates. While this is not a technical requirement, it does help you organize the structure of your chart so that your hook templates are separate from the regular chart templates. It also allows you to group the hook templates by function (backup versus restore).
Create a new folder called templates/backup in your guestbook Helm chart, as follows:
$ mkdir -p guestbook/templates/backup
- Next, you should create the two template files required to perform the backup. The first template that’s required is a PersistentVolumeClaim template since this will be used to contain the backup dump.rdb file. The second template will be a job template that will be used to perform the copy.
Create two empty template files to serve as placeholders, as follows:
$ touch guestbook/templates/backup/persistentvolumeclaim.yaml
$ touch guestbook/templates/backup/job.yaml
You can double-check your work by referencing this book’s GitHub repository. The file structure should reflect the example at https://github.com/PacktPublishing/Managing-Kubernetes-Resources-using-Helm/tree/main/chapter7/guestbook/templates/backup.
- Now, let’s fill in the contents of the persistentvolumeclaim.yaml template. Since the template’s content is relatively lengthy, we’ll copy each template from the GitHub repository and then take a deep dive into how they were created.
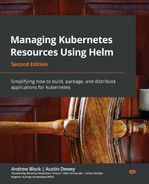
- Copy the contents of the file shown in the following screenshot to your backup/persistentvolumeclaim.yaml file. You can find this file at https://github.com/PacktPublishing/Managing-Kubernetes-Resources-using-Helm/blob/main/chapter7/guestbook/templates/backup/persistentvolumeclaim.yaml:
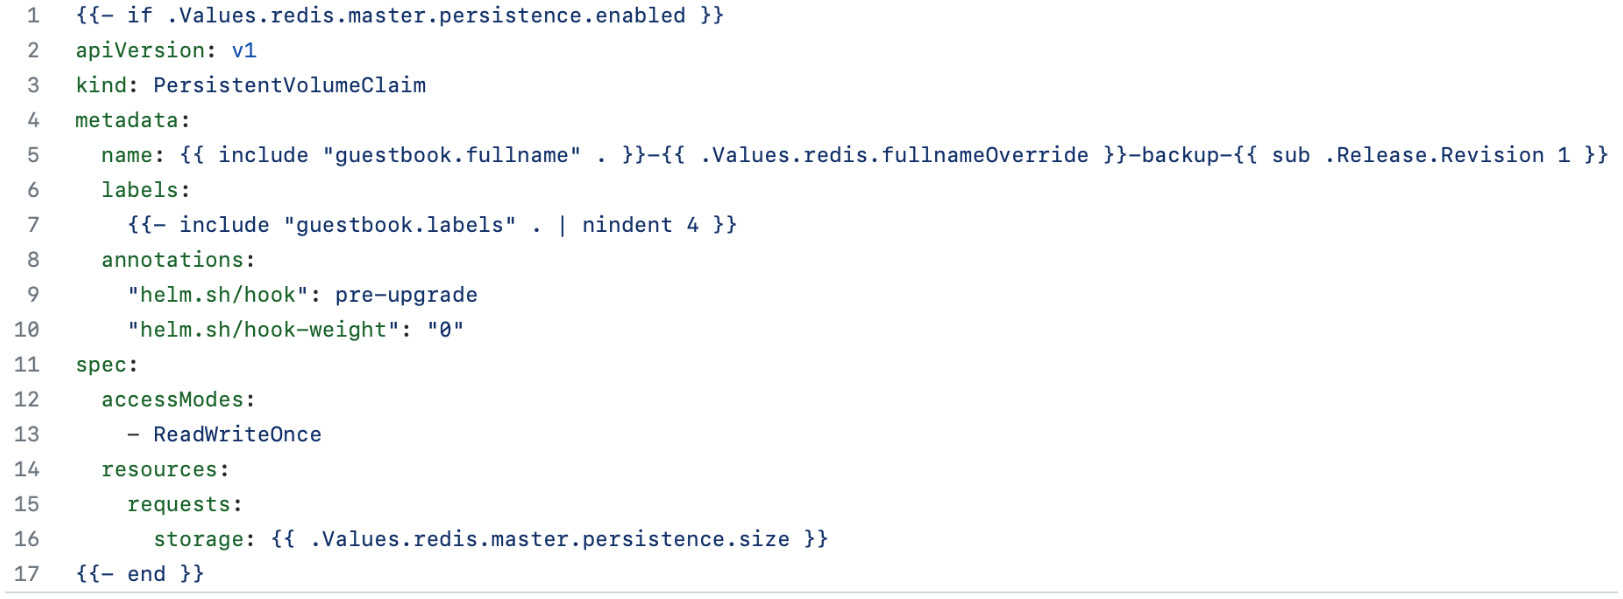
Figure 7.1 – The backup/persistentvolumeclaim.yaml template
- Lines 1 and 17 of the backup/persistentvolumeclaim.yaml file consist of an if action. Since this action encapsulates the whole file, it indicates that this resource will only be included if the redis.master.persistence.enabled value is set to true. This value defaults to true in the Redis chart and can be observed using the helm show values command.
- Line 5 determines the name of the new backup PVC (PersistentVolumeClaim). This name is based on the release name, Redis name, and the revision number from which the backup was taken. Notice the usage of the sub function, which aids in calculating the revision number. This is used to subtract 1 from the revision number since the helm upgrade command increments this value before the templates are rendered.
- Line 9 creates an annotation to declare this resource as a pre-upgrade hook. Finally, line 10 creates a helm.sh/hook-weight annotation to determine the order in which this resource should be created compared to other pre-upgrade hooks. Weights are run in ascending order, so this resource will be created before other pre-upgrade resources.
- Now that the persistentvolumeclaim.yaml file has been created, we must create the final pre-upgrade template – that is, job.yaml. Copy the following contents to your previously created backup/job.yaml file. This can also be copied from this book’s GitHub repository at https://github.com/PacktPublishing/Managing-Kubernetes-Resources-using-Helm/blob/main/chapter7/guestbook/templates/backup/job.yaml:
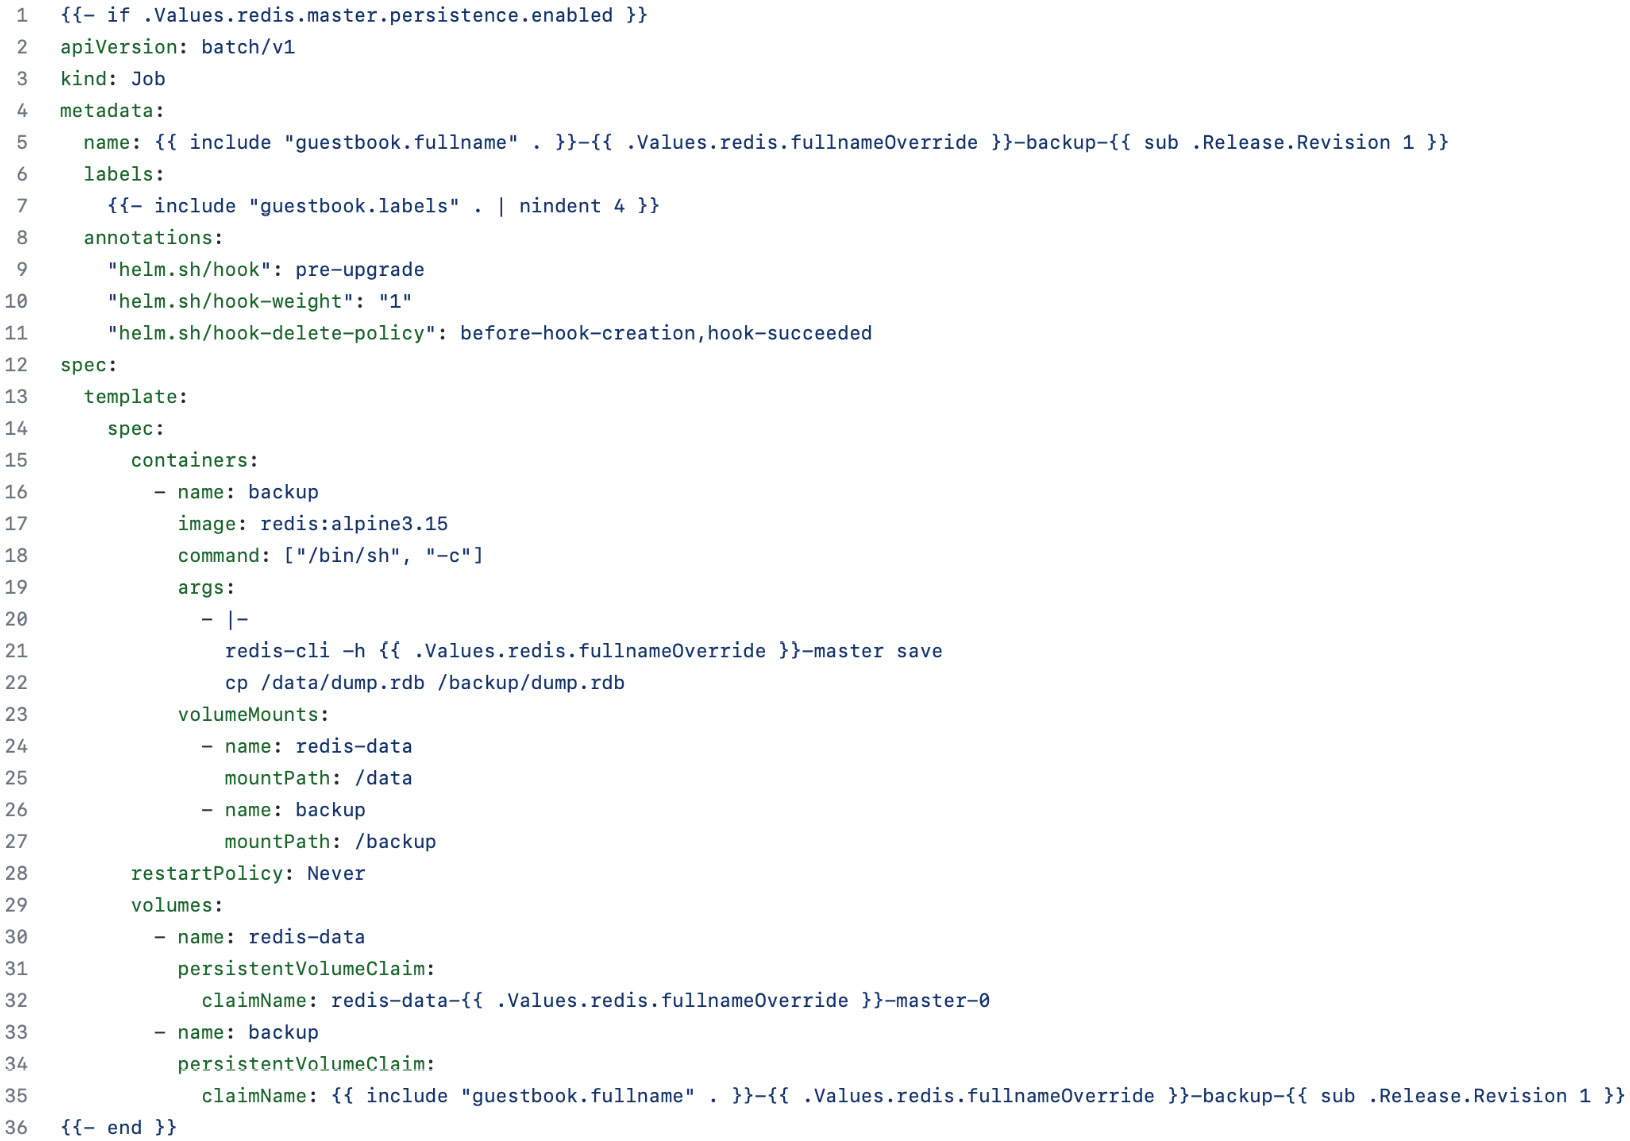
Figure 7.2 – The backup/job.yaml template
- Once again, line 9 defines this template as a pre-upgrade hook, while line 10 sets the hook weight to 1, indicating that this resource will be created after the persistentvolumeclaim.yaml template.
- Line 11 sets the helm.sh/hook-delete-policy annotation to specify when this job should be deleted. Here, we have applied two different policies. The first is before-hook-creation, which indicates it will be removed during subsequent helm upgrade commands if the job already exists in the namespace, allowing a fresh job to be created in its place. The second policy is hook-succeeded, which deletes the job if it finishes successfully. Another policy we could have added is hook-failed, which would delete the job if it failed. However, given that we want to keep failures around for the sake of troubleshooting, we haven’t implemented this policy.
- Lines 19 through 22 contain the commands for backing up the Redis database. First, redis-cli is used to save the current state. Then, the dump.rdb file is copied from the master to the backup PVC created in the backup/persistentvolumeclaim.yaml template.
- Finally, lines 29 through 35 define the volumes that reference the master and backup PVCs.
In this section, we created two pre-upgrade hooks – one to create a backup PVC and another to copy the Redis dump.rdb file to the PVC. In the next section, we will create the pre-rollback hooks for restoring Redis to a previously taken backup. Afterward, we will deploy the guestbook chart to see these hooks in action.
Creating the pre-rollback hook to restore the database
Whereas the pre-upgrade hook was written to copy the dump.rdb file from the Redis master PVC to the backup PVC, a pre-rollback hook can be written to do the opposite – that is, restore the database to a previous snapshot.
This hook can be implemented by copying the dump.rdb file from the backup PVC to the master Redis instance. Then, a rollout of Redis must be performed to create new Redis replica pods. When the replicas reconnect to the master, they will load the backup dump.rdb file for the Guestbook frontend to read.
Follow these steps to create the pre-rollback hook:
- Create the templates/restore folder, which will be used to contain the pre-rollback hook:
$ mkdir guestbook/templates/restore
- Next, scaffold the templates that are required for this hook. We need to create a serviceaccount.yaml template and a rolebinding.yaml template to create a ServiceAccount with permission to redeploy the Redis replicas. Then, we need a job.yaml template to perform the restore task:
$ touch guestbook/templates/restore/serviceaccount.yaml
$ touch guestbook/templates/restore/rolebinding.yaml
$ touch guestbook/templates/restore/job.yaml
You can check that you have created the correct structure by referencing this book’s GitHub repository at https://github.com/PacktPublishing/Managing-Kubernetes-Resources-using-Helm/tree/main/chapter7/guestbook/templates/restore.
- Now, let’s create the first pre-rollback hook, serviceaccount.yaml. Copy the contents shown in the following screenshot into restore/serviceaccount.yaml. This code can also be found within this book’s GitHub repository at https://github.com/PacktPublishing/Managing-Kubernetes-Resources-using-Helm/blob/main/chapter7/guestbook/templates/restore/serviceaccount.yaml:
Figure 7.3 – The restore/serviceaccount.yaml template
Line 8 defines this template as a pre-rollback hook. Since the hook’s weight is 0 (on line 10), this will be created before the other pre-rollback templates.
- The previous template created a ServiceAccount that we will use later in the job, but now, we need to give the ServiceAccount permission to roll out new Redis replica pods when it communicates with the Kubernetes API. To keep it simple for this example, we will give the ServiceAccount edit permission in the chapter7 namespace.
Copy the contents shown in the following screenshot into the restore/rolebinding.yaml template. This code can also be found in this book’s GitHub repository at https://github.com/PacktPublishing/Managing-Kubernetes-Resources-using-Helm/blob/main/chapter7/guestbook/templates/restore/rolebinding.yaml:
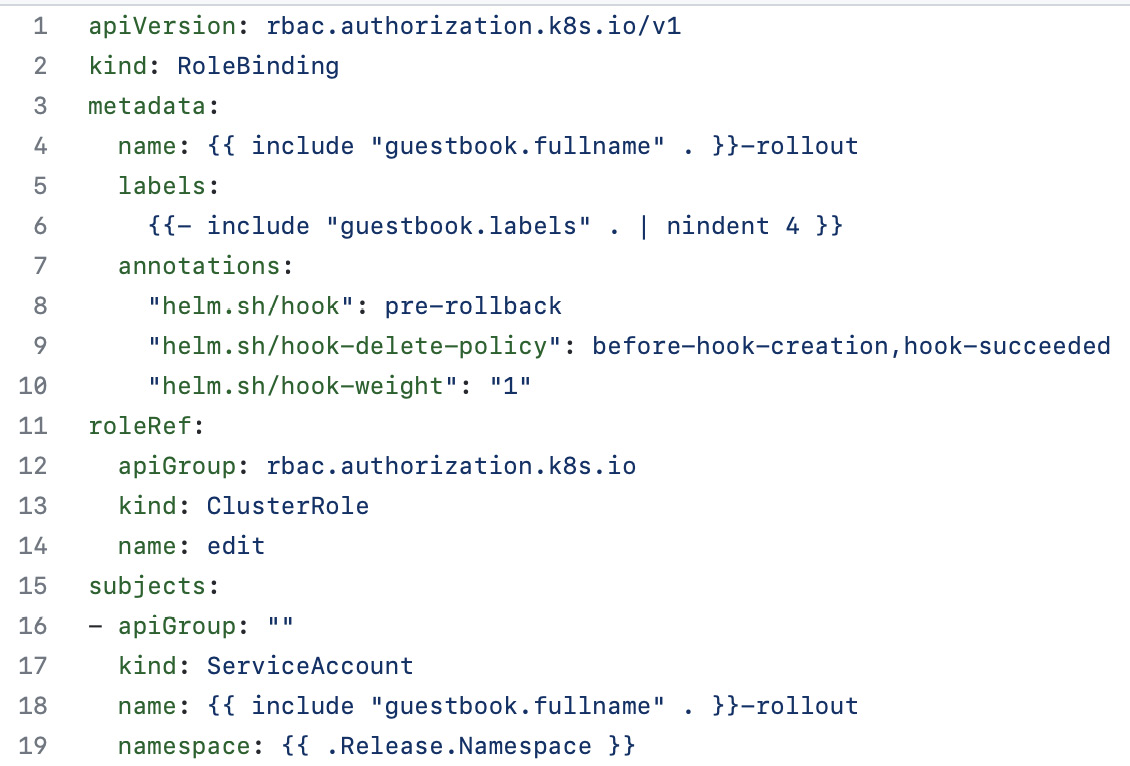
Figure 7.4 – The restore/rolebinding.yaml template
Lines 11 through 14 reference the edit ClusterRole that we want to grant, while lines 15 through 19 target our ServiceAccount in the namespace we are going to release to (which will be the chapter7 namespace).
- Finally, we need to add content to the job.yaml file. Copy the following content to your restore/job.yaml template. This content can also be found at https://github.com/PacktPublishing/Managing-Kubernetes-Resources-using-Helm/blob/main/chapter7/guestbook/templates/restore/job.yaml:
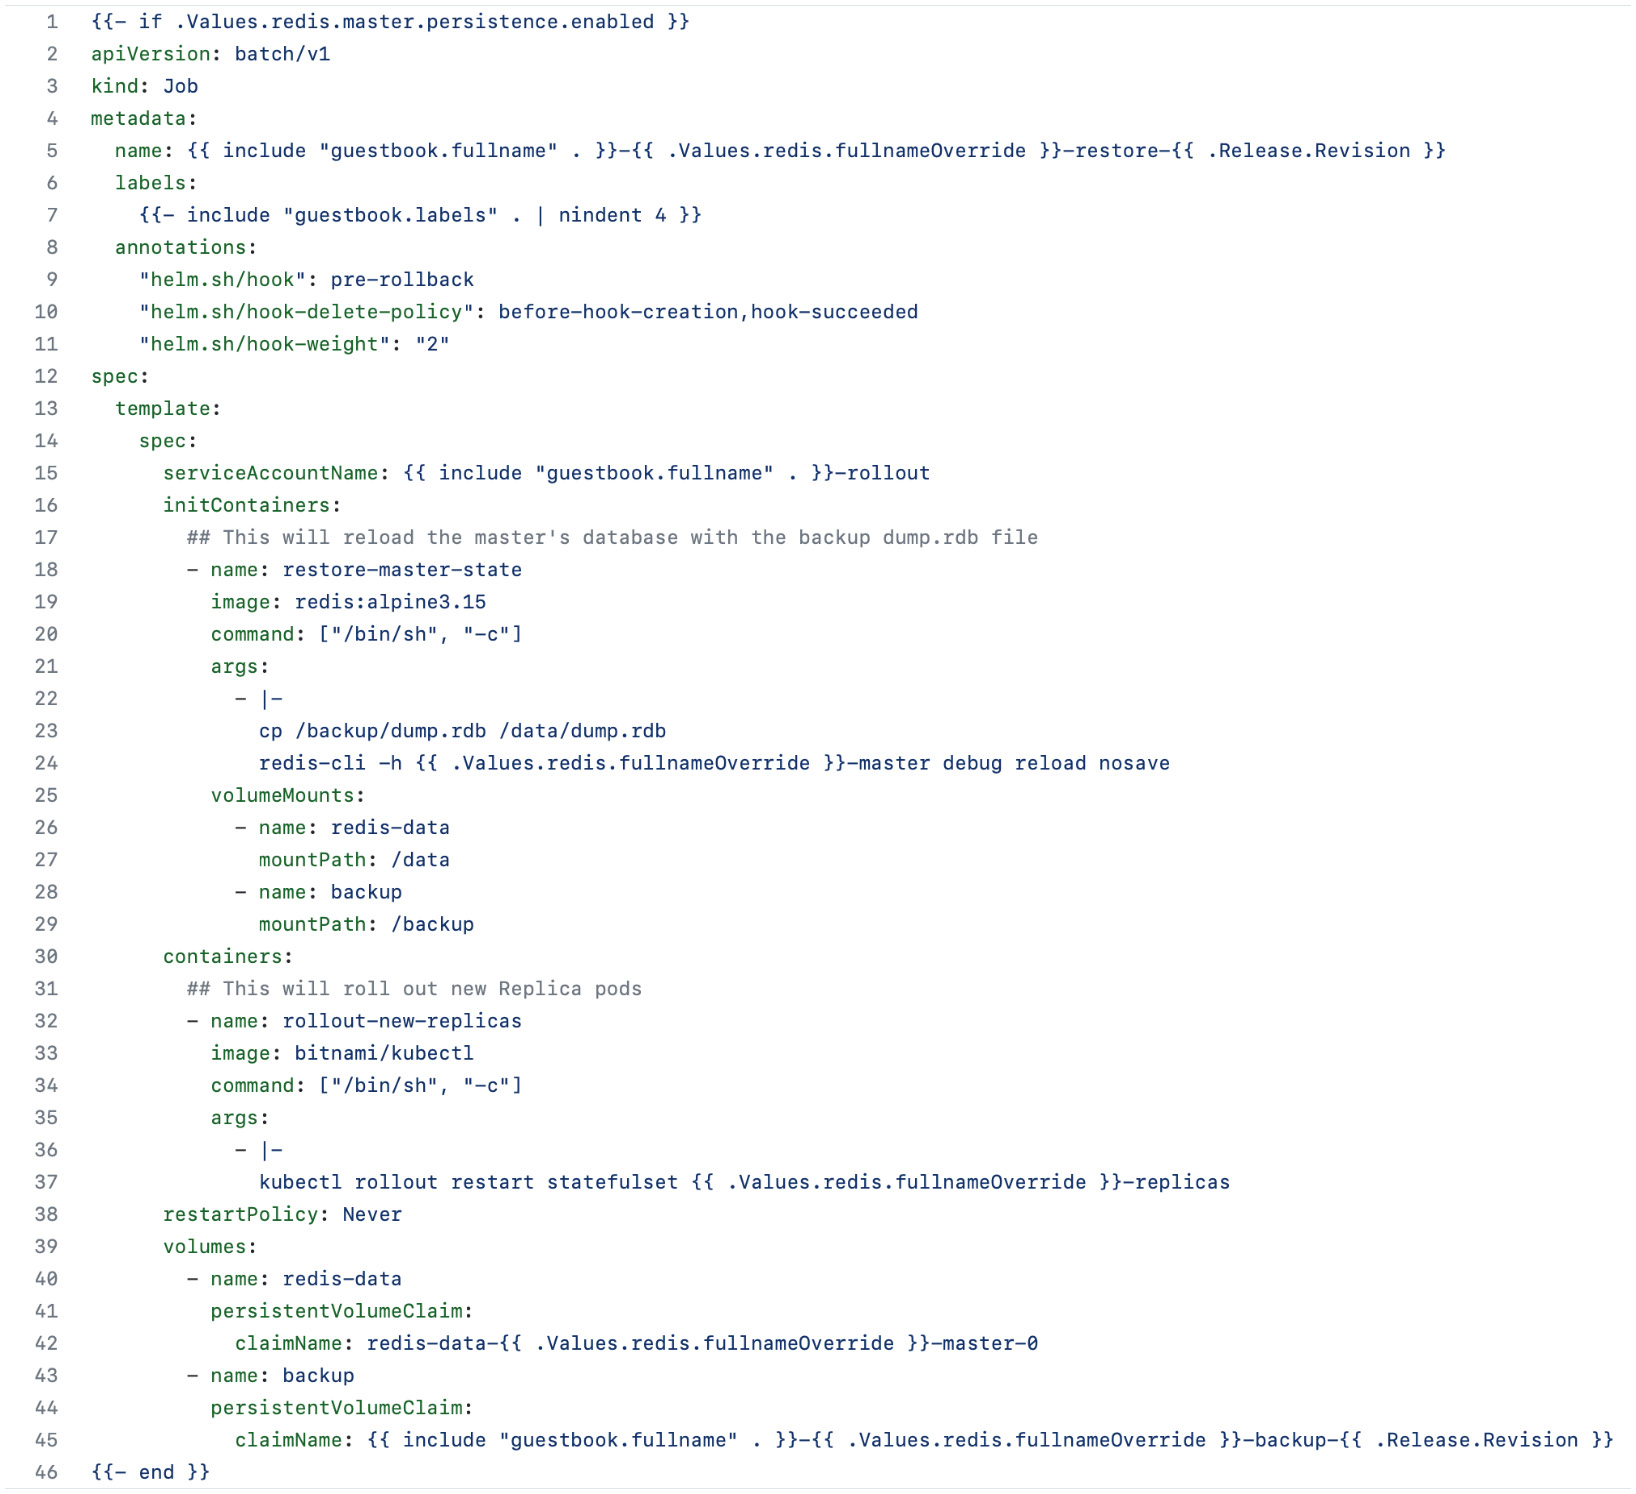
Figure 7.5 – The restore/job.yaml hook
This job.yaml template is where the core pre-rollback logic takes place. Lines 18 through 29 define an initContainer that copies the backup dump.rdb file to the Redis master and performs a reload, reverting the state of the master, as represented in the backup dump.rdb file. An initContainer is a container that runs until completion before any of the containers listed under the containers section are run. We created this first to ensure that the master is reverted before we move on to the next step.
Lines 30 through 37 represent the next step of the rollback. Here, we restart the Redis replica’s StatefulSet. When the replicas reconnect to the master, they will serve the data represented by the backup dump.rdb file.
With the pre-upgrade and pre-rollback hooks created, let’s see them in action within the minikube environment.
Executing the life cycle hooks
To run the lifecycle hooks you created, you must install your chart by running the helm install command:
$ helm install guestbook chapter7/guestbook -n chapter7 --dependency-update
When each pod reports the 1/1 Ready state, access your Guestbook application by running a port-forward command, as follows:
$ kubectl port-forward svc/guestbook 8080:80 –n chapter7
Next, access the Guestbook frontend at http://localhost:8080, write a message, and click Submit. An example message can be seen in the following screenshot:
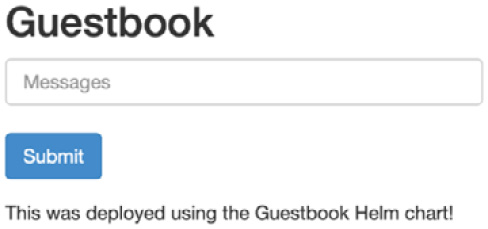
Figure 7.6 – Entering a message in the Guestbook frontend
Once a message has been entered, run the helm upgrade command to trigger the pre-upgrade hook. The helm upgrade command will hang briefly until the backup has finished:
$ helm upgrade guestbook guestbook –n chapter7
When the command returns, you should find a new PVC that was created that contains the backup. The PVC is called guestbook-redis-backup-1:
$ kubectl get pvc -n chapter7
NAME STATUS
redis-data-redis-master-0 Bound
redis-redis-backup-1 Bound
Now that a backup has been completed, let’s add another message. We plan to roll back after this message is entered. The following screenshot shows an example of the guestbook application after both messages have been added:

Figure 7.7 – A second message entered in the Guestbook frontend
Now, let’s run the helm rollback command to revert to the first revision. This command will hang briefly until the helm rollback command returns:
$ helm rollback guestbook 1 –n chapter7
When this command finishes, the Redis replicas should roll out. This rollout can be observed with the following command:
$ kubectl get pods –n chapter7 –w
Once the new replicas have been rolled out, refresh your Guestbook frontend in your browser. You will see the message you added after the upgrade disappears, as shown in the following screenshot:

Figure 7.8 – The Guestbook frontend after the pre-rollback phase
Hopefully, this example provided you with a greater understanding of Helm hooks. We want to emphasize again that this was just a simple example and is not a production-ready solution.
Note that while this chapter focused on developing and running lifecycle hooks, hooks can be skipped by adding the --no-hooks flag to the helm install, helm upgrade, helm rollback, and helm delete commands. Adding this flag will cause Helm to skip the hooks associated with the lifecycle phase that was executed.
Let’s wrap things up by cleaning up the minikube environment.
Cleaning up
First, delete the chapter7 namespace to delete the guestbook release and associated PVCs:
$ kubectl delete ns chapter7
Next, stop the minikube environment:
$ minikube stop
With that, everything has been cleaned up.
Summary
Lifecycle hooks open the door to additional capabilities by allowing chart developers to install resources at different lifecycle phases. Hooks commonly include job resources to execute the actions that take place within a hook, but they also often include other resources, such as ServiceAccounts, policies including RoleBindings, and PersistentVolumeClaims. At the end of this chapter, we added lifecycle hooks to our Guestbook chart and ran through a backup and restore of the Redis database.
In the next chapter, we will discuss publishing a Helm chart to a chart repository.
Further reading
To learn more about lifecycle hooks, visit the Helm documentation at https://helm.sh/docs/topics/charts_hooks/.
Questions
Answer the following questions to test your knowledge of this chapter:
- What are the nine different types of lifecycle hooks?
- What annotation is used to define a hook?
- What annotation is used to define the order in which a hook should be created?
- What can a chart developer add to ensure that hooks are always deleted upon success?
- How can a Helm user skip lifecycle hooks?
- What Kubernetes resource is most often used to execute a lifecycle hook?