3
Installing Your First App with Helm
Earlier in this book, we referred to Helm as the Kubernetes package manager and compared it to an operating system’s package manager. A package manager allows users to quickly and easily install applications of varying complexities and manage any dependencies that an application might have. Helm works similarly.
Users simply determine the application they want to deploy on Kubernetes and Helm does the rest of the work. A Helm chart – a packaging of Kubernetes resources – contains the logic and components required to install an application, allowing users to perform installations without needing to know the specific resources required. Users can also pass in parameters, called values, to a Helm chart to customize different aspects of the application. You will explore these features in this chapter by leveraging Helm as a package manager to deploy an instance of WordPress onto Kubernetes.
In this chapter, we will cover the following main topics:
- Understanding the WordPress application
- Finding a WordPress chart
- Creating a Kubernetes environment
- Installing a WordPress chart
- Choosing between --set and --values
- Accessing the WordPress application
- Upgrading the WordPress release
- Rolling back the WordPress release
- Uninstalling the WordPress release
- Shutting down your environment
Technical requirements
This chapter will use the following software technologies:
- minikube
- kubectl
- Helm
We assume that these components have already been installed on your system. For additional information on each of these tools, including their installation and configuration, please refer to Chapter 2, Preparing a Kubernetes and Helm Environment.
Understanding the WordPress application
WordPress is an open source Content Management System (CMS) used to create websites and blogs. Two different variants are available – WordPress.com and WordPress.org. WordPress.com is a Software-as-a-Service (SaaS) version of the CMS, meaning the WordPress application and its components are hosted and managed by WordPress. In this case, users do not need to worry about installing a WordPress instance as they can simply access instances that are already available. WordPress.org, on the other hand, is the self-hosted option. It requires users to deploy their WordPress instances and requires some level of expertise to maintain.
Since WordPress.com is easier to start with, it may sound like the more desirable option. This SaaS version of WordPress, however, has many disadvantages over the self-hosted WordPress.org, such as the following:
- It does not provide as many features as WordPress.org
- It does not give users full control over their website
- It requires users to pay for premium features
- It does not provide the ability to modify the backend code of a website
The self-hosted WordPress.org variation, on the other hand, gives users complete control over their website and WordPress instances. It provides the full WordPress feature set, from installing plugins to modifying backend code.
A self-hosted WordPress instance requires users to deploy a few different components. WordPress needs a MySQL or a MariaDB database to save the website and administrative data, and the WordPress UI is deployed as a PHP frontend. In Kubernetes, deploying these components means creating a variety of different resources:
- Secrets for database and admin console authentication
- A ConfigMap for externalized database configuration
- Services for networking
- A PersistentVolumeClaim for database storage
- A StatefulSet for deploying the database in a stateful fashion
- A Deployment for deploying the frontend
Creating these Kubernetes resources requires both WordPress and Kubernetes expertise. WordPress expertise is required because the user needs to know the required physical components, as well as how to configure them. Kubernetes expertise is required because users need to know how to deploy WordPress dependencies as Kubernetes resources. Given the complexity and number of components that are required, deploying WordPress on Kubernetes can be a daunting task.
The challenge presented by this task is a perfect use case for Helm. Rather than focusing on creating and configuring each of the Kubernetes resources we have described, users can leverage Helm as a package manager to deploy and configure WordPress on Kubernetes. To begin, we’ll explore a platform called Artifact Hub to locate a suitable WordPress Helm chart. After that, we’ll deploy WordPress to your Kubernetes cluster using Helm and explore basic Helm features along the way.
Finding a WordPress chart
Helm charts can be made available for consumption by publishing them to a chart repository. A chart repository is a location where packaged charts can be stored and shared. A repository is often hosted as an HTTP server and can take the form of various implementations, including GitHub pages, an Amazon S3 bucket, or a simple web server, such as Apache HTTPD. Recently, repositories can also take the form of OCI registries, allowing users to save and retrieve Helm charts from hosted services such as Docker Hub and Quay.
To use charts from a repository, Helm needs to be configured to use the repository. This can be accomplished by adding repositories using helm repo add. One challenge involved with adding repositories is that there are many different chart repositories available for consumption; it may be difficult to locate the particular repository that fits your use case. To make it easier to find chart repositories (and other Kubernetes-related artifacts), the Kubernetes community created a platform called Artifact Hub.
Artifact Hub is a centralized location for upstream Kubernetes artifacts, such as Helm charts, operators, plugins, and more. In this chapter, we will use the Artifact Hub platform to search for WordPress Helm charts. Once an appropriate chart is found, we will add the repository this chart belongs to so that it can be installed.
To begin, interaction with Artifact Hub can be accomplished either from the command line or from a web browser. When using the command line to search for Helm charts, the results that are returned provide a URL to Artifact Hub, which can be used to find additional information on the chart and instructions on how to add its chart repository.
Let’s follow this workflow to add a chart repository containing a WordPress chart.
Searching for WordPress charts from the command line
In general, Helm contains two different search commands to assist us in finding Helm charts:
- To search for charts in Artifact Hub, use the following command:
$ helm search hub
Note that in prior versions of Helm, helm search hub referenced a centrally managed public repository of Helm charts maintained by the Helm community called Helm Hub instead of Artifact Hub. Backward compatibility has been retained through the use of the --endpoint parameter, which enables users to specify the location of any monocular-based instance, the web search and discovery web application backing Helm Hub.
- To search repositories for a keyword present in a chart, use the following command:
$ helm search repo
If repositories have not been added previously, users should run the helm search hub command to locate Helm charts available across all public chart repositories. Once a repository has been added, users can run helm search repo to search across these repositories.
Let’s search Artifact Hub for any existing WordPress charts. Each chart in Artifact Hub has a set of keywords that can be searched against. Execute the following command to locate charts containing the wordpress keyword:
$ helm search hub wordpress
Upon running this command, an output similar to the following should be displayed:

Figure 3.1 – The output from running helm search hub wordpress
Each line of the output returned by this command is a chart from Artifact Hub. The output displays the URL to each chart’s Artifact Hub page. Also displayed is the chart version, which represents the latest version of the Helm chart, and the app version, which represents the version of the application that the chart deploys by default. The helm search hub command also prints a brief description of each chart.
As you may have noticed, some of the values returned are truncated. This is because the default output of helm search hub is table, causing the results to be returned in tabular format. By default, columns wider than 50 characters are truncated. This truncation can be avoided by using the --max-col-width=0 flag.
Try running the following command by including the --max-col-width flag to view the untruncated results in tabular format:
$ helm search hub wordpress --max-col-width=0
Alternatively, users can pass the --output flag and specify either yaml or json, which will print the search results in full.
Try running the previous command again with the --output yaml flag:
$ helm search hub wordpress --output yaml
The result will be in YAML format, similar to the output shown here:
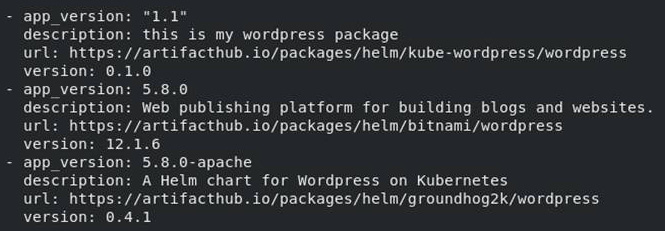
Figure 3.2 – The output for the helm search hub wordpress --output yaml command
For this example, we will choose to install the second chart that was returned in the preceding sample output. To learn more about this chart and how it is installed, visit https://artifacthub.io/packages/helm/bitnami/wordpress. We’ll explore this link in the next section.
Viewing the WordPress chart in a browser
Using helm search hub is the fastest way to search for charts on Artifact Hub. However, it does not provide all of the details needed for installation. Namely, users need to know a chart’s repository URL to add its repository and install the chart. A chart’s Artifact Hub page can provide this URL, along with other installation details.
Once you have entered the WordPress chart’s URL into a browser window, a page similar to the following will be displayed:
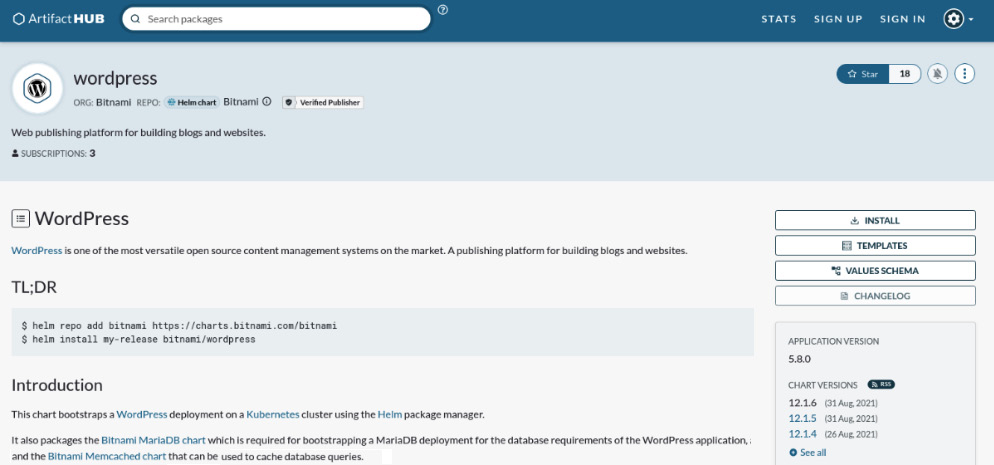
Figure 3.3 – A WordPress Helm chart from Artifact Hub
The WordPress chart’s page from Artifact Hub provides many details, including the maintainer of the chart (Bitnami, which is a company that provides software packages that can be deployed to different environments) and a brief introduction to the chart (stating that this chart will deploy a WordPress instance to Kubernetes, along with a Bitnami MariaDB chart as a dependency). The web page also provides installation details, including the chart’s supported values, which are used to configure the installation, along with Bitnami’s chart repository URL. These installation details give users the ability to add this repository and install the WordPress chart.
Under the TL;DR heading, you should see a helm repo add command. This is the command that you need to run to add the Bitnami chart repository, which is the repository that contains the WordPress chart we are interested in installing.
Bitnami repository chart retention policy
Recent changes within the Bitnami Helm community have resulted in charts being removed from the Bitnami repository 6 months after their publication date. Aligning to the most recent versions of software packages is a recommended practice so that the most recent set of features and security remediations are included. However, since the remainder of the exercises specify specific chart versions to support the stability of the tested integrations, an alternate repository must be utilized.
Fortunately, another repository index has been provided that includes all of the Bitnami charts without the retention policy of the default index, which will be described in the next section. You will learn more about repository indexes by creating and managing your own repository in Chapter 7, Helm Lifecycle Hooks.
Adding the full Bitnami repository
With an understanding of the considerations as they relate to charts within the Bitnami repository, let’s add the repository that allows us to specify specific chart versions without concerns that they may be removed in the future. The only difference in the helm repo add command is the URL of the repository.
Let’s add the repository now and verify that we can interact with its contents:
- Add the full Bitnami chart repository:
$ helm repo add bitnami https://raw.githubusercontent.com/bitnami/charts/archive-full-index/bitnami
- Verify that the chart has been added by running helm repo list:
$ helm repo list
NAME URL
bitnami https://raw.githubusercontent.com/bitnami/charts/archive-full-index/bitnami
We can do a little more now that we have added the repository.
- Run the following command to view charts from locally configured repositories that contain the bitnami keyword:
$ helm search repo bitnami --output yaml
A shortened list of the results returned is shown in the following output:

Figure 3.4 – The output for the helm search repo bitnami --output yaml command
Similar to the helm search hub command, the helm search repo command takes a keyword as an argument. Using bitnami as a keyword will return all the charts in the bitnami repository, as well as charts outside of that repository that may also contain the bitnami keyword.
To ensure that you now have access to the WordPress chart, run the following helm search repo command with the wordpress argument:
$ helm search repo wordpress
The output will display the WordPress chart that you found on Artifact Hub and observed in your browser:

Figure 3.5 – The output for the helm search repo wordpress command
The value in the NAME field before the slash (/) indicates the name of the repository containing the Helm chart that was returned. The latest version of the WordPress chart from the bitnami repository, at the time of writing, is version 12.1.6. This is the version that will be used for the installation. Previous versions can be queried by passing the --versions flag to the search command:
helm search repo wordpress --versions
You should then see a new line for each version of the available WordPress charts:

Figure 3.6 – The version lists for WordPress charts in the bitnami repository
Now that a WordPress chart has been identified and the chart’s repository has been added, we will explore how to use the command line to find out more about the chart so that you can install it.
Showing the WordPress chart information from the command line
You can find a lot of important details about a Helm chart on its Artifact Hub page. Once a chart’s repository is added locally, this information (and more) can also be viewed from the command line with the following four helm show subcommands:
- Display the chart’s metadata (or chart definition):
helm show chart
- Display the chart’s README file:
helm show readme
- Display the chart’s values:
helm show values
- Display the chart’s definition, README files, and values:
helm show all
Let’s use these commands with the Bitnami WordPress chart. In each of these commands, the chart should be referenced as bitnami/wordpress. Note that we will be passing the --version flag to retrieve information about version 12.1.6 of this chart. If this flag is omitted, information from the latest version of the chart will be returned.
Run the helm show chart command to retrieve the metadata for the chart:
$ helm show chart bitnami/wordpress --version 12.1.6
The result of this command will be the chart definition of the WordPress chart. A chart definition describes information such as the chart’s version, its dependencies, keywords, and maintainers:
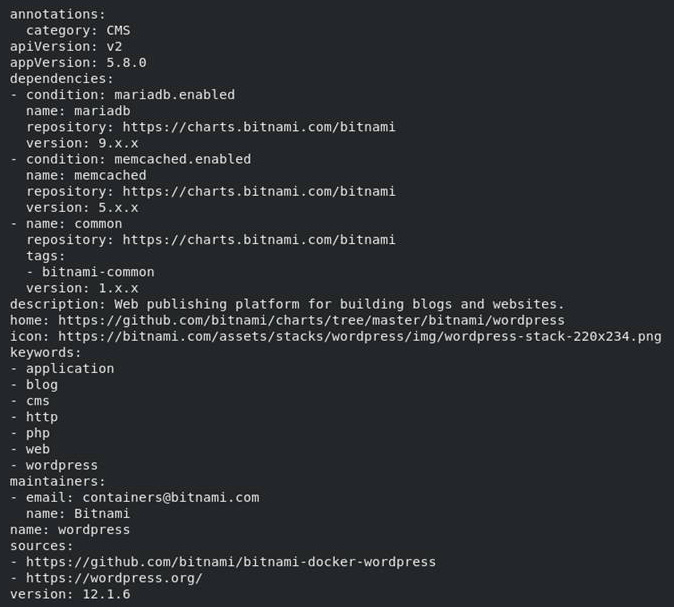
Figure 3.7 – The wordpress chart definition
Run the helm show readme command to view the chart’s README file from the command line:
$ helm show readme bitnami/wordpress --version 12.1.6
The results of this command may look familiar since a chart’s README file is also displayed on its Artifact Hub page. Using this option from the command line provides a quick way to view the README file without having to open a browser:
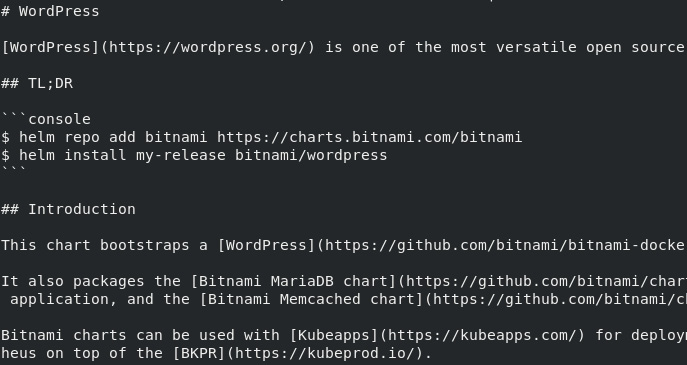
Figure 3.8 – The wordpress chart’s README file shown in the command line
We can use helm show values to inspect a chart’s values. Values serve as parameters that users can provide to customize a chart installation. We will run this command later in this chapter in the Creating a values file for configuration section when we install the WordPress chart.
Finally, helm show all aggregates all of the information from the previous three commands together. Use this command if you want to inspect all of a chart’s details at once.
Now that we have found and inspected a WordPress chart, let’s set up a Kubernetes environment where we can later install this chart.
Creating a Kubernetes environment
To create a Kubernetes environment in this chapter, we will use minikube. We learned how to install minikube in Chapter 2, Preparing a Kubernetes and Helm Environment.
Follow these steps to set up Kubernetes:
- Start your Kubernetes cluster by running the following command:
$ minikube start
- After a short amount of time, you should see a line in the output that resembles the following:
Done! kubectl is now configured to use "minikube" cluster and "default" namespace by default
- Once the minikube cluster is up and running, create a dedicated namespace for this chapter’s exercise. Run the following command to create a namespace called chapter3:
$ kubectl create namespace chapter3
Now that the cluster setup is complete, let’s begin the process of installing the WordPress chart to your Kubernetes cluster.
Installing a WordPress chart
Installing a Helm chart is a simple process that should begin with inspecting a chart’s values. In the next section, we will inspect the values that are available in the WordPress chart and describe how to create a file that allows for customizing the installation. Finally, we will install the chart and access the WordPress application.
Creating a values file for configuration
You can override the values defined in charts by providing a YAML-formatted values file. To create a values file, you need to inspect the supported values that the chart provides. This can be done by running the helm show values command, as explained earlier.
Run the following command to inspect the WordPress chart’s values:
$ helm show values bitnami/wordpress --version 12.1.6
The result of this command should be a long list of possible values that you can set, many of which already have default values set:

Figure 3.9 – A list of values generated by running helm show values
The preceding output shows a portion of the WordPress chart’s values. Many of these properties already have defaults set, meaning these values will represent how the chart is configured if they are not overridden. For example, if the values under the image map are not overridden, the WordPress chart will use the bitnami/wordpress container image from the docker.io registry against the 5.8.0-debian-10-r24 tag.
Lines in the chart’s values that begin with a hash sign (#) are comments. Comments can be used to explain a value or a block of values, or they can be used to unset them. As shown in the preceding example, comments were used to document each of the image-related values.
If we explore the helm show values output further, we can find values that pertain to configuring the WordPress blog’s metadata:

Figure 3.10 – The values returned by running the helm show values command
As you can see, these values are used to create a WordPress user and create a name for your blog. Let’s override them by creating a values file. Create a new file on your machine called wordpress-values.yaml. In that file, enter the following content:
wordpressUsername: helm-user
wordpressPassword: my-password
wordpressEmail: [email protected]
wordpressFirstName: Helm_is
wordpressLastName: Fun
wordpressBlogName: Learn Helm!
Feel free to get more creative with these values if you’d like. Continuing down the list of values from helm show values, there is one more important value that should be added to your values file before starting the installation, as shown here:
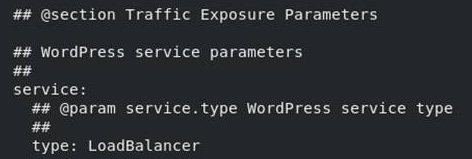
Figure 3.11 – The LoadBalancer value returned after running helm show values
To simplify the installation, we are going to update this value (referred to as service.type) to NodePort. We could leave this set to LoadBalancer, but this would require you to use the minikube tunnel command to reach the service. By setting this to NodePort instead, you will be able to directly access WordPress against a local port.
Add this value to your wordpress-values.yaml file:
service:
  type: NodePort
Once this value has been added to your values file, your complete wordpress-values.yaml file should look as follows:
wordpressUsername: helm-user
wordpressPassword: my-password
wordpressEmail: [email protected]
wordpressFirstName: Helm_is
wordpressLastName: Fun
wordpressBlogName: Learn Helm!
service:
  type: NodePort
Now that the values file is complete, let’s run the installation.
Running the installation
We use helm install to install a Helm chart. The standard syntax is as follows:
helm install [NAME] [CHART] [flags]
The NAME parameter is the name you would like to give your Helm release. A release captures the Kubernetes resources that were installed with a chart and tracks an application’s life cycle. We will explore how releases work throughout this chapter.
The CHART parameter is the name of the Helm chart that is installed. Charts from a repository can be installed using <repo name>/<chart name>.
The flags option in helm install allows you to further customize the installation. flags allows users to define and override values, specify the namespace to work against, and more. The list of flags can be viewed by running helm install --help. We can pass --help to other commands to view their usage and supported options.
Now that we have a proper understanding of the usage of helm install, let’s run the following command:
$ helm install wordpress bitnami/wordpress --values=wordpress-values.yaml --namespace chapter3 --version 12.1.6
This command installs a new release called wordpress using the bitnami/wordpress Helm chart. It uses the values defined in the wordpress-values.yaml file to customize the installation, and the chart is installed in the chapter3 namespace. Version 12.1.6 of the chart is deployed, as defined by the --version flag. Helm will install the latest cached version of the Helm chart without this flag.
If the chart’s installation is successful, you should see the following output:
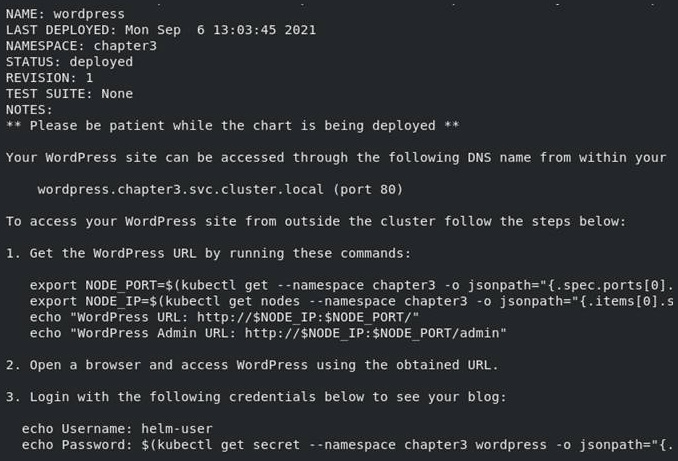
Figure 3.12 – The output of a successful WordPress chart installation
This output displays information about the installation, including the name of the release, the time it was deployed, the namespace it was installed to, the status of the deployment (which is deployed), and the revision number (which is set to 1 since this is the initial installation of the release).
The output also displays a list of notes related to the installation. Notes are used to provide users with additional information about their installation. In the case of the WordPress chart, these notes provide information about how to access the WordPress application. While these notes appear directly after installation, they can be retrieved at any time with the helm get notes command, as explained in the next section.
With your first Helm installation complete, let’s inspect the release to observe the resources and configurations that were applied.
Inspecting your release
One of the easiest ways to inspect a release and verify its installation is to list all the Helm releases in a given namespace. For this to be achieved, Helm provides the list subcommand.
Run the following command to view the list of releases in the chapter3 namespace:
$ helm list --namespace chapter3
You should see only one release in this namespace, as shown here:
Figure 3.13 – The output from the helm list command that lists the Helm releases
The list subcommand provides the following information:
- The release name
- The release namespace
- The latest revision number of the release
- A timestamp of the latest revision
- The release status
- The chart name
- The application version
Note that the status, chart name, and application version have been truncated in the preceding output.
While the list subcommand is useful for providing high-level release information, there are additional items that users may want to know about a particular release. Helm provides the get subcommand to provide more information about a release.
The following commands can be used to provide a set of detailed release information:
- To return all the hooks for a named release, run the following command:
helm get hooks
- To return the manifest for a named release, run the following command:
helm get manifest
- To return the notes for a named release, run the following command:
helm get notes
- To return the values for a named release, run the following command:
helm get values
- To return all the information about a named release, run the following command:
helm get all
The first command from the preceding list, helm get hooks, is used to display the hooks for a given release. Hooks will be explored in more detail in Chapter 7, Helm Lifecycle Hooks, when you build and test a Helm chart. For now, hooks can be thought of as the actions that Helm performs during certain phases of an application’s life cycle. This WordPress installation did not create any hooks, so let’s move on to the next command.
The helm get manifest command can be used to get a list of the Kubernetes resources that were created as part of the installation. Run the following command:
$ helm get manifest wordpress --namespace chapter3
After you run this command, you’ll see the following Kubernetes manifests:
- Two Secrets for MariaDB and WordPress credentials
- Two ConfigMaps (the first is used to configure the WordPress application, while the second is used for testing, which is performed by chart developers and so can be ignored).
- One PersistentVolumeClaim for persisting MariaDB data.
- Two Services for MariaDB and WordPress
- One Deployment for WordPress
- One StatefulSet for MariaDB
- One ServiceAccount for MariaDB
From this output, you can observe where your values had an effect when they configured the Kubernetes resources. One example to note is within the WordPress service, where type has been set to NodePort:
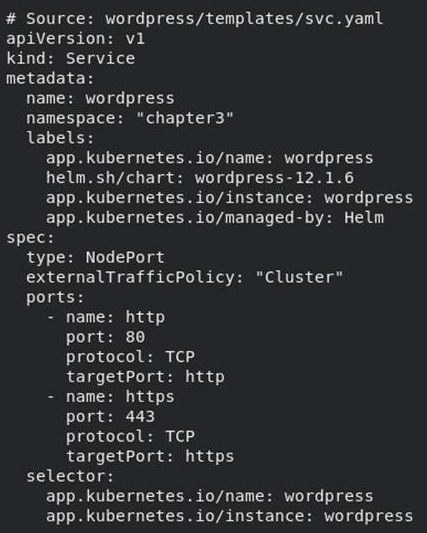
Figure 3.14 – Setting the Service type to NodePort
You can also observe the other values that we set for the WordPress user. These values are defined as environment variables in the WordPress deployment, as shown in the following screenshot:
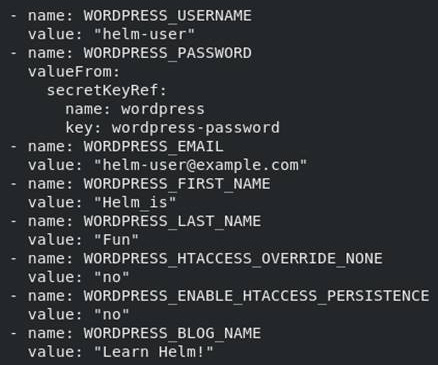
Figure 3.15 – Values set as environment variables
The rest of the default values provided by the chart were left untouched. Those defaults have been applied to the Kubernetes resources and can be observed through the helm get manifest command. If these values had been changed, the Kubernetes resources would have been configured differently.
Let’s move on to the next get command. The helm get notes command is used to display the notes from a Helm release. As you may recall, the release notes were displayed when the WordPress chart was installed. Notes are chart-specific and, in the case of WordPress, provide important information about accessing the application and can be displayed once again by running the following command:
$ helm get notes wordpress --namespace chapter3
The next command is helm get values, and it is useful for recalling the values that were used for a given release. Run the following command to view the values that were provided in the wordpress release:
$ helm get values wordpress --namespace chapter3
The result of this command should look familiar as they should match the values specified in the wordpress-values.yaml file:
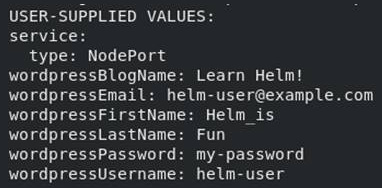
Figure 3.16 – User-supplied values in the WordPress release
While recalling the user-supplied values is useful, it may be necessary to return all of the values used by a release, including the defaults. This can be accomplished by passing in an additional --all flag, as shown in the following command:
$ helm get values wordpress --all --namespace chapter3
For this chart, the output will be lengthy. The first several values are shown in the following output:
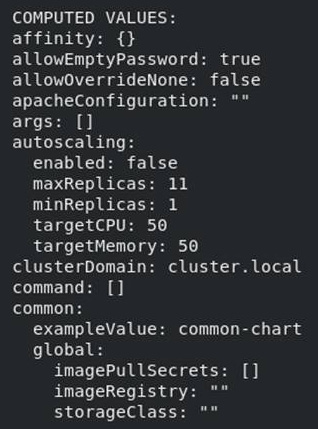
Figure 3.17 – A subset of all the values for the WordPress release
Finally, Helm provides a helm get all command, which can be used to aggregate all of the information from the various helm get commands:
$ helm get all wordpress –n chapter3
In the preceding command, we snuck in the -n flag in place of --namespace. From here on out, we will use the -n flag to provide the namespace that Helm should operate within.
Besides the commands provided by Helm, the kubectl CLI can also be used to inspect an installation more closely. For example, you could return the deployments that Helm created by running the following command:
$ kubectl get deployments -l app.kubernetes.io/name=wordpress -n chapter3
You’ll find that the following deployment exists in the chapter3 namespace:

Figure 3.18 – The wordpress deployment in the chapter3 namespace
In the preceding command, we filtered the deployments by using the -l app.kubernetes.io/name=wordpress parameter. Many Helm charts add the app.kubernetes.io/name label (or a similar label) on the resources they create. You can use this label to filter resources using kubectl so that only resources that Helm created are returned.
Choosing between --set and --values
When we installed WordPress earlier, we used the --values flag to pass parameters to the Helm chart. However, there are two ways to pass values:
- To pass a value explicitly from the command line, use the following command:
--set
- To specify values from a YAML file or URL, use the following command:
--values
In this book, we will treat the --values flag as the preferred method of configuring chart values. The reason for this is that it is easier to configure multiple values when they are contained in a YAML file. Maintaining a values file also makes it simple to save these assets in a Source Code Management (SCM) system, such as Git, which allows installations to be easily reproducible. However, take note that sensitive values, such as passwords, should never be stored in a source control repository. When secrets need to be provided, the recommended approach is to use the --set flag to prevent them from being committed to source control. We will cover the topic of security in greater detail in Chapter 12, Helm Security Considerations.
The --set flag is used to pass values directly from the command line. This is an acceptable method for simple values, as well as for when there are only a small number of values that need to be configured. Complex values, such as lists and maps, can be challenging to input when using the --set flag, so it is not preferred. There are other related flags, such as --set-file and --set-string. The --set-file flag is used to pass along a file that has configured values in a key1=val1 and key2=val2 format, while the --set-string flag is used to set all the values provided in a key1=val1 and key2=val2 format as strings.
Now, let’s explore the WordPress application that we just installed.
Accessing the WordPress application
The WordPress chart’s release notes provided four commands that you can run to access your WordPress application (you can recall the full release notes using helm get notes wordpress -n chapter3). Run the four commands that were provided from the notes:
- For macOS or Linux, run the following:
export NODE_PORT=$(kubectl get --namespace chapter3 -o jsonpath="{.spec.ports[0].nodePort}" services wordpress)
export NODE_IP=$(kubectl get nodes --namespace chapter3 -o jsonpath="{.items[0].status.addresses[0].address}")
echo "WordPress URL: http://$NODE_IP:$NODE_PORT/"
echo "WordPress Admin URL: http://$NODE_IP:$NODE_PORT/admin"
- For Windows PowerShell, run the following:
$NODE_PORT = kubectl get --namespace chapter3 -o jsonpath="{.spec.ports[0].nodePort}" services wordpress | Out-String
$NODE_IP = kubectl get nodes --namespace chapter3 -o jsonpath="{.items[0].status.addresses[0].address}" | Out-String
echo "WordPress URL: http://$NODE_IP:$NODE_PORT/"
echo "WordPress Admin URL: http://$NODE_IP:$NODE_PORT/admin"
After defining the two environment variables based on the series of kubectl queries, the resulting echo commands will reveal the URLs to access WordPress. The first URL is to view the home page and is where visitors will access your site. The second URL is to reach the admin console, which is used by website administrators to configure and manage the site’s content.
Paste the first URL into a browser. You should be presented with a page that looks similar to the following:
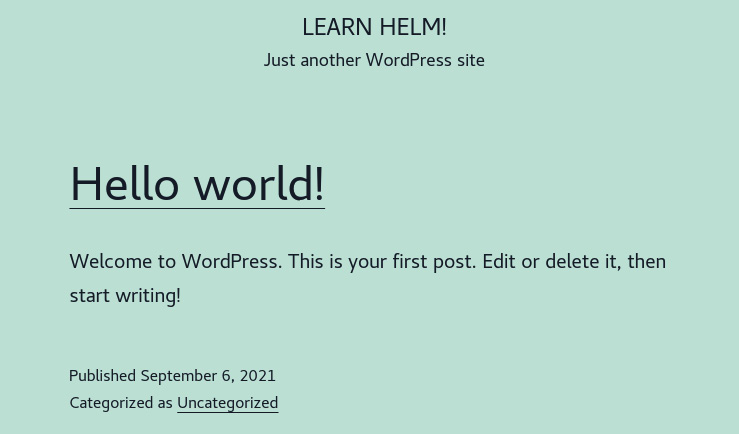
Figure 3.19 – The WordPress blog page
Several portions of this page may look familiar to you. First, at the top of the screen, the title of the blog is Learn Helm!, which is the string you gave the wordpressBlogName value previously during installation. You can also see this value at the bottom left-hand side of the page.
Another value that affected the customization of the home page is wordpressUsername. If you click on the Hello world! link, you’ll find that the author of that post is helm-user:
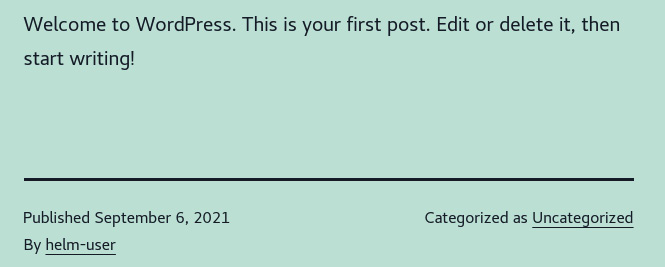
Figure 3.20 – The “Hello world!” post
If you had provided a different value for wordpressUsername, then the author here would appear differently as well.
The second link provided by the previous set of commands is for accessing the admin console. Paste the link from the second echo command into a browser. You should be presented with the following login screen:
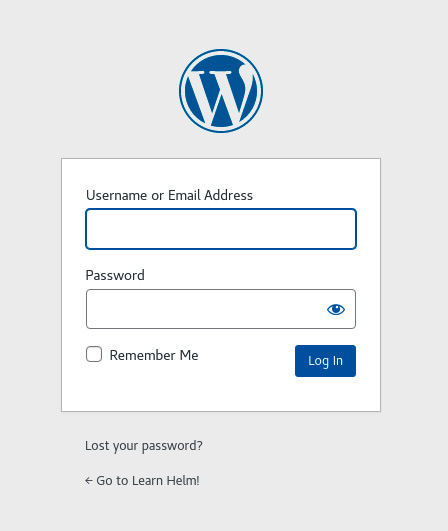
Figure 3.21 – The WordPress admin console login page
To log into the admin console, enter the wordpressUsername and wordpressPassword values that you provided during the installation. If you used the same values we specified earlier, then the username will be helm-user and the password will be my-password.
Once you’re authenticated, the admin console dashboard will be displayed, as shown here:

Figure 3.22 – The WordPress admin console page
If you were a WordPress administrator, this is where you could configure your site, write posts, and manage plugins. If you click on the top-right link that says Howdy, helm-user (not visible in the preceding screenshot), you will be directed to the helm-user profile page. From there, you can see several of the other values that you provided during the installation, as shown in the following screenshot:

Figure 3.23 – The WordPress profile page
The First Name, Last Name, and Email fields refer to their corresponding wordpressFirstname, wordpressLastname, and wordpressEmail Helm values.
Feel free to continue exploring your WordPress instance. Once you are finished, continue to the next section to learn how to upgrade a Helm release.
Upgrading the WordPress release
Upgrading a release refers to the process of modifying the release’s values or updating the chart to a newer version. In this section, we will upgrade the WordPress release by adding a couple more values to the installation.
Modifying the Helm values
Oftentimes, when deploying applications to Kubernetes, you will want to run multiple replicas of the application to provide high availability and reduce the load on a single instance. Helm charts often provide some sort of replica-related value for configuring the number of pod replicas to deploy. A quick browse through the output of the helm show values bitnami/wordpress --version 12.1.6 command shows that you can increase WordPress replicas by using the replicaCount value:

Figure 3.24 – replicaCount in the helm show values command
Add the following line to your wordpress-values.yaml file to increase the number of replicas from 1 to 2:
replicaCount: 2
Let’s add another value to set the resource requests. Looking through the helm show values output, you can see that this chart provides a resources map within its set of values:
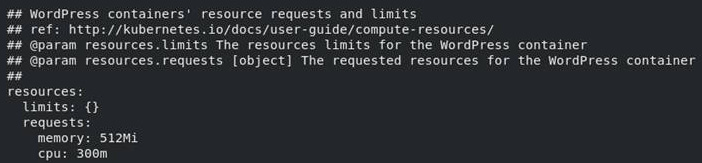
Figure 3.25 – The values under the resources stanza
Nested values such as resources are YAML maps (or objects), and they help provide a logical grouping of properties. Under the resources map is a requests map, which is used to configure the memory and cpu values that Kubernetes will allocate to the WordPress application. Let’s modify these values to decrease the memory request to 256Mi (256 mebibytes) and the cpu request to 100m (100 millicores). Add these modifications to the wordpress-values.yaml file, as shown here:
resources:
  requests:
    memory: 256Mi
    cpu: 100m
After defining these two new values, your entire wordpress-values.yaml file will look as follows:
wordpressUsername: helm-user
wordpressPassword: my-password
wordpressEmail: [email protected]
wordpressFirstName: Helm_is
wordpressLastName: Fun
wordpressBlogName: Learn Helm!
service:
  type: NodePort
replicaCount: 2
resources:
  requests:
    memory: 256Mi
    cpu: 100m
Once the wordpress-values.yaml file has been updated with these new values, you can run the helm upgrade command to upgrade the release, as we will discuss in the next section.
Running the upgrade
The helm upgrade command is almost identical to the helm install command in basic syntax, as illustrated in the following example:
helm upgrade [RELEASE] [CHART] [flags]
While helm install expects you to provide a name for a new release, helm upgrade expects you to provide the name of an already-existing release that should be upgraded. Alternatively, you can pass the --install flag, which instructs Helm to perform an installation instead if the release name you provide does not exist.
Values defined in a values file can be provided using the --values flag, identical to that of the helm install command. Run the following command to upgrade the WordPress release with the new set of values:
$ helm upgrade wordpress bitnami/wordpress --values wordpress-values.yaml -n chapter3 --version 12.1.6
Once this command has been executed, you should see an output similar to that of helm install. You should also notice that the REVISION field now says 2:

Figure 3.26 – The output for helm upgrade
You should also see that the wordpress pods have restarted if you run the following command:
$ kubectl get pods -n chapter3
In Kubernetes, new pods are created when their pod template is modified. The same behavior can be observed in Helm. The values that were added during the upgrade introduced a configuration change to the WordPress pod template. As a result, new WordPress pods were created with the updated configuration. These changes can be observed using the same helm get manifest and kubectl get deployment commands that were used earlier in this chapter.
In the next section, we’ll perform a couple more upgrades to demonstrate how values can sometimes behave differently during an upgrade.
Reusing and resetting values during an upgrade
In addition to --set and --values, which are present in both helm install and helm upgrade, the helm upgrade command includes two additional values-related flags.
Let’s look at these flags now:
- --reuse-values: When upgrading, reuse the last release’s values
- --reset-values: When upgrading, reset the values to the chart defaults
If an upgrade is performed without providing values with the --set or --values flags, then the --reuse-values flag is applied by default. In other words, the same values that were used by the previous release will be used again during the upgrade if no values are provided. Alternatively, if at least one value is provided with --set or --values, then the --reset-values flag is applied by default. Let’s run through an example:
- Run another upgrade command without specifying any values:
$ helm upgrade wordpress bitnami/wordpress -n chapter3 --version 12.1.6
- Run the helm get values command to inspect the values used in the upgrade:
$ helm get values wordpress -n chapter3
Notice that the values displayed are identical to the previous upgrade:
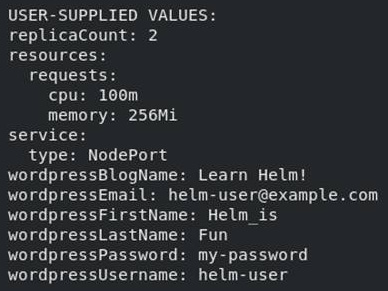
Figure 3.27 – The output of the helm get values command
Different behavior can be observed when values are provided during an upgrade. If values are passed via the --set or --values flags, all of the chart’s values that are not provided are reset to their defaults. Let’s see this in action.
- Run another upgrade by providing a smaller set of values with the --set flag:
$ helm upgrade wordpress bitnami/wordpress --set replicaCount=1 --set wordpressUsername=helm-user --set wordpressPassword=my-password -n chapter3 --version 12.1.6
- After the upgrade, run the helm get values command:
$ helm get values wordpress -n chapter3
The output will declare that you have only provided three values, as opposed to the many that you originally declared in the wordpress-values.yaml file:
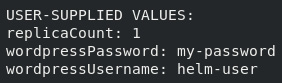
Figure 3.28 – The updated user-supplied values
To prevent confusion during your upgrades and to simplify how values are managed, try to manage all of your values in a values file. This provides a more declarative approach, and it makes it clear which values will be applied each time you upgrade.
If you have been following along with each of the commands provided in this chapter, you should now have four revisions of the WordPress release in your environment. This fourth revision is not quite in the way we want the application to be configured since most of the values were set back to their defaults by the most recent upgrade. In the next section, we will explore how the WordPress release can be rolled back to the stable version that contained the set of desired values.
Rolling back the WordPress release
While moving forward is preferred, there are some occasions where it makes more sense to return to a previous version of the application. The helm rollback command exists to satisfy this use case. Let’s describe how to roll back the WordPress release to a previous state.
Inspecting the WordPress history
Every Helm release has a history of revisions. A revision is used to track the values, Kubernetes resources, and the chart version that were used in a particular release version. A new revision is created when a chart is installed, upgraded, or rolled back. Revision data is saved in Kubernetes Secrets by default (other options are ConfigMaps, local memory, or a PostgreSQL database, as determined by the HELM_DRIVER environment variable). This allows your Helm release to be managed and interacted with by different users on the Kubernetes cluster, provided they have the appropriate Role-Based Access Control (RBAC) permissions to view or modify resources in your namespace. Secrets containing the revisions can be observed by using kubectl to get them from the chapter3 namespace:
$ kubectl get secrets -n chapter3
This command will return all of the secrets within the namespace, but you should see these four in the output:
sh.helm.release.v1.wordpress.v1
Sh.helm.release.v1.wordpress.v2
sh.helm.release.v1.wordpress.v3
sh.helm.release.v1.wordpress.v4
Each of these Secrets corresponds with an entry of the release’s revision history, which can be viewed by running the helm history command:
$ helm history wordpress -n chapter3
This command will display a table of each revision, similar to the following (some columns have been omitted for readability):
|
REVISION |
STATUS |
DESCRIPTION |
|
1 |
superseded |
Install complete |
|
2 |
superseded |
Upgrade complete |
|
3 |
superseded |
Upgrade complete |
|
4 |
deployed |
Upgrade complete |
Table 3.1 – Table caption
In this output, each revision has a number, along with the time it was updated, the status, the name of the chart, the app version, and the description. Revisions that have a status of superseded are no longer up to date, while the revision that says deployed is the currently deployed revision. Other statuses include pending and pending_upgrade, which means the installation or upgrade is currently in progress. failed refers to a particular revision that has failed to install or be upgraded and unknown means that you encountered a bug and may want to file an issue or notify the maintainers. It’s unlikely you will ever encounter a release with a state of unknown.
The helm get commands described previously can be used against a revision number by specifying the --revision flag. For this rollback, let’s determine the release that had the full set of desired values. As you may recall, the current revision, revision 4, only contains a subset of the values we need, but revision 3 should contain all of our desired values. This can be verified by running the helm get values command with the --revision flag:
$ helm get values wordpress --revision 3 -n chapter3
The full list of values is presented by inspecting this revision:
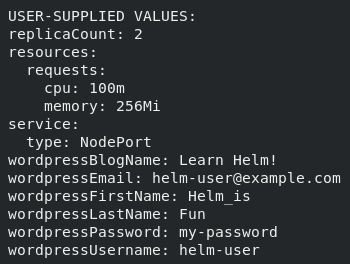
Figure 3.29 – The output of checking a specific revision
It is possible to execute other helm get commands against a revision number to perform a further inspection. If necessary, the helm get manifest command can also be executed against revision 3 to check the state of the Kubernetes resources that would be restored.
In the next section, we will execute the rollback.
Running the rollback
The helm rollback command has the following syntax:
helm rollback <RELEASE> [REVISION] [flags]
Users provide the name of the release and the desired revision number to roll a Helm release back to a previous point in time. Execute the following command to roll back WordPress to revision 3:
$ helm rollback wordpress 3 -n chapter3
The rollback subcommand provides a simple output, printing the following message:
Rollback was a success! Happy Helming!
This rollback can be observed in the release history by running the helm history command:
$ helm history wordpress -n chapter3
In the release history, you will notice that a fifth revision was added with a status of deployed and a description of Rollback to 3. When an application is rolled back, it adds a new revision to the release history. This is not to be confused with an upgrade. The highest revision number simply denotes the currently deployed release. Be sure to check a revision’s description to determine whether it was created by an upgrade or a rollback.
You can get this release’s values to ensure that the rollback now uses the desired values by running helm get values again:
$ helm get values wordpress -n chapter3
The output will show the values from the latest stable release:
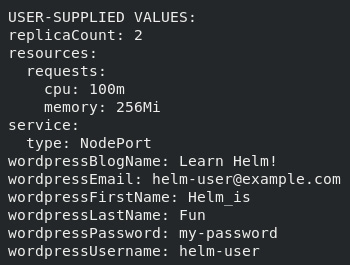
Figure 3.30 – The values from the latest revision
You may notice that we did not explicitly set the chart version or the release’s values in the rollback subcommand. This is because the rollback subcommand is not designed to accept these inputs. It is designed to roll a chart back to a previous revision and leverage that revision’s chart version and values. Note that the rollback subcommand should not be part of everyday Helm practices and that it should be reserved only for emergencies, where the current state of an application is unstable and must be reverted to a previously stable point.
If you have successfully rolled back the WordPress release, you are nearing the end of this chapter’s exercise. The final step is to remove the WordPress application from the Kubernetes cluster by using the uninstall subcommand, which we will describe in the next section.
Uninstalling the WordPress release
Uninstalling a Helm release means deleting the Kubernetes resources that it manages. In addition, the uninstall command deletes the release’s history. While this is often what we want, specifying the --keep-history flag will instruct Helm to retain the release history.
The syntax for the uninstall command is very simple:
helm uninstall RELEASE_NAME [...] [flags]
Uninstall the WordPress release by running the helm uninstall command:
$ helm uninstall wordpress -n chapter3
Once WordPress is uninstalled, you will see the following message:
release "wordpress" uninstalled
You will also notice that the wordpress release no longer exists in the chapter3 namespace:
$ helm list -n chapter3
The output will be an empty table. You can also confirm that the release is no longer present by attempting to use kubectl to get the WordPress deployments:
$ kubectl get deployments -l app.kubernetes.io/name=wordpress -n chapter3
No resources found in chapter3 namespace.
As expected, there are no more WordPress deployments available. However, there is still one PersistentVolumeClaim sticking around:
$ kubectl get pvc -n chapter3
NAME STATUS
data-wordpress-mariadb-0 Bound
PersistentVolumeClaim was not deleted because it was created in the background by the MariaDB StatefulSet. In Kubernetes, PersistentVolumeClaim resources that are created by StatefulSets are not automatically removed if the StatefulSet is deleted. During the helm uninstall process, the StatefulSet was deleted but the associated PersistentVolumeClaim was not, as expected. The PersistentVolumeClaim command can be deleted manually with the following command:
$ kubectl delete pvc data-wordpress-mariadb-0 -n chapter3
Now that we’ve finished running through an example of installing, upgrading, rolling back, and uninstalling an application using Helm, let’s shut down the Kubernetes environment.
Shutting down your environment
First, you can remove this chapter’s namespace by running the following command:
$ kubectl delete namespace chapter3
After the chapter3 namespace has been deleted, stop the minikube VM:
$ minikube stop
This will shut down the VM but will retain its state so that you can quickly begin working again in the next exercise.
Summary
In this chapter, you learned how to install a Helm chart and manage its life cycle. We began by searching Artifact Hub for a WordPress chart to install. After locating a chart, the repository containing the chart was added by following the instructions from its Artifact Hub page. We then proceeded to inspect the WordPress chart to create a set of values that overrides their defaults. These values were saved to a values file called wordpress-values.yaml, which was then provided during the installation.
After the chart was installed, we used helm upgrade to upgrade the release by providing additional values. We then performed a rollback with helm rollback to restore the chart to a previous state. Finally, we removed the WordPress release at the end of the exercise with helm uninstall.
This chapter taught you how to leverage Helm as an end user, and how to use an already-written Helm chart. In the next chapter, we will explore the concepts and structure of a Helm chart in greater detail to begin learning how to create Helm charts of our own.
Further reading
To learn more about adding repositories locally, inspecting charts, and using the four life cycle commands used throughout this chapter (install, upgrade, rollback, and uninstall), go to https://helm.sh/docs/intro/using_helm/.
Questions
- What is Artifact Hub? How can a user interact with it to find charts and chart repositories?
- What is the difference between the helm get and helm show commands?
- What is the difference between the --set and --values parameters in the helm install and helm upgrade commands? What are the benefits of using one over the other?
- What command can be used to provide the list of revisions for a release?
- What happens by default when you upgrade a release without providing any values? How does this behavior differ from when you do provide values for an upgrade?
- Imagine that you have five revisions of a release. What would the helm history command show after you roll back the release to revision 3?
- Imagine that you want to view all of the releases deployed to a Kubernetes namespace. What command should you run?
- Imagine that you run helm repo add to add a chart repository. What command can you run to list all of the charts in that repository?