
This chapter will cover the tools of the Stress Analysis and Dynamic Simulation environments found in the Inventor Professional suite and the Inventor Simulation suite. The Stress Analysis environment allows you to perform static and modal analysis on parts and assemblies by defining component materials, loads, constraints, and contact conditions. The Dynamic Simulation environment allows you to analyze an assembly in motion by specifying loads, constraints, motion joints velocities, acceleration, and environmental factors such as gravity and friction. Both environments can be used together to determine motion loads enacted upon one component by another component at a given point in time.
In this chapter, you'll learn to:
Set up and run stress analysis simulations
Set up and run dynamic simulation simulations
Export results from the Dynamic Simulation environment to the Stress Analysis environment
Although the terms stress analysis and finite element analysis (FEA) are often used interchangeably in conversation, it may be helpful to understand these terms as they relate to the tools available to you in the Inventor Stress Analysis environment. FEA is an analysis of a complex object solved by dividing that object into a mesh of smaller elements upon which manageable calculations can be run. The stress analysis done by Inventor uses this method to allow you to analyze your design under a given set of conditions specified by you in order to determine basic trends in regard to the specifics of your design.
Deriving an exact answer from the analysis of a model is generally reserved for an analyst with specific training, often for a more powerful set of analysis tools. With that said, you can use the Inventor simulation tools to run basic analyses to confirm design validity. This can be useful to determine design basics before going down a wrong path. Or you can use these tools to help find out, for example, whether a component or assembly is being over- or underdesigned for a given set of loads and/or vibrations. Inventor's stress analysis tools are also useful when determining how feature size and locations will affect the integrity of the part. For instance, how close to the edge of a bracket can you move a hole? Is another brace required to prevent a sheet-metal face from "pillow casing" because of a pressure load? Questions of this nature are ideal uses for these tools and can significantly reduce the number physical prototypes required to prove a final design.
Dynamic simulation allows you to set the components of your model in motion to verify how those parts interact with one another and to determine the force enacted on one component (or group of components) by another component (or group of components). The Dynamic Simulation environment allows you to define the way parts relate to one another and how the forces present create motion in the context of a timeline. From the simulation, you can determine how and when parts interact as well as the amount of force present for any point in time. For example you might use these tools to simulate a force applied to a shaft used to turn a lever, which in turn contacts a catch stop, where the goal is to determine the maximum force present throughout the entire sequence.
You can simulate a stress situation on your design to determine the effects of various load and constraint scenarios to determine areas of weakness, better design alternatives, how much a part is over- or underbuilt, to what extent a design change will impact a design, and so on. Using parametric studies, you can determine a combination of these elements to see how multiple changes impact a design at the same time. For more information on this, refer to the "Conducting Parameter Studies" section in this chapter. This is an important task because understanding the basic tools and workflow is the first step to setting up effective simulations.
The basic stress analysis workflow is as follows:
Simplify the selected model for analysis.
Enter the Stress Analysis environment (go to the Environment tab, and select Stress Analysis).
Create a simulation.
Specify the materials for the components.
Specify the load types, locations, and amounts.
Specify the support types and locations.
For assemblies, gather and refine contact between components.
Generate a mesh.
Run the simulation.
Interpret the results.
You can perform static and modal stress analysis on parts and assemblies in the Stress Analysis environment. To enter this environment, click the Stress Analysis button on the Environments tab. Once in the Stress Analysis environment, you use the Create Simulation button, and specify either Static Analysis or Modal Analysis. It's important to understand the difference between static and modal analysis:
- Static analysis
This attempts to determine the stress placed on a component by a particular set of loads and constraints. The stress is considered static because it does not vary due to time or temperature. You can import motion loads determined from the Dynamic Simulation environment to analyze the stress at any given time step for moving parts.
- Modal analysis
This attempts to determine the dynamic behavior of a model in terms of its modes of vibration. An example would be trying to determine whether the vibration generated by a running motor would create significant disturbance to a sensitive mechanism within the design.
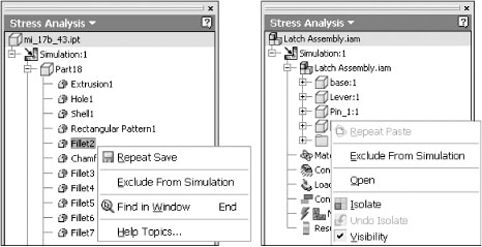
When working with assemblies, you should exclude parts that are not affected by or do not add to the results of the simulation in order to simplify the simulation and reduce the time required to run it. Excluding small parts such as fasteners, whose functionality is replicated by simulation constraints or forces, is also recommended. You can do this by expanding the assembly browser node, right-clicking the part to be excluded, and then selecting Exclude From Simulation.
When working with a part file in the simulation environment, you can suppress small features that are irrelevant to stress concentrations, such as outer fillets and chamfers. These "finish" features typically only complicate the mesh needed for the simulation and add overhead to the analysis. Other features that are typically excluded from simulations are small holes with diameters of less than 1/100 of the length of the part, embossed or engraved text, and other aesthetic features. Excluding features of these types can have a significant impact on the meshing process and the simulation's run time. Figure 17.1 shows the exclusion of features on the left and parts on the right.
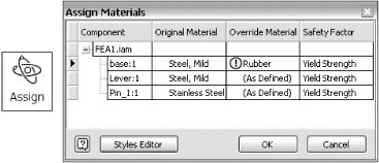
To specify the material of each part in a simulation, use the Assign button on the Material panel of the Stress Analysis tab. Material properties must be fully defined in order for the material to be used for the simulation. Materials with incomplete information are marked with an icon. Figure 17.2 shows the Assign button used to access the Assign Materials dialog box as well as the icon indicating incomplete materials have been specified.
You can specify the original material for each component or specify an override (per simulation) from the Material Library. To change the original material of the part file while in the Stress Analysis environment, click the Inventor button
It is assumed that materials are constant, meaning there is no change because of time or temperature to the structural properties of the material. All materials are assumed to be homogenous, with no change in properties throughout the volume of the part. And it is also assumed that stress is directly proportional to strain for all materials.
Constraints added in the simulation limit the movement or displacement of the model for the purposes of the simulation. To constrain a model for static simulations, you should remove all free translational and rotational movements. You should also strive to neither over- nor underconstrain your model because both can impact the simulation results.
You can create all the constraint types by clicking the constraint tool buttons on the Constraints panel of the Stress Analysis tab, as shown in Figure 17.3.
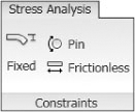
These are the types of simulation constraints available:
- Fixed constraints
These remove all translational degrees of freedom and can be applied to faces, edges, or vertices, typically to simulate a part that is bonded or welded to another component. You can click the >> button to specify the Use Vector Components option and free the component in a given vector plane. Fixed constraints can also be used to specify a known displacement of a component in order to determine the force required to create the displacement.
- Frictionless constraints
Use these constraints to prevent the selected surface from deforming or moving in a direction normal to the selected surface. You can also use frictionless constraints to simulate linear bearings and slides. Because most surface-to-surface situations are not entirely frictionless, you can expect the simulation to return more moderate results. If friction is considerable, it can be compensated for in the Dynamic Simulation environment, and the results can be imported into the Stress Analysis environment.
- Pin constraints
These are used to apply rotational constraints on a selected cylindrical face or faces, such as where holes are or where parts are supported by pins or bearings. Use the >> button to set the direction options. A pin that rotates in a hole would have only the tangential direction free, one that slides in a hole but does not rotate would have only the axial direction free, one that slides and rotates would have both the axial and tangential directions free, and so on.
Figure 17.4 shows the simulation constraint dialog boxes.

Loads are forces applied to a part or assembly resulting in stress, deformation, and displacement in components. A key to applying loads is being able to predict or visualize how parts will respond to loads. For simple static simulations, this is generally fairly straightforward, but for more complex designs where one component exerts a force on another, which exerts a force on yet another, loads will likely need to be determined through the use of the Dynamic Simulation tools, as discussed later in this chapter.
You can access all the load types from the Loads panel of the Stress Analysis tab, as shown in Figure 17.5.
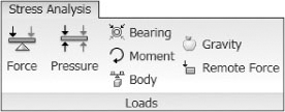
These are the types of load available:
- Force
This is specified in newtons (N) or pounds-force (lbf or lbforce). Forces can be applied by selecting a single or set of faces, edges, or vertices for the location. Selection sets must be of the same type, meaning that once you select a face, you can add faces to the selection set but not edges or vertices. The force direction can be specified by selecting an edge or face and then changed using the Flip Direction button. Direction is automatically set to the normal of the face (with the force directed at that face) when a face is selected for either a location or a direction. You can avoid stress singularities by selecting faces or the location rather than edges or vertices.
- Pressure
This is specified in megapascals (MPa) or pounds per square inch (psi). Pressure can be applied only to a face or set of faces. Pressure is uniform and is applied normal to the surface at all locations. When applying loads to faces that are involved in contacts, you should use pressure instead of force.
- Bearing
These are specified in newtons (N) or pounds-force (lbf or lbforce). Bearing loads are applied only to cylindrical faces. By default, the load is along the axis of the cylinder, and the direction is radial. You can specify the direction by selecting a face or edge. These are generally used to simulate a radial load such as roller bearing or a moment when specified perpendicular to the axis.
- Moment
These are specified in units of torque such as newton meters (N m or N*m) or pounds-force inch (lbforce in or lbf*in). Moment locations can be applied to faces only. Direction can be defined by selecting faces, straight edges, axes, and two vertices.
- Remote Force
These can be used as an alternative to applying a force load directly to a part, by specifying the location in space from which the force originates. Apply Remote Force by selecting faces and specifying in N or lb.
- Gravity
These are specified in units of acceleration such as millimeter per second squared (mm/s^2) or inch per second squared (in/s^2). Apply gravity to a face or parallel to a selected edge. The default gravity value is set to 386.220 in/s^2 or 9810.0mm/s^2.
- Motion
Unlike the other forces, there is no tool to apply Motion loads in the Stress Analysis environment; instead these are created from reaction forces determined from the Dynamic Simulation environment using the Export to FEA tool for a component per specified time step(s). Once done, you can consider motion loads by one of the following methods:
For a new simulation, click Create Simulation button on the Stress Analysis tab.
For an existing simulation, right-click the existing simulation in the browser node, and select Edit Simulation Properties.
In either case, once the Simulation Properties dialog box is open, you follow these steps:
In the Simulation Properties dialog box, select the Motion Loads Analysis check box.
Select the part from the enabled list.
Select the time step from the list.
Click OK.
- Body
These are specified in units of acceleration such as millimeter per second squared (mm/s^2) or inch per second squared (in/s^2). Body loads are the forces acting on the entire volume or mass of a component, such as gravity, linear acceleration, centripetal force, and centrifugal force. Select a planer face for linear acceleration or a cylindrical face for an axial direction. Use a body force to simulate the effect of outside forces. Only one body force per simulation is allowed.
Use the Linear tab to specify linear acceleration and the Angular tab to specify angular velocity or angular acceleration. The Angular tab has three possible results depending upon what is specified and how:
Velocity and acceleration have the same rotation axis, with an unspecified location. The solver determines the location along the axis.
Velocity and acceleration have different rotation axes, with an unspecified location. The solver determines the location along the axis. A point is selected along the velocity rotation axis for the acceleration location.
Velocity and acceleration have different rotation axes, with a specified location.
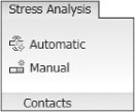
Contacts between components are detected when the simulation is run and automatically listed in the browser under the contact node. However, you can run the Automatic Contact tool to see them before running the simulation and then modify any of the automatic contacts listed or manually add other contacts. To add contacts, click either the Automatic or Manual button on the Contacts tab, as shown in Figure 17.6.
In order for contacts to be added, the faces must meet the following criteria:
The selected faces must be within 15 degrees of parallel. This 15-degree limit is a system setting and cannot be changed.
The distance between the selected faces cannot exceed the Tolerance setting specified in the simulation's properties. You can access the simulation's properties by right-clicking the simulation node in the browser for existing simulations, or you can specify them when you create the simulation.
Contacts are listed in the contact node in the browser and categorized per contact type. The type and components involved are set in the contact node name. Contacts are also listed under the browser node of each involved component. Modal analysis lists only the Bonded and Spring contact types, whereas all types are available for static analysis. You can change the contact type of automatic contacts by right-clicking a contact and choosing Edit Contact or by using the Ctrl or Shift key to multiselect contacts and then right-clicking and choosing Edit Contact. You can suppress contacts as well. Figure 17.7 shows the edit options.
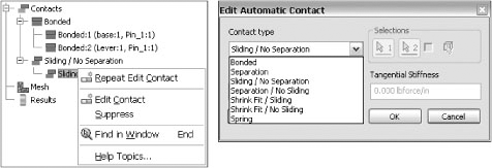
These are the available contact types:
- Bonded
This creates a rigid bond between selected faces.
- Separation
This partially or fully separates selected faces while sliding.
- Sliding/No Separation
This creates a normal to face direction bond between selected faces while sliding under deformation.
- Separation/No Sliding
This partially or fully separates selected faces without them sliding against one another.
- Shrink Fit/Sliding
This creates conditions similar to Separation but with a negative distance between contact faces, resulting in overlapping parts at the start.
- Shrink Fit /No Sliding
This creates conditions of Separation/No Sliding but with a negative distance between contact faces, resulting in overlapping parts at the start.
- Spring
This creates equivalent springs between the two faces. You define total Normal Stiffness and/or Tangential Stiffness. The Normal Stiffness and Tangential Stiffness options are available for the Spring contact only.
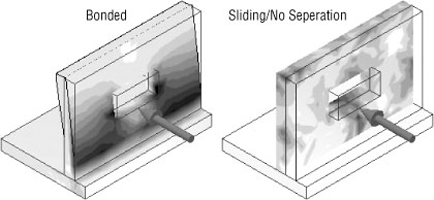
You can change the contacts between two components to see how the simulation results change. Figure 17.8 shows the same simple assembly simulation with a different contact applied between the two plates. On the left, a bonded contact is used, and the results show that the vertical plate is deformed by the load and that stress is concentrated at, and distributed out from, the contact joint. On the right, a Sliding/No Separation joint is used, and the results show that the vertical plate is essentially pushed along the horizontal plate, with the stress being spread over the vertical plate, with little or no concentration and no stress being distributed to the horizontal plate.
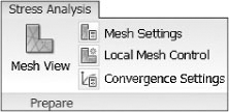
Although you can accept the default mesh settings and run the simulation, often you will want to adjust the mesh settings to compensate for areas where a finer mesh is required. You can adjust the global mesh settings or use a local mesh control when needed. Figure 17.9 shows the mesh tools found on the Prepare panel.
Use the Mesh Settings tool to change these mesh properties:
- Average Size
Controls the mean distance between mesh nodes. Setting the average size to a smaller value results in a finer mesh. This setting is relative to the overall size of the model. A value between 0.100 and 0.050 is generally recommended.
- Minimum Size
Controls the minimum distance between mesh nodes as a fraction of the Average Size value. Increasing this will decrease the mesh element density. Decreasing this value will increase the mesh element density. This setting is sensitive, and changes typically result in dramatic changes to the mesh quality. A value between 0.100 and 0.200 is generally recommended.
- Grading Factor
Controls the ratio of adjacent mesh edges where fine and coarse mesh areas come together. The smaller the factor used, the more uniform the mesh will be. A value of 1 to 10 can be used, but a value between 1.5 and 3.0 is typically recommended.
- Maximum Turn Angle
Controls the maximum angle for meshes applied to arcs. Specifying a smaller angle results in a finer mesh on curved areas. A value between 30 and 60 degrees is typically recommended.
- Create Curved Mesh Elements
Controls the creation of meshes with curved edges and faces. If unselected, a less accurate mesh is created, but performance may be better.
- Ignore Small Geometry
This should be deselected for models with thin and/or long profiles that contain small detailed cross sections.
- Use Part Based Measure For Assembly Mesh
This sets part mesh sizes relative to the overall dimensions of the part models. Deselecting this option sets the mesh size relative to the overall assembly dimensions. Use this option for assemblies composed of several parts of varying sizes. This setting is available only in an assembly.
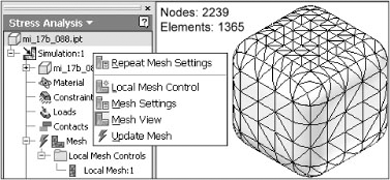
Once the mesh settings have been adjusted, you can click the Mesh View button to generate the mesh initially and then toggle on the visibility of the mesh afterward. It is not required that you generate the mesh manually because it will be done during the simulation, but this may allow you to identify areas of importance on the model that are not meshed to your liking and then apply a local mesh.
You can use the Local Mesh Control button to select faces and edges that require a finer meshing than what is required for the rest of the model. This allows you to manually improve the mesh quality for small or complex faces. A browser node is created in the Mesh node for each local mesh you create. You can right-click the local mesh and select Edit Local Mesh Control to change the mesh size or change the faces or edges selected.
When mesh settings or local mesh controls have been updated, a lightning bolt icon will display in the browser to indicate that the mesh is out-of-date. You can right-click the Mesh browser node and choose Update Mesh, as shown in Figure 17.10. This figure shows a simple cube with a local mesh applied to the top face; the other faces are meshed according to the mesh settings.
Once you have set the material, loads, constraints, and contacts, you are ready to run the simulation. To run a simulation, click the Simulate button on the Solve panel, or right-click the simulation node in the browser and select Simulate. The Simulate dialog box displays information about the simulation to be run and will display warning and stop errors when not all criteria is available to run. For instance, if you have forgotten to set a material type, the Simulate dialog box will stop you and tell you this. If you need to cancel a simulation in process, click the Cancel button, or press the Esc key.
When a simulation becomes out-of-date because of changes to mesh settings, loads, constraints, or other design parameters, you will see a red lightning bolt next to the Results browser node. To update the simulation, simply right-click the browser node and click Simulate, or just click the Simulate button on the Solve panel again.
When working with parametric studies, it is possible to run simulations for more than one configuration at a time. You can run an Exhaustive Set or Smart Set of configurations or just run the current configuration. You can find more information on simulating configurations in the "Conducting Parameter Studies" section.
Once a simulation is run, the Results node of the browser is populated, and the graphics area updates to show the shaded distribution of stresses. You can switch between available results types by double-clicking each type in the Results browser folder. Figure 17.11 shows a typical simulation result. Note the Results folder in the browser.
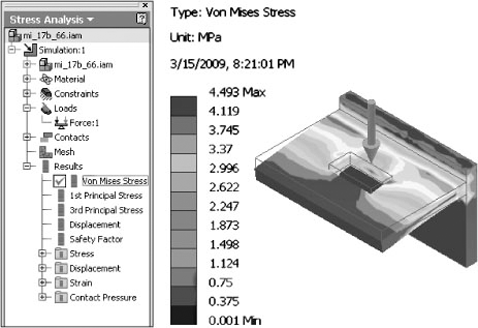
The Results node of the browser will display the subcategories of results, each displayed on the model by the use of color contours. The colors displayed on the model correspond to the value ranges shown in the color bar legend. Typically areas of interest are displayed in warm colors such as red, orange, and yellow. These colors represent areas of high stress, high deformation, or a low safety factor. You can adjust the number of colors used in the color bar as well as the position and size of it by clicking the Color Bar button on the Display panel. Listed here are the results subcategories:
- Von Mises Stress
Maximum stress theory states that failure will occur when the maximum principal stress in a component reaches the value of the maximum stress at the elastic limit. This theory works to predict failure for brittle materials. However, in elastic bodies subject to three-dimensional loads, complex stresses are developed, meaning that at any point within the body there are stresses acting in various directions. The Von Mises criterion calculates whether the combining stress at a given point will cause failure. This is represented in the results node as the Von Mises Stress, also commonly known as equivalent stress.
- 1st Principal Stress
Principal stresses are calculated by converting the model coordinates so that no shear stresses exist. The 1st principal stress is the maximum principal stress and is the value of stress that is normal to the plane in which shear stress is zero. This allows you to interpret maximum tensile stress present because of the specified load conditions.
- 3rd Principal Stress
The 3rd principal is the minimum principal stress, and it acts normal to the plane in which shear stress is zero. It helps you to interpret the maximum compressive stress present in the part because of the specified load conditions.
- Displacement
The displacement results show you the deformed shape of your model in a scaled representation, based on the specified load conditions. Use the displacement results to determine the location and extent to which a part will bend and how much force is needed to bend it a given distance.
- Safety Factor
The safety factor is calculated as the yield strength of the material divided by 1st principal stress. This shows you the areas of the model that are likely to fail under the specified load conditions. The calculated safety factor is shown on the color bar legend as the value followed by min. A safety factor of less than 1 indicates a permanent yield or failure.
- Frequency Modes
Modal results appear under the Results node in the browser as frequency modes only when running a modal analysis. You can view the mode plots for the number of specified natural frequencies. In an unconstrained simulation, the first six modes will occur at 0Hz corresponding to the six standard rigid body movements.
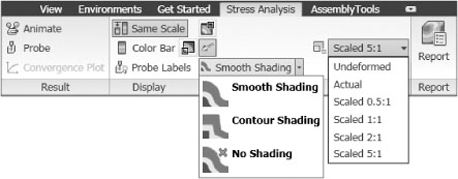
You can use several display tools to adjust the results display in order to clearly interpret the calculated results. You can access these tools on the Display panel, as shown in Figure 17.12.
The following list describes the result, display, and report tools shown in the previous figure:
- Same Scale
Maintains the same scale while viewing different results.
- Color Bar
Opens the Color bar dialog box so you adjust the color bar display settings.
- Probe
Allows you to select on the model and display results information per the selection. Right-click a label to edit or delete it.
- Probe Labels Display
- Shading
Displays color changes using a blended transition when set to Smooth Shading, striated shading when using Contour Shading, and no color shading when set to No Shading.
- Maximum
Turns on and off the display of the point of maximum result, which allows you to quickly identify the maximum result on the model.
- Minimum
Turns on and off the display of the point of minimum result, which allows you to quickly identify the minimum result on the model.
- Boundary Condition
Turns on or off the display of load symbols on the part.
- Displacement Scale
Allows you to select from a preset list of displacement exaggeration scales.
- Element Visibility
Displays the mesh over the top of the result contours.
- Animate Displacement
Animates the displacement for the current result type and displacement scale.
- Report
Generates reports of analysis simulations in HTML format with PNG graphics.
Often the purpose of a stress analysis simulation is to determine how a change to a design feature will impact the part or assembly's strength. The parametric study tools allow you to make comparative evaluations based on different parameter values at the feature, part, and assembly levels. To create a parametric study, you nominate certain parameters for evaluation in the study, define the range for each parameter, specify the design constraints that you are interested in seeing for those parameters, and finally analyze the results of each variation.
To create a parametric study, use these steps as a guideline:
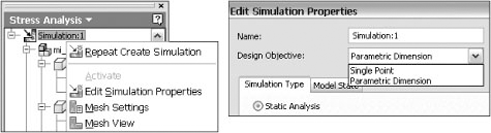
Set the simulation's design objective to Parametric Dimensions. How you do this depends on whether you are creating a new simulation or editing an existing one. You can set the design objective to Parametric Dimensions by using the Create Simulation button when creating a new simulation or by right-clicking an existing simulation in the browser and choosing Edit Simulation Properties, as shown in Figure 17.13.
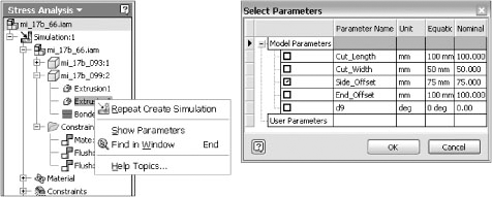
Nominate selected parameters for use in the study by expanding the browser node for the model and then right-clicking the assembly, part, or feature node you want to use in the study and selecting Show Parameters. Figure 17.14 shows a parameter called Side_Offset being nominated.
Define the range for the selected parameters by following these steps:
Click the Parametric Table button on the Manage panel of the Stress Analysis tab.
Enter a parameter range in the Value column; values must be in ascending order.
Create a simple range by separating the minimum and maximum values with a hyphen; for instance, you can enter 70-85.
Specify specific values in a range by separating each value with a comma, colon, hyphen, or slash; for instance, you can enter 70, 75, 80, 85.
Add a colon to a range to specify the number of points included; for instance, you can enter 70-85 : 4.
Use the slider to set the current value.
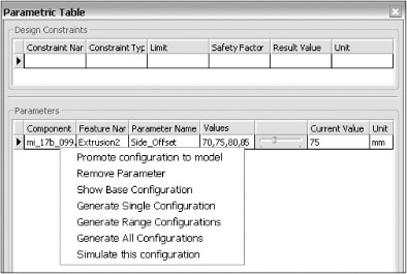
Right-click the parameter row, and choose from the options to generate the geometry configurations. For instance, if you were to set the range of a hole position to 70, 75, 80, 85, four model configurations would be created with the hole positioned at each of those values. Figure 17.15 shows a Parametric Table configuration for the Side_Offset parameter.
Add design constraints to the parametric table by following these steps:
In the Design Constraints area of the Parametric Table, right-click a row, and select Add Design Constraint.
In the Select Design Constraint dialog box, specify a results component, such as Von Mises Stress, Displacement, Safety Factor, and so on.
Specify the value of interest such as Minimum or Maximum (this applies to all geometry).
You can modify the selection set by selecting Include or Exclude and then selecting bodies, faces, or edges on-screen. Doing so focuses the results to a specific area of interest. Figure 17.16 shows the Safety Factor design constraint being added.
Specify the constraint type, set limits, enter a safety factor, and review the results using the following steps:
In the Parametric Table dialog box, click the Constraint Type drop-down, and select from the list.
Enter a value in the Limit column to filter the results to the set that meets the bounding limit when optimizing other design constraints.
Enter a safety factor to specify at what extent a variable can be exceeded before causing the design constraint to fail. A comparison to the limit factored by the Safety Factor setting determines whether it meets the limit or range.
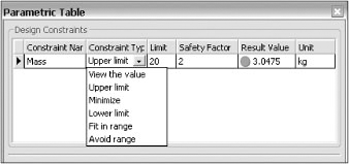
The Result Value column displays the value of the design constraint for the simulation. When the value is within the limit, it displays green. When the limit is exceeded, it displays red. When out of range, it displays gray, and the closest value display is displayed. Figure 17.17 shows the Mass design constraint being configured.
When multiple parameters are added to the table, configurations can be created. These configurations can then be generated and simulated by following a few simple steps:
In the Parametric Table dialog box, set the parameter values to the combination you want to simulate, right-click any parameter row, and choose Simulate This Configuration.
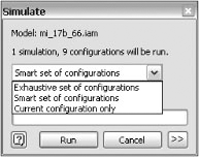
To simulate all configurations, exit the Parametric Table dialog box, and click the Simulate button on the Solve panel. You can choose to run an exhaustive set, a smart set, or the current configuration.
Once the simulations have been run, you can use the slider bar in the Parametric Table dialog box for each parameter to set the combinations and observe the results.
The Exhaustive Set Of Configurations setting runs all possible combinations of parameter settings, whereas the Smart Set Of Configurations setting runs only those combinations of parameter settings that Inventor determines have not yet been run. Figure 17.18 shows the choices for running simulation configurations.

Once you determine that a given configuration satisfies your design needs using the Parametric Table dialog box, you can right-click any of the parameter rows in the table and choose Promote Configuration To Model. This will write the parameter values of the configuration to the source files where you select Yes in the prompt dialog box.
Dynamic simulation is useful during the prototyping stages of design to test the function of interacting parts and for use in failure analysis where interacting parts enact stresses upon one another. When creating a dynamic simulation, you should follow the basic workflow listed here:
Define joints to establish component relationships.
Define environmental constraints such as gravity, forces, imposed motions, joint friction, and joint torque.
Run the simulation.
Analyze the output grapher to determine maximum or minimum stress at a given time step, maximum or minimum velocities, and so on.
Export the results to the Stress Analysis environment for motion stress analysis simulation.
To access the Dynamic Simulation tools, you first open the assembly you want to create the simulation in, and then you click the Dynamic Simulation button on the Environments tab.
In the Dynamic Simulation environment, joints are used to define the way that components relate to one another concerning motion. Although you might at first associate joints with assembly constraints, joints and constraints are actually two separate concepts. In the assembly environment, all components are assumed to have six degrees of free motion until grounded or constrained in such a way that some or all of these degrees of freedom (DOF) are removed. Standard joints approach the issue of DOF from the opposite end. In the Dynamic Simulation environment, all components are assumed to have zero DOF until joints are applied to add free motion. You can then add special joint types manually to restrict degrees of freedom.
Understanding the difference between assembly constraints and joints is important when working with joints. However, if you have a properly constrained model, much of the joint creation can be automated by setting the Simulation Settings option to Automatically Convert Constraints To Standard Joints. You can do this by clicking the Simulation Settings button on the Dynamic Simulation tab. Figure 17.19 shows the Automatically Convert Constraints To Standard Joints option.

When the convert constraints option is on, any assembly constraints that are changed will automatically update and be converted to a standard joint when possible. You can apply constraints while in the Dynamic Simulation environment by switching to the Assembly tab or pressing C on the keyboard. When the convert constraints option is off, you can use the Convert Constraints button to manually convert assembly constraints.
To convert constraints manually, you must have the automatic convert constraints option turned off and the Convert Assembly Constraint button enabled. Using the Convert Assembly Constraint tool, you simply select the parts you want to apply a joint to, and the assembly constraints that exist between the two will appear in the dialog box. You can deselect one or more of the constraints to apply a less restrictive joint solution. Figure 17.20 shows the different results achieved by selecting or deselecting the constraints that exist on a shaft and handle.

In addition to the automatic joint creation, you can (and most often need to) apply joints to your model manually. You can access the joint tool by clicking the Insert Joint tool. When you do so, the Insert Joint dialog box offers a drop-down with all the joint types listed. Alternatively, you can click the Display Joint Table next to the drop-down to display the five joint categories as buttons in the top of the table. Clicking a category button shows the available joint types for that category. Figure 17.21 shows the joint categories.
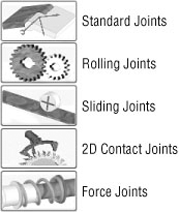
Standard joints are created by converting assembly constraints to joints, either automatically or manually. Only one type of standard joint, called Spatial, is listed in the Display Joints table when the option to automatically create constraints is on. Here is a list of all the standard joints:
- Revolution joints
Used to create a rotational relationship between cylindrical faces and axes of two components.
- Prismatic joints
Used to constrain the edge of one component to the edge of another.
- Cylindrical joints
Used to constrain the axis of one cylindrical component to the axis of another, thereby allowing the second component to slide along the axis of the first.
- Spherical joints
Used to create ball and socket joints between two components.
- Planar joints
Used to constrain the planar face of one component to the planar face of another. The first component is the motionless component, and the second is allowed to move along the face of the first.
- Point-Line joints
Used to constrain the center point of a sphere to the axis of a cylinder or a point on another component.
- Line-Plane joints
Used to constrain a planar face of one component to a point on another.
- Point-Plane joints
Used to constrain the point of one component to the planar face of another.
- Spatial joints
Used to create a relationship between two components where all six degrees of freedom are allowed to be free, without causing errors of redundancy in the simulation.
- Welding joints
Used to create a relationship between two components so that there are no degrees of freedom between them so that they are considered as a single body in the simulation.
Ten types of rolling joints are available. Rolling joints are used to restrict degrees of freedom. Here is a list of the rolling joint types:
- Rolling Cylinder On Plane joints
Used to constrain a rotating cylindrical face to a 2D planar face. The relative motion between the two selected components is required to be 2D. A basic, continuous, cylindrical face is required for this joint type.
- Rolling Cylinder On Cylinder joints
Used to constrain one rotating cylindrical face to another rotating cylindrical face. The relative motion between the two selected components is required to be 2D. A basic, continuous, cylindrical face is required for this joint type.
- Rolling Cylinder In Cylinder joints
Used to constrain one rotating cylindrical face to the inside of another rotating cylindrical face. The relative motion between the two selected components is required to be 2D. A basic, continuous, cylindrical face is required for this joint type.
- Rolling Cylinder Curve joints
Used to constrain a rotating cylindrical face to maintain contact with a curved face such as a cam. The relative motion between the two selected components is required to be 2D.
- Belt joints
Used to constrain a belt component to two cylindrical components that rotate. Faces, edges, and sketches can be selected.
- Rolling Cone On Plane joints
Used to constrain a rotating conical face to a 2D planar face. Faces, edges, and sketches can be selected.
- Rolling Cone On Cone joints
Used to constrain a rotating conical face to another rotating conical face. Faces, edges, and sketches can be selected.
- Rolling Cone In Cone joints
Used to constrain a rotating conical face to the inside face of a component that is not rotating. Faces, edges, and sketches can be selected.
- Screw joints
Used to constrain components that screw together by specifying a thread pitch to define the travel per rotation. Faces, edges, and sketches can be selected.
- Worm Gear joints
Used to constrain a component to a helical gear by specifying a thread pitch to define the travel per rotation. Faces, edges, and sketches can be selected.
The five joint types in the sliding category are used to restrict degrees of freedom between the two components selected. In all five, the relative motion between the two selected components is required to be 2D. Here are the five types of sliding joints:
- Sliding Cylinder On Plane joints
Used to constrain a cylindrical face to a 2D planar face so that it will slide along the plane without rotating
- Sliding Cylinder On Cylinder joints
Used to constrain a cylindrical face to slide on another cylindrical face
- Sliding Cylinder In Cylinder joints
Used to constrain a cylindrical face to slide inside another cylindrical face
- Sliding Cylinder Curve joints
Used to constrain a cylindrical face to slide on a curved face such as a cam
- Sliding Point Curve joints
Used to constrain a point on the second component to slide along a curve defined by the selected face, edge, or sketch on the first component
There is only one joint type in this category, and it is used to restrict degrees of freedom:
- 2D Contact joints
Creates contact between curves on two selected components. Curves can be faces, edges, or sketches, but the relative motion between the selections must be planar. The contact is not required to be permanent for this joint type.
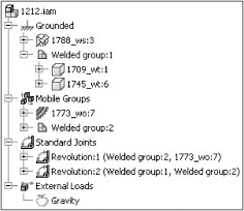
When components are assigned joints, either manually or automatically, they are grouped according to the results of the joints in the browser. For instance, if components are fully constrained to one another in the assembly, then they will be assigned a weld joint and listed in the browser as a welded group. If one of those components is grounded, then the welded group will be listed in the Grounded folder in the browser. If one of them is used in a motion joint, then it will listed as in the Mobile Groups folder. Figure 17.22 shows an assembly with two welded groups present. One is listed under Grounded, and the other is listed under Mobile Groups. You'll notice that both are used in the joint called Revolution: 2.
Here are some points to remember when creating joints:
The Joint Table displays a pictorial representation for each joint type to assist you with determining which to use.
Assembly constraints are not converted to joints in a one to one fashion, but instead joints are often created by combining assembly constraints. For instance, a mate and two flush constraints between two parts might be converted to a weld joint.
Dynamic simulation performance is affected by the number of joints present. If you are simulating a particular set of components in a large assembly, it might be beneficial to manually weld most of the components and consider motion only for the set you need.
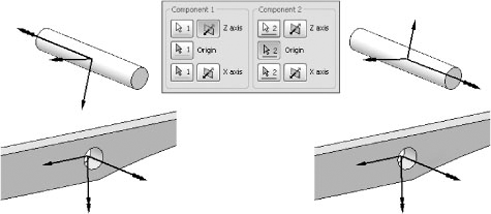
When placing joints, you are often required to align the z-axis of the joint on both components. Failing to do so will prompt a warning.
If you have the option to automatically convert assembly constraints selected, any assembly constraint you place in the Dynamic Simulation environment will automatically be converted to a standard joint.
When placing joints, you should keep an eye on the coordinate triad and ensure that the arrows align when required. Figure 17.23 shows the use of the flip arrow to align the z-axis.
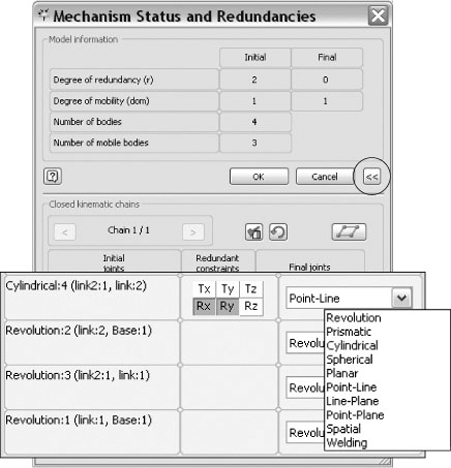
In the Dynamic Simulation environment, joints are said to contain redundancy when they are overconstrained or have too many unknowns to solve. When redundancy occurs, Inventor prompts you to use the Repair Redundancy tool to repair the joint. In most cases, one or more solutions are suggested in the Repair Redundancy tool. Figure 17.24 shows a link assembly that has a redundancy in joint 4, the Cylindrical joint. To resolve this, the Mechanism Status tool is selected.
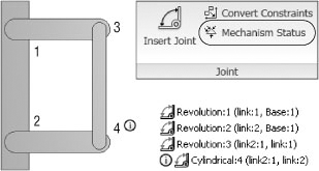
In the Mechanism Status And Redundancies dialog box, you can use the >> button to expand the options for resolving a redundancy. Typically a new joint type is suggested for the redundant joint. Often you can expand the drop-down and select from a list of possible alternatives, as shown in Figure 17.25.
Also listed in the Mechanism Status And Redundancies dialog box are the redundant constraints. Tx, Ty, and Tz are the translational (linear) constraints, and Rx, Ry, and Rz are the rotational constraints. In Figure 17.25, the Cylindrical joint shows the Rotational X (Rx) and Rotational Y (Ry) are redundant.
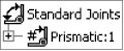
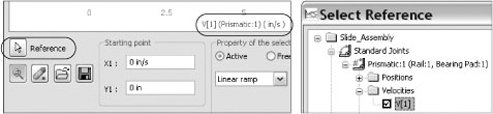
Once joints are applied to the model, it is often required to apply environmental constraints to make the joints perform more realistically or to set the simulation up more efficiently. For example, if you apply a prismatic joint between a rail and a linear bearing pad, a certain amount of friction would be anticipated, so you would modify the joint and apply a dry friction coefficient value. You might also want to create an imposed spring to emulate a spring cushion in the slide channel or set the start position of the slide for the simulation. And then you might want to apply an imposed motion on the joint so that it moves during the simulation as expected. All of this can be done by right-clicking the joint and choosing Properties. When an environmental constraint for a particular joint is added, the constraint is marked with a green pound sign next to it in the browser, as shown in Figure 17.26.
Often you will want to change the initial position of a component involved in a joint so that the simulation will run differently to how it is constrained. For instance, the rail and bearing pad example might be constrained so that the bearing is in the start position, but for the purposes of reducing the time of the simulation, it needs to run only from the middle of the cycle to the end. Setting the initial position allows this. To adjust the initial position of a joint, follow these general steps:
Here are some additional options that may apply depending upon the simulation and results you are trying to achieve:
Select Locked so that the joint cannot be modified in the simulation.
Deselect the Velocity check box to manually set the initial velocity of this degree of freedom, or leave it selected to allow the software to automatically compute the initial velocity. It's recommended that you leave this set at Computed and impose a velocity, using the Impose motion option (covered in the coming pages).
Set the initial minimum or maximum bounds values for the degree of freedom if desired. Value sets the boundary for the force or torque of this DOF, Stiffness sets the stiffness of this DOF, and Damping sets the damping boundary for this DOF.
Joint torques can be set to control damping and friction and also to impose a spring cushion. Depending upon the simulation, you can often apply these things to a few key joints and have other dependent joints react off of them. Of course, this depends on the mechanism and the simulation. To adjust a joint for these things, follow these general steps:
Right-click the joint in the browser, and select Properties.
Select the appropriate DOF tab (depending upon the joint, there may be multiples)
Click the Edit Joint Torque button (the appearance of this button varies between rotational and translational joints).
Select the Enable Joint Torque check box.
Right-click an input box, and choose the input type required. Use Constant Value if the value does not change over time, or use the input grapher to enter a graduated input.
Figure 17.27 shows the Joint Torque properties for a prismatic joint.
The range of inputs for Damping, Elastic Stiffness, and Friction are listed here:
Damping is proportional to the velocity of the DOF.
Free Position sets the position at which an imposed spring exerts no force.
Elastic Stiffness sets the imposed spring stiffness.
Friction is added as a coefficient between 0 and 2.
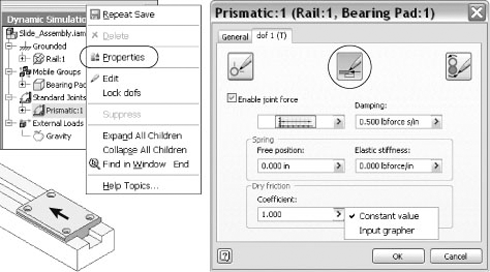
Although motion can be created by applying external forces where that is important, often an imposed motion on a joint is desired to allow control of the timing and position of components not involved in an external force. For instance, in the rail and bearing pad example, the bearing might need to slide out of the way of another component that is being driven by an external force. Setting the imposed motion in the joint properties allows this to happen without the need to apply an external force on the bearing pad. To adjust a joint to include an imposed motion, follow these general steps:
Right-click the joint in the browser, and select Properties.
Select the appropriate DOF tab (depending upon the joint, there may be multiples).
Click the Edit Imposed Motion button.
Select the Enable Imposed Motion check box.
Select a Driving motion parameter type, and enter a value. The parameter types are as follows:
Position imposes a motion to a specified position, typically specified using the input grapher to set the position relative to a time step (in other words, move 100cm over 10 seconds).
Velocity imposes a motion at a specified velocity. Use constant input or use the input grapher to enter a variable velocity to account for startup times and so on.
Acceleration imposes a motion as a specified acceleration. Use constant input or use the input grapher to enter a variable acceleration.
The input grapher is available in a number of input boxes used throughout the Dynamic Simulation environment. When an input is set to use the input grapher, a graph button is present in the input box. If no graph button is present, you can right-click in the input box and select input grapher from the context menu. To open the input grapher, simply click the graph button.
Typically the input grapher is used to specify a value that varies over time. In Figure 17.28, a velocity is being imposed on a joint starting at 0 in/s and coming up to 100 in/s in the first 10 seconds, at which time it levels off for the next 10 seconds before returning to 0 in/s at 30 seconds. The user has right-clicked in the graph to add a control point.
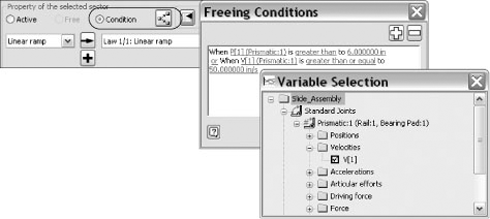
Each portion of the graph between points is selectable as a sector by clicking the graph. In Figure 17.28, the first sector is selected and is shaded. When a sector is selected, the inputs in the bottom half of the Input Grapher dialog box are specific to that sector. You can edit the sector's start and endpoints as well as the law applied to that specific sector.
You can modify the input graph by changing the x-axis variable, the laws applied, the freeing sector condition, and more. Here is a brief description of these graph input variables.
By default, Time is the x-axis variable for the curve graph in the input grapher. In many inputs, you can specify a different x-axis reference. Clicking the Reference button displays all variables available to be used as x-axis variables in the curve graph. Imposed motions cannot use x-axis references other than Time. Figure 17.29 shows a curve graph being set to call Velocity as the x-axis of the curve.
Laws can be applied individually or in combination to define the sector curve. To assign a sector a specific law, select the law from the list in the drop-down, and then use the arrow button to apply the law. Use the plus button to add laws to the sector, and use the minus button to remove laws from the sector. Here is a list of the available laws:
Each sector can be set to Active, Free, or Condition. Active indicates the sector has no conditions. Free indicates the sector has no values defined. Condition indicates one or more conditions have been assigned to the sector.
To create a condition, click the Condition radio button. By default, the Freeing Conditions dialog box appears. To edit or add a condition, click the Define Conditions button, and then click the Variable, Equal, or Value hyperlinks to set those options. Use the plus and minus signs to add or remove conditions. Figure 17.30 shows a condition being added.
The input grapher has a few functions that might not be apparent but are useful to know about when setting up and using the input grapher:
The bottom display is dependent upon what is selected in the graph. Selecting a point gives inputs for just that point, selecting a sector gives sector options, and clicking in the graph outside all sectors gives Out Of Definition options that are used to describe the part of the curve on the left or right of the first and last points.
Using the wheel button on your mouse, you can pan and zoom in the graph. This can be helpful when dealing with sectors that are dramatically different in scale. You can also use the Zoom button in the grapher dialog box.
Curve definitions can be saved and loaded using the Save Curve and Load Curve buttons.
In order to set a component in motion, you can apply an imposed motion on the joint or apply an external force on the component itself. External forces consist of Loads and Gravity. External forces can be used to initiate, complement, or resist movement. For instance, in the rail and bearing pad example, if the bearing traveled past a catch stop mechanism designed to prevent back travel, you might apply an external force on the bearing pad at that position to ensure it can overcome a maximum resistance. External forces are often used just to set the simulation in motion, as well. Loads and Gravity are further defined here.
You can apply as many force and torque loads as required and manage them from the External Loads browser node, where all force and torque loads are listed once created. To apply external load forces, click the Force or Torque buttons on the Load panel, and set the location, direction, magnitude, and so on, as described here:
- Location
For the Location setting, a vertex must be selected. You can select a vertex, circular edge, sketch point, work point, and so on.
- Direction
For the Direction setting, select an edge or face, and then use the Flip button to change it if needed.
- Magnitude
Enter the Magnitude setting as a constant, or select Input Grapher.
- Fixed and Associative load buttons
Use the Fixed and Associative load buttons to designate the load direction method. Fixed sets the load to be constant to the direction it is defined. Associative sets the direction to follow the component as it moves during the simulation. For instance, if an associative direction is established using the edge of a hinge, the direction will stay aligned to that edge as the hinge swings.
- The >> button
Use the >> button to set the Vector Components as required.
- Display check box
Set the Display check box to see the Force or Torque arrow, and then set the scale and color of the arrow.
You can define the gravity for the entire simulation by expanding the External Load node in the browser, right-clicking the Gravity button, and choosing Define Gravity. A default value of 386.220 in/s2 or 9810,0mm/s2 is supplied, but you can edit this to any value required. To define gravity, you simply select an object face or edge and then use the Flip button to set the direction. You should choose static components to define gravity.
Once the model is defined with joints, loads, and environmental constraints, you are ready to run the simulation. Running the simulation entails two primary controls: the Simulation Player and the output grapher. The tools are generally used together.
You use the Simulation Player to run and stop the simulation. The Simulation Player is displayed by default but can be toggled on and off using the Simulation Player button on the Manage panel of the Dynamic Simulation tab. Figure 17.31 shows the Simulation Player options, and Table 17.1 provides a description for each.
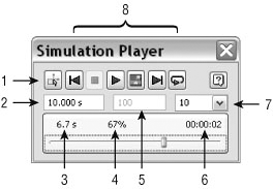
Table 17.1. Simulation Player Options
Item Number | Title | Definition |
|---|---|---|
1 | Construction Mode | Once the simulation is run, use this button to return to the construction mode to make changes. |
2 | Final Time | Enter the simulation's run time. |
3 | Simulation Time | |
4 | Percentage of Completed Simulation | Displays the percent complete value for the running simulation. |
5 | Images | This value is set in construction mode to control the number of image frames displayed during the simulation. A higher number results in a higher-quality simulation display (smoother motion) but comes at the expense of performance. |
6 | Real Time Of Computation | Displays the amount of time it has taken to run the simulation. |
7 | Filter | Sets the number of images displayed during the simulation playback. If set to 10, for instance, image 1 is displayed and then image 10, skipping 2 through 9. This can be used to gain performance for large or complex simulations. |
8 | Player controls | These include the standard play, stop, rewind to the beginning, fast-forward to the end, and continuous loop controls, as well as a Deactivate Screen Refresh During Simulation. Deactivating the screen refresh speeds up the simulation. |
You can access the output grapher during or after running a simulation to view and use the data collected during the simulation. Data can be exported to Microsoft Excel or marked for use in the Stress Analysis environment. You can also export the results as an *.iaa file and import the file into another simulation for comparison of the graph results.
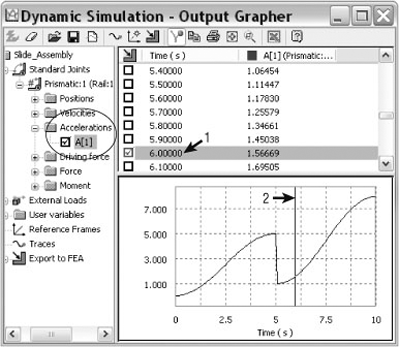
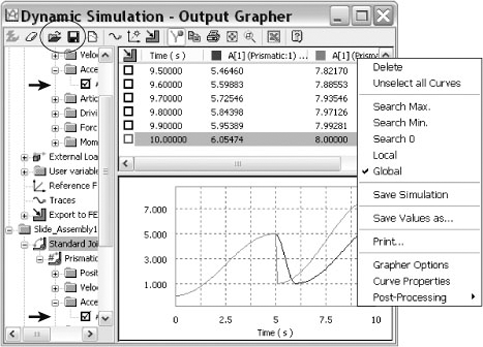
Once the curve type is selected, you can examine the time steps to see the value for each step. Figure 17.32 shows an acceleration curve displayed in the output grapher. The time step for 6 seconds is selected (1) and is marked in the graph area with a vertical line (2). You can click in the graph area to select a time stamp or select it from the top pane. You can also use the arrow keys on the keyboard to advance through each step.
You can use the Save Simulation button to save a simulation result before making changes and then use the Import Simulation button to bring it back in once the modified simulation has been run. This allows both simulation curves to be overlaid for comparison. Figure 17.33 shows the location of the Save and Import simulations buttons in the Output Grapher dialog box. In this illustration, the original acceleration curve has been imported and overlaid on to a modified simulation. You can see that the changes made just after six seconds has slowed the extended lag time and has reduced the end acceleration from 8 in/s in the original to just over 6 in/s in the modified version. Both simulations are marked in the browser.
Also shown in Figure 17.33, the context menu is obtained by right-clicking either of the curve columns. From this menu you can search for the minimum and maximum values as well as zero values. You can also select Curve Properties and change the curve colors and well as analyze the average, minimum, maximum, median, standard deviation, and amplitude of the curve.
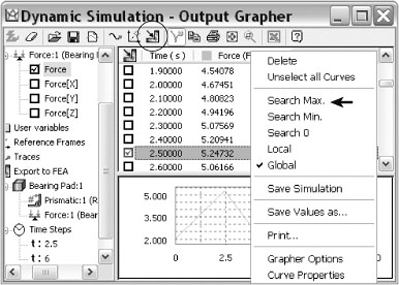
You can use the output grapher to identify maximum forces and then export those forces for use in the Stress Analysis environment. Although the maximum stress is likely the most common value to be exported, you can export the force for any time step in the simulation. This can be useful when trying to focus on a particular event in the simulation. Here are the general steps for exporting a maximum force:
Select that force in the left pane of the output grapher.
Right-click and choose Search Max.
Select the check box for the time step identified as the maximum value.
Click the Export To FEA button in the output grapher or on the Dynamic Simulation tab.
Select the part or parts to export the load information to.
Select the load bearing faces on the part or parts.
Figure 17.34 shows the steps involved in exporting the time step to FEA. Notice that once the time step is exported, it is listed in the Export To FEA node in the output grapher browser. You should also note that you can export multiple time steps at once by selecting them all before clicking the Export To FEA button.
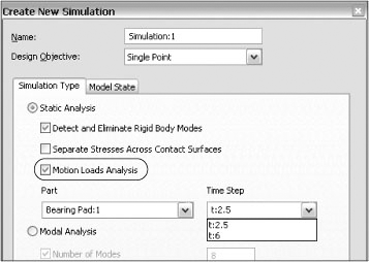
Once you've exported the information from the Dynamic Simulation environment, you can go to the Environments tab and select the Stress Analysis button to enter that environment. Follow these general steps:
Click the Create Simulation button, or right-click an existing simulation and choose Edit Simulation Properties.
In the Simulation Properties dialog box, select the Motion Loads Analysis check box, and then select the part and time step you intend to run the simulation analysis on. Then click OK.
Make modifications to the simulation parameters if needed, and then run the simulation.
You should note that motion load analysis is limited to a single part occurrence and a single time step, per simulation. You can create multiple simulations to consider other time stamps or parts. All other components are automatically excluded from the simulation for motion loads. Figure 17.35 shows the Motion Loads option in the Simulation Properties dialog box.
- Setup and run Stress Analysis simulations
Oftentimes you may find yourself guessing at what impact a change to your design might have on the strength and overall integrity of your part. Questions such as "Can I make this part a bit lighter?" or "Can I move this cutout closer to the edge?" become key to the success of your design.
- Master It
Set up a parameter study in your model to explore the consequences of editing features and their locations. Nominate all the crucial parameters to the table, and then create the configuration simulations for all of the combinations.
- Set up and run Dynamic Simulation simulations
When you find yourself working out the details of a design with many moving parts, consider using the Dynamic Simulation tools early in the process to prove what will or will not work before going forward.
- Master It
Even before the assembly is complete, switch over to the Dynamic Simulation environment, and create assembly constraints in the simulation. Test the motion as you build the parts, and attempt to understand how contact will occur from the beginning.
- Export results from the Dynamic Simulation environment to the Stress Analysis environment
Often when setting up a stress analysis simulation you are guessing at what the loads might be based on rough calculations. As you make changes to the design, those calculations become out-of-date and therefore invalid.
- Master It
Use the Dynamic Simulation tools to determine the force exerted on one part by another. When the parts are modified, the load calculations will automatically update based on the mass properties.