
At any point in your design process, you could choose to begin documenting your design. Although creating drawings, exploded views, and animations traditionally was something that had to wait until the design was fully complete, there are no such restrictions in Inventor. You can start to develop an annotated 2D drawing or a presentation file at any point in your process. It is recommended, however, that you start documenting as late in the design as possible for more predictable results in the documentation environments.
The ultimate goal of this chapter is to illustrate how you can use the Drawing Manager and presentation environments in Inventor to generate both traditional 2D annotated drawings and animated assembly instructions. Each of these finished products can be viewed by downstream design consumers using Autodesk Design Review through the .dwf file format.
In this chapter, you'll learn to:
Create an exploded assembly view by creating a presentation
Create and maintain drawing templates, standards, and styles
Generate 2D drawing views of parts, assemblies, and presentations
Annotate drawing views of your model
Presentations are generally used to document how an assembly model is put together. Your end result could be as simple as a static explosion that you'll use to generate a 2D view in a drawing or a dynamic video where a design is assembled or disassembled through animation.
When you first create a new presentation file, you'll find the environment looks similar to the other part and assembly modeling environments, but it has a significantly reduced set of tools. The 3D navigation tools detailed earlier in this book (Orbit and ViewCube), as well as the browser, are used in presentations as well as in the 3D modeling environments. In the following pages, you will create a basic exploded assembly and explore how to create tweaks, animations, and assembly instructions.
In the following sections, you will take a look at the basics of creating a presentation from an assembly file. This includes accessing an IPN template file, creating an IPN view (explosion), and creating linear tweaks. You'll start with creating a presentation file from a template and then choosing an assembly to explode.
Before you begin, ensure that you have loaded the tutorial files from the book's DVD. Also, be sure to set the Mastering Inventor 2010 project active.
From within Inventor, close any open files and then proceed as follows:
On the Get Started tab, click Projects.
In the Projects dialog box, click the Browse button.
In the Choose Project File dialog box, browse to the
Mastering Inventor 2010folder, select theMastering Inventor 2010.ipjfile, and click Open.Note that the Mastering Inventor 2010 project is denoted as being the active project with a check mark.
You create presentation files by using an .ipn template and then referencing an existing assembly. To create this presentation, start with the Standard (mm) .ipn template:
On the Get Started tab, click the New button.
In the New File dialog box, select the Metric tab, and choose the
Standard (mm) .ipntemplate.Click OK.
The first step in creating an assembly explosion is referencing an assembly. A presentation file can reference only one assembly file at a time, but the assembly can be used to generate as many explosions as you might need to properly document your design. For example, you may create one explosion to be used as a 2D drawing view and another explosion to be used as an animation. You may also choose to explode each subassembly in its own explosion. Walk through the following steps to create an assembly explosion:
On the Presentation tab, click the Create View icon.
In the Select Assembly dialog box, in shown in Figure 12.1, browse for the file named
mi_12a_001.iamlocated in the Chapter 12 directory of the Mastering Inventor 2010 folder, and click Open.Click the Options button to specify which view, position, or LOD representation of the selected assembly you want loaded into the presentation environment.
Set the view representation to Default, and leave the positional and LOD representations set to Master.
Click the Associative check box to ensure that the presentation view will update if the assembly view representation is updated.
Click OK.
If you have a relatively small assembly and it was modeled with a full and robust set of assembly constraints, you may choose to create an automatic explosion in the Select Assembly dialog box and then make minor modifications to meet your needs. Otherwise, use the manual method.
Ensure that the Manual option is selected.
Click OK.
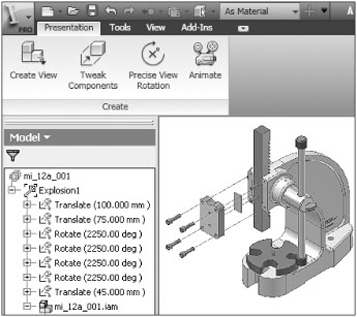
Locate Explosion1 in the Model browser, and click the + to expand it so that you can see a list of all the components in the assembly.

You'll now see the selected assembly in your presentation graphics area. It's time to start adding tweaks to explode the assembly. A tweak is simply a stored movement vector for a selected set of one or more components. You can define both linear and rotational tweaks. In the next steps, you'll create a linear tweak by first establishing a move direction, then choosing a component to move, and finally setting the move distance:
Click the Tweak Components icon on the Presentation tab.
In the resulting dialog box (shown in Figure 12.2), ensure the Direction button is enabled.
Select the yellow face of the faceplate to define the direction of the tweak.
Note that the Components button in the dialog box is now enabled and ready for you to select the component(s) to be moved.
Select the component with the yellow face (FACE PLATE) and all four of the components named CAP SCREW. Do this either in the graphics area or in the browser.
Next, you specify the tweak vector by choosing either the X, Y, or Z buttons in the Transformations area of the dialog box. Ensure that the Z button is enabled.
Click somewhere in an empty space of the graphics area, and drag your mouse pointer in the positive Z direction (pull toward the lower left of the screen).
Note the tweak distance reported in the dialog box as you drag. Enter 100mm in the dialog box.
Click the green check mark to set the distance.
Hold down the Ctrl key and click the FACE PLATE component to deselect it. Check the browser to ensure it is deselected.
You'll create a tweak for just the cap screws. This time, rather than clicking in the graphics window, click the triad to select the Z vector, and drag the triad to approximately 75mm. This simply demonstrates that the triad can be used to tweak components, allowing you to switch directions easily, as opposed to using the dialog box to do this.
Enter 30mm in the dialog box, and click the green check mark to set the distance. By doing this you have set the tweak to 30mm even though the initial drag value was approximately 75mm. Clicking the check mark sets the tweak value.
Click Close.
On the Model browser, click the filter icon

You should see the two tweaks just created, listed in the browser.

Once you create a tweak or tweaks based on one set of inputs, you can continue to tweak additional components with new inputs by first clicking the Clear button without dismissing the dialog box. Now that you have created a basic linear tweak, you'll explore how to create more advanced tweaks in the next section.
In the following sections, you will look at some of the more advanced functions associated with creating presentations, particularly for use as 3D animations. You will explore how to create rotational tweaks, how to modify tweak trails, and how to group, reorder, and animate tweaks. You'll also discover how to create assembly instructions and publish animations and assembly instructions to a lightweight DWF file that can be easily shared.
You can add rotational tweaks in much the same way as you created the linear tweaks, though rather than indicating the x-, y-, or z-axis for linear direction, the x-, y-, or z-axis is used as an axis of rotation, and the tweak value is entered as degrees of rotation rather than a linear distance.
Continuing where you left off in the previous section, click the Tweak Components icon on the Presentation tab.
In the resulting dialog box, ensure the Direction button is enabled.
Select the shaft of one of the cap screws.
With the components button enabled, select the same cap screw.
In the Transformations area of the dialog box, ensure the Z axis button is selected.
Switch the radio button to select the rotational option rather than the linear one.
Enter 6.25*360 in the input box (for six and a quarter revolutions).
Click the green check mark to set the rotation.
Note the tweak listed in the browser.
Click Clear.
Repeat steps 3 through 7 for each cap screw.
This completes a basic rotational tweak, so click Close to continue.
If you're tweaking only one component at a time and you're comfortable with the selection, orientation, and direction behavior, you can establish direction, choose your component, and input the tweak distance all with one mouse click. You can try this with the cyan-colored gib plate.
Start the Tweak Component tool.
Click the front face of the gib plate, continue holding the left mouse button while dragging the plate away from the main assembly, and then release the mouse button when you've moved it out approximately 45mm.
Your presentation should look similar to Figure 12.3.
Trails are added by default. A trail is a line (or an arc in the case of a rotation tweak) that is displayed in the graphics area showing the start and endpoints of a particular tweak. By default, the start and endpoints are defined by the three-dimensional geometric center of all the components that are chosen for a tweak. However, an optional fourth step in the tweak creation process is to manually select the tweak points by selecting one or more points on each of your selected components. Here are a few more points to know about trails:
By default, one trail is added per selected component in your tweak.
Deselecting the Show Trails check box when creating tweaks will set the visibility of the tweak trails off.
You can control the visibility of each tweak trail by expanding the tweak in the Model browser, right-clicking the component name, and choosing Visibility (assuming Tweak View is being used).
You can control the visibility of trails for each component by right-clicking a component and choosing Hide Trails.
You can edit a tweak by right-clicking the trail and choosing Edit or by clicking and dragging the endpoint of a tweak trail.
You can delete a tweak or delete a component from a multiple component tweak by right-clicking the trail and choosing Delete.
These trails are also visible in drawing views of presentations.
Don't forget that the browser filter controls the way tweaks are listed in the browser. When in the Assembly View, as you create tweaks, a browser node representing that tweak is generated in your browser and nested under the selected components that are part of that tweak. When in the Tweak View, tweaks are listed as line items and the components are nested below them. By selecting the tweak in the browser, you can enter a new movement value.
If your assembly is large or complex, consider making several explosions and tweaking only a few components per explosion. You can add explosions by clicking the Create View tool. Each subsequent time the Select Assembly dialog box is shown, a new assembly file cannot be specified. You can, however, choose a different view, positional, or LOD representation than your previous explosions.
If the end goal of your presentation is to simply create an explosion that looks good in one or more 2D drawing views, then you already know just about everything you need to know, and you never have to use more than two tools inside the presentation environment. Simply continue adding tweaks as needed.
Before you save your file and move on to creating your drawing, make sure to set your camera view up exactly as you'd like to see it on the page. Use Zoom, Orbit, and the ViewCube in conjunction with the Precise View Rotation feature to get a view that makes things as clear as possible. Then right-click in the graphics area and choose Save Camera. You can use this saved camera to create a view in the 2D drawing. You can also right-click and choose Restore Camera any time you have changed the camera view.
You can group and reorder tweaks for the purpose of animating components in a presentation. For instance, in the steps in the "Creating a Basic Explosion" section earlier in this chapter, you pulled the cap screws out all at once and then rotated them one at a time. You may want to have these actions separated, reordered, or grouped in order for them to behave correctly when animated. To see how this works, follow these steps:
On the Get Started tab, click the Open button.
Browse for the file named
mi_12a_090.ipnlocated in the Chapter 12 directory of the Mastering Inventor 2010 folder, and click Open.If you have zoomed or orbited the assembly, right-click and choose Restore Camera.
On the Presentation tab, click the Animate icon.
In the Animation dialog box, click the >> icon to expand the dialog box so that you can view the animation sequence.
Click the Play Forward button to animate the tweaks; note that the rotation tweaks just spin in place, and the gibs plate moves out of order.
Click the Reset button.
In the Animation Sequence area, hold down Ctrl on the keyboard, and select all the rotation tweaks (2250 deg) and all of the (100mm) tweaks.
Click the Group button to group these tweaks into a single sequence step. They should all be set as Sequence 2 in the list.
Click the gibs plate and use the Move Up button to change it from sequence step 4 to sequence step 1.
Click the Apply button.
Click the Play Forward button to animate the tweaks, and note that the cap screws now rotate and move at the same time.
Click Reset and Cancel to exit the Animation dialog box.
Although the rotation of the cap screws is still not true to life, you should be able to see that you can create tweaks in any order you choose and then group and reorder them as required later.
You can create assembly instructions for a presentation animation to share with a customer, present to a group, or be used by the people on the shop floor. The animations and instructions can be published to a DWF file and viewed with the free Autodesk Design Review application. Follow these steps to explore how to create assembly instructions. You can skip the first two steps if you have the file from the previous exercise open still.
On the Get Started tab, click the Open button.
Browse for the file named
mi_12a_090.ipnlocated in the Chapter 12 directory of the Mastering Inventor 2010 folder, and click Open.In the Model browser, click the Filter icon

Locate Explosion2 in the browser, and double-click it to activate it.
Expand Explosion2 to see that there are two tasks within it.
Double-click Task2a to activate it.
In the resulting Edit Task And Sequences dialog box, click the Play button at the top.
Click Reset when it is done playing.
Click the Play button in the middle to play just Sequence1.
Click Reset when it is done playing.
Enter the following into the Description area for Task2a: Assemble collar as shown.
Enter 10 in the interval input to speed up the playback of this sequence.
Click Apply.
Click the Sequence1 Play button to view the faster playback, and click Reset when done.
Switch the sequence drop-down from Sequence1 to Sequence2.
Note the instructions have been filled out already.
Use the ViewCube, the Orbit tool, or your 3D controller to change the camera view so that you can see the ram and the shaft. Zoom in as you see fit.
Click the Set Camera button.
Click the Apply button.
Click the Play button at the top to see the entire Task2a play back again. Note the changes in speed and the camera you made.
Click OK.
Here are a couple of other actions you can take to organize tasks:
- Create tasks
When you create tweaks within an explosion, they are initially all created in a single task. To create multiple tasks, use the filter to set the view to Sequence View, and then right-click an explosion and choose Create Task. Then just drag the sequences into the task as needed.
- Hide components
You can hide components per sequence by expanding the sequence while in Sequence View and revealing the Hidden folder. Then just select the component from the model tree and drag it up into the Hidden folder. If it lists in the hidden folder of a sequence, that component will not be visible for that particular sequence.
If you need to share assembly animations and instructions with someone who does not use Inventor, such as the people on the shop floor, you can publish the presentations to a .dwf file:
On the Get Started tab, click the Open button.
Browse for the file named
mi_12a_095.ipnlocated in the Chapter 12 directory of the Mastering Inventor 2010 folder, and click Open.Click the Inventor button

In the Publish Presentation dialog box, select one of the following:
- Express
Static exploded views are published. Bill of materials data, design views, and positional representations are not published.
- Complete
The DWF file contains all presentation views, including animations, assembly instructions, and the associated assembly, as well as its design views, positional representations, and BOM.
- Custom
You have full control over which animations and assembly instructions are included or excluded, as well as whether to include the assembly, the BOM, and so on.
Configure the general options for markup, measure, printing, and password protection.
Click Publish.
Set the filename and location, and choose between DWF and DWFx for the file type.
Click Publish.
The key differences between the two DWF file types is that the 2D DWFx can be read by Windows Vista and XP (with Internet Explorer 7 installed) without the need for an extra viewer such as Autodesk Design Review. 3D DWFx and DWF files still require Design Review. Note too that the DWFx file is generally on the order of twice as large.
You can invite vendors and clients as well as the shop floor to download Design Review for free from the Autodesk website.
Once you have created your 3D design, you can choose to document it with conventional 2D orthographic drawing views and traditional drafting tools. Creating this kind of documentation is done in Inventor's Drawing Manager environment.
These high-level Drawing Manager tasks are discussed in the following sections:
Creating templates and styles
Utilizing drawing resources
Editing styles and standards
Annotating part drawings
Creating assembly drawings
Working with sheet-metal drawings
Working with weldment views
Working with iParts and iAssembly drawings
Sharing your drawing outside your workgroup
Although several drawing templates are installed with Inventor, it's recommended that before you begin to document your own designs and models, you create your own custom template or templates to best meet your needs. This is because most users need to adhere to a specific set of drafting standards dictated by their company, customer, or vendor specifications. These standards are typically derivatives of one of several international drafting standards such as ANSI, ISO, or DIN. As such, Inventor ships with a set of templates and drafting styles configured for the following international standards:
ANSI (both English and metric units)
BSI
DIN
GB
GOST
ISO
JIS
When creating your own custom template, it's best to start with a shipping template that most closely meets your requirements and modify it accordingly.
Creating templates in the Drawing Manager is not unlike creating templates in other applications. Where many applications use a special file format for template files, Inventor uses the conventional part, assembly, presentation, and drawing formats as template formats. Therefore, you can use any .idw or .dwg file as a drawing template; you just need to indicate that the file is to be used as a template at the application or project level.
By default, Inventor templates are stored in and accessed from Program FilesAutodeskInventor 2010Templates. The default location is set on the File tab in the Application Options dialog box under Default Templates. Click the Tools tab, and click the Application Options button to access the Application Options dialog box.
For stand-alone users, consider using this same location for your design projects. If you're part of a networked workgroup, you should create a template folder on a shared network drive and change the default templates path accordingly.
The default template location can be overridden on a per-project basis as well by setting the templates location in the project file configuration. Keep in mind that if you have a template location set in Application Options and another set in the project file, the project file always takes precedence.
Prior to Inventor 2008, the .idw file format was the only native 2D file type recognized by Inventor. DWG TrueConnect, introduced with Inventor 2008, enables you to use both .dwg and .idw as valid file formats in Inventor's Drawing Manager.
Using .dwg as your file format enables you to open Inventor DWG files in AutoCAD (or an AutoCAD vertical product such as AutoCAD Mechanical) without going through a translation process. Although the data you create natively in Inventor cannot be manipulated directly in AutoCAD, all of the Inventor data can be viewed, measured, and printed using conventional AutoCAD commands.
Choosing .dwg as your default file format allows downstream consumers of your designs to view your 2D drawing documents in AutoCAD without having to purchase or install Inventor or download the Inventor file viewer. Vendors, customers, or other internal personnel can open the native Inventor DWG file and view, measure, and plot the Inventor data, or they can even add AutoCAD data to the file to create a hybrid document that can be viewed quickly and efficiently in either application.
For Inventor users, there is essentially no difference between using .dwg or the traditional .idw file format. The native .dwg file includes a Layer 0 in the layer list and an AutoCAD Blocks folder in Drawing Resources. These are the only noticeable differences between the two file formats.
An .idw file can always be saved as an Inventor DWG, and vice versa, without any loss of fidelity or data. If there's a good chance of someone wanting to see a DWG version of your Inventor file, you might consider choosing .dwg as your default file format.
Inventor's Task Scheduler enables you to batch convert a set of IDW files into DWG files.
You should customize three areas of the template to conform to your chosen drafting standards and personal preferences: drawing resources, document settings, and document styles and standards.
Drawing resources are simply a collection of reusable sketches that are stored in a drawing file. There are four types of drawing resources: sheet formats, borders, title blocks, and sketched symbols. If you've decided to use .dwg as your template format, you'll notice that AutoCAD blocks are also managed as Inventor drawing resources.
Drawing resources are accessed from your drawing browser under the Drawing Resources folder, as shown in Figure 12.4. If you expand the Drawing Resources node, you'll see a folder for each of the drawing resource types listed, and contained in each of the subfolders are drawing resource definitions. Double-click any drawing resource to place an instance in your drawing.
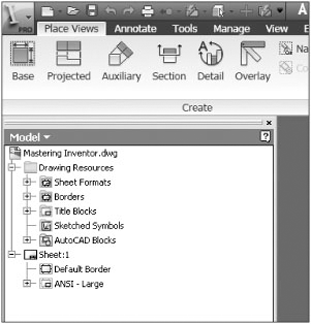
You can employ several document management techniques with respect to templates, sheet sizes, borders, and title blocks. Although you could create and maintain separate drawing templates for each sheet size and title block you might need, it's generally recommended that a single drawing template be used to maintain each of these different configurations. In the following sections, you'll take a look at the various drawing resources.
When you start a new drawing from one of the templates installed with Inventor, a border and title block are already present on the sheet, and the sheet is set to a default size. You can change the default sheet size by choosing Edit Sheet from the sheet's right-click menu in the browser. If you're using the ANSI (in) template, the default sheet size is C. If you change the sheet size to D, the border on the sheet updates automatically to accommodate the change in sheet size.
To have your templates default to a different size of sheet, follow these steps:
On the Get Started tab, click the Open button.
Browse to your template location, and open
Standard.idw(see the "Understanding Template Locations" section earlier in this chapter).Right-click the sheet in the browser, and choose Edit Sheet.
Click the arrow in the drop-down box, and choose the size or sheet format from the list.
Click the Inventor button

Now when you start a new file from the template, this new sheet size will be active.
If needed, you can add sheets to your template, which is recommended if most of your design documents require more than one sheet. It is recommended that you use caution when creating multiple sheet sets of a sizable number, because performance may suffer, depending upon the size and complexity of the models you are detailing. Be aware too of "putting all of your eggs into one basket," should a file become corrupt or lost. To insert a new sheet into your document, follow these steps:
Right-click any blank area on the page, and choose New Sheet (or click the New Sheet icon on the Place Views tab).
Note that this adds a copy of your active sheet to the drawing, including the border and title block.
To switch between sheets, double-click the sheet node in the browser.
The default border that's instanced on the Inventor templates may not meet your needs. You should first delete the default border from your sheet before creating a new border; then follow these steps:
Expand the sheet node in the browser.
Right-click the border instance, and choose Delete.
Recall that this removes the instance of the border from the sheet. The border definition is still stored in the Borders folder of the Drawing Resources node.
To create a new, custom border in your template, follow these steps:
In your template file, expand the Drawing Resources node in the browser.
Right-click the Borders folder, and choose Define New Border. (You might have the option to choose Define New Zone Border, but you'll use a simple border here to explore the steps required.)
- Zone Border
Brings up an input dialog box into which you can specify the number of horizontal and vertical zones, alpha or numeric zone labels, font and font size, as well as margins spacing. A sketch is created from your input automatically.
- Border
Creates a sketch with the four corners of the sheet projected in. You can sketch a rectangle to create a simple custom border and use dimensions to specify the margins off the sheet corners. Dimensioning to the sheet corners allows your border to automatically resize to any sheet size, holding the specified margins. Borders can be as simple or complex as required, but the sketch should always be fully constrained.
On the Sketch tab, select the Two Point Rectangle tool.
Sketch a small rectangle on the screen; ensure that you do not sketch it on the sheet corners.
On the Sketch tab, select the Dimension tool.
Place dimensions from the corners of your rectangle to the projected corner points of the sheet so that the edges of the rectangle will be 10mm.
When your border sketch is complete, right-click, and choose Save Border (or use the Finish Sketch icon on the Sketch tab).
Enter the name of your border definition.
Click Save.
Look in the border folder of the Drawing Resources node in the browser for your new border definition.
Right-click your border, and choose Insert to place an instance on it on the current sheet.
If you need to modify the border definition, right-click your border instance or the definition in Drawing Resources, and choose Edit Definition or Edit.
Customizing title blocks is done in much the same way as borders. Title blocks typically contain more text-based information than the border, so the concentration here will be on creating sketch text in this section. There are three common ways of creating a custom title block:
You can use an existing title block originally drawn in AutoCAD.
You can modify a default Inventor title block.
You can create one completely from scratch in Inventor, drawing the line work and inserting the text fields.
In this next section, you will bring in an existing AutoCAD title block and make it intelligent to Inventor. In doing so, you will explore the tools used to create a title block used in the other methods mentioned. Although not required, you should probably first delete the default title block from your sheet before creating a new title block. To do this, follow these steps:
From your template file (or any standard Inventor drawing file), expand the sheet node in the browser.
Right-click the title block instance, and choose Delete.
On the Get Started tab, click the Open button.
Browse for the file named
mi_12a_033.dwglocated in the Chapter 12 directory of the Mastering Inventor 2010 folder. You may need to change the Files Of Type drop-down to see All Files or AutoCAD Drawings (*.dwg) to locate the file.Click the Options button in the Open dialog box.
Ensure that Open is selected; otherwise, Inventor will take you to the import options.
Click Open.
Notice that when you open an AutoCAD drawing in Inventor, you can view and measure the file. You should see a black background, and if you check the browser, you will see that you are viewing the model space of the file.
Right-click the title block, and choose Copy.
Use the Open Documents tabs at the bottom of the screen to switch back to your template file (or press Ctrl+Tab on the keyboard).
On the Drawing Resources Folder in the browser, right-click the Title Blocks folder, and choose Define New Title Block.
Right-click in the graphics area, and choose Paste.
Click in the middle of the sheet to place the title block.
You'll note that the line work is underconstrained and not dimensioned at all. You can take the time to dimension it if you'd like, but because this will become a block, and therefore a static entity, you most likely will not need to do so.
Continue adding intelligence to the text now.
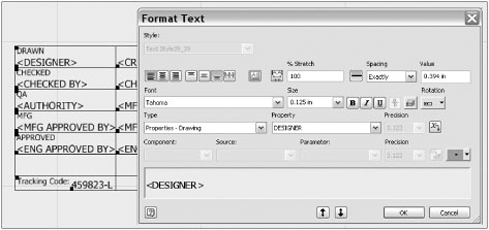
Right-click the text field containing CDW, and choose Edit Text.
In the Format Text dialog box, select the text, and press Delete on the keyboard.
Locate the Type drop-down, and choose Properties – Drawing, as shown in Figure 12.5.
Set the Property drop-down to Designer.
Click the Add Text Parameter button

Click OK.
Repeat steps 14 through 19 for the date field directly to the right of the field you just edited. Use the Creation Date property instead of the Designer.
Right-click and choose Save Title Block (or click the Finish Sketch icon on the Sketch tab).
Look in the Title Block folder of the Drawing Resources node in the browser for your new title block definition.
Right-click your title block and choose Insert to place an instance of it on the current sheet.
If you need to modify the title block definition, right-click your title block instance or the definition in Drawing Resources, and choose Edit Definition or Edit.
Obviously you have not configured the entire title block at this point, but before going any further, it is important to understand where the properties you linked to the title block text fields are coming from. You can find these properties in the file iProperties. Follow these steps to change an iProperty in the file and see that change show up in the title block:
Click the Inventor button

Go to the Project tab and change the Designer input to Test Designer.
Change the Creation Date input to 1/1/2010.
Click OK.
Your title block will have updated the two fields automatically based on the iProperty changes you made, demonstrating that you have linked those fields to the iProperties of this particular drawing file.
Each Inventor file has its own iProperties allowing you to pull that information into your title block. There are two distinct areas from which you can draw iProperties into your title block: from the drawing file or from the model file.
Table 12.1 lists the standard iProperties available. Each of these can be accessed from the Type drop-down in the Text Format dialog box as described in the previous steps. You'll learn more about iProperties in Chapter 13.
Follow these steps to modify a title block so that it is pulling information from the model iProperties. You'll note that this title block is calling the model filename iProperty for the drawing title. Most of the other fields are being pulled from the drawing iProperties. The field you will be modifying is static and needs to be set to pull for the model iProperties.
Table 12.1. Standard iProperties
File iProperties | ||
|---|---|---|
Author | Designer | Mfg Approved Date |
Authority | Eng Approval Date | Part Number |
Category | Eng Approved By | Project |
Checked By | Engineer | Revision Number |
Checked Date | Estimated Cost | Status |
Comments | Filename | Stock Number |
Company | Filename and Path | Subject |
Cost Center | Keywords | Title |
Creation Date | Manager | Vendor |
Description | Mfg Approved By | Weblink |
Design Date |
On the Get Started tab, click the Open button.
Browse for the file named
mi_12a_024.idwlocated in the Chapter 12 directory of the Mastering Inventor 2010 folder.Expand the sheet node in the browser.
Right-click the title block instance (named MI_TB_04), and choose Edit Definition.
Zoom up on the title block, and locate the Part Number area toward the bottom.
Right-click the text field showing ###, and choose Edit Text.
In the Format Text dialog box, select the text (###), and press Delete on the keyboard.
Locate the Type drop-down, and choose Properties – Model.
Set the Property drop-down to Part Number.
Click the Add Text Parameter button

Click OK.
Right-click, and choose Save Title Block (or click the Finish Sketch icon on the Sketch tab).
Click Yes at the Save Edits prompt.
In addition to iProperties, you can use some other standard file properties to fill out your title block automatically. You can access them from the Type drop-down in the Text Format dialog box just as you did the iProperties. Table 12.2 lists several general properties that can be called into a text field.
Table 12.2. Available Properties
Physical Properties of the Model | General Drawing Properties | Drawing Sheet Properties | Sheet-Metal Flat Pattern Properties |
|---|---|---|---|
Area | Number Of Sheets | Sheet Number | Flat Area |
Density | Sheet Revision | Flat Length | |
Mass | Sheet Size | Flat Width | |
Volume |
Follow these steps to set up the sheet number area of the title block to call on general file properties of the drawing file to automatically fill out the title block:
On the Get Started tab, click the Open button.
Browse for the file named
mi_12a_025.idwlocated in the Chapter 12 directory of the Mastering Inventor 2010 folder.Expand the sheet node in the browser.
Right-click the title block instance (named MI_TB_05), and choose Edit Definition.
Zoom up on the title block, and locate the Sheet 1 Of 2 area at the bottom right.
Right-click the text field showing ?#?, and choose Edit Text.
In the Format Text dialog box, select the text (?#?), and press Delete on the keyboard.
Locate the Type drop-down, and choose Drawing Properties. (Note that there is one called Properties – Drawing also, so ensure that you have the correct one.)
Set the Property drop-down to Number Of Sheets.
Click the Add Text Parameter button

Click OK.
Right-click the text field showing ??, and choose Edit Text.
In the Format Text dialog box, select the text (??), and press Delete on the keyboard.
Locate the Type drop-down, and choose Sheet Properties.
Set the Property drop-down to Sheet Number.
Click the Add Text Parameter button

Click OK.
Right-click, and choose Save Title Block (or click the Finish Sketch icon on the Sketch tab).
Click Yes at the Save Edits prompt.
You can also create fields in your title block to enter information manually using what is known as a prompted entry. However, experienced Inventor users will tell you that prompted entries should be used sparingly, for two reasons.
First, information entered into a prompted entry field is stored in the title block and nowhere else. This creates a limitation in that if you need to update the title block for your entire drawing library at some point in the future, you can do so easily with Inventor's Drawing Resource Transfer Wizard, which can swap out old title block definitions with a new one, en masse. (See Chapter 13 for more on this tool.) This works well when title blocks have been populated with iProperties, because the information resides in the file, not the title block. However, if a prompted entry was used, that information will not be carried over, because it exists only in the old title block instance.
Second, since iProperties are stored in the file, there are a couple of important tasks that can be performed on them:
iProperties can be viewed, searched, and copied easily using a number of tools such as Find, Design Assistant, and Vault.
Non-Inventor users can use iProperties to sign off on drawings without having Inventor installed.
Getting in the habit of using iProperties will pay large dividends in the future, once you have created many Inventor files. With these things in mind, you should use prompted entries in title blocks rarely. Here are the steps for creating a prompted entry in a title block if you determine that it is required:
On the Get Started tab, click the Open button.
Browse for the file named
mi_12a_026.idwlocated in the Chapter 12 directory of the Mastering Inventor 2010 folder.Expand the sheet node in the browser.
Right-click the title block instance (named MI_TB_06), and choose Edit Definition.
Zoom up on the title block, and locate the Tracking Code area at the bottom left.
Right-click the text field showing #####, and choose Edit Text.
Locate the Type drop-down, and choose Prompted Entry.
Replace ##### with Enter Tracking Code.
Click OK.
Right-click any empty space in the graphics area, and choose Save Title Block.
Click Yes at the Save Edits prompt.
Click OK.
You can edit a prompted entry in a title block by expanding the block instance in the browser and double-clicking the Field Text node. If no prompted entry is established, you will be able only to view the fields.
Sketched symbols are created, edited, placed, and managed much like other drawing resources, but there is no limit to the number of sketch symbol instances you can place on a sheet. Like other drawing resource definitions, sketched symbols are placed by double-clicking the definition node in the browser or using the User symbols icon found on the Symbols panel of the Annotate tab.
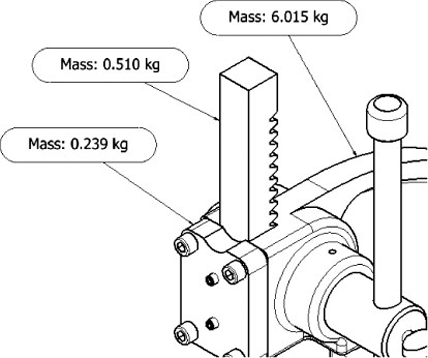
Sketched symbols can optionally include a leader. Using a leader, you can associate a sketch symbol with a model so that model-specific properties can be displayed in the symbol. For example, you could create a sketch symbol that calls out a component's mass:
On the Get Started tab, click the Open button.
Browse for the file named
mi_12a_030.idwlocated in the Chapter 12 directory of the Mastering Inventor 2010 folder.Expand the Drawing Resources browser folder.
Right-click the Sketch Symbol folder, and select Define New Symbol.
In the Draw panel of the Sketch tab, click the Text icon (or press T on the keyboard).
Click anywhere on the page to set the text location.
In the Format Text dialog box, type in a static text string that reads MASS:.
Locate the Type drop-down, and choose Physical Properties – Model.
Set the Property drop-down to MASS.
Click the Add Text Parameter button

Click OK.
Right-click anywhere in the graphics area, and choose Done.
Choose Save Sketched Symbol from the right-click menu.
Enter Mass for the name, and click Save.
To insert the symbol into the drawing, right-click the Mass sketch symbol definition in the drawing browser, and select Symbols.
Ensure the Mass symbol is chosen from the list on the left side of the Symbols dialog box, and select the Leader option.
Click OK.
Click any model edge in the drawing view.
Click again for each leader vertex you'd like, and then choose Continue from the right-click menu.
Continue to place additional symbol instances, but be sure to point to a different Arbor Press component each time.
You'll notice that symbol in Figure 12.6 has a bit more geometry than the simple symbol you just created. You can make a sketch symbol as elaborate as you like, but for the purposes of this exercise, the Mass property reference is all that is required. A finished symbol named Mass_2 has been created for you in this drawing file.
If the Mass shows up as "N/A," it indicates that the model needs to be updated. You can open the assembly model and go to the Manage tab and click the Update Mass icon to do this. Then return to the drawing to see the update.
Here are some more sketch symbol points to remember:
Sketched symbols can be placed as needed on new documents or placed on the template itself, which can be useful for standard drawing notes that will be placed in every drawing.
If there is field text in the sketch symbol, it becomes populated just like title block field text when you create a new drawing.
If you need to establish a symbol reference to a model but do not want to see the leader, you can edit the symbol and then select (double-click or select Edit Symbol from the symbol's right-click menu) and uncheck the leader Visibility option.
Sketched symbols placed by double-clicking the definition are set to static by default; you can set this option prior to placement if you use the Symbols tool.
Static sketched symbols cannot be graphically rotated or scaled like nonstatic symbols can.
When you mouse over a nonstatic sketch symbol, a single blue hot point is shown on the center top of the symbol, and four yellow hot points are displayed at the four corners of the symbol.
Clicking and dragging the blue hot point causes the symbol to rotate, while clicking and dragging any of the yellow hot points enables dynamic scaling.
Sheet formats are a preset collection of a drawing sheet, border, title block, sketched symbols, and/or base and projected views. They essentially give you the ability to quickly generate multiview drawings just by referencing a single model file. To create a multiview drawing, follow these steps:
On the Get Started tab, click the Open button.
Browse for the file named
mi_12a_037.idwlocated in the Chapter 12 directory of the Mastering Inventor 2010 folder.Expand the Drawing Resources browser folder.
Expand the Sheet Formats folder.
Right-click the C Size, 4 Views, 1 To 1 Scale format, and choose New Sheet.
Browse for the file named
mi_12a_038.iptlocated in the Chapter 12 directory of the Mastering Inventor 2010 folder, and click Open.Click OK in the Select Component dialog box.
You will note that a new sheet has been created to the specifications of the sheet format and set active. This technique is ideal if you find yourself detailing similar designs of common size and complexity.
To save your own sheet format, set up your sheet the way you like it, select Create Sheet Format from the active sheet's right-click menu in the browser, and name the sheet format as you'd like.
Here are some more sheet format points to remember:
Only base and projected views are saved in a sheet format. Section, detail, and other such views will not be included.
Placed drawing resources such as standard notes (in the form of sketched symbols) can be included in a sheet format.
You can preload your drawing template as a sheet format as well. Simply open a template, create base and projected views of any model, and then save and close them. When you next use your template for a new drawing, you'll be immediately prompted to reference a model file, and the drawing views are automatically created.
You can copy drawing resource definitions from drawing to drawing by following these steps:
Select Copy from the definition's right-click menu.
Right-click the appropriate drawing resource node in the target document.
Select Paste.
You can use this technique to add both new drawing resources and update existing resources with an updated change. You can also select the entire Drawing Recourses folder in one drawing and paste it into the Drawing Recourses folder of another drawing. You will be prompted to replace or make a new instance of any duplicate resources.
The copy-and-paste technique is efficient for single changes or transfers between two drawings, but to push one or more new or updated design resource definitions to multiple drawings, use the Drawing Resources Transfer Wizard discussed in Chapter 13.
Like color, material, lighting, and sheet-metal styles in the modeling environment, the Drawing Manager makes heavy use of XML-based styles. The basic framework of drawing styles is no different from those in the modeling environment. Drawing style settings are viewed and edited using the Style and Standard Editor dialog box. They can be shared among a workgroup via the same XML style library as the modeling styles, and they can be imported and exported as stand-alone XML files.
Drawing styles differentiate themselves from modeling styles more in concept than in practice, however, and the drawing styles themselves are a collection of drafting rules that include the following:
Dimension styles
Text styles
Balloon styles
The true key to understanding how styles are used to determine the formatting of everything you can create on a drawing sheet is the notion of object defaults.
In the previous example, it was clear that the majority of a designer's day-to-day drawing work is focused on creating prints for manufacturing. Therefore, the styles used for that type of drawing would be the styles set up as the object defaults. Object defaults are automatically set as the current styles in the template drawings. In that example, the object defaults would likely be configured as shown in Table 12.3.
Table 12.3. Object Defaults Styles
Style Type | Object Default |
|---|---|
Dimension style | Dim_Shop |
Text style | Text_125 |
Balloon style | Balloon_Item_Count |
Now that you understand the overall concept of object defaults, follow these steps to see how they are managed:
On the Get Started tab, click the Open button.
Browse for the file named
mi_12a_041.idwlocated in the Chapter 12 directory of the Mastering Inventor 2010 folder.Zoom to the top of the drawing, and note the three balloons.
Each balloon on the sheet is using a different balloon style. Each balloon style is calling a different set of iProperties, as you will see by comparing the balloons to the parts list. To see how object defaults work, you'll now create more balloons on the ram part, which is the square-shaped bar with teeth cut into it.
Click the Balloon icon on the right of the Annotate tab.
Note the two style drop-downs all the way to the right of the Annotate tab. The top one controls layers, and the second controls styles.
Click the Style drop-down to show the available balloon styles. You should see one line denoted as By Standard and three listed below that, one of which is the one called out in the By Standard line.
Select the Balloon_Partname style from the list, and then select any edge of the ram.
Drag out and place the balloon on the page by clicking.
Right-click, and choose Continue (or press Enter on the keyboard).
Repeat steps 11 through 13 for the other two balloon styles, until you have three balloons on the ram part, each using a different balloon style.
Right-click, and choose Done when complete.
This demonstrates the use of different styles and shows that one of these styles was set as the company standard default style. You'll now go into the Style And Standard Editor and change the object default for the balloon style.
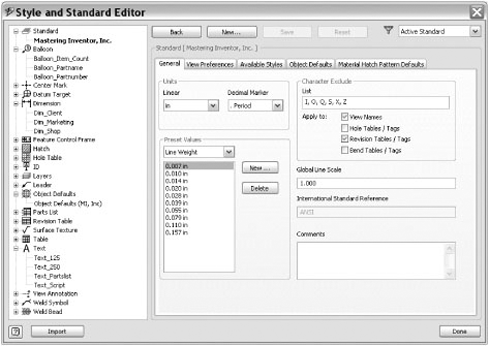
Click the Manage tab, and click the Styles Editor icon. You will be presented with the Style And Standard Editor. (It may take a few seconds to index the styles initially.)
Use the + to expand each style category as shown in Figure 12.7, and note the style names. Look at the following items:
Company Standard (Mastering Inventor, Inc.)
Balloon styles
Dimension styles
Object Defaults (MI, Inc.)
Text styles
Click Object Defaults (MI, Inc.).
Locate the Balloon row in the Object Type column.
Click the Object Style cell for the Balloon row, and set the drop-down to Balloon_Item_Count.
Click the Layer cell for the Balloon row, and set the drop-down to Balloons.
Click the Save button at the top of the editor.
Click Done to exit the editor.
Select the Balloon icon from the right of the Annotate tab.
Then select any edge of the Ram and place another balloon just as you did before.
Note that the Balloon tool now defaults to the Balloon_Item_Count style and comes in on the Balloon layer.
When setting object defaults, you typically want to use the most common style. Of course, you can always use another style by manually selecting the style from the Style drop-down as you place the object or by selecting an existing object on the page and then choosing the style from the list. You'll note that when you select an existing object, the Style and Layer drop-downs display that object's style and layer.
Objects that have been set to a specific style, rather than following the By Standard, will not update if you make any modifications to the object defaults. However, the objects will update if the specific style is updated. A quick way to get a set of objects (like our balloons, for example) to return to their object default is to window or Ctrl-select the objects on the screen and then select By Standard from the style drop-down. All the objects will update to use the newly selected standard.
As evident in the balloon example, you can have multiple styles for the same object type. Or you can have a single style that you always use. It's up to you to choose how many styles you have for each type, which will be dictated largely by need. Although this section will not go through all the settings for all the styles, you will explore how to create and configure a new style as a foundation to creating all style types.
On the Get Started tab, click the Open button.
Browse for the file named
mi_12a_046.idwlocated in the Chapter 12 directory of the Mastering Inventor 2010 folder.Select the Manage tab, and click the Style Editor icon.
In the left pane, expand the Text node to see the list of text styles.
Next expand the Balloon node to see the list of balloon styles. (In this case, there is just one.)
Click the balloon style named Balloon_Partnumber to display the style settings in the right pane.
Click the New button at the top of the editor dialog box, and enter Balloon_Item_Qty for the style name.
Ensure that the Add To Standard check box is selected, and click OK.
In the Balloon Style settings, under the Sub-styles section, use the drop-down to set the text style to use the style called Text_125.
Click the Shape button, and select the second shape (Circular – 2 Entries) from the list.
Below that, in the Property Display area, click the Property Chooser button.
Click the Part Number property in the right pane, and click the Remove button to take it out of the property list for this balloon style.
In the Left pane, locate the ITEM and ITEM QTY properties, and use the Add button to pull them into the right pane. Do this one at a time.
Use the Move Down and Move Up buttons to set ITEM as the top property.
Click OK.
Click the Save button.
Click the Help icon in the lower-left corner of the Style And Standard Editor, and notice that this takes you to a listing and description of each setting in the balloon style. This is true of all the style types.
Close the Help dialog box, and click Done in the Style Editor.
Select the Annotate tab, and click the Balloons icon.
Select Balloon_Item_Qty from the styles drop-down on the far right of the Annotate tab, and choose your new Balloon style from the list.
Click the edges of parts to place balloons on the drawing.
Although the settings for each style type vary, the concepts for creating them remain consistent throughout all styles. These concepts are as follows:
A basic example of a substyle in the modeling environment is the color style, which is a substyle of the material style. Once you apply a new material to a part, not only are you changing its physical parameters but you're potentially changing its color so that it shows the material's color substyle.
The use of substyles in the Drawing Manager is extensive. Almost every kind of annotation you create in a drawing contains some kind of text (dimensions, weld symbols, and parts lists), and many make use of leaders. The text style and leader style, therefore, are frequently used as substyles of other styles. This basically provides one-stop shopping if you wanted to quickly change all the text on your document. If you wanted to change the font for all text, for example, you wouldn't have to go to the parts list style and change the font, then to the dimension style and change the font, and so on; instead, you would simply change just one or two text styles that are being called into those other styles.
Substyles are coupled with their parent styles, which means a substyle cannot be purged if it's in use by another style. If you cache a high-level style into your document from the library or if you save a high-level style into the library from your file, all substyles participate in those operations.
Styles are an extremely powerful formatting tool that enables you to quickly change the entire face of a document. This also serves as a warning that modifying styles without understanding how they work can quickly generate unexpected results.
Each drawing template that comes with Inventor has a full set of styles saved (cached) in the drawing document. Although you can use the style library as a sharing and update tool, there is no direct link between objects on your sheet and styles in your library. Any in-use style is loaded into your document either automatically or manually.
If your project is set to use the style library (the Use Style Library setting is Yes or Read Only), then it's important to keep your style definitions in sync between your template file and the library. If your project is using the style library and you have a style in the library that has the same name as a style in your template and those styles have different settings, the definition in the library automatically overwrites the definition in the template each time it's used to start a new drawing (a warning dialog box is shown when this condition is detected).
The best way to ensure synchronization is to open your template file and run either the Update Styles tool (which pulls updates from the library) or the Save Styles To Style Library tool, depending on which way you want to transfer the styles. You can find both of these options and the Purge tool on the Manage tab.
We'll explore the various view creation and editing tools in the following sections as we discuss documenting different types of 3D models: part, assembly, sheet metal, weldment, and iPart/iAssembly.
Drawing views reference part, assembly, or presentation files. The workflows involved in creating and editing views from these different sources are similar, but with some notable exceptions detailed in the following sections.
Creating views in an Inventor drawing is a very intuitive process. You'll start by creating some basic views of a part file, while exploring the procedure and options along the way. Before you create any views, first open the part to become familiar with it.
On the Get Started tab, click the Open button.
Browse for the file named
mi_12a_048.iptlocated in the Chapter 12 directory of the Mastering Inventor 2010 folder, and click Open.Spin the part around, and take a look at it using the ViewCube or the Orbit tool. Do not close the part.
On the Get Started tab, click the New button.
On the Metric tab, choose the
ANSI (mm) .idwtemplate.On the Place Views tab, click the Base icon to create a base view.
With the Drawing View dialog box open, move your mouse pointer around on the drawing, and you will see a dynamic preview of the part file. Do not click screen just yet, or you will inadvertently place the drawing view.
Note that all open model files are listed in the File drop-down. You can select any model open file from the list or click the Browse button to select another file.
In the Scale input box, enter 2, or use the drop-down to select 2:1. You can specify scales in fractional or decimal formats (1/2 or 0.5 both work for half scale).
Click the lightbulb icon to turn on the View/Scale label.
In the View Identifier input, type Front.
In the Orientation pane on the right, click through the available options, and watch the preview at your mouse pointer change. Select Top when you're finished. You'll note that although the orientation is called top, you have entered Front in the view identifier box. The orientation name can be considered a suggestion, and the word top will not show up anywhere but here.
In the Style area, click just the middle icon to create an unshaded view with no hidden lines. Note that the shaded icon (blue) can be toggled off independently of the other two, but the hidden lines and no hidden lines icons are mutually exclusive to one another.
Click anywhere on the page to create the view (or click the OK button).
Here are some tips for working with base views:
Right-click any view and choose Open to open the model in a new window.
Most of the options you see in the Drawing View dialog box can be altered later by editing the view, but it's important to set the orientation correctly originally because it cannot be changed once placed.
To delete a view, simply select the dotted view boundary, right-click, and choose Delete.
Views can be edited by right-clicking or double-clicking the view.
Tangent edges and thread features that are not showing up in the view can be turned on by editing the view, going to the Display tab, and selecting the respective boxes.
Views can be moved by selecting the dotted line that appears when hovering over them and dragging into place.
Clicking a line or lines in a view gives you control options for just those lines.
Right-click lines, arcs, or circles and uncheck Visibility to hide those entities.
Right-click the view and choose Show Hidden Lines to bring back lines that were hidden.
Each base view created is listed in the browser; note the base view icon.
Expanding the view node in the browser shows the model tree for that view, where you can select all the edges of features at once. You can then right-click the selected objects on the page and toggle off the visibility, change the layer, and so on.
To rotate a view, right-click the view, and choose Rotate; then select an edge to make horizontal or vertical, or use the drop-down to specify by angle.
You can have as many base views as you need on a drawing, but the iProperties will be pulled from the first view in.
Views can be renamed in the browser or by editing the view.
To display the view name without the scale, right-click View Label, and choose Edit View Label; then remove <Scale> from the text box.
Once a base view is created, you can quickly create other views based on it without having to specify the model again:
On the Get Started tab, click the Open button.
Browse for the file named
mi_12a_049.idwlocated in the Chapter 12 directory of the Mastering Inventor 2010 folder, and click Open.Click the base view.
As you drag your mouse pointer around the base view, notice the view previews that are being generated.
Drag straight to the right and click. You will see a rectangular bounding box indicating a view will be placed there.
Drag straight up from the base view and click, again noting the preview.
Finally, drag diagonally up and to the right from the base view and click.
Then right-click and choose Create to generate the projected views.
Expand the + next to the Front view in the browser to see that the projected views are listed, as shown in Figure 12.8.

Here are some tips for working with projected views:
Orthographic projected views are linked to the "parent" view in style and alignment and stacked below them in the browser tree.
To break the style link between a projected view and its parent view, double-click to edit the projected view and deselect the Style From Base icon in the lower right of the Drawing View dialog box. Then change the shading and hidden line options as you like.
Isometric views are not linked to the "parent" view in style and alignment and are listed separately in the browser tree.
To break the alignment between a projected view and its parent view, right-click the projected view, and choose Alignment

To break the alignment without getting a view arrow, right-click the projected view, and choose Rotate. You can set an already horizontal edge horizontal and still break the alignment.
To reset the alignment, right-click the projected view, and choose Alignment and then Horizontal or Vertical as appropriate. The projected view will move back into place. Choose In Position to link the projected view to the parent in its current position.
By default, deleting a parent view or a base view will remove all projected views as well.
To delete a parent view without removing the projected views, click the >> icon in the Delete View dialog box, click Yes next to the views you want to keep, and set them to No.
Projected views can be created from views other than base views, such as detail views, section views, and even other projected views.
You can select the parent view first and then issue the projected view tool, or you can issue the tool and then select the view. Either order is acceptable. If you have a view preselected accidentally and click the projected view icon, that will be the view you are projecting.
You can move drawing views between sheets by dragging and dropping the browser nodes. When a projected view is moved to a different sheet than its parent, a view arrow is generated automatically on the parent view.
To move a view, follow these steps:
On the Get Started tab, click the Open button.
Browse for the file named
mi_12a_050.idwlocated in the Chapter 12 directory of the Mastering Inventor 2010 folder, and click Open.Expand the Front view node in the browser to show projected views 1 and 2.
Click the browser node of View2, and drag it down to the Sheet2 browser node.
Rest your mouse pointer over the top of the Sheet2 browser node, and release the mouse button.
Sheet2 becomes active to show you where View2 has been moved. Notice there is a browser icon for the Front view with an arrow and the sheet name in parentheses. This indicates that it is linked to the parent view on Sheet1. Notice too that the moved view has been renamed.
Right-click the Front view icon in the Sheet2 browser, and choose Go To to be returned to Sheet1.
Notice that a view arrow has been created next to the Front view.
To copy a view, follow these steps:
With
mi_12a_050.idwstill open, ensure you are on Sheet1.Right-click View3, and choose Copy.
Right-click the browser node for Sheet2, and choose Paste.
Sheet2 becomes active to show you where the view has been copied. Notice that the new view has been named the next available view number.
Section views are created by "sketching" a line across an existing view, to define the section cut. The sketch is created automatically for you as you define the section line.
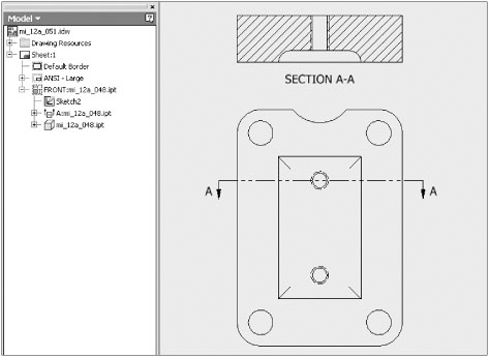
To create a section view, follow these steps:
On the Get Started tab, click the Open button.
Browse for the file named
mi_12a_051.idwlocated in the Chapter 12 directory of the Mastering Inventor 2010 folder, and click Open.On the Place View tab, click the Section icon.
Click the Front view to choose it as the view to be sectioned.
Hold down the Ctrl key, and click to the left of the view. This ensures that you do not accidentally constrain the start point of your section line to any midpoints, centerpoints, or endpoints.
Let up on the Ctrl key, drag the line across the part, and click to the right of the part, ensuring that you see either a perpendicular or horizontal constraint to indicate that you are getting a straight line.
Right-click, and choose Continue.
In the Section View dialog box, note that you can change the section identifier, scale, style, and section depth. You can also create a zero depth section called a slice. Leave all these options at the defaults.
Drag your cursor above the original view, and notice how the placement is constrained perpendicularly to the section line.
Hold down the Ctrl key, and click the screen to place the section line anywhere you like.
Click the section arrow, and drag it around to see the section update automatically.
Look at the browser to see how the section view was added as a child view of the base. Also, notice the sketch that was created on the base view listed just above the section view node (Figure 12.9). This sketch is the section line itself and can be edited like any other sketch. You can add or remove constraints (including sketch dimensions) as needed to precisely position the section line around your base view. You do this by right-clicking the sketch in the browser and choosing Edit Sketch, just as you would any other sketch.
Here are some tips for working with section views:
Section line appearance is controlled by a layer and a style just like most other annotation objects. To determine which layer and style are used, switch to the Annotate tab, and then click the section line. Note the Layer and View Annotation style in the Layer and Style drop-downs on the far right of the Annotate tab.
Project a section view to create an isometric section.
Orthographic section views are hatched automatically, but isometric sections are not.
Edit or hide a hatch by right-clicking it.
Display a hidden hatch or turn a hatch on for isometric section views by editing the view (right-click and select Edit View), going to the Display Options tab, and selecting Hatching.
You can hatch by material if you have mapped the materials and hatch patterns in your standard.
Flip the section arrow direction by right-clicking the section line and choosing Reverse Direction.
Show just the arrows of the section line by right-clicking the section line and choosing Show Entire Line.
Edit the section depth by right-clicking the section line and choosing Edit Section Properties.
To constrain a section line to the center of a hole, run your mouse over the hole to project the center point when you are creating the sketch line.
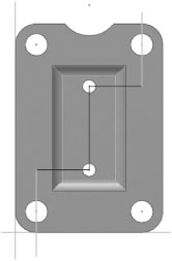
You defined the section line on the fly during the previous exercise. Now you will bring in a sketch created in the part model and use it to create a section view. Figure 12.10 shows the sketched line in the model.
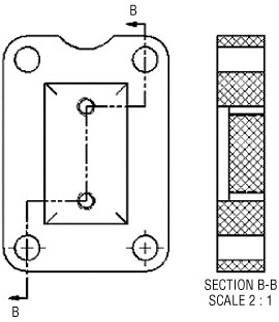
To create a section from a model sketch, proceed with these steps. If you still have mi_12a_051.idw open, you can skip to step 3.
On the Get Started tab, click the Open button.
Browse for the file named
mi_12a_051.idwlocated in the Chapter 12 directory of the Mastering Inventor 2010 folder, and click Open.In the browser, double-click Sheet2 to set it active.
Locate the sheet node, and then click the + symbol to expand it.
Then expand the view node called Front to reveal the model.
Finally, expand the model node to reveal the part features.
On the part node (
mi_12a_048.ipt), right-click and choose Get Model Sketches.You will now see that a model sketch called Section Sketch is present; right-click it, and choose Include.
This will reveal a zigzag line on the part view.
On the Place View tab, click the Section icon.
Click any part of the included sketch, or click the sketch in the browser to use as the section line.
In the Section View dialog box, click the Include Slice check box to create a zero-depth section. Leave the other options at the defaults.
Drag your cursor to the right of the original view and click Screen to create the section.
To change the section properties, right-click the section line, and choose Edit Section Properties.
Deselect the Include Slice box to change the section to a full-depth section.
Right-click the hatch, and choose Edit; then click the Double check box.
Your section should look similar to Figure 12.11.
You can also use a breakout to show a cutaway. Unlike the Section View tool that creates a new view, a breakout is a cut operation you perform on an existing view, such as our right-side projected view.
Breakouts start with a closed loop profile drawn on a view sketch, so you'll begin there as well. It is important to note that in order to use a sketch for a breakout, it must be associated to the drawing view. To create an associated sketch, first select the view, and then click the Create Sketch button. Clicking the Create Sketch button without selecting the view first will result in a sketch that is not associated with any view.
To create a breakout view, follow these steps:
On the Get Started tab, click the Open button.
Browse for the file named
mi_12a_067.idwlocated in the Chapter 12 directory of the Mastering Inventor 2010 folder, and click Open.Select the view named Front View. You can determine that the view is selected by looking at the browser; it should be highlighted.
On the Place Views tab, click the Create Sketch button.
Sketch a shape similar to Figure 12.12. The results don't need to be exact, but you do need to ensure that the sketch is a closed loop.
Click the Finish Sketch button on the Sketch tab, when your sketch is complete.
To ensure that the sketch has been created correctly, you can select the view on the sheet and drag it around a bit. If the sketch travels with the view, then it is associated to the view. If it stays put, it is not. You can also look at the browser and ensure that the sketch node is stacked under Front View. If you see it above Front View, it is not associated and will not work for the breakout.
On the Place Views tab, click the Break Out button.
Select the Front View.
Your sketch should automatically be selected as the Profile, provided you have only one unconsumed sketch. Otherwise, you will select the sketch for the profile. If you cannot select the sketch, review step 3.
Ensure the Depth area is set to From Point, and then click the center of the upper-rightmost hole.
Enter a depth value of 25mm, and click OK.
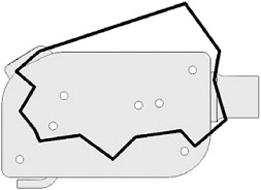
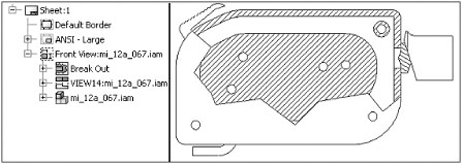
Your result should look similar to Figure 12.13. Note the Break Out view node in the browser. You may be able to see some portions of the internal parts, because they have been cut away as well. You'll explore how to control this in the coming pages.
Next you'll open a file and modify a breakout view to explore the other depth options:
On the Get Started tab, click the Open button.
Browse for the file named
mi_12a_072.idwlocated in the Chapter 12 directory of the Mastering Inventor 2010 folder, and click Open.In the browser, right-click the Break Out node, and choose Edit Break Out. You may have to expand the sheet node and the Front View node to locate it.
In the Depth area, set the drop-down to To Sketch. This sketch has been created associated to the top view by selecting the view first and then creating the view. This is required to use it as a To Sketch.
Select the zigzag sketch line in the top view.
Click OK.
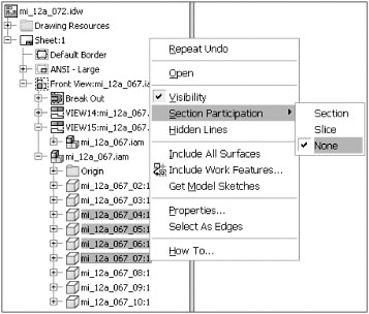
Examine the isometric view, and you will see that the breakout used the zigzag line as the depth extents and cut the internal and external parts. You can resolve this by going to the model tree and removing the file from the section participation as explained in the following steps.
Select the model node for the Front View. Hover your mouse pointer over model nodes in the browser, and watch the views on the sheet to ensure you are selecting the one for the Front View.
Expand the model node to reveal all the part files, and select the parts ending in 04 through 07, as shown in Figure 12.14.
Right-click the selected parts, choose Section Participation, and then select None.
The views will update on the sheet to show these parts unsectioned.
In the browser, right-click the Break Out node, and choose Edit Break Out. Note that there is a Section All Parts check box. This will override the Section Participation settings.
Change the Depth option to To Hole, and click the hole/circular edge in the Top View.
Click OK.
Notice that the zigzag sketch line reappears because it is no longer used by the breakout. Also notice that the breakout depth has adjusted to stop at the center of the hole.
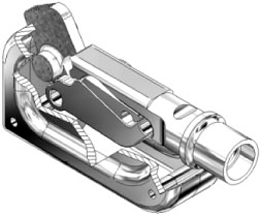
Edit the breakout once again, and set the Depth drop-down to Through Part.
Select the parts ending in 02, 03, 08, and 09, to ensure they are sectioned through.
Click OK; your results should be similar to Figure 12.15.
It should be pointed out that the preceding steps have created a situation that may yield inconsistent results by excluding some of the parts from the section participation settings and then setting the depth of the breakout to Through Part. Typically you would use the section participation settings only with the first three depth options and not with the Through Part option.
You will have noticed that, as you modified the breakout, the isometric view was linked to those changes. This was because isometric projected views created for views with a breakout inherit the breakout by default. Orthographic projected views, such as the top view, do not inherit the breakout.
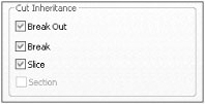
To switch the inheritance setting of the isometric view, right-click it and select Edit View. Go to the Display Options in the Drawing View dialog box, and deselect the Break Out check box in the Cut Inheritance area, as shown in Figure 12.16. You can also turn on hatching from this tab.
You can use the detail view to enlarge and segregate a particular portion of a drawing view as a new view. Follow these steps to explore the options of the detail views:
On the Get Started tab, click the Open button.
Browse for the file named
mi_12a_077.idwlocated in the Chapter 12 directory of the Mastering Inventor 2010 folder, and click Open.On the Place Views tab, click the Detail button.
Next click the Front view.
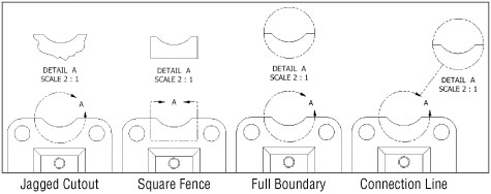
In the Detail View dialog box, you can modify the View/Scale Label And Style setting just as you can in other view creation dialog boxes. You can also set a fence and cutout shape. The Full Boundary and Connection Line options are available only if using the Smooth cutout option. Figure 12.17 shows examples of these options. Leave these set at the defaults.
Click the Front View, approximately in the center of the crescent-shaped feature, as shown in Figure 12.17.
Drag the boundary out to a size close to Figure 12.17 as well.
Click the screen where you would like to place the detail view.
Click the detail boundary on the Front View, and note the six green grips. Click and drag on any of the outer grips to resize the boundary, and use the center one to control the location.
You can also double-click the two grips near the arrowhead and change the head style.
Here are more options for detail views:
Right-click the detail boundary and choose Attach to anchor the detail to a specific point on the base view.
Right-click the detail boundary and choose Options to change the detail from rough to smooth and then to add a full detail and then to add a connection line.
Click and drag on the detail label character (the letter A in Figure 12.17) in the boundary fence to reposition it.
To move the detail label character out away from the boundary, right-click the detail boundary, click Leader, and then click the detail label character and drag it; it will be attached with a leader.
Right-click or double-click the detail view to edit the view and change scale, style, detail name, and so on, as you would any other view.
Once you've created the appropriate views to document the model, you can add annotations. You can find the annotation tools on the Annotate tab. The Annotate tab is divided into several groups of tools, including Dimension, Feature Notes, Text, Symbols, Sketch, Table, and Format tools.
There are four standard centerline and center mark tools as well as an automated centerline tool. These tools are called Centerline, Centerline Bisector, Center Mark, and Centered Pattern, and you can access them from the Symbols panel of the Annotate tab (look for the four buttons next to the Create Sketch button). Recall that hovering your mouse pointer over the tool buttons provides a tool tip with the button name and that hovering a second longer allows a dynamic tool tip to appear showing an illustrated example of each. The automated centerline tool is accessed differently.
Use Centerline to draw a centerline style line, arc, or circle by specifying points. When arcs are selected as centerline endpoints, a center mark is drawn on the arc along with the centerline.
Browse for the file named
mi_12a_082.idwlocated in the Chapter 12 directory of the Mastering Inventor 2010 folder, and click Open.On the Annotate tab, click the Centerline tool.
On VIEW 1, click the hole at the 12 o'clock position and then the hole at 2 o'clock. Notice the tool is drawing a straight line at this point.
Click the hole at 4 o'clock, and notice the centerline becomes an arc.
Continue on around clicking each hole and then close the centerline by clicking 12 o'clock once again; then right-click and choose Create.
You should still be in the centerline tool at this point. On VIEW 4, click the center of hole A1, then B1, then B2, and finally A4.
Right-click and choose Create; then right-click and choose Done. Your centerline should resemble the one on the left of Figure 12.18.
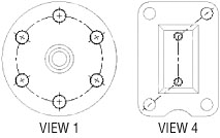
As you can see, the Centerline tool will triangulate the first three points and attempt to establish a centered pattern. In this way, you can use it to draw centerline arcs, circles, and lines. However, if you just need to draw a series of lines, this functionality can get in the way.
To draw just centerlines, click the first two points, then click any blank space on the sheet, then click the next two points and click a blank area again, and so on. The blank clicks are the same as right-clicking and choosing Create. Try this on VIEW 5 to draw centerlines between each of the corner holes.
Use Centerline Bisector to create a centerline halfway between two edges or two points. Note that the edges do not have to be parallel or the same length. You can even select two circles, and you will get a centerline halfway between them.
Still in
mi_12a_082.idw, select the Centerline Bisector tool on the Annotate tab.Zoom in on the center shaft area of view Section A-A.
Click the top and bottom lines on the shaft.
Notice that the distance between the two lines is bisected with a centerline.
Place bisector centerlines in two holes in Section A-A by clicking the opposing lines for each.
Right-click, and choose Done.
Click the centerline you placed in the center shaft and drag out the left end so that it extends past the shaft. Bisector centerlines are created based on the size of the lines you choose and may need to be adjusted. Your section view should resemble Figure 12.19.
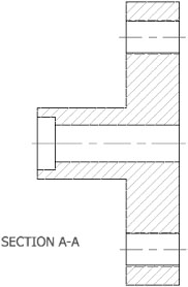
Use Center Mark to annotate hole centers, circular edges, cylindrical geometry, and arcs such as filleted corners. Center marks, as well as centerlines, are primarily formatted by the Center Mark style, but there is a distinct difference between how ANSI and non-ANSI center marks are drawn, so be sure your active standard is set properly for your needs.
Continuing with
mi_12a_082.idw, select the Center Mark tool on the Annotate tab.Zoom in to VIEW 2.
Click the centers of each hole.
Click the outermost circle as well.
Right-click, and choose Done.
Here are some Center Mark options to be aware of:
For large center marks that are mostly solid lines, you can right-click them, choose Edit
Once extra dashes have been added, click them to slide them into place.
To lock extra dashes down, right-click, and choose Edit
You can align center marks with an angled edge by right-clicking them, choosing Edit
You can adjust center mark overshoots by clicking the ends and dragging in or out as required.
To reset overshoots, right-click the center mark, and choose Edit
To simplify center marks to just a center cross, right-click them, and choose Edit
You can right-click a center mark and choose Edit Center Mark Style to adjust the way center marks are drawn by default.
Use Centered Pattern to create a centerline on parts or features that have a consistent pattern. If the pattern is circular, a center mark is automatically placed:
Continuing with
mi_12a_082.idw, select the Centered Pattern tool on the Annotate tab.Zoom in to VIEW 3.
Click the center hole first to establish the pattern axis.
Then click all the holes in pattern, and click the starting hole again to close the pattern.
Right-click and choose Create, and then right-click and choose Done.
Rather than placing centerlines and center marks manually, you can use the Automated Centerlines tool. This tool is in the right-click menu of each view, and you can run this on multiple views on the same sheet at one time (multiselect views while holding your Ctrl key down before executing the tool).
On the Get Started tab, click the Open button.
Browse for the file named
mi_12a_084.idwlocated in the Chapter 12 directory of the Mastering Inventor 2010 folder, and click Open.Hold the Ctrl key, and select all four views.
Right-click, and choose Automated Centerlines. If you do not see this option in the right-click menu, you have most likely selected something other than a view.
In the Automated Centerlines (ACL) dialog box, use the Apply To buttons to select the type of objects you want to apply center marks and centerlines to. In this case, choose one of the following:
Hole features
Cylindrical features
Revolved features
Circular patterned features
In the Projection area, ensure that both the Normal and Parallel projection buttons are selected; otherwise, the sections views will be ignored.
In the Radius Threshold area, enter 3 in the Maximum box for Circular Edges. This will ensure that no center mark is placed for the outer edge of the revolved part or for the 3.94 radius circle in the hub.
Click OK, and notice that centerlines and marks that have been created.
You can set the defaults for automated centerlines by going to the Tools tab, clicking Document Settings, and going to the Drawing tab in the dialog box that appears. Do this in your template, and you will not have to go through the process of selecting the Apply To buttons or specifying minimum and maximum threshold values each time.
A significant portion of any detailing job is placing and modifying dimensions, so it's important to become familiar with the various dimension tools and formatting options available in Inventor's Drawing Manager. Here is a quick reference of the dimension types available:
Linear dimension from one element. For instance, select a line and drag and drop the dimension.
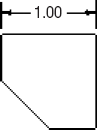
Linear dimension between two elements. Select two endpoints, and drag and drop the dimension.
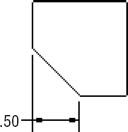
Aligned dimension between two elements. For instance, select two endpoints of an angled line, right-click, and select Aligned to force an aligned solution.
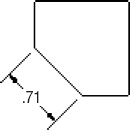
Angular dimension between three points. Select three points; they can be endpoints, midpoints, center points, and so on.
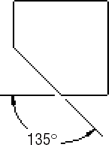
Angular dimension of an interior angle. Select two angular lines, and drag to the minor angle.
Angular dimension of an exterior angle. Select two angular lines, and drag to the major angle.
Angular dimension from a reference line, such as a line from an object line and a centerline, or a projected work axis.
Radial dimension. Select any circle or arc, and right-click to choose either a radius or a dimension. Radius is the default for arcs.
Diameter dimension. Select any circle or arc, and right-click to choose either a radius or a dimension. Diameter is the default for circles.
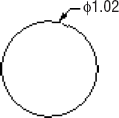
Baseline dimensions. Select objects, and then set the direction and base dimension.
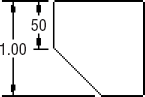
Ordinate dimensions. Select objects, and then set the direction and origin dimension.
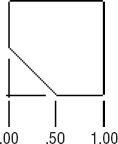
Implied intersection dimension. Select the first intersecting object, then right-click and choose Intersection, and finally select the second intersecting object. Next, select an object to dimension the intersection point to.
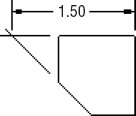
Apply General, Ordinate, and Baseline dimensions to spline endpoints.

Apply General and Ordinate dimensions to the X and Y Min/Max points of a spline.

Most of these dimensions can be created with just one tool, the General Dimension tool.
You can find the General Dimension tool by clicking the Dimension button on the Annotate tab. This will be your primary dimensioning tool. It works very much like the Sketch Dimension tool discussed earlier in this book in that this single tool can generate several different types of dimensions depending on the geometry you select.
Once geometry is selected, you can right-click to choose the options that are applicable to placing the type of geometry you've selected. You can also control snap options, arrowhead options, and leader options from the right-click menu specific to each dimension type.
A few more types of dimensions are available in drawings than can be generated in sketches using the General Dimension tool. For instance, once an arc is selected (not a full circle), a radius dimension is created by default, but prior to placement, you can right-click and choose Diameter, Angle, Arc Length, or Chord Length from the Dimension Type flyout, as shown in Figure 12.20.
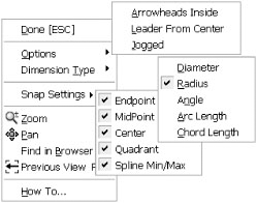
Prior to placing a linear dimension between two points or two parallel lines, you can create Linear Diameter or Linear Symmetric dimensions from the dimension's right-click menu, that is, the Dimension Type flyout. These types of dimensions are used commonly with symmetrical parts, especially turned cylindrical parts. Figure 12.21 shows the Linear dimension options available when two points or two parallel lines have been selected.
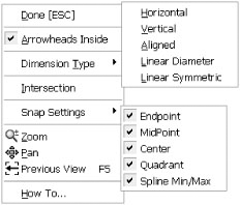
Prior to placing diameter dimensions, you can right-click and switch to a radius or change the leader options, as shown in Figure 12.22.
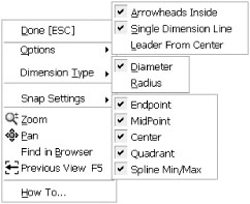
You can create and access selection filters by holding your Shift key down and right-clicking. Selection filters specify the elements that can be selected when in drawings. For instance, if you choose the Detail selection filter, only common objects common to detailing tasks are selectable, and items such as view boundaries, view labels, section view lines, and so on, are filtered out and cannot be selected. You can create a custom filter also by Shift+right-clicking and choosing Edit Select Filters.
Another way to quickly add dimensions to your model views is using the Retrieve Dimensions tool. You can access this tool from the view's right-click menu or from the Annotate tab. This tool allows you to recover sketch and feature dimensions that were used to model your part into the drawing view. To recover model dimensions, follow these steps:
On the Annotate tab, click the Retrieve button.
Select the view you want to retrieve dimensions for.
You can choose to retrieve dimensions per feature or per part, depending upon what makes sense. You might choose per part when working with an assembly view, for instance. Set the radio button as you require.
Next select the feature(s) or part(s) in the graphics window. You can select multiple objects by holding down Shift or Ctrl key as select them. Or you can window-select the whole view.
Click the Select Dimensions button to choose which dimensions to keep. Again, you can use a window selection to select them all.
Click the Apply button, and then select another view to retrieve or click OK.
Recovered model dimensions behave similarly to regular, placed dimensions with respect to editing and formatting. Recovered model dimensions cannot be detached or reattached from the geometry they're referencing.
Model dimension values can be directly edited from the drawing view, thus changing the model parameter value and affecting size and shape of your model feature. Access the dimension value by selecting Edit Model Dimension from the dimension's right-click menu.
The ability to change model dimension values is set during Inventor installation; the default setting is to have the ability enabled. If you would prefer that users can retrieve model dimensions but not be allowed to edit them from the drawing, go through the installation configuration settings to disable this.
Once a particular model dimension is recovered in one view, it cannot be recovered again in any other view in the same file. You can move recovered model dimensions between views, however, provided appropriate attachment points exist in the target view. To do this, right-click the dimension, and choose Move Dimension.
Baseline dimensions are a series of linear dimensions that each terminate to a common point (or baseline). The Baseline Dimension and Baseline Dimension Set tools offer a mechanism to quickly add dimensions to a drawing view in an orderly way.
When you execute the Baseline Dimension tool, you're left with a series of conventional linear dimensions. This tool simply automates what you could do on your own with the General Dimension tool. The Baseline Dimension Set tool, however, generates a collected group of linear dimensions that are moved (through dragging and editing) and edited as a single group.
To understand this more fully, open the file named mi_12a_085.idw located in the Chapter 12 directory of the Mastering Inventor 2010 folder, and compare the two dimensioned views. The one on the left was done with the Baseline Dimension tool, and the one on the right was done with the Baseline Dimension Set tool. Use the views on the bottom to create baseline dimensions. Start either tool, click the left vertical part edge (this will be the baseline), and then manually or multiselect additional features (these can be model edges or hole centers). When you've selected all the geometry you want to dimension, right-click and click to place the dimensions (shown in Figure 12.23). After you place the dimensions, you can continue to select points on the view (points on geometry rather than explicit geometry), or you can right-click and select Create.
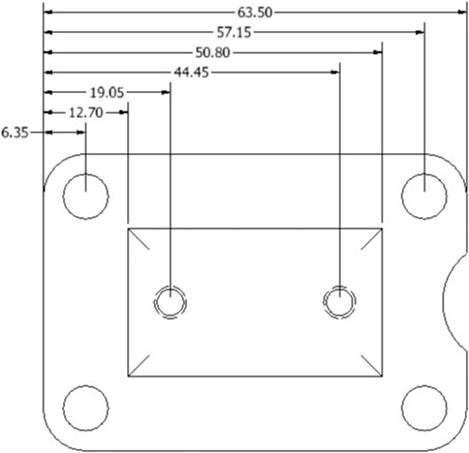
Ordinate dimensions and ordinate dimension sets are created much the same way. Again, a dimension set is managed and formatted as a single, selectable object (with some exceptions), while the Ordinate Dimension tool results in independently controlled dimensions.
Another key difference between ordinate dimensions and an ordinate dimension set is that you can have multiple ordinate sets on a single view with different origin points. Once you specify an origin for ordinate dimensions on a view, all ordinate dimensions placed on that view will reference that origin as well as any hole tables referencing that view. The reverse is true as well: once an origin is specified for a hole table, ordinate dimensions on that view share the origin.
To understand this more fully, open the file named mi_12a_099.idw located in the Chapter 12 directory of the Mastering Inventor 2010 folder, and compare the two dimensioned views. The one on the left was done with the Ordinate Dimension tool, and the one on the right was done with the Ordinate Dimension Set tool. Use the views on the bottom to create ordinate dimensions and ordinate dimensions sets.
Although you may have been taught at some point that dimensions should never be placed on isometric views because traditional detailing techniques do not allow an accurate dimension to be pulled from an isometric, Inventor can overcome this by pulling the intelligence from the physical model. When you use the General Dimension tool to add dimensions to an isometric view, the resulting dimensions are fundamentally different from those you place in orthographic views.
This is immediately noticeable when you see how the resulting dimensions are drawn on the sheet: all of the dimension geometry (text, arrowheads, extension lines, and dimension lines) are drawn in 3D space and not in sheet space (like orthographic views). Dimensions generated on isometric views are called true (meaning they reflect the true model space dimensional value). Dimensions added to orthographic views are known as projected because the dimension value represents the calculated distance or angle between endpoints or geometry projected onto the sheet.
When placing an isometric dimension, Inventor tries to determine an appropriate annotation plane based on your geometry selection. In many cases, particularly with linear dimensions, multiple inferred annotation planes are available. Prior to placing the dimension, you can toggle through these inferred annotation planes by clicking the spacebar.
If none of the inferred work planes meets your needs, you can project the dimension either onto the sheet plane or onto a model work plane. For instance, oftentimes you will find that hole notes and leader dimensions such as radii and diameters look better placed on the sheet plane rather than in the isometric plane; therefore, you can right-click and choose Use Sheet Plane when placing them.
The change in dimension behavior (true vs. projected) happens automatically depending on the view orientation. Any projected isometric or base isometric view results in True dimensions. As a rule, newly added dimensions to a view are treated as true if none of the model's origin planes is parallel to the sheet (with the exception of auxiliary views).
You can override this rule on a view-by-view basis by right-clicking a view and changing the dimension type (True or Projected).
Isometric dimensions are functionally identical to orthographic dimensions; however, they cannot be "moved." That is, they cannot be detached and reattached to different geometry, and they can't be moved using the dimension Move option on the dimension's right-click menu. All formatting options and behavior are otherwise identical.
Although placing isometric dimensions may seem unconventional, you can, in fact, oftentimes eliminate the number of views required to concisely communicate the design by placing dimensions on an isometric view. Try adding dimensions to the isometric view in mi_12a_105.idw, as shown in Figure 12.24.
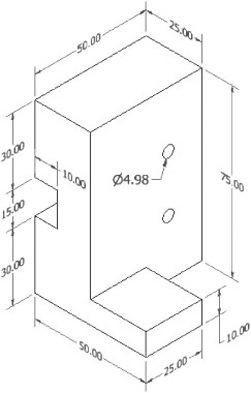
All the different types of dimensions discussed in this section are initially formatted by an associative dimension style. Indeed, each different type of dimension can be set to use a different dimension style if needed. Almost every formatting option available for dimensions is set through the dimension style. There are literally dozens of individual style settings—too many to list here. To illustrate how to change dimension formatting through styles, you'll walk through setting up a new dimension style to apply a symmetrical tolerance.
On the Get Started tab, click the Open button.
Browse for the file named
mi_12a_107.idwlocated in the Chapter 12 directory of the Mastering Inventor 2010 folder, and click Open.On the Manage tab, click the Style Editor button.
In the Style And Standard Editor, expand the Dimension node on the left side, and click the Default – mm (ANSI) dimension style.
Click the New button along the top, thus creating a new style based upon the Default – mm (ANSI) style. You can also right-click the dimension style you want to start from and choose New Style.
Click the Tolerance tab, and set the Method drop-down to Symmetric.
Enter 0.100 for the Value field, and then set the Linear Precision to three places, as shown in Figure 12.25.
Go to the Units tab, and change the Linear Precision setting to three places (3.123).
Click the Save button along the top, and close the Style Editor dialog box.
Apply this dimension style to the existing dimensions on the sheet by first selecting them and then going to the Annotate tab and selecting PM1 from the Style drop-down (found just under the Layer drop-down to the top right of the screen). The selected dimensions will immediately update to reflect the new style assignment.
Next, double-click the 25mm dimension to edit it, and click the Precision And Tolerance tab. The ±0.100 tolerance setting is reflected here in the Edit dialog box. Change the tolerance value to ±0.200.
You've now created two formatting overrides for the 25mm dimension. You overridden the Object Default assignment by setting it to a dimension style other than the By Standard style, and you've then set a tolerance override from the style itself.
In addition to making style-level formatting changes to dimensions, you can copy and paste dimension formatting between dimension objects on your sheet.
Right-click the 25mm dimension you just edited, and select Copy Properties.
Then click the 30mm dimension. It will adopt both the style formatting and the local tolerance value override from your source dimensions. You can configure which properties are copied before selecting the target dimension by right-clicking and selecting Settings after invoking the Copy Properties tool.
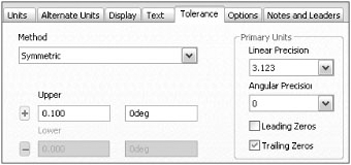
To edit a dimension's style, right-click the object and choose Edit Dimension Style, which will take you right into the Style Editor and highlight the dimension style. You can do this with just about any annotation object.
A hole note differentiates itself from a traditional diameter dimension by calling out feature information beyond just the hole diameter.
The Hole/Thread Note command (in the View Annotation panel) generates a leadered note that displays all pertinent hole feature information derived from the hole edge that is selected.
For example, a hole note pointing to a simple blind hole might appear as 10 × 20. A hole note pointing to a through partial-tapped hole might appear as 10-32 UNF-2B × 20.00. Inventor provides you with the ability to tailor the exact contents of the hole note through your dimension style.
Use the Hole/Thread Note tool to add a single note for the mounting hole and tapped hole in the faceplate front view. You can configure hole notes to display whatever string of description text you prefer as well as set the various hole parameter values' Precision and Tolerance settings. These preferences are set and stored in the dimension style.
You can configure more than 50 types of holes in this interface; they generally correspond to the different kinds of holes you can create using the Hole feature tool in part and assembly modeling ("holes" as a result of circular-extruded cuts, voids, or circular sheet-metal cut features are also supported by hole notes).
You can configure hole notes to display the hole quantity as part of the note. You can add a quantity note either directly on an individual note through the Edit Hole Note dialog box (right-click a hole note and choose Edit Hole Note) or at the style level (right-click a hole note and choose Edit Dimension style) so they appear for all holes of the same type. You can use the hole note in mi_12a_107.idw to explore this.
To add a quantity note at the style level, make sure you're editing the dimension style associated with the hole notes on your drawing (the best way to ensure this is to right-click on the hole note and choose Edit Dimension Style). Select Thru – Full Thread in the Note Format drop-down, and then click in the text field so that the cursor is in front of the note text; finally, click the button with the # sign on it. This inserts the <QTYNOTE> variable token in front of the note, as shown in Figure 12.26.
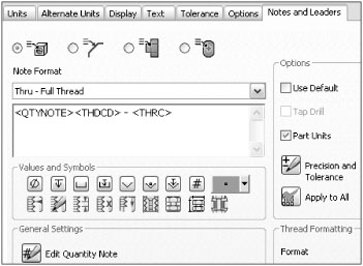
You can customize the quantity note by clicking the Edit Quantity Note button on the dimension style's Notes And Leaders tab, as shown at the bottom left of Figure 12.26. By default, the quantity note is set up as a prefix to the full hole note (2 ×). This dialog box also lets you determine how the hole quantity is determined (either the number of holes in a feature or pattern or a complete evaluation of identical holes in a view where all the hole axes are normal to the view).
As soon as you save the changes to your dimension style, you should see the hole note for the tapped holes update to include the quantity of holes (2 ×).
The Notes And Leaders tab on the Dimension style also enables you to preconfigure other kinds of feature notes including chamfer notes (which are actually calculated notes and not feature-dependent), punch notes, and bend notes (both of which are available only for views of sheet-metal parts).
Many of the annotations you can apply to a drawing belong to a common class of annotations we'll refer to as leadered symbols. These are all grouped together in the Drawing Annotation panel: Surface Texture Symbol, Welding Symbol, Feature Control Frame, Feature ID Symbol, Datum ID Symbol, and five different Datum Target tools. Each of these are created the same way, and each is formatted by their own dedicated style.
In the following steps, you will walk through an exercise that involves adding geometric dimensioning and tolerancing symbols to a drawing of a faceplate:
On the Get Started tab, click the Open button.
Browse for the file named
mi_12a_109.idwlocated in the Chapter 12 directory of the Mastering Inventor 2010 folder, and click Open.On the Annotate tab, use the drop-down on the Symbols panel, and choose the Datum Identifier Symbol button.
Click the far-right edge of the part, and drag the leader to the desired length.
Click the screen to set the leader, and then right-click and choose Continue.
Accept the default A value in the text editor, and hit OK.
Click the bottom edge to add a second datum ID (B), but rather than placing a leader, right-click, and choose Continue immediately after clicking the initial part edge point. You can do this with most Inventor leader features.
Next, on the Annotate tab, use the drop-down on the Symbols panel, and choose the Feature Control Frame button.
Rather than attaching the frame to the part, instead hover your mouse pointer near the bottom middle of the hole note, until you see a green dot indicating the snap point (just below the N in UNF), and then click it.
Then right-click and choose Continue to place the frame without a leader.
Fill out the appropriate fields for a positional tolerance relative to the A and B datums, as shown in Figure 12.27; then hit OK.
To see that the frame is attached, select the hole note, and then drag the leader landing to move the note. Notice how the frame remains constrained to the hole note.
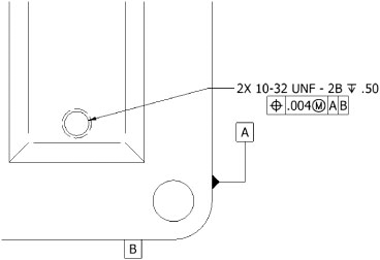
You can add text to your drawing in multiple ways. The Text tool (found on the Annotate tab) is used to create general drawing notes. This kind of text is limited because it can't be associated (constrained) to a drawing view and because it offers no control over which component iProperties and parameters are being accessed when you have multiple components detailed on the same sheet.
In addition to the Text tool, you can also use the Leader Text tool (also found on the Annotate tab), which can be associated to a view or a component, allowing you to extract and display iProperty and model parameter values from the component to which the leader is attached. If view associativity is required but you don't want a leader, you can right-click the leader text and choose Delete Leader.
Each of these tools utilizes the generic Format Text dialog box. This dialog box is used to edit any text-specific annotations as well as other annotations such as hole tags and datum and feature IDs. The general text formatting for any drawing annotation containing text ultimately comes from a text style. Text style formatting (size, font, color, and so on) can be overwritten in the Format Text dialog box.
You can document hole descriptions, quantities, and locations on a view by using a hole table rather than using hole notes. Indeed, you can use the hole table to document not only hole features but sheet-metal punches as well. You can even use a hole table to call out locations of recovered work points in your model. You can use this technique to detail specialized features such as slots and bosses.
Hole tables, like most types of annotation in Inventor, are initially formatted by an associative style—a Hole Table style in this case. The Hole Table style enables you to select which columns you want displayed in your table, format precision and units for the X and Y location columns, change line formatting, filter on different hole types, and configure various grouping mechanisms depending on your needs.
Everything about the hole table is formatted by the Hole Table style except for the description string for the hole. The description string uses the same configuration as your hole notes and receives this particular formatting by the hole tag's dimension style (hole tags are created with the hole table and are formatted by a dimension style).
In the following steps, you'll walk through setting up a Hole Table style and creating a hole table for the faceplate:
On the Get Started tab, click the Open button.
Browse for the file named
mi_12a_111.idwlocated in the Chapter 12 directory of the Mastering Inventor 2010 folder, and click Open.On the Manage tab, click the Styles Editor button.
In the left pane of the Styles Editor, expand the hole table node, and click the style named Hole Table – mm (ANSI). The right pane will update to show the settings for this style, as shown in Figure 12.28.
At the top of the right pane, click the New button, and set the name of the new hole table style to HT_02.
Click the Column Chooser button, and select the Quantity property on the left of the resulting property list.
Click the >> button to add it to the included list of columns on the right.
Use the Move Up button to move the Quantity column up in the list as you like; then hit OK.
Right-click the XDIM Property in the Default Column Settings frame, and select Format Column.
In the Format Column dialog box, change the precision to three places, and change the column heading to X LOCATION. Note that you can format columns in this manner in almost all of Inventor's annotation tables, such as parts lists and so on.
Click the Save button to save the changes, and exit the Style Editor dialog box with the Done button.
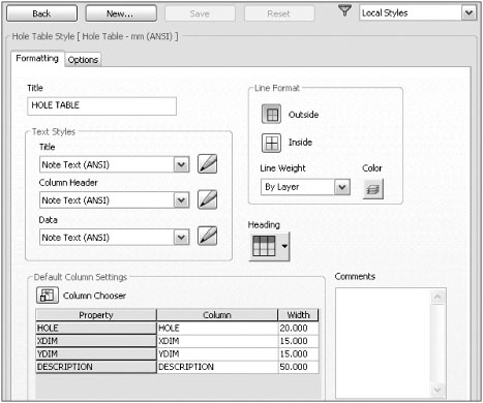
You will now need to place a hole table on the drawing. Three hole table variations are available on the Table panel of the Annotate tab:
- Selection
This allows you to select the holes you want to include in the table, and then only those holes are included.
- View
This documents all holes in a view, although you can use filters to exclude certain hole types. As holes are added to the part, the hole table updates to include them.
- Features
This allows you to select an instance of the types of holes you want to include in the table, and then all holes of that type are included.
To continue this exercise, you'll choose to place a hole table using the View method.
On the Annotate tab, select the Hole drop-down on the Table panel, and choose Hole View.
Select the view on the sheet.
Next you need to place the origin on the view. You can click any edge or vertex of the part, or you can project the edges to find the apparent intersection of the lower-left corner.
To place a table using the table style you created, go to the Style drop-down at the top right of the screen, and choose HT_02 from the list.
Next, click the screen to set the hole table on the sheet.
For each individual hole in the view, a hole tag is placed next to the hole edge, and a corresponding row is generated in the hole table. Also notice that because each hole is called out individually in this table, each row has a quantity of 1 (shown in Figure 12.29). You can edit the hole table by right-clicking it and choosing Edit Hole table. From there, you can set the table to roll up all A-type holes and all B-type holes from the Options tab by selecting the Rollup radio button.
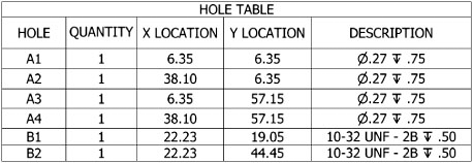
You can also edit the Tag, Note, or Description text by right-clicking the text in the table. You can make direct overrides to hole descriptions by double-clicking the description text, and you can override X and Y location precision by right-clicking an individual cell. You can access several other options by right-clicking the text in the table as well, so be certain to explore them all.
Creating/annotating drawing views of assemblies is similar to doing so for parts. All the same views and annotation tools discussed in the previous sections can be executed when working with assembly and presentation models. When creating views of assemblies, you will typically create parts lists and balloons and may need to control reference parts, interference edges, and assembly representations. These subjects and others dealing specifically with assembly files are covered in the following sections.
One of the most significant differences between part and assembly model views are the view options available for assembly views. When an assembly file is referenced in the Base View, representation options become available on the Component tab of the Drawing View dialog box. These controls allow you to specify which assembly view, positional, or LOD representation is displayed in the resulting drawing view.
View representations can optionally be made associative to the view (using the check box at the top of the View Representation control). Specifically, an associative view representation means that as a component's visibility is changed from the assembly, the change is witnessed in the drawing view as well. If the associative option is deselected, you can toggle component visibility from the drawing itself.
Recall the general definitions of each assembly representation type:
In the next several steps, you will edit a view of an assembly to see how to use assembly representations in drawing views:
On the Get Started tab, click the Open button.
Browse for the file named
mi_12a_115.idwlocated in the Chapter 12 directory of the Mastering Inventor 2010 folder, and click Open.Right-click the large view and choose Edit View to examine the view options dealing with representations. Notice the different presentations, as shown in Figure 12.30.
In the View area, choose the view representation named Frame And Ram, and then click OK. You'll notice that all the parts are gone now except for the frame and the ram. This was set up in the assembly by toggling the visibility state off for all of the other parts and then saving that as a view representation.
Right-click the large view, and choose Edit View again.
In the Level Of Detail area, choose the representation named Handle And Ram, and then click OK. You'll note that only the ram remains on-screen. This is because you have the view set to use two different representations at once. The view representation has the visibility turned off for everything but the frame and ram, but the frame was suppressed in the level of detail. Typically it's best not to use these two representations together because it can be confusing as to what is being controlled where.
Right-click the large view, and choose Edit View once again.
Set the view representation to Master, and set the positional representation to Closed (leave the LOD as is); then click OK.
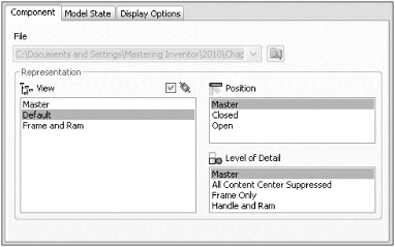
You'll see that now just the handle, shaft, and ram parts are shown (because the LOD representation), and the positional representation is controlling the positions of these parts.
Assembly components can be designated as Reference. You can apply this attribute as a document setting on the part or assembly file itself or on a per-instance basis when placed in a higher-level assembly.
In addition to being omitted from the assembly mass property calculations, BOM, and subsequent drawing parts lists, reference components are drawn and calculated differently in assembly drawing views.
By default, all reference component edges are mapped to a unique layer with a broken line style (double-dash chain). Hidden line calculation, by default, is run separately for reference components than nonreference components. Finally, reference components do not affect the calculation of the drawing boundary. This means that if you have a reference component well apart from nonreference parts in an assembly, it may not be visible in a drawing view until you increase the reference margin.
To explore these settings, you can open the file named mi_12a_117.idw located in the Chapter 12 directory of the Mastering Inventor 2010 folder and compare the two views. The view on the left shows the reference part at the default settings. The view on the right has been adjusted to show the reference part as a standard part. Right-click the view and choose Edit to adjust all the reference data view behaviors on the Model State tab of the Drawing View dialog box. Figure 12.31 shows the default settings.
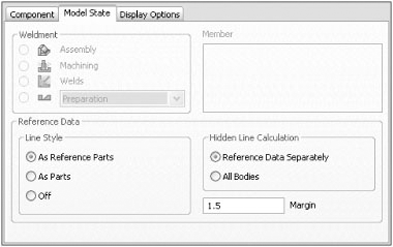
As you place and constrain components in an assembly file, it may be necessary to create an interference condition between parts. This is common for press-fit conditions such as pins in undersized holes. This condition is common in Inventor even when you have a threaded fastener being inserted into an equal-diameter threaded hole. These edges are designated as interference edges and can be turned on or off as needed.
Although not specific to assemblies, you can also control the display of tangent edges for cylindrical faces, filleted edges, and so on, in your drawing views. Both tangent and interference edges can be enabled by editing the view and selecting the Interference Edge check box on the Display Options tab.
Figure 12.32 shows the difference between two views with these edges turned off and turned on. The interference edge in this case is the small set screw in the middle of the plate. All other differences are tangent edges.
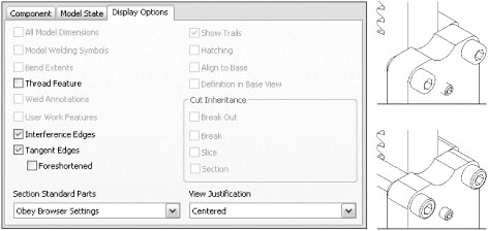
Parts lists are a formatted report of the assembly bill of materials placed on the drawing in a table. Most of the data you see in a parts list comes ultimately from the assembly BOM, but the BOM and the parts list are managed separately inside Inventor, providing control and flexibility for managing both.
Parts lists have a dedicated formatting style that provides dozens of formatting variations. We'll walk through a typical parts list editing and creation workflow to demonstrate what kind of capabilities can be levered in the parts lists.
On the Get Started tab, click the Open button.
Browse for the file named
mi_12a_119.idwlocated in the Chapter 12 directory of the Mastering Inventor 2010 folder, and click Open.On the Manage tab, click the Styles Editor button, expand the Parts List node, and click the style named MI_PL_02.
Click the Column Chooser button, and add the Material property from the list on the left. Then click OK.
Click the Heading button, and change the placement to Bottom.
Save your changes, and exit the Style dialog box.
On the Annotate tab, click the Parts List button.
The Parts List dialog box allows you to either click an assembly or presentation drawing view or browse directly to an assembly or presentation file (you can create a parts list on a drawing with no drawing views). You can choose either a structured (first or all levels) or parts-only parts list. If the parts list is too long for the sheet size you're placing it on, you can also enable the option to wrap the parts lists based on a specified number or rows.
Click the view on the sheet, and ensure that Structured is selected for the BOM view type. Click OK, and then snap the parts lists to the lower-left corner of the drawing border.
Although you can specify the default column width at the style level, you may need to adjust the width based on the length of the text strings read in from the component iProperties. You can adjust column width by clicking and dragging the vertical column lines on the parts list on your sheet. Resize the Materials column on the parts list to better accommodate the long description text.
The initial item numbering for the components and the row order come from the last save state of the assembly BOM but can be changed by editing the parts list. Double-click the parts list to launch Parts List dialog box.
Click the Sort button, and sort by Part Number in descending order, and then click OK.
Next, click the Renumber Items button, and notice how new item numbers are assigned based on the sort order.
The new item numbers appear blue and bold in the Parts List dialog box to indicate that they do not match the BOM. Any change you make to any of the cells in the Parts List dialog box (except for custom rows or custom columns) are treated as overrides to the BOM data. However, only Item number overrides can be written back to the BOM. All other overrides are preserved at the parts list level, allowing for greater flexibility of parts list edits at the drawing level without worries that they will be discarded if updated in the BOM. Item number changes can be saved to the assembly BOM cell by cell from the right-click menu or for the entire parts list in one of three ways:
While editing the parts list, click the Save Item Overrides To BOM button along the top.
Right-click the parts list itself on the sheet, and choose Save Item Overrides To BOM.
Right-click Parts List browser node, and choose Save Item Overrides To BOM.
If you intend for the overrides of prosperities other than the item numbers to match in both the BOM and parts list, you should make those edits in the BOM, where they will push through to the parts list. You can access the BOM quickly by right-clicking the parts list and choosing Bill Of Materials. Edits made in the BOM editor are written back to component iProperties and therefore push through to the parts list, provided no parts list overrides have already been made.
The parts list is not directly associated with any drawing view (if you choose a view when you create the parts list, it acts only as a pointer to the assembly file itself). Assembly drawing views are related to parts lists by ballooning the components in the assembly drawing view.
Balloons are perhaps the only type of annotation that are relevant for assembly views only. By default, balloons are set to display just a component's assigned item number, but through changes to the balloon style, a balloon can be configured to display any component iProperty or BOM property. Review the creation and editing of balloon styles in "Editing Styles and Standards" section earlier in this chapter.
You should know that only items visible in a view can be ballooned; however, you can string multiple balloons together on a single leader, including parts that are not visible, virtual parts, and even line items added to the parts list that do not exist in the BOM. This is also a common technique when ballooning a collection of hardware such as a screw, lock washer, and split washer.
Follow these steps to explore methods and options for balloon placement:
On the Get Started tab, click the Open button.
Browse for the file named
mi_12a_120.idwlocated in the Chapter 12 directory of the Mastering Inventor 2010 folder, and click Open.On the Annotate tab, click the Balloon button. Select the cap on the end of the handle, drag out and place the balloon on the sheet, right-click and choose Continue, and then right-click again and choose Done.
Right-click the balloon, and select Attach Balloon.
Then click the lever arm. The balloon for the lever arm is shown attached to the handle cap's balloon (Figure 12.33). Drag your mouse pointer around the balloon to set the position of the attached balloon, and then click to place it.
Right-click the balloon, and select Attach Balloon From List.
Select the box next to Spare Cap, and click OK.
Balloons can be added one at a time, or you can use the Auto Balloon tool (under the Balloon flyout) to quickly add multiple balloons to a drawing view.
Click the drop-down on the Balloon button, and select Auto Balloon.
Select the view on the sheet, and then window select all the components in the view.
Click the Select Placement button, and change the placement options. Move your mouse pointer around the sheet to see how the preview graphics update.
Set the placement option to Horizontal, place the balloons above the assembly, and then click OK.
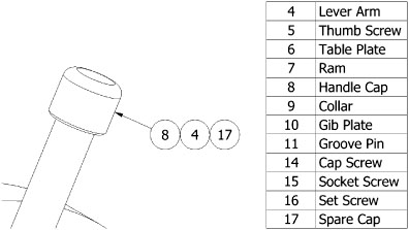
Here are some tips for working with balloons:
Click a balloon to reposition it on-screen.
Click the leader and drag it off the part edge and onto a part face if the edge is not clear as to what part is being specified.
Be aware that balloon contents do not update items when not attached to an edge, so if you pull a balloon from the edge of item 1 and place it on the face of item 2, the balloon will still read item 1.
You can reassociate balloons from one part to another part by dragging the arrowhead from one part edge to the edge of a different part.
Balloons not attached to an edge use an alternative leader style (most often a dot). You can specify a different alternative leader style in the balloon style.
If you right-click a balloon and choose Edit Balloon, you can change the item number and have it update the part list, or you can type in an override, and it will not update the parts list.
If you right-click a balloon leader, you can choose Attach Text To Leader and add text along the leader line.
If you've defined multiple positional representations in your assembly, you can use these different positional representations to create overlay views showing the mechanism in different positional states. To create an overlay view, follow these steps:
On the Get Started tab, click the Open button.
Browse for the file named
mi_12a_123.idwlocated in the Chapter 12 directory of the Mastering Inventor 2010 folder, and click Open.On the Place Views tab, click the Overlay button, and select the existing view on the sheet.
In the Overlay View dialog box, choose Closed from the Positional Representation drop-down, and then click OK.
Keep this file open for use in the next section.
The result is a view of the alternative position shown in a phantom line—type overlaid on the original. You can dimension to the overlay lines as you would any others, in order to capture a mechanism's extension length, rotation angle, and so on. The key to overlay views is really in setting up the positional representations in the assembly beforehand.
When you create the overlay, you are given the opportunity to specify a view representation for the overlay view. It's recommended that before you create an overlay view, you create a view representation that visibly isolates only the components that move as a result of the positional representation. Otherwise (as is the case in this example), all the nonmoving components are redrawn over the same components in the base view.
You can display the center of gravity (COG) of a part or assembly in a drawing view as a center mark. Only one COG can be shown per view with the exception of overlay views. Continuing from the last step in the previous exercise on overlay views, you will now take a look at displaying the COG marker in a drawing. If you did not complete the previous section, just open the file named mi_12a_123.idw located in the Chapter 12 directory of the Mastering Inventor 2010 folder, and activate Sheet 2 to follow these steps:
Locate the base view node in the browser, and expand it.
Right-click the mi_12a_115 assembly icon, and select Center Of Gravity. Doing this recalculates the model's center of gravity (it does not read the value in from the model's physical properties) and draws a center mark at the calculated location.
Locate the overlay node in the browser, and expand it.
Right-click the mi_12a_115 assembly icon, and select Center Of Gravity.
Finally, dimension the location of these center marks relative to the bottom-left corner of the Arbor Press frame.
Double-click to edit one of these dimensions, and add (COG) as a suffix to the dimension value on the Text tab of the Edit Dimension dialog box.
Use the Copy Properties tool to copy this appended text to the other COG dimensions (shown in Figure 12.34).

Drawing views of sheet-metal parts offer some unique options beyond what are normally available for conventional part files. Among these are the inclusion of bend notes, bend lines, punch notes, and tables, and the creation of flat pattern views.
When a sheet-metal part file has a flat pattern definition, you can create a drawing view of the folded model or the flat pattern. You can include both as well but need to separate base views to do so. To take a look at these options, follow these steps to create a flat pattern drawing view to start off:
On the Get Started tab, click the Open button.
Browse for the file named
mi_12a_130.idwlocated in the Chapter 12 directory of the Mastering Inventor 2010 folder, and click Open.Right-click the existing isometric view, and choose Open to open the model file.
Take a look at the model, and note that this file has been created using the sheet-metal tools discussed in Chapter 6 and that a flat pattern has been generated in the model.
Use the file tabs at the bottom of the screen to switch back to the drawing file (or press Ctrl+Tab).
On the Place Views tab, click the Base View button.
On the Component tab in the Drawing View dialog box, select the Flat Pattern option as well as the Recover Punch Center option, and then place the view of the flat pattern on the sheet.
Leave this file open because you will use it in the following pages.
Bend centerlines are drawn on sheet-metal flat pattern views where the center of the bend is located on the material face. Inventor tracks negative and positive bend centerlines independently of one another to enable users to apply different line formatting for these two conditions. This has already been done in file mi_12a_130.idw, but it should be noted that the default behavior is to have both positive and negative bend lines placed on the same layer. If you want to separate them, simply create a new layer called Bend Centerline (negative), and then go to the Object Defaults in the Styles And Standards Editor and assign the Sheet Metal Bend Centerline (+) and (-) to the appropriate layers.
Lines representing bend extents can be enabled by right-clicking the flat pattern view, choosing Edit View, going to the Display Options tab, and selecting the Bend Extents option.
You'll find two sheet-metal-specific annotation tools on the Annotate tab: Bend Notes and Punch Notes.
Bend notes are placed on bend centerlines in sheet-metal flat pattern views and can convey information about the bending operation including the bend radius, direction, angle, and K-factor. To place bend and punch notes, continue working with file mi_12a_130.idw, or open this file and activate Sheet2 to pick up from this point.
Click the Bend Note button on the Annotate tab.
Click one of the bend centerlines in the drawing view to place a single note.
To place the rest of the bend notes window, select the entire view. This tool looks only for bend centerlines, so you needn't be concerned about unintentionally selecting regular model edges.
By default, the bend notes are drawn adjacent to the bend centerlines, but where the note may be obscured in the view, you can drag individual bend notes to flip them to the opposite side of the bend centerline, or you can drag away from the bend centerline, and a leader is generated back to the bend centerline. Try this with the two outermost bend notes on the electrical box flat pattern view (shown in Figure 12.35).
The style formatting and direct editing of bend notes is identical to hole notes. You can preconfigure the contents of the note with the note's dimension style by adding one or more variable tokens for the bend note attributes. Punch notes are used to convey information about sheet-metal punch features (a special kind of iFeature). Punch notes can be applied only to flat pattern views of sheet-metal parts. They can be attached to recovered punch centers (shown as center marks in the flat pattern drawing) or on any model edge generated by the punch.
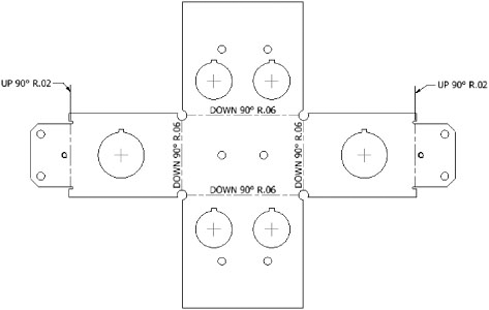
Punch notes can be configured to display the punch identifier (defined as part of the iFeature definition), the punch angle, the depth, and the direction. Punch notes are likewise formatted through dimension styles and have a similar editing interface to hole notes.
Bend information can alternatively be displayed in a table rather than a note. A bend table is generated using the General button on the Table panel on the Annotate tab. The Table tool basically morphs into several different kinds of tables depending on what you specify as a data source. If a flat pattern view is selected, then a bend table will be generated.
To create a bend table for file mi_12a_130.idw, activate Sheet3, and then follow these steps:
Click the General button on the Table panel of the Annotate tab.
Select the flat pattern view.
Click the Column Chooser button, and select Bend Radius from the list on the right.
Click the Remove button, and then click OK.
For Bend ID, select the Alpha option, and then click OK.
Place the table on the sheet, and adjust the Bend ID tags as required by clicking them and dragging.
A bend table is edited and maintained like a parts list. The Table dialog box is essentially identical, and any changes to the cell data are treated as overrides to the data source (in this case, the bend data stored in the sheet-metal file). Figure 12.36 shows a simple bend table and bend ID tags.
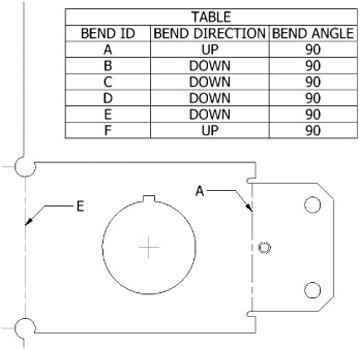
Punch information can likewise be displayed in a table, but because punches closely resemble holes with respect to the kind of information required to be displayed, a hole table is used to generate tabulated punch data. The only difference in creating a hole table and creating a punch table is that you use a predefined hole table style that is set to pick up only sheet-metal punch features.
Ensure that your flat pattern view has been set to collect punch centers. (Select Edit View
Select the flat pattern view.
Select an origin point.
Prior to placing the table, change the table's style to a Punch Table style. If you forget this step, you can always select the existing hole table and change it to the Punch table style using the Style drop-down (top right of the screen).
Figure 12.37 shows a simple Punch table.
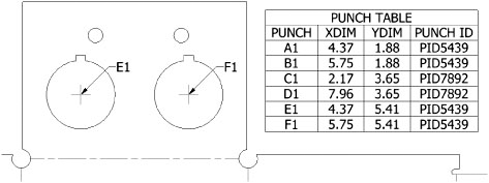
Weldments are a special kind of assembly model and offer unique drawing view and annotation options in the Drawing Manager. Here you'll take a quick look at the way drawing views handle weldment stages for detailing. For more information on working with weldments and weldment annotation, refer to Chapter 10. A drawing view of a weldment assembly can display any of the weldment states, which are as follows:
- Assembly
Displays the base assembly prior to the preparation, welding, and machining stages.
- Machining
Displays assembly features that represent the post-weld machining and finishing.
- Welds
Displays the assembly as it exists during the weld stage, before machining but after preparations have been made. Weld beads are also shown.
- Preparations
Displays assembly features such as chamfers, extrude cuts, and holes used to remove material to prepare the assembly for welding. You can set the view to display the entire assembly during the preparation stage or set the view to look at a single component as it exists at the preparation stage.
Follow the steps to explore the way that weldments are handled in drawings and drawing views:
On the Get Started tab, click the Open button.
Browse for the file named
mi_12a_139.idwlocated in the Chapter 12 directory of the Mastering Inventor 2010 folder, and click Open.Notice the following about the views on this drawing sheet:
Views 1 through 4 show the assembly with no preparations, welds, or machining.
Views P1 through P3 show each part at the preparation stage.
View W1 shows the weldment with welds but no machining done after the weld stage.
Right-click View-1, and choose Edit View; then click the Model State tab in the Drawing View dialog box.
Currently, this view, and the views projected from it, is set to the assembly state. Select the Machining option, as shown in Figure 12.38, so that the view displays the completed weldment. Click OK.
Notice that views 1 through 4 now show the weldment at its completion, including the machined holes that run through the weld on one side.
Edit View-W1 and check the Model State tab to see that it is set to the Weldment option.
Click the Display Options tab, and select the options to recover weld annotations and model weld symbols. Then click OK.
Because the weldment included the weld symbols, they can be pulled into the drawing. Click each symbol, and use the grip snaps to arrange them as you like. You'll also notice a series of arcs indicating the weld bead brought in via the Weld Annotations option. You can right-click those and choose Edit Caterpillar to adjust the appearance of each, or you can turn the visibility off as required. Figure 12.39 shows the view with recovered weld annotation and symbols.
Edit View-P1 through P3 to check the Model State tab settings for these views. Notice that each of these views is actually created from the assembly file but is set to look at the parts at their preparations stage.
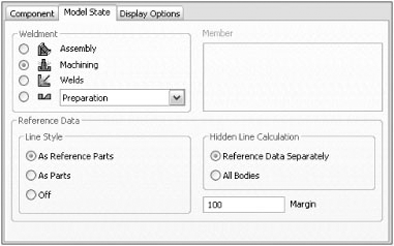
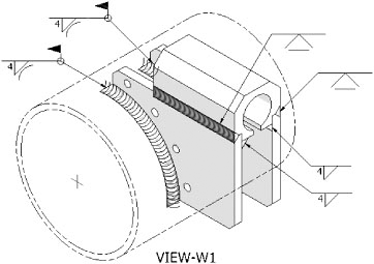
You might also note that the balloons on View-P1 through P3 are calling out the filenames and that both of the side plates are the same file but have opposing chamfers. This is because a common plate was used for both sides and then prepared as required in the weldment assembly. If you were to make views of the parts themselves as opposed to each part at the weldment preparation stage, the chamfers would not be present.
If you don't have the need to use the weldment tools in assembly modeling but still need to convey welding information in a drawing, you can create weld symbols and weld annotations (end fills and caterpillars) manually on the drawing view. Each is available in the Symbols panel of the Annotate tab as shown in Figure 12.40 and is formatted by a dedicated style (the Weld Symbol style and Weld Bead style, respectively).
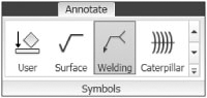
When your drawing view references an iPart or iAssembly, you can choose, from the Drawing View Model State tab, which member file you want to document.
Annotations (particularly dimensions) attached to drawing views of iParts and iAssemblies generally remain attached if you edit the base view and change the iPart member on the Model State tab. This means you can fully annotate just one iPart or iAssembly member and select Save Copy As for each unique member after changing the member referenced in the base view. Or you can create a tabulated drawing detailing all of the iPart/iAssembly members on a single sheet. To look at this workflow, follow these steps:
On the Get Started tab, click the Open button.
Browse for the file named
mi_12a_148.idwlocated in the Chapter 12 directory of the Mastering Inventor 2010 folder, and click Open.On the Annotate tab, click the General button found on the Table panel.
Next select the flat pattern view on the sheet to set the focus of the table.
Because this part file is both a sheet-metal part and an iPart, you are given the choice to create either a bend table or an iPart table (you can create both but need to do so in successive steps). Set the table data source to iPart/iAssembly Table.
Click the Column Chooser button, and use the Add button to include the Length Parameter; then click OK.
Click OK in the Table dialog box, and place the table on the sheet.
Next right-click the 100mm dimension at the top of the flat pattern, and choose Edit. Select the Hide Dimension Value box, and then type Length into the text box below. Then click OK.
Finally, right-click the table and choose Edit, and then right-click the Member header in the table and select Format Column.
Deselect the Name From Source box, enter Mark #, click OK, and then click OK again to return to the sheet. Your table should resemble Figure 12.41.
If you create a tabulated drawing in this manner and then add rows to the iPart/iAssembly table, your drawing table will automatically add the new row(s) as well. Rows can then be hidden in the table if needed simply by editing the table on the sheet and then right-clicking the row in the Table editor and unselecting Visibility.
Once your design is fully annotated, you can share the design documents to downstream consumers in numerous ways. Of course, the traditional hard-copy route is available from the Print tool, but there are other electronic means to share your Inventor drawings with people who do not have Inventor. The native file formats offer several possibilities. Inventor IPT, IAM, IPN, and IDW files can be viewed in their raw state using the freely distributed Inventor View application. A version of this is already installed with Inventor but can be downloaded for free from the Autodesk website.
As mentioned earlier, if you use DWG as your drawing file format, anyone with a copy of AutoCAD or AutoCAD LT 2007 or newer can view, plot, and measure the Inventor drawing. There are object enablers on the Autodesk website that even allow older versions of AutoCAD to open Inventor DWG files.
Using the Publish tool (click the Inventor menu
You can find any of the products mentioned earlier by going to www.autodesk.com or www.google.com and searching for one of these terms:
Autodesk Inventor View
Autodesk Object Enabler
Autodesk Design Review
PDF is a popular publishing format that can be read by Adobe Acrobat Reader. You can save a PDF from Inventor using the Save Copy As option and changing the file type to PDF. You can also download a number of PDF printer drivers that will allow you to print to PDF. Acrobat Reader is available for download from Adobe's website: www.adobe.com.
- Create an exploded assembly view by creating a presentation
Presentation files are used to virtually disassemble an assembly so downstream consumers can better visualize the design. The explosion created in the presentation file can be referenced in an assembly drawing to complement nonexploded assembly views.
- Master It
Your assembly design is complex and contains many internal components that can't be visualized in traditional assembly drawing views.
- Create and maintain drawing templates, standards, and styles
Inventor provides numerous methods to create, store, and use drawing templates and styles. Careful planning should be considered for how and where to manage these resources. Consideration must be given to how templates are deployed on your network and whether to use the style library.
- Master It
Rather than using one of Inventor's out-of-the box drawing settings, you need to set up a drawing template, a drafting standard, and annotation styles to conform to a particular international, industry, or company drafting standard.
- Generate 2D drawing views of parts, assemblies, and presentations
The Drawing Manager environment in Inventor enables you to generate traditional 2D drafting views from your 3D solid models.
- Master It
You've used Inventor's modeling tools to generate parts and assemblies to meet your design criteria. Now you need to generate drawing views of this design so that it can be communicated to machinists, fabricators, and inspectors.
- Annotate drawing views of your model
Drawing Manager provides a rich set of dimensioning tools, special symbols, and tables that enable you to fully annotate part and assembly drawings conforming to several international drawing standards.
- Master It
Now that you've generated drawing views of your design, the views must be fully annotated in accordance with your company's or your customer's required drafting standard.