
6
Wireless and Bluetooth Attacks
The dominance of mobile devices has led the majority of companies to adopt Bring Your Own Devices (BYOD) and the need to provide instant network connectivity, with wireless networks becoming the ubiquitous access point to the internet. Unfortunately, the convenience of wireless access is accompanied by an increase in effective attacks that result in the theft of data and unauthorized access, as well as the denial of service of network resources. Kali provides several tools to configure and launch these wireless attacks, allowing organizations to improve security.
In this chapter, we will examine several housekeeping tasks and wireless attacks, including the following topics:
- Configuring Kali for wireless and Bluetooth attacks
- Wireless and Bluetooth reconnaissance
- Bypassing a hidden Service Set Identifier (SSID)
- Bypassing MAC address authentication and open authentication
- Compromising WPA/WPA2 encryption and performing Man-in-The-Middle (MiTM) attacks
- Attacking wireless routers with Reaver
- Denial-of-Service (DoS) attacks against wireless and Bluetooth communication
Introduction to wireless and Bluetooth technologies
Wireless technology provides the ability to communicate between two or more entities over distances without the use of wires or cables of any sort. This utilizes radio frequency (RF) as well as infrared (IR) waves.
Table 6.1 outlines the different wireless technologies with the IEEE standards they support, the radio frequency that they operate on, data bit rates, and network ranges and size:
|
Name |
Bluetooth Classic |
Bluetooth 4.0 Low Energy (BLE) |
ZigBee |
Wi-Fi |
Wi-Fi 5/6 |
|
IEEE Standard |
802.15.1 |
802.15.1 |
802.15.4 |
802.11 (a, b, g, n) |
802.11 (ac, ax) |
|
Frequency (GHz) |
2.4 |
2.4 |
0.868, 0.915, 2.4 |
2.4 and 5 |
ac= 5, ax=2.4 and 5 |
|
Maximum raw bit rate (Mbps) |
1-3 |
1 |
0.250 |
11 (b), 54 (g), 600 (n) |
433(ac)600.4 (ax) |
|
Typical data throughput (Mbps) |
0.7-2.1 |
0.27 |
0.2 |
7 (b), 25 (g), 150 (n) |
6933 (ac)9607.8(ax) |
|
Maximum (Outdoor) Range (Meters) |
10 (class 2), 100 (class 1) |
50 |
10-100 |
100-250 |
ac=35-110 ax=70-240 |
|
Network Size |
7 |
Undefined |
64,000+ |
255 |
8 |
Table 6.1: A comparison of different types of wireless technologies
In this chapter, we will focus on two main wireless technologies, Bluetooth and Wi-Fi. The main difference is Wi-Fi can provide long-range and high-speed internet and Bluetooth is designed for short-range devices for sharing information.
Configuring Kali for wireless attacks
Kali Linux is pre-equipped with several tools to facilitate the testing of wireless networks; however, these attacks require extensive configuration to be fully effective. In addition, testers should acquire a strong background in wireless networking before they implement attacks or audit a wireless network.
The most important tool in wireless security testing is the wireless adapter, which connects to the wireless Access Point (AP). It must support the tools that are used, especially the aircrack-ng suite of tools; in particular, the card’s chipset, and drivers must possess the ability to inject wireless packets into a communication stream.
This is a requirement for attacks that require specific packet types to be injected into the traffic stream between the target and the victim. The injected packets can cause a DoS, allowing an attacker to capture handshake data that’s needed to crack encryption keys or support other wireless attacks.
The most reliable adapters that you can use with Kali are the Alfa Network cards, especially the AWUS036NH or Wi-Fi Pineapple adapters or TP-Link N150 TL-WN722N version 1, which support wireless 802.11 b, g, and n protocols. Similarly, to perform the Bluetooth attacks, it is recommended you use an external dongle such as the TP-Link USB Bluetooth Adapter or WAVLINK Wireless Bluetooth CSR 4.0 Dongle. These cards generally cost less than $10 and are readily available online and will support all the tests and attacks that are delivered using Kali.
Wireless reconnaissance
The first step in conducting a wireless attack is to conduct reconnaissance—this identifies the exact target AP and highlights the other wireless networks that could impact testing.
If you are using a USB-connected wireless card to connect to a Kali virtual machine, make sure that the USB connection has been disconnected from the host operating system and attached to the virtual machine. If you are using VirtualBox, select the Kali Linux virtual machine, then click on Settings. Select the USB category, then click on the USB icon with the + symbol, then select the USB wireless or Bluetooth adapter. This should disconnect the USB from the host operating system and attach it to your VirtualBox. Similarly, for VMware, click on the VM from the main menu, click Removable devices, and select your wireless or Bluetooth device.
Next, determine which wireless interfaces are available by running iwconfig from the command line, as shown in Figure 6.1:

Figure 6.1: Wireless adapter list
For certain attacks, you may wish to increase the power output of the adapter. This is especially useful if you are collocated with a legitimate wireless AP, and you want the targets to connect to a false AP under your control rather than the legitimate AP. These false, or rogue, APs allow an attacker to intercept data and view or alter it as needed to support an attack. Attackers will frequently copy or clone a legitimate wireless network and then increase its transmission power compared to the legitimate site as a means of attracting victims. To increase power, the following command is used:
sudo iwconfig wlan0 txpower 30
Many attacks will be conducted using aircrack-ng and its related tools. To start, we need to intercept or monitor wireless transmissions; therefore, we need to set the Kali communication interface with wireless capabilities to monitor mode using the airmon-ng command:
sudo airmon-ng start wlan0
The execution of the previous command is shown in Figure 6.2:

Figure 6.2: Starting the monitoring mode using airmon-ng
Note that the description that is returned indicates that there are some processes that could cause trouble. The most effective way to deal with these processes is to use a comprehensive kill command, as follows:
sudo airmon-ng check kill
To view the local wireless environment, use the following command:
sudo airodump-ng wlan0mon
The previous command lists all the identified networks that can be found within the range of the wireless adapter at that particular point in time. It provides the Basic Service Set Identifier (BSSID) of the wireless nodes on the network, as identified by the MAC addresses.
A Media Access Control (MAC) address uniquely identifies each node in a network. It takes the form of six pairs of hexadecimal digits (0 to 9 and the letters A to F) that are separated by colons or dashes, and usually appears in this format: 00:50:56:C0:00:01.
It also shows you an indication of the relative output power, information on data packets that have been sent, bandwidth information including the channel used and data, information on the encryption used, and the Extended Service Set Identifier (ESSID) that provides the name of the wireless network. This information is shown in Figure 6.3; non-essential ESSIDs have been blurred out:

Figure 6.3: airodump-ng actively identifying different wireless APs
The airodump command cycles through the available wireless channels 1-13 by default on 2.4 GHz and identifies the following:
- The
BSSID, which is the unique MAC address that identifies a wireless AP or router. - The
PWR, or power, of each network. Althoughairodump-ngincorrectly shows the power as being negative, this is a reporting artifact. To obtain the proper positive values, access a terminal and runairdriver-ng unload 36, and then runairdriver-ng load 35. CHshows the channel that is being used to broadcast.ENCshows the encryption in use—it isOPN, or open, for no encryption being used, orWEPorWPA/WPA2if encryption is being used.CIPHERandAUTHprovide additional encryption information.- The
ESSIDis the common name of the wireless network and is made up of the APs that share the same SSID or name.
In the lower section of the terminal window, you will see the stations attempting to connect, or that are connected to the wireless network.
Before we can interact with any of these (potential) target networks, we have to confirm that our wireless adapter is capable of packet injection. To do this, run the following command from a terminal shell prompt:
sudo aireplay-ng -9 wlan0mon
Here, -9 indicates an injection test. That will provide the ability to inject the packets into the target Wi-Fi network.
Bypassing a hidden SSID
ESSID is the sequence of characters that uniquely identify a wireless local area network. Hiding the ESSID is a poor method of attempting to achieve security through obscurity; unfortunately, the ESSID can be obtained by doing either of the following:
- Sniffing the wireless environment and waiting for a client to associate to a network and then capturing that association
- Actively deauthenticating a client to force the client to associate and then capturing that association
The aircrack tools are particularly well suited to capture the data that’s needed to unhide a hidden ESSID, as shown in the following steps:
- At the command prompt, confirm that wireless is enabled on the attacking system by entering the following command:
sudo airmon-ng - Next, use the following
ifconfigcommand to review the available interfaces and to determine the exact name that’s used by your wireless system:ifconfig - Enable your wireless interface by entering the following (you may need to replace
wlan0with an available wireless interface that was identified in the previous step):sudo airmon-ng start wlan0 - If you reconfirm with
ifconfig, you will see that there is now a monitoring orwlan0monaddress in use. Now useairodumpto confirm the available wireless networks by entering the following command, and attackers should be able to see the screen in Figure 6.4:sudo airodump-ng wlan0mon
Figure 6.4: airodump displaying all the available wireless networks in range
As you can see in Figure 6.4, the last network’s
ESSIDis identified only as<length: 0>. No other name or designation is used. The length of the hiddenESSIDis identified as being composed of nine characters; however, this value may not be correct because theESSIDis hidden. The trueESSIDlength may actually be shorter or longer than nine characters.What is important is that there may be clients attached to this particular network. If clients are present, we will deauthenticate the client, forcing them to send the
ESSIDwhen they reconnect to the AP. - Rerun
airodumpand filter out everything but the target AP. In this particular case, we will focus on collecting data from the hidden network on channel 11 using the following command:sudo airodump-ng -c 11 wlan0monExecuting this command removes the output from the multiple wireless sources, and allows the attacker to focus on the target
ESSID, as shown in Figure 6.5:
Figure 6.5: airodump running on channel 11
The data that we get when the
airodumpcommand is executed indicates that there is one station (82:A4:64:7F:6D:88) that is connected to theBSSID(C0:05:C2:02:85:67), which is, in turn, associated with the hiddenESSID. - To capture the
ESSIDas it is being transmitted, we need to create a condition where we know it will be sent—during the initial stage of the connection between a client and the AP.Therefore, we will launch a deauthentication attack against both the client and the AP by sending a stream of packets that breaks the connection between them and forces the client to re-associate with the AP.
To launch the attack, open a new command shell and enter the command that’s shown in the following screenshot (
0indicates that we are launching a deauthentication attack,10indicates that we will send10deauthentication packets,-ais the target AP, andcis the client’s MAC address):
Figure 6.6: Sending deauthentication packets to the connected station
- After all the deauthentication packets have been sent, return to the original window that monitors the network connection on channel 11, as shown in Figure 6.7:

Figure 6.7: Hidden ESSID is now visible in the airodump on channel 11
You will now see the ESSID in the clear.
Knowing the ESSID helps an attacker to confirm that they are focused on the correct network (because most ESSIDs are based on the corporate identity) and facilitates the logon process.
Bypassing MAC address authentication and open authentication
A MAC address is usually associated with a network adapter or a device with networking capability; for this reason, it’s frequently called the physical address.
The first three pairs of digits in the MAC address are called the Organizational Unique Identifier, and they serve to identify the company that manufactured or sold the device. The last three pairs of digits are specific to the device and can be considered to be a serial number.
Because a MAC address is unique, it can be used to associate a user to a particular network, especially a wireless network. This has two significant implications—it can be used to identify a hacker or a legitimate network tester who has tried to access a network, and it can be used as a means of authenticating individuals and granting them access to a network.
During penetration testing, the tester may prefer to appear anonymous to a network. One way to support this anonymous profile is to change the MAC address of the attacking system.
This can be done manually using the ifconfig command. To determine the existing MAC address, run the following from a command shell:
sudo ifconfig wlan0 down
sudo ifconfig wlan0 | grep HW
To manually change the IP address, use the following commands:
sudo ifconfig wlan0 hw ether 38:33:15:xx:xx:xx
sudo ifconfig wlan0 up
Substitute different hexadecimal pairs for the xx expressions. This command will allow us to change the attacking system’s MAC address to one that is used and accepted by the victim network. The attacker must ensure that the MAC address is not already in use on the network, or the repeated MAC address may trigger an alarm if the network is being monitored.
The wireless interface must be brought down before changing the MAC address.
Kali also permits the use of an automated tool, macchanger. To change the attacker’s MAC address to a MAC address of a product produced by the same vendor, use the following macchanger command from a terminal window:
sudo macchanger wlan0 -e
To change the existing MAC address to a completely random MAC address, use the following command :
sudo macchanger wlan0 -r
You should be able to see the macchanger tool. Figure 6.8 provides the new MAC address assigned for our wireless adapter:

Figure 6.8: Changing the MAC address of the wireless adapter
Some attackers use automated scripts to change their MAC addresses on a frequent basis during testing to anonymize their activities.
Many organizations, particularly large academic groups, such as colleges and universities, use MAC address filtering to control who can access their wireless network resources.
MAC address filtering uses the unique MAC address on the network card to control access to network resources; in a typical configuration, the organization maintains a whitelist of the MAC addresses that are permitted to access the network. If an incoming MAC address is not on the approved access list, it is restricted from connecting to the network.
Unfortunately, MAC address information is transmitted in the clear text. An attacker can use airodump to collect a list of accepted MAC addresses and then manually change their MAC address to one of the addresses that is accepted by the target network. Therefore, this type of filtering provides almost no real protection to a wireless network.
The next level of wireless network protection is provided using encryption.
Attacking WPA and WPA2
Wi-Fi Protected Access (WPA) and Wi-Fi Protected Access 2 (WPA2) are wireless security protocols that were intended to address the security shortcomings of WEP. Because the WPA protocols dynamically generate a new key for each packet, they prevent the statistical analysis that caused WEP to fail. Nevertheless, they are vulnerable to some attack techniques as well.
WPA and WPA2 are frequently deployed with a pre-shared key (PSK) to secure communications between the AP and the wireless clients. The PSK should be a random passphrase of at least 13 characters in length; if not, it is possible to determine the PSK using a brute-force attack by comparing the PSK to a known dictionary. This is the most common attack.
Note that if configured in the Enterprise mode, which provides authentication using a RADIUS authentication server, it might require a more powerful machine to crack the key or perform different types of MiTM attacks.
Brute-force attacks
Unlike WEP, which can be broken using a statistical analysis of a large number of packets, WPA decryption requires the attacker to create specific packet types that reveal details, such as the handshake between the AP and the client.
To attack a WPA transmission, the following steps should be performed:
- Start the wireless adapter and use the
ifconfigcommand to ensure that the monitor interface has been created. - Use
sudo airodump-ng wlan0monto identify the target network. - Start capturing traffic between the target AP and the client using the following command:
sudo airodump-ng --bssid F0:7D:68:44:61:EA -c 11 --showack --output-format pcap --write <OUTPUT LOCATION> wlan0mon - Set
-cto monitor a specific channel,--writeto write the output to a file for a dictionary attack later, and the--showackflag to ensure that the client computer acknowledges your request to deauthenticate it from the wireless AP. A typical output from the above command is shown in Figure 6.9:
Figure 6.9: airodump on specific BSSID on channel 11
- Leave this terminal window open and open a second terminal window to launch a deauthentication attack; this will force the user to reauthenticate to the target AP and re-exchange the WPA key. The deauthentication attack command is shown as follows:
sudo aireplay-ng -0 10 -a <BSSID> -c <STATION ID> wlan0monFigure 6.10 shows
aireplay-ngin action for deauthenticating a station connected to a particular BSSID:
Figure 6.10: Deauthentication of the station from the BSSID
- A successful deauthentication attack will show
ACKs, which indicates that the client who was connected to the target AP has acknowledged the deauthentication command that was just sent. - Review the original command shell that was kept open to monitor the wireless transmission, and ensure that you capture the four-way handshake. A successful WPA handshake will be identified in the top-right corner of the console. In the following example, the data indicates a WPA handshake value of
C2:B3:7B:17:00:B7:
Figure 6.11: Successful capture of a wireless handshake for a specific BSSID
- Use
aircrackto crack the WPA key using a defined wordlist. The filename that was defined by the attacker for collecting handshake data will be located in the root directory, and the.capextension will be appended to it.
In Kali, wordlists are located in the /usr/share/wordlists directory. Although several wordlists are available, it is recommended that you download lists that will be more effective in breaking common passwords.
In the previous example, the key was preplaced in the password list. Undertaking a dictionary attack for a long, complex password can take several hours, depending on the system configuration. The following command uses passwordlist as the source wordlist (attackers can also utilize the password list located in the /usr/share/wordlists/ folder within Kali):
sudo aircrack-ng -w passwordlist -b BSSID <OUTPUT LOCATION>Output.cap
Figure 6.12 shows the results from successfully cracking the WPA key; the key to the network named “Hidden” was found to be Letmein87 after testing six well-known keys:

Figure 6.12: Wireless adapter list
If you don’t have a custom password list to hand or wish to rapidly generate a list, you can use the crunch application in Kali. The following command instructs crunch to create a wordlist of words with a minimum length of 5 characters and a maximum length of 25 characters using the given character set:
sudo crunch 5 25 abcdefghijklmnopqrstuvwxyzABCDEFGHIJKLMNOPQRSTUVWXYZ0123456789 | aircrack-ng --bssid (MAC address) -w nameofthewifi.cap
As an additional option, you can also improve the effectiveness of the brute-force attack using GPU-based password cracking tools (oclHashcat for AMD/ATI graphics cards and cudaHashcat for NVIDIA graphics cards).
To implement this attack, first convert the WPA handshake capture file, output.cap, to a hashcat file using the following command:
sudo aircrack-ng nameofthewifi.cap -j <output file>
When the conversion is completed, you should have a .hccapx file in the same folder where the command was run. Now the attacker can execute the hashcat against the new capture file (choose the version of hashcat that matches your CPU architecture and your graphics card) using the following command :
sudo hashcat -m 2500 <filename>.hccapx <wordlist>

Figure 6.13: Running hashcat on your VirtualBox using a host GPU
One of the common issues noted while running hashcat in virtual containers such as VirtualBox or VMware is that users might not be able to run hashcat as expected, as 3.x version of hashcat requires GPUs. However, an alternative is to run the following command in the terminal: sudo apt-get install libhwloc-dev ocl-icd-dev ocl-icd-opencl-dev. This will allow the testers to utilize the CPU power to run hashcat within the container.
If you have multiple GPUs, testers can utilize tools such as John the Ripper and cowpatty to crack the password from the captured wireless traffic by using the following command in a terminal:
sudo john –w=<dictionaryfile> --stdout | sudo cowpatty -r yourhandshake.cap -d - -s WIFIESSIDS
Basically, John the Ripper will create a dictionary incrementally for all the characters, special characters, and numbers. Later, the output will be passed through to Pyrit to crack the password using the passthrough keyword, and additionally, cowpatty will crack the password for a particular WIFIESSID.
Attacking wireless routers with Reaver
WPA and WPA2 are also vulnerable to attacks against an AP’s Wi-Fi Protected Setup (WPS) and PIN.
Most APs support the WPS protocol, which emerged as a standard in 2006 to allow users to easily set up and configure APs and add new devices to an existing network without having to re-enter large and complex passphrases.
Unfortunately, the PIN is an eight-digit number (100,000,000 possible guesses), but the last number is a checksum value. Because the WPS authentication protocol cuts the pin in half and validates each half separately, this means that there are 104 (10,000) values for the first half of the pin, and 103 (1,000) possible values for the second half—the attacker only has to make a maximum of 11,000 guesses to compromise the AP!
Reaver is a tool that’s designed to maximize the guessing process (although Wifite also conducts WPS guesses).
To start a Reaver attack, use the wash companion tool to identify any vulnerable networks first, ensure the device is in monitoring mode by running sudo airmon-ng start wlan0, and then run the following command:
sudo wash -i wlan0mon --ignore-fcs
If there are any vulnerable networks, launch an attack against them using the following command:
sudo reaver -i wlan0mon -b (BSSID) -vv
Attackers should be able to see the following screenshot when running the Reaver tool from the terminal:

Figure 6.14: reaver running on a specific BSSID
Testing this attack in Kali has demonstrated that the attack is slow and prone to failure; however, it can be used as a background attack or can supplement other routes of attack to compromise the WPA network.
Denial of Service (DoS) attacks against wireless communications
The final attack against wireless networks that we’ll evaluate is DoS attacks, where an attacker deprives a legitimate user of access to a wireless network or makes the network unavailable by causing it to crash. Wireless networks are extremely susceptible to DoS attacks, and it is difficult to localize the attacker on a distributed wireless network. Examples of DoS attacks include the following:
- Injecting crafted network commands, such as reconfiguration commands, into a wireless network can cause the failure of routers, switches, and other network devices.
- Some devices and applications can recognize that an attack is taking place and will automatically respond by disabling the network. A malicious attacker can launch an obvious attack and then let the target create the DoS itself!
- Bombarding the wireless network with a flood of data packets can make it unavailable for use; for example, an HTTP flood attack making thousands of page requests to a web server can exhaust its processing ability. In the same way, flooding the network with authentication and association packets blocks users from connecting to the APs.
- Attackers can craft specific deauthentication and disassociation commands, which are used in wireless networks to close an authorized connection and flood the network, thereby stopping legitimate users from maintaining their connection to a wireless AP.
To demonstrate this last point, we will create a DoS attack by flooding a network with deauthentication packets. Because the wireless 802.11 protocol is built to support deauthentication upon the receipt of a defined packet (so that a user can break a connection when it is no longer required), this can be a devastating attack—it complies with the standard, and there is no way to stop it from happening.
The easiest way to bump a legitimate user off a network is to target them with a stream of deauthentication packets. This can be done with the help of the aircrack-ng tool suite:
sudo airmon-ng start wlan0
sudo aireplay-ng -0 0 -a (bssid) -c (station ID) wlan0mon
This command identifies the attack type as -0, indicating that it is for a deauthentication attack. The second 0 (zero) launches a continuous stream of deauthentication packets, making the network unavailable to its users.
The WebSploit framework is an open source tool that’s used to scan and analyze remote systems. It contains several tools, including tools that are specific to wireless attacks. It can be installed by running sudo apt install websploit in the terminal. To launch it, open a command shell and simply type websploit.
The WebSploit interface is similar to that of recon-ng and the Metasploit framework, and it presents the user with a modular interface.
Once launched, use the show modules command to see the attack modules that are present in the existing version. Select the Wi-Fi deauth (a stream of deauthentication packets) using the use wifi_deauth command. As shown in Figure 6.15, the attacker just has to use the set commands to set the various options and then run execute to launch the attack:

Figure 6.15: Using WebSploit to perform a deauthentication attack
Compromising enterprise implementations of WPA2
WPA-Enterprise is a technology that’s widely utilized in corporations. It does not use a single WPA-PSK, which most users use to connect to wireless networks. To maintain the governance and the flexibility of the domain accounts, corporations utilize WPA-Enterprise.
A typical approach to compromising a WPA-Enterprise network would first be to enumerate the wireless devices and finally attack the connected clients to find out the authentication details. This consists of spoofing a target network and also providing a good signal to the client. Then, the original valid AP later leads into a MiTM attack between the AP and the clients connecting to the AP. To simulate a WPA-Enterprise attack, attackers must be physically near to the target when they have a range of APs. Attackers can also sniff the traffic using Wireshark to identify the wireless network traffic handshake.
In this section, we will explore different tools that attackers would typically utilize to perform different types of attacks on WPA-/WPA2-Enterprise networks.
Wifite is an automatic wireless attack tool that’s preinstalled in Kali Linux, and is written in Python. The latest version of Wifite is V2.5.8, which has previously known aircrack-ng bugs.
This tool utilizes the following attacks to extract the password of a wireless AP:
- WPS: The Offline Pixie Dust attack and the Online Brute-Force PIN attack
- WPA: The WPA Handshake Capture and offline crack, and the PMKID Hash Capture and offline crack
- WEP: All of the aforementioned attacks, including chop-chop, fragmentation, and aireplay injection
Now we are all set to start Wifite so that we can perform a WPA four-way handshake capture and then perform an automatic password cracking attack. This tool can be directly launched from the terminal by typing sudo wifite. The attacker will be presented with the interactive mode so that they can select an interface, as shown in Figure 6.16:

Figure 6.16: Wireless adapter list in wifite
Once the interface has been selected, it should automatically enable the adapter in monitor mode and start to list all the Wi-Fi ESSIDs, channels, encryption, and power, regardless of whether or not they are WPS, as well as the number of clients connected to a particular ESSID. Once the target ESSID is selected, the attacker presses Ctrl + C on the keyboard, which will launch the attack.
By default, four attack types are launched automatically. These are WPS Pixie Dust, WPS PIN, PMKID, and WPA Handshake. Attackers can choose to ignore the first three attacks if they aren’t relevant by pressing Ctrl + C. While the handshake is being captured, attackers can see which clients have been discovered that are connected to the station. Once the handshake has been captured, by default, a copy of the handshake will be stored in the current folder as hs/handshake_ESSID_MAC.cap.
Once the handshake has been successfully captured, it will be analyzed using tshark, cowpatty (this tool is not preinstalled in Kali Linux, so to install it, run sudo apt install cowpatty in the terminal), and aircrack-ng, which will validate the handshake for ESSID and BSSID.
Wifite is programmed to automatically use a wordlist to run with aircrack-ng. The custom wordlist can also be passed directly while launching Wifite by typing wifite --wpa --dict /path/customwordlist. A successful handshake cracking would typically return the password for the wireless AP (router), as shown in Figure 6.17:

Figure 6.17: Wireless adapter list
All the passwords will be saved in the cracked.txt file in the current folder from where Wifite was run from. The tool has an anonymous feature that can change the MAC to a random address before attacking, and then change it back when the attacks are complete.
Working with bettercap
bettercap is one of the tools that attackers could utilize to better perform a Wi-Fi handshake capture attack within a few minutes. The tool is prepacked with the Wi-Fi hacking modules that can be very handy during a red team exercise or pentest. The following steps are involved to successfully capture a WPA2 handshake:
- Ensure the wireless device is on the monitoring mode by running
sudo airmon-ng start wlan0. - Run bettercap with the relevant interface from the terminal by entering
sudo bettercap --iface wlan0mon. - Type
wifi.recon onin the bettercap terminal as shown in Figure 6.18:
Figure 6.18: bettercap performing wireless network reconnaissance
If you get error messages reading
error while setting interface wlan0monwhen runningwifi.recon onin bettercap, ensure you have the older version of libpcap installed. You can download it usingwget http://old.kali.org/kali/pool/main/libp/libpcap/libpcap0.8_1.9.1-4_amd64.deband then install it usingdpkg -i libpcap0.8_1.9.1-4_amd64.deb. - To list all the Wi-Fi networks that are visible, enter
wifi.showin the bettercap terminal. - Perform a deauthentication attack by running
wifi.deauth <BSSID>. - After the deauthentication is succesful, when the station reconnects to the Wi-Fi network, the handshake must be captured by bettercap and stored in the
/root/folder as shown in Figure 6.19 for BSSIDc2:b3:7b:17:00:b7:
Figure 6.19: bettercap capturing the handshake of the wireless network
- Finally, the same
.pcapfile can be passed toaircrack-ngorhashcatto crack the password.
Evil Twin attack using Wifiphisher
One of the main issues that a majority of companies face is rogue APs within the range of their offices with the same name as their Wi-Fi network. In this section, we explore Wifiphisher, a rogue AP framework to conduct red team engagements or Wi-Fi penetration testing. Typically, we use this tool to perform effective MiTM attacks against clients that are associated with a Wi-Fi network.
This tool is not installed by default in Kali, hence attackers should install this tool by running sudo apt install wifiphisher in the terminal.
The following steps are involved in successfully performing an Evil Twin attack using Wifiphisher:
- Once Wifiphisher is installed, launch the tool by running
sudo wifiphisherin the terminal, which should bring up the following screen with the list of available wireless networks:
Figure 6.20: Wifiphisher identifying the list of wireless networks
- Select the right ESSID/BSSID of the wireless target and hit Enter. This will enable our wireless adapter to copy and clone the AP. This should bring us to a screen to select the available phishing scenarios as shown in Figure 6.21:

Figure 6.21: Wifiphisher’s predefined phishing templates
- There are three built-in scenarios as shown in the preceding screenshot: a firmware upgrade page, network manager connect, and browser plugin update. We can select any of these options. In this example, we have selected option 2 to imitate a network manager window with a specific page and ask for a password. In the next step, the ESSID is copied with the same name and channel. Additionally, web and DHCP server is set, and all the connected stations will be disconnected using the deauthentication method. Internally, an AP is set up with another interface to capture the details entered by the victim as shown in Figure 6.22:

Figure 6.22: Wifiphisher’s dashboard of active client connections to the fake AP
- The wireless end clients are disconnected by the deauthentication attack and will not be able to connect to their Wi-Fi, since this tool also performs Wi-Fi jamming. (If attackers do not want to jam the network, it is recommended to use
sudo wifiphisher –nojamming.) - Victims will now be able to see the Wi-Fi network as an open network, as seen in Figure 6.23:

Figure 6.23: Insecure clone of our target wireless network
- Once the user is connected to the free Wi-Fi, it will open the captive portal requesting the user to enter the password, as shown in Figure 6.24:
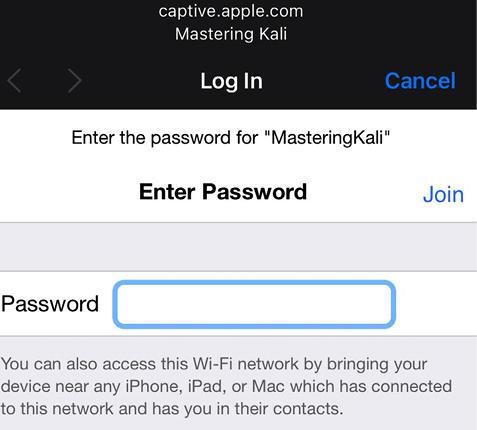
Figure 6.24: Fake captive portal on the victim device
- And that is it – whatever password the victim entered to connect to the attacker’s network is captured in Wifiphisher, and these entries can be used to create a password list dictionary to crack the handshake captured in the previous sections. Attackers should see the following screen when they close the Wifiphisher tool with Ctrl + C:

Figure 6.25: List of passwords captured by the fake AP using Wifiphisher
WPA3
Although the adoption of the third generation of WPA (WPA3) was introduced in January 2018 as a replacement for WPA2 to remedy the weaknesses of WPA2, it is not widely used. This standard utilizes 192-bit cryptographic strength and WPA3-Enterprise works with AES-256 in GCM mode with SHA-384 (Secure Hashing Algorithm) as Hash-Based Message Authentication Code (HMAC) and still enforces the use of CCMP-128 (Counter Mode Cipher Block Chaining Message Protocol), which is AES-128 (American Encryption Standard) in CCM mode and this is used as the minimum encryption algorithm in WPA3-Personal.
Unlike WPA2’s Pre-Shared Key (PSK), WPA3 utilizes Simultaneous Authentication of Equals (SAE), also known as Dragonfly. One quite interesting paper written by Mathy Vanhoef (https://papers.mathyvanhoef.com/usenix2021.pdf) outlines the design flaws in the IEEE Standard 802.11 relating to frame fragmentation, aggregation, and Forge attacks.
Although there are no readily available exploits, there are issues related to WPA3-Personal and the SAE authentication protocol it uses.
Bluetooth attacks
A casino was once hacked through a fish tank thermometer in the past, which shows the importance of securing devices that are part of the Internet of Things (IoT). Bluetooth is not an exception and Bluetooth Low Energy (BLE) devices are used extensively by consumers and corporations, hence it is important for attackers to understand how to probe and attack them.
Important parts of the Bluetooth protocol layers are the following:
- Logical Link Control and Adaptation Protocol (L2CAP): This provides the data interface between the high layer data protocols and the applications.
- Radio Frequency Communications Protocol (RFCOMM): This emulates the functionalities required for serial communication interfaces such as EIA-RS-232 on a computer. RFCOMM can be accessed by AT commands and also the Wireless Application Protocol (WAP) through the Transmission Control Protocol/Internet Protocol (TCP/IP) stack and Object Exchange (OBEX) protocol. By default, data files, business cards, and calendar information can be shared without vendor dependencies.
Bluetooth has three security modes:
- Security mode 1 – This is an insecure mode, observed in old models of phones/devices.
- Security mode 2 – In this mode, service-level security is enforced; for example, some access requires authorization and authentication to connect and use the service.
- Security mode 3 – In this mode, link-level security is enforced, while Bluetooth itself uses trusted and untrusted devices.
Kali Linux is pre-installed with device drivers (BlueZ, which is a set of tools to manage Bluetooth devices) to support Bluetooth devices. Similar to using iwconfig to identify wireless adapters, we use sudo hciconfig -a in the terminal to verify that our Bluetooth devices are connected and active.
When running this command, you should see configuration information for the hci0 or hci1 adapter or both, as shown in Figure 6.26:

Figure 6.26: Bluetooth USB devices list
The next step is to perform reconnaissance for any available Bluetooth devices within range by running sudo hcitool scan in the terminal. This should bring us a list of devices that our adapter is able to reach and get responses from as shown in Figure 6.27:
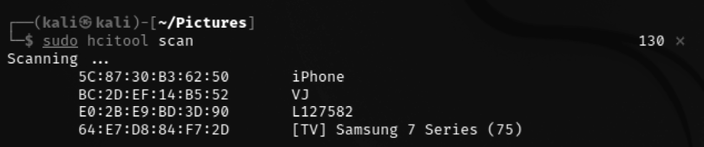
Figure 6.27: Bluetooth reconnaissance using hcitool
Similar to Wireshark, attackers can also leverage the hcidump tool to further debug the packets sent and received by the devices.
Now that we have our target devices, the next step is to identify what type of services the devices support. This can be achieved by utilizing sdptool, preinstalled with Kali. The following command provides us with a list of services that the target device supports, as shown in Figure 6.28:
sudo sdptool browse <MAC address of the target>

Figure 6.28: Running sdptool to browse on the target MAC
Once these details are obtained, attackers can perform more advanced attacks such as bluesnarf (compromising the device to access its contact list, SMS, emails, or even private photos) or bluejacking (sending anonymous messages to other available Bluetooth devices). As these attacks are dependent on specific mobile device models, we will not be exploring them in this book. Attackers can choose to perform a DoS attack using the l2ping utility. This is done simply by running sudo l2ping –s 100 <MAC address> on the device, and once the target is down, you can use one of the social engineering tactics to pretend to be IT personnel.
Summary
In this chapter, we examined different tasks that are required to perform a successful attack against any wireless network and also how to configure the wireless modem and reconnaissance of APs using tools such as aircrack-ng. In this chapter, we also learned the basics of Bluetooth and also about the complete suite of aircrack-ng tools that are used to identify hidden networks, bypass MAC authentication, and compromise WPA, WPA2, and WPA-Enterprise. We also saw how we can utilize the automated tool Wifite to perform a quick capture of a handshake and crack passwords offline or with a good dictionary with the use of multiple options. Then, we took a deep dive into setting up a fake AP using Wifiphisher, and learned how to perform DoS attacks against wireless networks and Bluetooth devices.
In the next chapter, we will focus on how to assess a website using a methodology that’s specific to this type of access, thereby conducting the reconnaissance and scanning that’s necessary to identify vulnerabilities that may be exploitable. We’ll see how attackers take advantage of these vulnerabilities with automated tools, such as exploit frameworks and online password cracking. Finally, we’ll be able to conduct the most important attacks against a web application and then leverage this access with a web shell to fully compromise the web services. We will also look into specific services and why and how they are vulnerable to DoS attacks.