
3
Active Reconnaissance of External and Internal Networks
Active reconnaissance is the art of collecting information directly from a target. The purpose of this phase is to collect and weaponize information about the target to the greatest degree possible to facilitate the exploitation phase of the kill chain methodology. We saw in the last chapter how to perform passive reconnaissance using OSINT, which is almost undetectable and can yield a significant amount of information about the target organization and its users. This phase builds on the results obtained from OSINT and passive reconnaissance and emphasizes more focused probing to identify the path to, and the attack surface of, a target. In general, complex systems have a greater attack surface, and each surface may be exploited and then leveraged to support additional attacks.
Although active reconnaissance produces more useful information, interactions with the target system may be logged, triggering alarms by protective devices, such as firewalls, Intrusion Detection Systems (IDSes), Intrusion Prevention Systems (IPSes), and Endpoint Detection Response (EDR) systems. As the usefulness of the data to the attacker increases, so does the risk of detection; this is shown in Figure 3.1:

Figure 3.1: Usefulness of data and risk of detection for attackers
To improve the effectiveness of active reconnaissance in providing detailed information, our focus will be on using the stealthiest techniques, as these will be the most difficult to detect. In this chapter, you will learn about the following:
- Stealth scanning techniques
- External and internal infrastructure, host discovery, and enumeration
- Comprehensive reconnaissance of applications, especially recon-ng
- Enumeration of internal hosts using DHCP
- Enumerating services within the SaaS applications
- Useful Microsoft Windows commands during penetration testing
- Taking advantage of default configurations
- Enumeration of users using SNMP, SMB, and rpcclient
Stealth scanning techniques
The greatest risk of active reconnaissance is discovery by a target. Using the tester’s time and data stamps, the source IP address, and additional information, the target can identify the source of the incoming reconnaissance.
Therefore, stealth techniques are employed to minimize the chances of detection. When employing stealth to support reconnaissance, a tester mimicking the actions of a hacker will do the following:
- Camouflage tool signatures to avoid detection and thereby trigger an alarm
- Hide the attack within legitimate traffic
- Modify the attack to hide the source and type of traffic
- Make the attack invisible using non-standard traffic types or encryption
Stealth scanning techniques can include some or all of the following:
- Adjusting source IP stack and tool identification settings
- Modifying packet parameters (Nmap)
- Using proxies with anonymity networks (ProxyChains and the Tor network)
Adjusting source IP stack and tool identification settings
Before the penetration tester (or the attacker) begins testing, we must ensure that all unnecessary services on Kali are disabled or turned off. This is to prevent detection. Say that the local DHCP daemon is enabled but is not required. It is possible for the DHCP to interact with the target system, which could then be logged and send alarms to the target’s administrators. Other services that require updating might establish network communication to the licensing server or bug reporting services, so it is better to disable all those services that are not required during the course of testing and enable only what is required to perform a given task.
Some commercial and open-source tools (for example, the Metasploit framework) tag their packets with an identifying sequence. Although this can be useful in a post-test analysis of a system’s event logs (where events initiated by a particular testing tool can be directly compared to a system’s event logs to determine how the network detected and responded to the attack), it can also trigger certain intrusion detection systems. Test your tools against a lab system to determine the packets that are tagged, and either change the tag or use the tool with caution.
The easiest way to identify tagging is to apply the tool against a newly created virtual image as the target, and review system logs for the tool’s name. In addition, use Wireshark to capture traffic between the attacker and target virtual machines, and then search the packet capture (pcap) files for any keywords that can be attributed to the testing tool (name of the tool, vendor, license number, and so on).
useragent in the Metasploit framework can be changed by modifying the http_form_field option. From the msfconsole prompt, select the option to use auxiliary/fuzzers/http/http_form_field and then set a new useragent header, as shown in Figure 3.2:

Figure 3.2: Changing the User agent in the Metasploit auxiliary
In this example, useragent was set to be Google’s indexing spider, Googlebot-Image. This is a common automated application that visits and indexes websites, and rarely attracts attention from the website’s owner.
Pentesters can also choose to use plugins such as Firefox’s user agent switcher: https://addons.mozilla.org/en-GB/firefox/addon/uaswitcher/
Another alternative is Chrome’s user agent switcher:
https://chrome.google.com/webstore/detail/user-agent-switcher-for-c/djflhoibgkdhkhhcedjiklpkjnoahfmg
To identify legitimate useragent headers, refer to the examples at:
Modifying packet parameters
The most common approach to active reconnaissance is to conduct a scan against the target, send defined packets to it, and then use the returned packets to gain information. The most popular tool of this type is Network Mapper (Nmap). To use Nmap effectively, it must be run with root-level privileges. This is typical of applications that manipulate packets, hence we will be using sudo for all Nmap queries.
When attempting to minimize detection, some stealth techniques include the following:
- Attackers approach the target with a goal in mind and send the minimum number of packets needed to determine the objective. For example, if you wish to confirm the presence of a web host, you first need to determine whether port
80or443, the default ports for web-based services, are open. - Avoid scans that may connect with the target system and leak data. Do not ping the target or use synchronize (SYN) and non-conventional packet scans, such as acknowledge (ACK), finished (FIN), and reset (RST).
- Randomize or spoof packet settings, such as the source IP and port address, and the MAC address.
- Adjust the timing to slow the arrival of packets at the target site.
- Change the packet size by fragmenting packets or appending random data to confuse packet inspection devices.
As an example, if you want to conduct a stealthy scan and minimize detection, the following nmap command could be used:
# nmap --spoof-mac Cisco --data-length 24 -T paranoid --max-hostgroup 1 --max-parallelism 10 -Pn 10.10.10.100/24 -v -n -sS -sV -oA output -p T:1-1024 --randomize-hosts
Table 3.1 details the previous command in detail:
|
Command |
Rationale |
--spoof-mac-Cisco |
This spoofs the MAC address to match a Cisco product. Replacing Cisco with 0 will create a completely random MAC address. |
--data-length 24 |
This appends 24 random bytes to most packets that are sent. |
-T paranoid |
This sets the time to the slowest setting: paranoid. |
--max-hostgroup |
Limits the hosts that are scanned at any one time. |
--max-parallelism |
Limits the number of outstanding probes that are sent out. You can also use the |
-Pn |
This does not send a ping to identify active systems (as this can leak data). |
-n |
No DNS resolution: internal or external DNS servers are not actively queried by Nmap for DNS information. Such queries are frequently logged, so the query function should be disabled. |
-sS |
This conducts a stealth TCP SYN scan, which does not complete the TCP handshake. Other scan types (for example, null scans) can also be used; however, most of these will trigger detection devices. |
-sV |
This enables version detection. |
-oA |
This outputs the results to all formats (XML, gnmap, and nmap). |
-p T:1-1024 |
This specifies the TCP ports to be scanned. |
--random-hosts |
This randomizes the target host order. |
Table 3.1: Breakdown of the previous Nmap command
Together, these options will create a very slow scan that hides the true identity of the source. However, if the packets are too unusual, complex modification may actually attract the attention of the target; therefore, many testers and attackers use anonymity networks to minimize detection.
Attackers can also utilize the decoy or zombie method by running the following commands: -D is the switch, and the decoy can be any IP address; RND:10 is any set of 10 random IP addresses that purport to be the source of the attack. When we use the –sI switch in Nmap, the target should receive the alerts from a zombie IP on the target:
nmap -n –D Decoy1,decoy2,decoy3 targetIP
nmap –D RND:10 targetIP
nmap -sI [Zombie IP] [Target IP]
Using proxies with anonymity networks
In this section, we will be exploring the two important tools that are utilized by attackers to maintain anonymity on the network. We will be focusing on Tor and Privoxy in this section.
Tor (www.torproject.org) is an open source implementation of the third-generation onion routing that provides free access to an anonymous proxy network. Onion routing enables online anonymity by encrypting user traffic and then transmitting it through a series of onion routers. At each router, a layer of encryption is removed to obtain routing information, and the message is then transmitted to the next node. It has been likened to the process of gradually peeling an onion, hence the name. It protects against traffic analysis attacks by guarding the source and destination of a user’s IP traffic.
In this example, Tor will be used with Privoxy, a noncaching web proxy that sits in the middle of an application that communicates with the internet and uses advanced filtering to ensure privacy and the removal of adverts, along with any potentially hostile data being sent to the tester.
To install Tor, perform the following steps:
- Issue the
apt-get updateandapt-get upgradecommands, and then use the following command:sudo apt install tor - Once Tor is installed, edit the
proxychains4.conffile located in the/etcdirectory. This file dictates the number and order of proxies that the test system will use on the way to the Tor network. Proxy servers may be down, or they may be experiencing a heavy load (causing slow or latent connections); if this occurs, a defined or strict ProxyChain will fail due to an expected link being missing. Therefore, disable the use ofstrict_chainand enabledynamic_chain, which ensures that the connection will be routed, as shown in Figure 3.3:
Figure 3.3: Enabling the dynamic chain in Proxychains4.conf
- Edit the
[ProxyList]section to ensure that thesocks5proxy is present, as shown in Figure 3.4:
Figure 3.4: Adding the proxy list to the proxychains4.conf
Open proxies can easily be found online (an example would be https://www.proxynova.com/proxy-server-list/) and added to the
proxychains.conffile. Testers can take advantage of this to further obfuscate their identity. For example, if there are reports that a certain country or block of IP addresses has been responsible for recent online attacks, look for open proxies from that location and add them to your list or a separate configuration file. - To start the Tor service from a terminal window, enter the following command:
# sudo service tor start - Verify that Tor has started by using the following command:
# sudo service tor statusIt is important to verify that the Tor network is working and providing anonymous connectivity.
- Verify your source IP address first. From a terminal, enter the following command:
# firefox www.whatismyip.comThis will start the Iceweasel browser and open it to a site that provides the source IP address connected with that web page.
- Note the IP address, and then invoke Tor routing using the following ProxyChains command:
# proxychains firefox www.whatismyip.comIn this particular instance, the IP address was identified as
xx.xx.xx.xx. Awhoislookup of that IP address from a terminal window indicates that the transmission is now exiting from a Tor exit node, as shown in Figure 3.5:
Figure 3.5: whois details of your randomly assigned IP address
You can also verify that Tor is functioning properly by accessing
Although communications are now protected using the Tor network, it is possible for a DNS leak to occur, which occurs when your system makes a DNS request to provide your identity to an ISP. You can check for DNS leaks at www.dnsleaktest.com.
Most command lines can be run from the console using proxychains to access the Tor network. When using Tor, some considerations to be kept in mind are as follows:
- Tor provides an anonymizing service, but it does not guarantee privacy. Owners of the exit nodes are able to sniff traffic and may be able to access user credentials.
- Vulnerabilities in the Tor browser bundle have reportedly been used by law enforcement to exploit systems and acquire user information.
- ProxyChains do not handle User Datagram Protocol (UDP) traffic.
- Some applications and services cannot run over this environment—in particular, Metasploit and Nmap may break. The stealth SYN scan of Nmap breaks out of ProxyChains and the connect scan is invoked instead; this can leak information to the target.
- Some browser applications (Flash/ActiveX or HTML5) can be used to obtain your IP address.
- Attackers can also use random chaining. With this option, ProxyChains will randomly choose IP addresses from our list (local Ethernet IP, for example,
127.0.0.1,192.168.x.xor172.16.x.x) and use them to create our ProxyChain. This means that each time we use ProxyChains, the chain of proxies will look different to the target, making it harder to track our traffic from its source. - To do so, in a similar fashion, edit the
/etc/proxychains4.conffile and comment outdynamic chainsand uncommentrandom_chain, since we can only use one of these options at a time. - In addition, attackers can uncomment the line with
chain_len, which will then determine the number of IP address in the chain while creating a random proxy chain.
This technique can be engaged by attackers to establish a qualified anonymity and then remain anonymous over the network.
DNS reconnaissance and route mapping
Once a tester has identified the targets that have an online presence and contain items of interest, the next step is to identify the IP addresses and routes to the target. DNS reconnaissance is concerned with identifying who owns a particular domain or series of IP addresses (the sort of information gained with whois, although this has been completely changed with the General Data Protection Regulation (GDPR) enforcement across Europe from May 2018). The DNS information defines the actual domain names and IP addresses assigned to the target, and the route between the penetration tester—or the attacker—and the final target.
This information gathering is semi-active, as some of the information is available from freely available open sources such as dnsdumpster.com, while other information is available from third parties such as DNS registrars. Although the registrar may collect IP addresses and data concerning requests made by the attacker, it is rarely provided to the end target. The information that could be directly monitored by the target, such as DNS server logs, is seldom reviewed or retained.
Because the information needed can be queried using a defined systematic and methodical approach, its collection can be automated.
Note that DNS information may contain stale or incorrect entries. To minimize inaccurate information, query different source servers and use different tools to cross-validate results. Review results and manually verify any suspect findings.
The whois command (post GDPR)
The whois command used to be the first step in identifying an IP address for many years until GDPR came into force. Formerly, the whois command was used to query databases that store information on the registered users of an internet resource, such as a domain name or IP address. Depending on the database that is queried, the response to a whois request will provide names, physical addresses, phone numbers, and email addresses (useful in facilitating social engineering attacks), as well as IP addresses and DNS server names. After May 25, 2018, there are no registrant details provided; however, attackers can understand which whois server responds, and it retrieves domain data that includes availability, ownership, creation, expiration details, and name servers. Figure 3.6 shows the whois command run against the domain of facebook.com:

Figure 3.6: whois details on the facebook.com domain that includes Name Server details
Employing comprehensive reconnaissance applications
Although Kali contains multiple tools to facilitate reconnaissance, many of the tools contain features that overlap, and importing data from one tool into another is usually a complex manual process. Most testers select a subset of tools and invoke them with a script.
Comprehensive tools focused on reconnaissance were originally command-line tools with a defined set of functions; one of the most commonly used was the Deep Magic Information Gathering Tool (DMitry). DMitry could perform whois lookups, retrieve netcraft.com information, search for sub-domains and email addresses, and perform TCP scans. Unfortunately, it wasn’t extensible beyond these functions.
Figure 3.7 provides details on running DMitry on www.cyberhia.com. The following command can be used to enumerate the reverse DNS to IP lookup, Whois, subdomain, email address, and open port details:
sudo dmitry -winsepo out.txt www.cyberhia.com

Figure 3.7: Running DMitry to extract domain and whois information
Note that some information produced here might belong to a hosting company that provides DNS protection. An example is if our target is hosting the name servers from Cloudflare or AWS Content Delivery Network (CDN).
Recent advances have created comprehensive framework applications that combine passive and active reconnaissance. In the following section, we will be looking more at recon-ng.
The recon-ng framework
The recon-ng framework is an open-source framework for conducting reconnaissance (passive and active) that has recently added a complete new marketplace for plugins. The framework is similar to Metasploit and the Social Engineer Toolkit (SET); recon-ng uses a very modular framework. Each module is a customized command interpreter, preconfigured to perform a specific task.
The recon-ng framework and its modules are written in Python, allowing penetration testers to easily build or alter modules to facilitate testing. The recon-ng tool also leverages third-party APIs to conduct some assessments; this additional flexibility means that some activities undertaken by recon-ng may be tracked by those parties. Users can specify a custom useragent string or proxy requests to minimize alerting the target network.
recon-ng is installed by default in newer versions of Kali. All data collected by recon-ng is placed in a database, allowing you to create various reports against the stored data. The user can select one of the report modules to automatically create either a CVS report or an HTML report.
To start the application, enter recon-ng at the prompt; to view the available modules, type marketplace search at the recon-ng> prompt, as shown in Figure 3.8:

Figure 3.8: Marketplace search in recon-ng for all available modules
To install any module, we will simply run marketplace install modulename, and to load a specific module, type modules load followed by the name of the module. Pressing the Tab key while typing will autocomplete the command. If the module has a unique name, you can type in the unique part of the name, and the module will be loaded without entering the full path.
Entering info will provide you with information on how the module works and where to obtain API keys if required. Once the module is loaded, use the options set command to set the options, and then enter run to execute, as shown in Figure 3.9:

Figure 3.9: Loading the hackertarget module and setting the source as www.packtpub.com
In general, testers rely on recon-ng to do the following:
- Harvest hosts and contacts using multiple sources, such as haveibeenpwned, mangle, mailtester, censys, and shodan.
- Identify geographical locations of hosts and individuals using Flickr, Shodan, geocode, YouTube, and Twitter.
- Identify host information using
netcraftand related modules. - Identify account and password information that has previously been compromised and leaked onto the internet (the
pwnedlistmodules within the domains-credentials –domain_ispwned,account_creds, domain_creds,leak_lookup, andleaks_dump).
IPv4
The Internet Protocol (IP) address is a unique number used to identify devices that are connected to a private network or the public internet. Today, the internet is largely based on version 4, known as IPv4. Kali includes several tools to facilitate DNS reconnaissance, as given in Table 3.2:
|
Application |
Description |
|
|
These are comprehensive DNS scanners—DNS record enumeration (A, MX, TXT, SOA, wildcard, and so on), subdomain brute-force attacks, Google lookup, reverse lookup, zone transfer, and zone walking. dsnrecon is usually the first choice—it is highly reliable, results are well parsed, and data can be directly imported into the Metasploit framework. |
|
|
This DNS debugger checks specified domains for internal consistency and accuracy (this is not installed by default in the newer versions of Kali; hence, you have to run apt-get install dnswalk). |
|
|
This locates non-contiguous IP space and hostnames against specified domains by attempting zone transfers and then attempting brute-force attacks to gain DNS information. |
Table 3.2: Tools in Kali to facilitate DNS reconnaissance
During testing, most investigators run fierce to confirm that all possible targets have been identified, and then run at least two comprehensive tools (for example, dnsenum and dnsrecon) to generate the maximum amount of data and provide a degree of cross-validation.
In Figure 3.10, dnsrecon has been used to generate a standard DNS record search, and a search that is specific for SRV records. An excerpt of the results is shown for each case:

Figure 3.10: Running the dnsrecon tool on www.packtpub.com
dnsrecon allows the penetration tester to obtain the SOA record, Name Servers (NS), mail exchanger (MX) hosts, servers sending emails using Sender Policy Framework (SPF), and the IP address ranges in use.
IPv6
Although IPv4 seems to permit a large address space, freely available IP addresses were exhausted several years ago, forcing the employment of NAT to increase the number of available addresses. A more permanent solution has been found in the adoption of an improved IP addressing scheme, IPv6. Although it constitutes less than five percent of internet addresses, its usage is increasing, and penetration testers must be prepared to address the differences between IPv4 and IPv6.
In IPv6, the source and destination addresses are 128-bits in length, yielding 2,128 possible addresses—that is 340 undecillion addresses!
The increased size of the addressable address space presents some problems to penetration testers, particularly when using scanners that step through the available address space looking for live servers. However, some features of the IPv6 protocol have simplified discovery, especially the use of ICMPv6 to identify active link-local addresses.
It is important to consider IPv6 when conducting initial scans for the following reasons:
- There is uneven support for IPv6 functionality in testing tools, so the tester must ensure that each tool is validated to determine its performance and accuracy in IPv4, IPv6, and mixed networks.
- Because IPv6 is a relatively new protocol, the target network may contain misconfigurations that leak important data; the tester must be prepared to recognize and use this information.
- Older network controls (firewalls, IDS, and IPS) may not detect IPv6. In such cases, penetration testers can use IPv6 tunnels to maintain covert communications with the network and exfiltrate the undetected data.
Using IPv6-specific tools
Kali includes several tools developed to take advantage of IPv6 (most comprehensive scanners, such as Nmap, now support IPv6), some of which are detailed here. Tools that are particular to IPv6 were largely derived from the THC-IPv6 Attack Toolkit. This tool can be installed by running the following:
sudo apt install thc-ipv6
Table 3.3 provides a list of tools that are utilized for the reconnaissance of IPv6:
|
Application |
Description |
|
|
Enumerates sub-domains to obtain IPv4 and IPv6 addresses (if present) using a brute-force search based on a supplied dictionary file or its own internal list |
|
|
Performs reverse DNS enumeration given an IPv6 address |
|
|
Sends the content of a file covertly to the target |
|
|
Writes covertly received content to a file |
|
|
Performs various denial-of-service attacks on a target |
|
|
Detects new IPv6 addresses joining the local network |
|
|
Tests whether systems on the local LAN are sniffing |
|
|
Performs exploits of various CVE-known IPv6 vulnerabilities on the destination |
|
|
Fake DHCPv6 server |
Metasploit can also be utilized for IPv6 host discovery. The auxiliary/scanner/discovery/ipv6_multicast_ping module will discover all of the IPv6-enabled machines with the physical (MAC) address, as shown in Figure 3.11:

Figure 3.11: Discovery of IPv6 devices on the network using the Metasploit ipv6 scanner
The sudo atk6-alive6 IPv6 suite will discover live addresses in the same segment, as shown in Figure 3.12:

Figure 3.12: Discovery of IPv6 live devices on the network using atk6-alive6
Mapping the route to the target
Route mapping was originally used as a diagnostic tool that allows you to view the route that an IP packet follows, from one host to the next.
Using the Time To Live (TTL) field in an IP packet, each hop from one point to the next elicits an ICMPTIME_EXCEEDED message from the receiving router, decrementing the value in the TTL field by 1.
The packets count the number of hops and the route taken. From an attacker’s or penetration tester’s perspective, the traceroute data yields the following important data:
- The exact path between the attacker and the target
- Hints pertaining to the network’s external topology
- Identification of accessing control devices (firewalls and packet-filtering routers) that may be filtering attack traffic
- If the network is misconfigured, it may be possible to identify internal addressing
Using a web-based traceroute (www.traceroute.org), it is possible to trace various geographic origin sites to the target network. These types of scans will frequently identify more than one different network connecting to the target, which is information that could be missed by conducting only a single traceroute command from a location close to the target. Web-based traceroute may also identify multi-homed hosts that connect two or more networks. These hosts are an important target for attackers because they drastically increase the attack surface leading to the target.
In Kali, traceroute is a command-line program that uses ICMP packets to map the route; in Windows, the program is tracert.
If you launch traceroute from Kali, you will likely see most hops filtered (the data is shown as: * * *). For example, traceroute from the author’s present location to www.packtpub.com would yield the output shown in Figure 3.13:

Figure 3.13: Traceroute on www.packtpub.com
If the same request was run using tracert from the Windows command line, however, we would see the output shown in Figure 3.14:

Figure 3.14: Traceroute to www.packtpub.com using Windows tracert utility
Not only do we get the complete path, but we can also see that www.google.com is resolving to a slightly different IP address, indicating that load balancers are in effect (you can confirm this by using Kali’s lbd script; however, this activity may be logged by the target site).
The reason for the different path data is that, by default, traceroute uses UDP datagrams, while Windows tracert utility uses ICMP echo request (ICMP type 8). Therefore, when completing traceroute using Kali tools, it is important to use multiple protocols in order to obtain the most complete path, and to bypass packet-filtering devices. Kali provides a set of tools for completing route traces, as detailed in Table 3.4:
|
Application |
Description |
|
|
This is a TCP/IP packet assembler and analyzer. This supports TCP, UDP, ICMP, and raw-IP and uses a ping-like interface. |
|
|
Newer versions of Kali do not have this tool pre-installed, so testers will have to run apt install intrace in the terminal to obtain it. This tool enables users to enumerate IP hops by exploiting existing TCP connections, both initiated from the local system or network, or from local hosts. This makes it very useful for bypassing external filters such as firewalls. intrace is a replacement for the less reliable 0trace program. |
|
|
This is a traceroute program that uses ICMP6. |
hping3 is one of the most useful tools because of the control it gives over the packet type, source packet, and destination packet. For example, Google does not allow ping requests. However, it is possible to ping the server if you send the packet as a TCP SYN request.
In the following example, the tester attempts to ping the target domain from the command line. No data is returned; the target domain is clearly blocking ICMP-based ping commands. However, the next command invokes hping3, instructing it to do the following:
- Send a ping-like command to the target domain using TCP with the SYN flag set (
-S) - Direct the packet to port 80; legitimate requests of this type are rarely blocked (
- p 80) - Set a count of sending three packets to the target (
-c 3)
To execute the previous steps, use the commands shown in Figure 3.15:

Figure 3.15: Running hping3 on the target via port 80
The hping3 command successfully identifies that the target is online and provides some basic routing information.
Identifying the external network infrastructure
Once the tester’s identity is protected, identifying the devices on the internet-accessible portion of the network is the next critical step in scanning a network. Attackers and penetration testers use this information to do the following:
- Identify devices that may confuse (load balancers) or eliminate (firewalls and packet inspection devices) test results
- Identify devices with known vulnerabilities
- Identify the requirement for continuing to implement stealthy scans
- Gain an understanding of the target’s focus on secure architecture and security in general
traceroute provides basic information on packet filtering abilities; some other applications on Kali include the following:
- Lbd: Uses two DNS and HTTP-based techniques to detect load balancers (shown in Figure 3.16)
- Nmap: Detects devices and determines the operating systems and version
- Shodan: Web-based search engine that identifies devices connected to the internet, including those with default passwords, known misconfigurations, and vulnerabilities
- censys.io and spyze: Similar to the Shodan search that has already scanned the entire internet, with certificate details, technology information, misconfiguration, and known vulnerabilities.
Figure 3.16 shows the results obtained on running the lbd script against a target domain; as you can see, the target uses both DNS-Loadbalancing and HTTP-Loadbalancing on its site. From a penetration tester’s perspective, this information could be used to explain why spurious results are obtained, as the load balancer shifts a particular tool’s activity from one server to another. Figure 3.16 also displays the HTTP load balancing:

Figure 3.16: Running lbd to detect the load balancers
Mapping beyond the firewall
Attackers normally start network debugging using the traceroute utility, which attempts to map all of the hosts on a route to a specific destination host or system. Once the target is reached, the TTL field will be 0, while the target will discard the datagram and generate an ICMP time exceeded packet back to its originator. A regular traceroute will be similar to that shown in Figure 3.17:

As you see from the preceding example, we cannot go beyond a particular IP, which most probably means that there is a packet filtering device at hop 3. Attackers would dig a little bit deeper to understand what is deployed on that IP.
Deploying the default UDP datagram option will increase the port number every time it sends a UDP datagram. Hence, attackers will start pointing to a port number to reach the final target destination.
IDS/IPS identification
Penetration testers can utilize nmap and WAFW00F to identify whether there are any detection or prevention mechanisms put in place, such as an Intrusion Detection System (IDS), Intrusion Prevention System (IPS), or a Web Application Firewall (WAF).
Another tool that attackers utilize during active reconnaissance is WAFW00F; this tool is preinstalled in the latest version of Kali Linux. It is used to identify and fingerprint the WAF products. It also provides a list of well-known WAFs. The version of the WAF in use can be extracted by adding the -l switch to the command (for example, wafw00f -l). Figure 3.18 shows the exact WAF running behind a web application:

Figure 3.18: Running wafw00f to fingerprint a web application firewall
Enumerating hosts
Host enumeration is the process of gaining specific particulars regarding a defined host. It is not enough to know that a server or wireless access point is present; instead, we need to expand the attack surface by identifying open ports, the base operating system, services that are running, and supporting applications. This is highly intrusive and, unless care is taken, such activity will be detected and logged by the target organization.
Live host discovery
The first step is to run network ping sweeps against a target address space and look for responses that indicate that a particular target is live and capable of responding. Historically, pinging is referred to as the use of ICMP; however, TCP, UDP, ICMP, and ARP traffic can also be used to identify live hosts.
Various scanners can be run from remote locations across the internet to identify live hosts. Although the primary scanner is Nmap, Kali provides several other applications that are also useful, as shown in Table 3.5:
|
Application |
Description |
|
|
This is for IPv6 host detection. |
|
|
|
|
|
These are packet crafters that respond to targets in various ways to identify live hosts. |
Table 3.5: Tools used to discover live hosts in Kali Linux
To the penetration tester or attacker, the data returned from live host discovery will identify the targets for attack.
It is good practice to run multiple host discovery scans while conducting a penetration test, as certain devices may be time-dependent. During one penetration test, it was discovered that the system administrator set up a server to play games after regular business hours. Because it was not an approved business system, the administrator didn’t follow the normal process for securing the server; multiple vulnerable services were present, and it hadn’t received the necessary security patches. Testers were able to compromise this server and gain access to the underlying corporate network using vulnerabilities in the administrator’s server that was used to play games.
Port, operating system, and service discovery
Kali provides several different tools useful for identifying open ports, operating systems, and installed services on remote hosts. The majority of these functions can be completed using Nmap. Although we will focus on examples using Nmap, the underlying principles apply to the other tools as well.
Port scanning
Port scanning is the process of connecting to TCP and UDP ports to determine what services and applications are running on the target device. In TCP/IP, there are 65,535 ports each for both TCP and UDP on any computer. Some ports are known to be associated with particular services (for instance, TCP 20 and 21 are the usual ports for the File Transfer Protocol (FTP) service).
The first 1,024 are the well-known ports, and most defined services run over ports in this range; accepted services and ports are maintained by IANA (http://www.iana.org/assignments/service-names-port-numbers/service-names-port-numbers.xhtml).
Although there are accepted ports for particular services, such as port 80 for web-based traffic, services can be directed to use any port. This option is frequently used to hide particular services, especially if the service is known to be vulnerable to attack. However, if attackers complete a port scan and do not find an expected service, or find it using an unusual port, they will be prompted to investigate further.
The universal port mapping tool, Nmap, relies on active stack fingerprinting. Specially crafted packets are sent to the target system, and the response of the OS to those packets allows Nmap to identify the OS. In order for Nmap to work, at least one listening port must be open, and the operating system must be known and fingerprinted, with a copy of that fingerprint stored in the local database.
Using Nmap for port discovery is very noisy; it will be detected and logged by network security devices. Some points to remember are the following:
- Attackers and penetration testers focused on stealth will only test the ports that impact the kill chain they are following to their specific target. If they are launching an attack that exploits vulnerabilities in a web server, they will search for targets with accessible ports
80and443or ports8080and8443. - Most port scanners have default lists of ports that are scanned to ensure that you know what is on that list and what has been omitted. Consider both TCP and UDP ports.
- Successful scanning requires a deep knowledge of TCP/IP and related protocols, networking, and how particular tools work. For example, SCTP is an increasingly common protocol on networks, but it is rarely tested on corporate networks.
- Port scanning, even when done slowly, can impact a network. Some older network equipment and equipment from specific vendors will lock when receiving or transmitting a port scan, hence turning a scan into a denial-of-service attack.
- Tools used to scan a port, particularly Nmap, are being extended with regard to functionalities. They can also be used to detect vulnerabilities and exploit simple security holes.
Writing your own port scanner using netcat
While attackers utilize the proxying application and Tor network, it is also possible to write their own custom network port scanner. The following one-line command can be utilized during penetration testing to identify the list of open ports just by using netcat, as shown in Figure 3.19:
while read r; do nc -v -z $r 1-65535; done < iplist

Figure 3.19: Running a one-line Bash script to do port scanning
The same script can be modified for more targeted attacks on a single IP, as follows:
while read r; do nc -v -z target $r; done < ports
The chances of getting alerted in any intrusion detection system using custom port scanners are high compared to other port scanners.
Fingerprinting the operating system
Determining the OS of a remote system is conducted using two types of scans:
- Active fingerprinting: The attacker sends normal and malformed packets to the target and records its response pattern, referred to as the fingerprint. By comparing the fingerprint to a local database, the operating system can be determined.
- Passive fingerprinting: The attacker sniffs—or records—and analyzes the packet stream to determine the characteristics of the packets.
Active fingerprinting is faster and more accurate than passive fingerprinting; in Kali, the primary active tool is Nmap. The Nmap tool injects packets into the target network and analyzes the response that it receives. In Figure 3.20, the -O flag commands Nmap to determine the operating system:
nmap -sS -O target.com

Figure 3.20: Nmap scan to identify the operating system of the target
Note that it is simple for the target system to hide the true operating system. Since fingerprinting software relies on packet setting, such as time-to-live or the initial window’s size, changes to these values or other user-configurable settings can change the tool results. Some organizations actively change these values to make the final stages of reconnaissance more difficult.
Determining active services
The final goal of the enumeration portion of reconnaissance is to identify the services and applications that are operational on the target system. If possible, the attacker will want to know the service type, vendor, and version to facilitate the identification of any vulnerability. The following are some of the techniques used to determine active services:
- Identify default ports and services: If the remote system is identified as having a Microsoft operating system with port
80open (the WWW service), an attacker may assume that a default installation of Microsoft IIS is installed. Additional testing will be used to verify this assumption (using Nmap). - Banner grabbing: This is done using tools such as amap, netcat, Nmap, and Telnet.
- Review default web pages: Some applications install with default administration, error, or other pages. If attackers access these, they will provide guidance on installed applications that may be vulnerable to attack. In Figure 3.21, the attacker can easily identify the version of Microsoft IIS that has been installed on the target system.
- Review source code: Poorly configured web-based applications may respond to certain HTTP requests such as
HEADorOPTIONSwith a response that includes the web server software version, and, possibly, the base operating system or the scripting environment in use. In Figure 3.21,netcatis launched from the command line and is used to send rawHEADpackets to a particular website. This request generates a success message (200 OK); however, it also identifies that the server is running Microsoft IIS 7.5 and powered by ASP.NET:nc -vv www.target.com port number and then enter HEAD / HTTP/1.0
Figure 3.21: Using netcat to grab the banner of a target
Large-scale scanning
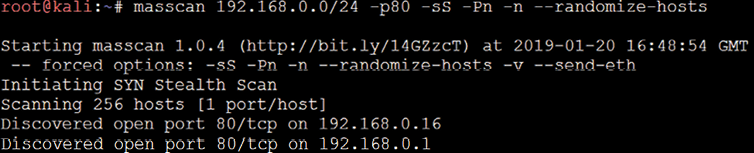
In the case of testing bigger organizations with multiple class B/C IP ranges, large-scale scanning is engaged. For example, with a global company, often, a number of IP blocks exist as part of external internet facing. As mentioned earlier in Chapter 2, Open-Source Intelligence and Passive Reconnaissance, attackers do not have time limitations to scan, but penetration testers do. Pentesters can engage multiple tools to perform the activity; Masscan is one such tool that would be engaged to scan large-scale IP blocks to quickly analyze the live hosts in the target network. Masscan is installed in Kali by default.
The biggest advantage of Masscan is the randomization of hosts, ports, speed, flexibility, and compatibility. Figure 3.22 provides a Class C scanning network within a few seconds to complete and identify the available HTTP service on port 80 and services running on the target hosts:
DHCP information
The Dynamic Host Configuration Protocol (DHCP) is a service that dynamically assigns an IP address to the hosts on the network. This protocol operates at the MAC sub-layer of the Data Link layer of the TCP/IP protocol stack. Upon the selection of auto-configuration, a broadcast query will be sent to the DHCP servers and when a response is received from the DHCP server, a broadcast query is sent by the client to the DHCP server requesting required information. The server will now assign an IP address to the system, along with other configuration parameters such as the subnet mask, DNS, and the default gateway.
Sniffing is a great way of collecting passive information once connected to a network. Attackers can start this by running the Wireshark utility and will be able to see a lot of broadcast traffic, as shown in Figure 3.23:

We will now see traffic on DNS, NBNS, BROWSER, and other protocols that might potentially reveal hostnames, VLAN information, domains, and active subnets in the network. We will be discussing more attacks specific to sniffing in Chapter 11, Action on the Objective and Lateral Movement.
Identification and enumeration of internal network hosts
If the attacker’s system is already configured with the DHCP, it will provide some information that is very useful to map the internal network. The DHCP information can be obtained by typing ifconfig in the Kali terminal, as shown in Figure 3.24; you should be able to see the information detailed:
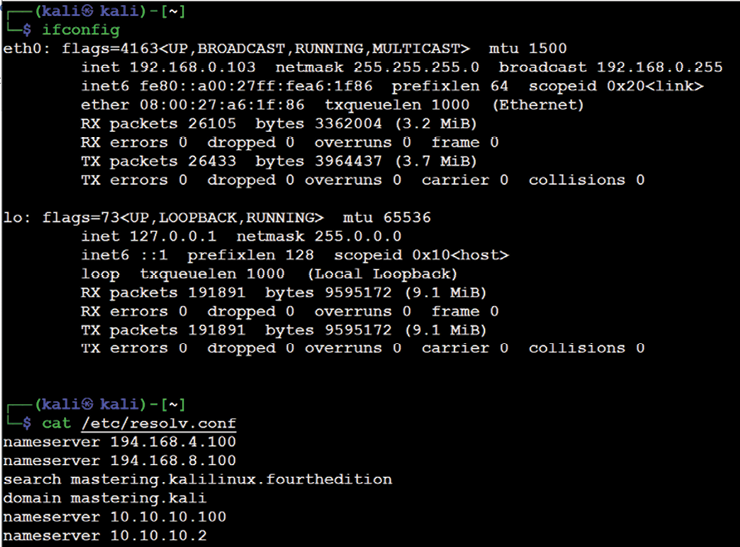
Figure 3.24: Ifconfig details on the Ethernet adapters
inet: The IP information obtained by the DHCP server should provide us with at least one active subnet, which can be utilized to identify the list of live systems and services through different scanning techniques.netmask: This information can be utilized to calculate the subnet ranges. From the previous screenshot, we have255.255.255.0, which meansCIDRis/24, and we can probably expect 255 hosts on the same subnet.- Default gateway: The IP information of the gateway will provide the opportunity to ping other similar gateway IPs. For example, if your default gateway IP is 10.10.10.1, by using ping scans, attackers may be able to enumerate other similar IP addresses, such as 10.10.20.1 and 10.10.20.1.
- Other IP address: DNS information can be obtained by accessing the
/etc/resolv.conffile. The IP addresses in this file are commonly addressed in all of the subnets, and domain information will also be automatically added during the DHCP process, which will also be available in the same file.
Native MS Windows commands
Table 3.6 provides a list of useful commands during a penetration test or Red Team exercise, even when only having physical access to the system or having a remote shell to communicate to the target. This is not an exhaustive list, however:
|
Command |
Sample |
Description |
|
|
|
|
|
|
|
This displays a list of computers/domains and other shared resources. |
|
|
|
This manages the shared resources and displays all information about the shared resources on the local system. |
|
|
|
This connects to any system on the same network; it can also be used to retrieve a list of network connections. |
|
|
|
This displays information regarding users and performs activities related to user accounts. |
|
|
|
This displays and modifies any entries in the ARP cache. |
|
|
|
Similar to ARP, |
|
|
|
This displays all active TCP connections and ports on the local system; that is to say, connections that are listening, established, and waiting on the network adapter IP address. |
|
|
|
This displays NETBIOS information, normally utilized to identify a particular MAC address of an IP, which can be utilized in MAC spoof attacks. |
|
|
|
|
|
|
|
The |
|
|
|
The |
Table 3.6: Useful Windows commands during penetration testing activity
ARP broadcasting
During internal network active reconnaissance, the entire local network can be scanned using nmap (nmap -v -sn IPrange) to sniff the ARP broadcasts. In addition, Kali has arp-scan (arp-scan IP range) to identify a list of hosts that are alive on the same network.
Figure 3.25 is a screenshot of Wireshark that provides the traffic generated at the target when arp-scan is run against the entire subnet. This is considered to be a non-stealthy scan:

Figure 3.25: ARP scanning network traffic on Wireshark
Ping sweep
A ping sweep is the process of pinging an entire range of network IP addresses or individual IPs to find out whether they are alive and responding. An attacker’s first step in any large-scale scanning is to enumerate all of the hosts that are responding. Penetration testers can leverage fping or nmap, or even write custom Bash scripts to carry out the activity:
fping -g IPrange
nmap -sP IPrange
for i in {1..254}; do ping -c 1 10.10.0.$i | grep 'from'; done
Sometimes, attackers can encounter a roadblock during the ping sweep due to a firewall that blocks all of the ICMP traffic. In the case of an ICMP block, we can utilize the following command to identify alive hosts by specifying a list of port numbers during the ping sweep:
nmap -sP -PT 80 IPrange
Figure 3.26 shows all of the live hosts that were discovered using the fping tool:

Figure 3.26: Output of gping on the class-c IP range
Using scripts to combine masscan and nmap scans
The speed and reliability of masscan and nmap to enumerate in detail is a great combination to use in our goal-based penetration testing strategy. In this section, we will write a piece of script that can save time and provide more accurate results than those that can be used during exploitation while identifying the right vulnerabilities:
#!/bin/bash
function helptext {
  echo "enter the massnmap with the file input with list of IP address ranges"
}
if [ "$#" -ne 1 ]; then
  echo  "Sorry cannot understand the command"
  helptext>&2
  exit 1
elif [ ! -s $1 ]; then
  echo "ooops it is empty"
  helptext>&2
  exit 1
fi

if [ "$(id -u)" != "0" ]; then
  echo "I assume you are running as root"
  helptext>&2
  exit 1
fi
for range in $(cat $1); do
  store=$(echo $range | sed -e 's///_/g')
  echo "I am trying to create a store to dump now hangon"
  mkdir -p pwd/$store;
  iptables -A INPUT -p tcp --dport 60000 -j DROP;
  echo -e "
 alright lets fire masscan ****"
  masscan --open --banners --source-port 60000 -p0-65535 --max-rate 15000 -oBpwd/$store/masscan.bin $range; masscan --read$
  if [ ! -s ./results/$store/masscan-output.txt ]; then
     echo "Thank you for wasting time"
  else
    awk'/open/ {print $4,$3,$2,$1}' ./results/$store/masscan-output.txt |  awk'
/.+/{
  if (!($1 in Val)) { Key[++i] = $1; }
  Val[$1] = Val[$1] $2 ",";
  END{
  for (j = 1; j <= i; j++) {
    printf("%s:%s
%s",  Key[j], Val[Key[j]], (j == i) ? "" : "
");
  }
}'>}./results/$store/hostsalive.csv

for ipsfound in $(cat ./results/$store/hostsalive.csv); do
  IP=$(echo $TARGET | awk -F: '{print $1}');
  PORT=$(echo $TARGET | awk -F: '{print $2}' | sed's/,$//');
  FILENAME=$(echo $IP | awk'{print "nmap_"$1}');
  nmap -vv -sV --version-intensity 5 -sT -O --max-rate 5000 -Pn -T3 -p $PORT -oA ./results/$store/$FILENAME $IP;
   done
fi
done
Now, save the file into anyname.sh and then chmod +x anyname.sh. Next, run ./anyname.sh fileincludesipranges.
Upon executing the preceding script, you should be able to see the following, as shown in Figure 3.27:

Figure 3.27: Running our custom script in Kali to scan the network
Taking advantage of SNMP
SNMP, Simple Network Management Protocol, is traditionally used to collect information about the configuration of network devices such as printers, hubs, switches, routers on internet protocol, and servers. Attackers can potentially take advantage of SNMP that runs on UDP port 161 (by default) when it is poorly configured or left out, with the default configuration having a default community string.
SNMP was first introduced in 1987: version 1 had plain text passwords in transit; version 2c had improved performance, but still plain text passwords; and now the latest version 3 encrypts all of the traffic with message integrity. There are two types of community strings utilized in all versions of SNMP:
- Public: Community string is used for read-only access
- Private: Community string is used for both read and write access
The thing that attackers would look for is any identified network device on the internet and find out whether a public community string is enabled so that they can pull out all of the information specific to the network and draw a topology around it to create more focused attacks. These issues arise since, most of the time, IP-based Access Control Lists (ACLs) are often not implemented, or not used at all.
Kali Linux provides multiple tools to perform the SNMP enumeration; attackers can utilize snmpwalk or onesixtyone to understand the complete information SNMP steps, as shown in Figure 3.28:
snmpwalk -c public ipaddress –v1

Figure 3.28: snmpwalk output on a device with a public community string
Attackers can also utilize Metasploit to perform SNMP enumeration, by using the /auxiliary/scanner/snmp/snmpenum module as shown in Figure 3.29.
Some systems have SNMP installed, but that is completely ignored by the system administrators:

Figure 3.29: SNMP enumeration using Metasploit through the SNMP protocol
Attackers will also be able to extract all of the user accounts by using account enumeration modules within Metasploit, as shown in Figure 3.30:

Figure 3.30: Account enumeration using Metasploit through the SNMP protocol
Windows account information via SMB sessions
Traditionally, during internal network scanning, it is very likely that attackers exploit the internal Server Message Block (SMB) sessions that are most commonly used. In the case of external exploitation, attackers can engage nmap to perform the enumeration, but this scenario is very rare. The following nmap command will enumerate all of the remote users on the Windows machine. This information normally creates lots of entry points, much like brute force and password guessing attacks in later stages:
nmap --script smb-enum-users.nse -p445 <host>
Attackers may also utilize the Metasploit module, auxiliary/scanner/smb/smb_enumusers, to perform the activity. Figure 3.31 shows the successful enumeration of users on a Windows system running Metasploitable3:

Figure 3.31: Enumeration of users in Metasploit using the SMB protocol
This can be achieved either by having a valid password guess to the system or by brute-forcing the SMB logins.
Locating network shares
One of the oldest attacks that penetration testers these days forget about is the NETBIOS null session, which will allow them to enumerate all of the network shares:
smbclient -I TargetIP -L administrator -N -U ""
enum4linux can also be utilized in a similar way to enum.exe, formerly from BindView, which has now been taken over by Symantec; this tool is normally used for enumerating information from Windows and Samba systems:
enum4linux.pl [options] targetip
The options are the following (such as enum):
-U: Get user list-M: Get machine list-S: Get share list-P: Get password policy information-G: Get group and member list-d: Be detailed; applies to-Uand-S-u user: Specify the username to use (default"")-p pass: Specify the password to use (default"")
This tool is more aggressive in scanning and identifying the list of domains along with the domain SID, as shown in Figure 3.32:

Figure 3.32: Enumerating the domain controller using enum4linux
Reconnaissance of active directory domain servers
Often during an internal penetration testing activity, penetration testers will be provided with a username and password. In real-world scenarios, the attackers are inside the network, and an attack scenario would be what they could do with normal user access and how they elevate the privileges to compromise the enterprise domain.
Kali Linux provides rpcclient installed by default, which can be utilized to perform more active reconnaissance on an active directory environment. This tool provides multiple options to extract all of the details about the domain and other networking services, which we will be exploring in Chapter 10, Exploitation. One of the system internal tools, ADExplorer, can also be utilized to perform the AD enumeration. Figure 3.33 shows the enumeration of lists of domains, users, and groups:

Figure 3.33: Enumeration of domain and account details using rpcclient with valid credentials
Enumerating the Microsoft Azure environment
During the pandemic, many organizations transformed themselves to be better integrated with cloud platforms, especially when there was a critical vulnerability on Microsoft Exchange Server that was released. In this section, we will discuss the various techniques utilized to perform information gathering from the Azure environment using Kali Linux.
To interact with the Azure services, we will first need the client to be downloaded. This can be achieved by running the following commands in the terminal:
curl -sL https://aka.ms/InstallAzureCLIDeb | sudo bash
sudo apt-get install ca-certificates curl apt-transport-https lsb-release gnupg
sudo apt-get install azure-cli
Upon successful installation of azure-cli, we should be able to log in using the az client from our Kali Linux by running az login; if there are no subscriptions, attackers can choose to log in without any subscription by adding --no-subscriptions, as shown in Figure 3.34:

Figure 3.34: Logging in to a Microsoft 365 Azure account
Once logged in with a Microsoft 365 account, you should be able to successfully receive the cloud details; if the account has subscriptions, they will be displayed as shown in Figure 3.35:
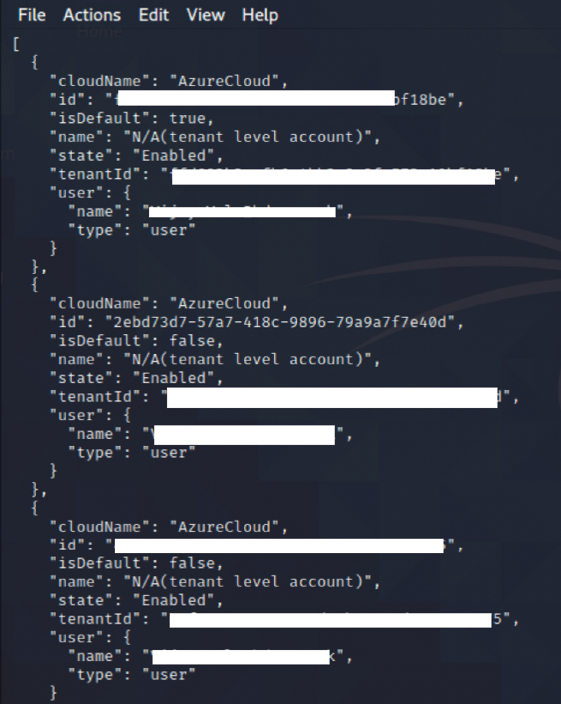
Figure 3.35: Portal details of the Azure that the user is authorized to view
Table 3.7 provides some of the useful commands that come in handy during the enumeration of Microsoft Azure cloud services:
|
Command |
Example |
Description |
|
|
|
This command will provide a list of all users who are connected to this Azure AD |
|
|
|
This will provide a full list of groups associated with the tenant |
|
|
|
This will provide a full list of members in a given group |
|
|
|
This will provide us with a list of applications that are available within the Azure AD |
|
|
|
This will provide us with the service principal account details |
Table 3.7: Commands to be used in the enumeration of Microsoft Azure cloud services
Using comprehensive tools (Legion)
The former security tool Sparta is no longer available in the latest version of Kali, but it has been complemented by another comprehensive tool called Legion, which is the same fork as Sparta. This tool can help to speed up the penetration tester’s goal of compromising a system that combines multiple tools, such as Nmap, and several other scripts and tools. This is a semi-automated tool that can be very handy when attackers wish to perform focused information gathering, based on the ports and services:
Hosts: This will list down all the targets that are set by the pentestersServices: This is a list of services that need to be run during the automatic run; for example, if you configure to run Nmap and when port80is identified, it will automatically take the screenshotTools: This will include all the tools that were run on a specific port, along with its relevant output
Figure 3.36 shows Legion in action against a local subnet. By default, Legion performs an nmap full port scan, and also runs the respective Nmap scripts based on the services identified on the port and takes a screenshot, where possible:

Figure 3.36: Port scanning output in Legion
Using machine learning for reconnaissance
Machine learning has become a vital technology in cybersecurity. It is the art of using data and algorithms to imitate the way we learn as humans. Machine learning is a branch of artificial intelligence. In this section, we will explore the GyoiThon tool, which you can leverage during large-scale pentesting or red team activities.
There are four types of machine learning algorithms:
- Supervised: These learning algorithms are provided with a set of known data (labeled) that includes the desired output. The goal of this type of learning is for the algorithm to achieve a high level of accuracy by learning from patterns in the data to make predictions.
- Unsupervised: These learning algorithms are trained with unlabeled data or datasets that do not include the desired output. The algorithm tries to interpret and organize the datasets.
- Semi-supervised: This is a mix of the preceding types.
- Reinforcement learning: These algorithms are based on regimented learning processes, where the algorithm is provided with a clear set of actions, factors, and desired outcomes. Most of the time, it is a trial-and-error method to explore different possibilities and options to determine which is best.
GyoiThon by gyoisamurai is a pentest tool based on the Naïve Bayes (supervised) deep learning method (deep learning is a subset of machine learning) and is written in Python 3. It includes a software analysis engine, vulnerability identification engine, and report generation engine. To install the GyoiThon on our Kali Linux machine, run the following commands in the terminal:
$ sudo git clone https://github.com/gyoisamurai/GyoiThon
cd GyoiThon
sudo pip3 install -r requirements.txt
sudo apt --fix-broken install
sudo apt install python3-tk
Once the requirements are installed, run sudo python3 gyoithon.py -h from the terminal, you should see all the options, as seen in Figure 3.37:

Figure 3.37: Successfully running the GyoiThon tool
Before beginning the reconnaissance activity, you can edit the configuration file config.ini and enter the proxy details (if any), such as Censys and DomainTools API details. All the target information can be entered in the host.txt file, which is located in the same folder where the tool was cloned. The format to enter the target details is protocol (http or https), domain (cyberhia.com), port (80 or 443), and the root (/ or /admin/). An example of using host.txt to perform reconnaissance on cyberhia.com is:
http cyberhia.com 80 /
https cyberhia.com 443 /admin/
Finally, you can run sudo python3 gyoithon.py from the terminal. The software engine within the tool should be able to grab the banner using normal web access using the deep learning base and signature. Figure 3.38 shows a successful reconnaissance output on the target:
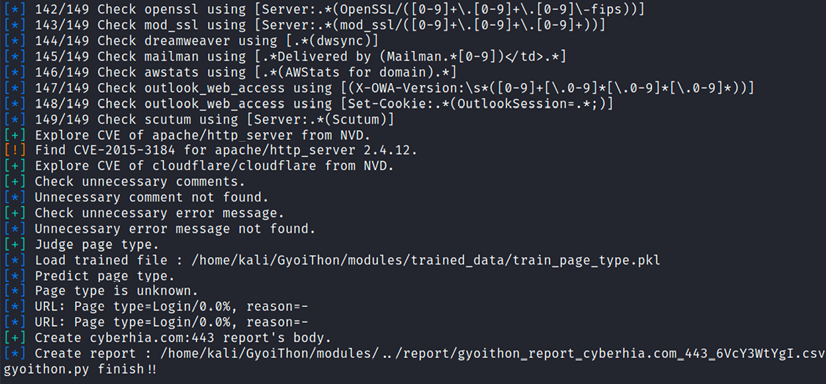
Figure 3.38: Performing reconnaissance using GyoiThon
Other features you can leverage with this tool include:
- Scanning for cloud services and exploring relevant (Fully Qualified Domain Names (FQDNs))
- Performing custom Google searches and exploring the default paths based on the product version
- Performing port scanning on targets
- Executing the exploit module using Metasploit
As it’s a supervised learning algorithm, you should be able to determine the input and output with the data fed into the algorithm. In this case, every time the scan is performed, the data will be labeled and the algorithm trained, which will reduce false positives significantly. For example, if the target has hundreds of domains, this can be very handy to automate the server banner grabbing and list all the vulnerabilities using the vulnerability detection engine to prepare for the exploitation.
Summary
Attackers might face a very real chance of their activities being identified, which puts them at risk of exposure to a target. However, we have now seen the different techniques that can be employed during active reconnaissance to mitigate such a risk. Attackers must ensure that there is a balance against the need to map a network, find open ports and services, and determine the operating system and applications that are installed.
The real challenge for attackers is to adopt stealthy scanning techniques to reduce the risk of triggering an alert.
Manual approaches are normally used to create slow scans; however, this approach may not always be effective. Therefore, attackers take advantage of tools such as the Tor network and various proxy applications to hide their identities.
Additionally, we explored how to perform reconnaissance using machine learning using the GyoiThon tool, which can significantly reduce your manual efforts.
In the next chapter, we will explore more techniques and procedures that aid in vulnerability assessments, and how to utilize the scanners to identify the vulnerabilities that can be utilized as the potential candidates for the exploitation to move forward in achieving the objective.