
2
Open-Source Intelligence and Passive Reconnaissance
Gathering all possible information on a target is always the most important aspect of a penetration tester’s thinking to achieve the best outcomes. In cybersecurity, gathering information through publicly available sources is often referred to as Open-Source Intelligence (OSINT). Passive reconnaissance through OSINT occurs during the first step of the kill chain when conducting a penetration test or attack against a given organization. An attacker will typically dedicate up to 75% of the overall work effort for a penetration test to reconnaissance, as it is this phase that allows the target to be defined, mapped, and explored for the vulnerabilities that will eventually lead to exploitation.
There are two types of reconnaissance:
- Passive reconnaissance (direct and indirect)
- Active reconnaissance
Passive reconnaissance is the art of collecting and analyzing openly available information, usually from the target itself or public sources online. On accessing this information, the tester or attacker does not interact with the target in an unusual manner—requests and activities will not be logged and so will not be traced directly to the tester. Therefore, passive reconnaissance is conducted first to minimize the direct contact that may signal an impending attack or to identify the attacker.
In this chapter, you will learn the principles and practices of passive reconnaissance and OSINT, which include the following:
- Basic principles of reconnaissance
- OSINT
- Online resources and dark web search
- Obtaining user information
- Profiling users for password lists
- Using social media to extract password wordlist
Active reconnaissance, which involves direct interaction with the target, will be covered in Chapter 3, Active Reconnaissance of External and Internal Networks.
Basic principles of reconnaissance
Reconnaissance, or recon, is the first step of the kill chain when conducting a penetration test or an attack against a data target. It is conducted before the actual test or attack on a target network. The findings will give us an idea of where additional reconnaissance may be required or the vulnerabilities that can be capitalized upon during the exploitation phase. Reconnaissance activities are segmented on a gradient of interactivity with the target network or device.
Passive reconnaissance does not involve any malicious, direct interaction with the target network. The attacker’s source IP address and activities are not logged (for example, a Google search for the target’s email addresses will not leave a trail that the target can detect). It is difficult, if not impossible, for the target to differentiate passive reconnaissance from normal business activities.
Passive reconnaissance is divided further into the categories of direct and indirect. Direct passive reconnaissance involves the normal interactions that occur when an attacker expectedly interacts with the target. For example, an attacker will log on to the corporate website, view various pages, and download documents for further study. These interactions are expected user activities and are rarely detected as a prelude to an attack on the target. In indirect passive reconnaissance, there will be absolutely no interaction with the target organization.
In contrast, active reconnaissance involves direct queries or other interactions (for example, port scanning of the target network) that can trigger system alarms or allow the target to capture the attacker’s IP address and activities. This information could be used to identify and arrest an attacker, or used during legal proceedings. Therefore, passive reconnaissance carries a lot less risk but, like its active counterpart, has its limitations.
Penetration testers or attackers generally follow a process of structured information gathering, moving from a broad scope (the business and regulatory environments) to something much more specific (user account data).
To be effective, testers should know exactly what they are looking for and how the data will be used before collection starts. Using passive reconnaissance and limiting the amount of data collected minimizes the risk of being detected by the target.
OSINT
The first step in a penetration test or an attack is information collection using OSINT. This is the art of collecting information from public sources, particularly through the internet. The amount of available information is considerable—most intelligence and military organizations are actively engaged in OSINT activities to collect information about their targets, and to guard against data leakage about them.
OSINT can be divided into two types: offensive and defensive. Offensive deals with harvesting all the data that is required to prepare an attack on the target, while defensive is the art of collecting the data of previous breaches and any other security incidents relevant to the target that can be utilized to defend or protect themselves. The diagram displayed in Figure 2.1 depicts a basic mind map for OSINT:

Figure 2.1: Basic mind map for OSINT
Offensive OSINT
The information that is targeted for collection is dependent on the initial goal of the penetration test. For example, if testers want to access personal health records, they will need the names and biographical information of relevant parties involved (third-party insurance companies, healthcare providers, head of IT operations in any industry, commercial suppliers, and so on), their usernames, and their passwords. If the route of an attack involves social engineering, they may supplement this information with details that give credibility to the requests for information, such as:
- Domain names: Identification of targets for the attackers or penetration testers during an external scenario begins with domain names, which is the most crucial element of OSINT:
- Sub-domains: These are the domains that are part of the main domain; for example, if a domain offered to the target is
sample.com, it might usedemo.sample.com,producton.sample.com,ecommerce.sample.com, and so on. Identification of these domains will provide the attackers with a wider range of assets to assess in the reconnaissance phase. - DNS entries: In today’s cyber world, everything can be potentially networked. That means each device that is connected to the internet has a unique IP address assigned to it. Likewise, the DNS entries are a list of human-friendly names that are assigned to a specific IP address, for example,
demo.sample.com, that is translated to an IP address in the format104.x.x.243. DNS entries include A (hostname to an IP), NS (name server), CNAME (canonical name), MX (mail exchange) AAAA (DNS record to IP v6), SRV (service record), TXT (text record), and PTR (pointer record, which is opposite to the A record). All this information will provide the attackers not only with details relating to DNS, but also a wide range of other information—such as what type of service they run on—which attackers can then utilize to begin equipping the attack strategy. - Mail exchange: Although we will find the MX records from the DNS entries, identifying the mail exchange is treated as a completely different set of enumeration, since most of the time they involve a third party that provides mail delivery services, which can be potentially utilized by the attackers to send bulk emails by exploiting the SMTP normal functionality of the mail relay.
- Sub-domains: These are the domains that are part of the main domain; for example, if a domain offered to the target is
- DNS reconnaissance and route mapping: Once a tester has identified the target that has an online presence and contains items of interest, the next step is to identify the IP addresses and routes to the target. DNS reconnaissance is concerned with identifying who owns a particular domain or series of IP addresses (information such as WHOIS, although this has changed a lot after the General Data Protection Regulation), the DNS information defining the actual domain names and IP addresses assigned to the target, and the route between the penetration tester or the attacker and the final target.
This information gathering is semi-active—some of the information is available from freely available sources, while other information is available from third parties such as DNS registrars. Although the registrar may collect IP addresses and data concerning requests made by the attacker, it is rarely provided to the end target. The information that could be directly monitored by the target, such as DNS server logs, is almost never reviewed or retained. Because the information needed can be queried using a defined systematic and methodical approach, its collection can be automated.
In the following sections, we will discuss how easy it would be to enumerate all the domain names just by using simple tools that are pre-installed within Kali Linux.
Gather domain information
We will utilize the sublist3r tool to perform domain harvesting. This tool is not preinstalled in Kali Linux; however, it can be installed by running sudo apt install sublist3r in the terminal. This tool is written in Python, which will enumerate the sub-domains of a primary domain using the OSINT techniques. It utilizes APIs such as the Google, Bing, Baidu, and ASK search engines. Additionally, it also performs searches in NetCraft, VirusTotal, Threatcrowd, DNSDumpster, and ReverseDNS, while also performing DNS brute force using a specific wordlist.
Once the tool is installed, attackers can run sudo sublist3r -d ourtargetcompany.com -t 3 -e bing to search for sub-domains in the Bing search engine, as shown in Figure 2.2 for packtpub.com:

Figure 2.2: Sub-domain information gathering through sublist3r of packtpub.com using the Bing API
One might encounter an error message of VirusTotal blocking the requests. This can be fixed by adding your own API key by entering export VT_APIKEY=yourapikey. An API key can be generated by creating an account at virustotal.com.
Maltego
Maltego is one of the most capable OSINT frameworks for both individual and organizational reconnaissance. It is a GUI tool that can gather information on any individual by extracting the information that is publicly available on the internet by various methods, such as email addresses, URLs, social media network profiles of an individual, and mutual connections between two individuals. It is also capable of enumerating the DNS, brute-forcing the normal DNS, and collecting the data from social media in a format that can be easily read.
We can utilize this tool by developing a visualization of the data that has been gathered. The community edition, Maltego 4.2.17, is shipped along with Kali Linux. The easiest way to access this application is to type maltego in the terminal. The tasks in Maltego are called transforms. Transforms come built into the tool and are defined as being code scripts that execute specific tasks.
There are also multiple plugins available in Maltego, such as the SensePost toolset, Shodan, VirusTotal, and ThreatMiner.
The steps to use Maltego for OSINT are as follows:
- In order to access Maltego, you will need to create an account by visiting https://www.maltego.com/ce-registration/. Once the account is created and you are successfully logged in to the Maltego application, you should see the screen shown in Figure 2.3:

Figure 2.3: Start-up screen of Maltego
- Upon clicking Run under Maltego CE (Free), agree to the terms and conditions, install transforms, select a web browser option (privacy mode), and lastly, click on Ready. That will enable us to utilize the community transforms. There is a limit on how many you can utilize, however.
- Transform Hub is where the Maltego client allows users to easily install the transforms from different data providers, which have both commercial and community transforms.
- Once everything is complete, you should be ready to use Maltego; create a machine by navigating to Machines in the Menu folder and clicking on Run Machine, as shown in Figure 2.4; then you will be able to start an instance of the Maltego engine.

Figure 2.4: Running a machine in Maltego
After running a machine, the following machine selections will typically be presented:
- Company Stalker: This will retrieve all email addresses associated with a domain and then see which one has entries on social networking sites, such as LinkedIn. It also downloads and extracts metadata from published documents on the internet by filtering to the specific domain as a target.
- Find Wikipedia edits: This transform looks for the details from the Wikipedia edits and searches for them across all social media platforms.
- Footprint L1: This performs basic footprints of a domain.
- Footprint L2: This performs medium-level footprints of a domain.
- Footprint L3: This performs an intense deep dive into a domain and is typically used with care since it will consume a large amount of the memory resources running on Kali Linux.
- Footprint XML: This works on large targets, such as a company hosting its own data centers, and tries to obtain the footprint by looking at sender policy framework (SPF) records hoping for netblocks, as well as reverse delegated DNS to their name servers.
- Person - Email Address: This is used to obtain someone’s email address and see where it’s used on the internet. The input is not a domain, but rather a full email address.
- Prune Leaf entries: This filters the information by providing options to delete certain parts of the network.
- Twitter digger X: This analyzes tweets for aliases.
- Twitter digger Y: This works on Twitter affiliations; it finds a tweet, extracts it, and analyzes it.
- Twitter Monitor: This can be used to monitor Twitter for hashtags and named entities mentioned around a certain phrase. The input is a phrase.
- URL to Network and Domain Information: This transform will identify the domain information of other Top-Level Domains (TLDs). For example, if you provide
www.cyberhia.com, it will identifywww.cyberhia.co.ukandcyberhia.co.inand so on as the other TLDs.
Attackers begin with Footprint L1 to gain a basic understanding of the domain and the sub-domains that are potentially available, along with relevant IP addresses. It is good practice to begin with this information as part of information gathering; however, attackers can also utilize all the other machines mentioned previously to achieve their goal. Once the machine is selected, click on Next and specify a domain, for example, cyberhia.com. Figure 2.5 provides an overview of cyberhia.com:

Figure 2.5: Maltego results on a dashboard on the Footprint L1 module for cyberhia.com
OSRFramework
OSRFramework is a tool designed by i3visio to perform open-source threat intelligence as a web interface with consoles such as OSRFConsole. To install this framework, install pip3 by running sudo apt install python3-pip in the terminal. Finally, the OSRFramework tool can be installed directly through pip3 by running the sudo pip3 install osrframework command in the same terminal.
OSRFramework provides threat intelligence about keywords in multiple sources and also provides the flexibility to be a standalone tool—or a plugin to Maltego. There are three handy modules that come with OSRFramework, each of which can be utilized by penetration testers during external threat intelligence data collection:
usufy: This is used for searching on multiple search engines, to identify the keywords in a URL, and to automatically enumerate and store all the results in.csvformat. The following is the output ofcyberhiaas a keyword forusufy:usufy -n cyberhiamailfy: This identifies a keyword and adds the email domains to the end of the keyword, while automatically searching in haveibeenpawned.com with an API call:mailfy -n cyberhiasearchfy: This searches for a keyword in Facebook, GitHub, Instagram, Twitter, and YouTube. The testers can runsearchfy -q "cyberhia"in the terminal to querycyberhiaas a keyword forsearchfy, as shown in Figure 2.6:
Figure 2.6: searchfy output for the cyberhia keyword
Web archives
When something is deleted from the internet, it is not necessarily completely deleted from everywhere. Every page that is visited by Google is backed up as a snapshot in Google’s cache servers. Typically, these cache servers are intended to see whether Google can serve you the best available option to base your search query on.
The same technique can be utilized by attackers to gather information about a given target. For example, say a hacked database’s details were posted in sampledatadumpwebsite.com, and that the website or the link is taken off the internet.
If the page has been accessed by Google, this information can serve as a great source of information for attackers, including usernames, password hashes, what type of backend was being utilized, and other relevant technical and policy information.
Wayback Machine maintains the digital archive of the internet web pages. The following link is the second level used after the google cache when harvesting past data
https://web.archive.org/web/.
Figure 2.7 is a screenshot of cyberhia.com in the WayBack Machine, as of 24 March 2018:

Figure 2.7: Cached page for cyberhia.com as of March 2018
Google Cache, Wayback Machine, and the live version of any given domain can be accessed directly by visiting https://cachedviews.com/.
Passive Total
Passive Total by RiskIQ is another platform that provides OSINT on any specific target domain. It has both a commercial offering and a version for the community (https://community.riskiq.com/). Attackers can enumerate the information about a target within this portal such as the DNS and IP address, certificate information, and the frequency of the changes that happen on a particular sub-domain.
Figure 2.8 provides the details about cyberhia.com:

Figure 2.8: Passive total output on a search for cyberhia.com
We will be discussing the hidden face of Google in more depth in the Google Hacking Database section.
Scraping
A technique that attackers utilize to extract a large number of datasets from websites, whereby the extracted data is stored locally in a filesystem, is called scraping, or web scraping. In the following section, we will utilize some of the most commonly used tools in Kali Linux to perform scraping.
Gathering usernames and email addresses
theHarvester is a Python script that searches through popular search engines and other sites for email addresses, hosts, and sub-domains. Using theHarvester is relatively simple, as there are only a few command switches to set. The options are as follows:
-d: This identifies the domain to be searched, usually the domain or target’s website.-b: This identifies the source for extracting the data; it must be one of the following:Bing,BingAPI,Google,Google-Profiles,Jigsaw,LinkedIn,People123,PGP, orAll.-l: This limiting option instructs theHarvester to only harvest data from a specified number of returned search results.-f: This option is used to save the final results to an HTML and XML file. If this option is omitted, the results will only be displayed on the screen, and not saved.
Figure 2.9 provides the sample data extract from theHarvester for the packtpub.com domain by running theHarvester -d packtpub.com -l 500 -b google.

Figure 2.9: Running theHarvester to gather details on packtpub.com
Note there might be two versions of theHarvester installed on Kali, so it is recommended to use the latest version of theHarvester.
Attackers can also utilize the LinkedIn API to extract a list of people within the given domain and easily form a list of possible valid email addresses and/or usernames. An example would be when an organization uses first and last names within the format of [email protected]; for example, [email protected]. theHarvester tool can be utilized to enumerate user details on who is currently working in the organization; this can be easily run using:
theHarvester -d packtpub.com -l 500 -b LinkedIn
The results can be utilized to create a list of email IDs to perform email phishing.
Email addresses of former employees can still be of use. When conducting social engineering attacks, directing information requests to a former employee usually results in a redirect that gives the attacker the credibility of having dealt with the previous employee. In addition, many organizations do not properly terminate employee accounts, and it is possible that these credentials may still give access to the target system.
Obtaining user information
Many penetration testers gather usernames and email addresses, as this information is frequently used to log on to targeted systems. The most commonly employed tool is the web browser, which is used to manually search the target organization’s website as well as third-party sites, such as LinkedIn or other social networking websites.
Pentesters may also choose to search on other portals, such as https://hunter.io and/or utilize Firefox plugins such as Email Extractor in their browser to extract the email addresses.
TinEye
TinEye is an online reverse image search portal developed and offered by Idee, Inc. In short, this is a search engine like Google, but it allows the users to search using only images. This information can help the attacker to map images to the target, and can be utilized in a well-defined social engineering attack:

Figure 2.10: Image search on TinEye
Online search portals
Where can you find a surfeit of vulnerable hosts, with the vulnerability details along with screenshots? Often, attackers utilize existing vulnerabilities to gain access to the system without much effort, so one of the easiest ways to do so is to search in Shodan. Shodan is one of the most important search engines available, as it lets anyone on the internet find devices connected to the internet using a variety of filters. It can be accessed by visiting https://www.shodan.io/. This is one of the most popular websites consulted for information around the globe. If the name of a company is searched for, it will provide any relevant information that it has in its database, such as IP addresses, port numbers, and the service that was running.
Figure 2.11 is a sample screenshot from shodan.io that shows hosts that are running Windows 7, which enables attackers to go ahead and narrow down the target and move laterally. We will learn about this in upcoming chapters:

Figure 2.11: Search results for Windows 7 in Shodan
Similar to Shodan, attackers can also utilize the censys.io API for relevant information gathering; this can provide more information about IPv4 hosts, websites, certifications, and other stored information. As an example, Figure 2.12 provides information about cyberhia.com:

Figure 2.12: Results for cyberhia.com in censys.io
SpiderFoot
There are many more automated tools included within Kali that can supplement manual searches. One such tool is SpiderFoot, which automates both offensive and defensive passive reconnaissance using OSINT. The tool is written in Python 3 with the GPL license, and it is preinstalled in the latest version of Kali. The tool provides the option to configure a number of APIs to strengthen the outcome.
The tool can be launched by running spiderfoot -l IP:Port, as shown in Figure 2.13:

Figure 2.13: Running SpiderFoot from the terminal
Once the engine is started, you will be able to visit http://IP:port, click on Settings, and add all the API keys that you might already have; an example, the AbusIPDB.com API key (you can create this key by visiting abuseIPDB) is added to SpiderFoot, as shown in Figure 2.14; then save the changes. This can similarly be done for all the APIs that require tokens or API keys:

Figure 2.14: Adding AbuseIPDB.com API key in SpiderFoot settings
Once all the settings are configured, click on New Scan and type the scan name and the seed target, which is our target organization’s primary domain, and select the options shown in Figure 2.15:

Figure 2.15: Creating a new scan in SpiderFoot
The SpiderFoot web interface provides three different ways to run the passive reconnaissance scan:
- By Use Case, whereby pentesters can specify All, Footprint, Investigate, and Passive (for pentesters, it is a good option to remain stealthy while using SpiderFoot)
- By Required Data, which will allow the pentesters to select the information that they are looking for
- By Module, allowing the testers to select from which modules they want the information to be gathered
The tools can also gather information on print media, academic publications, and so on. Like Passive Total, this tool also has commercial and community versions.
Once the required selection is completed and the scan has finished running, you should be presented with a similar result to that shown in Figure 2.16:

Figure 2.16: Output of SpiderFoot scan results that are in progress
The archive of the OSINT performed using SpiderFoot could be accessed by clicking on the Scans tab, which will provide all of the past and current running scans, as shown in Figure 2.17:

Figure 2.17: SpiderFoot scan details
Other commercial tools
Spyse (https://spyse.com/) and ZoomEye (https://www.zoomeye.org/) are great search engines that can be utilized for defensive passive recon to quickly gather the entire attack surface of a given target. Figure 2.18 provides a screenshot of what Spyse looks like:

Figure 2.18: Spyse output on cyberhia.com
Google Hacking Database
The rise of an infodemic during the Covid-19 pandemic has had a significant impact on the world economy. The public generally utilizes Google to keep themselves updated; “google it” is a common idiom that can refer to a search for any type of information, whether it be a simple search query, or when collating information on a given topic. In this section, we will narrow down how penetration testers can utilize Google through dorks.
A Google dork or Google Hacking query is a search string that uses advanced search techniques and methods to find information that is not readily available about a target website. These dorks can return information that is difficult to locate through simple search queries.
Using dork scripts to query Google
The first step in understanding Google Hacking Database (GHDB) is that the testers must understand all the advanced Google operators, just like how machine-level programming engineers must understand computer OP codes (known as operation code, these are machine language instructions that specify what operations are to be performed).
These Google operators are part of the Google query process, and the syntax for searching is as follows:
operator:itemthatyouwanttosearch
There is no space between operator, the colon (:), and itemthatyouwanttosearch. Table 2.1 lists all the advanced Google operators:
|
Operator |
Description |
Mixes with other operators? |
Can be used alone? |
|
|
Page title keyword search |
Yes |
Yes |
|
|
All keywords search at a time in the title |
No |
Yes |
|
|
Search the keyword in the URL |
Yes |
Yes |
|
|
Filter Google search results only to the site |
Yes |
Yes |
|
|
Search for a particular extension or file type |
Yes |
No |
|
|
Keyword search for all number of occurrences |
No |
Yes |
|
|
External link search on a page |
No |
Yes |
|
|
Search anchor link on a web page |
Yes |
Yes |
|
|
Limit search on the range |
Yes |
Yes |
|
|
Limit search on the date |
Yes |
Yes |
|
|
Finding group author |
Yes |
Yes |
|
|
Searching group names |
Yes |
Yes |
|
|
Search related keywords |
Yes |
Yes |
Table 2.1: A list of advanced operators to be used in GHDB
Figure 2.19 provides a screenshot of a simple Google dork to search any plaintext passwords on poorly configured WordPress sites. The dork search is in the following format, entered in the search bar:
inurl:/wp-content/uploads/ ext:txt "username" AND "password" | "pwd" | "pw"

Figure 2.19: Google dork search output for plain text passwords
For more specific operators, we can refer to the guide from Google at http://www.googleguide.com/advanced_operators_reference.html.
We can utilize the Google hacking database from exploit-db, which is constantly updated by the security research community, available at https://www.exploit-db.com/google-hacking-database/.
Data dump sites
In today’s world, any information can be shared online quickly and more effectively with the birth of apps such as pastebin.com. However, this turns out to be one of the major drawbacks when developers store source code, crypto keys, and other confidential information on the app, which leaves it unattended; this online information provides attackers with a list of abundant information with which to formulate more focused attacks.
The archive forums also reveal the logs of a particular website or the past hacking incidents, if it was previously hacked; Pastebin also offers this information. Figure 2.20 provides a list of confidential information about a target:
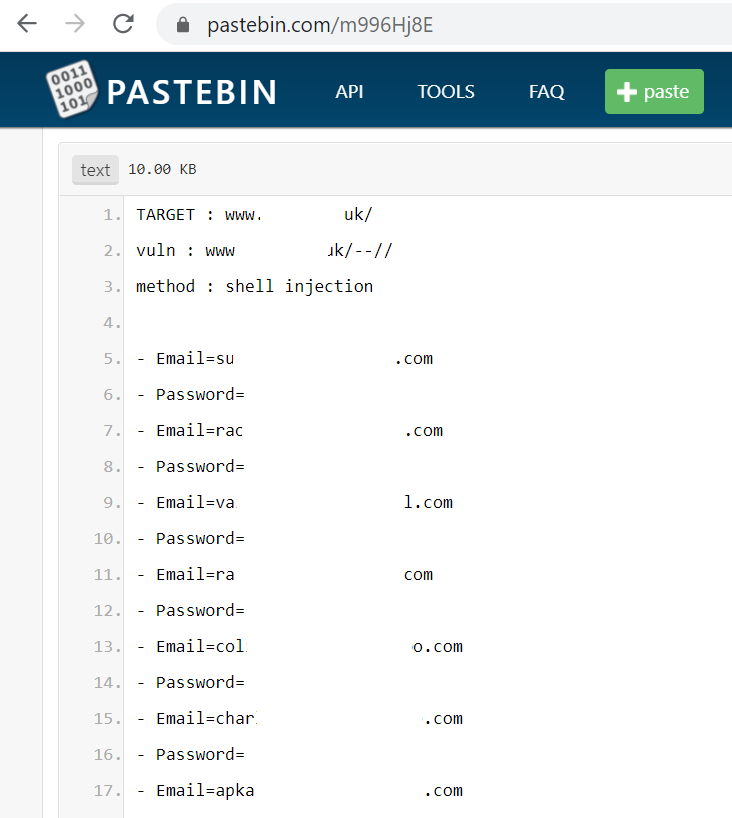
Figure 2.20: Pastebin output of plaintext username and passwords
Defensive OSINT
Defensive OSINT is typically used to see what is already on the internet, including breached information; it is also used to see whether that information is valuable during penetration testing. If the goal of penetration testing is to demonstrate a real-world scenario where this data will be useful, the first step is to identify a similar target that has already been breached. The majority of organizations fix only the affected platform or the host—they often forget about other similar environments. Defensive OSINT is largely divided into three places of search.
Dark web
The dark web is the encrypted network that exists between Tor servers and their clients, whereas the deep web is simply the content of databases and other web services that for one reason or another cannot be indexed by conventional search engines, such as Google.
Let’s take an example of expired drugs or banned drugs that can be sold on the dark web. We will explore how to identify information on the dark web using the Tor browser. Some websites, such as https://dark.fail/, provide a market list of hidden deep web links. These links can only be accessed through the Tor browser. Figure 2.21 provides an example of drugs that are being sold on such a market, called Dream Market:

Figure 2.21: Darknetlive Dream Market
Although governments attempt to block access to these black markets, there are always clones of these sites that are up and running. We have now learned where to locate information to access the dark web using the Tor browser.
Security breaches
A security breach is any incident that results in unauthorized access to data, applications, services, networks, and/or devices, by bypassing their underlying security mechanisms. One such example is Facebook’s data breach in April 2021 that saw the details of 533 million users leaked. This can potentially help attackers to create a good dictionary of passwords, which we will examine in Profiling users for a password list.
Hackers are known to visit the following websites:
These websites contain an archive of breached data. The following screenshot provides information about whether your email ID was breached as part of the recent Facebook breach: https://www.businessinsider.com/stolen-data-of-533-million-facebook-users-leaked-online-2021-4?r=US&IR=T:

Figure 2.22: Confirmation of whether an email address has been breached, along with what other information was leaked in Facebook’s data breach
To harvest more information about a target, pentesters can look into websites such as zone-h.com, which provide information about breaches. For example, a defacement of chinaseeds.com was performed by a threat actor group named Moroccohackteam. Figure 2.23 provides details on the IP address, web server, and operating system used during the defacement:

Figure 2.23: Output of chinaseeds.com hacked snapshot
Testers can utilize these different sources to enumerate the information about a target organization or individual, which can then be leveraged in social engineering attacks. Attackers can email the victim posing as a law enforcement agency, asking them to confirm their identity by clicking on the attacker-controlled site, for example. We will learn different scenarios in more detail in Chapter 5, Advanced Social Engineering and Physical Security.
Public records
Harvesting information about high-profile targets, such as C-Level, board of directors, or VIPs during social engineering or red team activities, is very useful. Public records can be utilized to form a password list based on the information that is available to profile an individual. One such example is a public record of individuals, such as Findmypast, which provides information about individuals (say, Donald Trump), as shown in Figure 2.24:

Figure 2.24: Results on Findmypast.co.uk on “Donald Trump” name search
Threat intelligence
Threat intelligence is controlled, calculated, and refined information about potential or current attacks that threaten an organization. The primary purpose of this kind of intelligence is to ensure organizations are aware of the current risks and profile them according to the threat that they present, such as Advanced Persistent Threats (APTs), zero-day exploits, and other severe external threats. For example, if Company A—a healthcare drug manufacturer—was hit with by ransomware through APTs, Company B could be alerted to this threat intelligence with the Tactics, Techniques, and Procedures (TTPs) and adjust their security accordingly.
In reality, it is much more likely that organizations will take a very long time to make a decision due to a lack of trusted sources, and also the spending involved due to the nature and probability of the threats. In the preceding example, Company B may have fewer systems on site, or may have to halt all connections to and from the internet to its assets, until an internal review is carried out.
This information has the potential to be utilized by attackers to exploit a network. However, this information is considered part of the passive reconnaissance activity, since no direct attack has been launched on the target yet. Pentesters and attackers will always subscribe to these kinds of open-source threat intelligence frameworks, such as the ATT&CK matrix for indicators of compromise (IOCs).
Profiling users for password lists
So far, you have learned how to use passive reconnaissance to collect names and biographical information for users of the target being tested; this is the same process used by hackers. The next step is to use this information to create password lists specific to the users and the target.
Lists of commonly used passwords are available for download and are stored locally on Kali in the /usr/share/wordlists directory. These lists reflect the choices of a large population of users, and it can be time-consuming for an application to attempt to use each possible password before moving on to the next one in the queue.
Fortunately, Common User Password Profiler (CUPP) allows the pentester to generate a wordlist that is specific to a particular user. It is not installed by default in the latest version of Kali; it can, however, be installed by entering the following command in the terminal:
sudo apt install cupp
This will download and install the tool. CUPP is a Python script, and it can be simply invoked from the CUPP directory by entering the following command:
root@kali:~# cupp -i
This will launch CUPP in interactive mode, which prompts the user for specific elements of information to use in creating wordlists. An example is shown in Figure 2.25:

Figure 2.25: Creating password lists using CUPP
When the wordlist has been created, it is placed in the cupp directory.
Creating custom wordlists for cracking passwords
There are multiple tools that are readily available in Kali Linux to create custom wordlists for cracking passwords offline. We will now take a look at a couple of them.
Using CeWL to map a website
CeWL is a Ruby app that spiders a given URL to a specified depth, optionally following external links, and returns a list of words that can then be used in password crackers, such as John the Ripper. Figure 2.26 provides the custom list of words generated from the Google index page:

Figure 2.26: Creating custom password list using the CeWL from the web pages
These texts extracted from the web pages sometimes include the HTML comments that are left by the developers, which can be very useful for performing more informed attacks.
Extracting words from Twitter using twofi
While we can profile a user on social media platforms such as Facebook, Twitter, and LinkedIn, we can also use twofi, which stands for Twitter words of interest. This tool is written using Ruby script and utilizes the Twitter API to generate a custom list of words that can be utilized for offline password cracking. Twofi is not installed in Kali Linux by default, so you have to run sudo apt install twofi in the terminal.
To use twofi, we must have a valid Twitter API key and an API secret. Ensure that you are entering these details in /etc/twofi/twofi.yml. Figure 2.27 shows how to utilize twofi during passive reconnaissance to form our custom password wordlist; in the following example, we run twofi -m 6 -u @PacktPub > filename, which generates a list of custom words that were posted by the PacktPub Twitter handle:

Figure 2.27: Using twofi to create a wordlist for packtpub.com
Twofi is powerful during an individual targeted attack. For example, it is easy to create a profile for a frequent Twitter user and to use these wordlists to crack the password on other platforms, such as Microsoft 365, along with other social media platforms.
Summary
This chapter has detailed the first step in an attack process or kill chain: to conduct information harvesting, or passive reconnaissance, to identify the right information on the target with the power of OSINT. Passive reconnaissance provides a real-time view of an attacker’s perspective on a target company. This is a stealthy assessment: the IP address and activities of an attacker are almost indistinguishable from normal business traffic.
The same information is extremely fruitful during social engineering attacks or when facilitating other attacks. We took a deep dive into the use of automated tools to save time and performed passive reconnaissance using both offensive and defensive OSINT.
In the next chapter, we will learn the difference between the types of reconnaissance in an active sense and make use of the data that was harvested using OSINT. Although active reconnaissance techniques will provide more information, there is always an increase in the risk of detection. Therefore, the emphasis will be on advanced stealth techniques.