
4
Vulnerability Assessment
The goal of passive and active reconnaissance is to identify an exploitable target, and the goal of vulnerability assessment is to find the security flaws that are most likely to support the tester’s or attacker’s objective (unauthorized access, modification of data, or denial of service). The vulnerability assessment during the exploit phase of the kill chain focuses on creating the access to achieve the objective mapping of the vulnerabilities to line up the exploits and maintain persistent access to the target.
Thousands of exploitable vulnerabilities have been identified, and most are associated with at least one proof-of-concept code file or technique to allow the system to be compromised. Nevertheless, the underlying principles that govern success are the same across networks, operating systems, and applications.
In this chapter, you will learn about the following:
- Using online and local vulnerability resources
- Vulnerability scanning with Nmap
- Lua scripting
- Writing your own Nmap script using the Nmap Scripting Engine (NSE)
- Selecting and customizing multiple vulnerability scanners
- Installing Nessus in Kali and exploring Qualys’ online community scanner
- Web- and application-specific scanners
- Threat modeling in general
Vulnerability nomenclature
Vulnerability scanning employs automated processes and applications to identify vulnerabilities in a network, system, operating system, or application that may be exploitable.
When performed correctly, a vulnerability scan delivers an inventory of devices (both authorized and rogue devices), known vulnerabilities that have been actively scanned for, and usually a confirmation of how compliant the devices are with various policies and regulations.
Unfortunately, vulnerability scans are loud; they deliver multiple packets that are easily detected by most network controls and make stealth almost impossible to achieve. They also suffer from the following limitations:
- For the most part, vulnerability scanners are signature-based; they can only detect known vulnerabilities, and only if there is an existing recognition signature that the scanner can apply to the target. To a penetration tester, the most effective scanners are open source; they allow the tester to rapidly modify code to detect new vulnerabilities.
- Scanners produce large volumes of output, frequently containing false-positive results that can lead a tester astray; in particular, networks with different operating systems can produce false positives with a rate as high as 70 percent.
- Scanners may have a negative impact on the network; they can create network latency or cause the failure of some devices. It is recommended to tweak the scan by removing denial-of-service type plugins during initial scans.
- In certain jurisdictions, scanning is considered hacking, and may constitute an illegal act.
There are multiple commercial and open-source products that perform vulnerability scans.
Local and online vulnerability databases
Together, passive and active reconnaissance identify the attack surface of the target, that is, the total number of points that can be assessed for vulnerabilities. A server with just an operating system installed can only be exploited if there are vulnerabilities in that particular operating system; however, the number of potential vulnerabilities increases with each application that is installed.
Penetration testers and attackers must find the particular exploits that will compromise known and suspected vulnerabilities. The first place to start the search is at vendor sites; most hardware and application vendors release vulnerability information when they release patches and upgrades. If an exploit for a particular weakness is known, most vendors will highlight this to their customers.
Although their intent is to allow customers to test for the presence of the vulnerability themselves, attackers and penetration testers will take advantage of this information as well.
Other online sites that collect, analyze, and share information about vulnerabilities are as follows:
- The National Vulnerability Database, which consolidates all public vulnerability data released by the US Government, available at http://web.nvd.nist.gov/view/vuln/search
- Packet Storm Security, available at https://packetstormsecurity.com/
- SecurityFocus, available at http://www.securityfocus.com/vulnerabilities
- The Exploit database maintained by Offensive Security, available at https://www.exploit-db.com/
- For some 0-day vulnerabilities, penetration testers can also keep an eye on https://0day.today/
The Exploit database is also copied locally to Kali, and it can be found in the /usr/share/exploitdb directory.
To search the local copy of exploitdb, open a Terminal window and enter searchsploit and the desired search term(s) in the command prompt. This will invoke a script that searches a database file (.csv) that contains a list of all exploits. The search will return a description of known vulnerabilities as well as the path to a relevant exploit. The exploit can be extracted, compiled, and run against specific vulnerabilities. Take a look at Figure 4.1, which shows the description of the exchange windows vulnerabilities:

Figure 4.1: Searching in searchsploit with keywords
The search script scans for each line in the CSV file from left to right, so the order of the search terms is important; a search for Oracle 10g will return several exploits, but 10g Oracle will not return any.
Also, the script is weirdly case sensitive; although you are instructed to use lowercase characters in the search term, a search for vsFTPd returns no hits, but vs FTPd returns more hits with a space between vs and FTPd. More effective searches of the CSV file can be conducted using the grep command or a search tool such as KWrite (apt-get install kwrite).
A search of the local database may identify several possible exploits with a description and a path listing; however, these will have to be customized to your environment, and then compiled prior to use. Copy the exploit to the /tmp directory (the given path does not take into account that the /windows/remote directory resides in the /platforms directory).
Exploits presented as scripts such as Perl, Ruby, and PHP authentication are relatively easy to implement. For example, if the target is a Microsoft Exchange 2019 server that may be vulnerable to remote code execution using valid credentials, copy the exploit to the root directory and then execute as a standard Python file, as shown in Figure 4.2:

Figure 4.2: Running the Python script from exploit-db for the Microsoft exchange server vulnerability
Many of the exploits are available as source code that must be compiled before use. For example, a search for Windows RPC-specific vulnerabilities identifies several possible exploits.
The RPC DCOM vulnerability identified as 76.c is known from practice to be relatively stable. So, we will use it as an example. To compile this exploit, copy it from the storage directory to the /tmp directory. In that location, compile it using GCC with the command that follows:
root@kali:~# gcc 76.c -o exploit
This will use the GNU Compiler Collection application to compile 76.c to a file with the output (-o) name of 76.exe, as shown in Figure 4.3:

Figure 4.3: Compiling the c file to create the exploit executable
Although we get some warnings and a note, the compilation was successful without any error messages. When you invoke the application against the target, you must call the executable (which is not stored in the /tmp directory) using a symbolic link as follows:
root@kali:~# ./exploit
The source code for this exploit is well documented and the required parameters are clear at execution, as shown in Figure 4.4:

Figure 4.4: Running the compiled exploit
Unfortunately, not all exploits from the Exploit database and other public sources compile as readily as 76.c. There are several issues that make the use of such exploits problematic, even dangerous, for penetration testers, which are listed as follows:
- Deliberate errors or incomplete source code are commonly encountered as experienced developers attempt to keep exploits away from inexperienced users, especially beginners who are trying to compromise systems without knowing the risks that go with their actions.
- Exploits are not always sufficiently documented; after all, there is no standard that governs the creation and use of code intended to be used to compromise a data system. As a result, they can be difficult to use, particularly for testers who lack expertise in application development.
- Inconsistent behaviors due to changing environments (new patches applied to the target system and language variations in the target application) may require significant alterations to the source code; again, this may require a skilled developer.
- There is always the risk of freely available code containing malicious functionalities. A penetration tester may think that they are conducting a proof of concept (POC) exercise and will be unaware that the exploit has also created a backdoor in the application being tested that could be used by the developer.
To ensure consistent results and create a community of coders who follow consistent practices, several exploit frameworks have been developed. The most popular exploitation framework is the Metasploit framework, and we will explore more about Metasploit in Chapter 10, Exploitation.
Next, let’s explore the different tools that penetration testers can leverage during vulnerability scanning.
Vulnerability scanning with Nmap
There are no security operating distributions without Nmap. So far, we have discussed how to utilize Nmap during active reconnaissance, but attackers don’t just use Nmap to find open ports and services, but also engage Nmap to perform the vulnerability assessment. As of December 21, 2021, the latest version of Nmap is 7.92 and it ships with 600+ NSE scripts, as shown in Figure 4.5:

Figure 4.5: Viewing all the scripts in the /usr/share/nmap/scripts folder
Penetration testers utilize Nmap’s most powerful and flexible features, which allow them to write their own scripts and also automate them to simplify the exploitation. Primarily, the NSE was developed for the following reasons:
- Network discovery: The primary purpose that attackers utilize Nmap for is network discovery, as we learned in the active reconnaissance section in Chapter 3, Active Reconnaissance of External and Internal Networks.
- Classier version detection of a service: There are thousands of services with multiple version details for the same service, so Nmap makes it easier to identify the service.
- Vulnerability detection: To automatically identify vulnerability in a vast network range; however, Nmap cannot be a full vulnerability scanner in itself.
- Backdoor detection: Some of the scripts are written to identify the pattern of backdoors. If there are any worms infecting the network, it makes the attacker’s job easy to narrow down and focus on taking over the machine remotely.
- Vulnerability exploitation: Attackers can also potentially utilize Nmap to perform exploitation in combination with other tools, such as Metasploit, or write custom reverse shell code and combine Nmap’s capability with them for exploitation.
Before firing up Nmap to perform a vulnerability scan, penetration testers must update the Nmap script database to see whether there are any new scripts added to the database, so that they don’t miss the vulnerability identification:
sudo nmap --script-updatedb
Use the following to run all the scripts against the target host:
sudo nmap -T4 -A -sV -v3 -d -oA Target output --script all --script-argsvulns.showall target.com
Introduction to Lua scripting
Lua is a lightweight embeddable scripting language that is built on top of the C programming language, was created in Brazil in 1993, and is still actively developed. It is a powerful and fast programming language mostly used in gaming applications and image processing. The complete source code, manual, and binaries for some platforms do not go beyond 1.44 MB (which is less than a floppy disk). Some of the security tools that are developed in Lua are Nmap, Wireshark, and Snort 3.0.
One of the reasons why Lua was chosen to be the scripting language in information security is its compactness, no buffer overflows and format string vulnerabilities, and because it can be interpreted.
Lua can be installed directly in Kali Linux by issuing the sudo apt install lua5.4 command in the terminal. The following code extract is the sample script to read the file and print the first line:
#!/usr/bin/lua
local file = io.open("/etc/shadow", "r")
contents = file:read()
file:close()
print (contents)
Lua is similar to any other scripting, such as Bash and Perl scripting. The preceding script should produce the output shown in Figure 4.6:

Figure 4.6: Running a Lua script to display the /etc/shadow file
Customizing NSE scripts
To achieve maximum effectiveness, the customization of scripts helps penetration testers to find the right vulnerabilities in a timely fashion. However, most of the time, attackers do not have the time to write one. The following code extract is a Lua NSE script to identify a specific file location that we will search for on the entire subnet using Nmap:
local http=require 'http'
description = [[ This is my custom discovery on the network ]]
categories = {"safe","discovery"}
require("http")
function portrule(host, port)
  return port.number == 80
end

function action(host, port)
  local response
  response = http.get(host, port, "/config.php")
  if response.status and response.status ~= 404
    then
    return "successful"
  end
end
Save the file into the /usr/share/nmap/scripts/ folder. Finally, your script is ready to be tested, as shown in Figure 4.7; you must be able to run your own NSE script without any problems:

Figure 4.7: Running our newly created Nmap script
To completely understand the preceding NSE script, here is a description of what is in the code:
local http: require'http': This calls the right library from Lua; this line calls the HTTP script and makes it a local request.description: This is where testers/researchers can enter the description of the script.categories: This typically has two variables, one of which declares whether it is safe or intrusive.
Web application vulnerability scanners
Vulnerability scanners suffer from the common shortcomings of all scanners (scanners can only detect the signature of a known vulnerability; they cannot determine if the vulnerability can actually be exploited; there is a high incidence of false-positive reports). Furthermore, web vulnerability scanners cannot identify complex errors in business logic, and they do not accurately simulate the complex chained attacks used by hackers.
In an effort to increase reliability, most penetration testers use multiple tools to scan web services. When multiple tools report that a particular vulnerability may exist, this consensus will direct the tester to areas that may require manually verifying the findings.
Kali comes with an extensive number of vulnerability scanners for web services and provides a stable platform for installing new scanners and extending their capabilities. This allows penetration testers to increase the effectiveness of testing by selecting scanning tools that do the following:
- Maximize the completeness (the total number of vulnerabilities that are identified) and accuracy (the vulnerabilities that are real and not false-positive results) of testing.
- Minimize the time required to obtain usable results.
- Minimize the negative impacts on the web services being tested. This can include slowing down the system due to an increase in traffic throughput. For example, one of the most common negative effects is a result of testing forms that input data to a database, and then emailing an individual providing an update of the change that has been made; uncontrolled testing of such forms can result in more than 30,000 emails being sent!
There is significant complexity in choosing the most effective tool. In addition to the factors already listed, some vulnerability scanners will also launch the appropriate exploit and support post-exploit activities. For our purposes, we will consider all tools that scan for exploitable weaknesses to be vulnerability scanners. Kali provides access to several different vulnerability scanners, including the following:
- Scanners that extend the functionality of traditional vulnerability scanners to include websites and associated services (for example, the Metasploit framework and Websploit)
- Scanners that extend the functionality of non-traditional applications, such as web browsers, to support web service vulnerability scanning (OWASP Mantra)
- Scanners that are specifically developed to support reconnaissance and exploit detection in websites and web services (Arachni, Nikto, Skipfish, WPScan, joomscan, and so on)
Nikto
Nikto is one of the most utilized active web application scanners. It performs comprehensive tests against web servers. Its basic functionality is to check for 6,700+ potentially dangerous files or programs, along with outdated versions of servers and vulnerabilities specific to versions of over 270 servers. Nikto identifies server misconfiguration, index files, and HTTP methods, and also finds the installed web server and the software version. Nikto is released based on Open-General Public License versions (https://opensource.org/licenses/gpl-license).
Nikto is a Perl-based open-source scanner that allows IDS evasion and user changes to scan modules; however, this original web scanner is beginning to show its age and is not as accurate as some of the more modern scanners.
Most testers start testing a website by using Nikto, a simple scanner (particularly concerning reporting) that generally provides accurate but limited results; a sample output of this scan is shown in Figure 4.8:

Figure 4.8: Running Nikto against the target on port 80
Customizing Nikto
The latest version of Nikto is 2.1.6. The community allowed developers to debug and call specific plugins. These plugins can be customized accordingly from the previous version. You can acquire a listing of all the plugins, and then you specify a specific plugin to perform the scan. There are currently around 35 plugins that can be utilized by penetration testers; Figure 4.9 provides the list of plugins that are currently available in the latest version of Nikto:

Figure 4.9: Listing all the plugins in Nikto
For example, if attackers find banner information denoting Apache server 2.4.0, Nikto can be customized to run specific plugins for Apache user enumeration by running the following command:
sudo nikto -h target.com -Plugins "apacheusers(enumerate,dictionary:users.txt);report_xml" -output apacheusers.xml
Penetration testers should be able to see the following information:
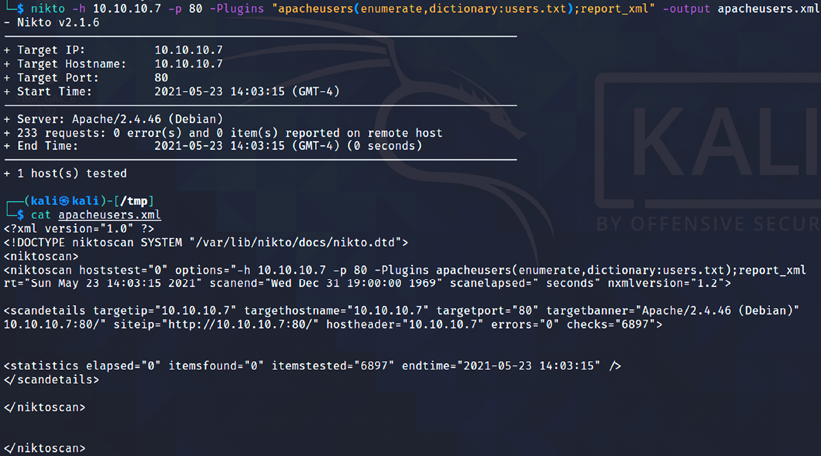
Figure 4.10: Running Nikto with a specific plugin
When the Nikto plugin is run successfully, the apacheusers.xml output file should include the active users on the target host.
Attackers can also point Nikto scans to Burp or any proxy tool with nikto.pl -host <hostaddress> -port <hostport> -useragentnikto -useproxy http://127.0.0.1:8080.
The next step is to use more advanced scanners that scan a larger number of vulnerabilities; in turn, they can take significantly longer to run to completion. It is not uncommon for complex vulnerability scans (as determined by the number of pages to be scanned as well as the site’s complexity, which can include multiple pages that permit user input, such as search functions or forms that gather data from the user for a backend database) to take several days to be completed.
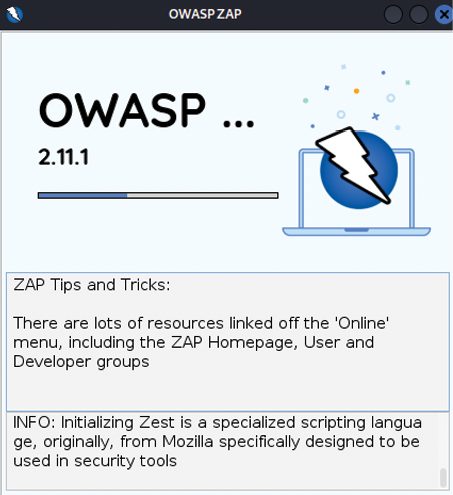
OWASP ZAP
One of the most effective scanners based on the number of verified vulnerabilities discovered is OWASP ZAP. This tool is not preinstalled in Kali Linux 2021. This tool is based on the fork from the Paros proxy tool. The latest version is 2.11.1 and was released on 11 December 2021. It can be installed by running sudo apt install zaproxy from a terminal and opened by running zaproxy, which should lead us to Figure 4.11:
Once the application is launched, it should ask if you want the session to be persistent or temporary. Make the most appropriate choice for your situation. One of the features of this scanner is that it can be used as a standalone automatic scanner and as a proxy tool to test only the relevant sections of the web application under test. Update all the plugins before we kick off the scanning activity to maximize the output. If you choose to use the automated scanner, the tool should present you with the following screen to enter the target URL and the option to use the traditional spider and/or the AJAX Spider. If the AJAX Spider is chosen, then the application is going to use the browser to crawl through every link on the website and capture them for the next phase: performing an active scan. Use the manual/proxy approach to keep the network traffic/web requests low and focus the testing without creating huge noise at the target web server logs, which can trigger alarms or cause denial of service. Unlike any other scanners, this tool may produce false positives:
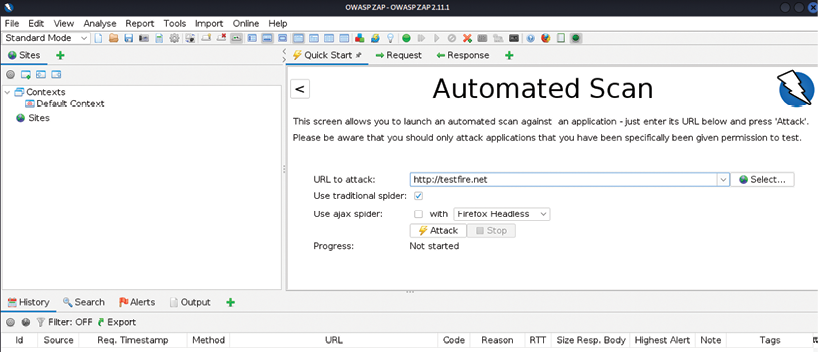
Figure 4.12: Initiating an OWASP ZAP automated scan
To test for specific vulnerabilities, you can choose which modules to enable by navigating to Analyse and Scan Policy Manager from the main menu. This should bring you to the Scan Policy Manager window. Select Default Policy and click on Modify, which should bring you to Figure 4.13. You should now be able to modify the relevant attacks:
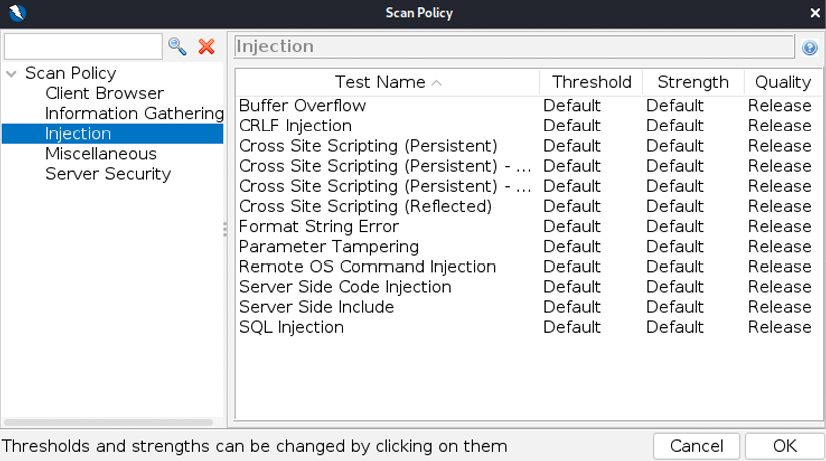
Figure 4.13: Customizing the scan policy for the automated scan
ZAP scans a target and classifies the vulnerabilities as high, medium, low, and informational in the form of alerts. You can click on the identified results to drill down to specific findings. OWASP ZAP can help you find vulnerabilities such as reflected cross-site scripting, stored cross-site scripting, SQL injection, and remote OS command injection. Once the scan is complete, you should be able to see the following screen with the folder structure of the target, alerts, and other activities (active scan/spider/AJAX Spider) that are performed by the scanner:

Figure 4.14: Listing all the vulnerabilities identified by OWASP ZAP in the Alerts section
Also, OWASP ZAP provides special features in the Proxy section, which allow penetration testers to query the request and observe the response to perform the validation, which we call manual PoC.
Tools such as OWASP DirBuster can also be utilized by the attackers to define their own user agent or mimic any well-known user agent headers, such as an IRC bot or Googlebot, and also configure the maximum number of total descendants and sub-processes, and the number of paths that can be traversed. For example, if the spider reveals www.target.com/admin/, there is a dictionary to add to the URL as www.target.com/admin/secret/, and the maximum by default is set to 16, which means the tool will scan up to 16 folder possibilities. But attackers would be able to drill down by utilizing other tools to maximize the effectiveness of the tool and would select precisely the right number of paths. Also, if any protection mechanisms were in place, such as WAF or network-level IPS, penetration testers can select to scan the target with a small number of connections per second to send to the target.
Other tools include Burp Suite Community Edition, which is preinstalled in Kali Linux and is considered one of the best proxy tools. It has a variety of options that can be utilized by testers. However, the free version of the tool lacks the ability to scan and save the output. The commercial version of the tool allows testers to add additional plugins and perform passive scans while exploring web applications.
Vulnerability scanners for mobile applications
Penetration testers often ignore mobile applications in app stores (Apple, Google, and others); however, these applications also serve as a network entry point. In this section, we will run through how quickly one can set up a mobile application scanner and how one can combine the results from this mobile application scanner and utilize the information to identify more vulnerabilities and achieve the goal of the penetration test.
Mobile Security Framework (MobSF) is an open-source, automated penetration testing framework for all the mobile platforms, including Android, iOS, and Windows. The entire framework is written in the Django Python framework.
This framework can be directly downloaded from https://github.com/MobSF/Mobile-Security-Framework-MobSF, or it can be cloned in Kali Linux by issuing the git clone https://github.com/MobSF/Mobile-Security-Framework-MobSF command.
Once the framework is cloned, use the following steps to bring up the mobile application scanner:
cdinto theMobile-Security-Framework-MobSFfolder:cd Mobile-Security-Framework-MobSF/- Install the dependencies using the following command:
sudo apt install python3-venv
sudo python3 -m pip install -r requirements.txt
sudo ./setup.sh
sudo ./run.sh
Testers might get a
python3:No module named piperror message if they are running this for the first time. To fix the error, simply runsudo apt install python3-pipfrom your terminal and continue with the steps. - Once all the installation is complete, check the configuration settings by entering
sudo ./setup.shorsudo python3 setup.py install. That should set up all the prerequisites and also do all the migration seeding to the database. - Run the vulnerability scanner using
sudo ./run.sh yourIPaddress:portnumber, as shown in Figure 4.15:
Figure 4.15: Running the MobSF framework on port 8080
- Access the URL
http://yourIPaddress:Portnumberin the browser and upload any mobile applications found during the reconnaissance to the scanner to identify the entry points. - Once the files are uploaded, penetration testers can identify the disassembled file in the scanner, along with all the other important information:

Figure 4.16: Successful installation and execution of the MobSF scanner on a sample APK file
The scan output will provide all the mobile application configuration information, such as activities, services, receivers, and providers. Sometimes, this configuration information provides hardcoded credentials or cloud API keys that can be utilized on other identified services and vulnerabilities. During a penetration testing exercise, we found a developer account username and Base64 password in one of the Java files that was commented on the target’s mobile application, and that allowed access to the external VPN of the organization.
The more important portions of the mobile security framework are in the URLs, malware, and strings.
The OpenVAS network vulnerability scanner
Open Vulnerability Assessment System (OpenVAS) is an open-source vulnerability assessment scanner and also a vulnerability management tool often utilized by attackers to scan a wide range of networks, which includes 80,000+ vulnerabilities in its database. However, this is considered a slow network vulnerability scanner compared with other commercial tools, such as Nessus, Nexpose, and Qualys.
This tool is not preinstalled within Kali Linux 2021.4, hence it needs to be installed manually. Ensure your Kali is up to date and install the latest version of OpenVAS by running the sudo apt install gvm command. Once this is done, run the sudo gvm-setup command to set up OpenVAS. This setup will run all the relevant vulnerability databases (SCAP/NVT/CERT) and, once the script has successfully executed, it should create an admin user and generate a random password, as shown in Figure 4.17:
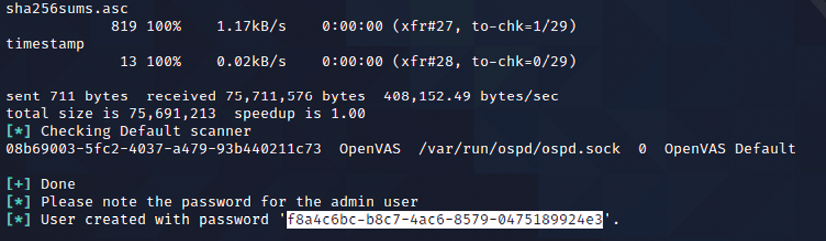
Figure 4.17: Confirmation of admin user creation and the temporary password during the installation
Finally, to make sure the installation is OK, run the sudo gvm-check-setup command and it will list the top 10 items that are required to run OpenVAS effectively. Once the installation is successful, testers should be able to see the following:

Figure 4.18: Successful installation of the OpenVAS vulnerability scanner
The next task is to start up the OpenVAS scanner by running the sudo gvm-start command from the prompt. Depending on bandwidth and computer resources, this could take a while. Once the installation and update are complete, penetration testers should be able to access the OpenVAS server on port 9392 with SSL (https://localhost:9392) by entering the username and password.
One of the important things to check is that you have the latest feeds of the vulnerabilities by navigating to Administration->Feedstatus from the main menu, and you should see what’s shown in Figure 4.19:

Figure 4.19: Checking the feed status of OpenVAS to update the current feeds
Attackers are now set to utilize OpenVAS by entering the target information by navigating to Configuration, clicking on Targets, and then clicking on New Target. Once the details of the new target are entered, attackers can navigate to Scans, click on Tasks, click on New task, enter the details, see the scan targets as entered previously, set the scanner and scan configuration, and save. Finally, you are all ready to fire the scan by clicking on the name of the task and then clicking Start Scan from the scanner portal.
Customizing OpenVAS
Unlike other scanners, OpenVAS is also customizable for scan configuration: it allows testers to add credentials, disable particular plugins, set the maximum and minimum number of connections that can be made, and so on. To stop this service, testers can run sudo gvm-stop.
Commercial vulnerability scanners
Most threat actors utilize open-source tools to launch attacks; however, commercial vulnerability scanners come with their own advantages and disadvantages in the penetration testing process. In this section, we will learn how to install Nessus and Nexpose in Kali Linux, and since these scanners are backed up by respectable companies, they have comprehensive documentation, so we will not be taking a deep dive into configuring these tools.
Nessus
Nessus is one of the old vulnerability scanners that was started by Renaud Deraison in 1998. It was an open-source project till 2005 when the project was taken over by Tenable Network Security (co-founded by Renaud). Nessus is one of the most commonly used commercial vulnerability scanners in the security community for network infrastructure scanning. Note that Tenable has multiple security products. In this section, we will explore the installation of Nessus Essential.
The following provides step-by-step instructions on how to install Nessus on Kali Linux:
- Register as a normal user by visiting https://www.tenable.com/try and selecting TRY NESSUS PRO FOR FREE.
- Download the right version of Nessus from https://www.tenable.com/downloads/.
- Once Nessus is downloaded, run the installer, as shown in the following command:
sudo dpkg -i Nessus-8.14.0-debian6_amd64.deb - The next step is to start the
nessusservice by runningsudo systemctl start nessusd.service, which should bring Nessus up on our system. - By default, the Nessus scanner runs on port
8834over SSL. Following a successful installation, attackers should be able to see the following:
Figure 4.20: Successful installation of Nessus on our Kali Linux
- Add a new user and activate the license; your scanner will download all the relevant plugins, based on your license.
- Finally, you should be able to see Nessus up and running, as shown in Figure 4.21, where it is ready to launch a scan against the target system/network:

Figure 4.21: Selecting the policy to launch the Nessus scans
Attackers can leverage all of Nessus’ capabilities to quickly identify the vulnerabilities that can be utilized to select the right target for exploitation. We will explore other commercial and specialized scanners in a later section.
Qualys
Qualys is another player in the vulnerability management commercial market. They also provide a community edition of the online scanner that can certainly be handy during a penetration test/RTE.
Penetration testers can get the free community edition by accessing https://www.qualys.com/community-edition/ once the registration is complete. The testers should have their own custom portal with login credentials, and the free edition should allow us to scan up to 16 IP addresses. A sample external completed scan in Qualys will be as shown in Figure 4.22:

Figure 4.22: Successfully launching the scan using Qualys community edition
You should note that the scans will originate from the Qualys-hosted public IP address, and it is recommended you customize the scan policy, such as disabling the denial-of-service type checks, before initiating the Qualys scan.
Specialized scanners
The exploitation phase of the kill chain is the most dangerous one for the penetration tester or attacker; they are directly interacting with the target network or system, and there is a high chance that their activity will be logged or their identity discovered. Again, stealth must be employed to minimize the risks to the tester. Although no specific methodology or tool is undetectable, there are some configuration changes and specific tools that will make detection more difficult.
In the previous editions, we discussed the Web Application Attack and Audit Framework (w3af) scanner, a Python-based open-source web application security scanner, which is no longer available in the Kali Linux distribution due to a lack of updates to the product.
Kali also includes some application-specific vulnerability scanners such as WPScan and VoIP Hopper. Let us explore WPScan, commonly known as the WordPress security scanner, which can be utilized by attackers to automatically detect 22,800+ WordPress vulnerabilities.
This application is written in Ruby and it is preinstalled on Kali. The scan can be simply initiated by running wpscan --url target.com as shown in Figure 4.23:

Figure 4.23: Scanning a web application using WPScan
Threat modeling
The passive and active reconnaissance phases map the target network and system and identify vulnerabilities that may be exploitable to achieve the attacker’s objective. During this stage of the attacker’s kill chain, there is a strong desire for action; testers want to immediately launch exploits and demonstrate that they can compromise the target. However, an unplanned attack may not be the most effective means of achieving the objective, and it may sacrifice the stealth that is needed to achieve it.
Penetration testers have adopted (formally or informally) a process known as threat modeling, which was originally developed by network planners to develop defensive countermeasures against an attack.
Penetration testers and attackers have turned this defensive threat modeling methodology on its head to improve the success of an attack. Offensive threat modeling is a formal approach that combines the results of reconnaissance and research to develop an attack strategy. An attacker has to consider the available targets and identify the types of targets, listed as follows:
- Primary targets: These are the primary entry point targets to any organization, and when compromised, they serve the objective of a penetration test
- Secondary targets: These targets may provide information (security controls, password and logging policies, and local and domain administrator names and passwords) to support an attack or allow access to a primary target
- Tertiary targets: These targets may be unrelated to the testing or attack objective, but are relatively easy to compromise and may provide information or a distraction from the actual attack
For each target type, you have to determine the approach to use. A single vulnerability can be attacked using stealth techniques, or multiple targets can be attacked using a volume of attacks to rapidly exploit a target. If a large-scale attack is implemented, the noise in the defender’s control devices will frequently cause them to minimize logging on the router and firewall or even fully disable it.
The approach to be used will guide the selection of the exploit. Generally, attackers follow an attack tree methodology when creating a threat model, shown in Figure 4.24:

Figure 4.24: A sample attack tree for an objective
The attack tree approach allows the tester to easily visualize the attack options that are available and the alternative options that can be employed if a selected attack is not successful. Once an attack tree has been generated, the next step of the exploit phase is to identify the exploits that may be used to compromise vulnerabilities in the target. In the preceding attack tree, we visualize the objective of obtaining engineering documents, which are crucial for organizations that provide engineering services.
Penetration testers can also utilize pytm, a Python-based tool that can be very handy during the exploitation of web applications, helping you understand how to infiltrate a specific organization from their exposed servers. This tool comes with 100 predefined web-based threats that also provide the capability to create a Data Flow Diagram (DFD) within a few minutes, which can be utilized as typical entry points. This can be directly downloaded from GitHub or by running git clone https://github.com/izar/pytm. Once downloaded, install all the dependencies to run the program:
git clone https://github.com/izar/pytm
cd pytm
sudo pip3 install –r requirements.txt
sudo python3 setup.py install
sudo python3 tm.py -–list
sudo python3 tm.py --dfd | dot -Tpng -o sample.png
Penetration testers should see the DFD generated for the web server on the cloud by pytm as shown in Figure 4.25:

Figure 4.25: Sample DFD generated by pytm
This DFD can be utilized by the attackers to identify the right entry points of the application, identify the vulnerabilities, and take advantage of them.
Summary
In this chapter, we focused on multiple vulnerability assessment tools and techniques. We learned how to write our own vulnerability script for Nmap using NSE, and how to use a tool that can convert the findings from active reconnaissance into a defined action that establishes access for the tester to the target. We also learned how to install the OpenVAS, Nessus, and Nexpose vulnerability scanners on Kali Linux and utilize the community edition of Qualys in the cloud.
Kali provides several tools to facilitate the development, selection, and activation of exploits, including the internal exploit-db (searchsploit), as well as several frameworks that simplify the use and management of exploits. We also explored the application-specific WordPress security scanner (WPScan) and discussed the basic principles of threat modeling. Additionally, we learned how to create a threat DFD using pytm, which helps penetration testers identify most entry points and infiltrate a web application.
The next chapter focuses on the most important part of the attacker’s kill chain, the exploitation phase. Physical security is one method to gain access to data systems (if you can boot, you’ve got root!). Physical access is also closely tied to social engineering, the art of hacking humans and taking advantage of their trust. This is the part of the attack where the attackers achieve their objective. Typical exploitation activities include horizontal escalation by taking advantage of poor access controls, and vertical escalation by theft of user credentials.