Cascading Style Sheets are becoming the predominant method of formatting a Web site. A Cascading Style Sheet (CSS) is style information that can be referenced by individual or multiple Web pages. The cascading part of cascading style sheets indicates different style levels and the control each one has over the other. CSS let you separate the content of a Web page from its layout and design. A CSS Web page is an HTML file with links to a CSS file. You can create the two files separately, or you can use CSS Layouts in Expression Web to create and link them.
Expression Web provides several panels and toolbars to help you create and manage CSS. The CSS tools include four tasks panes: Manage Styles, Apply Styles, CSS Properties, and Tag Properties, and two toolbars: Style Application and Style. Expression Web also provides two different Quick Tag tools for working with tags: Quick Tag Selector and Quick Tag Editor. The Quick Tag Selector makes it easy to identify and select page elements, including CSS classes and IDs. The Quick Tag Editor allows you to modify an HTML tag using color coding and IntelliSense support. IntelliSense displays a context-sensitive dropdown list of code choices you can quickly select and insert in Code or Split view.
If you’re having CSS problems, you can use CSS Reports to help identify them. CSS Reports helps you check individual pages or an entire Web site for errors relating to unused styles, undefined classes, mismatched case.
Code view and Split view (upper pane) allow you to view and edit the HTML (HyperText Markup Language) code generated by Expression Web or write your own. The code in these views is indented and color-coded to make it easier to read and follow.
When you make code changes, Expression Web checks the code to make sure it’s valid. If the code is invalid, Expression Web adds a wavy red underline to it. If your code has structure problems, Expression Web highlights the code in yellow. To help you enter valid code, Expression Web uses IntelliSense, which provides a pop-up menu with commands. As you type code, IntelliSense recognizes what you’re doing and provides a pop-up menu with valid commands. You can select the command and press Enter or double-click it to insert it.
Instead of retyping the same code on multiple pages, you can reuse a code segment, known as a code snippet. To insert a code snippet in Code or Split view, click to place the insertion point, press Ctrl+Enter, and then select the code snippet you want from the pop-up menu. You can add, delete, or modify code snippets as well as change code formatting and color coding in the Page Editor Options dialog box. To open the dialog box, click the Tools menu, and then click Page Editor Options.
In addition to these tools, you can also right-click a HTML tag to access many helpful tools and commands, including Find Matching Tab, Select Block (of code), and Find Matching Brace.
An HTML tag is code inserted in a document that specifies how the document, or a portion of the document, should be formatted. HTML defines the structure and layout of a Web document by using a variety of tags and attributes.
The Tag Properties panel allows you to examine the attributes related to HTML tags. When you select an HTML element in Design or Code view, the properties associated with the selected tag appear in the Tag Properties panel. The Tag Properties panel shows you properties grouped into three categories: attributes, events, and misc (short for miscellaneous).
An attribute defines the behavior of a tag. You can have more than one attribute for a tag. In the following example, the hyperlink is defined using the <a> tag and the attribute dis defined using the href:
<a href="http//www.perspection.com">Perspection
Web Site</a>
An event is an attribute that is triggered by an event and misc is any non standards-compliant attribute.
Expression Web provides two different Quick Tag tools: Quick Tag Selector and Quick Tag Editor. The Quick Tag Selector makes it easy to identify and select page elements, including CSS classes and IDs. The Quick Tag Editor allows you to modify an HTML tag using color coding and IntelliSense support.
Cascading Style Sheets (CSS) are becoming the predominant method of formatting a Web site. CSS let you separate the content of a Web page from its layout and design. The separation allows you to display Web content on individual or multiple Web pages with different size computer monitors and other devices, such as PDAs and cell phones.
A CSS contains style definitions, called Selectors, which are the HTML components linked to a specialized list of style properties and values. A selector is followed by those properties and values. For example, h1 {font-size: x-large; color: green}, h2 {font-size: large; color: blue). h1 and h2 are selectors that modify the formatting properties of standard HTML tags.
There are three types of Cascading Style Sheets in Expression Web: external (for multiple pages in the same file), internal or embedded (for individual Web pages), and inline (for individual elements), which you create when you apply a style directly to an item using the Apply Styles panel. An external CSS file uses a .css file extension. The cascading part of cascading style sheets indicates different style levels and the control each one has over the other. The cascading control starts at the lowest level and works its way up: inline, internal, and external. If an inline style is applied to an element, it takes control. If no inline style is applied, then an internal style sheet takes control. If no inline or internal style is applied, then an external style sheet takes control. An inline style is applied to individual elements using tags, such as <p> and </p>. An internal style sheet is applied to an entire page. The coding appears at the top of the page between <head> and </head>. An external sheet links to a file where all the code styles are located. Since the styles are external, you can apply them to multiple files.
CSS allows you to create three different styles: tag-based, class-based, and ID-based. Tag-based styles apply to a specific HTML element, such as paragraph <p> or any of the headings <h1> through <h6>. Class-based styles are not associated with an HTML element, which means you can apply them multiple times to the same page. ID-based styles are similar to Class-based styles, except they are only to be applied once per Web page.
CSS Layouts depend on two things working together: div tags (short for page divisions) and ID-based styles. ID-based styles, unlike the element- or class-based styles, can only be used once per Web page, which makes them good for styling navigation bars, banners, layout columns, and footers.
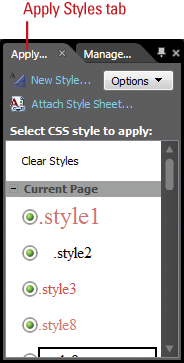
Expression Web provides several panels and toolbars to help you create and manage CSS. The CSS tools include four tasks panes: Manage Styles, Apply Styles, CSS Properties, and Tag Properties, and two toolbars: Style Application and Style. The Manage Styles panel allows you to create and organize styles, while the Apply Styles panel makes it easy to preview and apply styles. The CSS Properties panel provides several ways to sort through your CSS properties, which includes CSS tags, cascading styles, and CSS rules. The Tag Properties panel displays HTML tag properties for a selected HTML element in Design or Code view and allows you set individual tag attributes. If you prefer using toolbars, you can use the Style Application toolbar to build your CSS manually, or the Style toolbar to apply classes and IDs.
You can insert commonly used HTML tags into a page by using the HTML submenu on the Insert menu or dragging a control from the Toolbox. The common HTML tags include <div>, <span>, Break, Horizontal Line, Image, Inline Frame, Layer, and Paragraph. When you insert the Break tag from the Toolbox, a single break line is inserted into the page. However, when you insert the Break tag from the Insert menu, the Break dialog box appears, asking you to select an option to insert a normal line or clear the left, right, or both margins.
 Open and display the Web page you want to use.
 Expand the Tags category in the Toolbox panel.
 Click to place the cursor in Design view where you want to place the HTML tag.
 Drag the HTML tag to your Web page in Code or Design view where you want to insert it.
<div>. Defines a section of a page. Tag: <div>
<span>. Defines a portion of a page. Tag: <span>
Break. Inserts a line break to create white space. Tag: <br>
Horizontal Line. Inserts a horizontal line. Tag: <hr>
Image. Inserts an image placeholder. Tag: <img scr=“” />
Inline Frame. Inserts an inline frame. Tag: <iframe id=“I1” name=“I1”>
Layer. Inserts a placeholder object that is absolutely positioned. Tag: <div id=“layer” style=“position: absolute”>
Paragraph. Inserts a paragraph on a page. Tag: <p>

- Open and display the Web page you want to use in Design view.
- Click to place the cursor in Code or Design view where you want to place the HTML tag.
- Click the Insert menu, and then point to HTML.
- Select the tag you want on the HTML submenu.

 If you selected the Break command, specify the options you want, and then click OK.
Normal line break. Inserts a default line break.
Clear left margin. Begins the next line at the nearest line below any items in the left margin.
Clear right margin. Begins the next line at the nearest line below any items in the right margin.
Clear both margins. Begins the next line at the nearest line below any items in both margins.

The Tag Properties panel displays HTML tag properties for a selected HTML element in Design or Code view. To display the tag properties, you select the element in Design view or click in the HTML tag in Code view. Each property in the panel displays an icon in the left column that indicates the property type. A finger pointing to a page indicates an attribute and a lighting bolt indicates an event. If a property name appears in bolded blue text, the property is set.
- Open and display the Web page you want to use.
- Click the Code or Split button, and then click to place the insertion point where you want.
- To insert tag brackets or comments, click the Edit menu, point to Code View, and then click Insert Start Tag, Insert End Tag, Insert HTML Comment, or Insert CSS Comment (New!).
- To insert common HTML tags, click the plus sign (+) next to Tags in the Toolbox, and then drag or double-click the tag you want.

- Open and display the Web page you want to use.
- Click the Panels menu, and then click Tag Properties to display the panel.
- Select the element in Design view or click in the HTML tag in Code view that you want to view tag properties.
- Click the plus sign (+) next to the category to want to view: Attributes, Events, or Misc.

- Open and display the Web page you want to use.
- Click the Panels menu, and then click Tag Properties to display the panel.
- Select the element in Design view or click in the HTML tag in Code view that you want to view tag properties.
- Click any of the following buttons at the top of the panel.
Show Categories List button. Click to display by category as attributes, events, and misc.

Show Alphabetized List button. Click to display alphabetically.

Show Set Properties on Top button. Click to display specified properties at the top of the list.

You set tag attributes in the Tag Properties panel. The tag properties that appear in the Tag Properties panel differ depending on the selected element. To set a tag property, select the element in Design view or the tag in Code view you want to change, click the attribute you want in the Tag Properties panel you want to change, and then enter, select, or edit the value box next to it. Some attributes provide a drop-down menu to select a value, while others require certain value types. For other attributes, you can add any text you want, such as the alt attribute for an <img> tag, which provides text for pictures, so the visually impaired can read the text in a ScreenTip. If you are more comfortable using dialog boxes, you can click the Show Tag Properties button at the top of the panel to display a dialog box with the attributes.
- Open and display the Web page you want to use.
- Click the Panels menu, and then click Tag Properties to display the panel.
- Select the element in Design view or click in the HTML tag in Code view that you want to view tag properties.
- Click the plus sign (+) next to the category to want to view: Attributes, Events, or Misc.
- To change attributes in the panel, click the value box to the right of the attribute, and then change the value.
 Click the Show Tag Properties button at the top of the panel.
 View the properties, and then make any changes you want.
 Click OK.???
Expression Web provides two different Quick Tag tools: Quick Tag Selector and Quick Tag Editor. The Quick Tag Selector makes it easy to identify and select page elements, including CSS classes and IDs. The Quick Tag Selector appears under the tabs in the Editing window. You can use Quick Tag Selector in any view. However, Split view allows you to quickly view and select page elements (Design view) and code elements (Code view) without having to switch.
- Open and display the Web page you want to use.
- Click the View menu, and then click Quick Tag Selector to display it under the tabs in the Editing window.
- Do any of the following:
Point to a tag selector. Highlights the element with a border. Also, displays the tag selector arrow.
Click a tag selector. Selects the element or code.
Click a tag selector arrow. Point to a tag selector to display the arrow. Displays a menu where you can perform actions on the selected tag. Click Select Tag to select the element or code, or click Select Tag Contents to select only the contents of the tag, not the tag itself.

The Quick Tag Editor allows you to modify an HTML tag using color coding and IntelliSense support. In Code view, you see all the HTML code for a given page or element. Sometimes it’s hard to figure out exactly what you want to change. The Quick Tag Editor allows you to easily isolate a specific tag, where you can make changes. You can access the Quick Tag Editor by clicking a tag selector arrow or right-clicking a tag selector, and then selecting one of the following commands on the shortcut menu: Edit Tag, Insert HTML, or Wrap Tag. Other commands on the shortcut menu allow you to remove tags, change CSS positioning, and modify tag properties.
- Open and display the Web page you want to use.
- Click the View menu, and then click Quick Tag Selector to display it under the tabs.
- Right-click the tag selector or click the tag selector arrow you want to modify.
You can also click the Edit menu, and then point to Code View.
- Click the command on the shortcut menu you want. Each one displays the Quick Tag Editor dialog box.
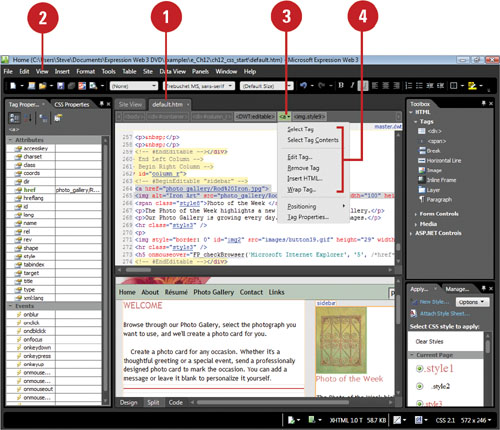
Edit Tag. Edit the HTML for the selected tag.
Insert HTML. Enter HTML code, which is inserted on the page. The HTML code appears at the insert point or before a selected element.
Wrap Tag. Enter HTML code, which wraps the selected tag.
- Make the changes you want in the edit box.
- Click the green checkmark button or press Enter to accept your changes, or click the red X to cancel your changes.

Expression Web provides several panels and toolbars to help you create and manage CSS. The CSS tools include four panels: Manage Styles, Apply Styles, CSS Properties, and Tag Properties, and two toolbars: Style Application and Style. The Manage Styles panel allows you to create and organize styles, while the Apply Styles panel makes it easy to preview and apply styles. The CSS Properties panel provides several ways to sort through your CSS properties, which includes CSS tags, cascading styles, and CSS rules. If you prefer using toolbars, you can use the Style Application toolbar to build your CSS manually, or the Style toolbar to apply classes and IDs.
- Open and display the Web page you want to use.
- Click the Panels menu, and then select the following panels: Manage Styles, Apply Styles, CSS Properties, and Tag Properties.


The Manage and Apply Styles panels appear on separate tabs in the lower right panel group. The CSS and Tag Properties panels appear on separate tabs in the lower left panel group.
- Click the View menu, point to Toolbars, and then click Style Application and Styles to display them.
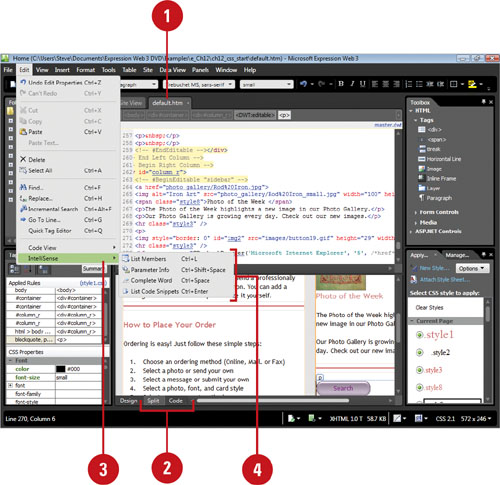
In Code view, IntelliSense displays a context-sensitive dropdown list of choices as you enter code. From the dropdown list, you can quickly select the code item you want to use. You can customize the way IntelliSense works by using the IntelliSense tab in the Page Editor Options dialog box. You can set options to disable shortcut menus and inserting tags, quotes, and braces, and to disable code hyperlinks. By default, all check boxes are selected.
- Open and display the Web page you want to use.
- Click the Code or Split button, and then click to place the insertion point where you want to edit the code.
- Click the Edit menu, point to IntelliSense.
- Click the command on the submenu you want:
List Members. Displays a shortcut menu of valid tag properties.
Parameter Info. Displays a ScreenTip that lists valid script parameters.
Complete Word. Use to complete the insertion of a selected item.
List Code Snippets. Displays the list of code snippets in a dropdown list; you can also press Ctrl+Enter.
- Click the IntelliSense tab.
- Select the IntelliSense options for CSS that you want in the following categories:
Auto Popup. Displays a shortcut menus for statement completion and display ScreenTips.
Auto Insert. Automatically inserts the right curly brace (}) that ends a style declaration.
Code Hyperlinks. Enables the ability to go to the class-based styles by Ctrl+clicking.

- Click the Authoring tab.
- To set the CSS schema version for IntelliSense, click the Schema version list arrow, and then select the schema version you want.
- Click OK.

A tag-based (also known as element-based) style applies the defined style to every instance of a selected HTML element. When you create a style for a defined tag element (known as a Selector), such as a header <h1> through <h6>, paragraph <p>, or hyperlink <a:link>, it’s applied to every instance of the defined tag on the page (internal) or site (external). After you define the styles you want, the style appears in the Manage Styles tab under the elements category.
- Open and display the Web page you want to use.
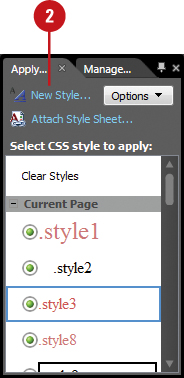
- Click the New Style button in the Manage Styles or Apply Styles tab.
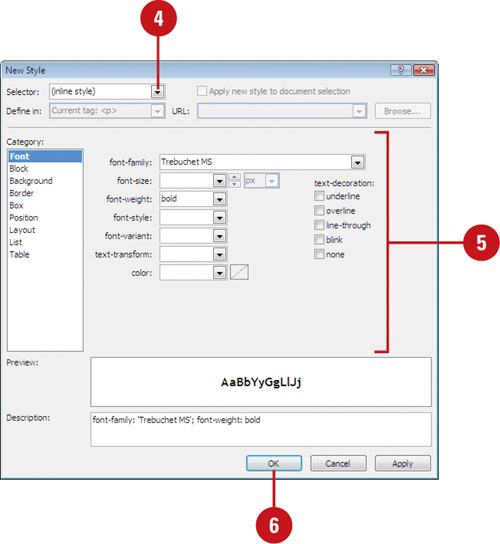
- Click the Selector list arrow, and then select the type of style you want.
The Define in box displays Current page by default.
- Select the Categories and make changes to set the appearance of the style you want.
- Select or clear the Apply new style to document selection check box.
- Click OK.

The Manage Styles tab adds the style to the elements category.
Instead of applying a style to a specific element, such as a header, paragraph, or hyperlink, a class-based style can be applied to anything you want to define. This flexibility allows you to create custom styles for your specific purposes. For example, you can create a style called .companyname, which formats the company name with our custom look. You get to decide on the name of the style; it’s best to name styles based on their function, so you can easily identify them in the Styles list. Avoid using numbers at the beginning of a style name. Class-based styles start with a dot (.) to preserve class-based syntax.
- Open and display the Web page you want to use.
- Click the New Style button in the Manage Styles or Apply Styles tab.

A default name, .newStyle1, appears selected (without the period at the beginning) in the Selector box.
- Type the name you want for the class-based style.
- Select the Categories and make changes to set the appearance of the style you want.
- Select or clear the Apply new style to document selection check box.
- Click OK.

The Manage Styles tab adds the style to the elements category.
An inline style allows you to apply formatting directly to an element. An inline style is like an exception to the rule. It’s alright to do every so often. However, it’s not a good practice. It can cause formatting problems when you apply an internal or external style sheet. An inline style doesn’t appear in the Manage Styles tab like the tag- and class-based styles. In the CSS Properties panel, the style is identified by type, inline.
- Open and display the Web page you want to use.
- Click in the paragraph or block you want to style.
- Click the New Style button in the Manage Styles or Apply Styles tab.
- Click the Selector list arrow, and then click (inline style).
- Select the Categories and make changes to set the appearance of the style you want.
- Click OK.
The CSS Properties panel displays <inline style> as the applied rule.
Instead of creating a new style every time you need one, you can also copy an existing one that is close to the style you want, and then modify it to become the one you want. If you mistakenly apply a style to an element and decided you don’t like it, you can remove the style from the element without deleting the style itself. However, if you want to permanently delete a style, you can certainly do it.
- Open and display the Web page you want to use.
- Click in the paragraph or block you want to style.
Copy and Change a Style. Right-click the style you want to copy in the Manage Styles tab, click New Style Copy, enter a new name in the Selector box, make any changes you want, and then click OK.

Modify a Style. Right-click the style you want to modify in the Manage Styles tab, click Modify Style, make any changes you want, and then click OK.
Remove a Style. Select the element with the style, and then click the Clear Style button in the Apply Styles tab.

Delete a Style. Right-click the style you want to delete, click Delete, and then click Yes to confirm.
Sort and Filter Styles. Click the Options button, and then click one of the sorting or filtering commands, such as Categorize By Order, or Show Styles Used In Current Page.

Cascading Style Sheets are becoming the predominant method of formatting a Web site. A Cascading Style Sheet (CSS) is style information that can be referenced by individual or multiple Web pages. A CSS contains style definitions, called Selectors, which are the HTML components linked to a specialized list of style properties and values. A selector is followed by those properties and values. There are three types of Cascading Style Sheets: external (for multiple pages in the same file), internal or embedded (for individual Web pages), and the rarely-used inline (for individual items). An external CSS file uses a .css file extension. After you create a style sheet, you can attach it to Web pages. If you no longer need a style sheet attached to a Web page, you can detach it.
- Click the Web Site tab for the site in which you want a new page.
- Click the New button arrow on the Common toolbar, and then click Page.
- In the left pane, click General.
- Click CSS.
- Click OK.

A blank, untitled CSS file opens in the Editing window.
- Click the Save button on the Common toolbar.
- Type a descriptive name for the CSS file.
- Click the Save as type list arrow, and then click CSS Files.
 Click Save.
- Open and display the Web page(s) to which you want to attach an existing external style sheet.
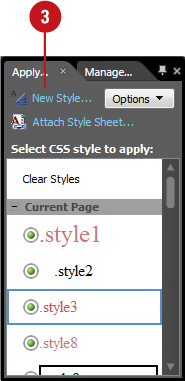
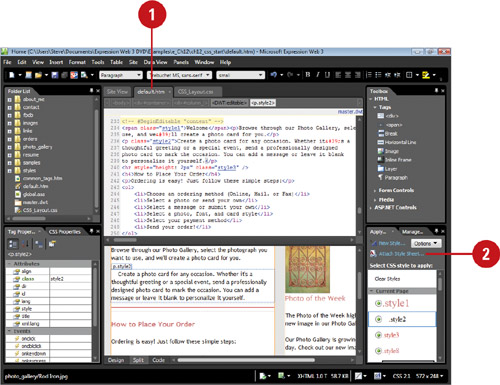
- Click the Attach Style Sheet button in the Apply Styles or Manage Styles panel.
- Type the location and CSS file name, or click Browse to locate and select the CSS file.
- Click the All HTML pages or Current page option.
- Click the Link or Import option.
- Click OK.

Did You Know?
You can move internal styles to an external style sheet. Attach the external style sheet to the current page, open the Manage Styles tab, select the internal styles you want to move, and then drag them onto the external style sheet’s name. The styles are moved to the external style sheet and are no longer in the internal style sheet.
You can detach an external style sheet from a page. Open the page from which you want to detach an external style sheet, right-click the external style sheet in the Manage Styles tab, and then click Remove Link.
You can use rulers and a visible layout grid in Design view. Turning on the visible grid makes it easier to create, modify, and align elements of all types. Within the Page Editor Options dialog box, you can select from a variety of options, such as ruler and grid measurement units and the display grid spacing and line color. To align several elements to a grid, you first turn Snap to Grid on. Then you can drag the elements to align them to the grid.


When you’re working with CSS, you can display elements on a page from top-to-bottom using five positioning properties: absolute, fixed, relative, static, and inherit.
An absolute positioned element is placed in relation to the page’s left, top corner. You can position the element anywhere on a page; it’s not confined to a specific place.
A fixed positioned element is placed in relation to the browsers window rather than the page or other elements. If you scroll the browser window, the element stays in the same place.
A relatively positioned element remains part of the placement on the page in relation to the page’s code. When you move a relatively positioned element, its position changes relative to its normal spot in the code.
Floating properties work similarly to the wrapping styles that control how text flows around images. You can select four floating positions: Left, None, Right, and Inherit. Left allows other elements to flow down its right side. None causes no wrap. The element stays in place and no other elements wrap around it. Right allows other elements to flow down its left side. Inherit uses the float settings of its enclosed parent element.
Clearing properties work in relation to Floating properties. You can select five floating positions: Both, Left, None, Right, and Inherit. Both blocks floats on both sides. Left blocks other elements from floating to its left. None causes no floating. The element stays in place and no other elements wrap around it. Right block other elements from floating to its right. Inherit uses the clear setting of its enclosed parent element.
The easiest way to set positioning properties for selected elements is to use the Positioning toolbar, which provides all the positioning options in one place. To display the Positioning toolbar, click the View menu, point to Toolbars, and then click Positioning. Another way to set position properties is to use the CSS Properties tab. Click the Panels menu, and then click CSS Properties to display it. In the properties list, click the box to the right of the properties position, float, and clear to select the option you want. If you want to change positioning properties for a style, right-click the style in the Manage Styles tab, click Modify Styles, click the Position category, make the changes you want, and then click OK.

Cascading Style Sheets (CSS) provide a formatting template for Web page elements. Instead of formatting individual elements, which can be time consuming, you can change and apply a CSS to make the changes you want for the entire Web site. CSS allows you to separate your content from your formatting. Using CSS also simplifies and reduces the HTML code, which speeds up download times. A CSS page is an HTML file with links to a CSS file. You can create the two files separately, or you can use CSS Layouts in Expression Web to create and link them.
- Click the Web Site tab for the site in which you want a new page.
- Click the New button arrow on the Common toolbar, and then click Page.
- In the left pane, click CSS Layouts.
- Click the type of CSS layout you want.
- Click OK.

A blank, untitled HTML Web page appears along with a related untitled CSS-based page.
- Click the File menu, and then click Save All.
- In the Save As dialog box, name and save the HTML page and its related external CSS file.
- Add content to the different layout sections.

- To change a layout, right-click the style you want to modify in the Manage Styles tab, click Modify Style, make the changes you want to the Box, Position, and Layout, and then click OK.
In the Modify Styles dialog box, boldface categories have property values already set.
 Click the File menu, and then click Save All.
A contextual selector allows you to create styles for different situations. If you want to create a special paragraph style for a main header, you can create a contextual selector to perform the task. With contextual selectors, you can create contextual ID-based styles that only appear when particular tags are used in specific divisions. If you want to use the contextual selector on multiple pages, you can move the contextual selector style to an external style sheet.
- Open and display the Web page to which you want to create a contextual selector style.
- Click the New Style button in the Manage Styles tab.
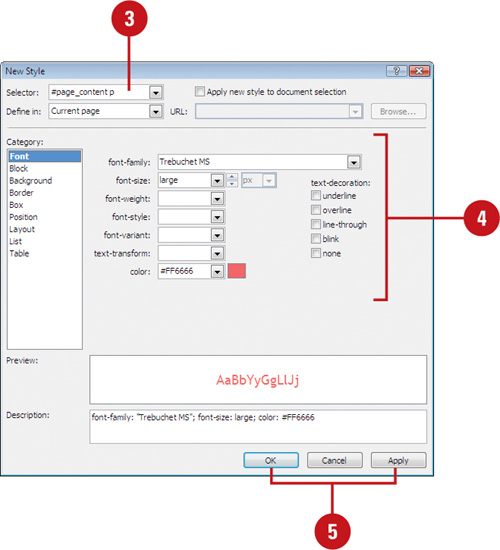
- Select the provided selector name including the period, and then type a contextual selector name using the following format:
#div_name(space)class_name. For example, #page_content p, where p is the paragraph style.
- Select the Categories and make changes to set the appearance of the style you want.
- Click Apply to view the changes, make any adjustments, and then click OK.
The new contextual style is applied in the appropriate situations and the contextual ID-based style is listed in the Manage Styles tab.
- Click the File menu, and then click Save All.

If the CSS pre-built layouts don’t provide exactly what you need, you may want to create a CSS layout from scratch. It’s a two step process: (1) create ID-based styles for each division, (2) insert the divisions, or divs (<div>), and then pairs them with the ID-based styles. You can insert the divs in any order. However, placing them in top to bottom order as they appear on the page helps display the page better on nonCSS browsers. After you insert the divs, you can pair them with ID styles using the Tag Properties panel.
- Click the Web Site tab for the site in which you want a new page.
- Click the New button arrow on the Common toolbar, and then click HTML.
- Click the New button arrow on the Common toolbar, and then click CSS.
- Use the Save button on the Common toolbar to name and save the HTML page and its related external CSS file.
- Display the HTML file.
- Click the Attach Style Sheet button in the Manage Styles tab.
- Specify the CSS file and options you want, and then click OK.
- Click New Style in the Manage Styles tab.

- Delete the Selector, and then type the division name. For example, #container.
- Click the Define in list arrow, click Existing style sheet, and then click Browse to select the CSS file. For example, CSS_Scratch.css.
 Set the position category to specify a position property, and then click OK.
 Click the File menu, and then click Save All.
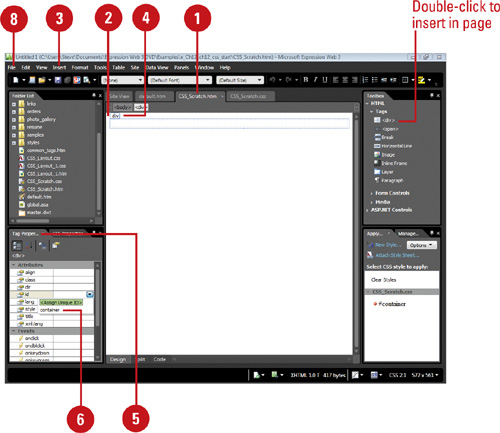
- Open and display the HTML page with the ID styles for a CSS layout.
- Click in the HTML page where you want to insert a div tag.
- Click the Insert menu, point to HTML, and then click <div>.
You can also double-click <div> in the Toolbox panel.
An empty division, marked by a dotted border appears across the top of the page.
- Click the box for the <div> in Design view or click in the <div> tag in Code view to select it.
Changes in Code view don’t appear in Design view until you press F5 to refresh the screen.
- Click the Tag Properties tab in the panel.
- Click the blank column to the right of ID, click container from the list, and then press Enter.
A list of the previously created IDs appears in the list. The container ID is applied to the div tag. This connects the CSS and HTML together.
- Click in the container div and repeat steps 3 through 6 to insert and ID the next division for your page.
- Click the File menu, and then click Save All.
Expression Web can help to identify CSS problems using CSS Reports. CSS Reports allows you to check individual pages or an entire Web site for errors relating to unused styles, undefined classes, mismatched case. In addition, CSS Reports also show how CSS is used in a page; it checks the usage of class selectors, ID selectors, and element selectors. After you check for CSS problems, the results appear in the CSS Reports panel, where you can review styles and fix any problems.
- Click the Tools menu, and then click CSS Reports.
- Click the Errors tab.
- Click the option to specify which pages you want to search.
- Select or clear the Check for check boxes you want to include or exclude.
Unused Styles. Shows styles not used in the style sheet.
Undefined Classes. Shows styles not defined, yet still used.
Mismatched Case. Shows mismatches in case between a CSS class or ID in a page and the case used in a style sheet.
- Click Check.

The Accessibility panel opens.
- To correct a problem, double-click the entry to open the page, where you can correct the highlighted code.
- To sort or filter information in the panel, click a column header, or click the column list arrow, and then click a filter or Custom to use AutoFilter.
- To generate an HTML report, click the Generate HTML Report button in the panel.
- When you’re done, click the Close button in the panel.

- Click the Tools menu, and then click Accessibility Reports.
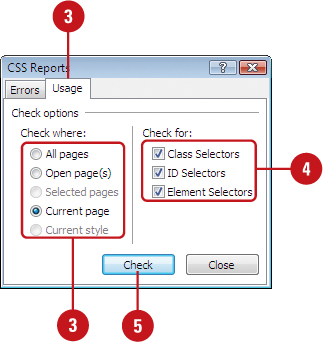
- Click the Usage tab.
- Click the option to specify which pages you want to search.
- Select or clear the Check for check boxes you want to include or exclude.
Class Selectors. Shows the CSS classes in use.
ID Selectors. Shows the CSS ID selectors in use.
Element Selectors. Shows all HTML element selectors. This option generates a lot of output; use only if necessary.
- Click Check.
- To view report information, double-click the entry, and then view the highlighted code.
- To sort or filter information in the panel, click a column header, or click the column list arrow, and then click a filter or Custom to use AutoFilter.
- To view a list of style sheet links, click the Style Sheet Links button in the panel.
- When you’re done, click the Close button in the panel.

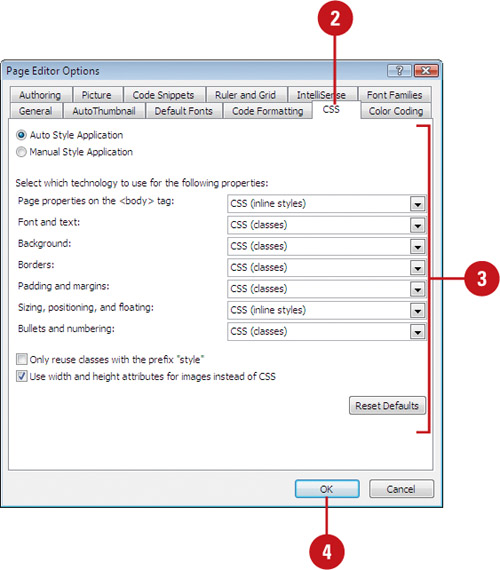
The CSS tab in the Page Editor Options dialog box allows you to control how Expression Web uses CSS styles in your Web pages. You can use the CSS tab to override default CSS behavior in Expression Web. By default, Expression Web automatically adds CSS code to your Web pages when you apply formatting based on the options set in the CSS tab. You can set different CSS properties for different page elements, such as font and text, borders, background, sizing, positing, and floating.
- Click the Tools menu, and then click Page Editor Options.
- Click the CSS tab.
- Select the CSS options you want. Some of the common options include:
Auto Style Application. This option automatically applies CSS styles to formatting text based on the selected CSS technology properties.
Manual Style Application. This option displays the Style Application toolbar so you can apply styles manually.
Only reuse classes with the prefix “style.”. Select to change automatically added CSS classes to start with the prefix “style,” which prevents Expression Web from modifying them.
Use width and height attributes for images instead of CSS. Select to override CSS width and height settings.
- Click OK.